How to Track UTM Parameters & Other Lead Source Data in Fluent Forms
Are you struggling to track where your leads and customers are coming from?
It’s a common problem. Tools like Google Analytics are great at telling you where your website visitors are coming from, but if you’re the kind of business that generates leads through your website and then closes them offline (via email, phone, etc), then it can’t really tell you where your leads & customers are coming from.
Fortunately, though, there is a solution
In this article, we’ll show you how to use a tool called Attributer to capture UTM parameters and other lead source data with each submission of your Fluent Forms so you can easily see where your leads & customers are coming from.
4 steps for capturing UTM parameters & other lead source information in Fluent Forms
Attributer makes it easy to capture lead source data with each submission of your Fluent Forms. Here’s how it works:
1. Add the Attributer code to your website
To start off with, you’ll need to install the Attributer code on your website (you’ll get given this code after you start a 14-day free trial).
Fortunately, WordPress makes this really easy to do and you have a few different options:
- Use your Theme Settings – Many popular WordPress themes and page builders, such as Elementor, Beaver Builder, and Divi, include built-in options for adding custom code to your website. You can typically find these options in the Settings section of the theme or page builder you are using. For example, in Divi, you can add code in the ‘Integrations’ tab within the theme settings. Simply copy the code from your Attributer account and paste it into the designated area in your theme settings.
- Use a Plugin – If your WordPress theme doesn’t provide an option to add code to the header of your website, you can use a plugin like FluentSnippet to add the code to your site.
- Using Google Tag Manager – If you prefer using Google Tag Manager to manage scripts on your site, you can easily paste the Attributer code into a new Tag, and it will be loaded onto your site.
2. Add hidden fields to your forms
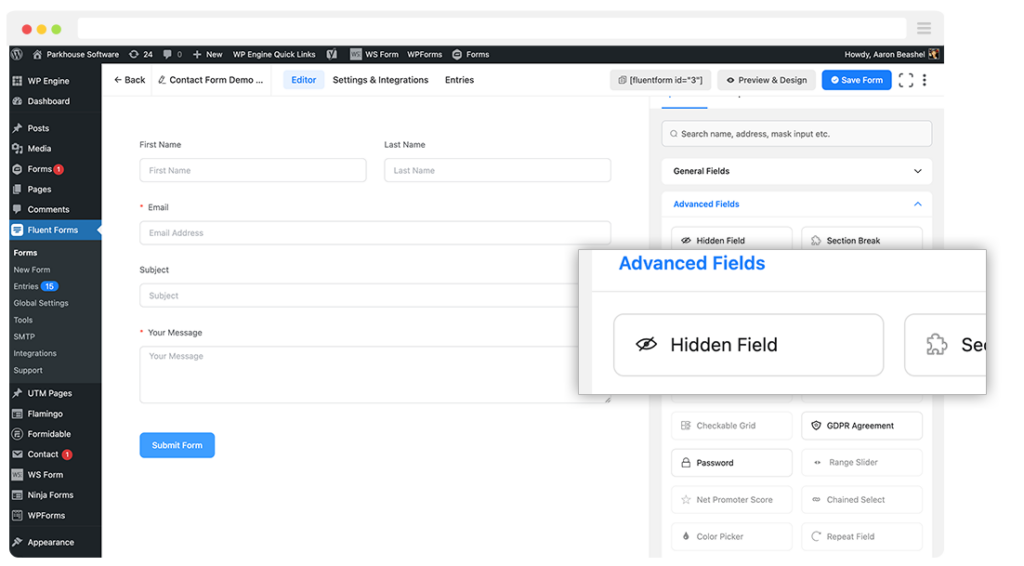
The next step is to add a series of hidden fields to your website forms, such as your Contact Us form or your Request a Quote form.
You’ll need to add the following 6x hidden fields to your forms:
- Channel
- Channel Drilldown 1
- Channel Drilldown 2
- Channel Drilldown 3
- Landing Page
Fortunately, Fluent Forms makes it super easy to add hidden fields. All you need to do is drag-and-drop a ‘Hidden’ field into the bottom of the form and set the default value as per these help instructions.
3. Attributer completes the hidden fields with lead source data
When a visitor arrives on your website, Attributer will look at a bunch of technical information about how they got there and categorise the visitor into a number of different channels (the same ones you see in tools like Google Analytics, including Paid Search, Paid Social, Organic Search, Organic Social, Referral, etc).
It’ll then save that data in the user’s browser so that it isn’t forgotten as the user browses around the site, or if they leave and come back later.
Then when they complete a form on your website, Attribute writes the lead source data into the hidden fields.
4. Lead source information is captured by Fluent Forms and can be sent to your CRM and other tools
Finally, when a site visitor submits the form, the lead source data that Attributer wrote into the hidden fields is captured by Fluent Forms alongside the data the lead entered into the form (like their name, email, phone number, etc).

Once the data is captured in Fluent Forms, you can then:
- See it in the Entries section – You can view the lead source data alongside each form submission in the Entries section of Fluent Forms
- Send it to your CRM – You can use Fluent Forms built-in integration with Salesforce, Hubspot, Pipedrive, Zoho CRM, etc to send the data into your CRM where you can use it to create reports & dashboards.
- Include it in your email notifications – You can include the data in the email notifications that Fluent Forms sends for each form submission, allowing you to see where each lead comes from right from within your inbox.
- Send it to a spreadsheet – You can use Fluent Form’s built-in integration with Google Sheets, Airtable, etc to send the data to a spreadsheet. You can then use the built-in charting capabilities of the spreadsheet to build charts & graphs that show where your leads are coming from.
What data gets captured
Attributer doesn’t just capture UTM parameters. It captures information on all leads that come to your website, including those that come from organic channels (like Organic Search, Organic Social, Referral, etc)
To illustrate, let’s pretend you’re a marketer at a company called Olmo Software and someone clicks on one of the ads from the Brand Campaign you are running in Google Ads. Here’s what data would get passed through:
- Channel: Paid Search
- Channel Drilldown 1: Google
- Channel Drilldown 2: Brand Campaign (or the specific campaign name)
- Channel Drilldown 3: Olmo Software (or the keyword used in the campaign)
Similarly, if a lead arrives organically through a Google search, the following information would be captured:
- Channel: Organic Search
- Channel Drilldown 1: Google
- Channel Drilldown 2: www.google.com (or the specific Google domain they came from)
- Channel Drilldown 3: Olmo Software (or the keyword used to find the site, if available)
In addition to providing information about which channel a lead came from, Attributer also provides data on what content attracted them.
Attributer captures two critical pieces of data: the lead’s initial landing page (e.g., olmosoftware.com/blog/best-crm-software) and the landing page group (e.g., /blog).
With this data, you can easily track how many leads you get from your blog (for instance) as well as how many leads each individual blog post has generated.
Difference between Attributer and using GET parameters
As you may know, it’s already possible to capture UTM parameters in your Fluent Forms using GET parameters, so why use a tool like Attributer?
Here’s why:
1. Captures all traffic
The GET Parameters feature only captures data on visitors that come from your paid ads with UTM parameters, while Attributer passes through information on all leads (including those from organic channels like Organic Search, Organic Social, Direct, and Referral).
This means that when you build reports, you’ll see the source of all leads, not just those from paid campaigns. This is vital because if your SEO efforts are bringing in more leads than your Facebook campaigns (for example), you’ll want to know this so you can adjust your investment accordingly.
2. Remembers the data across pages
The GET parameters feature only captures UTM parameters if they are in the URL when the form is completed. So if someone was to land on your homepage from an ad, but then navigate to your Contact Us page to complete a form, the UTM parameters would be lost.
Attributer works differently though. It stores the UTM parameters in the user’s browser, meaning that regardless of what page the user completes a form on the attribution data will always be passed through.
3. Captures landing page data as well
Ever wanted to know how many leads and customers come from your blog? Or those in-depth content pieces you spent hours writing?
Attributer also captures the landing page (I.e. attributer.io/blog/capture-utm-parameters) and the landing page category (I.e. /blog).
With this data, you can easily track how many leads you get from your blog (for instance) as well as how many leads each individual blog post has generated.
3 example reports you can run when you track the source of your leads in Fluent Forms
If you use Attributer to capture lead source data in Fluent Forms and send that data to your CRM or another reporting tool, you can build charts and dashboards that show where your leads and customers are coming from.
In my 15 years of marketing, I have built hundreds of these reports and have included some of my favourites below to help you get started.
1. Leads by Channel
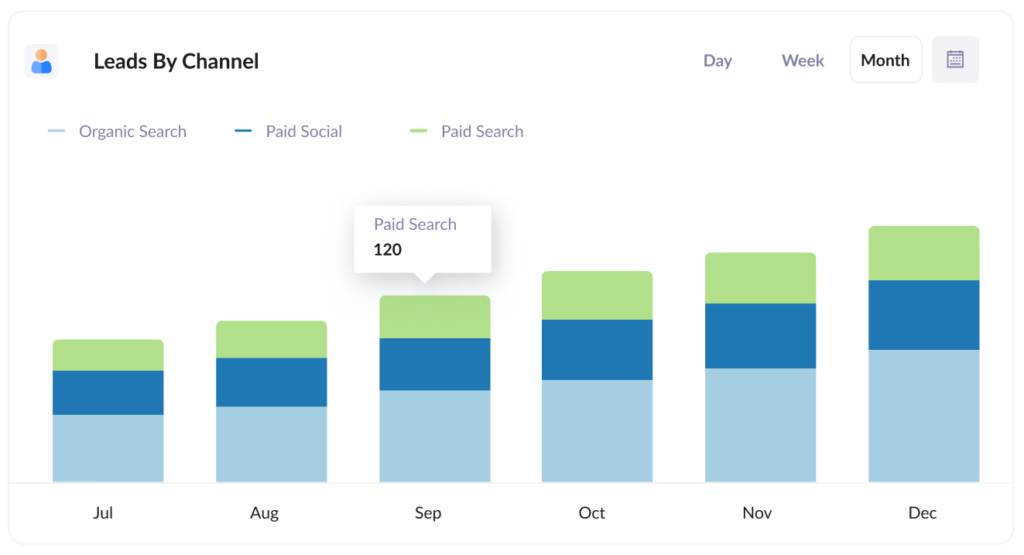
This report shows how many leads you’re getting every month from various channels, including Paid Social, Paid Search, and Organic Search.
This allows you to see which channels are the most effective at generating leads, and you can adjust your marketing budget and resources accordingly.
2. Customers by Google Ads campaign
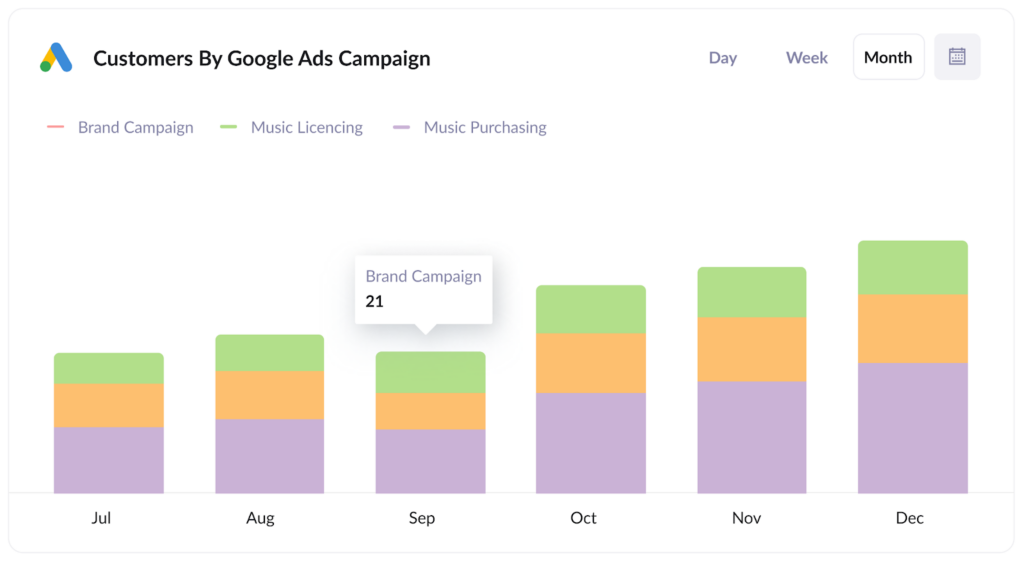
If you’re using Google Ads there’s a good chance you have multiple campaigns running and would like to see which campaigns are performing best.
This report can help. It shows you how many customers you get from each campaign and can help you understand which campaigns you should continue to invest in and which ones to stop.
3. Revenue by Meta Ads Network
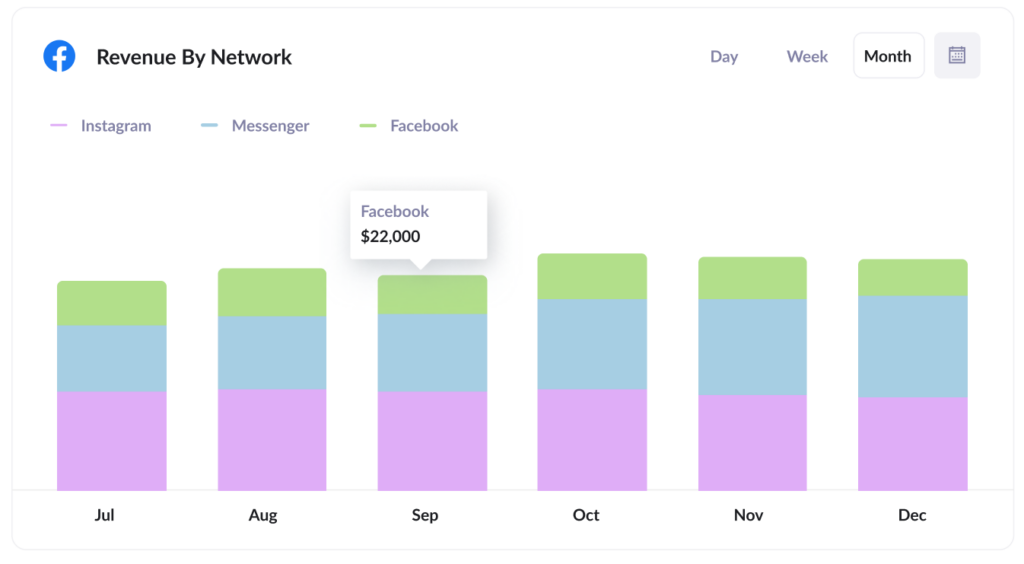
If you are running ads on Meta (formerly Facebook), then it’s likely those ads are appearing across the various networks they own (I.e. Facebook, Instagram, Messenger, Whatsapp).
If that’s the case, the above graph will be useful to you. It shows how much new revenue you’ve generated from your ads on each network and can help you understand which is the best one for your business.
Wrap Up
As you can see, Attributer is a great tool for capturing UTM parameters and other lead source information with each submission of your Fluent Forms.
If you then send the data to your CRM or a reporting tool, you’ll be able to create charts and dashboards that show which channels are driving the most leads, which campaigns are generating the most customers, and much more. Best of all, Attributer offers a 14-day free trial and it usually takes less than 10 minutes to set up, so try it out today!


Leave a Reply