

How to Add Downloadable PDFs to WordPress Form Confirmations
Someone fills out your form, hits submit, and then keeps waiting for a response. Maybe they check their inbox a few times. Maybe the email never shows up, or it lands in spam. That gap between “I submitted this” and “I actually have what I came for” is where many good user experiences quietly fall apart.
Nothing closes the loop faster than handing someone a document the moment they hit Submit.
A downloadable PDF instantly turns it into a reality. The moment a visitor submits your form, they get a document right there on the page, no inbox required. In this guide, we’ll walk through how to set that up in WordPress using Fluent Forms, from generating a branded PDF to making it downloadable through your confirmation message and your email notifications.
TL;DR
- Fluent Forms’ PDF Generator add-on turns any form submission into a professionally formatted PDF,
- You can send an invoice, a certificate, an ebook link, or an order summary using the PDF Generator
- Once the add-on is active, you build your form and design a PDF feed for it. Then drop a download shortcode into your confirmation message or email notification.
- From there, every submitter gets a copy the second they finish, no manual work required on your end.
Why Deliver PDFs Through a Form
Manually creating a document every time someone fills out a form doesn’t scale. If you’re running a course, an agency, or an event, you might be looking at dozens or hundreds of submissions a week, each one needing its own invoice or ticket. Doing that by hand eats up hours you don’t have.
Delivering PDFs automatically through your form solves a few problems at once:
- The document generates itself the instant someone submits, so you’re not copying data into a template each time, saving your time.
- A branded PDF with your logo and consistent formatting builds more trust than a plain email or a generic download link.
- A confirmation page download is available immediately, while an email can take a few minutes (or get lost in spam), which closes the loop faster.
- Every generated PDF is tied to a form entry, so you always have a copy on file if you need to look something up later.
For anyone running a website that collects information and needs to hand something back, an ebook, a receipt, or a signed agreement summary, this is the kind of automation that pays for itself quickly.
Common Ways to Use Downloadable PDFs
Downloadable PDFs work for almost any situation where a form submission should end with a document in the user’s hands. A few of the most common uses:
- Ebooks and lead magnets for marketers and bloggers who want to trade a resource for an email address
- Invoices and receipts for order forms, donation forms, or service bookings
- Event tickets or registration confirmations for event organizers
- Certificates for course creators marking a completed module or workshop
- Application records for HR teams collecting job applications or onboarding paperwork
- Consultation summaries for coaches and consultants who want to hand clients a recap after an intake form
If your form collects information that someone would want a copy of, there’s a good chance it belongs on this list.
Steps to Add Downloadable PDFs to WordPress Form Confirmations
Here’s the full walkthrough, from installing the add-on to sending your first automated PDF.
Add and integrate the PDF add-on
Before anything else, you’ll need Fluent Forms installed, along with the free Fluent Forms PDF Generator add-on. Once both are active, go to Fluent Forms PDF under Integrations and click Install Fonts. Let this finish before moving on, since it loads the font files your PDFs will use.
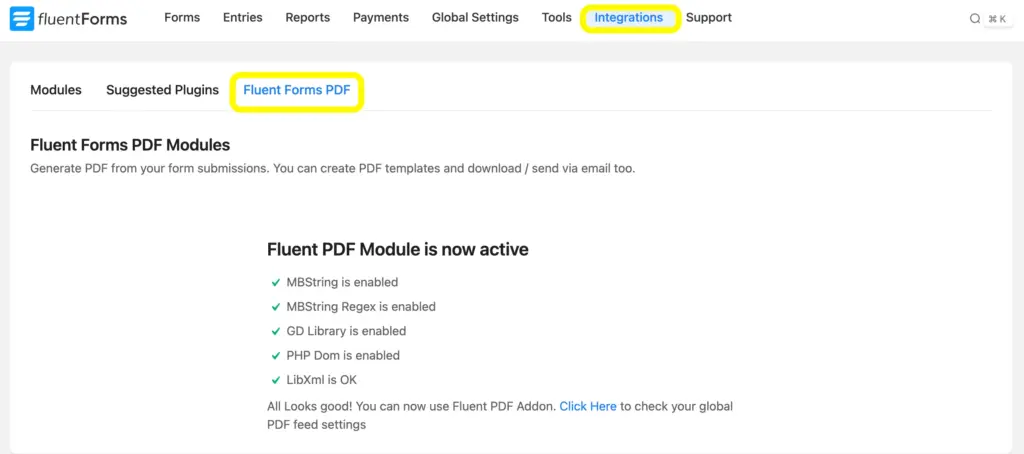
[Note: on my site, the Fluent Forms PDF Modules were already installed.]
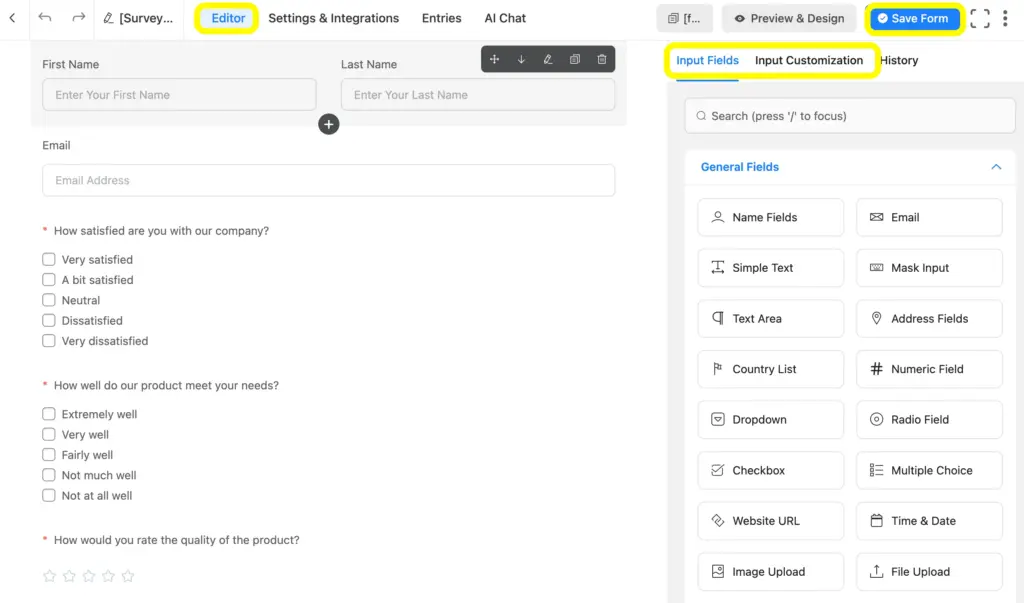
Finish building your form
Your PDF pulls directly from your form fields, so build the form first. Add your chosen fields, such as names, emails, order details, and payment fields. Clear, specific field labels make this step matter more than it seems: those labels often carry over into the PDF itself.
Customize your PDF
With your form saved, open its Settings and Integrations, then go to PDF Feeds and click Add PDF Feed.
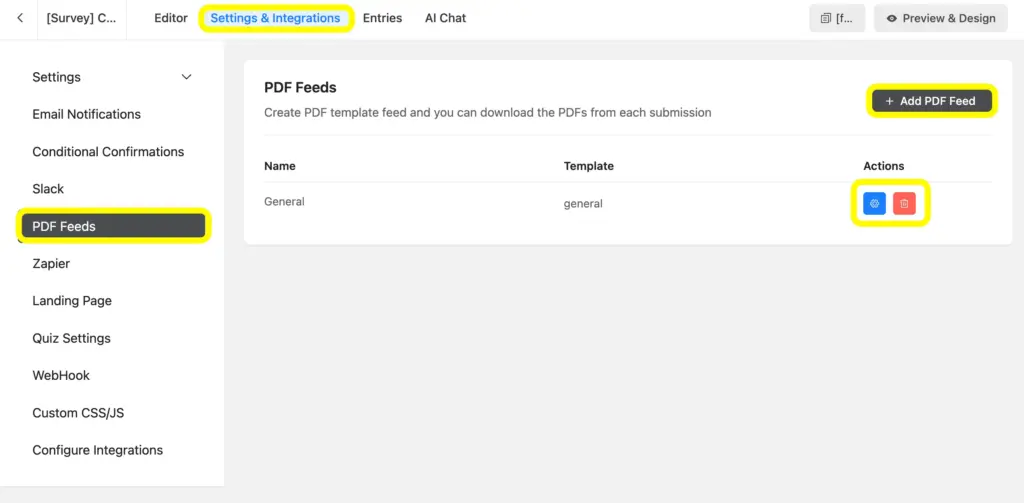
Once the PDF Feed is opened, pick a starting template, set a feed title, and upload your logo. From there, use the shortcode dropdown to map your form fields into the PDF body, so each submission fills in the document automatically.
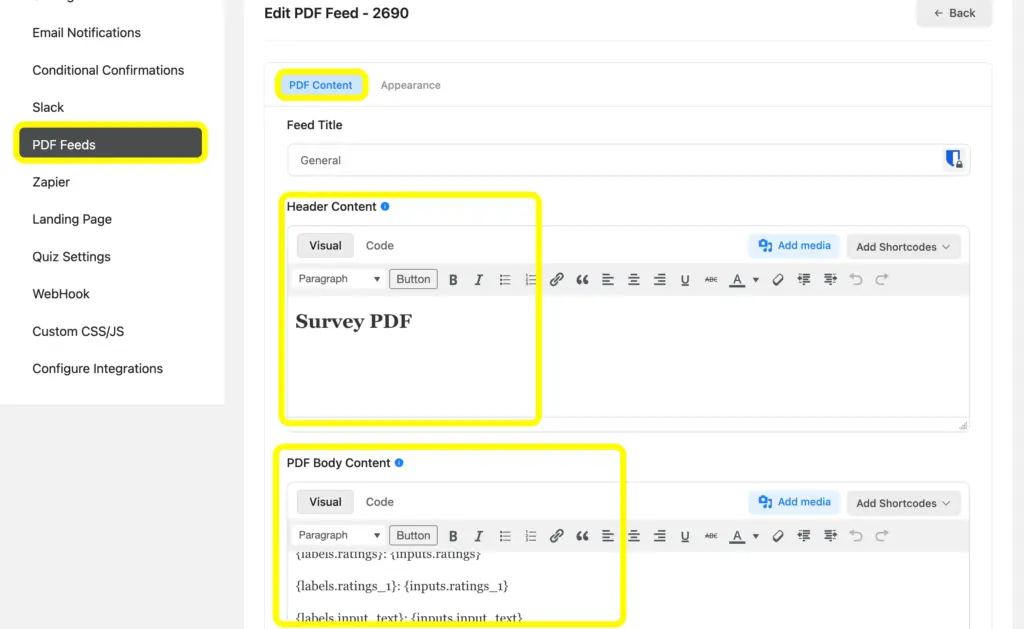
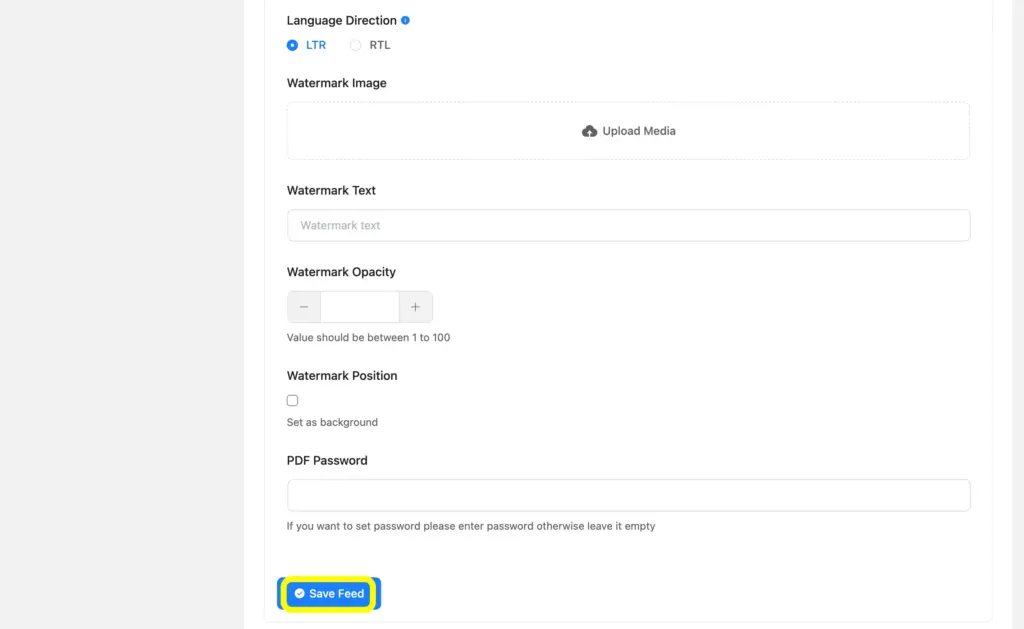
You can also customize orientation, paper size, font, and color to match your brand, plus add a watermark or a password if the document needs an extra layer of security.
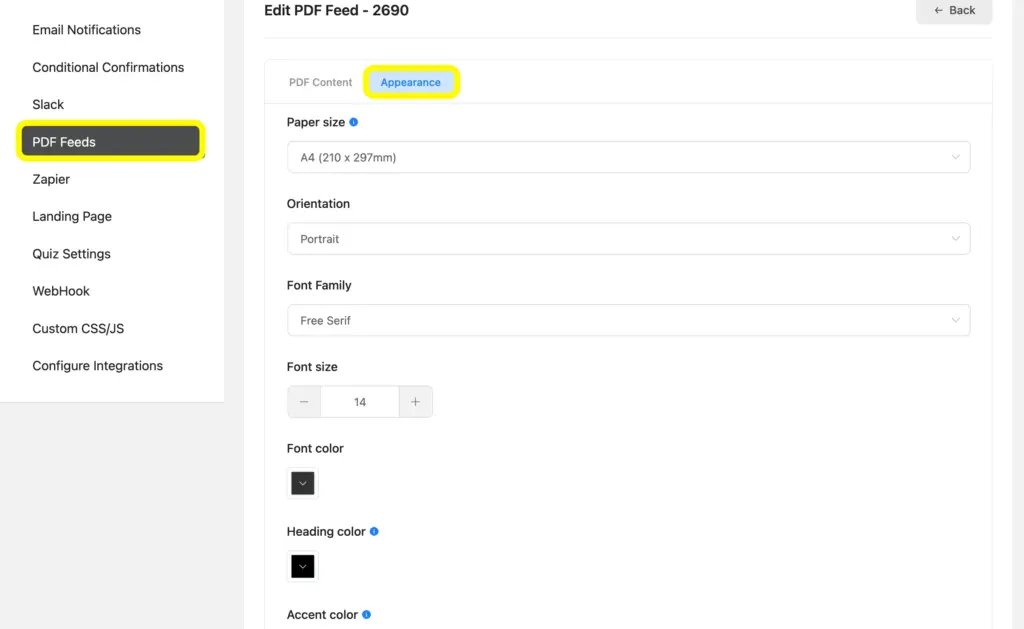
The appearance settings are so detailed that you can customize subtle features such as the watermark without coding a single line.
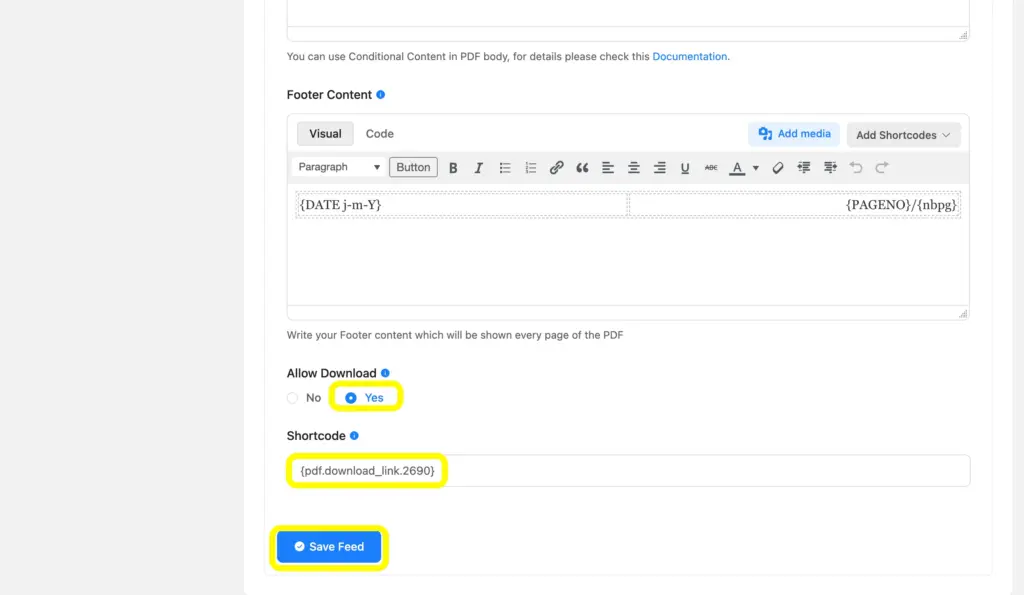
Once everything looks right, check Yes under Allow Download and copy the shortcode.
Allow downloading PDFs using the confirmation settings
This is where visitors get their document the instant they submit. Go to Confirmation Settings for your form, write your thank-you message, and insert a button. Paste the shortcode you copied earlier into the button’s URL field, then save.
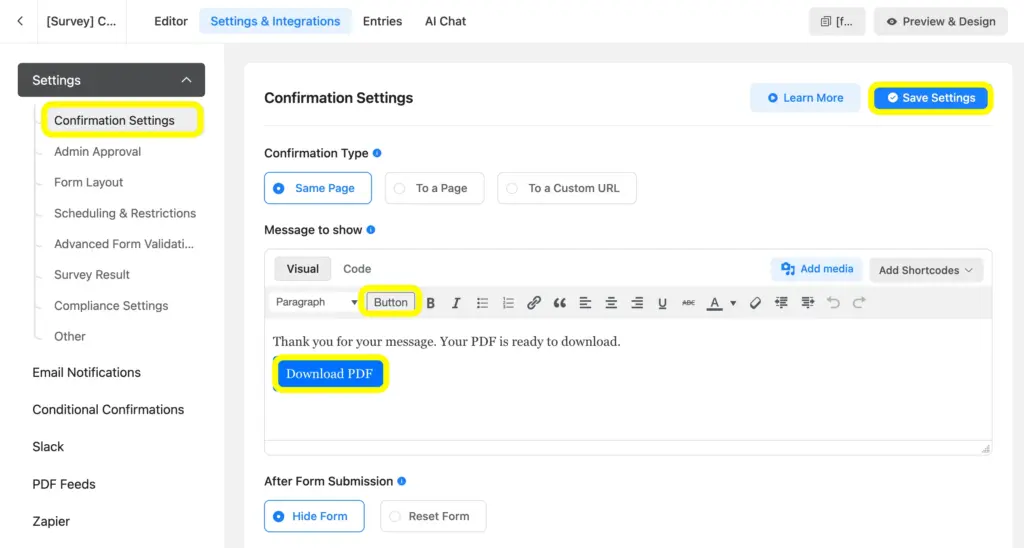
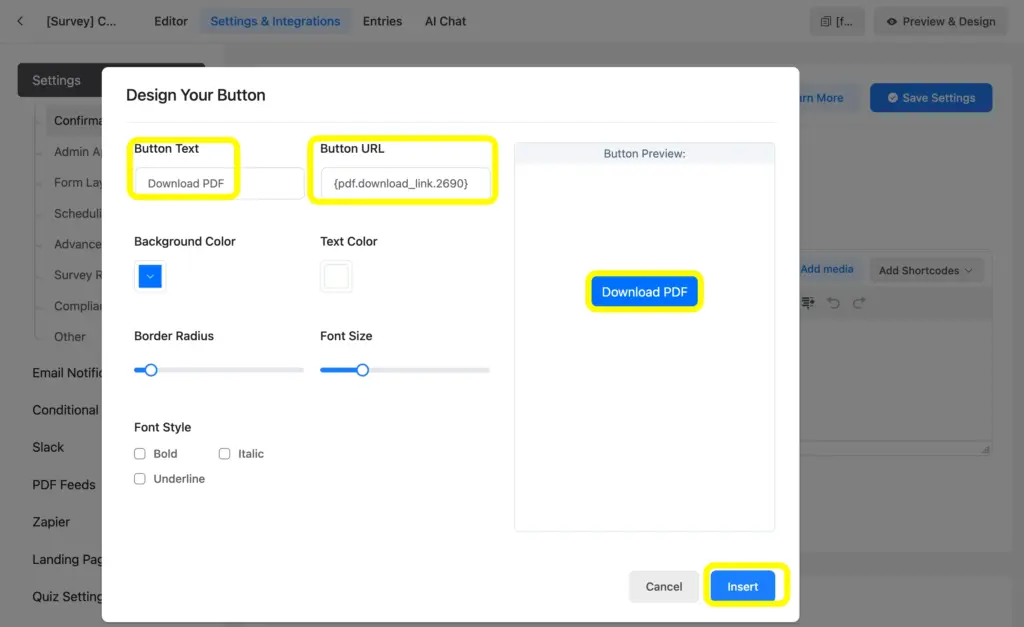
After clicking on the Button, you can customize the Button Text, Background Color, Text Color, etc. You can check the button preview as well.
And more importantly, paste the Button URL here that you copied from the PDF Feeds.
Once done, click Insert to proceed with the changes.
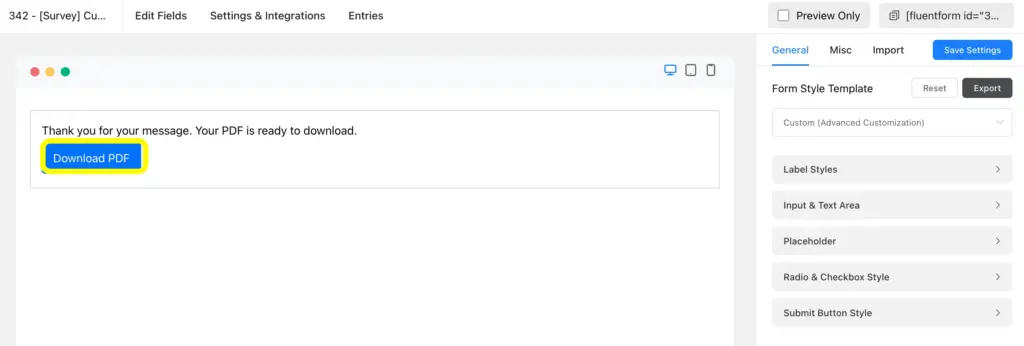
To make sure your PDF is working, go to Preview, fill out the fields, and then submit the form, and then click Download PDF to get the PDF.
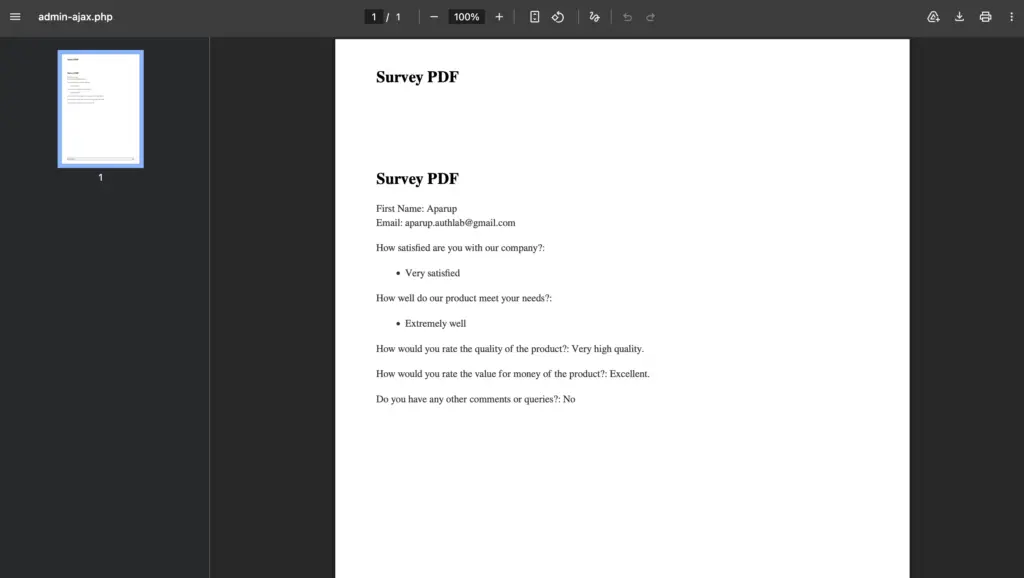
Here is an example that you will see after downloading the PDF.
Now, when someone submits the form, they’ll see a download button right on the confirmation screen, no waiting for an email. If different submissions should point to different documents (say, one PDF for a paid order and another for a free signup), you can pair this with conditional confirmation messages so the right PDF shows up for the right entry.
Allow downloading PDFs using the email notification settings
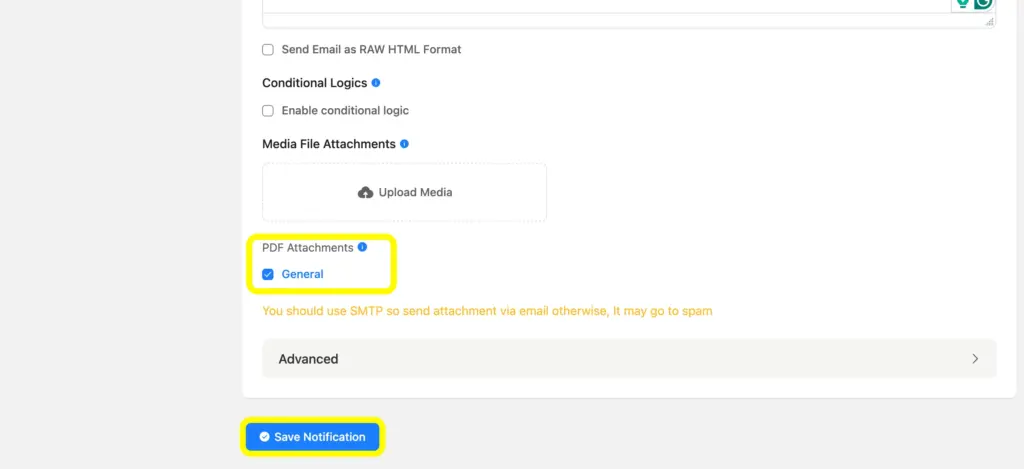
A confirmation download is fast, but an email gives people a copy they can find later. Head to Email Notifications, add a new notification, and fill in the subject and body as usual. In the attachment settings, check the PDF feed you created earlier so it’s attached automatically.
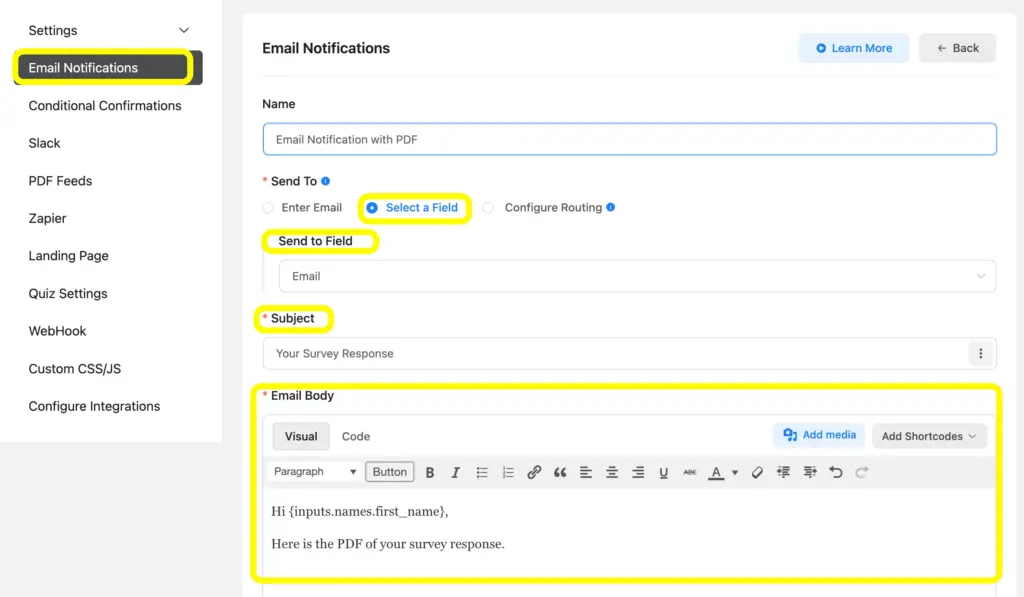
Checkmark the PDF Attachments and Save Notification to make sure the PDF is attached once an email notification is sent.
If you want the document sent to the person who submitted the form, choose their email field under Send To. If it also needs to go to your team, set up a second notification pointed at your internal inbox. For more details on getting notifications to the right people, this guide on sending email notifications to your WordPress users covers the setup end-to-end.
Automate Your PDF Workflow with Fluent Forms
Once this is set up, the entire process runs on its own. A visitor submits your form, a branded PDF generates in the background, and they get it immediately through the confirmation page, with a backup copy waiting in their inbox. No manual document creation, no forgotten follow-ups, no attachments to send by hand.
This is the kind of small automation that adds up. Whether you’re issuing invoices, sending certificates, or handing out an ebook, letting the form do the document work frees you up for everything else on your plate.

Hi, this is Aparup. I am a Literature postgraduate, mixing my creative thoughts with my experience in the tech industry to surpass AI. Professionally, I am a content marketer seeking solutions to users’ problems regarding WordPress.


Leave a Reply