

How to Create a Time Off Request Form with a Template
Disorganized leave management creates gaps, requests get missed, schedules go wrong, and managers waste time chasing paperwork. A dedicated time off request form fixes that by giving employees a clear place to submit requests.
The fastest way to get there isn’t building a form field by field. You can do this with a form template that collects exactly the pieces of information you need. In this tutorial, we’ll walk through importing a Fluent Forms time-off request template, customizing it as per your preferences, setting up notifications, styling it to match your site, and publishing it so employees can start submitting requests right away.
TL;DR
- A prebuilt time off request template gives you the core fields already in place, so you only need to adjust what’s specific to your organization.
- Fluent Forms’ template includes employee details, department selection, leave type, and start and end date fields out of the box.
- You can add, remove, or edit fields, and use conditional logic to show extra questions only when they’re relevant.
- Confirmation messages and email notifications keep employees and HR in sync the moment a request is submitted.
- The Advanced Form Styler lets you match the form to your website’s branding without touching CSS.
- Once configured, the form can be embedded on any WordPress page using a shortcode or the block editor.
Why a Form Template Beats Building from Scratch
Building a leave request form from scratch means deciding on every field, label, and setting yourself. A template shortcuts the setup work while still leaving every setting fully editable.
Start with the essential fields already in place
A time off request template already includes the fields employees need to fill in: name, employee ID, contact details, department, leave type, and the dates of the leave. Here, you’ll get a structure that’s already been thought through and organized into a clean layout.
Customize only what your organization needs
While using a prebuilt template, you can customize it completely. You can remove or expand the fields, change labels, or bring company-specific style to make it more tailored to your business.
Maintain control over the design
Using a template doesn’t lock you into a fixed look. You still control the form’s appearance, confirmation messages, and notification emails. The template just removes the hassle of starting from a blank editor page where you need to toggle the fields’ positions and edit labels tens of times.
Steps to Create a Time Off Request Form with a Template in WordPress
Here’s the full process, from picking the template to publishing the finished form on your site.
Step 1: Select or download the time off request form template
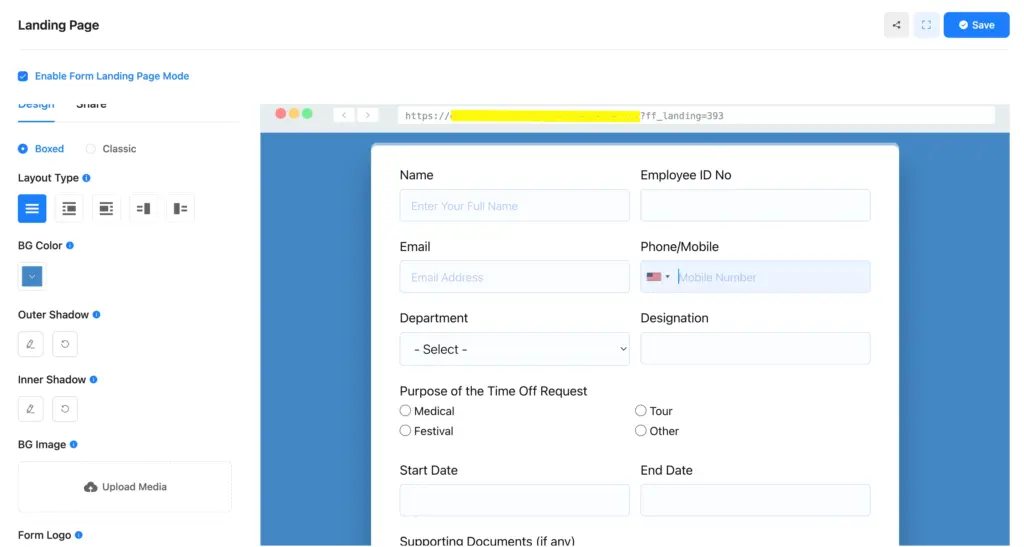
Fluent Forms includes a ready-made time off request form template in its template library. The template is built with two-column containers for a balanced layout, and it comes with name, email, phone, and employee ID fields for identification, a department dropdown, a text field to write down the designation, radio buttons for the leave type (medical, tour, festival, or other), and date fields to capture the requested start and end dates.
You can download the form and then import it to your site.
Step 2: Import the form template
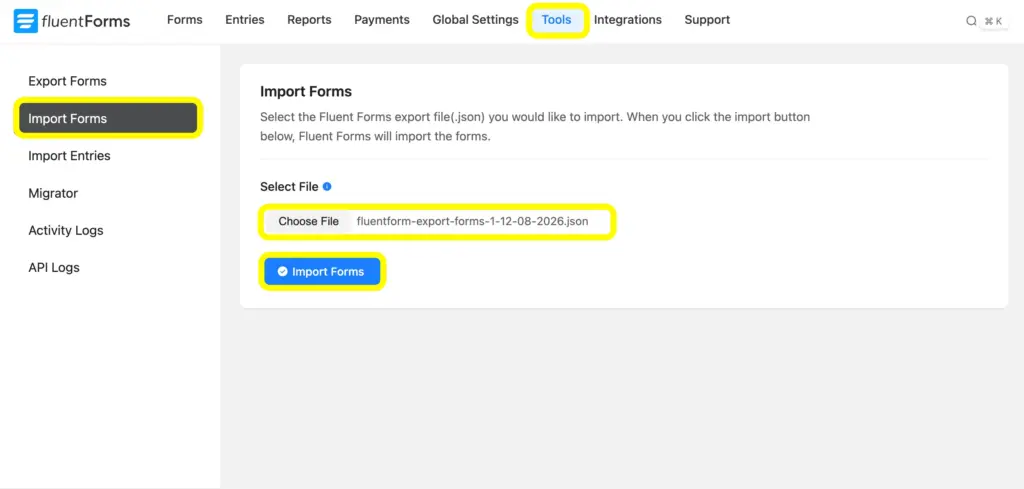
Once you’ve found the template, get back to your site and go to the Fluent Forms Dashboard. Now, go to the Tools tab and then click Import Forms. Here, you can upload the form you’ve just downloaded.
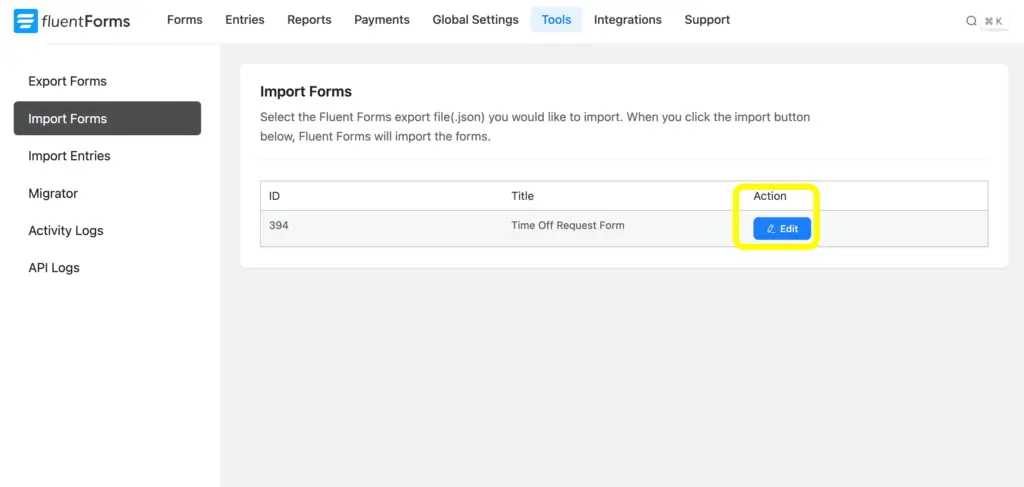
After the form is successfully imported, click the Edit button and go directly to the editor page.
Step 3: Customize the fields (if required)
Once you get the form template imported to the editor page, you can add, remove, or customize fields depending on what your organization actually needs to know. Common adjustments include:
- Adding leave type options beyond medical, tour, and festival, such as sick leave, unpaid leave, or bereavement leave.
- Adding a manager or supervisor field so requests route to the right approver.
- Adding a file upload field for supporting documents like medical certificates.
- Making the reason field required for certain leave types only.
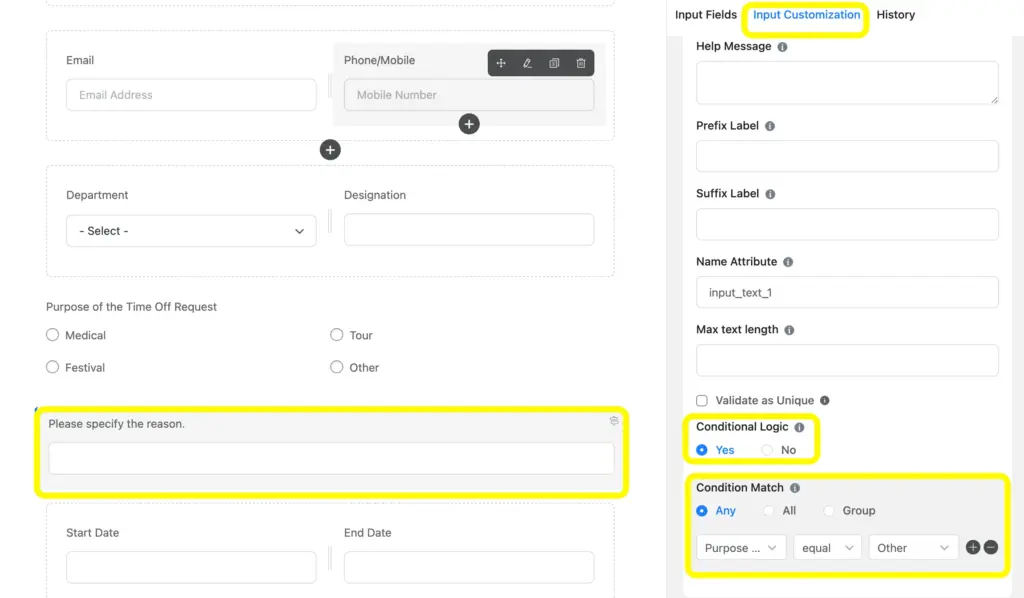
Fluent Forms’ input fields cover everything from dropdowns and date pickers to file uploads and numeric fields, so you can drag in whatever the template doesn’t already include. If you only want certain fields to appear based on an employee’s earlier answers (for example, showing a document upload field only when “Medical” is selected as the reason), conditional logic handles that without any code.
Step 4: Configure confirmation and notification
When you’ve added, deducted, customized, or have decided to keep the fields original, decide what happens after an employee submits a request. Under the form’s Settings & Integrations tab, you can set up a confirmation message that appears on the same page, redirect the employee to a custom thank-you page, or send them to a specific URL. Confirmation messages reassure employees that their request actually went through.
In the confirmation message, you can Add Shortcodes and Add media to make the confirmation more tailored based on the employee’s response.
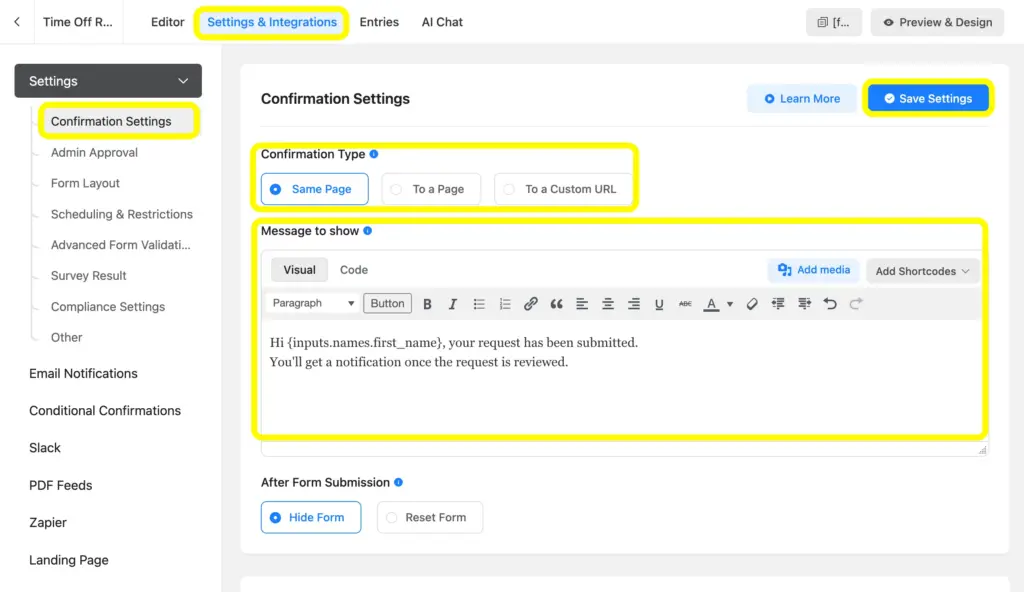
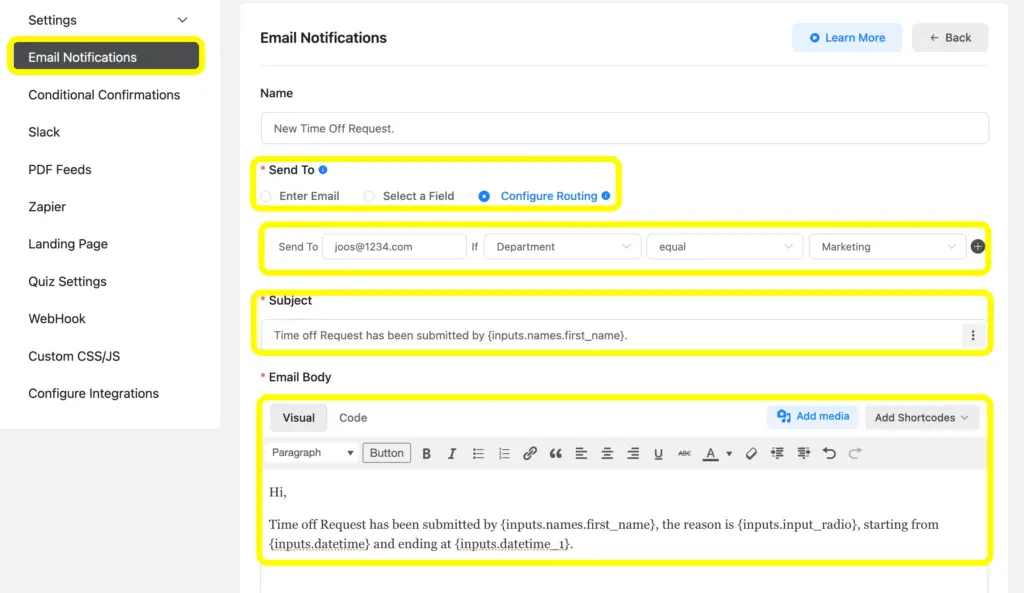
Alongside the confirmation message, set up email notifications so the right people know a request has come in. You can configure one notification to the employee confirming their submission, and another to HR or the employee’s manager with the request details, so nothing sits unnoticed in an inbox.
Go to the Email Notifications tab and then click on Add Notification to configure the email notification as per your leave management policy. Here is a detailed guide on email notification setup.
Step 5: Preview and style the form
Before publishing, preview the form to check that the fields, conditional logic, and notifications all behave the way you expect. Submit a test entry and confirm the notification emails arrive correctly.
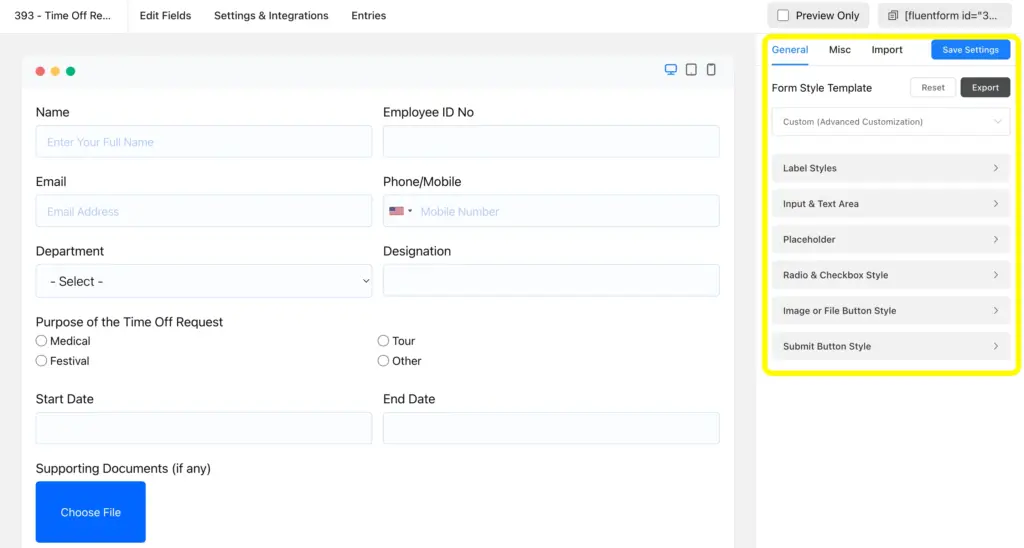
Then use the Advanced Form Styler to match the form to your site’s branding. You can adjust colors, fonts, spacing, and button styles through a visual editor, without writing any CSS.
Step 6: Embed the form to your WordPress site
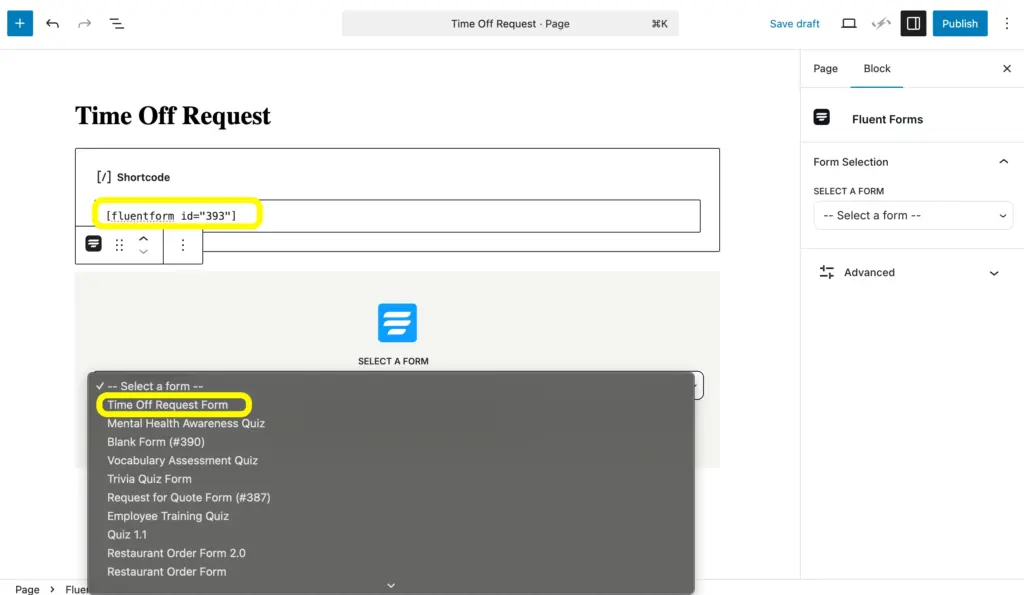
With the form built, configured, and styled, it’s time to publish it. Copy the form’s shortcode from the top right side of your form, or add it directly through the Fluent Forms block in the WordPress block editor.
If you want a dedicated, distraction-free page for the form itself, Fluent Forms’ landing page module lets you publish it as a standalone page, which works well for a link you can share directly in outreach or ad campaigns.
To make a landing page form, go to Settings and Integrations again, and Enable Form Landing Page Mode. In this module, you can customize the form with Layout Type, BG Color, BG Image, Form Logo, Featured Image, Page Heading, etc.
Simplify Employee Leave Requests
While customizing the time off request form template, you can also use Fluent Forms’ integrations to automate the entire workflow. Connecting the form to the relevant tools will help reduce further manual work. Get Fluent Forms Pro to access all fields, features, and integrations that work smoothly on your site; simplify the leave requests as well as your HR workflow.

Hi, this is Aparup. I am a Literature postgraduate, mixing my creative thoughts with my experience in the tech industry to surpass AI. Professionally, I am a content marketer seeking solutions to users’ problems regarding WordPress.



Leave a Reply