

How to Build a School Enrollment Form on WordPress

Enrolling students on paper means missing signatures, trying to understand handwriting, and retyping every form into a spreadsheet by hand. You can move the whole thing online in WordPress with Fluent Forms. I’ll show you how to plan the fields, build the form, collect the enrollment fee, route each submission to the right staff, and publish it.
Parents complete it on their own time, from a phone or a laptop, and get an instant confirmation. You get a dated, searchable record per applicant as soon as they submit.
TL;DR
- Plan your fields first, grouped into student, guardian, enrollment, and document, so the build goes fast and nothing is missed.
- Core fields (name, email, dropdown, date, address, and text area) and PDF copies are free. File uploads, multi-step layout, and conditional email routing are Pro.
- Break a long form into steps so parents move through focused sections instead of one endless page.
- Use conditional logic to reveal transfer-student or sibling fields only when they apply.
- Collect the fee with a payment field, which is free (via Stripe, Fluent Forms keeps a 1.9% fee), and Pro unlocks all eight gateways with no added charge.
- Charge tuition in installments with the Subscription field, and pass entries to Google Sheets or a CRM to automate the rest.
- After submission, confirm receipt to parents, notify your staff, store every entry, and protect the form since it holds student data.
What a School Enrollment Form Should Capture
A school enrollment form is a structured intake form that registers a student in one place. It captures who the student is, who their guardians are, which grade or program they’re joining, and their enrollment fee if you charge it.
A plain contact form asks for a name, an email, and a message. It’s not enough for an enrollment, where you need dozens of specific details in a consistent format and often a payment alongside them.
The details every enrollment form needs
Enrollment pulls together a few groups of information a school needs on record from day one: who the student is, who to contact, where they live, and what they’re enrolling in. Add the required documents and a fee, and each application arrives as a complete, ready-to-process record.
Why an online form beats paper
Paper forms go missing, arrive half-finished, and result in hours of manual data entry. An online form fixes each of those: parents complete it before they arrive, every submission lands in your dashboard, timestamped and searchable, required fields stop half-finished applications, and you can collect the fee in the same form.
Plan Your Enrollment Fields Before You Build
Outline the form before you open the builder. A quick field list keeps the build fast and stops you from adding clutter that lowers your completion rate. Parents also move faster through a well-organized form. In this tutorial, we’re grouping the fields into four sets.
Student information
Start with who the student is and where they live: full name, date of birth, gender, and home address. A quick radio field can note whether the student previously attended or applied, which sets up the transfer-student logic later.
Guardian and emergency contact
Next, capture who’s responsible for the student and who to reach in an emergency: the guardian’s full name, phone, email, and relationship with the applicant, and a separate emergency contact name and number.
Enrollment details
Then the specifics of what they’re enrolling in: the grade or class applying for, the program or course, the semester or term, and a preferred start date. A Dropdown for grade keeps records consistent. Add a text area here for medical notes or accommodations the school should know about before the first day.
Documents, consent, and payment
Finally, the parts that make enrollment official: a file upload for required documents like the birth certificate and previous transcripts, an agreement for your enrollment terms, a consent field for emergency medical treatment, and a payment field for the fee. With the list mapped out, you’re ready to build.
Why Fluent Forms Fits School Enrollment
Fluent Forms is the fastest form builder plugin for WordPress with a drag-and-drop editor and more than 65 field types, so everything on your field list already has a matching field. It also handles the parts that elevate a basic form: document uploads, a fee, and routing each submission to the right person. Most of the build runs on free features, with a few Pro pieces I’ll flag as we reach them.
Free vs Pro for this build
Here’s the split for the features this form actually uses:
| Feature | Free | Pro |
| Core fields (Name, Email, Dropdown, Date, Address, Text Area, Radio) | Yes | Yes |
| Section breaks to group fields | Yes | Yes |
| Spam protection (reCAPTCHA, hCaptcha, Turnstile, Honeypot) | Yes | Yes |
| File upload for documents | No | Yes |
| Conditional logic to show or hide fields | Yes | Yes |
| Payment fields and gateway (Stripe) | Yes | Yes |
| Recurring payments (Subscription field) | Yes | Yes |
| Stripe Payment processing fee (on top of gateway rate) | 1.9% | None |
| All eight gateways, coupons, inventory, calculation on a custom amount | No | Yes |
| Conditional email routing by program | No | Yes |
| Google Sheets integration | No | Yes |
| PDF copy of each entry | Yes | Yes |
How to Build a School Enrollment Form in Fluent Forms
With your plan ready, the build moves quickly. Work through these steps in your WordPress dashboard.
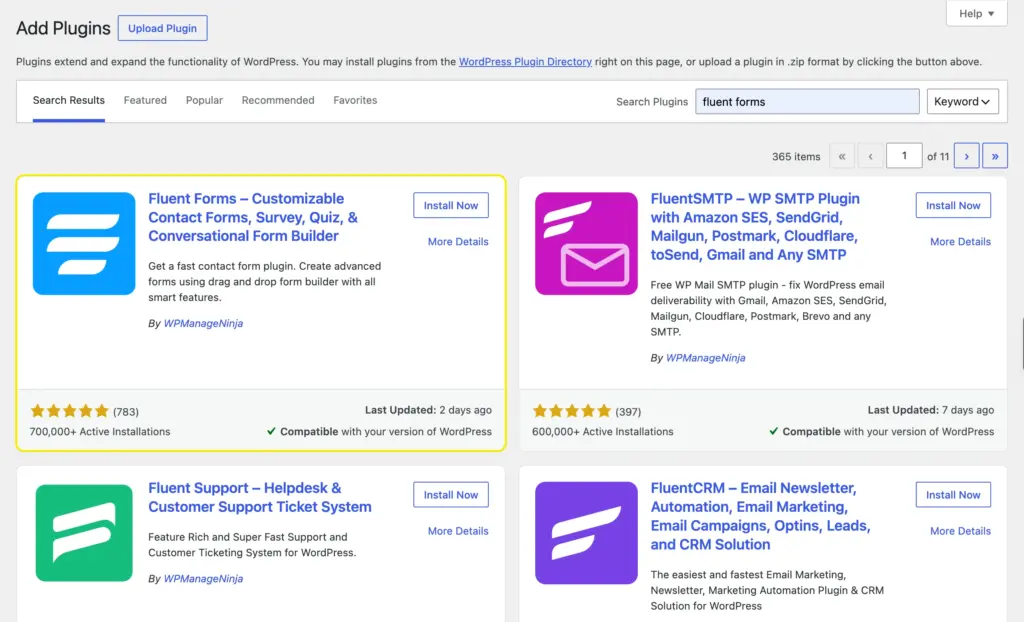
Step 1: Install and open Fluent Forms
- Go to Plugins > Add New, search for Fluent Forms, then click Install Now and Activate.
- Open Fluent Forms > New Form to start building.
Step 2: Start blank or from a school template
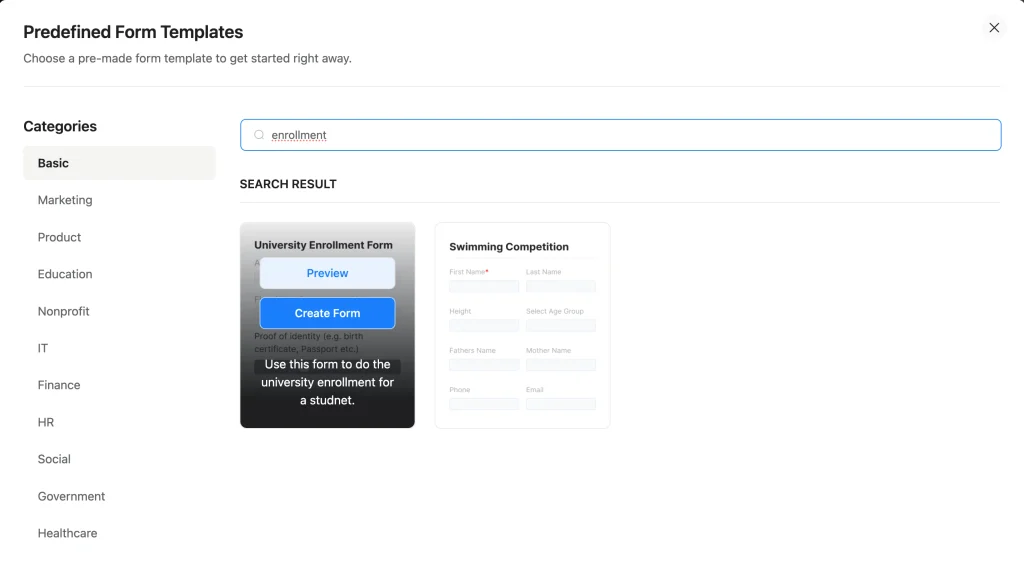
You don’t have to build from scratch. Fluent Forms ships with ready-made templates, including a school enrolment form and a university enrolment form, that already have the common fields and sections laid out.
- On the New Form screen, choose Choose a Template and search for the university enrolment template, then tweak it instead of building from scratch.
- Or choose Create a Blank Form if you’d rather add each field yourself. That’s the path I’ll follow here so you see every step.
- Give the form a clear name like “2026 Enrollment Application.”
Step 3: Add and group your fields
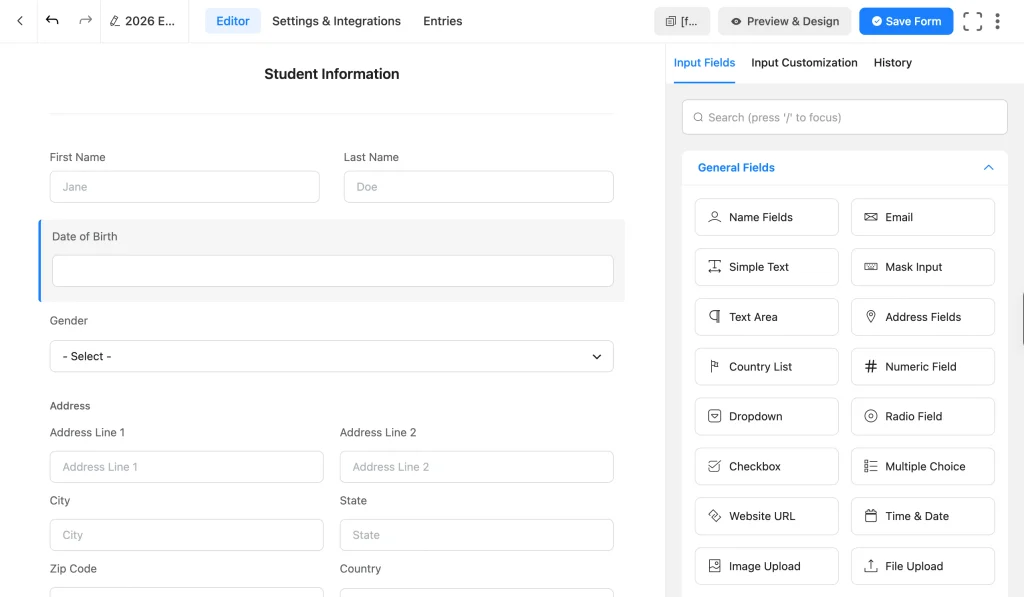
In the editor, the input fields panel sits on the right and the form canvas on the left. Drag the fields you mapped earlier onto the canvas, then click any field to set its label and mark it as required under Input Customization.
Use a Section Break between each group so the form reads in clear blocks:
- Under a “Student Information” section, add Name, Date (date of birth), a Dropdown for gender, and the Address field.
- Add a section break, then Name, Email, and Phone fields for the guardian, plus an emergency contact, under “Parent or Guardian.”
- Add another section break, then Dropdown fields for grade and semester, the program, a start date, and a Text Area for medical notes under “Enrollment Details.”
Mark the guardian’s email and phone number as required so you always have a way to reach the family.
Step 4: Break the form into steps
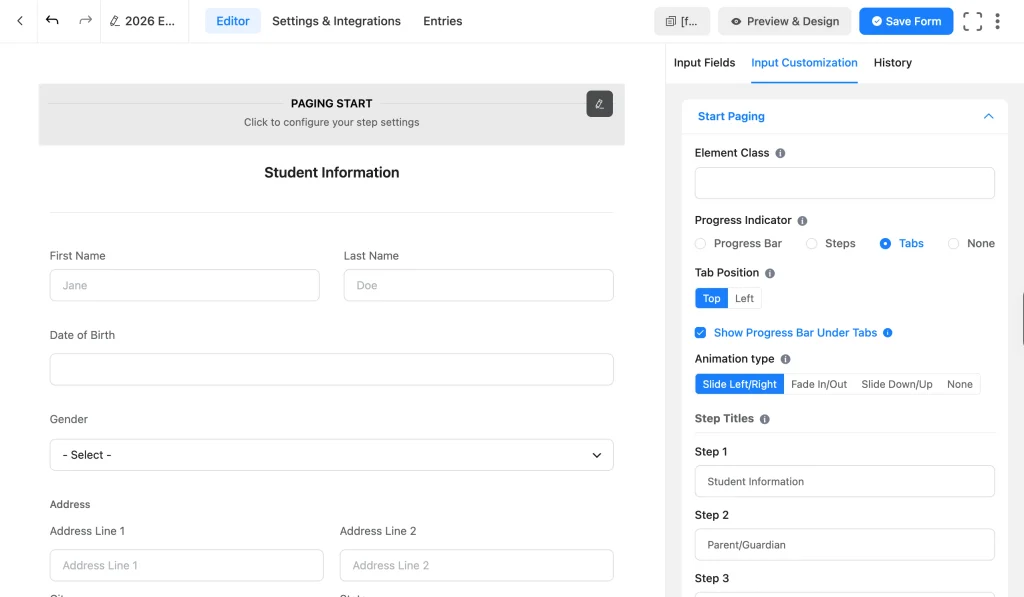
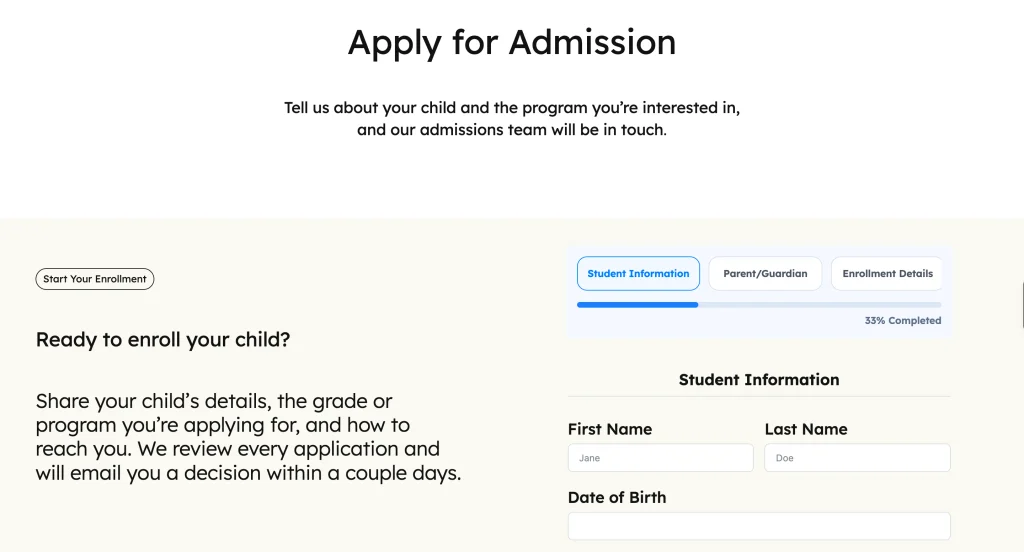
A long enrollment form on one page feels heavy. The Form Step field splits it into focused steps that parents move through one at a time, and it can save progress between steps.
- Drag a Form Step field to the top of each new section, so your section breaks become separate steps: student details, guardian info, then enrollment details.
- Pick a progress bar style in the field’s settings so parents can see how close they are to finishing.
The Form Step field is a Pro feature. Click Save Form when your steps are in place.
Step 5: Show conditional fields when they apply
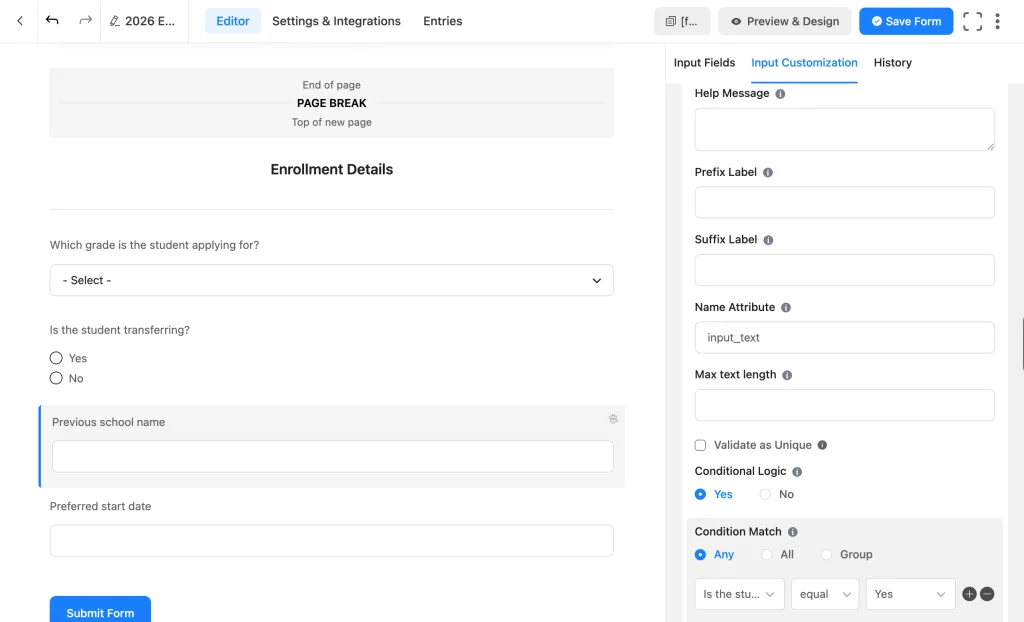
Some questions only apply to some families. A transfer student needs a previous-school field; a sibling discount needs sibling details. Rather than show those to everyone, reveal them only when they’re relevant with conditional logic. You set the rule on the field you want to show, not on the field that triggers it.
- Add a Radio field asking “Is this a transfer student?” with Yes and No options.
- Add a Simple Text field labeled “Previous school name.”
- Click that text field, open Advanced, and turn on Conditional Logic.
- Create the rule: show this field when “Is this a transfer student?” equals Yes.
Reuse the same pattern for meal plans, transport pickup points, or sibling fields, then click Save Form.
Step 6: Collect required documents
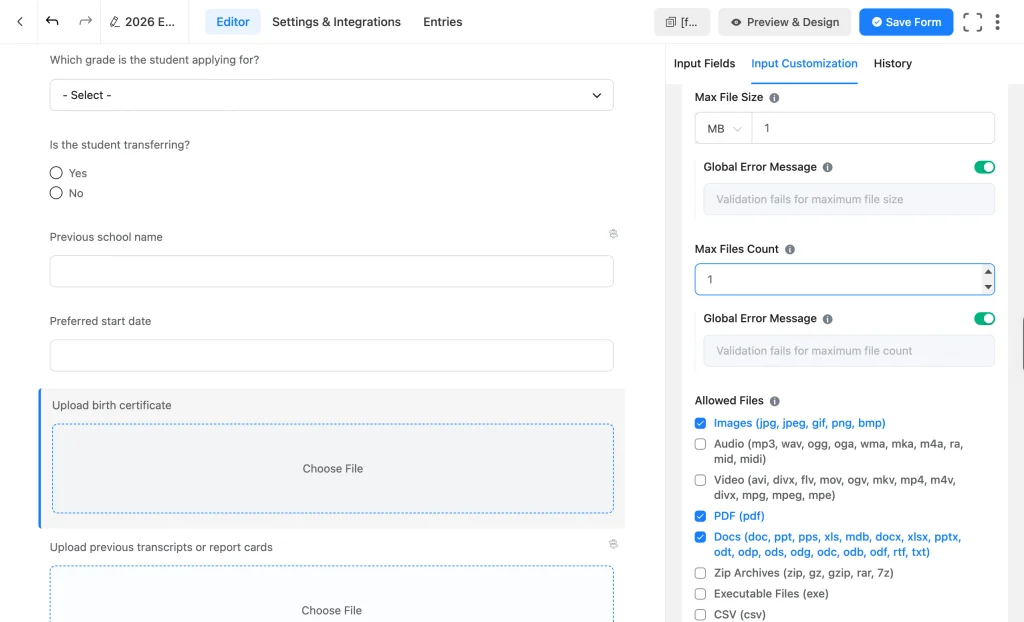
Schools need a few documents on file before a place is confirmed. A File Upload field lets parents attach them right in the form. The File Upload field is a Pro feature.
- Drag a File Upload field onto the enrollment step and label it “Birth certificate.”
- In the field settings, set the allowed file types (PDF, JPG, PNG) and a size limit so uploads stay manageable.
- Add a second upload labeled “Previous transcripts or report cards,” and tie it to the transfer-student rule from Step 5 so it only shows when it applies.
Step 7: Add consent and emergency medical authorization
Enrollment is an agreement, and most schools also need a guardian’s authorization to seek emergency medical care if they can’t be reached. Capture both in the form so they’re recorded and dated with the rest of the submission.
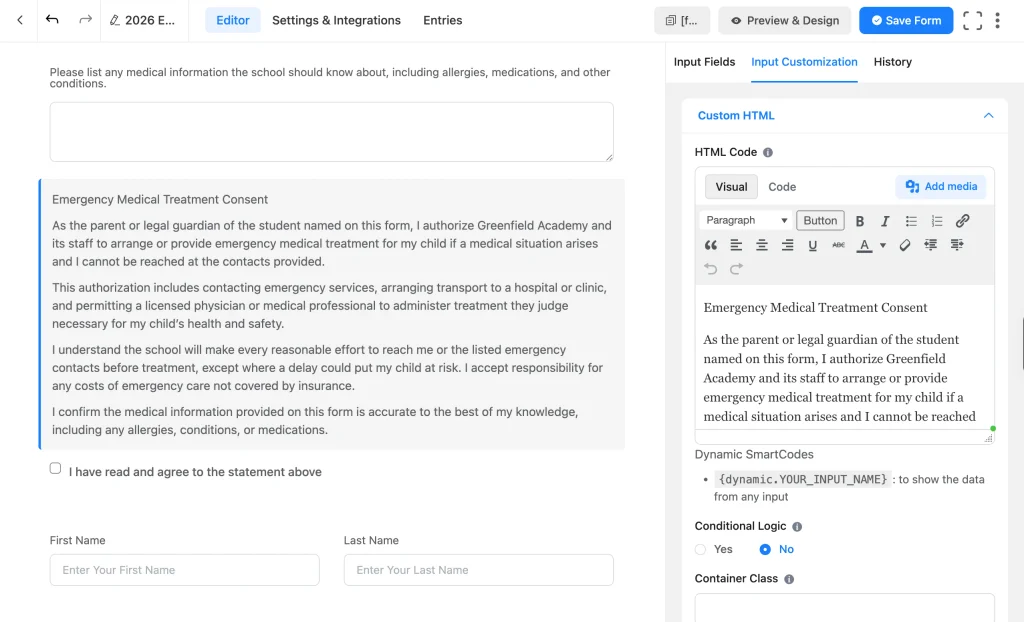
- Add a Custom HTML field (no code) and write your terms and your emergency medical statement in plain language, for example that the guardian authorizes the school to arrange emergency treatment if they cannot be reached.
- Add a Terms & Conditions or GDPR Agreement field so the guardian ticks a box to record agreement.
- Add a Signature (via the Signature Add-on purchased separately) or a Name field where the guardian signs or types their full name to confirm, then click Save Form.
Keep the wording your own and check it with a professional if rules like FERPA apply to your school. This is a form field, not legal advice.
Step 8: Add spam protection
A public enrollment page attracts bots, and you don’t want spam submissions among real applicants. Fluent Forms gives you a few free options.
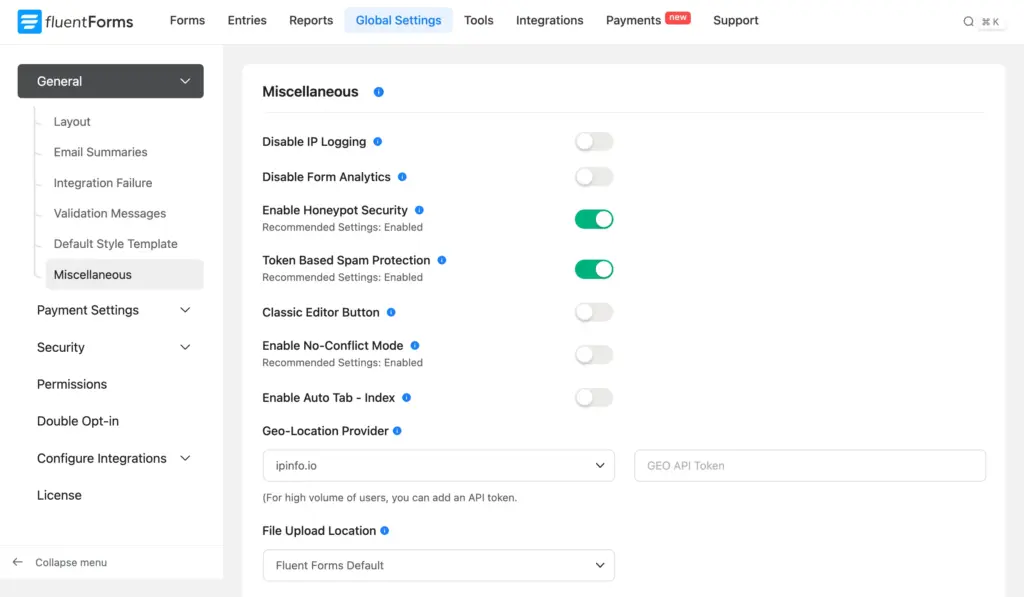
- Drag a reCAPTCHA, hCaptcha, or Turnstile field onto the form, then connect your keys under Global Settings.
- For an extra layer, enable Honeypot and token-based protection under Global Settings > General > Miscellaneous.
The honeypot catches bots with a hidden trap field a human never sees, and token protection rejects any submission missing a valid form token. All of these are free. With the fields in place, let’s collect the fee.
Collect the Enrollment Fee
Many schools charge a registration or enrollment fee, and you can collect it on the same form so parents can register and pay in one visit. Payments are available for free in Fluent Forms, so you can start charging without an upgrade.
Connect a gateway and add the fee
First, connect a gateway under Fluent Forms > Global Settings > Payment. Stripe works on the free version, with Fluent Forms keeping a 1.9% platform fee per transaction on top of Stripe’s own charges. Add your API keys and set the currency here. Fluent Forms Pro removes that platform fee and unlocks all eight gateways, including PayPal, Mollie, Razorpay, Paystack, Square, Paddle, and Authorize.net.
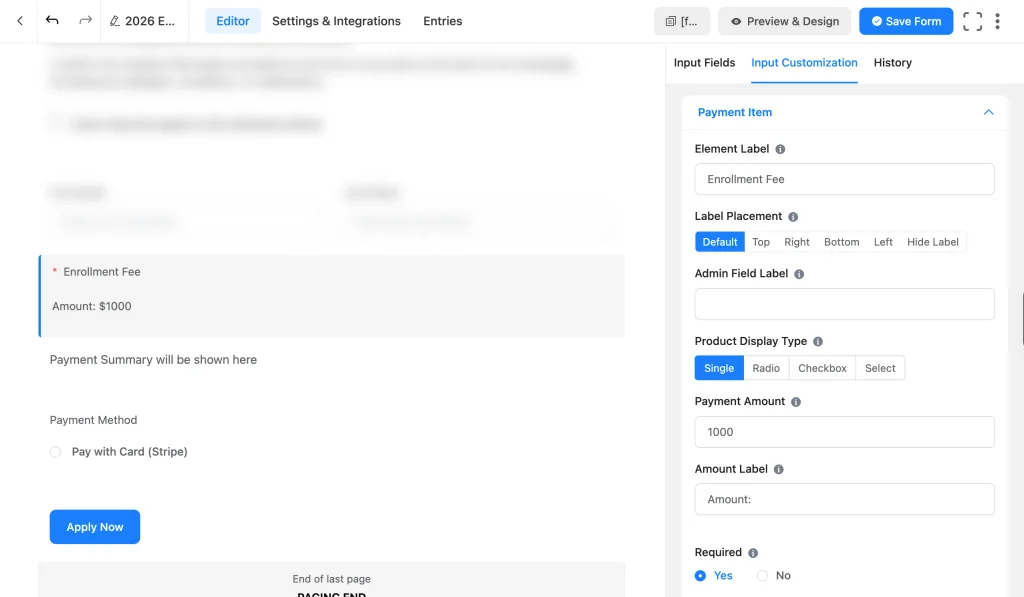
- Back in your form, drag a Payment Item field onto the enrollment step, label it “Enrollment fee,” and enter the amount.
- Add a Payment Method field so parents pick how they pay.
- Drop in a Payment Summary so parents see the total before they submit, then click Save Form.
Set the fee as fixed, per-program, or custom
How you set the amount depends on how your school charges:
- Fixed fee: enter one amount in the Payment Item field for every applicant.
- Per-program fee: use a Payment Item with multiple options, such as half-day and full-day, so the total updates with the parent’s choice.
- Optional add-ons: add items like transport, meals, or a uniform, and Fluent Forms adds them to the total automatically.
- Custom amount: let parents enter their own figure, useful for a voluntary donation to the school fund or a deposit they choose to put toward tuition. This is free. Running a calculation on that amount, like a percentage discount or tax, is a Pro feature.
A couple of extras are Pro too: coupons for sibling or early-bird discounts, and inventory to cap seats per program.
Offer a payment plan for tuition
A one-time fee suits most schools, but full-term tuition is easier for families to pay in installments. The Subscription field collects recurring payments on a schedule you set, and it’s free.
- Add a Radio field for how the family wants to pay, with “Pay in full” and “Pay monthly” options.
- Drag a Subscription field for the monthly plan, set a billing interval like monthly across the semester, and set Total Billing Times to cap how many payments run, for example, 10 across a school year.
- Turn on Conditional Logic so the Subscription field only shows when the family picks “Pay monthly,” and full-payment families never see it.
Next, set up what happens after a parent submits.
Set Up What Happens After Submission
Building the form is only half the job. The other half is the workflow that runs the moment a parent submits: the message they see, the alert your staff gets, and where every entry is stored.
Confirmation message for parents
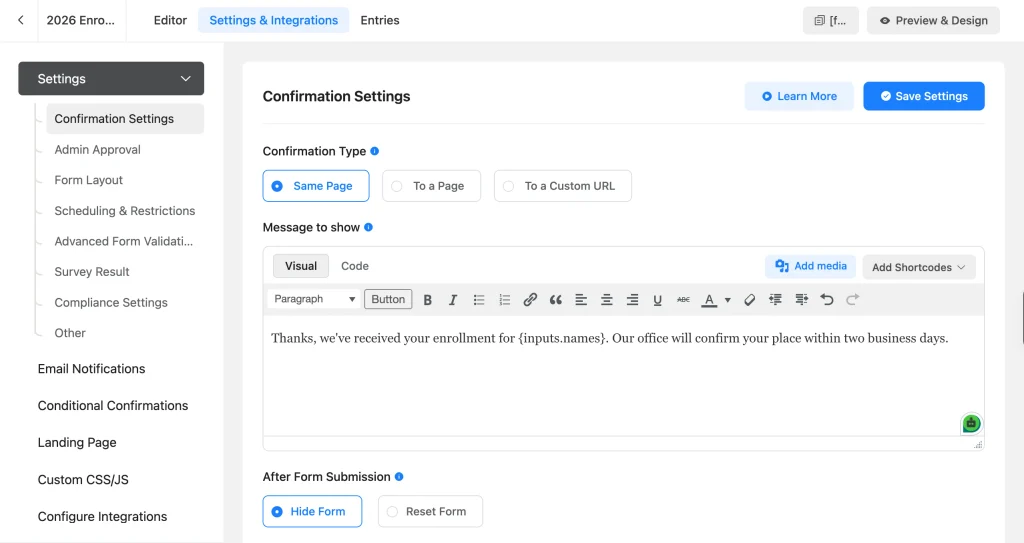
Go to Settings & Integrations > Confirmation Settings and write a message that tells the parent what happens next, like “Thanks, we’ve received your enrollment for [student]. Our office will confirm your place within two business days.” You can show it on the same page or redirect to a thank-you page with orientation dates or a receipt.
Notify staff and route by program
Go to Settings & Integrations > Email Notifications. You’ll usually want two: one to your office so the registrar knows a new enrollment came in, and one to the parent as a confirmation copy. Use the email body shortcodes to pull in the student name, grade, and guardian contact.
If your school runs several programs, route each enrollment to a different coordinator with conditional email routing (a Pro feature): set Send To to Configure Routing, then add one row per program tied to your program dropdown. Connect FluentSMTP so these emails reach the inbox instead of landing in spam or not being sent.
Store, export, and save entries
Every submission is saved under your form’s Entries tab, timestamped and searchable. You can filter by grade or program, export entries as a CSV for your student records, and generate a PDF copy of each enrollment when you need a hard copy for a file.
Automate the rest of your workflow
Enrollment rarely ends at the submission, so pass each entry to the tools your office already runs:
- Sync to Google Sheets: the Google Sheets integration (Pro) sends every submission to a shared spreadsheet, so your team tracks applicants in one live sheet.
- Add families to a CRM: the FluentCRM integration stores each guardian as a contact for follow-up about orientation or missing documents.
- Route for approval: use conditional notifications to send each enrollment to the coordinator who approves that grade, then confirm the place once they’ve reviewed it.
Start with the form and email routing, then add these as your enrollment volume grows.
Keep Student Data Secure
Enrollment forms hold sensitive details about children and their uploaded documents, so protect them. Fluent Forms is self-hosted, which means every submission stays in your own WordPress database rather than on a third party’s servers.
On top of that, turn on the role manager under Global Settings > Permissions so only chosen staff can view entries, keep an SSL certificate active so data is encrypted in transit, and keep WordPress, your theme, and your plugins updated. If rules like FERPA or GDPR apply to your school, confirm your setup with a compliance professional.
Publish Your Enrollment Form
Your form is ready to go live. Send a few test submissions to ensure every setup is working right. Once you verify the fields, conditions, and notifications are working properly, publish your application form.
- Gutenberg block: edit any page, add the Fluent Forms block, and pick your enrollment form.
- Shortcode: copy the form’s shortcode from the editor and paste it into any page, post, or widget.
- Dedicated page: create an “Enroll” or “Admissions” page, embed the form, and link it from your main menu.
A dedicated page is the strongest choice, since it gives parents an obvious place to go. Preview it on desktop and mobile, since most parents will fill it out on a phone, then publish.
Frequently Asked Questions
Can I build a school enrollment form without any coding?
Yes. The whole form is drag-and-drop. You plan your fields, drop them in place, set which ones are required, and publish, with no code at any step.
Can parents upload documents like birth certificates?
Yes. Add a file upload field for each document and set the allowed file types and size limits. Uploads are stored with the entry. The File Upload field is a Pro feature.
Do I need the Pro version to collect an enrollment fee?
No. You can collect the fee for free with Stripe, though Fluent Forms keeps a 1.9% fee per transaction on the free plan. Pro removes that fee and unlocks PayPal and the other gateways.
Can I take tuition in installments?
Yes, with the Subscription field, which is free. Set a billing interval and cap the number of payments, for example, 10 monthly charges across a school year, and offer a “pay in full” option alongside it.
Can I send each application to a different staff member?
Yes. Conditional email routing (Pro) sends each enrollment to the coordinator for that program, based on which program the student chose, so the right person reviews every application.
Is student data safe in Fluent Forms?
Fluent Forms is self-hosted, so submissions stay in your own WordPress database. Restrict who can view entries with the role manager, keep SSL on, and keep your site updated. For rules like FERPA, confirm your setup with a compliance professional.
Enjoying this article?
We regularly publish actionable content on our blog. Subscribe to get them delivered straight to your inbox.
We won’t spam you. You can unsubscribe whenever you want.
Start Building Your Enrollment Form
Building a school enrollment form takes a few steps: plan your student and guardian fields, group them into steps, add conditional logic and a payment field, then set up notifications, storage, and security.
You can build the whole system in Fluent Forms, most of it on free fields, and add Pro features like multi-step layout and document uploads when you’re ready. The quickest start is the school enrolment template, and the free version of Fluent Forms is enough to build and publish your first form today.
Fluent Forms is the smartest form builder for WordPress. See how educators are benefiting from Fluent Forms.

Sarika writes for Fluent Forms and loves to offer insights into small businesses. She’s curious and enjoys discussing ideas, interests, and perspectives. In her free time, she’s either marvelling at architectural beauties or trying different cuisines.




Leave a Reply