

Fluent Forms Contact and Lead Capture Fields: A Complete Guide

A contact form with just a Name and Email field doesn’t tell you why they’re there, what they need, or whether they’re worth a follow-up call.
Fluent Forms offers a full set of lead capture fields built for both jobs: collecting contact details and qualifying the lead behind them. I’ll go through every one of them, what it does, its settings, and which field to reach for depending on the question you’re actually asking.
TL;DR
- Fluent Forms has dedicated fields for contact info (name, email, phone, address, website, country) and separate fields and features built for qualifying, scheduling, and tracking a lead.
- Most contact fields are free except Phone/Mobile and Rich Text Input. Accordion Fields and Form Step Fields (to organize long lead forms) also need Fluent Forms Pro.
- Four fields handle “pick from a list.” Radio and Dropdown fields allow single selection, whereas Checkbox and Multiple Choice Fields allow multiple selections.
- Numeric and Time & Date fields turn “how many” and “when” questions into structured and consistent data.
- A Hidden field can capture where a lead came from, a UTM parameter, a referral source, straight from the URL, with no extra plugin.
- Conditional Logic, Multi-step Forms, Conversational Forms, and Save and Resume all help a longer lead form feel manageable without cutting questions.
Why Field Choice Matters for Contact and Lead Capture Forms
The wrong field costs you in one of two ways. A free-text box gives you inconsistent entries (“marketing”, “Marketing dept”, “MD”) that are hard to filter or route. An unnecessarily demanding field (a full mailing address when you only need a country) gives users a reason to abandon the form.
The fields below are grouped by the job they do: identifying who someone is, qualifying what they want, tracking where they came from, and getting consent. Once you know which group a question belongs to, the specific field is usually obvious.
Settings You’ll See on Almost Every Field
A handful of settings appear on nearly every field in this guide. I’ll define them once here and skip re-explaining them per field, mentioning them again only when they do something different for a field.
Basic settings on most fields
- Element Label: the field’s visible title, shown to the visitor.
- Label Placement: where the label sits relative to the input, Top, Left, Right, Default, or Hidden.
- Admin Field Label: a second label only you see when reviewing entries, handy when the visitor-facing wording is friendlier than what you want in your own records.
- Placeholder: sample text shown inside the field before anyone types.
- Required: whether the field must be filled in to submit the form.
Advanced options on most fields
- Default Value: pre-fills the field, using a fixed value, a shortcode, or, on some fields, a URL parameter. Users can edit this value.
- Container Class: a custom CSS class for styling a field with your own theme. It targets the outer wrapper block holding the label and the field.
- Element Class: a custom CSS class on the input itself, one level more specific than Container Class.
- Help Message: short guidance text shown near the field, separate from the label, useful for a quick clarifying note (“We’ll use this to confirm your appointment”) without cluttering the label.
- Name Attribute: the field’s HTML name attribute, used internally. You’ll rarely touch it, except when pairing a Hidden field with a URL parameter (more on that below).
- Help Message: short guidance text shown near the field, separate from the label.
- Conditional Logic: rules that show or hide the field based on how someone answered an earlier question.
Core Contact Information Fields
These are the fields most forms start with. They tell you who filled out the form and how to reach them.
Name fields
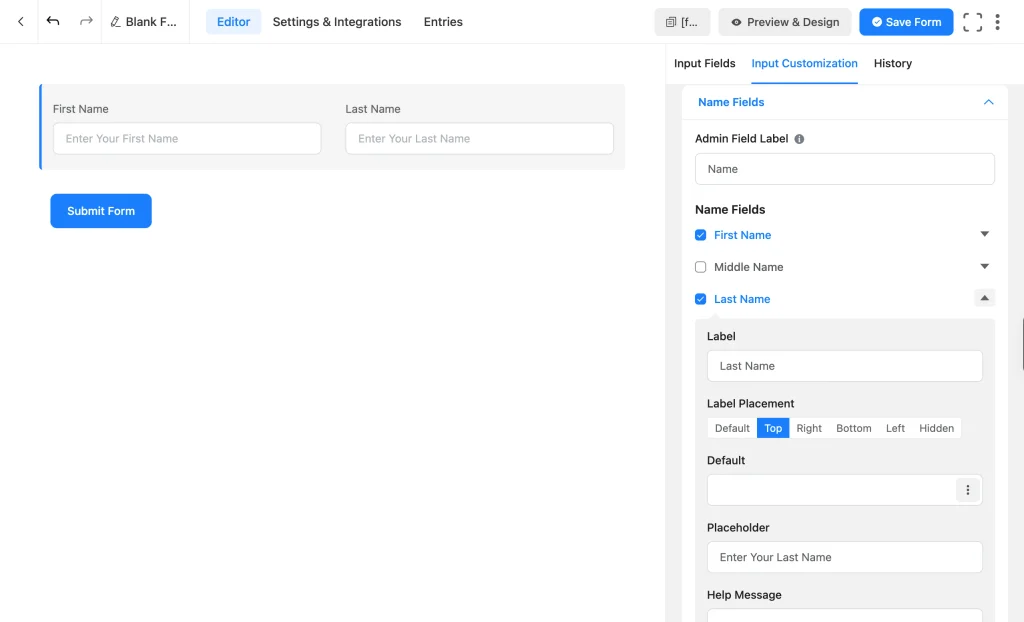
The Name field (free) splits into First Name, Middle Name, and Last Name subfields, and you can turn each one on or off independently. Most contact and lead forms only need First and Last. Middle names are added when there’s a specific reason (a legal or medical intake form, for instance).
Each subfield can be individually labeled, placed, and made required, so you can ask for a full name or just a first name depending on how personal the form should feel.
- First Name, Middle Name, Last Name: each is its own subfield with its own copy of the basic settings above (Label, Label Placement, Default Value, Placeholder, Help Message, Required). Each can be turned on or off independently.
- Advanced Options: Container Class, Name Attribute, and Conditional Logic.
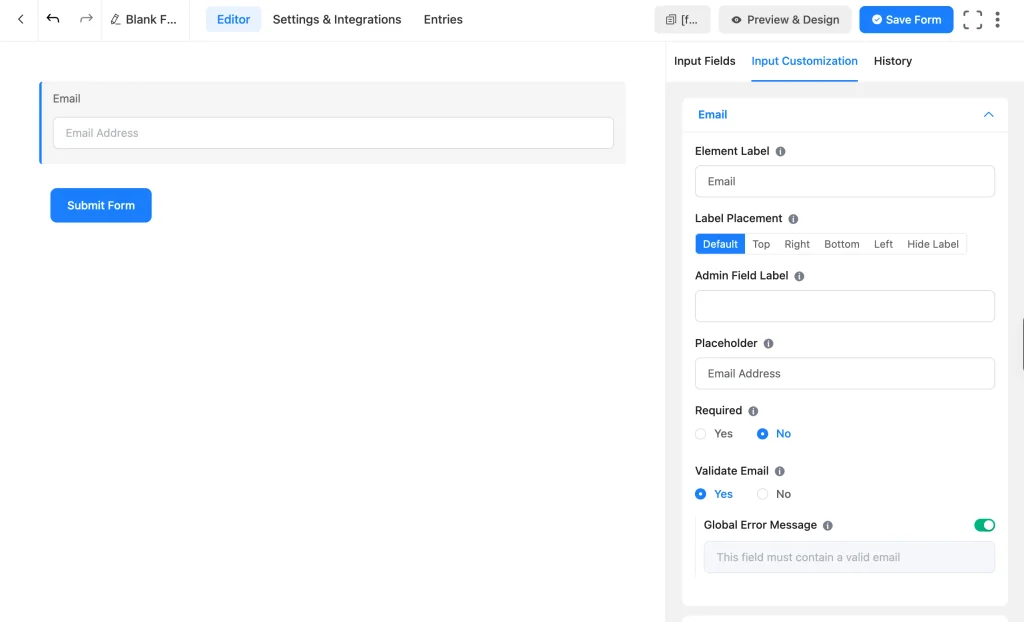
Email field (free) comes with built-in format validation. It also has a unique entry validation (within advanced options) that you can turn on to block a second submission from the same address, useful for a one-entry-per-person form like a giveaway or a gated download.
- Validate Email: checks that whatever’s typed matches a properly formatted email address before the form submits.
- Prefix Label / Suffix Label: short text shown directly before or after the input, useful for a hint.
Phone/Mobile
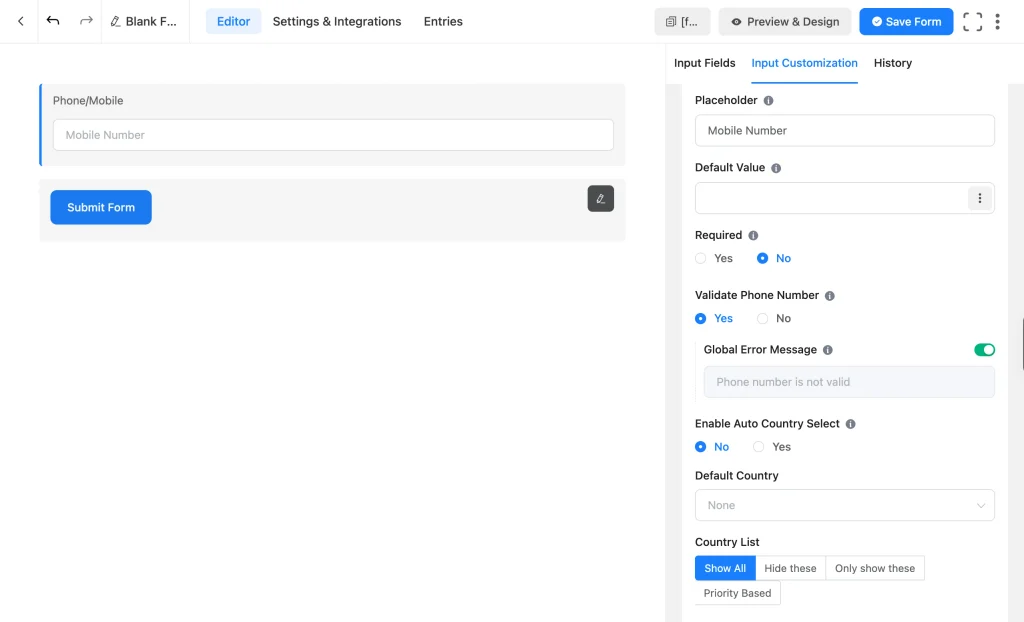
Phone/Mobile field requires Fluent Forms Pro. It’s worth the upgrade specifically for sales-qualified leads, where a callback closes faster than an email reply.
The field validates the number against the selected country’s format and can auto-detect a visitor’s country from their IP address, so international leads don’t have to look for a country code.
- Validate Phone Number: checks the entry against the selected country’s number format.
- Global Error Message: the message shown when that validation fails.
- Enable Auto Country Select: guesses the visitor’s country from their IP address and preselects it.
- Default Country: the country that’s displayed by default when auto-select is off.
- Country List display mode: controls which countries appear in the list, Show all, Hide these, Only show these, or Priority based (pins specific countries to the top).
Website URL
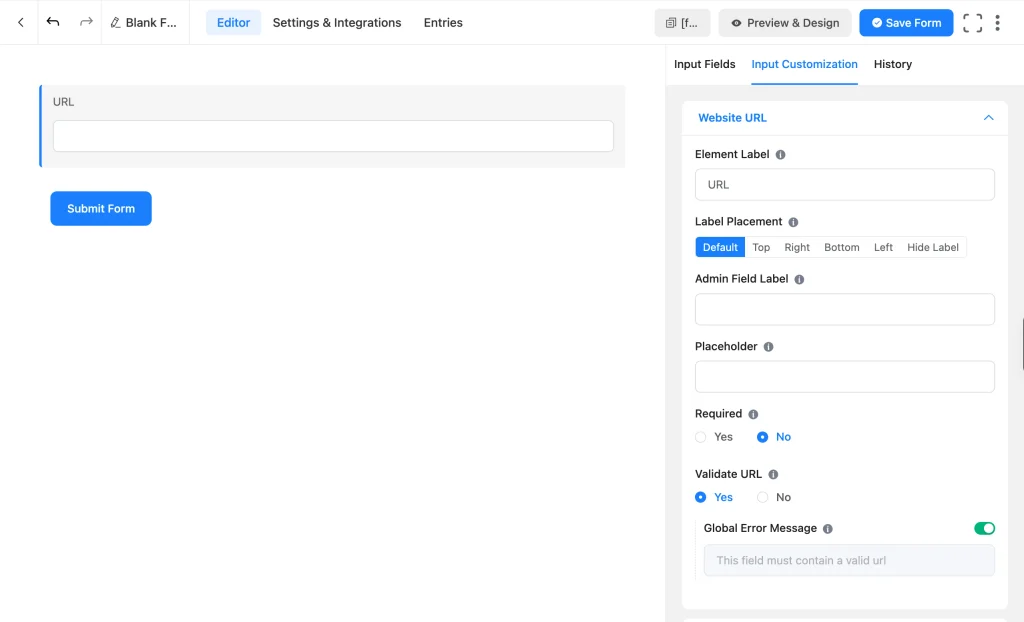
Website URL (free) validates that the typed input is actually a URL. It’s worth adding to a B2B lead form (you want their company site) or an agency intake form (you want to see their current site before you quote the work).
Website URL includes the shared basic and advanced settings above, plus the validation, prefix, and suffix labels.
Address fields
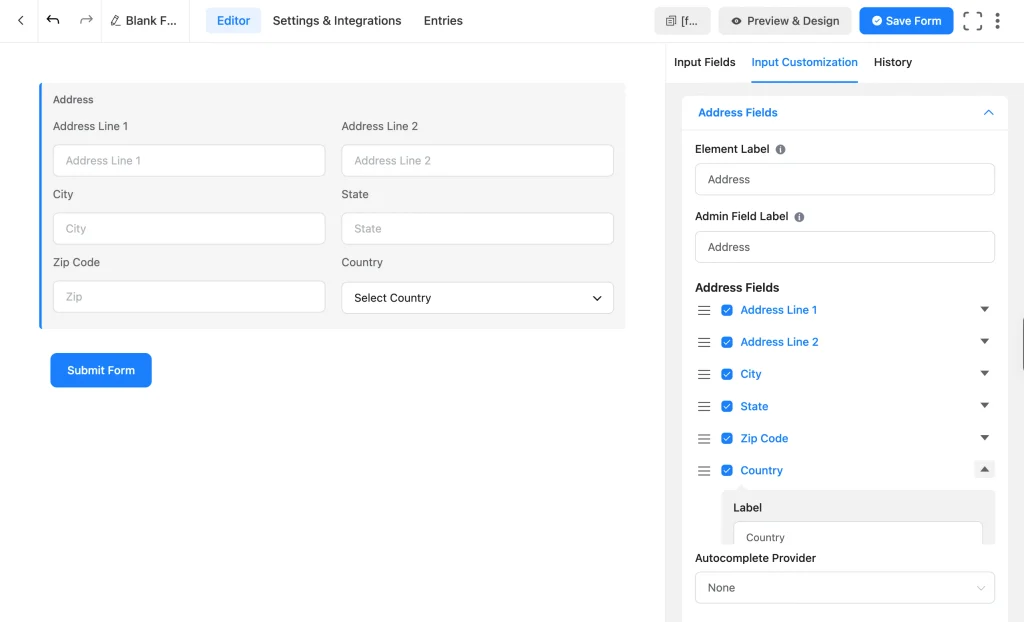
Address breaks into up to six subfields, street, city, state, ZIP, and country among them, and each one can be toggled on or off independently. Most lead capture forms don’t need a full mailing address, just a rough location, so turn off whatever you don’t need.
If you do need a real mailing address (a shipping quote, an in-person event), Fluent Forms can autocomplete it and drop a map pin using its Google Maps integration, which is configured separately from the field’s own settings.
- Subfields (Street Address/Address Line 1, Address Line 2, City, State, ZIP/Postal Code, Country): each one can be turned on or off independently, with its own Label, Placeholder, Default Value, Help Message, and Required toggle, so you only ask for what you actually need.
- Autocomplete: a separate integration that fills in the address as someone types and can drop a map pin, configured outside this field’s own settings panel.
Address Fields are free. Google Maps (autocomplete) is a Pro integration.
Country list
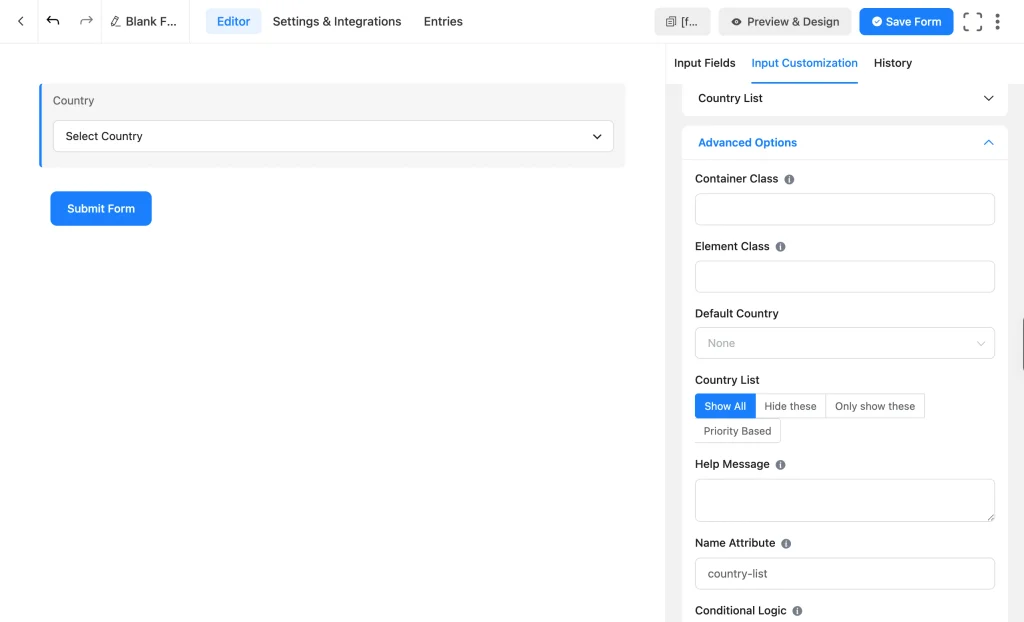
Country List (free) is a standalone field, not part of Address, for when you want to know where someone is without asking for a full address. It’s the better choice for a webinar signup, a shipping-eligibility check, or any lead form where region matters but a street address doesn’t.
- Enable Searchable Smart Options: lets visitors type to filter the list instead of scrolling through every country.
- Default Country: which country is preselected.
- Country List display mode: Show all, Hide these, Only show these, or Priority based, the same options as Phone/Mobile’s country list above.
- Global Error Message: the message shown if the field is required and left blank.
Plus the shared basic and advanced settings above.
Selection Fields for Qualifying Leads
Once you know who someone is, the next question is what they actually want. Fluent Forms has four fields that all handle “pick from a list”: Radio, Checkbox, Dropdown, and Multiple Choice. Each serves a specific purpose.
Radio field
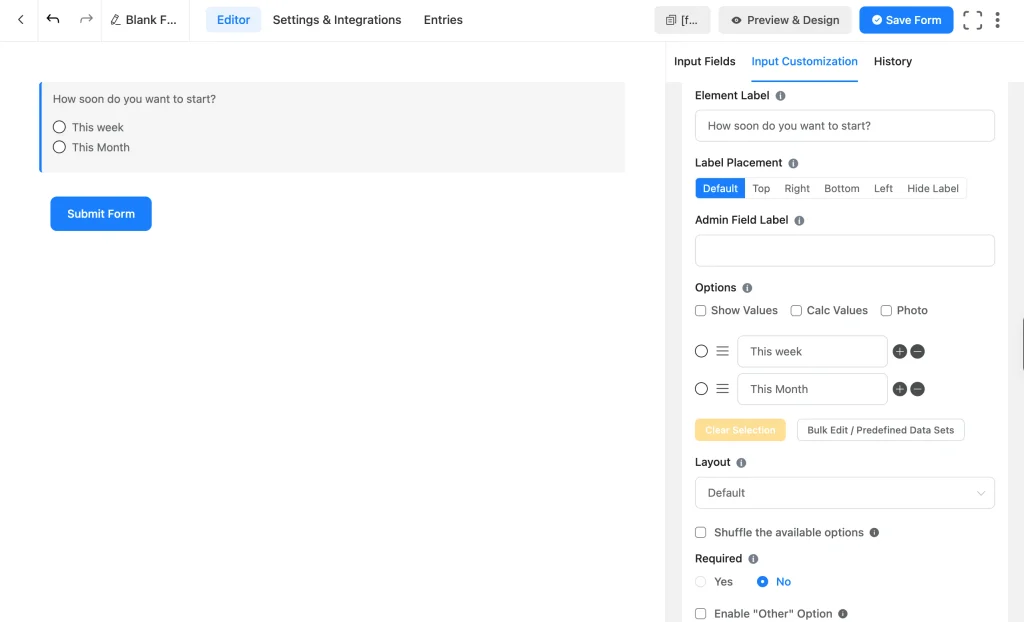
Radio (free) is for a single answer from a short list, shown fully on the page so a visitor sees every option at once without an extra click. It allows users to pick one option. Use Radio Field when your option list is short (five or six) so that it doesn’t clutter the form.
Example: “How soon do you want to start?” with options like This week, This month, and Just researching.
- Options: add, remove, and reorder the choices, and optionally, set one as the default (by selecting one in the option setup menu).
- Show Value: enter a separate backend value per option that’s different from the visible label.
- Calc Value: attaches a hidden number to each option, useful for lead scoring or calculations without changing what the visitor sees.
- Photo option: adds images to the options for a visual reference.
- Layout: arranges the options in 1 (default), 2, 3, 4, or 5 columns, inline, or in a button style.
- Shuffle: randomizes the option order on each reload.
- Enable “Other” Option (Pro): adds an inline text box that appears automatically the moment someone picks Other, so you don’t need a separate Simple Text field plus a Conditional Logic rule to catch answers you didn’t list.
- Bulk Edit / Predefined Data Sets: loads a ready-made list of options (see the bonus section below) instead of adding them one at a time.
Plus the shared basic and advanced settings above.
Checkbox field
Checkbox Field (free) is Radio’s multi-select counterpart: several options, all visible, and a visitor can pick more than one. Use it whenever more than one answer can be true, and the list is still short enough to show in full.
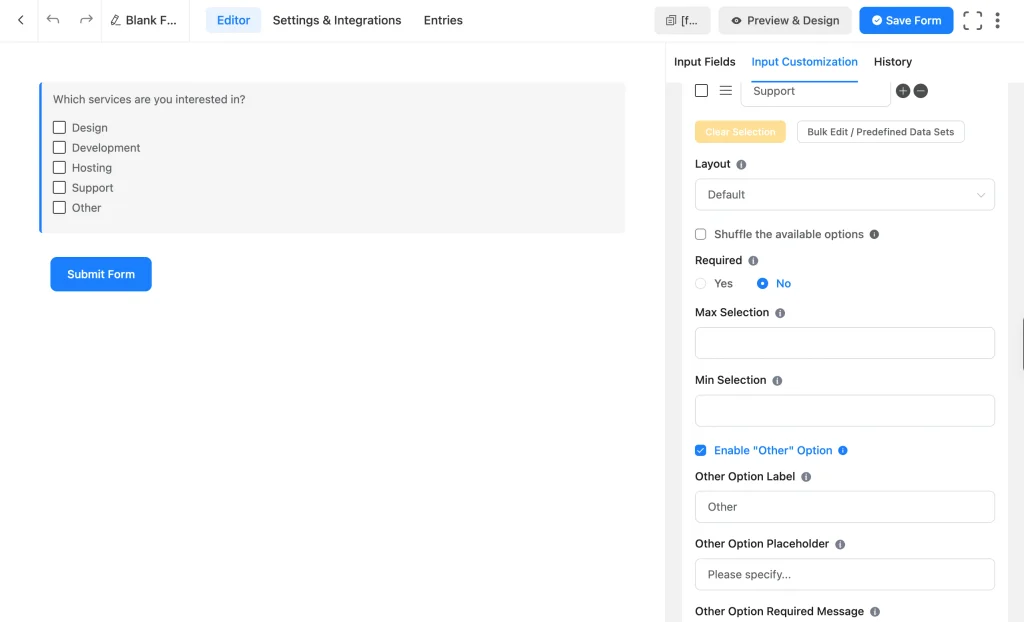
Example: “Which services are you interested in?” with options like Design, Development, Hosting, and Support, where a lead might want two or three of them at once.
- Same settings as Radio: Options, Show & Calc Value, Photo option, Layout, Shuffle, Enable “Other” Option (Pro), and Bulk Edit / Predefined Data Sets, all working the same way, just with more than one answer allowed.
- Selection cap: Set a minimum and maximum selection limit, so users can’t select below or above that.
Plus the shared basic and advanced settings above.
Dropdown field
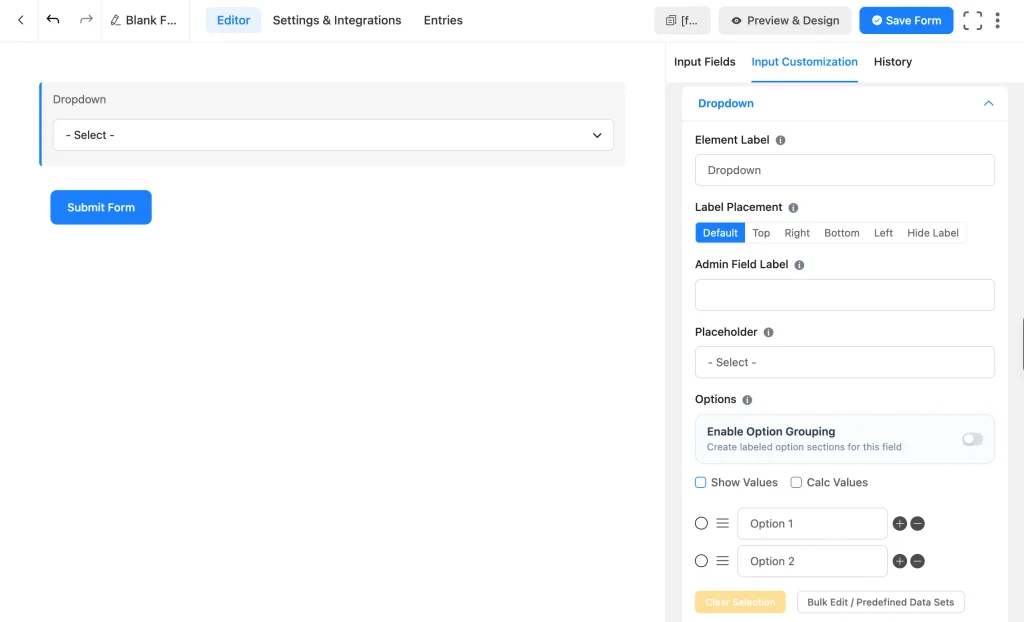
Dropdown (free) is a single-answer field, like Radio, but the options stay collapsed behind a menu instead of displaying on the page. Reach for it once a list gets past five or six items, or whenever the options have a natural order (job levels, company size ranges), so the form doesn’t look cluttered.
Example: “Company size” with a long, ordered list from 1 to 10 employees up through 1,000+.
- Options: the same add, reorder, default, and show-values controls as Radio.
- Show & Calc Value: the same hidden backend value and numeric value per option as Radio.
- Bulk Edit / Predefined Data Sets: loads a ready-made list instead of typing each option (see the bonus section below).
- Shuffle Options: randomizes the order of the list.
- Searchable Smart Options: lets visitors type to filter a long list instead of scrolling.
- Option Grouping: adds category headings that split a long list into labeled sections.
- No built-in “Other” option: unlike Radio and Checkbox, Dropdown won’t reveal a text box automatically. If you need that fallback here, it’s back to a separate Simple Text field shown by Conditional Logic when Other is selected.
Plus the shared basic and advanced settings above.
Multiple choice field
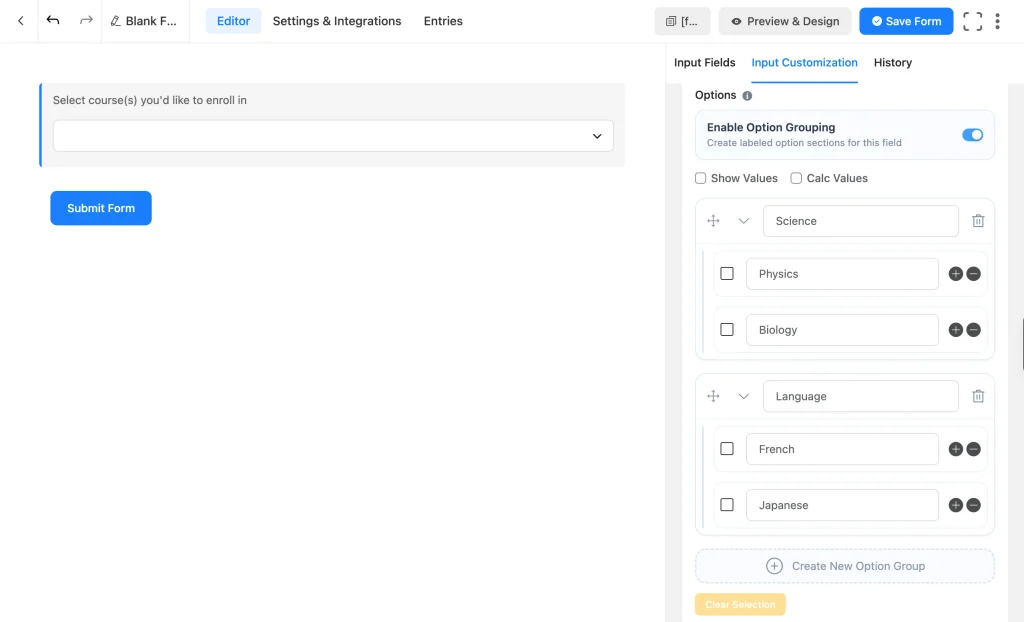
Multiple Choice (free) is the fourth combination: several answers allowed, but collapsed behind a menu like a Dropdown rather than spread across the page like a Checkbox. Go for it when you want multi-select but keep a long list from taking over the page.
Example: “Which product lines are you currently using?” pulled from a list of ten or more, capped at three selections.
- Options, Option Grouping, Show & Calc Value, Bulk Edit / Predefined Data Sets, Shuffle: the same as Dropdown, just with multiple answers allowed.
- Min and Max Selection: caps how many options a visitor can pick, like the Checkbox.
- No built-in “Other” option: same limitation as Dropdown, as it’s a collapsed-menu field.
Plus the shared basic and advanced settings above.
Which selection field fits your question
Here’s the same logic as a quick reference, with a few more question types you’ll actually run into on a lead form.
| What you’re asking | Best field | Example |
| One answer, from a visible/displayed short list | Radio | “How often would you need this service?” (Weekly / Monthly / One-time) |
| One answer, long or ordered list hidden behind a menu | Dropdown | “Which department are you contacting?” or “Highest level of education” (High school / Bachelor’s / Master’s / PhD) |
| One answer, exclusive ranges | Dropdown (or Radio if the list is short) | “Monthly marketing budget” ($0-1k / $1k-5k / $5k-20k / $20k+) |
| Multiple answers, short list, all visible | Checkbox | “Which services do you need?” (Design / Development / Hosting) |
| Multiple answers, long list | Multiple Choice | “Which product lines do you use?” (from a list of 10+) |
Two patterns to watch for on your forms: a range question (“budget,” “team size,” “years in business”) is always exclusive, so it belongs in Radio or Dropdown, never Checkbox. And a free-text job title field is fine when titles vary too much to list (“Head of Growth,” “Founder,” “VP, Ops”), but switch to Dropdown once you’re really asking about a role tier (Individual Contributor, Manager, Director, Executive) rather than the literal title.
One more thing worth weighing when you’re stuck between a fixed list and free text: Radio and Checkbox can catch the answers you didn’t anticipate through their built-in “Other” option. Use it when you expect a lot of “other” answers on a selection question.
Add options in bulk instead of typing them one by one
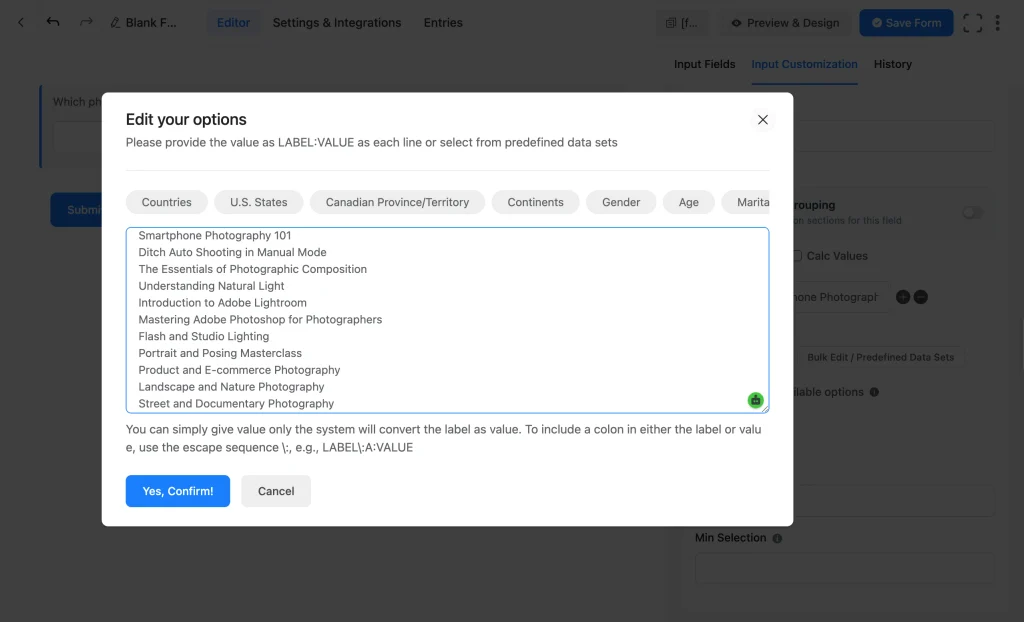
Radio, Checkbox, Dropdown, and Multiple Choice all share the same Options panel, and that panel has a Bulk Edit / Predefined Data Sets option (free) so you don’t have to add a long list one entry at a time.
Simply load a ready-made set (Fluent Forms gives US & Canadian states, ranges, days, etc. as examples). You can also paste in your own list at once (in a single column, one option below another).
Numeric and Time & Date Fields for Lead Details
Numeric field
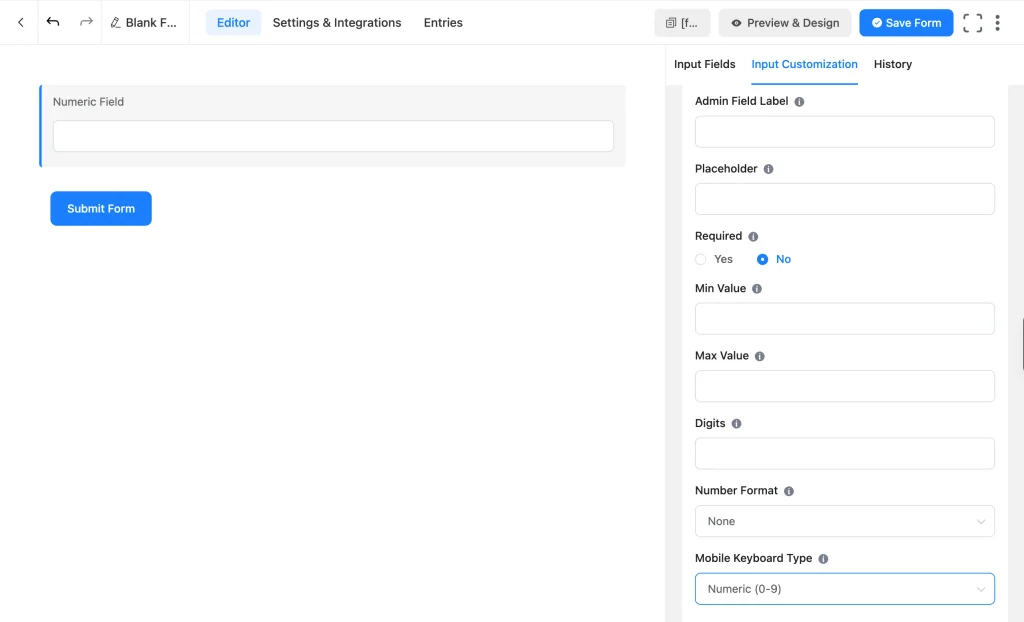
Numeric Field (free) only accepts numbers, which makes it the right choice whenever you need an exact figure instead of a bucketed range: team size, employee count, quantity requested, or a specific budget amount rather than a range like $5k-20k.
A Simple Text field would accept “about 50” or “fifty-ish” just as easily as “50,” which is an inconsistent data format. Numeric Field forces a real number, so every entry is comparable and you can easily analyze the data.
- Min Value / Max Value: sets the lowest and highest number the field will accept, each with its own error message.
- Digits: caps how many digits someone can enter, useful for keeping answers realistic.
- Numeric Format: switches the decimal and thousands separator style (EU or US, with or without decimal), so the field matches how your audience writes numbers.
- Step: sets the increment the value moves by, 1 for whole numbers or 0.01 for currency-style decimals.
- Prefix Label / Suffix Label: text shown directly before or after the input, useful for a currency symbol or a unit like “employees.”
- Mobile Keyboard Type: shows visitors on mobile a Numeric and Decimal keypad instead of a full keyboard.
- Calculation Field Settings (Pro): Enables calculation. You create a formula in the field with other fields’ answers and math operators. If enabled, the field shows the calculated result on the frontend.
Plus the shared basic and advanced settings above.
Time & date field
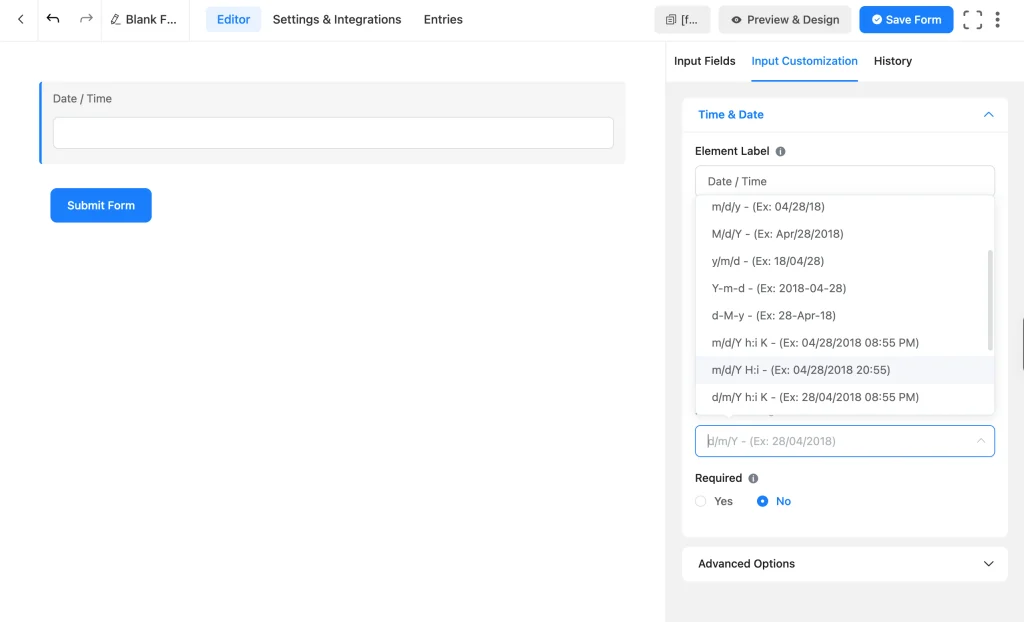
Time & Date Field (free) covers scheduling-related questions: a callback request, a demo booking, or a preferred contact window. It can capture a date, a time, or both from the same field.
Ask for a date alone when only the day matters, “what date works for a site visit?” Ask for time alone when the day is already fixed, “what time should we call you back today?” Turn on both when you’re booking something specific, like a demo slot that needs a day and a time together.
- Date & Time Format: picks how the date, time, or both are displayed from a dropdown of standard formats.
- 24 Hour Time: switches the time picker between 12-hour and 24-hour displays.
- Form Scheduling: This is a related setting in Settings & Integrations > Settings > Scheduling & Restrictions. Defines which days of the week the form stays live and limits the submission start and end times. You can use it even without the Date/Time field.
Plus the shared basic and advanced settings above.
Open-Ended Fields for Context
Some answers are genuinely open-ended: a job title, a project description, or a message. Two fields cover that.
Simple text
Simple Text (free) accepts a single line. It’s best for anything short that doesn’t fit a fixed list: a job title, a company name, or a referral code.
Simple Text adds prefix and suffix labels, a maximum text length limit, and unique field validation (one answer can be entered once), along with the common basic and advanced settings above.
If you want it to catch “Other” responses from a Radio or Checkbox question, turn on that field’s own Enable “Other” Option setting instead (see above). That gives you the same text box without the extra field or Conditional Logic rule.
Text area
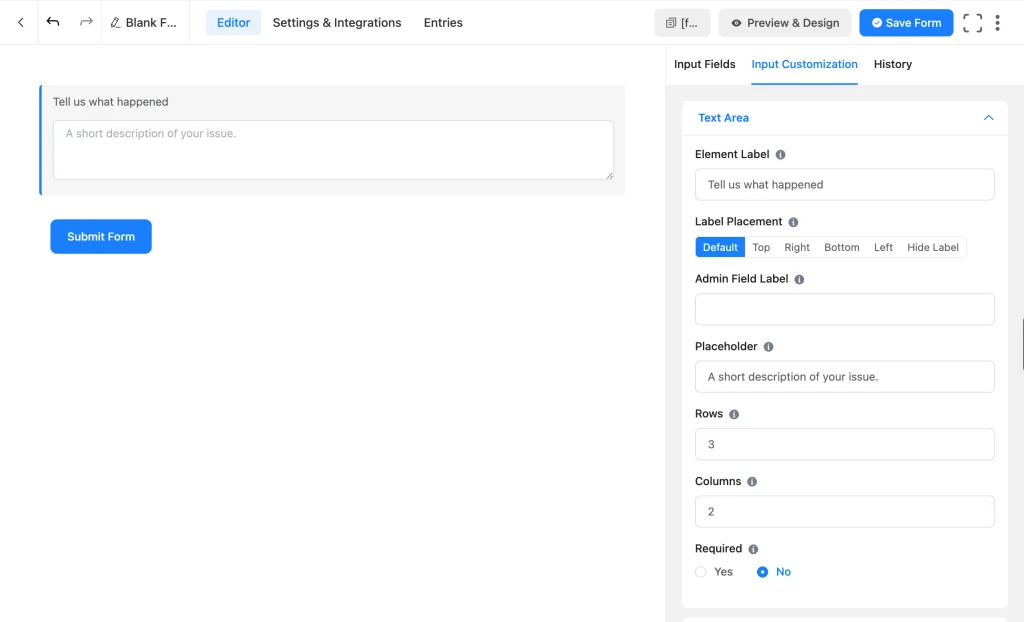
Text Area (free) is Simple Text’s multi-line counterpart, built for a message, a project brief, or a “tell us what you need” field.
- Character Limit: Caps how many characters someone can type; useful for keeping responses skimmable in your entries table.
- Prefix and Suffix Labels: Show a fixed text/symbol/emoji/unit at the start or end of the actual input.
Plus the shared basic and advanced settings above.
Rich Text Input
Rich Text (Pro) is a formatted version of Text Area: a visitor can bold, italicize, underline, or link text instead of typing plain sentences. It’s worth the upgrade only when formatting genuinely helps, like a detailed project brief someone wants to structure with a list or a link, not a regular message field.
- Rows / Columns, Max Length: the same size and length controls as Text Area, plus the formatting toolbar itself.
Plus the shared basic and advanced settings above.
Tracking Where a Lead Came From
This helps track which ad, email, or landing page actually worked, so you can optimize your marketing budget.
Hidden field
Hidden Field (free) stores a value without showing it to the visitor at all, which makes it the right tool for attribution data: a UTM parameter, a referring page, a campaign name, anything you want attached to the submission without adding a field the visitor has to see or fill in.
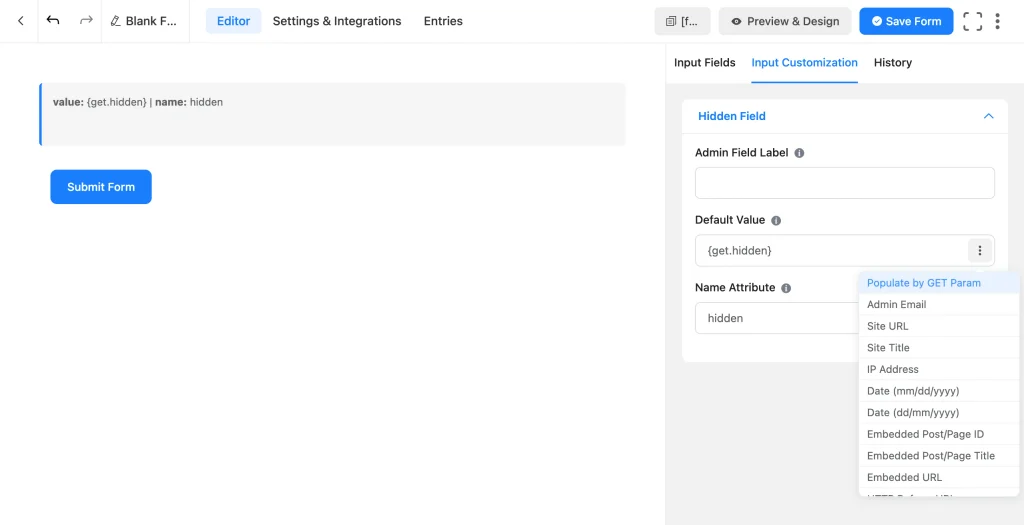
The mechanism that makes this work without a third-party plugin is Fluent Forms’ own Populate by GET Param option. Set the Hidden field’s Name Attribute to match a URL parameter (say, utm_source), then set its Default Value using the three-dot menu next to that setting and choose Populate by GET Param. Whatever value shows up in that parameter when someone lands on the page (yoursite.com/contact/?utm_source=newsletter) gets pulled into the field automatically at submission.
Add one Hidden field per parameter you want to track, utm_source, utm_medium, utm_campaign, and every submission in your entries table carries its own source data.
- Default Value: can be a fixed value, a shortcode, or, through the three-dot menu, Populate by GET Param, which pulls in a URL query parameter automatically.
- Name Attribute: matters more here than in any other field. Set it to match the URL parameter you want to capture, e.g. utm_source.
- Admin Field Label: a label for your own reference, since visitors never see this field at all.
You can hide any other field in Fluent Forms by typing ff-hidden in the field’s Container Class. Useful for hiding calculation steps/fields from users.
Consent and Compliance Fields
Terms & conditions
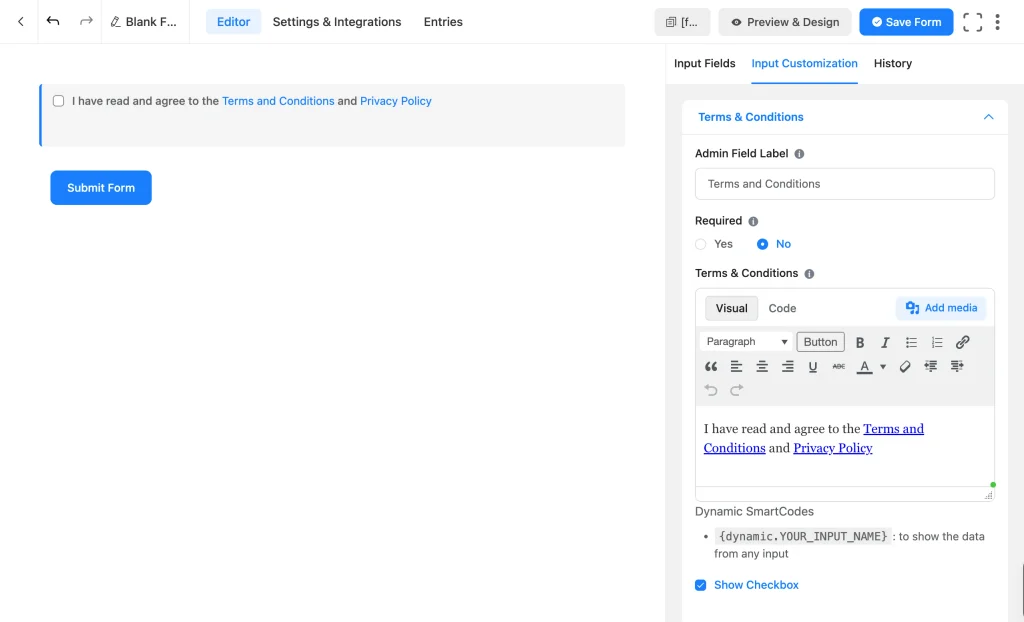
Terms & Conditions (free) is the general-purpose consent checkbox: agree to the terms of service, agree to be contacted, agree to any legal or marketing language you write into it. The agreement text accepts HTML (visually editable, no code needed), so you can format it and link out to a full terms page, and you can toggle the checkbox itself on or off if you just want the text to display without requiring a click.
- Terms & Conditions text: the agreement wording itself, accepts HTML formatting and Fluent Forms’ own dynamic smartcodes (user input value from other field).
- Show Checkbox: turn it off if you just want the text to display without requiring a click, useful for a plain disclosure rather than active consent.
Plus Admin Field Label, Required, and the shared advanced settings (container and element class, name attribute, and conditional logic) above.
GDPR agreement
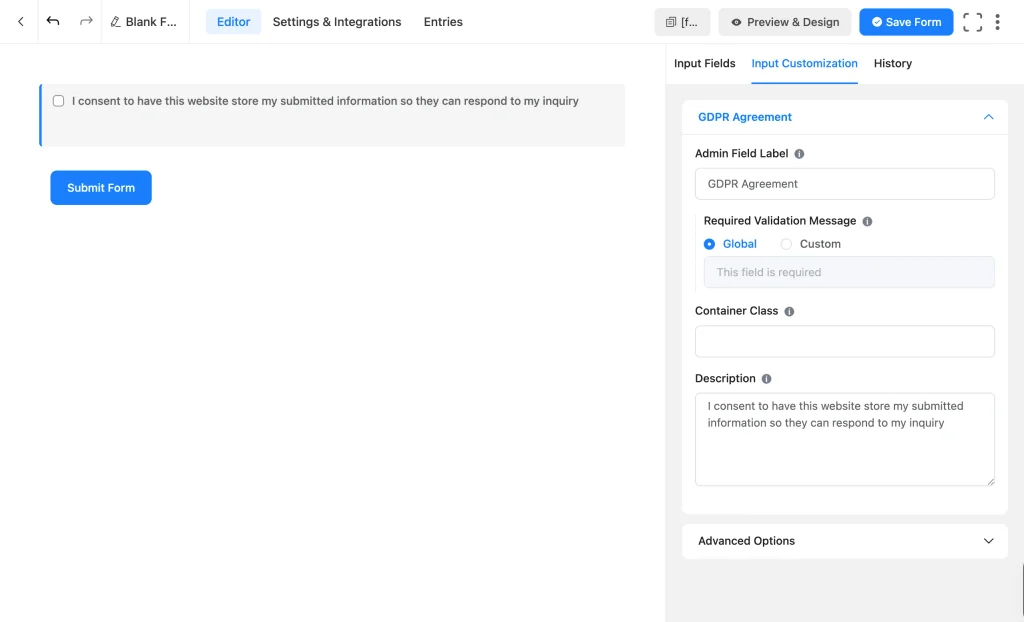
GDPR Agreement (free) is narrower on purpose: its Description field is meant specifically to explain how you’ll collect, store, and use someone’s data, which is the actual language GDPR requires for data-processing consent. If you have visitors from the EU or UK, add this alongside (not instead of) Terms & Conditions, since they’re consenting to different things.
- Description: the actual consent statement, meant to explain how you’ll collect, store, and use the visitor’s data.
- Required Validation Message: the message shown if someone tries to submit without checking the box.
Plus Admin Field Label, Container and Element class, Name Attribute, and Conditional Logic.
Spam and Security Protection
A lead capture form is a target for bots. Fluent Forms has several ways to filter that out. Some of them work as input fields.
| Field | How it works | Worth knowing |
| reCAPTCHA | Google’s bot-detection service. Checks traffic patterns to tell humans from bots | The most recognized option to visitors, but it loads a Google script and can flag privacy-conscious users for an extra challenge |
| hCaptcha | Same basic job as reCAPTCHA, run by a different, more privacy-focused provider | Good pick if you’d rather not route visitor data through Google |
| Turnstile | Cloudflare’s challenge. Usually passes visitors through with no visible puzzle at all. | Needs a free Cloudflare account for its site and secret keys |
| Honeypot | Not a standard field you add to the form, but rather an invisible field (to humans) that only a bot would fill in. So any submission that fills it gets blocked | No challenge for real visitors at all. It only catches bots, not a human spamming the form |
All four are free, and Honeypot plus one CAPTCHA-style option together cover spam better than either alone. Enable Honeypot under Global Settings → General → Miscellaneous, and add reCAPTCHA, hCaptcha, or Turnstile as a field, or set it to auto-load from the same Miscellaneous tab, after entering that provider’s keys under Global Settings → Security.
Organizing a Long Lead Form
A lead capture form covering contact info, qualification questions, and consent can get long fast. Two fields keep it readable without cutting anything.
Section break
Section Break (free) splits a long form into labeled, scannable groups, “Your Details,” “About Your Project,” “Consent”, so a visitor can see progress and structure instead of one uninterrupted list of fields.
Custom HTML
Custom HTML (free) lets you display formatted text or images anywhere in the form: a short trust-building line above the fields or a specific section, or dynamic text that pulls in an answer from an earlier field using Fluent Forms’ smartcodes. You can visually edit it without writing any HTML code.
Accordion
Accordion/Tab (requires Fluent Forms Pro) groups related fields into collapsible sections that expand one at a time, so a long lead form appears short and manageable, instead of one continuous scroll.
Start with a lead form template and publish in minutes.
Make Longer Lead Forms Easier to Complete
Some contact or lead capture forms need more fields, like a detailed service inquiry or an application-style intake form. The length stops being a problem if you present it well. These four features change how a long form feels.
Conditional logic
You’ve already seen Conditional Logic throughout this guide, it’s the setting that shows or hides a field based on an earlier answer, and it’s free on every field. It keeps someone from seeing a question that doesn’t apply to them.
A service inquiry form might only show “Which platform are you using?” when someone picks Technical Support and skip it for anyone asking about billing. The form looks shorter to each visitor than it actually is, because everyone only sees the fields that apply to them instead of the whole form.
Multi-step forms
Multi-step forms (Fluent Forms Pro) split one long form into separate screens, with a progress bar, numbered steps or tabs, and custom step titles, showing how far along someone is. Add the form step field once a form covers more than one distinct topic, so a visitor progresses one at a time instead.
A detailed service inquiry breaks naturally into three steps: contact details, project or service requirements, and budget and timeline. Each step reads like a short, focused form rather than one long one. It makes a long form easier to fill in one step at a time and can save the input data as users move to the next step.
Conversational forms
Conversational Forms (free) show one question at a time in a chat-like flow instead of a traditional field-by-field layout. It suits a shorter lead qualification form where you want the exchange to feel more like a conversation, a good fit for four or five qualifying questions rather than a full intake.
Where Multi-step groups several fields per step, Conversational Forms show exactly one field at a time, so it’s a better fit for a short, personal exchange than for a long, multi-topic form.
Save and resume
Save and Resume (Fluent Forms Pro) lets someone save a partially completed form and come back to it later using a link. It’s useful for a form that asks for information a visitor might not have on hand yet, a detailed project inquiry, a quote request, or an application-style intake.
Free vs Pro at a Glance
Fluent Forms comes as a free plugin and a paid Pro add-on. Pro is one feature set, its license tiers (Personal, Business, Agency, and so on) differ by how many sites you can use it on, not by which features you get. So “Pro” below means any Pro license, and “Free” means the free plugin on its own, with nothing extra to buy. The table covers both the fields and the form-building features from this guide.
| Field / Feature | Free | Pro |
| Name fields | Yes | Yes |
| Yes | Yes | |
| Phone/Mobile | No | Yes |
| Website URL | Yes | Yes |
| Address fields | Yes | Yes |
| Country list | Yes | Yes |
| Radio field | Yes | Yes |
| Checkbox field | Yes | Yes |
| Dropdown field | Yes | Yes |
| Multiple choice field | Yes | Yes |
| Numeric field | Yes | Yes |
| Time & date field | Yes | Yes |
| Simple text | Yes | Yes |
| Text area | Yes | Yes |
| Rich text field | No | Yes |
| Hidden field | Yes | Yes |
| Terms & conditions | Yes | Yes |
| GDPR agreement | Yes | Yes |
| reCAPTCHA, hCaptcha, Turnstile, Honeypot | Yes | Yes |
| Section break, Custom HTML | Yes | Yes |
| Accordion | No | Yes |
| Conditional Logic (field-level show/hide) | Yes | Yes |
| Conversational Forms | Yes | Yes |
| Multi-step Forms | No | Yes |
| Save and Resume | No | Yes |
Check the full breakdown if you want to compare every field Fluent Forms offers.
Frequently Asked Questions
Which Fluent Forms fields are actually free for a lead capture form?
Most of the contact fields are free, including Name, Email, Address, Website URL, Selection fields, Numeric, Time & Date, Simple Text, Textarea, both consent fields, and spam protection options. The Phone/Mobile field requires Fluent Forms Pro.
How do I let someone enter an answer that isn’t on my list?
If the question uses a Radio or Checkbox field, turn on its Enable “Other” option setting, and a text box appears automatically when someone picks it. Dropdown and Multiple Choice don’t have that built in, so you’d need a separate Simple Text field shown by Conditional Logic when the Other option is selected.
Do I need the Phone/Mobile field, or can I use Simple Text instead?
Simple Text or numeric works and costs nothing, but it won’t validate the number or handle international formats. Phone/Mobile (Pro) adds real validation and can auto-detect a visitor’s country.
What’s the actual difference between Terms & Conditions and GDPR Agreement?
Terms & Conditions is a general consent checkbox for the legal or marketing language you write. GDPR Agreement is specifically about explaining how you’ll collect, store, and use someone’s data, the language the GDPR itself requires. Use both if you have EU or UK visitors.
Can I track where a lead came from?
Yes. Add a Hidden field, set its Name Attribute to match a URL parameter like utm_source, and set its Default Value to Populate by GET Param. It fills in automatically from the landing page URL. Users don’t see this field.
Which spam protection should I actually use?
Honeypot costs nothing to enable and catches bots invisibly, so turn it on regardless. Add reCAPTCHA, hCaptcha, or Turnstile on top, picking whichever fits your comfort with Google’s tracking versus a Cloudflare account.
Should I ask for a full mailing address on a lead capture form?
Only if you genuinely need one, for shipping, an in-person event, or a service-area check. Otherwise, turn off the Address field’s unnecessary subfields, or swap in the standalone Country List field if region is all you actually need.
How do I stop the same person from submitting my form twice?
Turn on the Email field’s unique entry restriction, which blocks a second submission from an address that’s already in your entries. It’s a built-in option.
Start Capturing Better Leads Today
You don’t need all lead capture fields in this guide on one form. Start with Name, Email, and whichever selection field matches your qualifying questions about a lead. You can add more fields later if it helps the qualification process further.
Fluent Forms includes almost all of this in the free plugin. Phone/Mobile, Rich Text Input, Multi-step Forms, and Save and Resume are the only fields in this guide that need Fluent Forms Pro, so there’s nothing stopping you from building the form today. Start for free with Fluent Forms and build your first form in a few minutes.
Build Smarter Forms for Free

Sarika writes for Fluent Forms and loves to offer insights into small businesses. She’s curious and enjoys discussing ideas, interests, and perspectives. In her free time, she’s either marvelling at architectural beauties or trying different cuisines.




Leave a Reply