
How to Add a Request a Call Back Form to Your WordPress Site

Your products or services have hundreds of features. And you have thrice as many documentations/blog posts explaining how they work.
However, your prospects don’t always have the time to go through all those resources to find what they need. Even if they do, it’s not convenient. Of course, they can communicate their issue through your “Contact Us” form, but waiting for a response email can get frustrating.
Providing a direct way to contact you (like a phone number, email, or live chat) smooths this process for your users. However, your sales agents might not work 24/7. Hence, offering a backup solution (you calling them back at their convenience) is a standard practice.
That’s where a “Request a Call Back” form comes in. It’s a simple form on your website that allows your visitors to provide their contact information and preferred time for you to call them back. It makes them feel taken care of and keeps them from abandoning your site for your competitors’.
Win-win, right? Let’s move on to understanding the essential parts of a callback form and learn how to create one.
Key components of a “Request a Call Back” form
The first thing you should know about forms is that the shorter & less intrusive the forms are, the likelier your users are to fill them out. With that in mind, let’s see what a short and sweet callback form consists of.
Must-have elements of a callback form
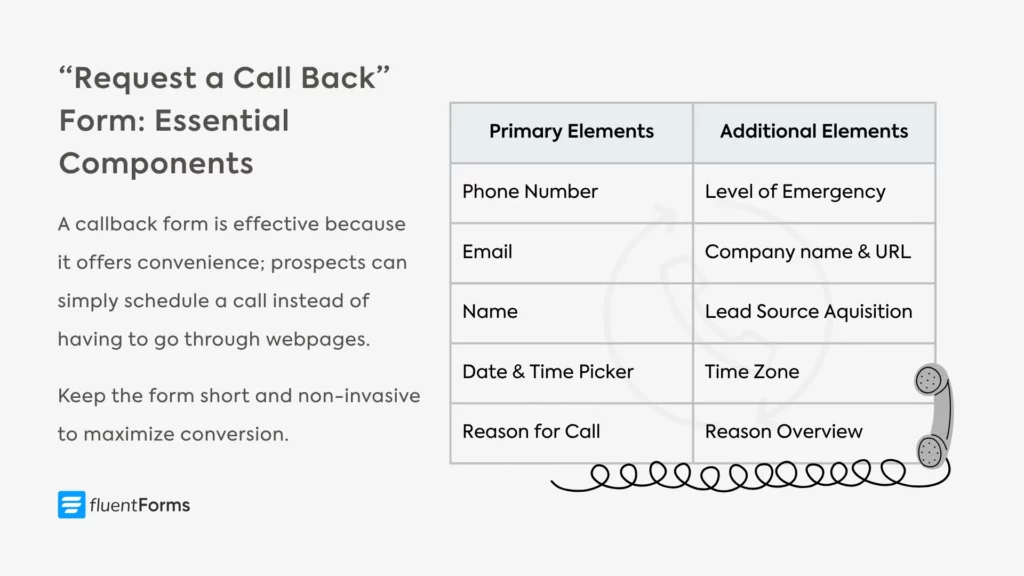
These are the primary elements of a “Request a Call Back” form. Regardless of your industry or company size, you need to add these fields to your callback form.
Phone/mobile number
Obvious, right? Without a contact number, you can’t call them back. So the single most important component of a callback form is the contact number field. In fact, you should make the phone/mobile field a must (add an asterisk), as any other information you receive through the form is pretty useless unless you can call them.
Email (back-up contact information)
Sometimes, users might miss your call. In that case, the best practice is to email them about rescheduling another call instead of repeatedly calling them. That’s why an email field is necessary as an alternative contact information.
However, some of your users might not be comfortable sharing multiple contact details. That’s why it’s best to keep the email field optional, so users can choose whether they want to provide this information.
Name
You need users’ names to greet them when they receive your call. It makes the call feel personalized and the communication smooth. However, this is not a required field.
Preferred date & time
This is the other important element of a callback form. You don’t want to bother your users by calling them at an inconvenient time. That might even cost you a sale. So the best practice is to let users pick when they want to schedule the call.
Every callback form should contain these three fields. But aside from these, several other fields can provide you with more insight into the prospect requesting a call.
Additional components of a callback form
You can add one or more of the following fields to your callback form based on your business requirements. They prove to be helpful in preparing you better for the call.
Reason for call
Pick the top two/three reasons (on a broader scale) why prospects contact you. Add a reason for the call section with those reasons as options. Add an “other” option for users with concerns outside the provided options.
This field is specifically helpful if your sales agents specialize in different issues. You can easily delegate each call to the respective expert.
Additional messages
Sometimes, your users might face a complex issue or a very unique problem. In that case, having some context beforehand might help you prepare a comprehensive solution tailored to that specific issue. It’ll help you sound more confident over the phone and provide users with a suitable solution.
Time zone
If you have a global audience, it’s best to include a time zone option. Without it, the scheduled time won’t make sense, because you don’t know the user’s time zone. Although you can find workarounds like area codes from phone numbers or the users’ IP addresses, it’s more accurate if users select the time zone themselves.
Level of emergency
If you get lots of callback requests every day, this field might help you sort the requests based on users’ emergency level. You can let them select their urgency level on a 3/5-point Likert scale, with options like highly urgent, very urgent, moderately urgent, etc.
Company name/URL
If you run a B2B business that offers tailored solutions for businesses, you might ask your leads about their business name or URL. This way, you can learn about their company size & client base and offer a solution that best matches their interest.
How did you hear about us
This field is completely optional, but it provides valuable insight into how your prospects are finding your business. Provide a few response options so users don’t have to type an answer. It helps you understand which of your marketing platforms are reaching your target audience the most. Moreover, you learn where a user takes advice from, which tells you a lot about their psychology that you can utilize in nurturing them.
Now that you have a solid knowledge of the essential components, plan an outline of your callback form. In the next step, we’ll learn how to easily create our “Request a Call Back” form.
How to add a “Request a Call Back” form in WordPress
Adding a callback form to your WordPress site is a breeze if you have Fluent Forms installed. If not, you can easily download the plugin from the plugin repository and upload, install, and activate it from your dashboard. Once you’re done, let’s move on to creating our “Request a Call Back” form.
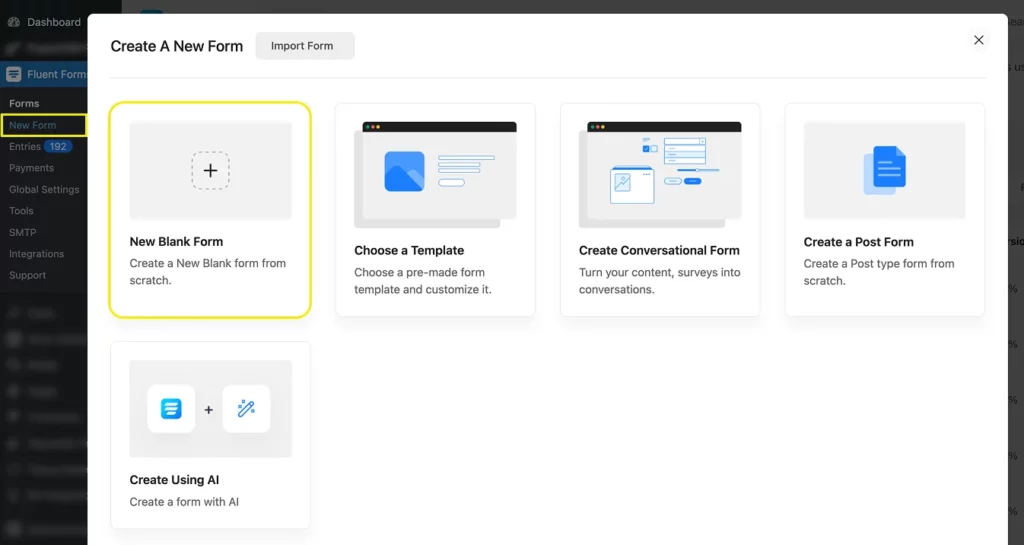
Navigate to New Form from Fluent Forms and click “New Blank Form” from the pop-up, since we’ll learn how to create a callback request form from scratch.
Next, we’ll drag & drop or click on the necessary input fields required for our callback form. The order doesn’t matter since you can drag the fields to reposition them anytime.
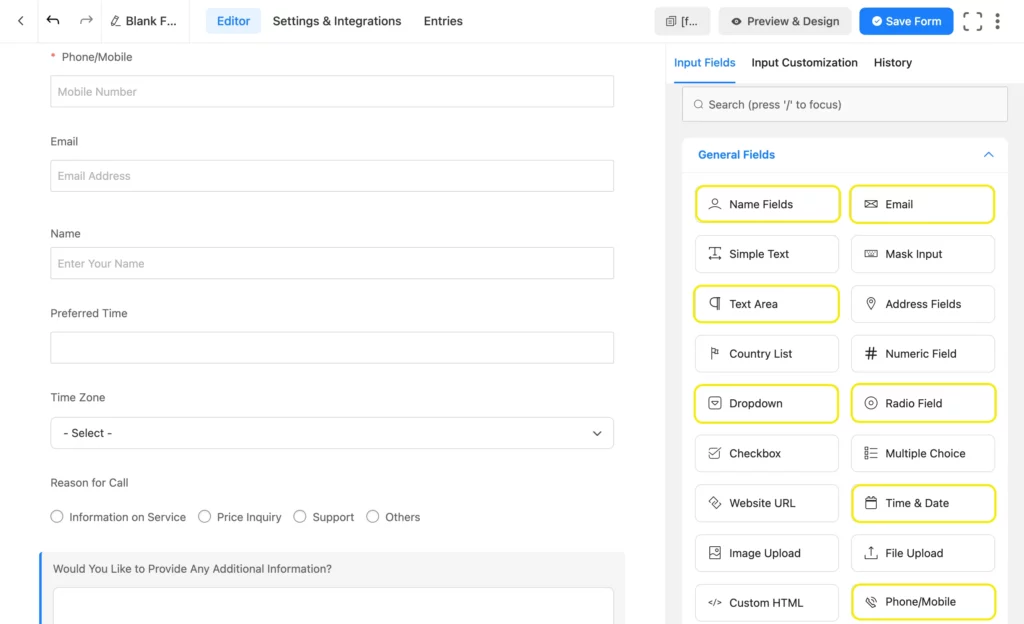
We’re taking the marked fields to create our callback form. You can add more fields if needed, like a website URL or a simple text field for company name, etc. You can easily navigate through the input fields to select one or simply search for it.
Once we’ve taken the necessary fields, it’s time to customize them. Click on a field to open its customization options. Common customization options include a field’s element label (the text on top of an input box) and placeholder (the text inside the input box).
However, there are other customization options to help you achieve more advanced results. Let’s take a look.
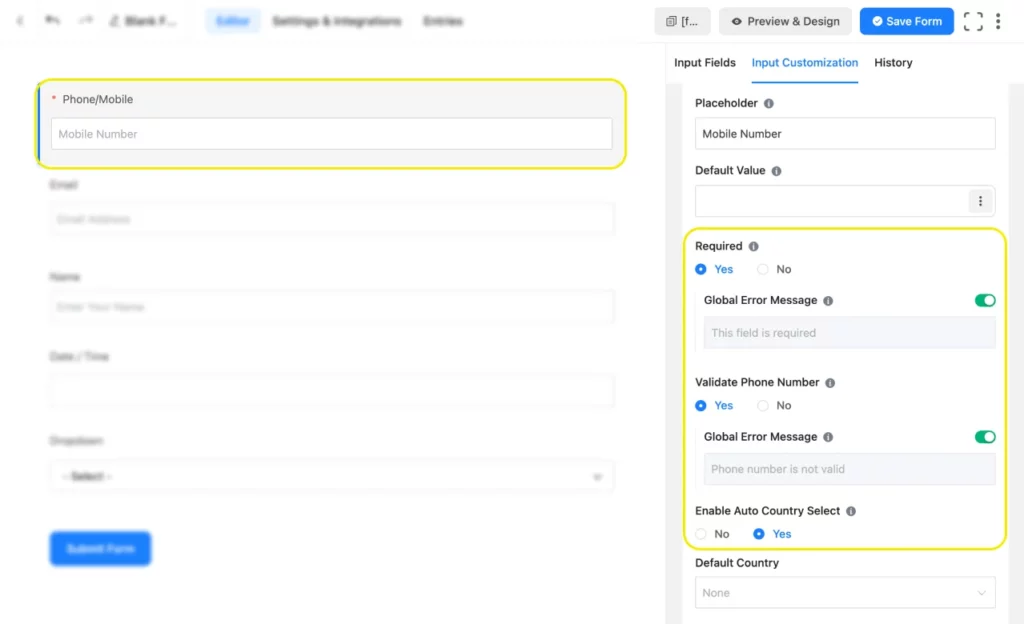
In the phone/mobile field, you’ll find options to mark the field as required (users can’t submit the form without a phone number), phone number validation (the digits match a phone number’s format), country selection (country to code), etc. Customize the options as required, and move to the next field.
In the email field, you’ll find the required and validation options as well. Set them as per your preference and move to the name fields.
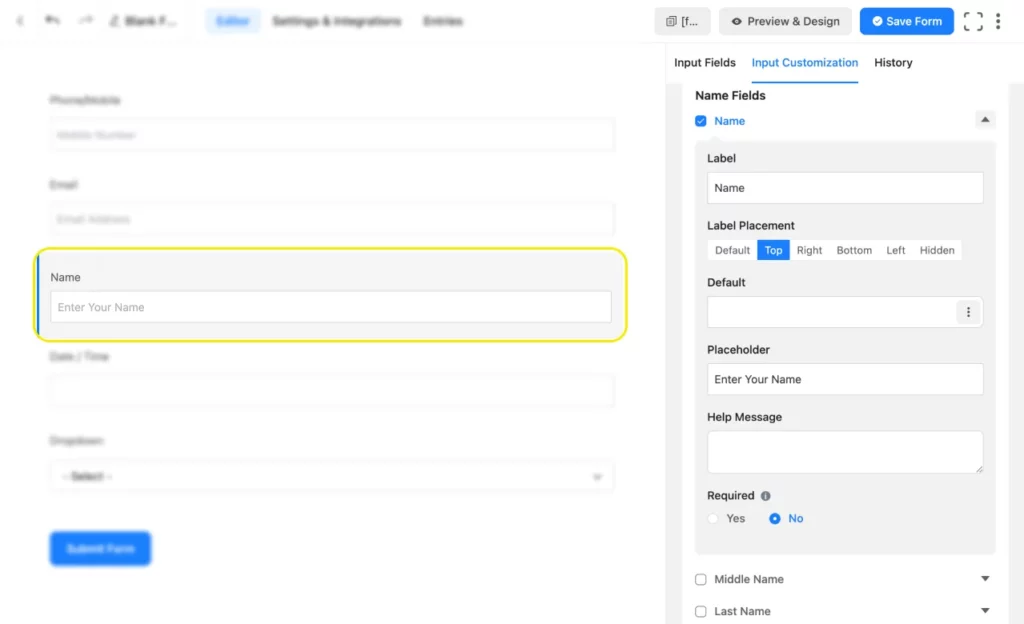
In the name fields, you’ll find options to include first, middle, and last names. You have to check the boxes beside them to include them. For this form, we selected the first name field and edited the text to show name instead of first name.
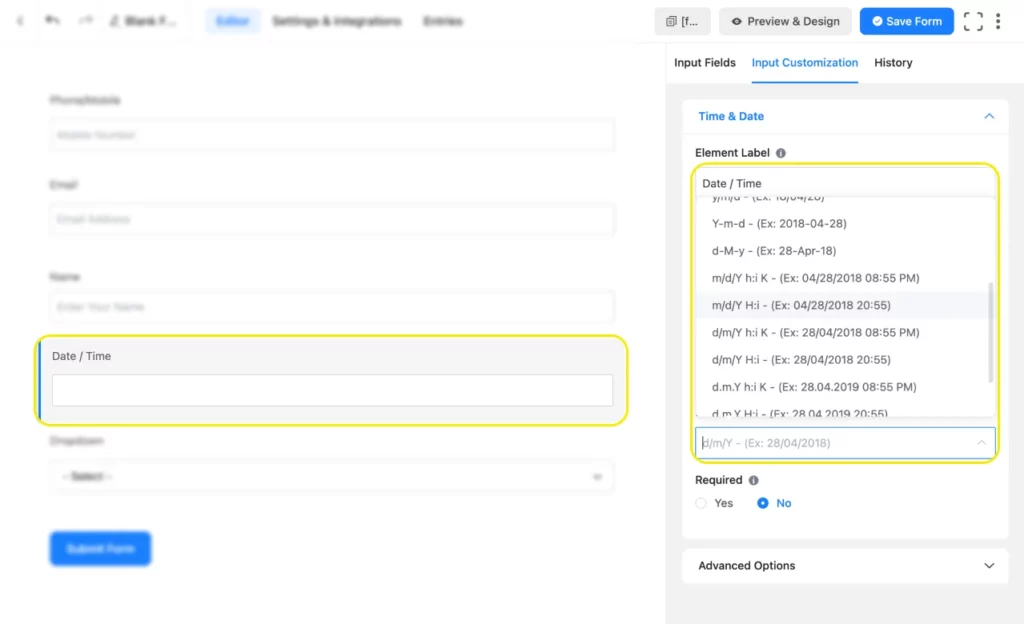
Next, we’ll customize the date field. Fluent Forms offers a user-friendly datepicker that pops open an interactive calendar grid so users can easily select dates and times. You can set the date and time format from the customization options.
Now that users can schedule a call on a specific date and time, you’ll need to know their time zone, especially if you have a global audience. Fluent Forms has a built-in time zone selector; you have to set it up from the dropdown field.
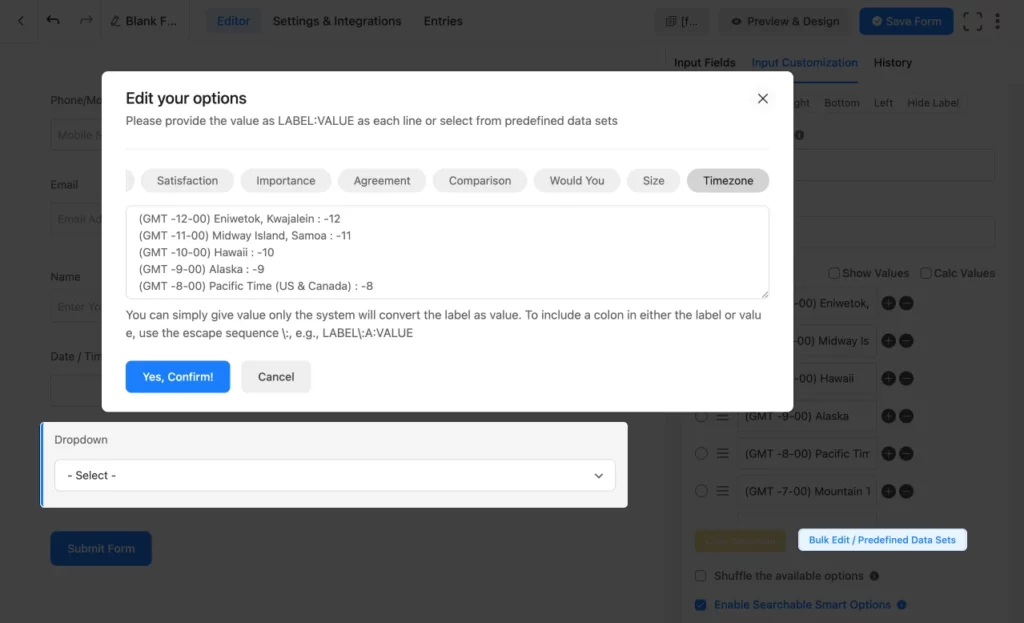
Click the dropdown field, navigate to Bulk Edit/Predefined Data Sets, and click on it. From the pop-up that appears, scroll right to Timezone and confirm. Change the element label from dropdown to time zone. You can also check the box “Enable Searchable Smart Options.” It’ll allow your users to search for their time zone instead of having to scroll down to find it.
Edit the Radio Field to include a reason for the call, and enter options. If you want to allow users to select multiple options, go with a Checkbox field instead of a radio field. Add a Text Area field and customize the label and placeholder text so users can provide more context on their query. Knowing about users’ issues beforehand will help you offer them a more tailored solution.
We also added a Custom HTML field to add a heading (Request a Call Back) to the callback form. You can edit the HTML field visually without any coding knowledge, so it’s super easy.
Finally, we added a one-column container for styling the form (completely optional and irrelevant to the form’s purpose) and a custom submit button field because we want the submit button inside the container.
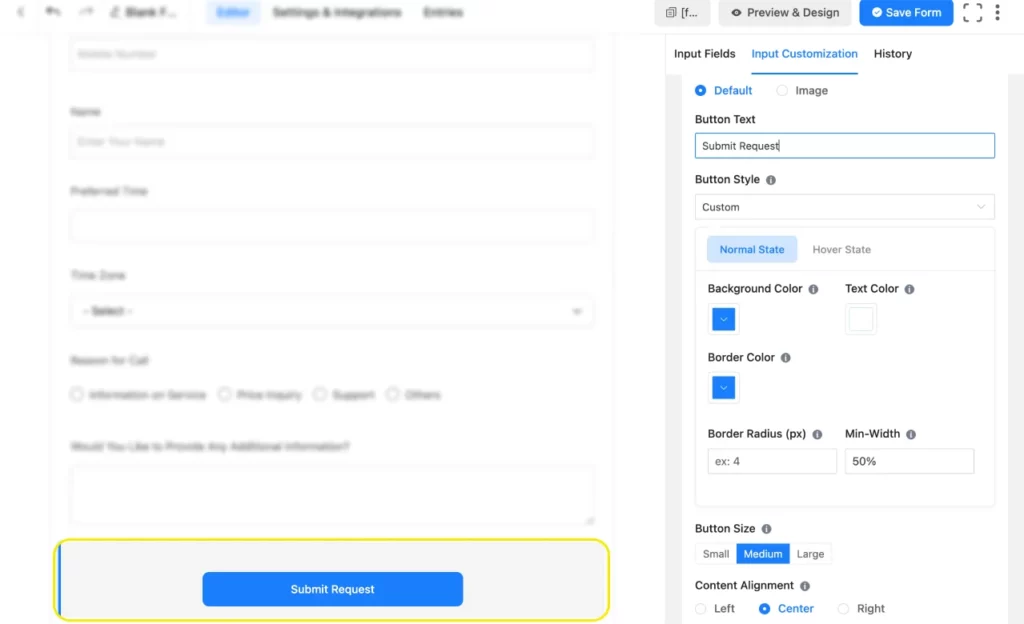
You can customize the submit button’s text to make the form submission more intuitive. Besides, you can set the button’s alignment, size, color, border, and more.
Once you’re done, click Save Form. Here’s the callback form we just created. You can easily download this form from our templates, import it to your site, and customize it for your brand.
If you want to receive an email notification each time you receive a callback request, you need to set up an admin email notification from the form’s settings. If you want to delegate the requests to your sales team, you can configure that with the conditional email routing from the email notification settings. This way, you can assign an expert agent to help your leads based on their reason for requesting a callback.
Try the Fluent Forms free version,
Build Smarter Forms for Free

Convert website traffic into leads you can nurture
It’s always us chasing the leads through adverts, targeted content, and more. Nice to have them chase us for a change, right? Create a “Request a Call Back” form with fields that suit your business needs and say no to confused leads forever.
The requests you receive through the callback form are from your highly qualified leads. Capture valuable lead information like contact details and users’ pain points through the form and nurture those leads with your expert knowledge, and you’ll never miss a sale again.
So, are you ready to receive callback requests and close more sales every day? When you are, let us know how those callback forms are performing.

Sarika writes for Fluent Forms and loves to offer insights into small businesses. She’s curious and enjoys discussing ideas, interests, and perspectives. In her free time, she’s either marvelling at architectural beauties or trying different cuisines.


Leave a Reply