How to Create a Form in WordPress (7 Easy Steps)

Do you want to create a form in WordPress but not finding the right way to do that?
A contact form is a great way to bridge the gap between you and your visitors.
Every time they want to share opinions regarding your businesses, or file a complaint they felt with your services, a contact form allows them to convey the message to you.
Thus, the importance of a contact form is immense.
But, the problem is WordPress has no default option to create a contact form, although some themes come with prebuilt forms they don’t work or create trouble with the database.
No worries, anyway. This post is all about how to create a form in WordPress (hint: not just contact form) and display it across your website.
Fluent Forms is the most beginner-friendly form builder. Download now and start crafting beautiful forms FREE!!!
Why do you need a WordPress form?
Previously, a form was needed only for giving an opportunity to visitors so that they can contact you.
The evolution of forms takes it from there to a big playground where you can accomplish a lot of tasks that include marketing, sales, and communication.
With a WordPress form builder tool, you can create forms for multiple necessities, and here are a few reasons you can consider.
- Contact form: It’s an easy guess, right? The biggest reason you should choose a form builder to create contact forms. Remember, if you place your email on the page, then you’re inviting spams from your end.
- Lead generation: There are many ways you can use a form builder and collect leads of your customers. Creating newsletter form, placing them on the WordPress site, integrating email marketing tools – you can do a lot.
- Survey, poll, and quiz: For creating surveys, polls, and quizzes, you don’t need any additional plugin. With a robust form builder, you can do that all, and drive results to boost your business.
- CRM integration: WordPress form plugins offer CRM integrations so that you can streamline your marketing endeavors with less effort and more benefits. For example, Fluent Forms has HubSpot, ActiveCampaign, ConvertKit, and other powerful tools in its modules.
- Payment collection: Advanced WordPress form builder like WP Fluent Forms allows you to collect payments via your forms using popular gateways, such as Stripe and PayPal.
- …and a lot more
Now that you know why a WordPress form is needed, let’s dive into the details of how to create a form in WordPress step by step.
Step 1: Pick the best WordPress form plugin
To create a form in WordPress, you need to select a WordPress form builder tool.
There are many WordPress contact form plugins available in the market, and you can go with any of them you like.
In this guide, we chose Fluent Forms to show you how to create a WordPress form easily. Here are some reasons for this awesome WordPress plugins:
- Fluent Forms is really easy to use, without requiring any advanced technological knowledge.
- The free version of Fluent Forms is feature-rich and way better than any lite form plugins you see in the industry.
- You can accomplish a lot of marketing tasks beyond creating simple WordPress contact forms.
- Fluent Forms tons of integrations to take your marketing endeavor to the next level
- When you upgrade to Fluent Forms Pro, more advanced functionalities unlocked to boost your business.
This is why WP Fluent Forms is the right choice to collect emails, conducting survey, and creating contact forms to your WordPress site.
Let’s move on to the next step to see how to install the plugin from your WordPress dashboard.
Step 2: Install a form plugin in WordPress
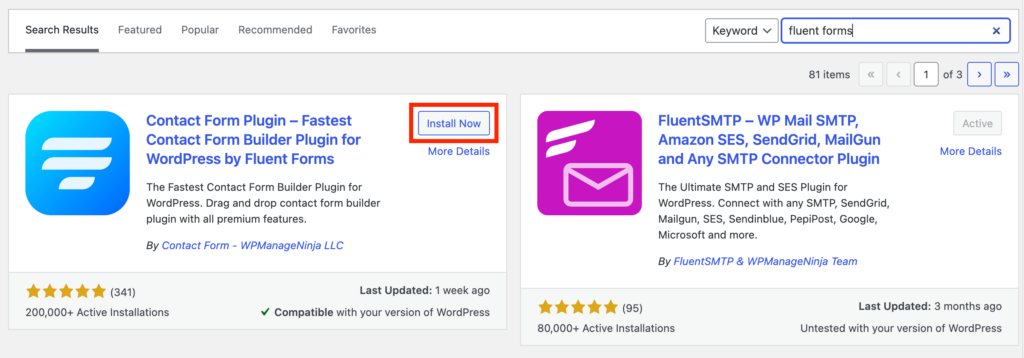
Go ahead to your WordPress admin panel, and choose Add New under Plugins. Now, type Fluent Forms in the search bar.
Fluent Forms will appear on the top. Click Install Now button.

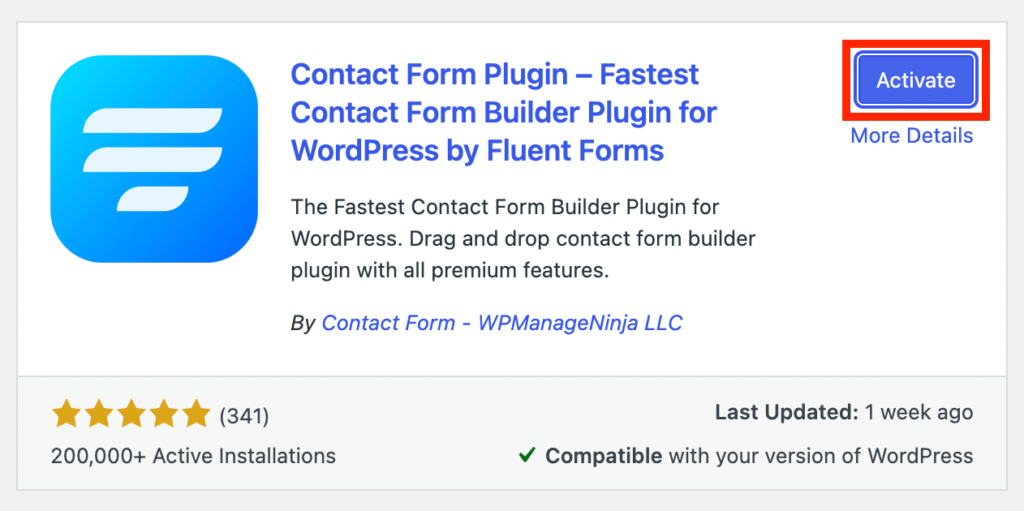
After the plugin is installed, click Activate.

Step 3: Create a form in WordPress
Let’s build a form with WP Fluent Forms. You can see Fluent Forms on the left side of your WordPress dashboard.
Hover over and click New Form.

You will be taken to the world of prebuilt templates. Choose the right template for your purpose, or start with a blank form.
Note: Some templates won’t work on the free version, because they have advanced functionalities which are associated with the premium package.

However, I’m choosing the basic contact form here. To get any template, hover over it and click Create Form button.

You’ll be landed to this editor where you can further customize your form.

As you can see Fluent Forms comes with a ton of ready fields, and most of them are free under General Fields.
If you need any additional field on top of what’s included with the template you chose, click the field from the righ-hand panel.

However, if you want to customize any field, Fluent Forms will allow you to do that without any complication.
Hover over any field, and click on the little pencil icon. It will show you all the customizing options. It will be enough if you also click on that field on your editor.
On small note, the other icons you can see here are equally beneficial. You can drag any field upward or downward with the plus-like icon. The rest two will allow you to duplicate or delete any field.

When you click any field, a new panel will open on the right side of your editor, where you can further edit the labels and their placement. The Advanced Options are for applying conditional logic.

Click Save Form on the top-right portion of editor to set the form in action.
Step 4: Configuration of your WordPress form
Now that you have created your first form, there are a lot to discover for making your form ready for the way you want to see it rocking.
Head over to Settings & Integrations from the top. Many ways you can utilize the settings to adapt the forms according to your need.

I’ll discuss briefly what each section does for your forms.
Confirmation Type: After submitting the form, where do you want to show the message: on the same page, to another page, or a custom URL.
Message to show: There’s a default text you can see, meaning if you don’t input your message it will be shown to the visitors. Therefore, write your message and personalize it with the editor.
After Form Submission: Hide the form or reset it after someone submits a form.
Form Layout: Define your form layout by choosing from various options, such as Label Alignment, Help Message position, Error Message, etc.
Scheduling & Restrictions: This is truly an important part of your form. You can set restrictions on your forms so that only certain number of submissions are allowed. Moreover, you can schedule a form so that it opens at your predefined time. Most significantly, enable Deny empty submission to protect your site from getting malicious spams.
Advanced Form Validation: You can set conditions to your form if you want to.
Survey Result: When you create a survey form with Fluent Forms, this option will come handy.
Compliance Settings: This is a sensitive part which is associated with HIPPA and GDPR. If you check the option, all data will be deleted right after submission.
Other: If you want to have any CSS form class to input, use this box.
After checking every section, click Save Settings.
Step 5: Customizing email notifications
It’s a great way to stay on the loop. While a form is submitted, you’ll get notifications about it.
First, got to Email Notifications under Form Settings, and enable the feature. Now, click the gear icon you see stays in the middle of three adjacent icons.

Here, you can configure everything about your email.

Where do you want to send the email? Either you can select your admin email or a different email for the notification to be delivered.
On the Email Body, click Add Shortcodes and choose what information you want to get with your email.

When you want to get the email as plain text, check the box from the bottom.
Use the Advanced option from the bottom to optimize more options for admin email notification.
If you want to add BCC and CC with your emails, you can do that here, along with the sender’s name and email.
Once you’ve done with everything, click Save Notification.
Step 6: Adding a WordPress form to your blogs posts and pages
Now that you have created your form and done with the customization, it’s time to embed the form to your WordPress site.
You can place the form wherever you want within your website, including pages, posts, and sidebar.
Let’s add the form to a page as quickly as it takes.
Go to Pages » Add New and give your page a title.
Click the plus icon that appears on top of every block. From there, type Fluent Forms in the search bar, and click Fluent Forms when it appears.

All your forms will appear under a dropdown. Choose the one you want to display.

Now hit Publish button. Your form will start showing on your website.

Step 7: Add a WordPress form the your sidebar
Fluent Forms makes it easy to display your form on the sidebar widget without any additional customization.
Visit Appearance » Widgets from your WordPress dashboard. Find out where the Fluent Forms widget is.
Based on the theme, the options might come differently. Choose the widgetized area you want to display your form, and click Add Widget.
Also, you can drag the widget to the active sidebar.

Select a form from the dropdown, and click Save.

That’s it! As you could see creating a form in WordPress is a lot easier than you think. I hope you find this article helpful for adding forms to multiple places on your website.
2 responses to “How to Create a Form in WordPress (7 Easy Steps)”
-
Good regards, I wanted to ask if you have an open questionnaire option, that is, for open answers.
-
Hi, David
I’m sorry I didn’t understand your question. Did you mean open-ended questions? If not, could you please provide some references?
-


Leave a Reply
You must be logged in to post a comment.