How to Accept Credit Cards in WordPress (Multiple Solutions)

If you run a WordPress site where you sell products or services, you need to know how to accept credit cards. Many users feel comfortable to pay with their credit card, so you should not miss out on this option.
But, WordPress doesn’t come with a payment option, by default. That’s why you need to know how to allow customers to pay without any complications. No worries! You have multiple options to accept credit cards in WordPress, and I’m going to discuss that.
Receive credit card payments to your WordPress site
In many situations, such as selling a single service, users don’t want to install an e-commerce setup. If you happen to be one of those who want to charge for your consultancy or sell something, there are nice and smooth ways to collect money.
The solution is simple. You need a powerful WordPress form builder that allows credit card payments. With this tool, you can easily create an order form and enable the payment option.

Fluent Forms is an excellent form builder plugin for WordPress. It is a lightweight and comfortable tool. Anyone can create any kind of form with its smooth interface. Its drag-and-drop feature makes it easier for users to make any form within a few minutes. Furthermore, Fluent Forms comes with 60+ input fields and 70+ pre-built templates to make the form-making process sleeker. You can also get 60+ third-party integrations with the plugin.
Moreover, advanced post creation, Stripe and PayPal integration, PDF entry generation, file upload, conditional logic, etc., functions are also available in Fluent Forms. You don’t need to worry about the security with this tool, as it is secured with reCAPTCHA, Honeypot, and Akismet.
So, without any doubt, Fluent Forms is full of unique features. The developers of the tool add more functionalities every two or three months. Moreover, the plugin is super cost-effective.
Go install Fluent Forms now. If you’re not ready to purchase the premium version, check out the free form builder now. But, for payment and other advanced features, you have to upgrade to Pro.
I hope you have completed the installation and activated the license by this time. Head over to the Payment configuration now.
Setting up Payment and Stripe
To accept credit card payments to your website, you need a payment processor. Fluent Forms has Stripe, as it’s one of the best solutions for credit card processing.
However, you have to set up Stripe on your form first. Go to Global Settings from the left sidebar of your admin dashboard under Fluent Forms Pro. Alternatively, you can navigate from the top.
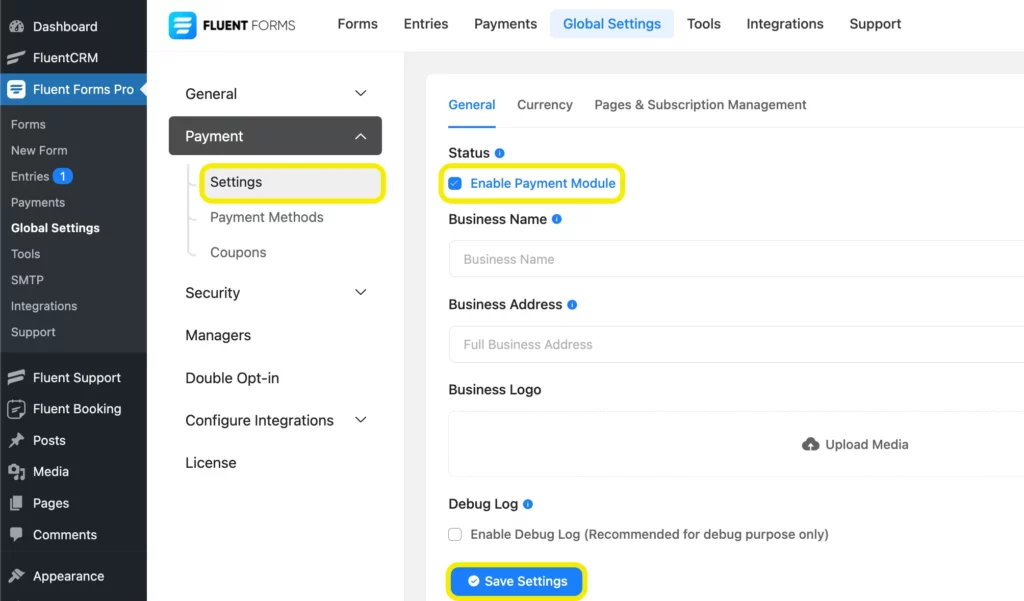
Now, click on the Payment tab that stays on the left. Scroll around the Settings and check out what information you need to place here. Before doing anything else, enable the payment module by checking the box.
You can add your business name, address, and logo for more personalization. You’ll also find some currency settings, such as default currency, currency sign position, and separators. Click Save Settings when you’re done.
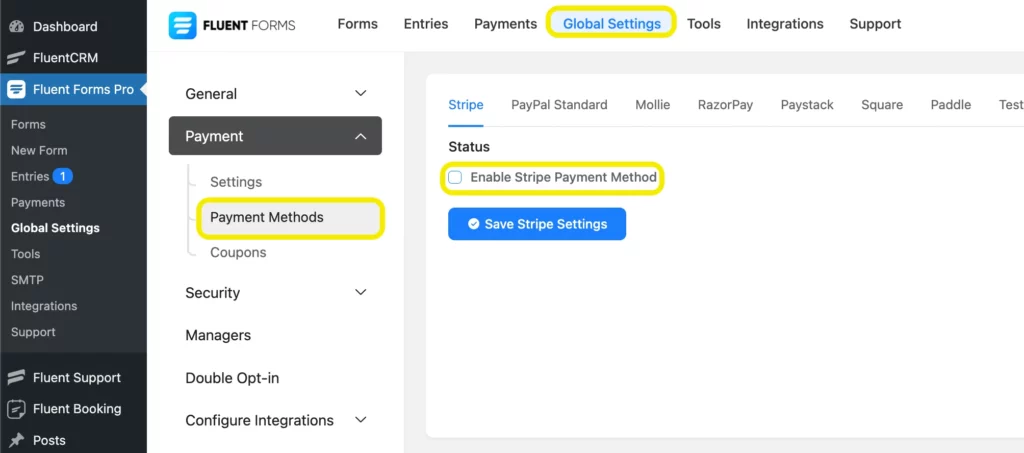
Hit the next tab for Stripe Settings. Update the status first by enabling the Stripe method. Next, choose the Payment Mode. The Test Mode is for testing purposes you select if you want to work around the system for a while. Live Mode means your system is up and running, and people can now pay using this form.
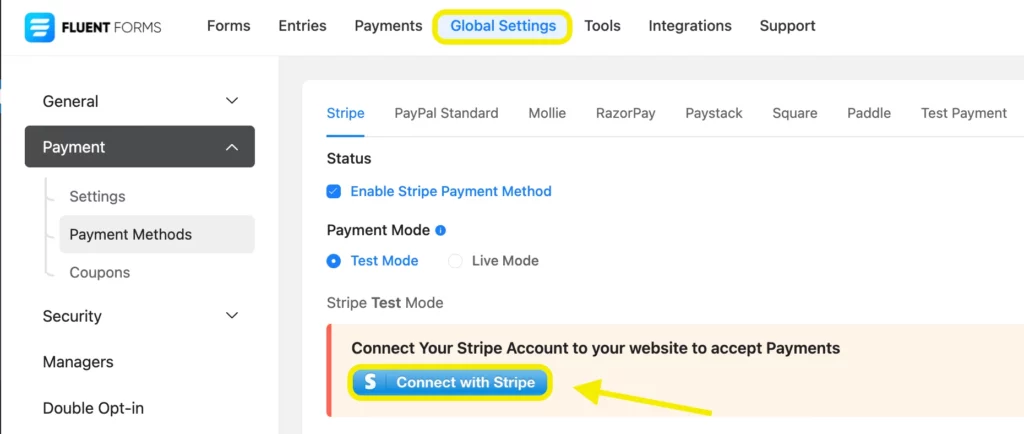
In the next part, you’re going to provide the keys. As I’ve mentioned, you may first check the test mode, so provide the temporary API keys first. Once everything goes well, get the live API keys. Anyway, all your API keys are available to your Stripe Dashboard. If you don’t have an account, create one. It doesn’t charge for opening an account.
After filling out all the necessary details, hit the blue button below for saving the Stripe settings. For subscription and recurring payments, you need to configure webhooks. You can find the relevant information at the bottom of the same page.
Create a new order form
It’s time to build the form where we can integrate the payment option. Move over to New Form under the Fluent Forms Pro. As the plugin comes up with a box of premade form templates, you can see them upon adding a new form.
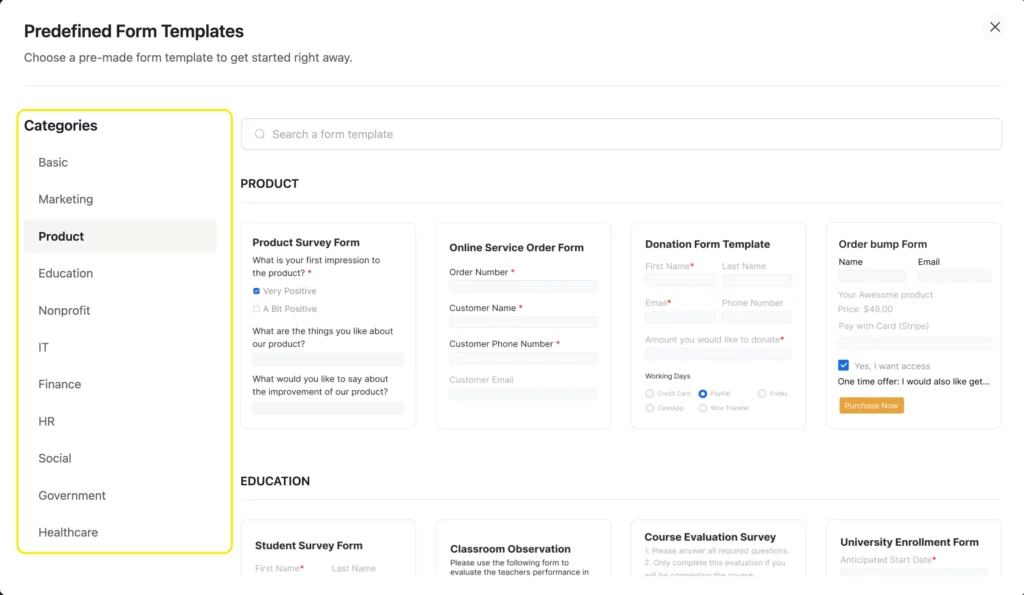
What’s more interesting is all templates are well-categorized, so you won’t feel convoluted to find the right form. Scroll a little to the Product category, and select an order form. Here’s what a service order form looks like.
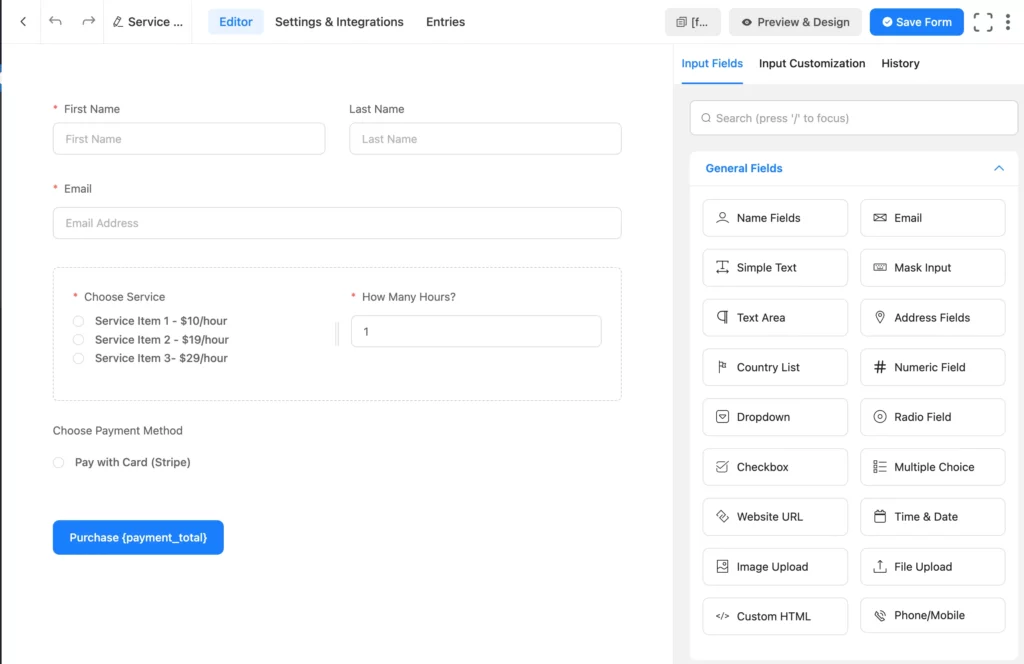
This is a ready template with full customization capability. If you want more fields, bring one from the right panel. For editing any field, hover over it and click the pencil icon. Clicking on that item will works the same, though.
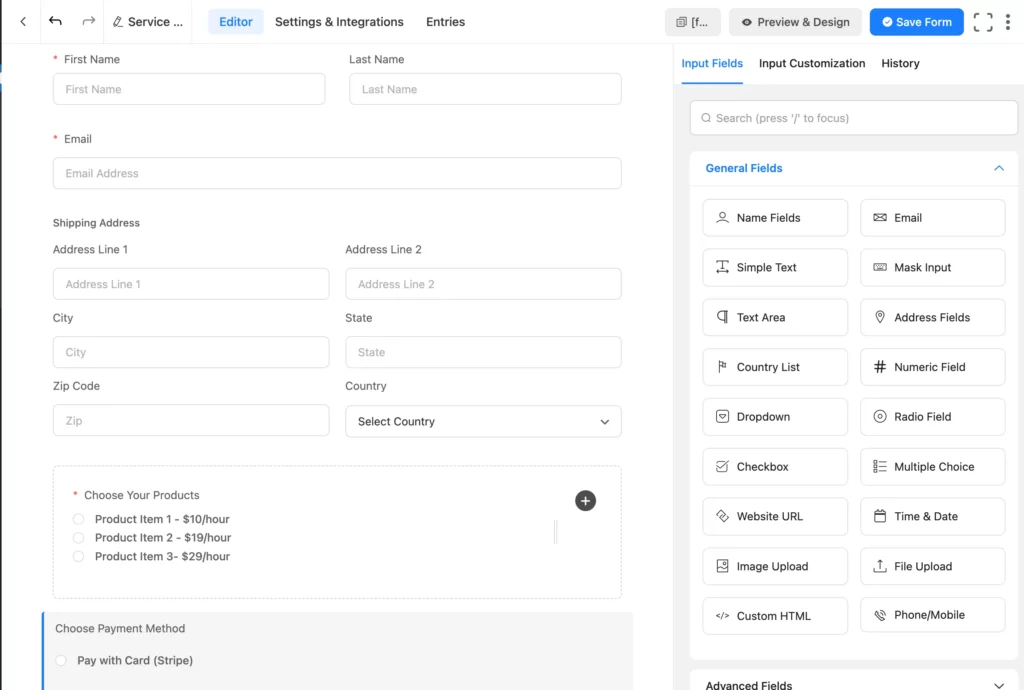
You can add your service list using the radio button or check box. Below the product or service description, you can include the payment options. Although Fluent Forms has PayPal integration besides Stripe, you can go with the credit card only.
Check out the preview, and if you want to fix any part, do that before making your form live. When you think everything’s perfect, hit the Save Form button.
There you have it. Your form is now ready to take dough via credit card.
Confirmation and Notification
You need to decide the after-submit action of a form. Let’s navigate to Settings and Integrations from the top bar. Here you can see all the options for configuring the confirmation.
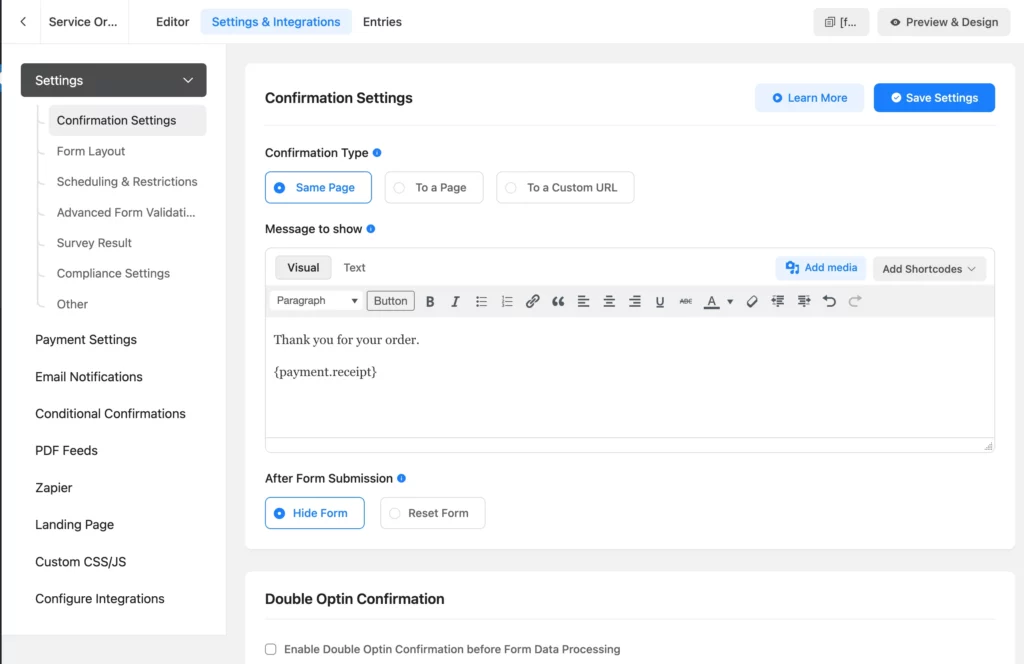
Select the confirmation type first of all that indicates where to show the message. In the next section, write the message that you want your readers to see. Layout decision, scheduling, advanced validation – there is a lot more to check out. After filling all the necessary fields, click Save Settings.
Adding form to your website
Now that your form is entirely ready, it’s time to make it live for your users. Let’s create a new page from Pages >> Add New. Give your page a title.
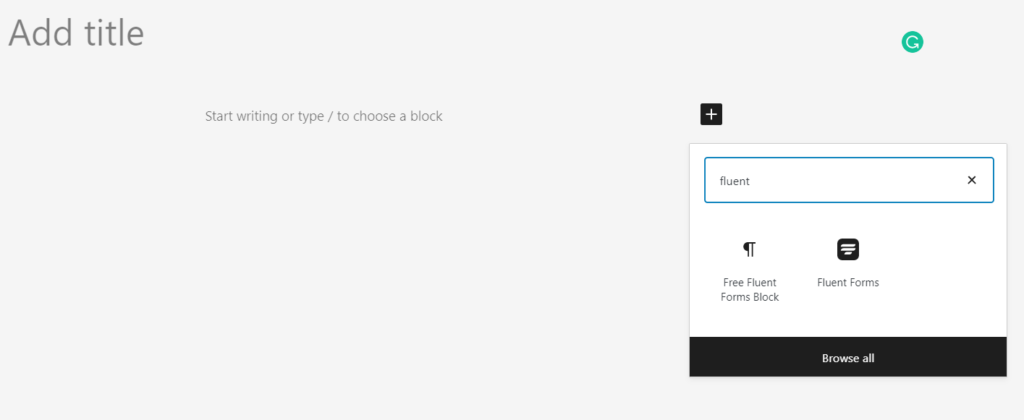
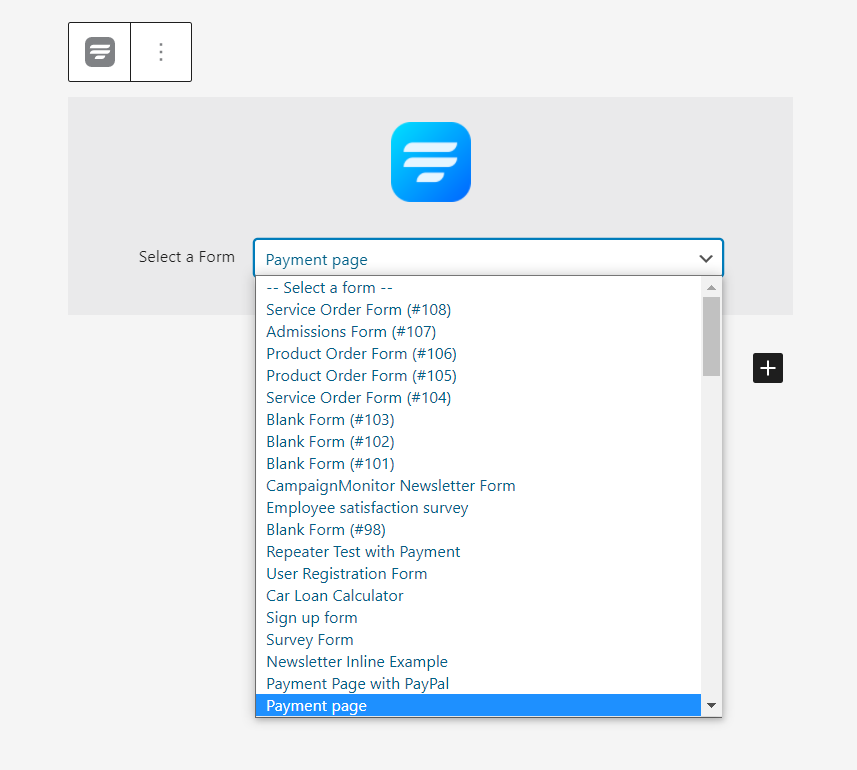
Click the ‘+’ icon and search for Fluent Forms. When you see the respective block, click on it, and the block will be displayed. You’ll find all the forms you’ve created under the dropdown of this block. Select your form and hit Publish.
Getting paid with a payment plugin
In a nutshell, Fluent Forms is a powerful tool that works beyond a simple form builder. But if you don’t want to bother all the functionalities and need something payment-focused, there’s a solution for you. By choosing a WordPress payment plugin, you can work only with the payment gateway.
For this particular situation, WPPayForms comes real handy with all of its user-friendly and fantastic features. With this plugin, you can add both Stripe and PayPal to your website. Setting up the tool is easy, and you can accept credit cards in WordPress without any complications.
Allow credit cards for an eCommerce store
All the options I’ve mentioned above are for your minimal needs when running a blog or small website where you don’t have a full-fledged eCommerce store. What if you want to start with an online store and accept credit cards there?
Well, a robust solution for WordPress is using WooCommerce to run a store for any kind of products. Not only WooCommerce lets you collect payments, but it will give you more control over your store.
Accept payments for membership websites
Do you want to accept credit card payment on your membership website? You can do that as well for selling subscriptions and premium content. A solution would be using a membership plugin, such as MemberPress, Restrict Content Pro, MemberMouse, and so on. These plugins will allow you to integrate powerful payment gateways and get paid via credit cards.
Sell online courses and accept payments
Beyond the scenarios stated above, you may need to accept credit cards for selling online courses. Again, you can use a WordPress plugin to design your platform and allow people to pay for the courses. LearPress, Tutor LMS, LearnDash – there are many choices if you want to get started now.
Conclusion
By now, you must understand what your options are when you need to accept credit cards to your store. In most situations – especially when you’re looking for a minimal solution – Fluent Forms can give you the right and cost-effective opportunity. With this WordPress form plugin, you can accomplish a ton of tasks that also include accepting payments. Accept credit cards in WordPress and extend your income flow right from the beginning.





Leave a Reply