How to Create WordPress Forms Using Free AI Form Generator
WordPress users have already experienced the fruit of form templates and drag-and-drop form builders. Now, the form creation has taken a step forward with the implementation of AI.
Free AI form generator has simplified form building with the shortest possible commands.
Let’s dive in to explore the ways to utilize free AI form builder and see how it works.
TL;DR
- Building web forms using an AI form builder is way faster and easier, and you can also simplify creating a detailed form
- Using an AI form builder to build a form is all about giving a prompt mentioning the form type; you can specify the preferred form fields, labels, and placeholders
- You can select ‘Create Using AI’ in Fluent Forms while getting Suggestions, and enabling the Include these questions option; mentioning the field names helps you get the exact results
- Fluent Forms offers users a Free AI Form Builder, in which you can also manually add and customize fields
Can AI form builders generate complex forms
While creating a simple form in seconds, AI form builder also makes complex forms depending on the prompt and the availability of features.
For example, you need a multi-step form with conditional logic and a save and progress button to specify the fields’ names. And, your form builder must have the required fields and features.
AI prompt or form template: which is better
A well-built template is better if your requirement aligns with the design of the template. Additionally, you can edit a template too, as per your preference.
Again, a prompt of an AI form builder gives you the scope to create a fresh form where you can include/exclude fields, toggle position, and put the label name in a single command. You can make a desired form in a minute, and with a single prompt.
Prompt-made forms are also customizable once created.
The perfect prompts to prepare forms exactly as you wanted
Creating an AI-built form doesn’t differ much from an email or social media caption generated with ChatGPT. You give the best prompt, you get the best result.
Let’s get some to-the-point steps about giving a prompt to make forms with the AI-generated form builder, resulting in as much as you expected.
Define the purpose clearly
What’s the purpose of the form you are going to make?
Is it a contact form to increase newsletter subscribers or a customer feedback form to evaluate the product quality?
Define the purpose at the very start of your prompt.
For example: write: ‘Create a user feedback form asking customers to rate the product on a scale of 10. Add other relevant fields.’
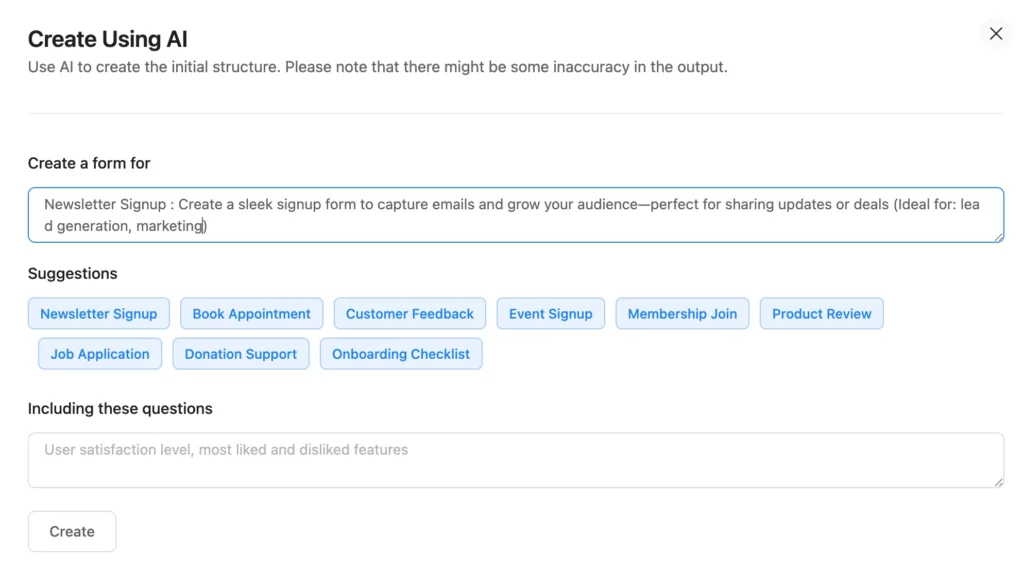
Take the given suggestions if applicable
When you use AI form-building tools like Fluent Forms, you will get a few suggestions such as ‘Newsletter Signup’, ‘Customer Feedback’, ‘Product Review’, etc.
This suggestion gives you a pre-built prompt that you can directly edit or add more instructions as you need.
Name the preferred fields
That’s a very helpful way to decorate your form with multiple preferred fields and features. Naming the right fields will allow the AI form builder to perfectly serve the purpose.
Let’s say if you write ‘Add a range slider for the rating, multiselect for choosing the size’, the form builder will show the output, displaying exactly where you wanted that field.
Suggest a sequence
To make the form at once, you can suggest a sequence like Name – Email – Phone Number – Website URL. It’s right that using a drag-and-drop form builder, you can easily toggle the fields. But in terms of long and sequential form, where you add too many fields, like 20 questions, it’s better to sequentially add the questions.
Instruct avoiding irrelevant fields/data
For example, if you want the AI form builder to ask the user for an address, it may add all the fields of an address. If you want your form not to have state or country name, or the last name, etc, you can add this command to get a solid result.
Technical terms: simplified using Fluent Forms
Fluent Forms, the fastest form builder plugin for WordPress, has introduced a free AI form builder as a built-in feature. With the Fluent Forms free version, you can now easily create web forms following some simple steps.
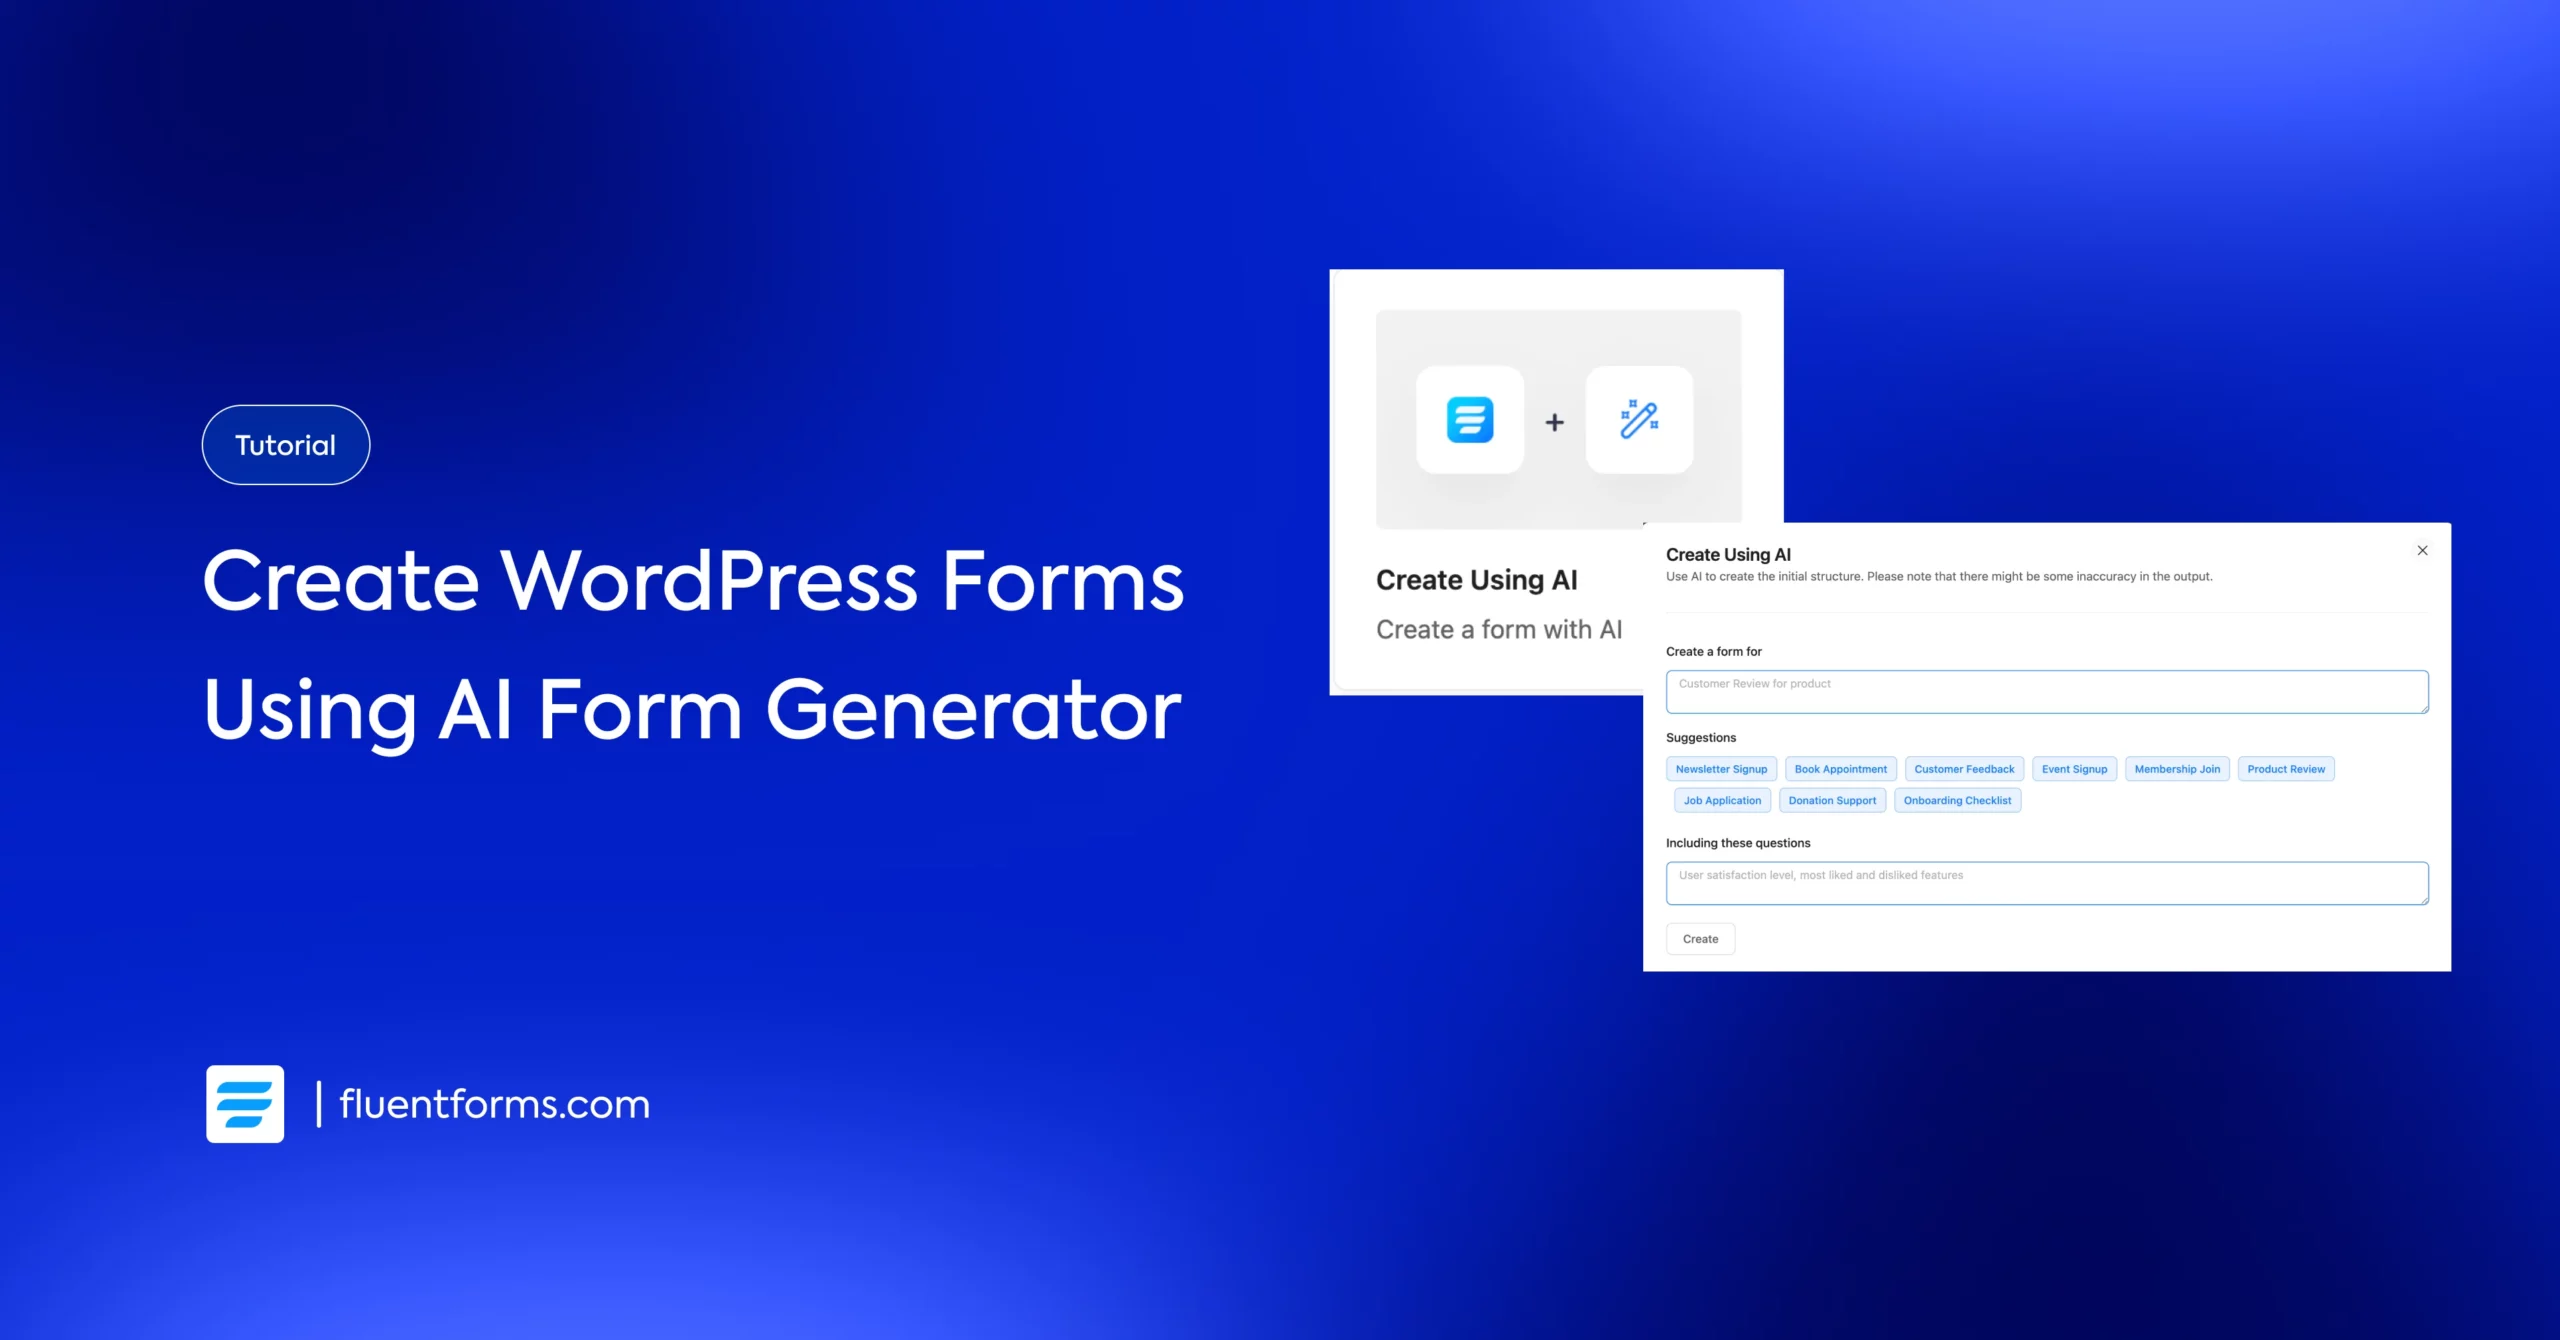
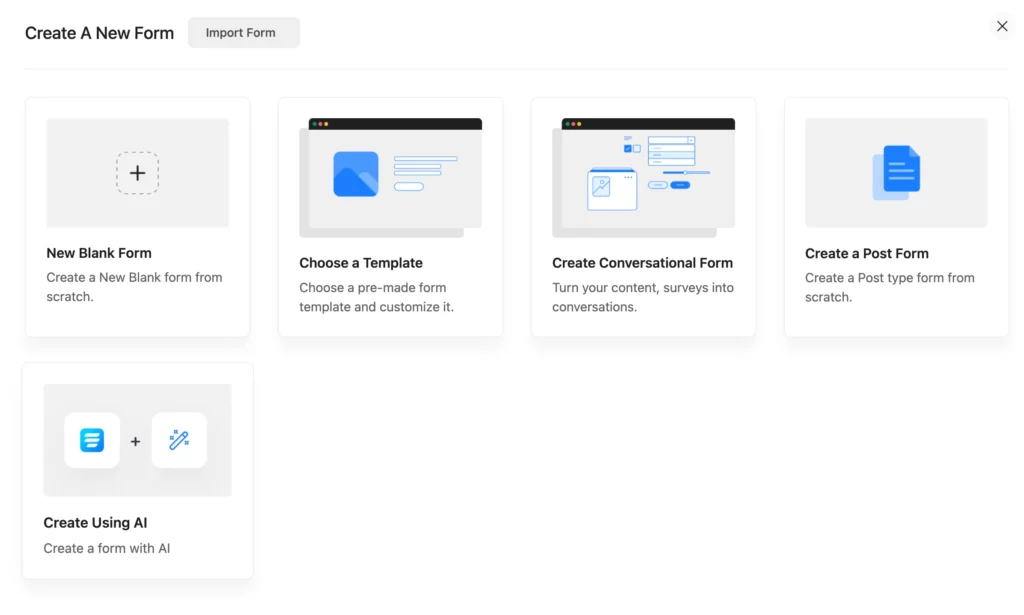
‘Create using AI’
Right after opening the Add New Form button, you will see some options about how you would like to create a form. You will have several options; from these, you can choose ‘Create Using AI’ to generate an AI-built form.
Put your prompts
You will see an indicator ‘Create a form for’, and below that, you will get a space to put your prompt.
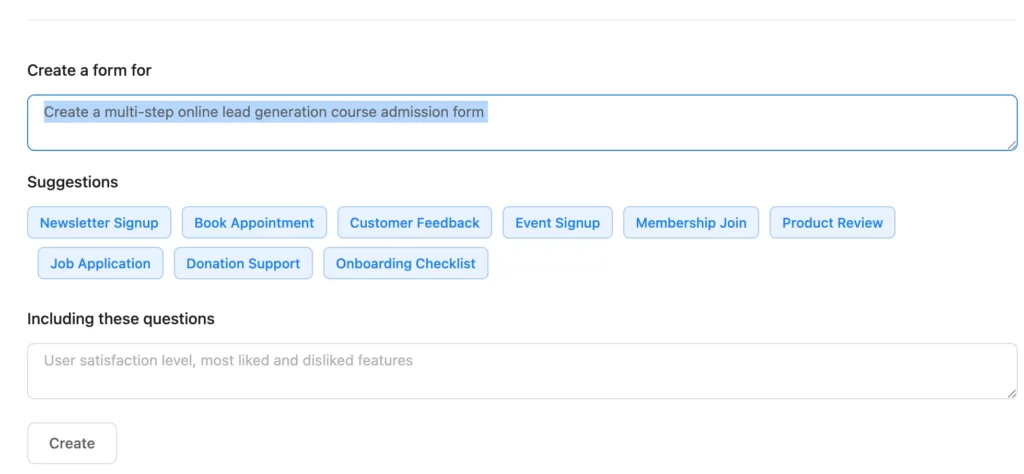
Choose the suggestions
Below the prompt box, you will find some suggestions for the most popular form types. From those, you can select the one you want to use. You can also edit the suggested prompts or add more instructions.
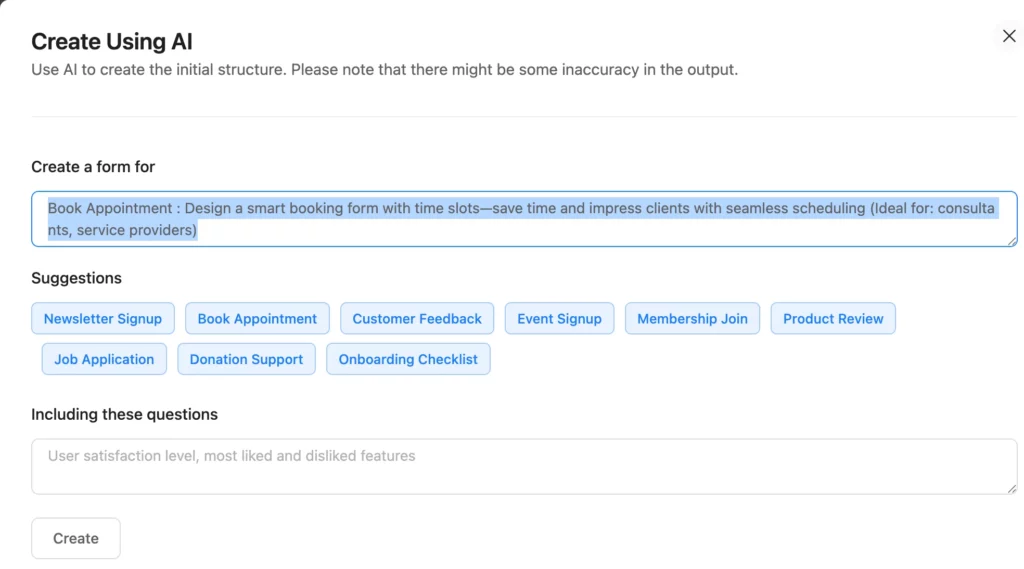
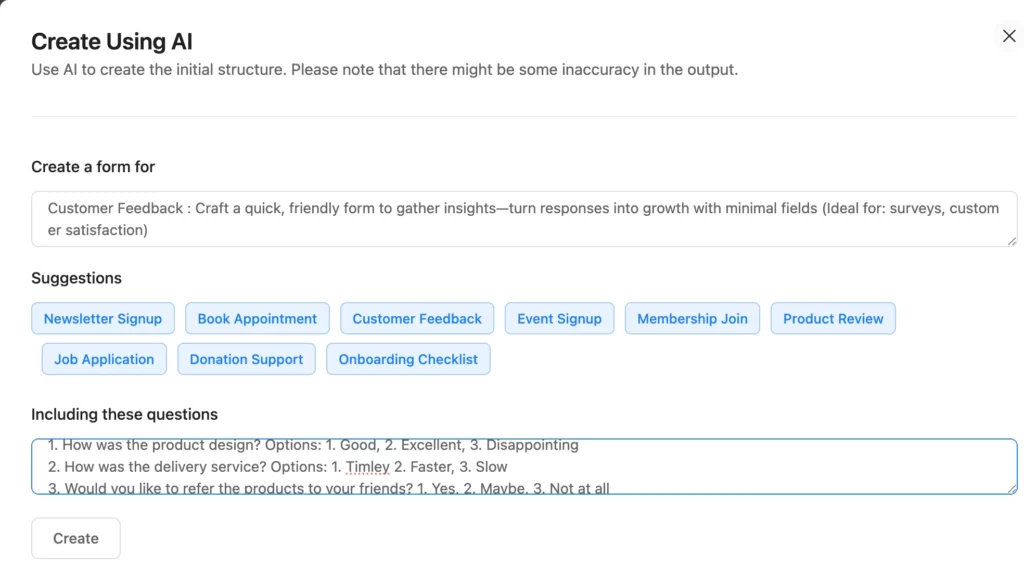
Including questions
There is a useful feature in the built-in AI-form builder of Fluent Forms: Including these questions.
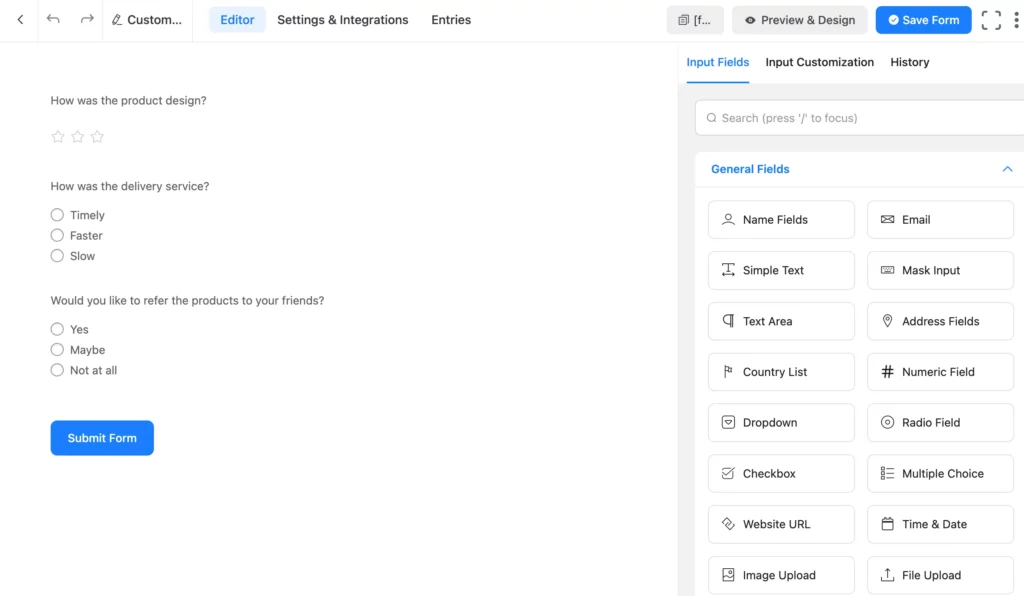
Let’s say you are making a multiple-choice-enabled customer feedback form. You have 3 specific questions, 3 options for every question, which you want to add to the form sequentially with checkboxes. You can add the questions to the relevant box.
You can easily edit the generated form using the fields. Please note that you can access the general fields while using the Fluent Forms free version, and, using the advanced fields requires the Fluent Forms pro version.
Customize once it’s generated
Currently, you cannot edit the prompt multiple times; however, you can edit the form within the generated fields or after adding new ones. As there may be a few inaccuracies, you can make adjustments to fine-tune the form.

Evaluate the results
You can check the preview to see how the user will view the form, which you can use directly or finalize after editing.

Useful fields and features to improve AI-generated forms
[Dropdown, checkbox, image upload, etc.]
Giving a prompt asking for unavailable fields is a complete waste. On the contrary, asking for specific contact form’s input fields will help you meet your expectations while creating an AI-powered contact form.
Instructing the AI form builder to implement these fields will get you a better result.
Here are a few popular input fields you can access using the Fluent Forms free version:
- Mask Input (for specialised information like ZIP Code)
- Dropdown and Radio Field (for selecting from the given options)
- Checkbox and Multiselect (for selecting multiple options), and more
- Image/File Upload field (For receiving files from the users)
Along with these input fields, Fluent Forms Pro comes with many advanced fields, citing these field names in the instructions can result in making better-performing forms.
- Section Break (for describing a section)
- Form Step (for multi-step forms)
- Ratings (brands/service/product)
- Checkable Grid (for collecting feedback in a grid format)
- Custom Submit Button (describing the color/size/alignment)
- Range Slider (for selecting a value within a range)
- Save and Resume (to save progress and submit a form later), and more.
It’s not a must to suggest the field names, but suggesting the field names removes confusion and generates exactly the kind of form you expected.
Noteworthy AI-generated form examples
Here, you will find examples of a few free AI-generated forms using Fluent Forms:
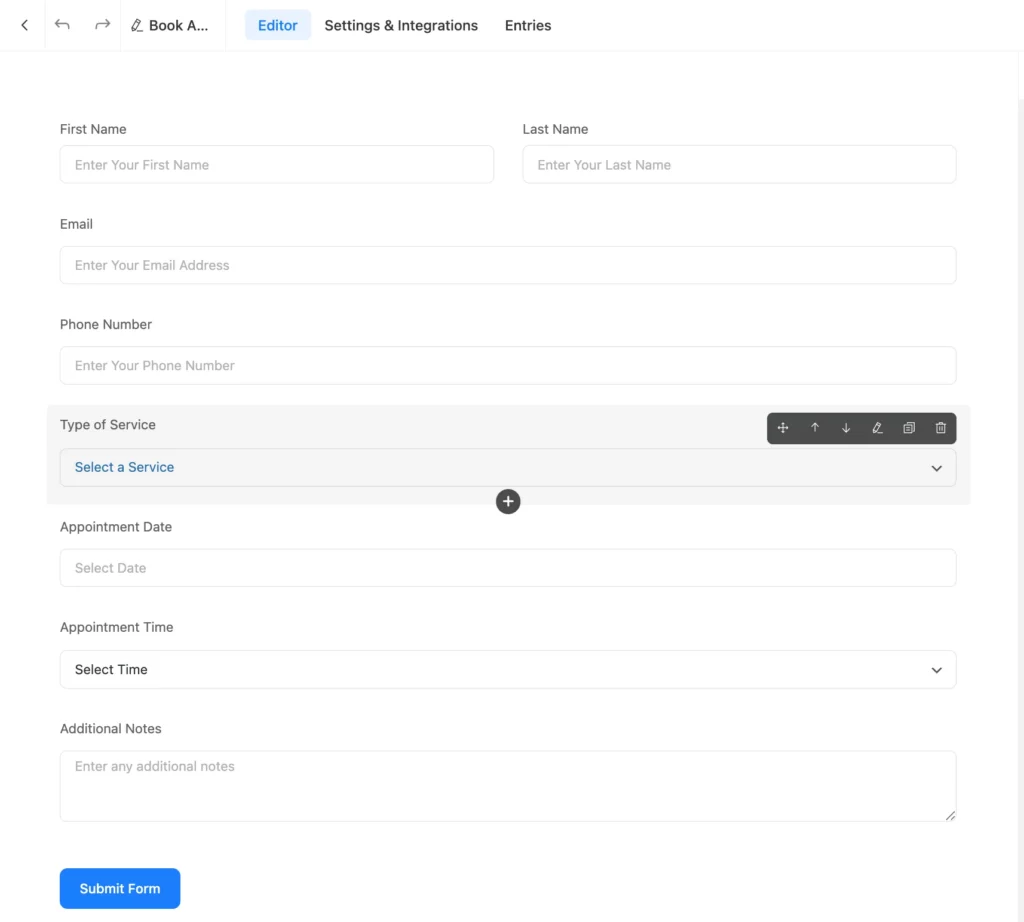
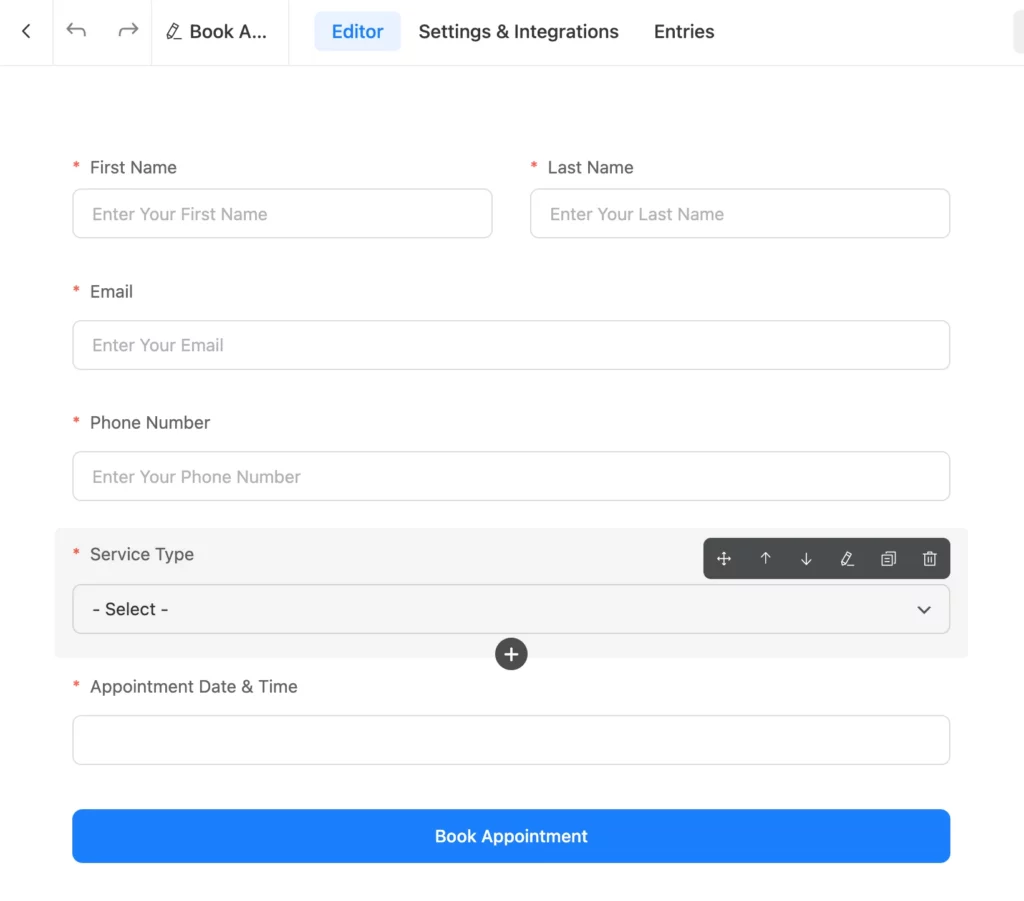
Example 1: Book an Appointment using the suggestion
Example 2: Book an Appointment using the suggestion. Also adding this command: Remove the Additional Noted field and change Type of Service field to Service Type.
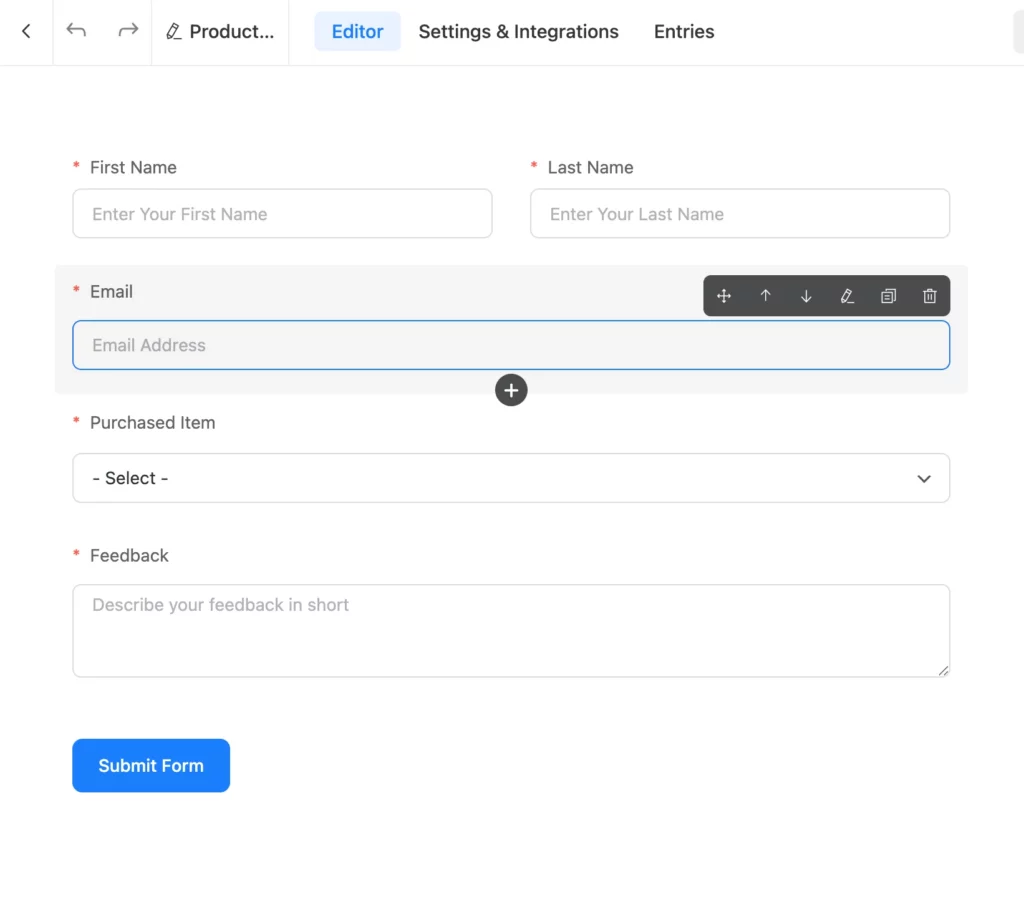
Example 3: product review: creating with own instruction: (Applicable for both Fluent Forms Free and Pro users)
The prompt: Create a product review form asking for: User Name, Email, a Dropdown menu for the items the user purchased, and a text field to describe the feedback in short.
The output:
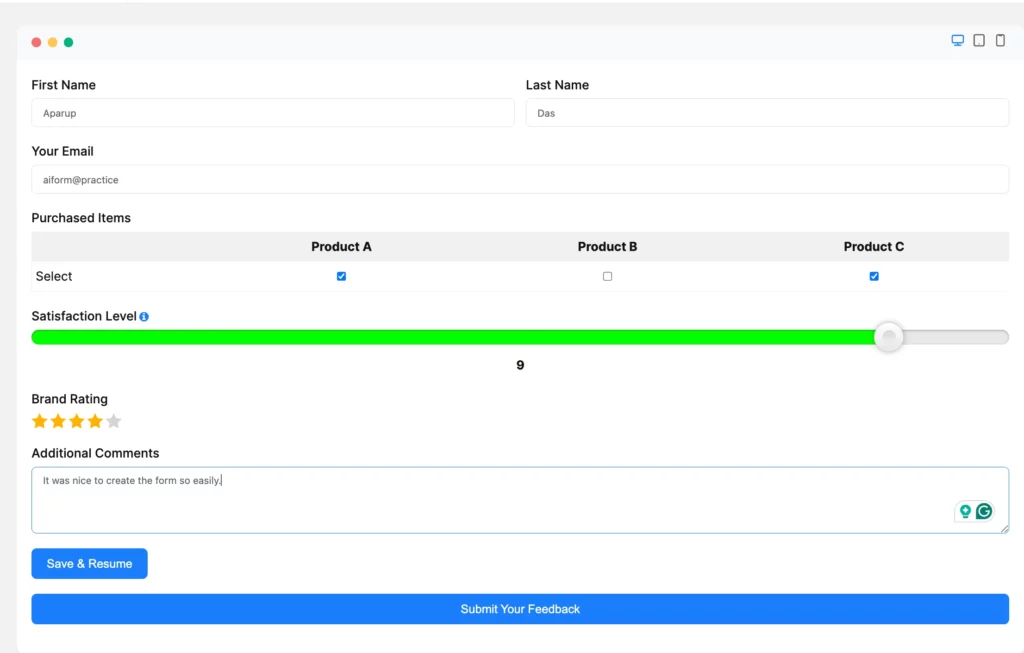
Example 4: product review: creating with own instructions (applicable for the Pro users)
The prompt: Create a product review form asking for purchased items with checkable grid, user’s satisfaction level with range slider, brand rating, save and resume option. Change the submit form button name to Submit Your Feedback.
The output (how users will see)
Don’t forget that whether you use the Fluent Forms Free version or the Pro version, you can easily customize the form.
Moving Forward
AI form building gets enriched through the accessibility of the features of the tool you are using to create forms. And then comes the perfection of how your instructions get implemented.
There might be a bit lack of accuracy. But technology is changing fast, and those lacking will vanish. Soon enough, you might not need to manually recheck the output from an AI form generator’s results. The future is exciting!

Hi, this is Aparup. I am a Literature postgraduate, mixing my creative thoughts with my experience in the tech industry to surpass AI. Professionally, I am a content marketer seeking solutions to users’ problems regarding WordPress.


Leave a Reply