How to Create a Quiz in WordPress using Form Builder Plugin
Quizzes are one of the most effective ways to gamify your website, capture leads, or simply keep visitors engaged longer. But often, the logic required to calculate scores, grade results, or map personality types can feel overwhelming to set up.
Fortunately, you don’t need a complex tool or custom code to build a dynamic quiz. With Fluent Forms, you can turn any standard form into an interactive experience using built-in quiz features like randomized questions, weighted scoring, instant results, and more.
In this tutorial, I’ll show you how to create a quiz in WordPress step-by-step. Whether you want a graded test for students or a fun personality assessment for potential customers, simply follow this guide for the simplest yet powerful quizzes.
TL;DR
- Fluent Forms Pro lets you build interactive quizzes in WordPress with built-in scoring, grading, and result display (no coding required). Enable the Quiz Module from Integrations > Modules.
- Supported quiz fields include radio buttons, dropdowns, checkboxes, and text inputs; each can be assigned correct answers and point values.
- Key features: randomized questions/options, weighted scoring for partial credit, custom grade labels, and instant results on the confirmation page.
- To create a trivia quiz: add question fields, insert a quiz score field & select score type, enable the quiz module in settings, set correct answers, and configure grading.
- To create a personality quiz: map each answer option to a personality type using “Show Values,” then select “Personality Quiz” as the score type in the quiz score field and map the types. Fluent Forms calculates the dominant type automatically.
- Randomizing options is especially important for personality quizzes to prevent predictable answer patterns.
- Results can be displayed as total points, percentage, fraction, grade label, or personality type using shortcodes in confirmation messages.
Why create a quiz using Fluent Forms: features & settings
Fluent Forms is the fastest WordPress form builder with the most comprehensive yet easy-to-use set of quiz features. Not only that, but it’s also surprisingly easy for your users to take the quizzes, and they get instant results.
Here’s an overview of Fluent Forms quiz features:
- Randomize questions: Randomizing questions keeps the quiz fresh by changing the order of the questions on each reload.
- Randomize answer options: Randomizing answer options keeps the quiz test honest by shuffling the response options every time the form reloads.
- Regular quiz scoring: Quiz scoring lets you set a correct answer and assign a numeric point to it.
- Advanced/weighted scoring: This lets you set multiple correct answers, where one answer may be more correct than the other.
- Custom grading system: With custom grading, you can grade participants based on their total points. You can set the numeric range for each grade level and customize the grade label, like “Pass/Fail,” “A/B/C,” “A+, A, A-, B+,” or even longer assessment texts.
- Show result on confirmation page: Shows all the questions with checked answers and correct answers in a table view. Additionally, you can show total points, percentage, number of correct questions, etc.
- Personality type quiz: Finds participants’ character archetype (like hero/mentor/trickster/any custom type) based on their response options.
Now let’s see how each of these features works while building our quiz forms.
How to create a quiz in WordPress
In this section, I’ll show you step-by-step how to use Fluent Forms to easily create quizzes on your WordPress site while explaining how each of the features works.
If you don’t have Fluent Forms activated, these steps are for you:
- Go to your WordPress dashboard.
- Find the “Plugins” option on the left menu bar.
- Select “Add New.”
- Search for the “Fluent Forms” plugin.
- Click “Install.”
- Activate the plugin when installation is complete.
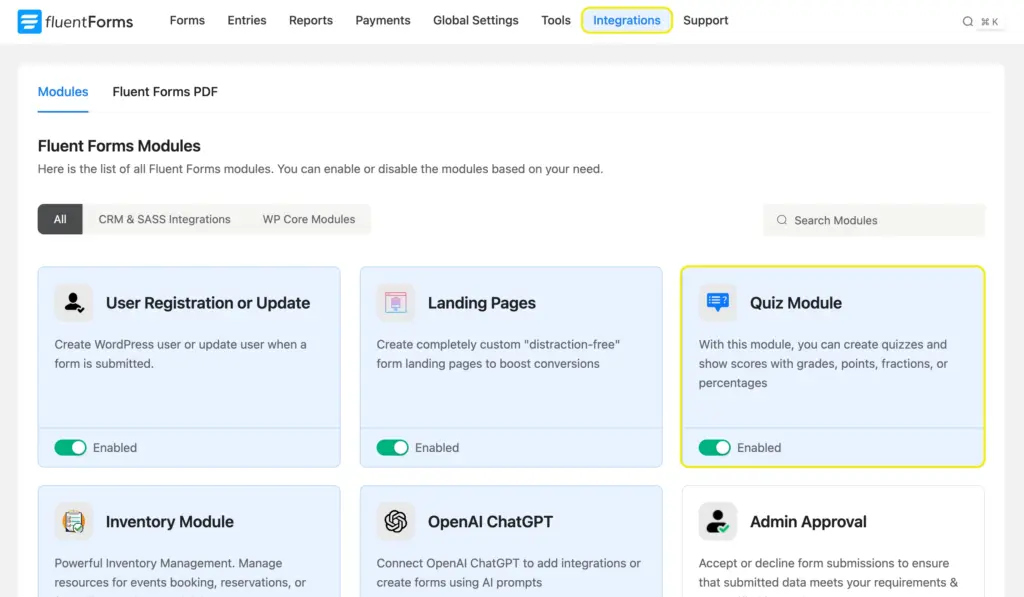
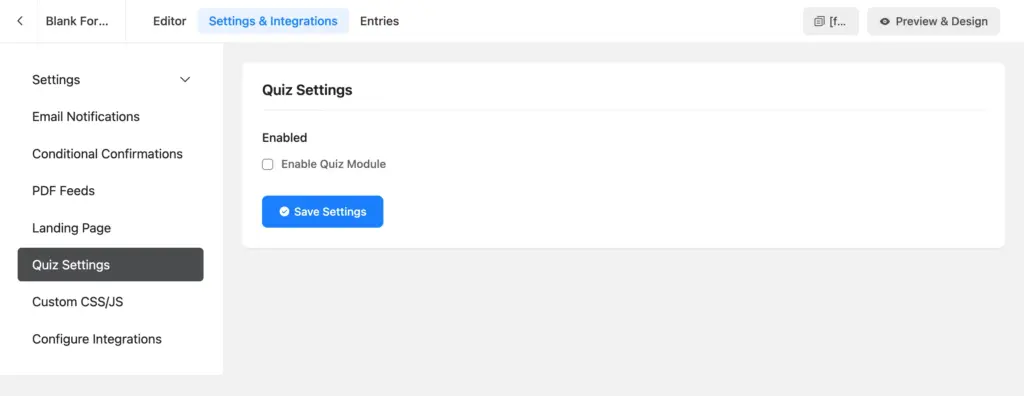
Once the plugin is activated, you need to upgrade to Fluent Forms Pro, since quiz scoring is a pro feature of Fluent Forms. After that, enable the quiz module from integrations to access the quiz settings.
Now we need to create our quiz form. Once the questions and options are compiled, we can move on to configuring the scores and grades. These are the fields supported in quizzes:
Fields for quizzes with Options:
- Radio Field (one option can be selected)
- Dropdown (one option can be selected)
- Checkbox (multiple options can be selected)
- Multiple Choice (multiple options can be selected)
For these fields, you have to select the correct answer option(s) in the quiz settings.
Fields for quizzes without options:
- Text Input Field
- Numeric Field
- Range Slider
- Date Field
For these fields, you have to type the correct answer in the quiz settings, and participants will get points only if their answer is an exact match.
Now, let’s get familiar with the quiz score field. Your participants can’t see this field; it’s for displaying the score upon form submission or in an email. There are 6 different formats/score types. Let’s see what each means.
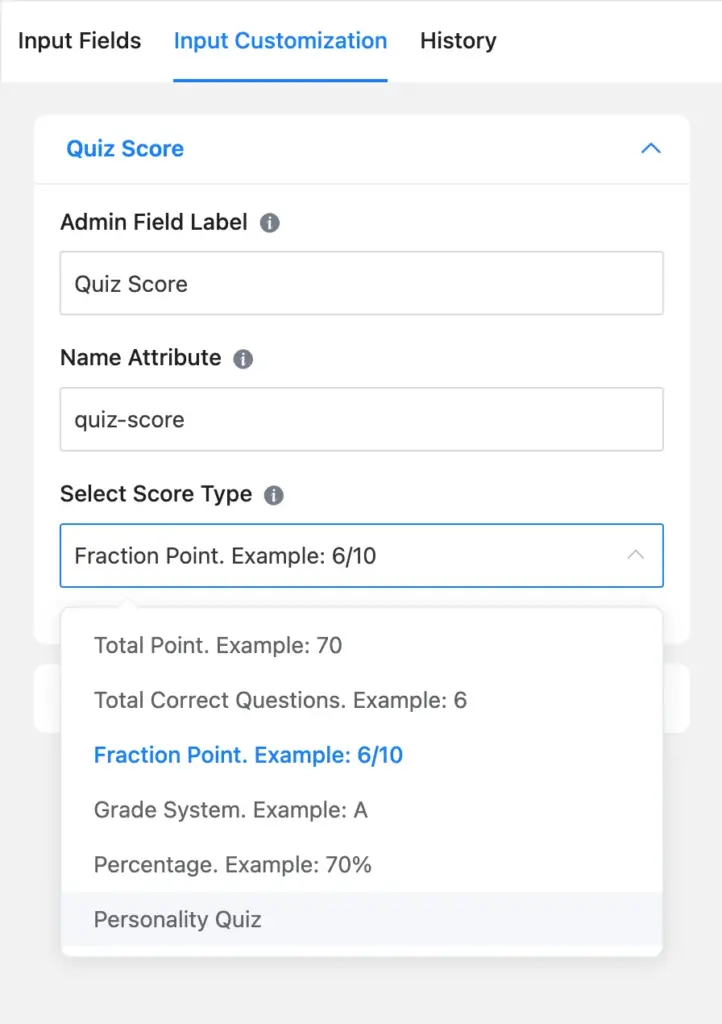
Total point: Shows the total points a participant scores.
Total correct questions: Shows the number of questions the participant got right.
Fraction point: Shows the number of correct questions against the total number of questions in a fraction format.
Grade System: Shows the custom grade labels/texts
Percentage: shows the percentage score (with respect to total points)
Personality quiz: Shows the personality archetype after a user completes the personality quiz test.
Now that you’re caught up on what’s required for the quiz form, let’s start creating with a basic Halloween trivia quiz.
How to create a trivia quiz
Go to Fluent Forms > Add New Form > New Blank Form from your dashboard’s left-hand panel.

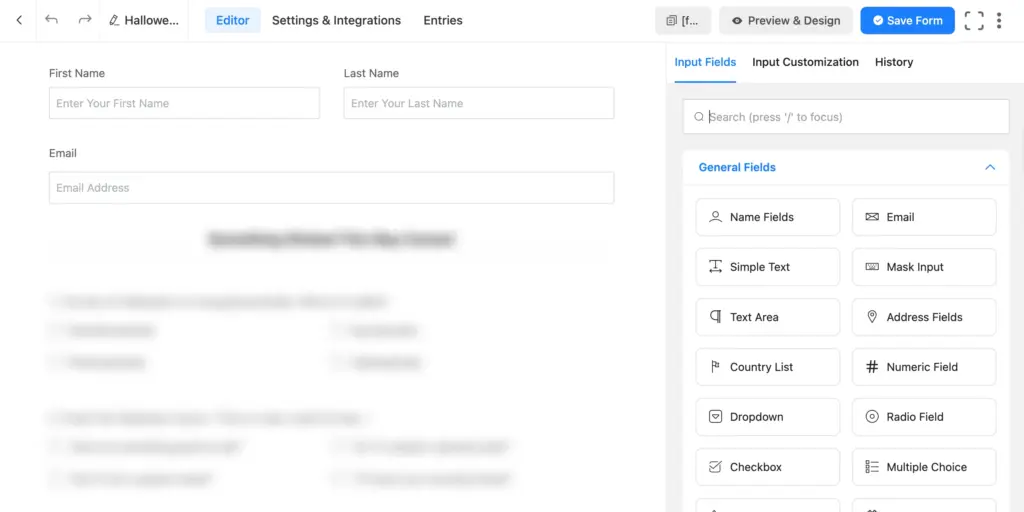
You’ll find the input fields on the right-hand panel of the form editor tab. From general fields, add participant identifying fields like name, a numeric field for student ID, email, etc. If you want to create an anonymous quiz, don’t add these fields.
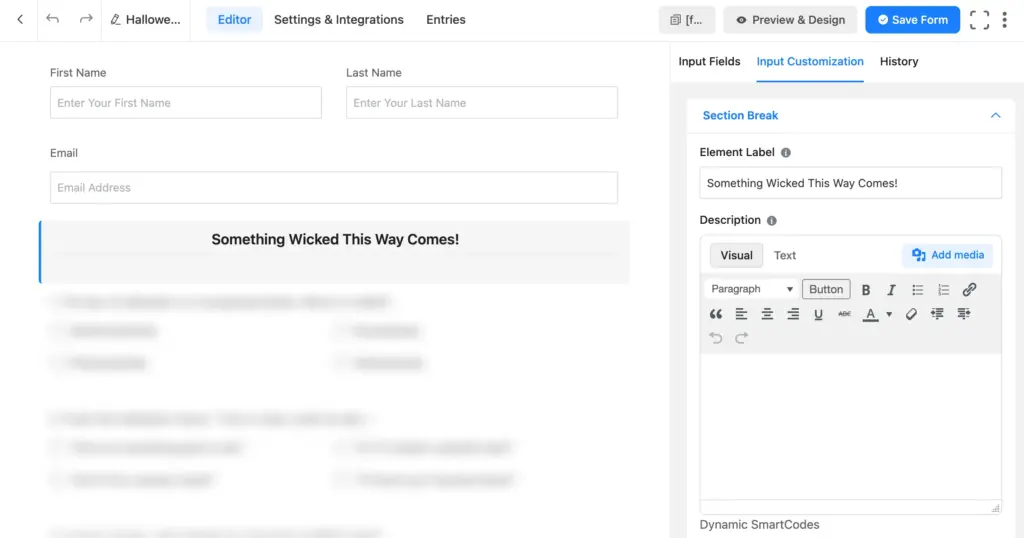
Now it’s time to add the quiz questions. You can insert a visually editable HTML field or a section break field before the quiz questions. This will separate the quiz section from the contact section, making the form easy to scan.
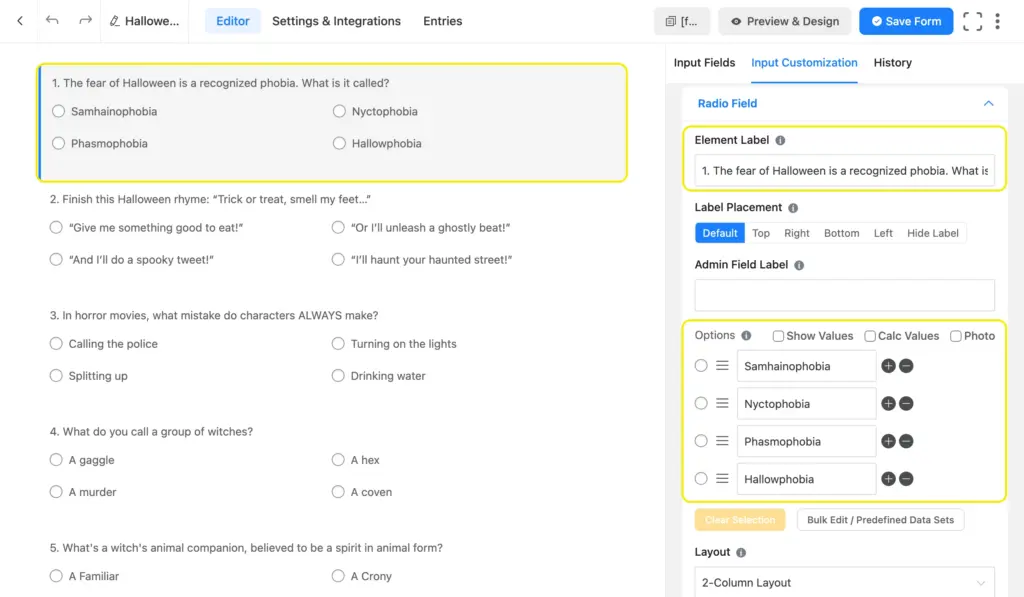
Take a radio field for each question. Click on the radio field to customize it. Enter the question in the element label and the quiz options in the radio fields’ options section. I also changed the layout to 2-column for a balanced look, but you can leave it as 1-column if you like.
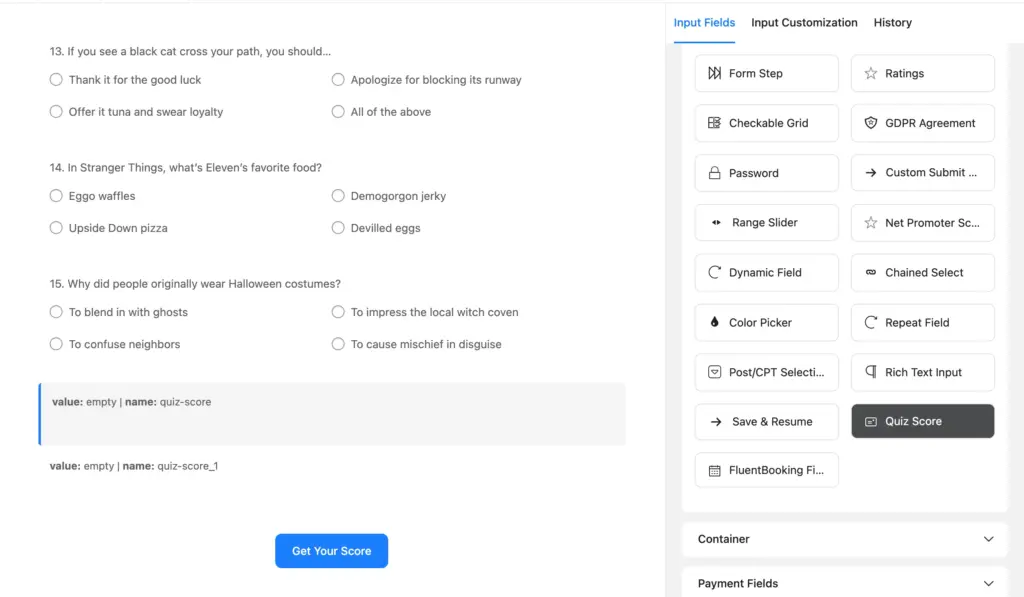
Once all the questions are added, insert a quiz score field from advanced fields. Or more, if you want to show the score in multiple formats. I took two: one for showing total points and another for the grade system (to show a custom message).
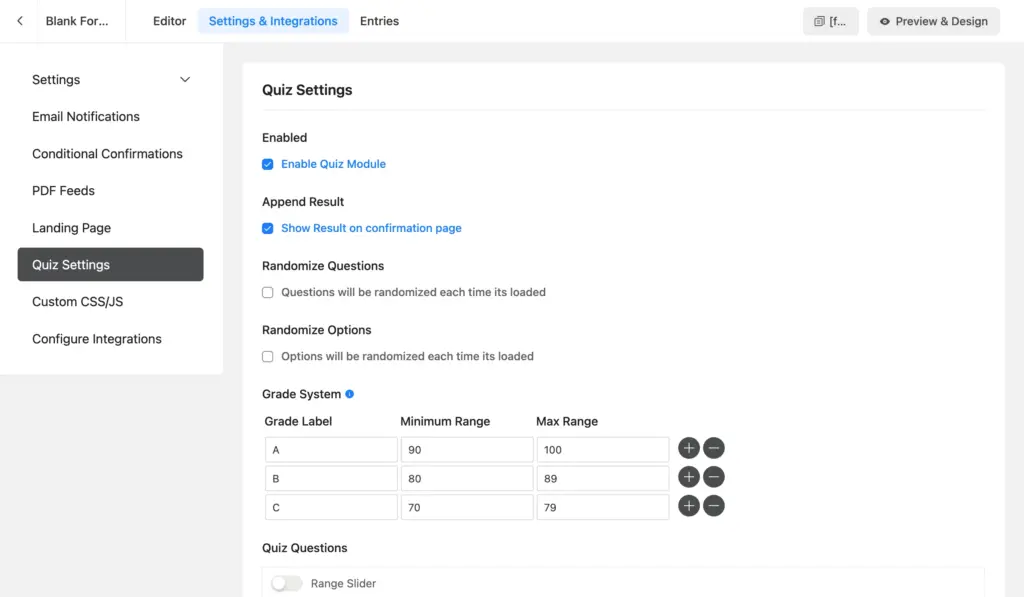
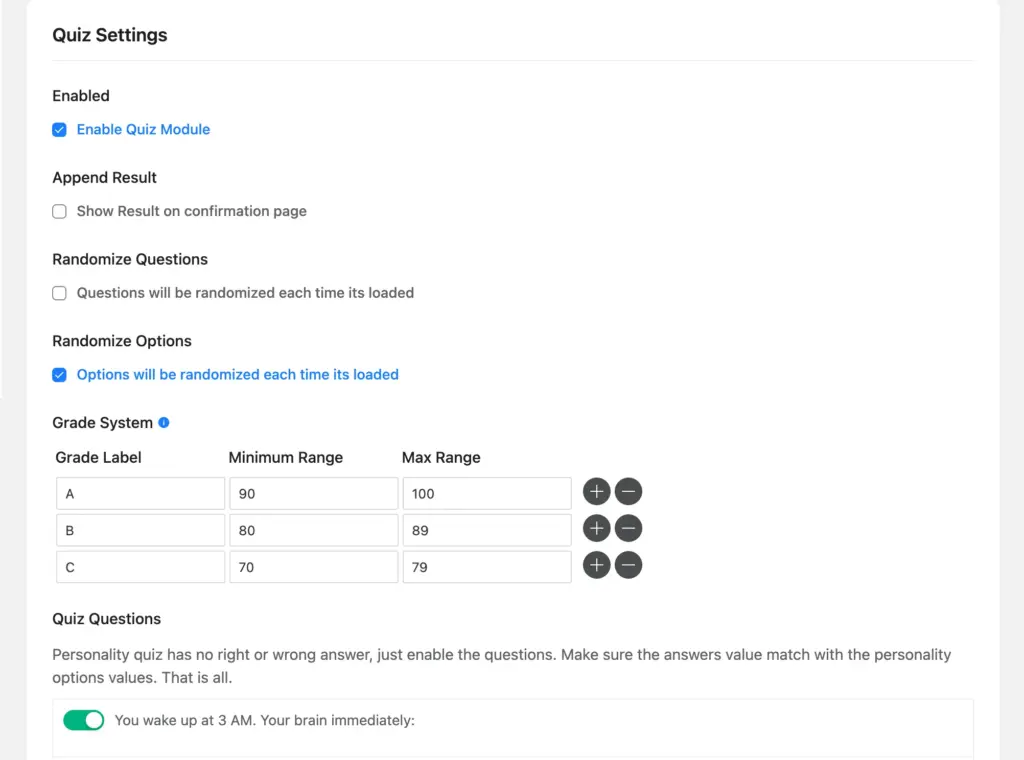
Now let’s configure the quiz settings. Navigate to settings & integrations > quiz settings. Enable the quiz module.
Here are the quiz settings you’ll have to customize:
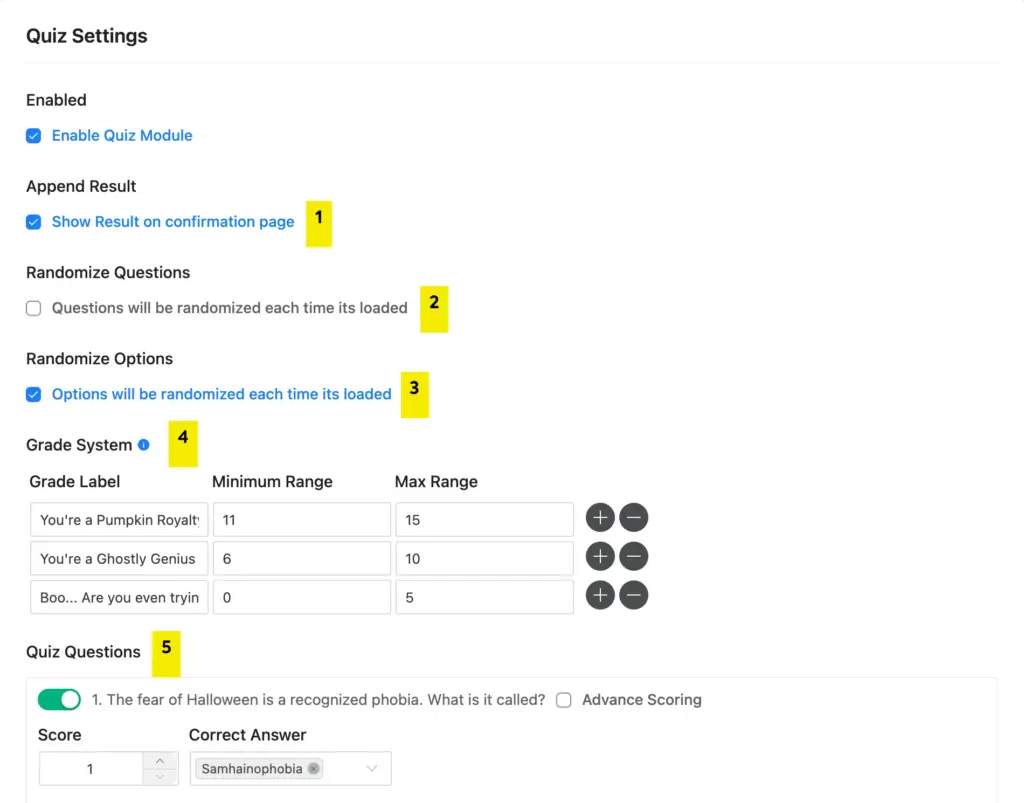
- Append Result: Check this box. It shows the quiz result on the confirmation page, in a tabular view.
- Randomize Questions: Checking this changes the order of the questions on each reload
- Randomize Options: Checking this shuffles the options on each reload
- Grade system: Allows you to set multiple score ranges and assign a grade/custom message to each of them
- Quiz Questions: Here, you get to enable which questions are included in the quiz test, enter/select the correct answer, and assign points to it.
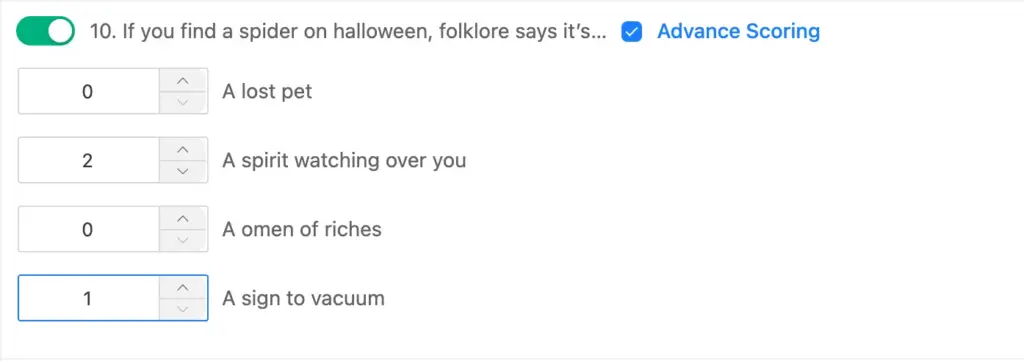
You can also enable advanced scoring (if there is more than one correct answer, where one answer is comparatively more correct). Here, I’m showing you how, but I’ll count only one correct answer for this quiz test.
Once you’re done configuring the settings, save the settings at the bottom. Now let’s move to the confirmation message.
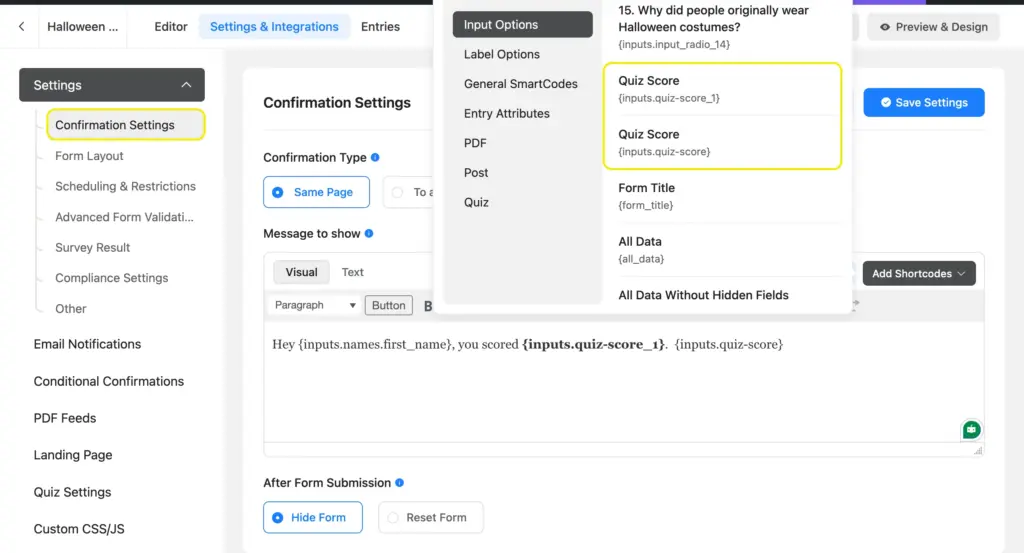
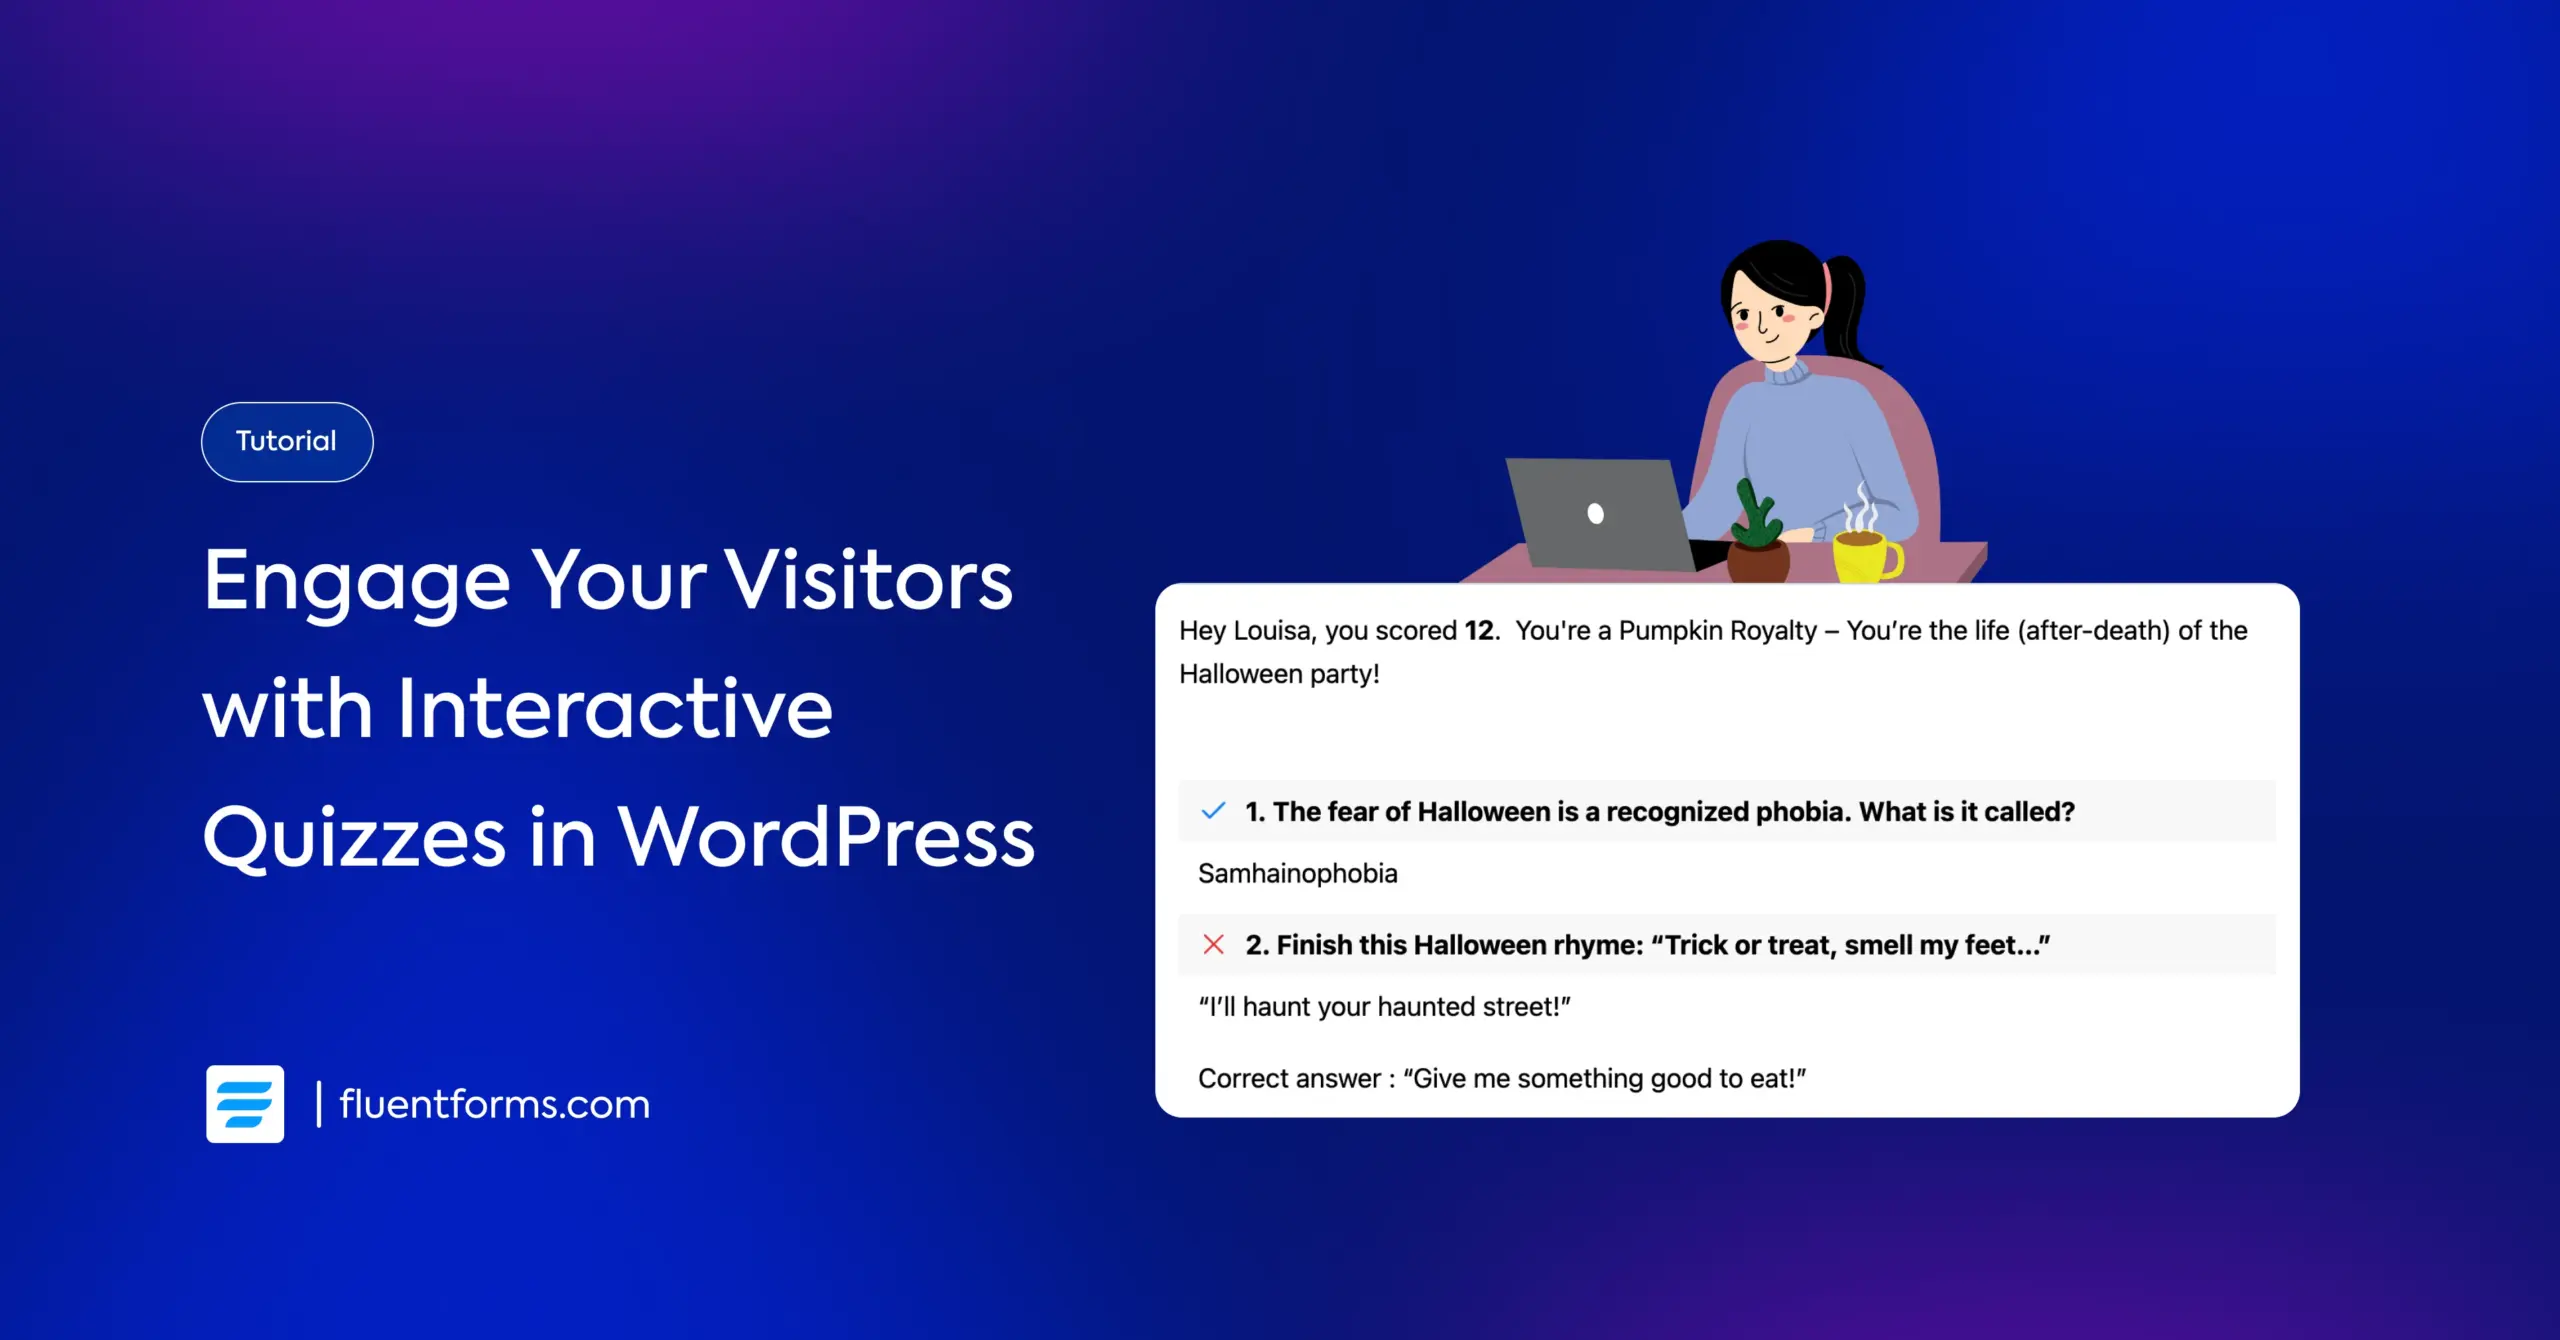
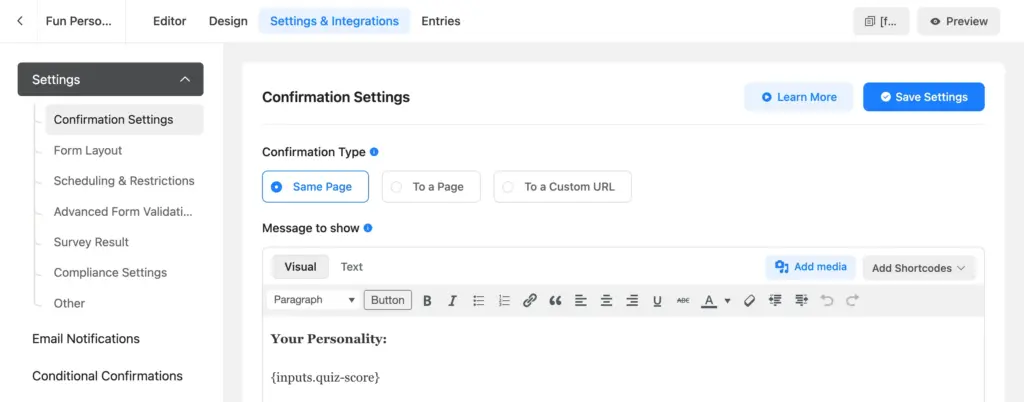
Navigate to Settings > Confirmation Settings. Write any confirmation message you like. You’ll find the shortcodes for the quiz scores from Add Shortcodes > Input Options. Choose the shortcode of the quiz score input fields you’ve inserted in your form accordingly and save the settings. Here’s a preview of the confirmation page.
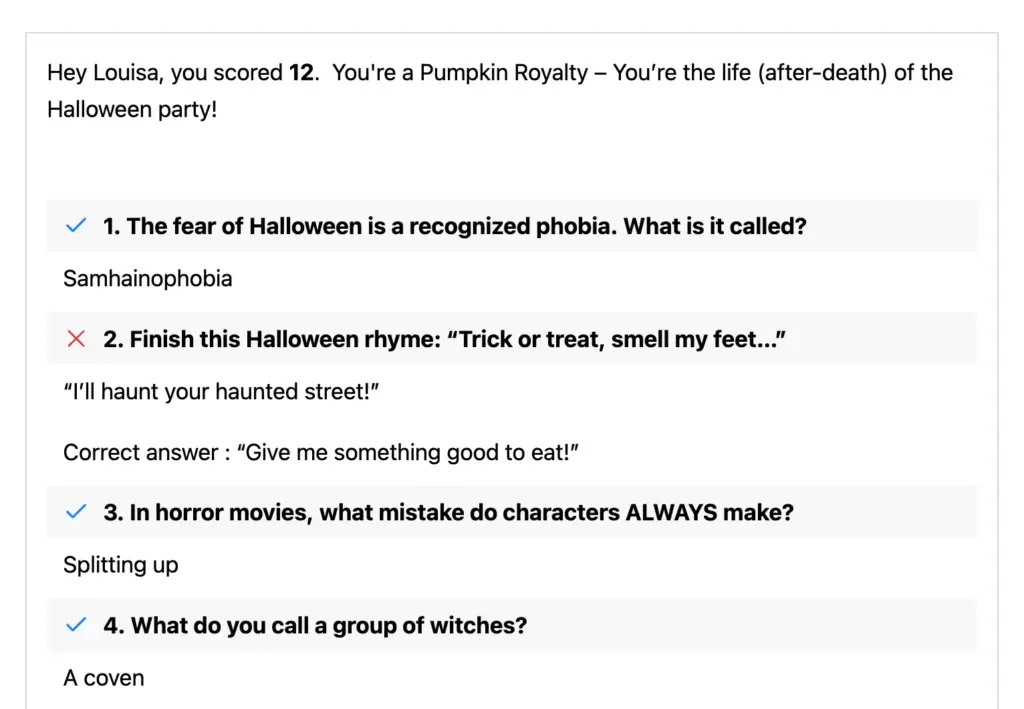
And here’s a preview of our Halloween quiz form. You can download it from our templates.
How to create a personality quiz
Personality quizzes are a fun way to engage your audience. Everyone is curious about themselves, and personality quizzes are the perfect opportunity for someone to understand their behavior. You can create a personality quiz for your psychiatry practice site or product site for recommending personalized products/services.
Before creating a personality quiz, you need to:
- Outline how many character types you want to include, and describe them.
- Design personal/behavioral questions.
- Outline an answer option for each personality type with each question.
I created the personality quiz form in conversation style, but you can go with the traditional look. Let’s keep this personality quiz anonymous.
Take a radio field for each question. Write the question in the field’s element label. Enter the options. Check the “Show Values” box. In the show values box, write the corresponding personality description beside each option.
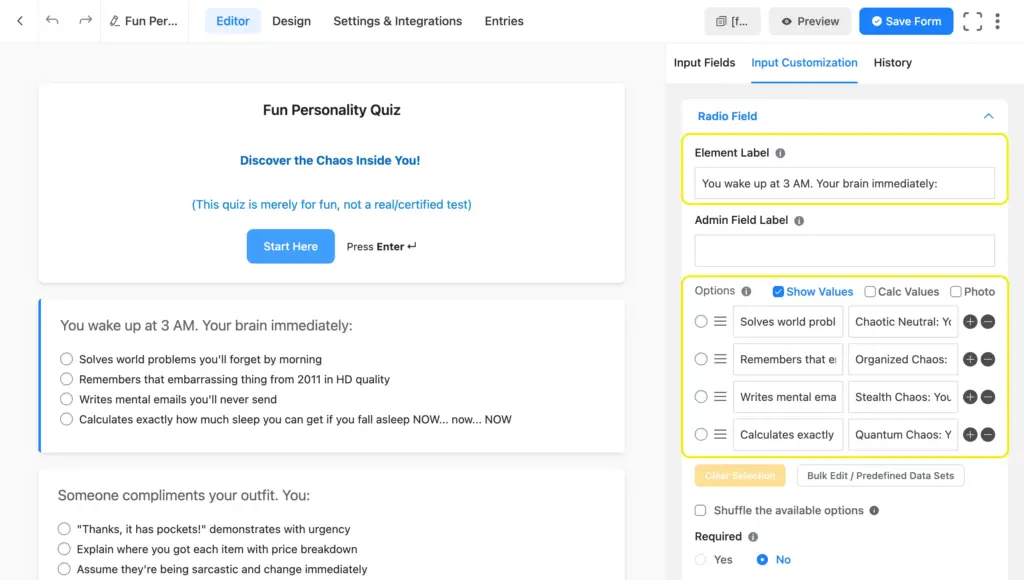
Add the other questions and options similarly, while adding personality types in the show value boxes. You can also repeat the first radio field and edit the questions and options. That way, the show value (personality) will already exist.
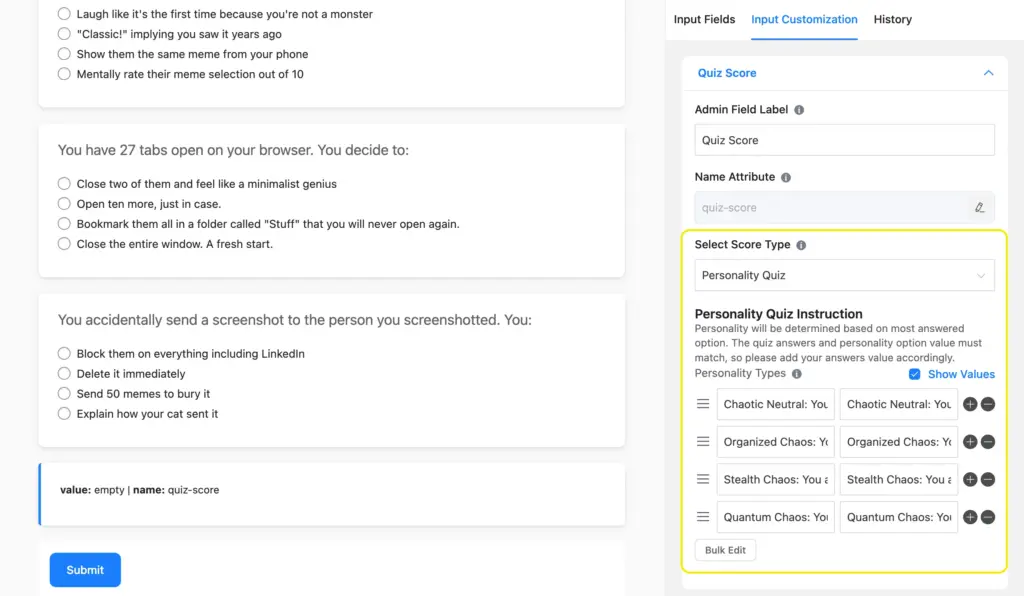
When you’re done compiling the questions, take a quiz score field. Select “Personality Quiz” as the score type. Enter the personality type descriptions under the personality quiz instruction, check the show values box, and repeat the corresponding personality descriptions in the show value boxes. Make sure your personality type description is an exact match across the form (even punctuations and capitalizations).
Save the form, and navigate to quiz settings. Enable the quiz module. I unchecked the “show result on confirmation page” because there are no right/wrong answers, so a result table isn’t necessary. You can show it, of course.
Then I turned on the “randomize options” setting. This is important because I entered all personality A-type options in option A, and likewise. So, if I don’t randomize options, they become obvious and predictable.
Next, toggle on the quiz questions and save settings. After that, navigate to the confirmation settings. Select the quiz score field from the shortcodes’ input options with your message. Save settings.
The personality quiz compiles all the answers and counts the total number of answers in each personality type. The personality type to which the highest number of answers belong is the dominant type. In case of a tie, the result is the type that you put first in order out of the two.
Here’s the preview of a personality quiz result.

And here’s the live demo of our personality quiz form.
Learn how to use this template on your site.
Capture audience interest with engaging quizzes
Whether you are looking to grade students automatically or simply want to offer a fun “Which Character Are You?” interaction for your blog readers, the setup process follows the same general structure: add your questions, set up scoring or personality types if necessary, configure the quiz settings, and customize the confirmation message.
All you have to think about is outlining the great questions and options. Fluent Forms will take care of the logic, calculation, and the rest.
Moreover, Fluent Forms quiz features (randomization, weighted scoring, custom grading, and personality matching) give you enough flexibility to build quizzes that actually serve your goals, whether that’s engagement, education, or lead generation.
So, simply design your questions or start with a template, and create your quiz in no time. Let us know how it goes!

Sarika writes for Fluent Forms and loves to offer insights into small businesses. She’s curious and enjoys discussing ideas, interests, and perspectives. In her free time, she’s either marvelling at architectural beauties or trying different cuisines.


Leave a Reply