8 Proven Ways To Stop Contact Form Spam in WordPress

Ah, you know that feeling when you check your contact form entries, excited to find a potential lead, and—boom—all you end up with is a flood of spam? Now you’re scrolling through endless messages offering “SEO optimization,” “website redesign,” or “partnership opportunities” from companies you’ve never heard of. Each one more irrelevant than the last.
And in the chaos, that real potential lead you were hoping for? It’s lost somewhere in the mix. But hey, here’s the deal: you don’t have to keep dealing with this nonsense. In this blog, we’re about to show you six surefire ways to stop contact form spam.
What are spambots?
Spambots are automated software programs or scripts designed to exploit contact forms on websites by submitting irrelevant, unsolicited, or malicious data. These bots typically target form fields by scraping website pages for contact form structures and automatically filling out the fields with junk content, such as fake business proposals, service offers, or links to phishing sites.
They are programmed to submit high volumes of entries, which not only clutters your inbox but also poses security risks by potentially distributing malware or harvesting personal information. Without effective countermeasures, these automated submissions can overwhelm your form data, reducing the quality of legitimate inquiries.
Why do bots spam contact forms?
Spambots primarily target contact forms for malicious purposes. One of the key reasons is data harvesting, where they scrape valuable personal information, such as email addresses and business details, for use in targeted spam campaigns or to sell to third parties.
Another reason is SEO manipulation, where bots flood forms with submissions containing backlinks to their own sites, aiming to boost their search engine rankings.
Some bots are specifically designed for phishing or malware distribution, injecting harmful links into form submissions in an attempt to steal sensitive data or infect users with malware.
Additionally, spambots can create a server overload, submitting vast amounts of irrelevant data that can slow down or even crash your website. All of this leads to a waste of time and resources, making it difficult to sort through legitimate inquiries and reducing the effectiveness of your contact forms.
How to stop contact forms spam
Keeping your forms secure without overcomplicating the user experience is a delicate balance. You want to ensure that legitimate users can easily submit their information while blocking out spam. Here are six effective ways to stop contact form spam and improve your form’s performance at the same time.
Choose a reliable contact form plugin
The most effective way to block contact form spam is by choosing a powerful contact form plugin. However, most WordPress form plugins don’t have built-in spam protection capabilities.
This is where Fluent Forms comes in. It’s a reliable, feature-rich plugin that not only provides an intuitive form-building experience but also comes with strong, built-in spam protection. With Fluent Forms, you can easily implement anti-spam measures, ensuring your forms stay secure while maintaining a seamless user experience.
Key features of Fluent Forms that makes it a secured form plugin:
- 60+ input fields to collect any type of information
- Spam protection using hCaptcha, reCAPTCHA, Turnstile, Honeypot, Akismet, and CleanTalk
- Form scheduling and restriction based on different rules
- Double opt-in confirmation to ensure efficient data collection
- Advanced form validation to accept eligible submissions
- 55+ integrations to expand core functionalities
Use Honeypot Security
Honeypot Security is an effective anti-spam system designed to trick bots into submitting unwanted data. It works by creating hidden fields that are invisible to human users but visible to bots.
Since legitimate users won’t interact with these fields, any submission that includes data in these hidden fields is automatically flagged as spam, making it easy to detect and block unwanted submissions.
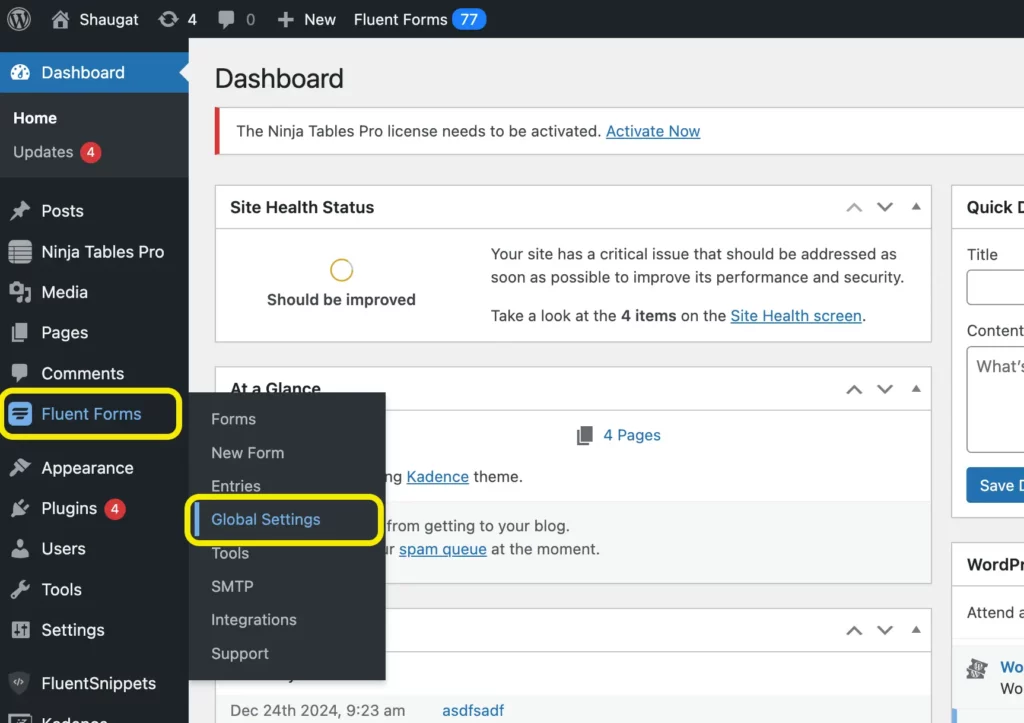
To enable Honeypot Security, go to Fluent Forms > Global Settings.
Scroll down to the Miscellaneous section and you will find Honeypot Security.
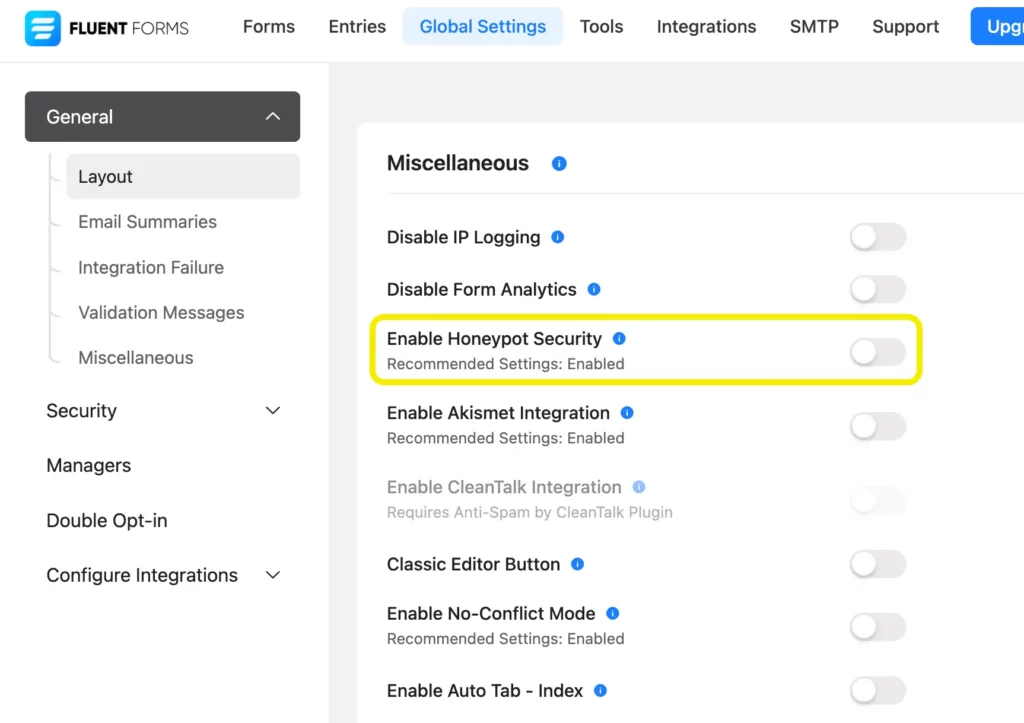
Toggle the button to enable Honeypot Security.
Use reCAPTCHA on your forms
Google reCAPTCHA is a free security tool that protects your website from spam and abuse by blocking automated submissions while keeping forms user-friendly for humans.
The latest version, reCAPTCHA v3, improves the process by working silently in the background, unlike reCAPTCHA v2, which requires users to solve puzzles or complete tasks. This makes form submissions smoother for users while making it harder for bots to spam your forms.
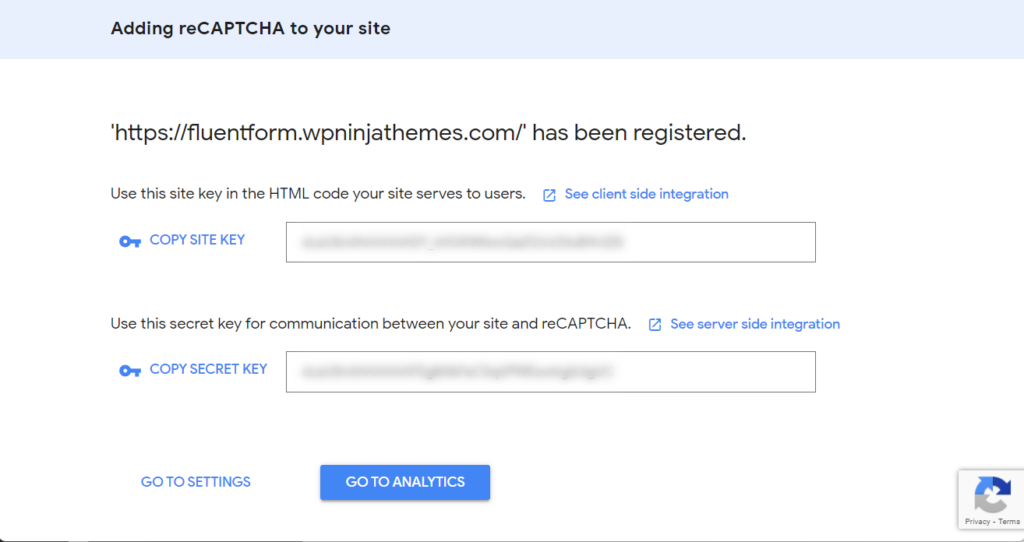
To set up Google reCAPTCHA v3 with Fluent Forms, the first step is to get the API keys.
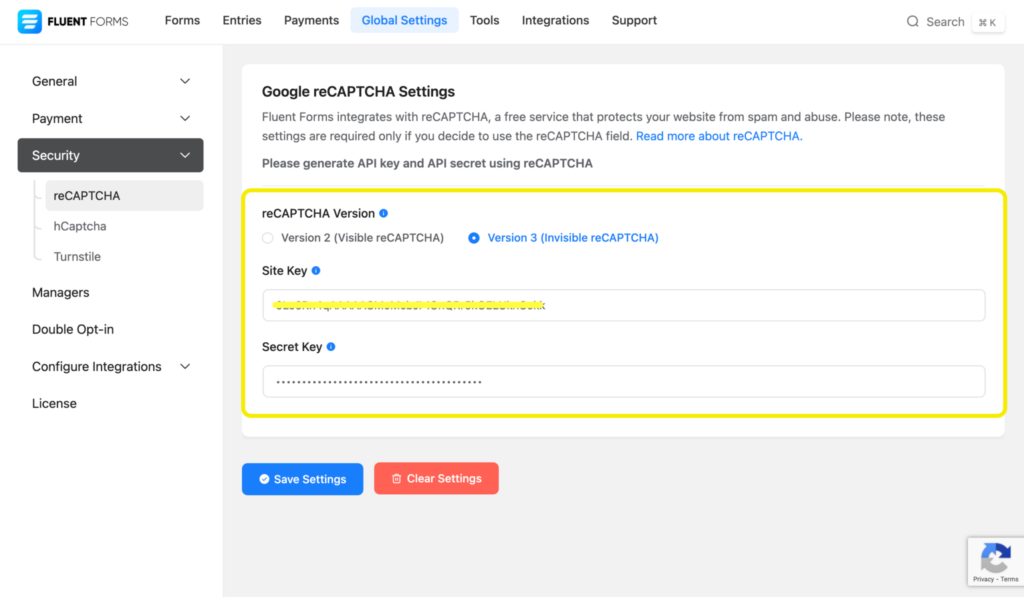
After obtaining the keys, paste the Site Key and Secret Key you obtained earlier. Once you save the settings, you’ll see a confirmation message saying, “Your reCAPTCHA is valid.”
The final step is to add reCAPTCHA to your form. Simply add the necessary fields to your form and then drag the reCAPTCHA field from the Advanced Fields section.

And that’s it! Your form is now protected with Google reCAPTCHA v3, making it much harder for spam bots to flood your submissions.
Apply hCaptcha
hCaptcha is a free security solution designed to safeguard your website from spam while ensuring genuine visitors can access your content. This bot detection tool shields your forms from spam entries and blocks automated program submissions, all while preserving a seamless and user-friendly form experience.
Before a form is submitted, hCaptcha prompts users to complete one or more challenges. If the responses are correct, the form can be submitted successfully.
To set up hCaptcha in Fluent Forms, first sign up on hCaptcha to get your Site Key and Secret Key. In your WordPress dashboard, go to Fluent Forms > Global Settings > Security > hCaptcha, and paste the keys.
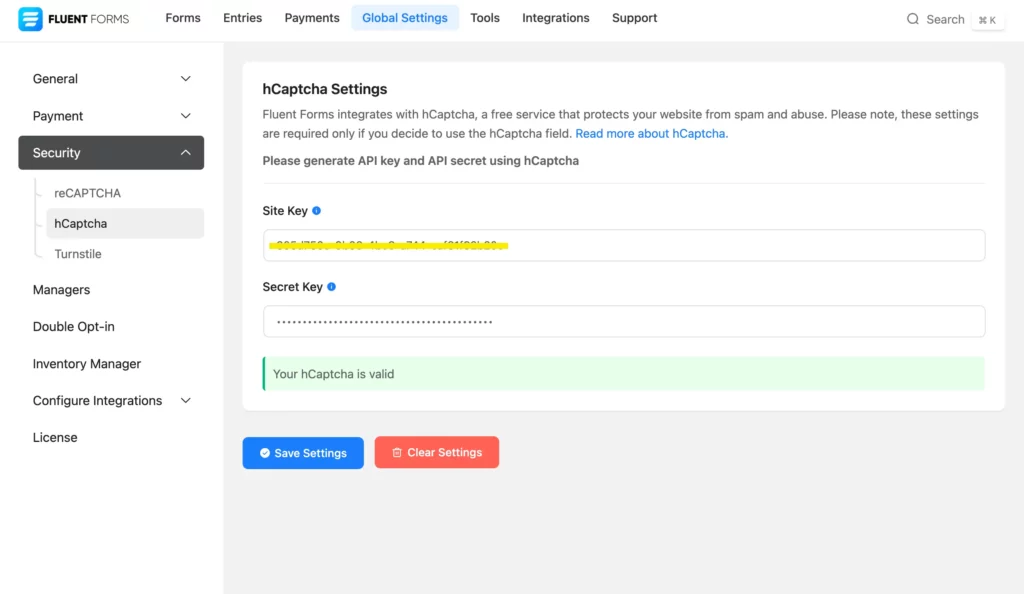
Just like reCAPTCHA, adding hCaptcha to a form is super simple. Add the hCaptcha input field from the Advanced Fields section and your form is ready with spam protection!
Take advantage of Akismet
Fluent Forms integrates with Akismet, a popular spam protection service, to filter out unwanted submissions. To enable it ensure Akismet is installed and activated on your WordPress site.

Now go to Fluent Forms > Global Settings, find the Miscellaneous section, and toggle on Enable Akismet Integration.
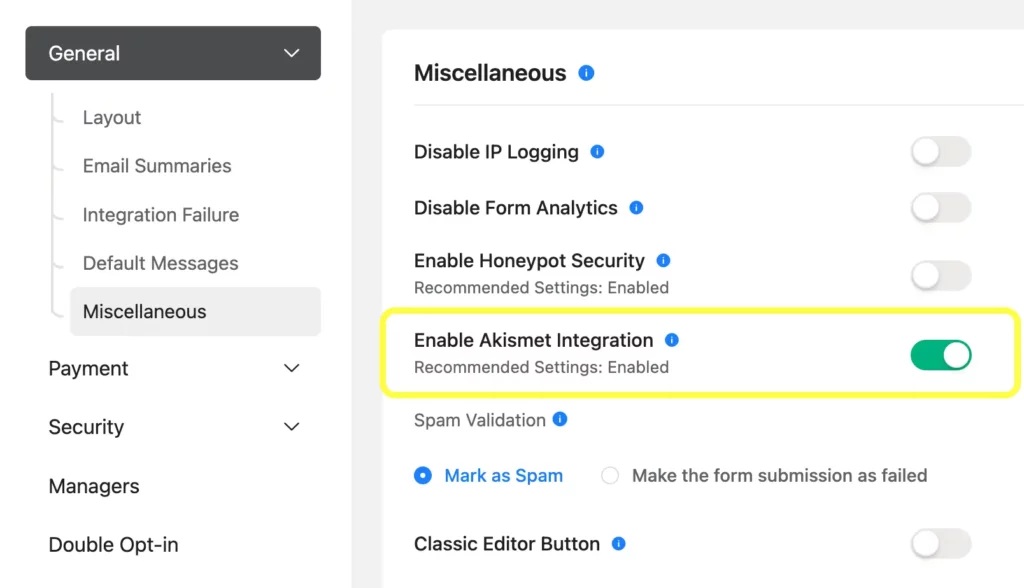
Then choose to either mark detected spam or fail the submission entirely.
Enable token-based spam protection
Token-based spam protection works by assigning unique, time-sensitive tokens to form submissions, verifying their validity before accepting the submission. This method ensures that only legitimate users can submit forms while blocking automated spam bots.
The process typically involves the following steps:
- Token generation: When a visitor loads a form and focuses on a form-field using her mouse cursor, Fluent Forms generates a unique token. This token is embedded within the form as a hidden field or stored in the session.
- Token validation upon submission: When the user submits the form, the token is sent along with the form data. Fluent Forms checks if the token is valid by verifying its existence, ensuring it has not expired.
- Handling invalid tokens: If the token is missing, expired, or already used, the submission is rejected. If valid, the form data is processed as usual.
To enable token-based spam protection, go to Fluent Forms > Global Settings, find the Miscellaneous section, and toggle on Token Based Spam Protection.

If your form contains a single input field with default value, token-based spam protection will prevent the form from being submitted.
Use Advanced Form Validation
Advanced form validation helps prevent spam and bot submissions by ensuring more accurate form entries. You can set multiple conditions to verify if the entries are correct or contain errors. Based on whether the conditions are met, the submission will either proceed or be rejected.
To set up advanced form validation, select a form field and define the condition (e.g., equal to, starts with, includes) for the field’s answer.
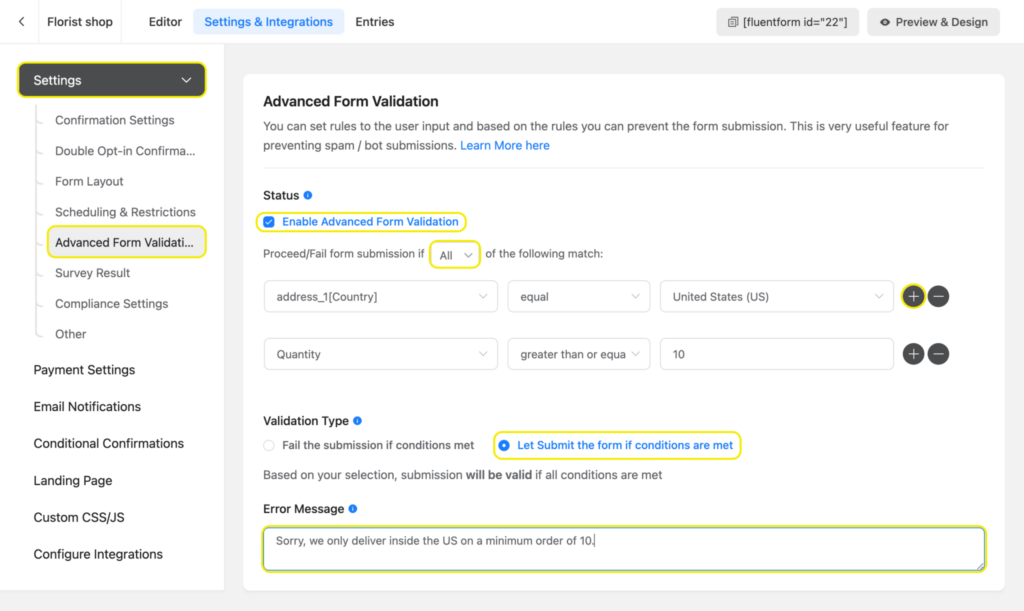
Add more conditions by clicking the Plus icon, and choose “All” or “Any” to determine when the submission proceeds or fails based on the conditions.
Next, select the validation type (fail or proceed) and write an error message for failed submissions.
Using this feature, you can set boundaries for form field entries to define what is considered acceptable or not, ensuring the submitted data meets your requirements.
Restrict form entries based on IP, Country, or Keywords
Restricting form entries based on pre-specified rules can help prevent unwanted form submissions. Fluent Forms gives you the ability to restrict form entries based on IP, Country or Keywords.
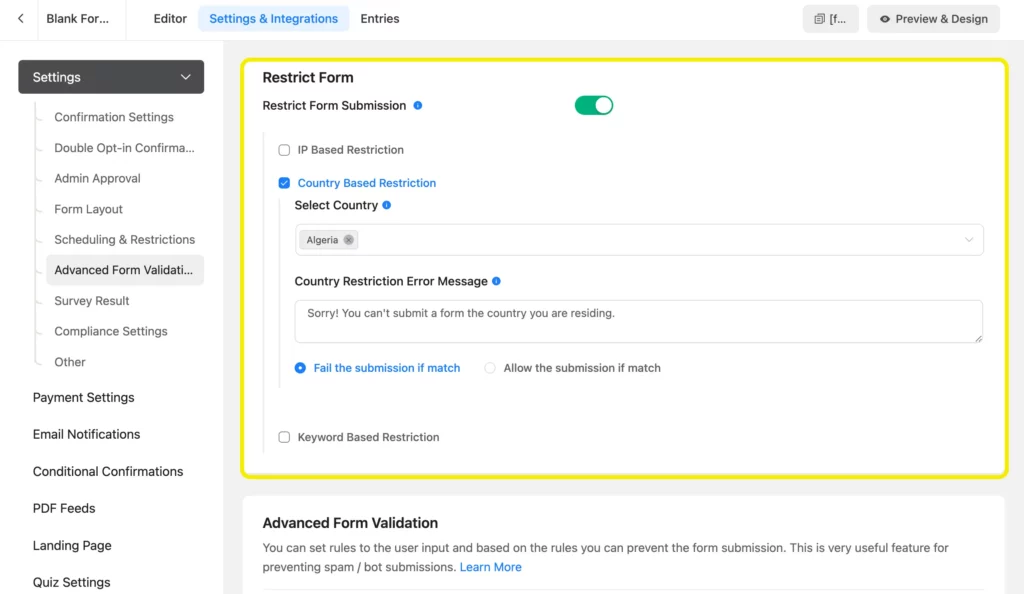
IP-based restrictions help prevent submissions from fake or suspicious IP addresses. Country-based restrictions are useful for targeted marketing, allowing submissions only from specific countries. To block harmful, offensive, or irrelevant keywords in your forms, you can use keyword-based restrictions.
Furthermore, Fluent Forms provides a way that can help limit the maximum number of entries per IP address.
To use this feature, navigate to the specific form’s Settings & Integration interface and find the Scheduling & Restrictions section.
Enable Maximum Number of Entries and choose Per User (IP Address Based) from the dropdown menu.

This will help prevent bulk form submissions by bots.
Final words
Keeping your contact forms free from spam is essential for maintaining efficiency and ensuring genuine submissions. There is no surefire way to stop bots entirely, as spammers constantly evolve their tactics.
However, using tools like Honeypot, reCAPTCHA, hCaptcha, and Fluent Forms’ advanced spam prevention features can significantly reduce spam submissions. By implementing multiple layers of protection, you can maximize security while maintaining a smooth user experience.
Follow us on social media platforms for more updates and helpful tips.

Hello, This is Prema. I work as a marketing strategist for Fluent Forms at WPManageNinja. When I am not playing with words, I go to explore nature.


Leave a Reply