Collect More Leads in WordPress Forms with Insightly

Lead generation is a crucial part of a business. When done correctly, this can increase and grow your business. Hence, it is absolutely vital that you have the perfect tools by your side to help you achieve your goal.
Keeping this in mind, we have put together this useful blog to introduce you to one such tool, Insightly, that will work with you hand in hand in clarifying order details, checking inventories, assigning tasks, tracking performance, and overall building good relationships with your target audience.
So read on to learn about the CRM software and how you can connect Insightly to WordPress.
Insightly
Insightly is a super-efficient SaaS-based CRM developed with helping mid-sized businesses in mind. It comes packed with features that are easy to use, powerful in performance, and although there is no free version, it is affordable for the business.
Some of the reasons businesses love Insightly are:
- Centralized customer data
- Content design and testing tools
- Advanced analytics
- Custom project dashboard
- Campaign performance tracker
- ROI tracker
- Mobile app, etc.
How to connect Insightly in WordPress
Insightly does not support WordPress. But that doesn’t mean you cannot connect Insightly to WordPress. In fact, there’s a number of ways you can do that. We will be using the WordPress form builder Fluent Forms because of its straightforward nature. But you can use other form builders if you like. Fluent Forms Pro offers Zapier integration with all of its premium licenses so you can effortlessly integrate 3000+ apps to WordPress. Here we will show you how you can connect Insightly to WordPress using Zapier.
Step 1: Create a lead generation form
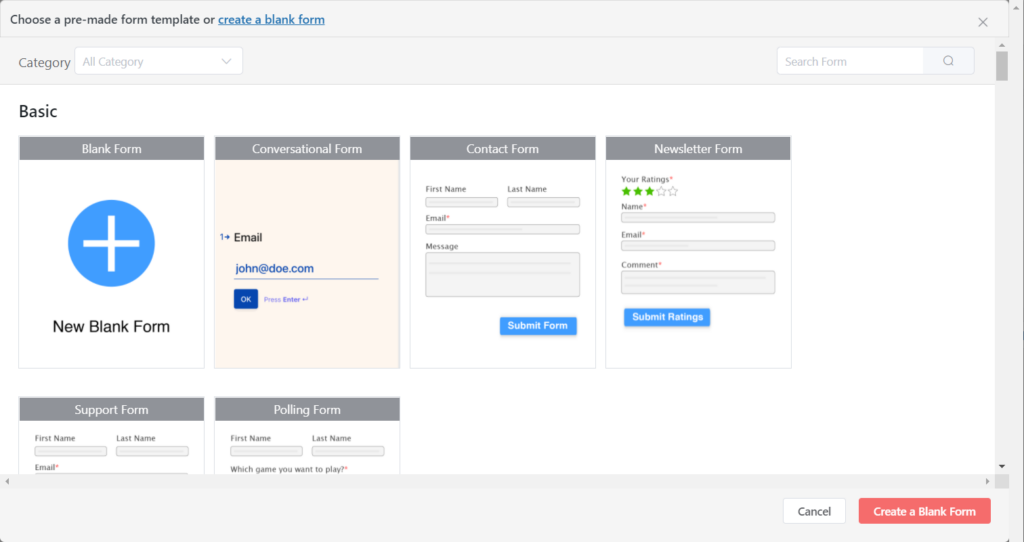
Let’s start by creating a lead generation form. To do that, go to the Fluent Forms dashboard, and click on Add a New Form and go with a blank form.
From here on, we will go through all the input fields available to us and drag and drop the ones we need. First, we definitely need the names of the people. So we’ll drag a Name field. The whole purpose of the lead generation form is to collect emails, so next comes an Email field.
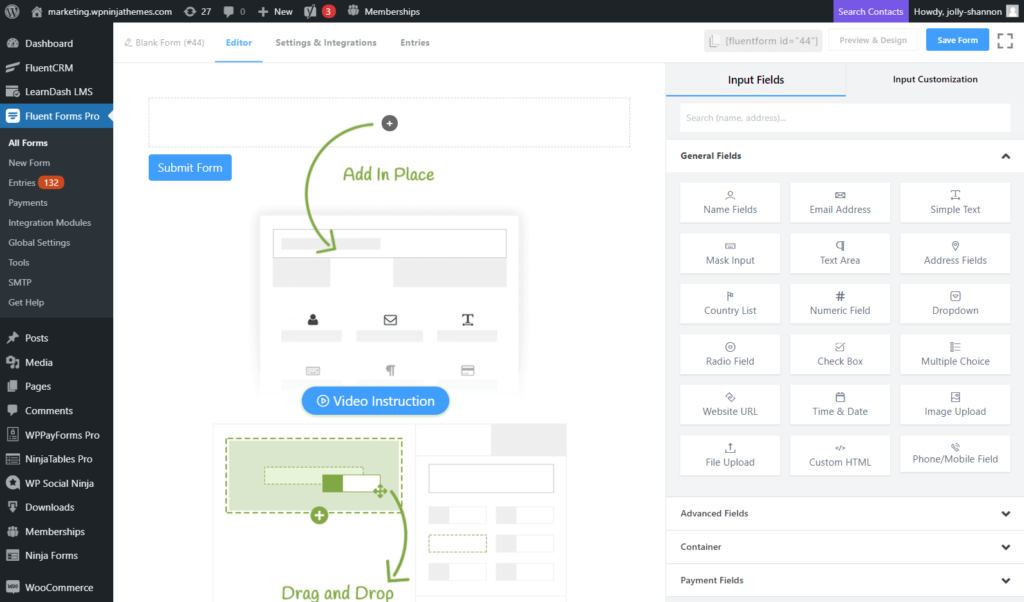
This sums up a basic lead generation form. However, depending on the type of product or service you offer, you can throw in a couple more questions. For instance, if you offer financial consultations, you can ask for their yearly income or if they have a house. Include all the taxable assets as options on a dropdown field, and you are done.
You can also add double opt-in to your form.
Remember to click on the Save Form button, or all your changes will be lost.
Step 2: Create a Zap
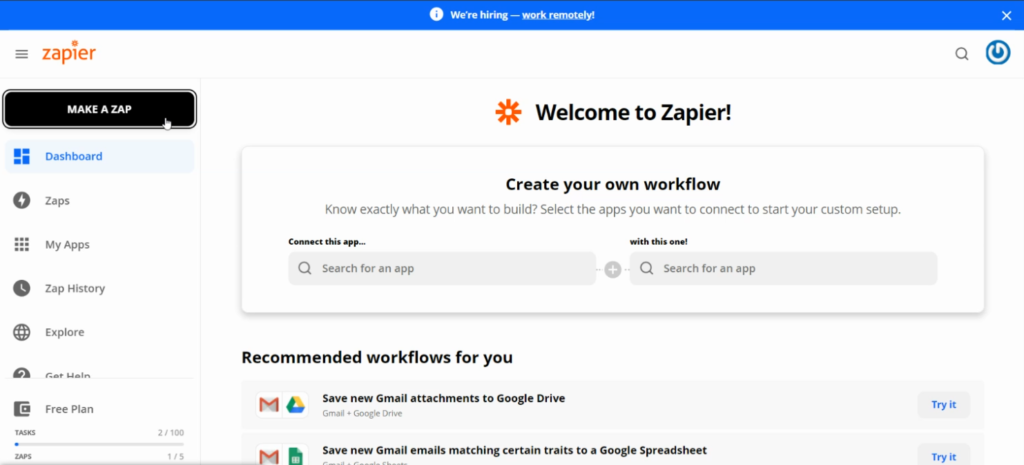
After you have created your lead generation form, it is time to connect it with Zapier. Through Zapier, you can connect your form to 3000+ apps and plugins. But first, let’s see how it works for Insightly.
Start at the Zapier dashboard, and follow the steps below.
- There’s a Make a Zap button on the left sidebar, click on it.
- Skim through the selection of apps and select Webhooks by Zapier.
- To connect Fluent Forms to Zapier, you’ll need the Catch Hook event.
- Click Continue.
- Copy the Custom Webhook URL for future use.
Congratulations! You just created a Zap.
Step 3: Create a Zapier feed
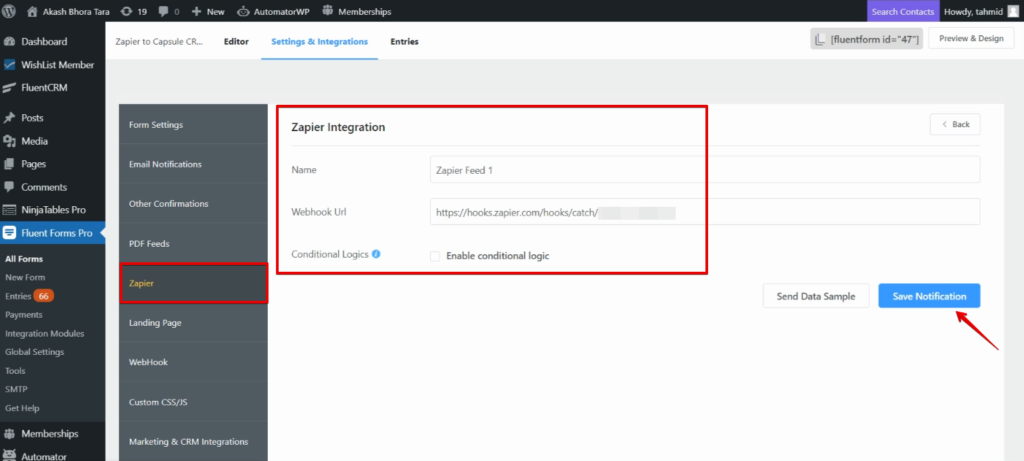
Now it’s time to go back to your lead generation form and prepare it a little more so you can use it to connect Insightly in WordPress. Open up your form and start following the steps mentioned below.
- Head to the Settings & Integrations tab of your lead generation form.
- Scroll to the Zapier section from your side menu.
- Click on the Add Webhook button.
- Paste the custom webhook URL you copied previously.
- Remember to Save Notifications.
Your Zapier feed is up and running and ready to be taken out for a test drive. Make a test form submission, and that data will show up in Zapier, which means the feed is working.
Step 4: Create an action
Your Zapier hook may be working, but you’re still going to need an action. So hit that Continue button and do the following.
- Use the search bar to locate Insightly.
- As for the Action Event, we will go with the Create Record.
- Click to Continue.
- Sign in to your Insightly account.
- Define the action by configuring it further with first name, last name, email address, shipping details, etc.
- Test & Review.
When you visit your Insightly account after finishing these steps, you’ll notice an additional contact. More such contacts will be added after each successful form submission. One quick click into them will provide you with all the necessary details.
Step 5: Turn on Zap
Hold on. You’re not done just yet. You still have to turn on the Zap for the integration to work. This will allow you to view everything from your Zapier module. And if you have more integrations running, this will be especially handy.
It’ll take a single click. On the Zapier module, there’s a Go to my Zaps button on the popup. Click on it, and you’re done.
More than lead generation
Your lead generation form is ready, and you have it integrated with Insightly. But there’s more that Fluent Forms can do. WordPress forms contain limitless possibilities, and Fluent Forms vows to reach all of them. Advanced date configuration, conditional post categories, numeric calculation, double opt-in, landing page, advanced form validation, conversational forms, payment gateways, etc., are just a handful of the most impressive features that Fluent Forms has to offer. Try it out and see for yourself.




Leave a Reply