

How to Build a Custom Application Tracker with Fluent Forms and Ninja Tables

Collecting job applications through a form is the easy part. Tracking them is trickier. You have to remember each application’s status, find approvals in your inbox, and answer applicants who email to ask if they got accepted.
You can fix all of that inside WordPress. I’ll show you how to build a full application tracker using the Fluent Forms admin approval feature and Ninja Tables. The team gets a clean table, which you can publish for the applicants to check their own status.
TL;DR
- Build your application form in Fluent Forms, then turn on the Admin Approval module so every entry gets a status: approved, declined, or unapproved (pending).
- Change an application’s status two ways: click Approve or Decline in the admin email, or set it from the Entries screen.
- Connect the form to Ninja Tables to display entries in a table. Use it as an internal tracker, or show it on a front-end page so applicants can view their own status.
- Add a short rowspan JavaScript snippet and a combine class so rows with the same status merge into one grouped block.
- Bonus: skip approval entirely and route submissions into FluentBoards, where you review and drag applications between stages on a board.
- Every piece is self-hosted on your own site. No monthly applicant tracking subscription.
What You’ll Build
By the end, every application has a status and shows up in one clean data table that you can also display on the frontend.
- An internal tracker using Ninja Table that shows your whole pipeline, with applications grouped by status so approved, declined, and pending sit in their own blocks.
- A public status page using the same table is displayed on the front end, so applicants can look up where their application stands instead of emailing you.
Here’s the workflow you’ll set up:
- Build the application form.
- Turn on admin approval so submissions start as pending and wait for review.
- Approve or decline each application from the email or the Entries screen.
- Connect the form to a Ninja Table to display the entries.
- Merge rows by status (optional). A small JS snippet groups same-status rows visually; sorting does the same thing without code.
Once that’s running, I’ll show you a FluentBoards alternative for teams who’d rather review applications on a kanban board than through approval emails.
What You’ll Need
Before you start, make sure you have these installed and activated:
- Fluent Forms (free or Pro). The Admin Approval module (Pro) is available in the plugin’s Integrations screen.
- Ninja Tables (free or Pro) to display form entries in a table. The Fluent Forms connection works in the free version.
- Optional: FluentBoards (free or Pro) for the bonus board-based review workflow. The connection works with each plugin’s free version.
Step 1: Build the Application Form
Start with the form that collects applications. Go to Fluent Forms > New Form and either start blank or pick a template, then customize it.
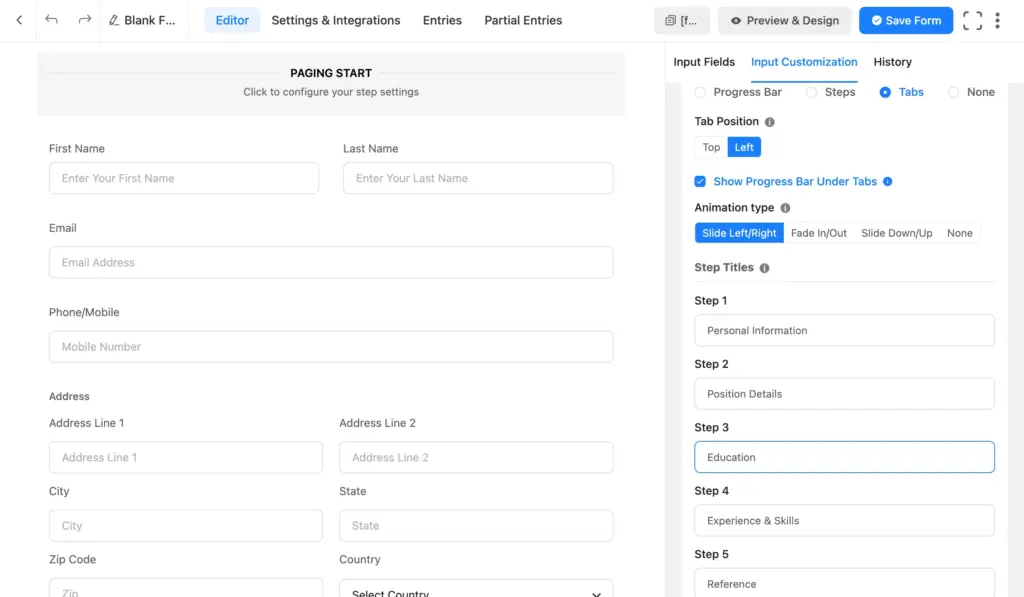
A job application has more fields than a contact form, so split it into steps. Add Form Step fields to break the form into sections, then name each step from the Input Customization panel. For example:
- Personal Information: Name (first and last), Email (required, so you can notify the applicant later), Phone/Mobile, Address.
- Position Details: Position Applied For (dropdown), Desired Salary, Available Start Date, Employment Type (Full Time / Part Time radio).
- Education: High School/College Name, Degree or Diploma Earned, Graduation Year.
- Experience & Skills: Most Recent Company Name, Job Title, Employment dates, Summary of Duties.
- Reference: Reference contact details.
Multi-step forms keep a long application from feeling long, and Fluent Forms tracks partial entries so you can see who started but didn’t finish. Only add fields you’ll actually use to screen applicants. Save the form, then preview and submit a test entry.
Step 2: Set Up Admin Approval
The approval module turns a plain form into a tracker. It holds every submission as pending (unapproved) until you review it, which you can later approve or decline.
Enable the admin approval module
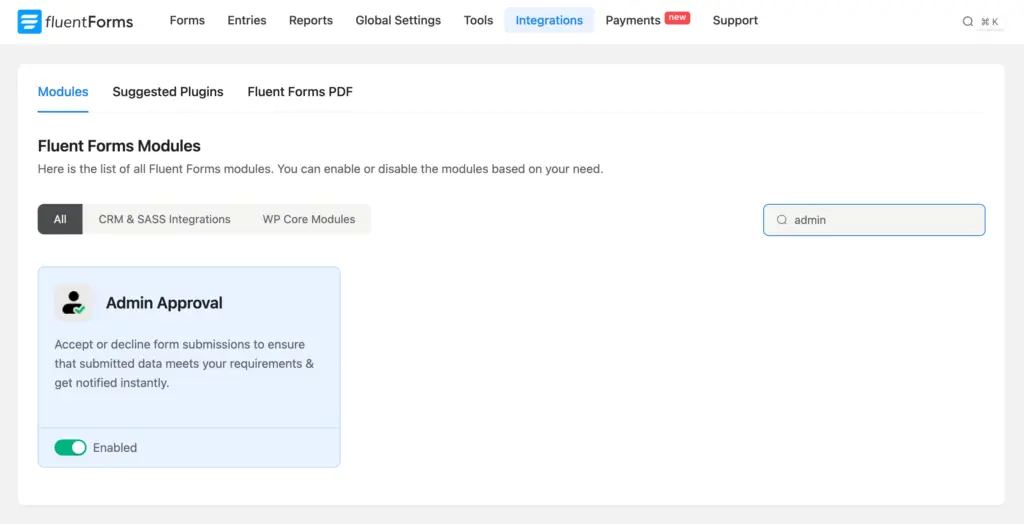
Go to Integrations from the Fluent Forms navbar to open the Fluent Forms Modules screen. Search for Admin Approval and toggle its card to Enabled. This activates the approval functionality across your forms.
Configure global settings
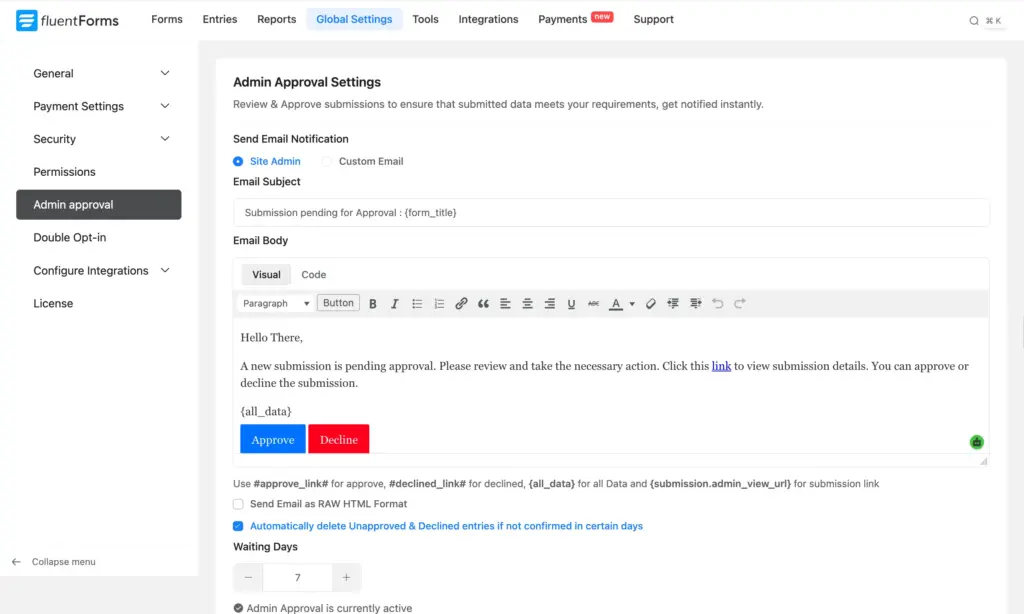
Click Global Settings from the top menu, then open the Admin approval section from the left sidebar. This controls the approval email that lands in your inbox.
- Send Email Notification. Choose Site Admin to send approval emails to your admin address, or Custom Email to send them to specific reviewers.
- Email Subject. Set what the reviewer sees (supports smartcode), for example, Submission pending for Approval: {form_title}.
- Email Body. Write the notification. A default email body is already there, which you can customize. Use the #approve_link# and #declined_link# placeholders for the approve and decline buttons, {all_data} to drop in the full submission, and {submission.admin_view_url} for a link to the entry. You can send it as raw HTML if you want custom formatting.
- Auto-Decline Option. Check Automatically delete Unapproved & Declined entries if not confirmed in certain days and set the waiting days. Anything left pending past that window gets cleaned up on its own.
Turn on approval for your form
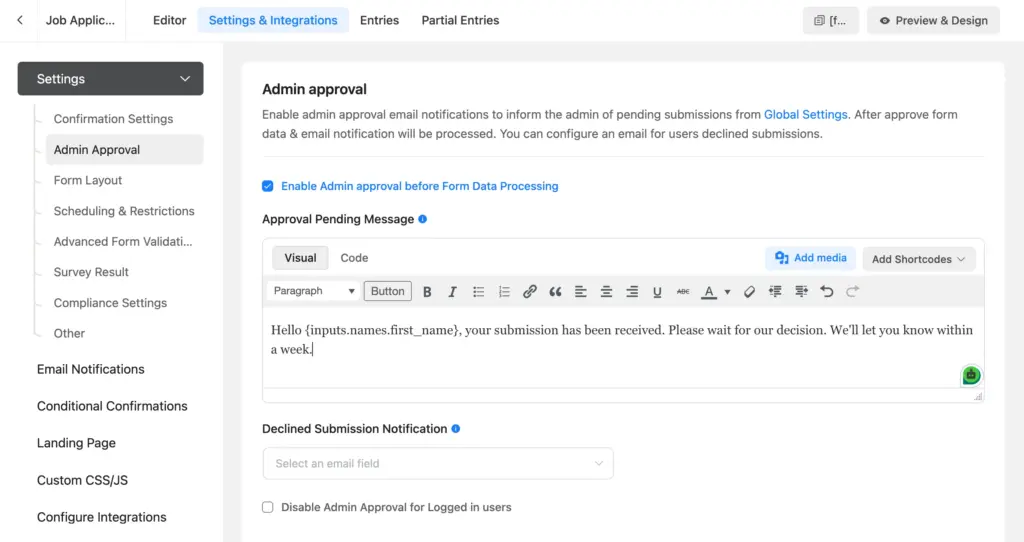
Global settings make the approval setting available for all forms. You have to enable it for the individual forms for which you want to accept or reject submissions. Go to your application form’s Settings & Integrations > Settings > Admin Approval.
Enable Admin approval before Form Data Processing. This is what makes a submission wait as pending (unapproved) instead of processing right away. Then customize the Approval Pending Message that applicants see after they submit, for example, “Your submission is received. Please wait for our decision.” Shortcodes work here, so you can pull in the applicant’s name for a personal touch.
Set up the declined notification
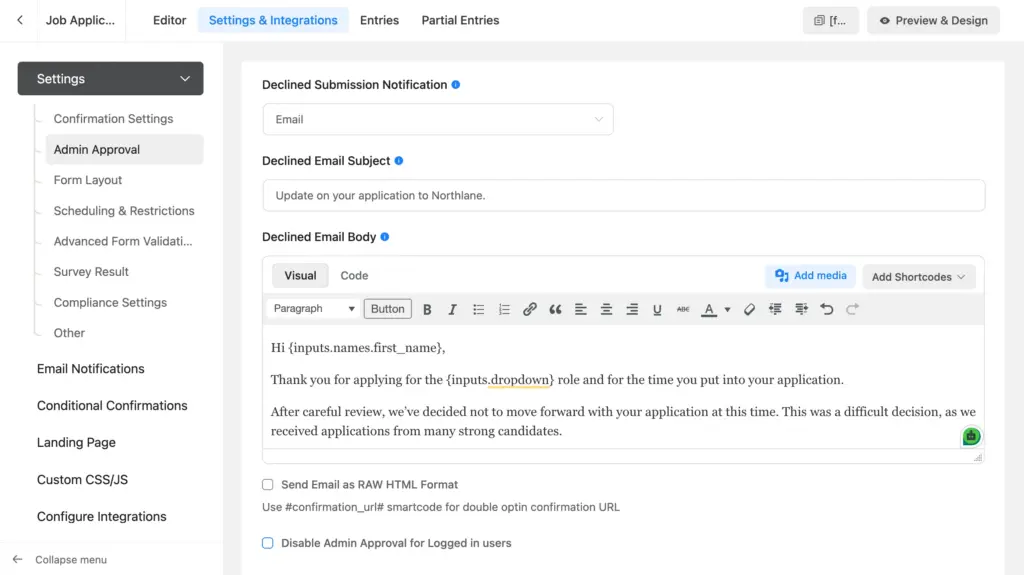
You can email applicants automatically when their application is declined. Your form needs an Email field for this to work. Pick that field from the Declined Submission Notification dropdown, then write the Declined Email Subject (for example “Update on your application to Northlane”) and the Declined Email Body. Keep the tone kind, since this is a rejection message.
One thing to know: if your form has a Payment Field, the approval process is skipped. Approval is built for review-first forms, not checkout forms.
Make Sure Your Approval Emails Actually Arrive
Your tracking system is based on emails. Approval requests go to you, and decline notices/approved applications go to applicants. Your workflow breaks if those emails go to spam or are never sent.
WordPress sends email through PHP’s built-in mail() function by default, which has no authentication. Providers like Gmail and Outlook often flag or block it, and WordPress still reports the email as “sent.” So you’d never know it failed.
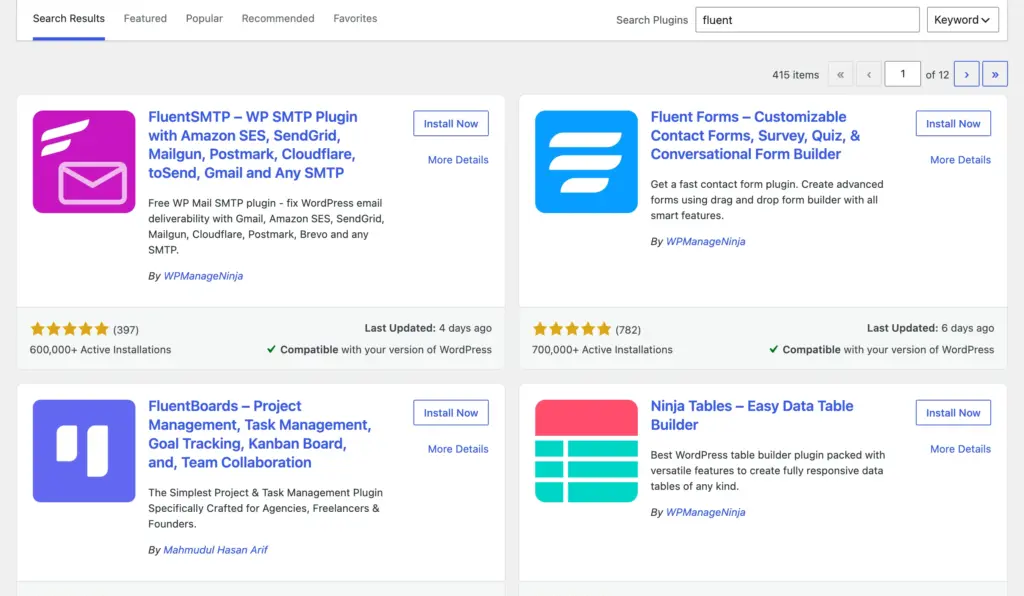
FluentSMTP fixes this. It’s a free plugin that connects to 10+ popular SMTP services to route your emails so they get authenticated and reach the inbox. Set it up before you go live, and confirm with a test email.
Step 3: Change Submission Status from Email or Entries
With approval on, you have two ways to move an application through the pipeline. Both set the same status, so use whichever is easy for you.
From the approval email
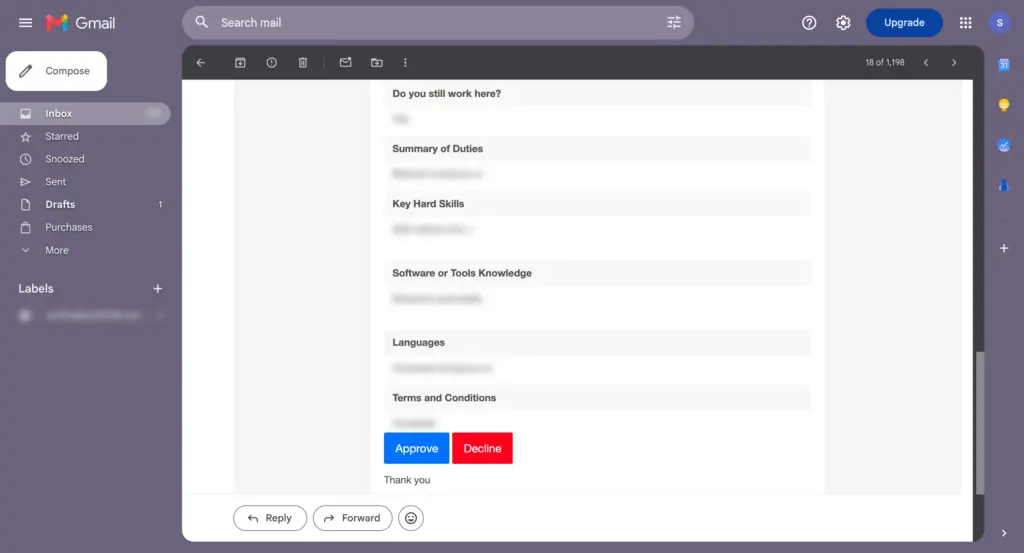
Every submission sends you an email with the applicant’s details followed by an Approve button and a Decline button. Click one and the entry’s status updates instantly. This is the fast path when you’re reviewing from your phone or between meetings.
From the Entries screen
Go to Fluent Forms > Entries and open an entry. In the Submission Info panel, click the Change status to dropdown to select from Unread, Read, Unapproved, Approved, Declined, or Trashed. This is the better path when you’re reviewing a batch of applications and want to compare them side by side.
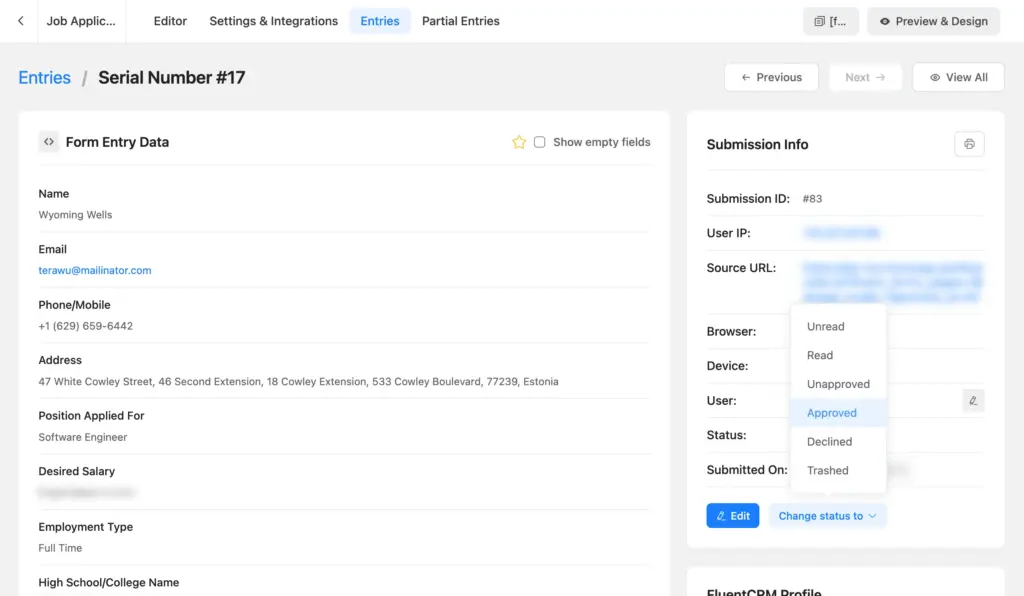
Three statuses are relevant to your tracker:
- Approved: The application passed review.
- Declined: The application was rejected. If you set up the declined notification, the applicant is notified automatically.
- Unapproved (pending): The default state. It’s waiting for your review.
Every status change here feeds straight into the table you’re building next.
Step 4: Connect the Form to Ninja Tables
Fluent Forms stores every submission in its own Entries table, with search, filtering, status, and export built in. For private, admin-only tracking, that screen may be all you need.
Ninja Tables adds two things the entries table doesn’t: table rows grouped by status and a front-end page where applicants can check their own status. If either matters to you, connect the form to a table.
Go to Ninja Tables > + Create New Table > Connect Fluent Forms. Give the table a title, like “Recruitment Board,” and pick your application form from the Select a Form dropdown.
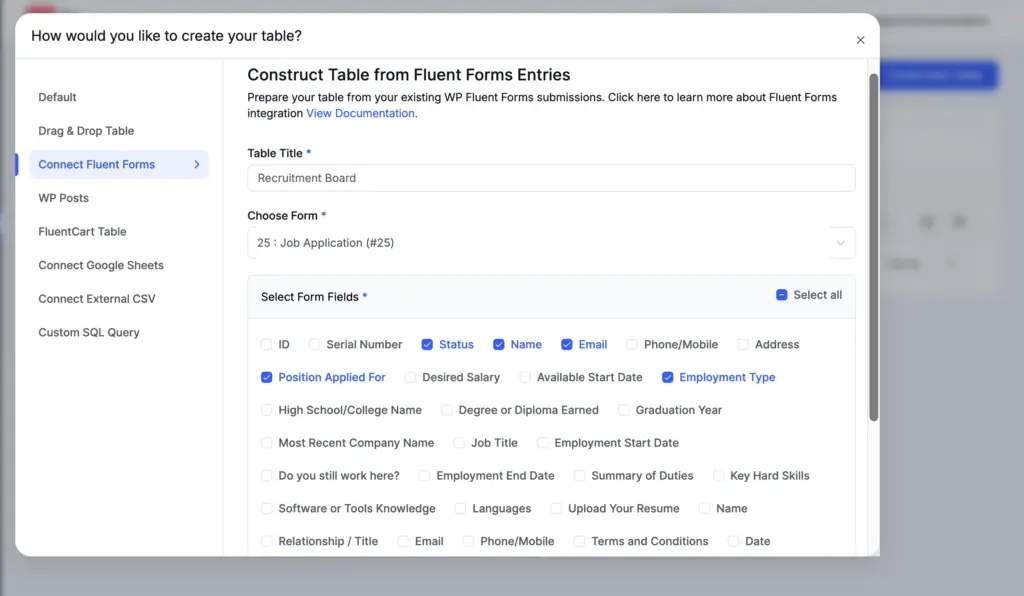
Once connected, every field from your form appears as a selectable column. Choose the columns you want in the tracker. For the internal view, a useful set is Status, Name, Email, Position Applied For, Employment Type, and Most Recent Company Name. Make sure Status is included, since that’s what you’ll group by. Click Save.
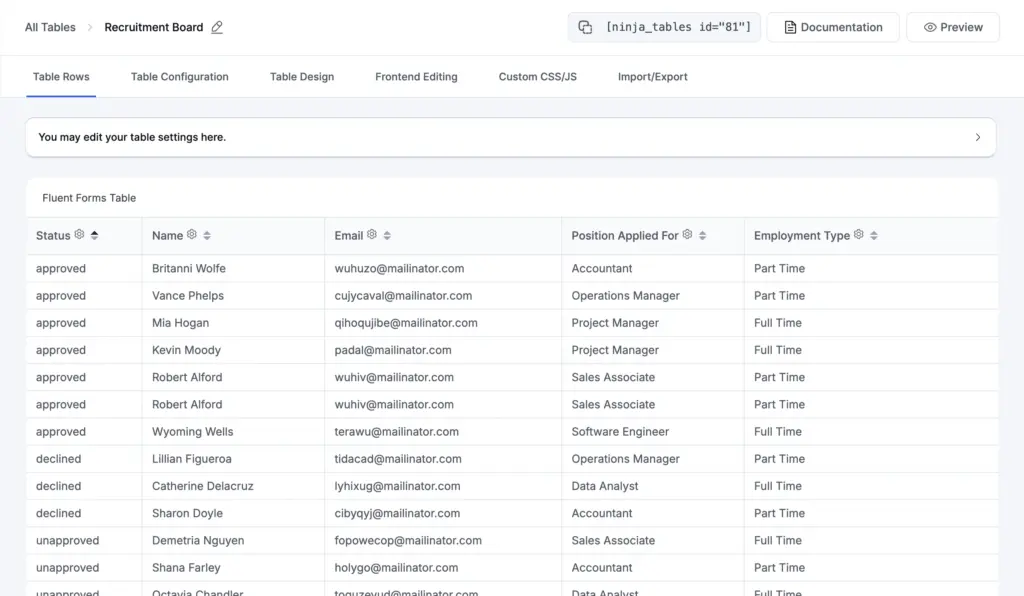
A table is created with your form fields as headers and each submission as a row. Ninja Tables gives you a shortcode to embed it, and you can edit the table options, design, and responsiveness from the table settings.
Step 5: Group Entries by Status (Optional)
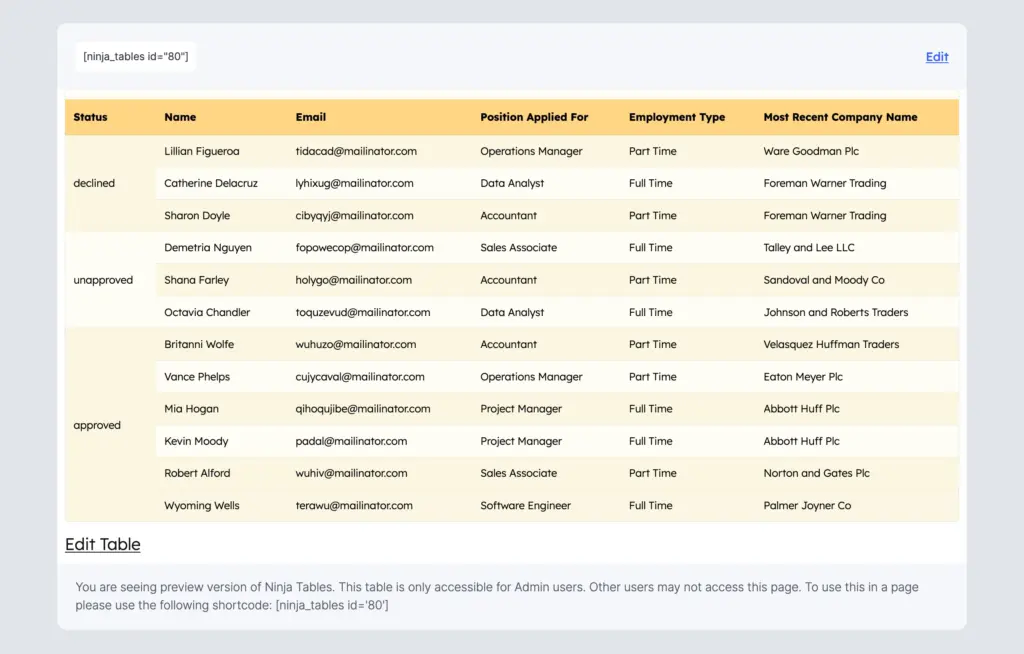
Your tracker already works. This step is about presentation. If you want to merge cells that share the same value, the rowspan snippet does that. This way, the approved applications sit under one “approved” cell, declined under one “declined” cell, and so on.
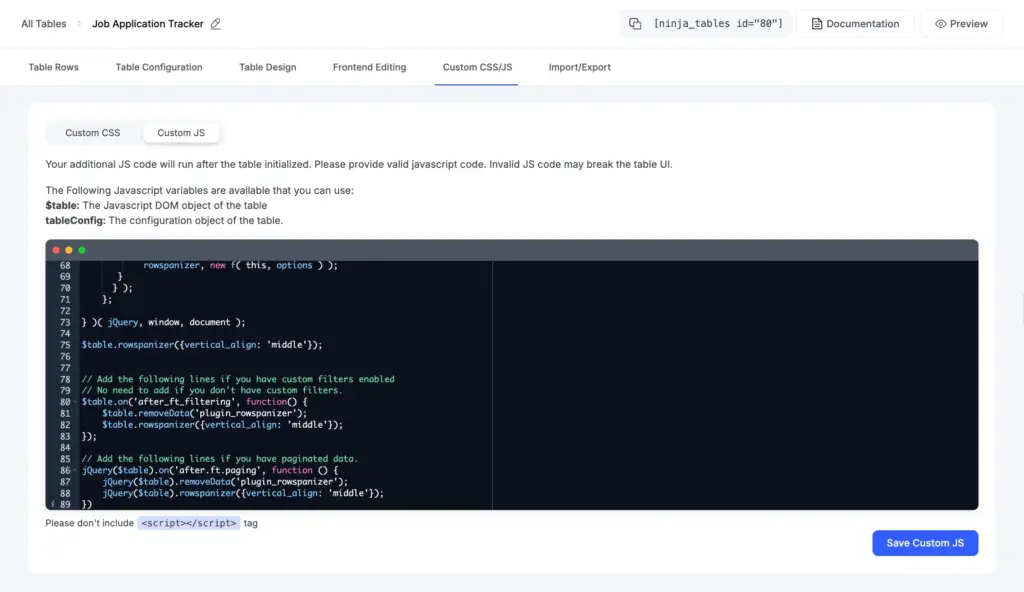
Add the merge JavaScript
Open your table and go to the Custom CSS/JS option. Paste the rowspan snippet into the Custom Javascript box, then click Save Custom JS.
Add the combine class to the status column
Go to the column you want to merge, which is your Status column, and open its settings. Under Advanced Settings, type combine into the Extra Classes field, then click Update.
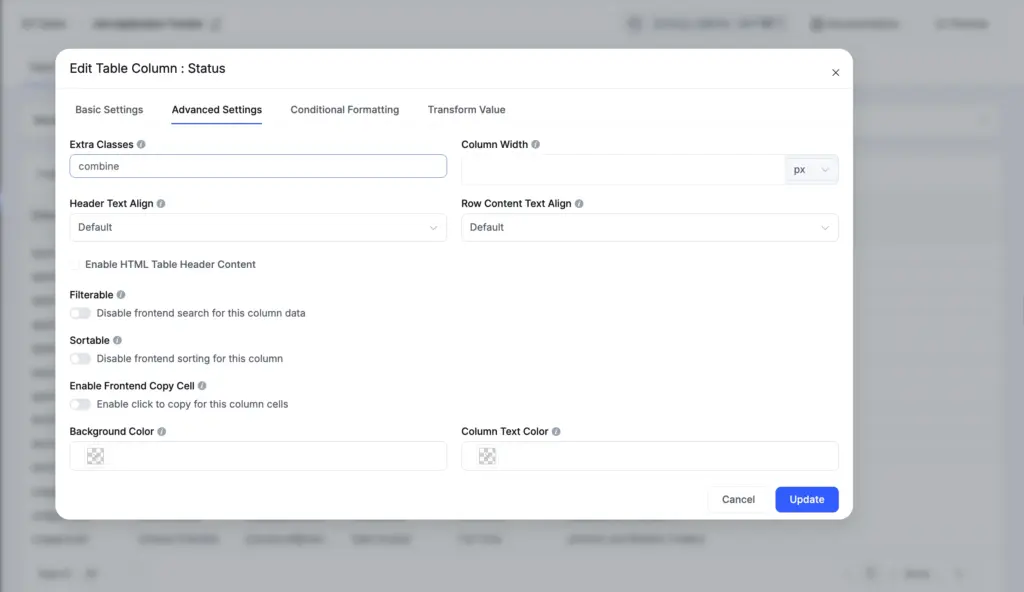
Now rows with matching status values merge into one cell automatically. To keep the grouping tidy, sort the table by status so all the matching rows sit next to each other before they merge. The result is a tracker where each status label spans its group as a single merged cell.
Show Applicants Their Own Status (Public Table)
You can publish your recruitment tracking table on the frontend using the Ninja Tables shortcode. That helps applicants check where they stand instead of emailing you for updates.
Create a separate public table, display only what an applicant should see, such as their name or an application reference and the current status. Keep email, phone, company, etc. out of the public columns.
The merge-by-status grouping works here too, so a public page can show a clean approved list or a simple “your application is under review” state.
Bonus: Review Applications on a FluentBoards Board
Approval emails work well for a small team. If you’d rather review applications visually, FluentBoards gives you a kanban board where each submission becomes a card you drag between stages. This path doesn’t need the admin approval module, as you’ll review applications right on the board and then move them accordingly.
The free version of FluentBoards offers Kanban and List views. With FluentBoards Pro, you also get Table, Calendar, and Gantt views.
Enable the FluentBoards module
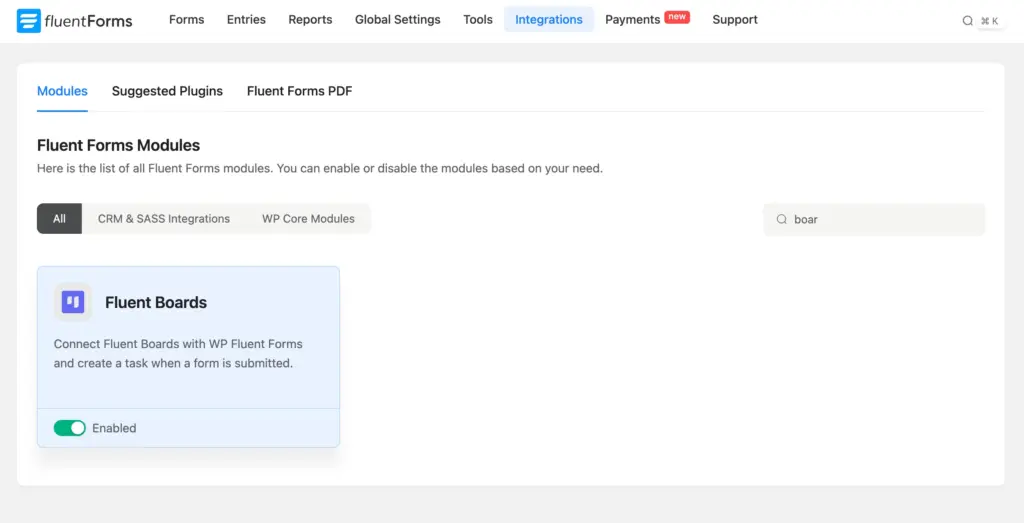
Go to Fluent Forms > Integrations > Modules, search for the Fluent Boards module, and toggle it to Enabled.
Set up your board
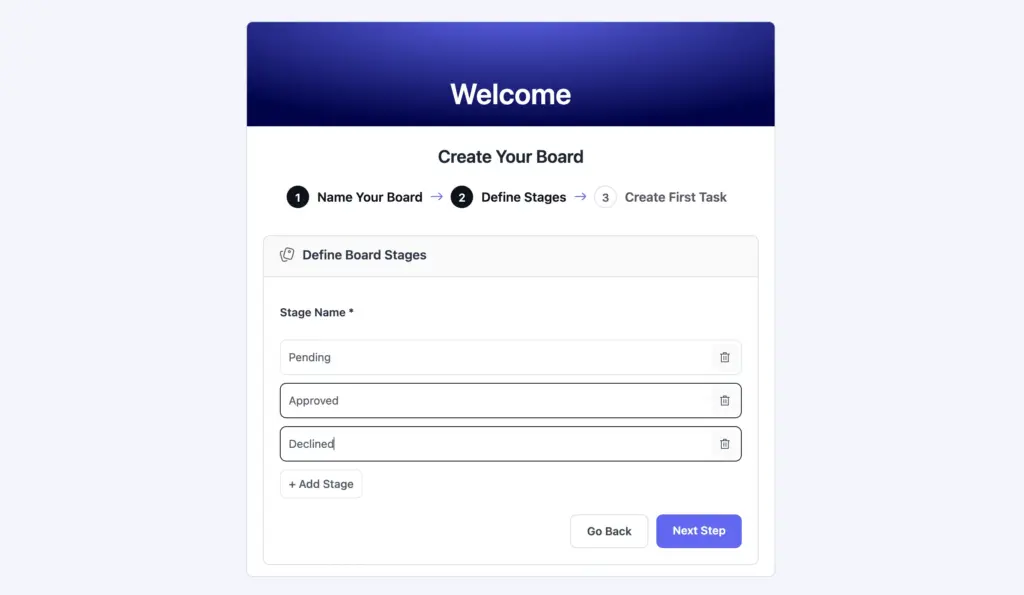
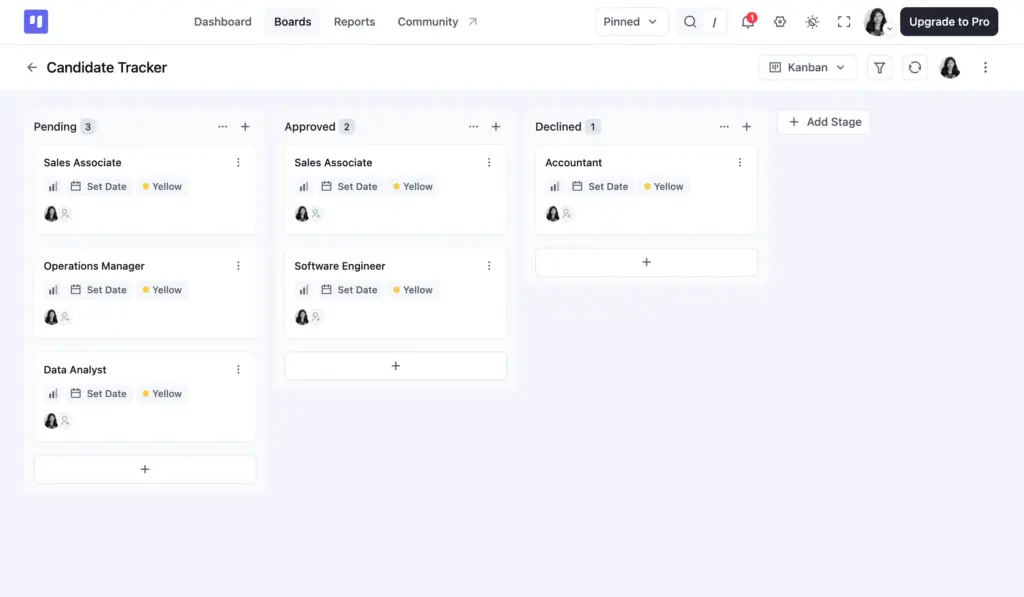
In FluentBoards, create a board for your pipeline. Name it “Candidate Tracker” and set up stages that mirror your statuses: Pending, Approved, and Declined.
Add the integration to your form
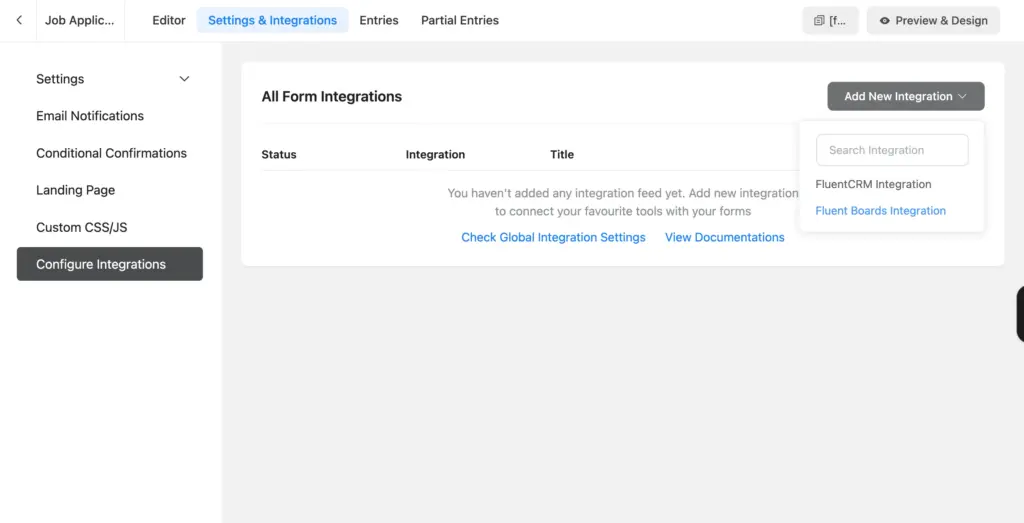
Open your application form and go to Settings & Integrations > Configure Integrations. Click Add New Integration dropdown and select Fluent Boards Integration to open the integration feed.
Configure the board feed
Set up the feed so each submission lands on the right board as a task:
- Board, Stage, Labels, Assignees, Priority: Select your “Candidate Tracker” board, set the stage to Pending so new applications start there, and pick labels, an assignee, and a priority.
- Task Title: Map a form field, such as the position dropdown ({inputs.dropdown}) or the applicant’s name, using its shortcode.
- Submitter Name and Email: Map the name ({inputs.names.first_name} / {inputs.names.last_name}) and email ({inputs.email}) fields.
- Description: Map the fields you want in the card body, like recent company, job title, and duties.
- Task Position, Due Date, FluentCRM, Conditional Logic: Choose where the card sits in the stage (top/bottom), set a review deadline (and optionally create a FluentCRM contact and add conditions if only certain submissions should create cards).
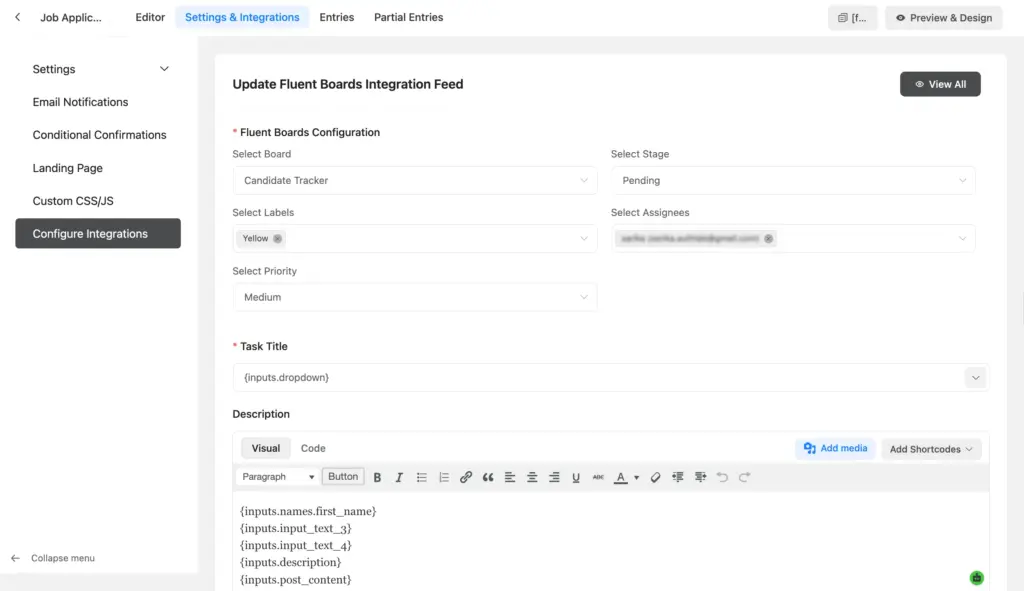
Check Enable This feed and click Save Feed. Now every submission creates a card in your Pending stage. To track an application, drag its card from Pending to Approved or Declined. The board is your pipeline, where you can change an application’s status by dragging it to the desired stage.
Test Your Tracker
Before you rely on it, submit a few applications to verify the workflow is functional.
- Submit a test application from the front end with a real email address. If you disabled approval for logged-in users, test in an incognito window or after logging out.
- Check your inbox for the approval email, and click Approve.
- Go to Fluent Forms > Entries and confirm the entry now shows as approved.
- Open your Ninja Table and confirm the entry appears with the right status.
- Check that same-status rows merge into one grouped block.
- Load the public table and confirm it shows only the columns and entries you intended.
If you set up FluentBoards instead, submit a test entry and confirm the card lands in your first stage, then drag it to another stage to check the flow.
Tips for a Cleaner Tracker
Add a hidden submission date field
If you want a date column in your table, add a hidden field to the form for the submission date and time. Ninja Tables can then display it as a column, which makes your pipeline easier to sort by recency.
Keep the public table read-only
Never expose contact details or internal fields on the public status page. Build a separate table with only the columns applicants need.
Let auto-delete clean up old entries
Turn on the auto-delete day limit in global settings so pending and declined applications get cleared automatically after certain days. Your tracker stays current without manual cleanup.
Sort by status before you merge
The merge feature groups adjacent matching rows. Sorting the table by status first keeps every group compact and the table easy to read.
Track Applications with an Organized System
You now have a full application pipeline running on your site. Fluent Forms captures and holds each submission for review, admin approval assigns a clear status, and Ninja Tables displays the pipeline for your team and your applicants. The merge snippet turns a flat list into a grouped view, and FluentBoards offers a drag-and-drop alternative when you’d rather work on a board.
Set it up once, and every new application follows the same clean path from submission to decision. Download Fluent Forms free and start building your tracker today.
Build Smarter Forms for Free

Sarika writes for Fluent Forms and loves to offer insights into small businesses. She’s curious and enjoys discussing ideas, interests, and perspectives. In her free time, she’s either marvelling at architectural beauties or trying different cuisines.



Leave a Reply