

How to Create a Request for Quote Form on WordPress

If your site still doesn’t have a specific quote request process, you’ll end up with scattered emails and files and won’t be able to get a clear deadline or budget. A quote request (RFQ) form fixes this at the source. Instead of a generic “get in touch” box, you get a structured intake that captures project scope, budget, timeline, and files in one submission, then routes that information wherever your team needs it.
In this guide, we will walk through building a simple yet effective request for quote form on WordPress using Fluent Forms, from field selection to confirmation emails to embedding the form on your site.
TL;DR
- A Request Quote form collects structured project details that summarize the client and project info
- A proper Request Quote form qualifies leads dynamically by capturing budget range, attachments, timeline, and other relevant info.
- Fluent Forms lets you add conditional logic, file uploads, and payment fields without writing any code.
- Confirmation messages and admin notifications keep both the client and your team informed the moment a request is submitted.
- CRM and productivity integrations turn a single form submission into an automated follow-up workflow.
- You can embed a form anywhere on your site using a shortcode, block, or a dedicated landing page.
Benefits of Using a Request for Quote Form
A request for quote form is a structured intake form that a potential client fills out to request pricing or a project proposal. Rather than a single open message field, it has more tailored fields, including project type, scope, budget range, deadline, and supporting files, so you can ensure a logical quotation.
The top benefits of a quote request form are:
- Qualify leads before responding, according to the project type, timeline, budget, etc.
- Collect complete project information in a single submission instead of repetitive emails.
- Reduce back-and-forth communication by asking the right questions upfront.
- Make sure your site has a stable solution for all prospective clients’ quote requests.
- Improve response time because your team already has what it needs to prepare a quote.
- Build a more professional client experience with a branded, organized intake process.
What Should an Ideal Quote Request Form Include
Client information
Start with the basics: first name, last name, business email, and optionally a phone number and company name. You can use this information for every follow-up, so keep it simple and require only what you need.
Project details
A project title field and a project type dropdown let clients categorize their own request. Pair this with a text area for a detailed project description so they can explain their goals in their own words.
Budget information
An estimated budget field, which can be a simple numeric field, sets expectations early and helps you prioritize the projects. This single field often does more lead qualification work than any other part of the form.
Timeline
A desired completion date or preferred deadline field with a date picker lets you assess whether your team can complete the project within the expected timeframe.
Attachment upload
Clients often have existing briefs, reference designs, or specification documents. A file upload field lets them attach these directly to the submission instead of sending a separate email.
Conditional questions
Not every project type needs the same follow-up questions. Conditional logic lets you show or hide fields based on earlier answers. For example, when a user doesn’t find their project type in a dropdown field, they can choose Other and then use the simple text field that comes once the type is chosen as ‘Other’.
Steps to Create a Request a Quote Form in WordPress
Step 1: Add a new form
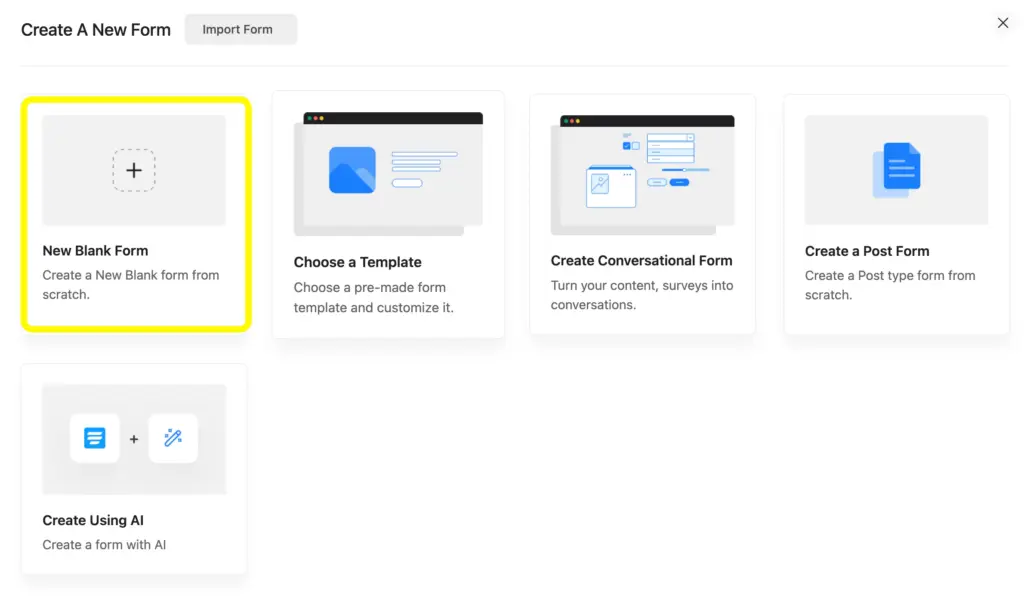
From your WordPress dashboard, go to Fluent Forms and select Add New Form. You can start from a blank form or search the template library for the quote request template. Here, I am using the New Blank Form, in which I can choose the fields as per my needs.
Step 2: Add and customize the relevant fields
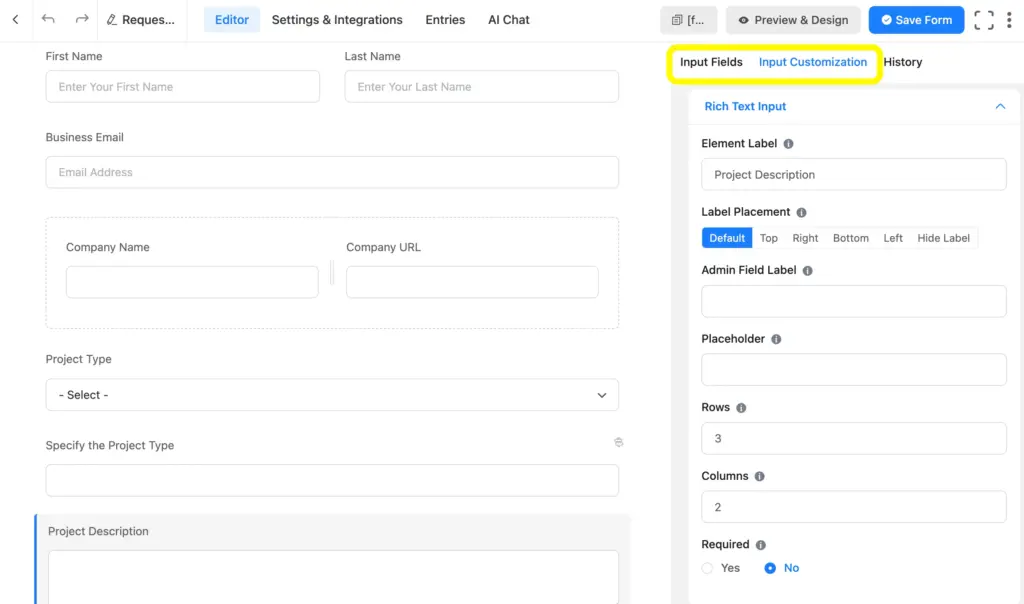
In the Editor page, you’ll find the Input Fields on the right side of the page, which you can choose by clicking on the field name or dragging or dropping to the desired positions.
Here I have added a few fields: Name and Email Fields, 2 Two-column Containers for company name & URL, a dropdown field for project type, a Simple Text field to specify project type, Rich Text Input for project description, a Numeric Field and a Time & Date for estimated budget and deadline, and a File Upload field for attachments.
You can easily customize the fields by clicking on the fields, where you can change the Element Label, Placeholder, etc.
Step 3: Configure confirmation and email notification
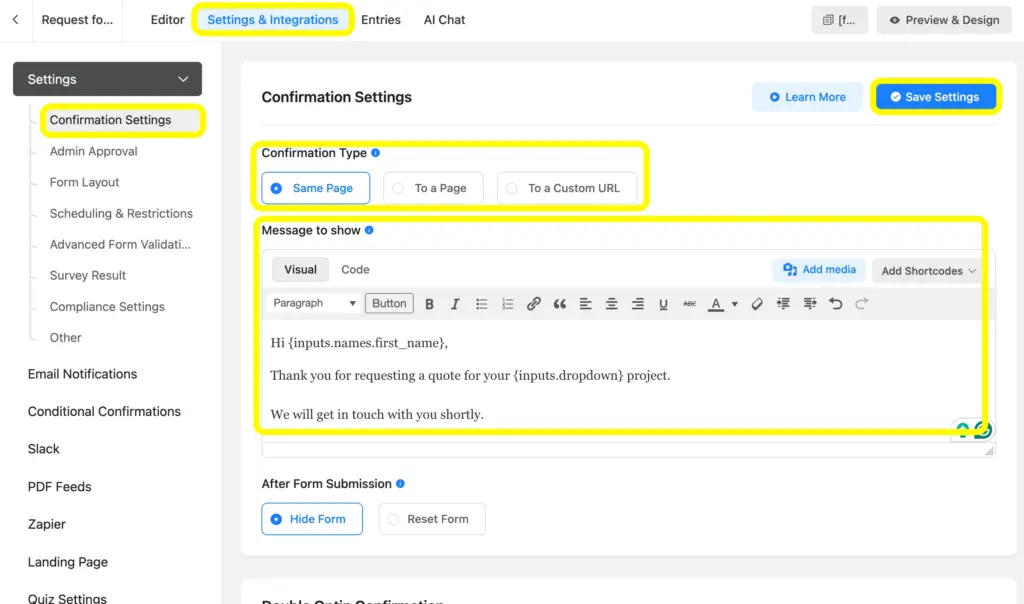
Once your fields are in place, set up what happens immediately after submission. Under the form’s Settings & Integrations tab, configure a confirmation message that reassures the client their request was received and gives a rough timeframe for your response.
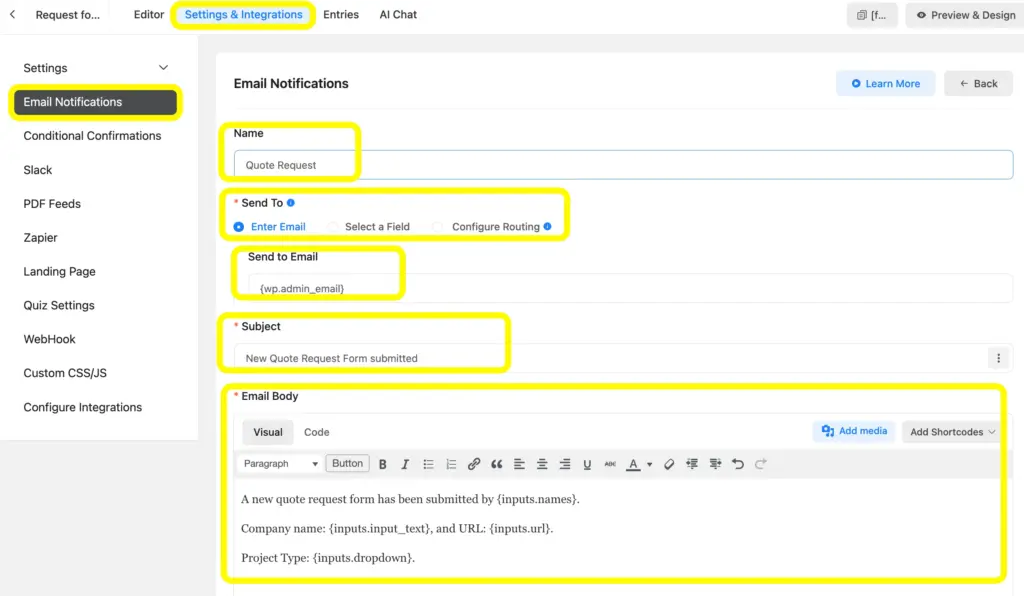
Next, set up an email notification to your team so new requests do not sit unnoticed in a dashboard. You can route notifications to a shared inbox, a specific team member, or multiple recipients based on the project type selected, keeping everyone informed without extra manual forwarding. You can Add Shortcodes to make the email notification more tailored.
Step 4: Embed the form to your site
Once the form is built, check the preview to make sure your form works as per your demands. If you want to match your site’s branding more closely, the Advanced Form Styler gives you control over colors, spacing, and typography without touching CSS.
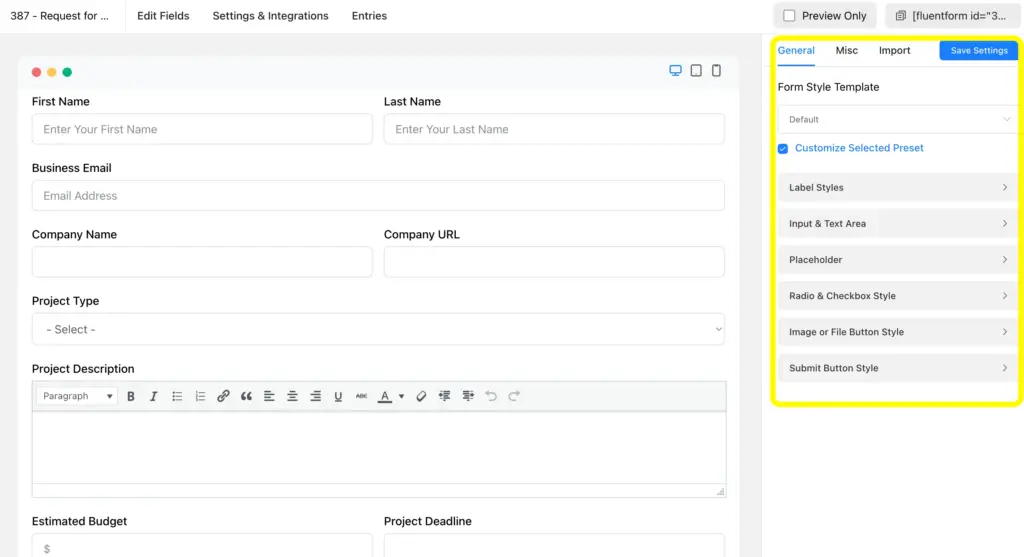
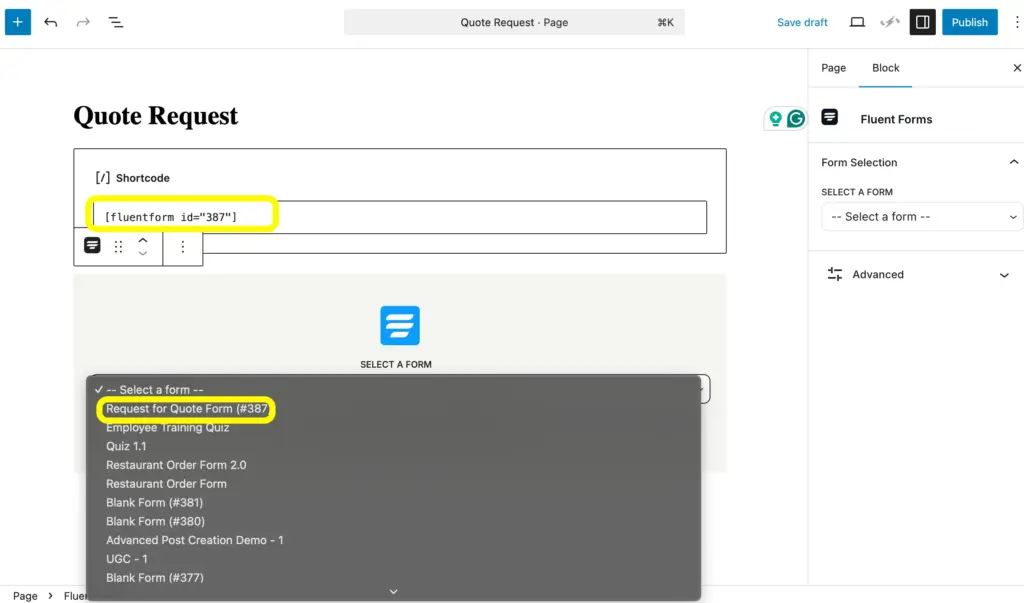
To publish the form, copy its shortcode from the top right side of the editor page and/or rename the form to find it easily later. Once this is done, go to your preferred page/post and add the shortcode or add the Fluent Forms block directly into any page or post.
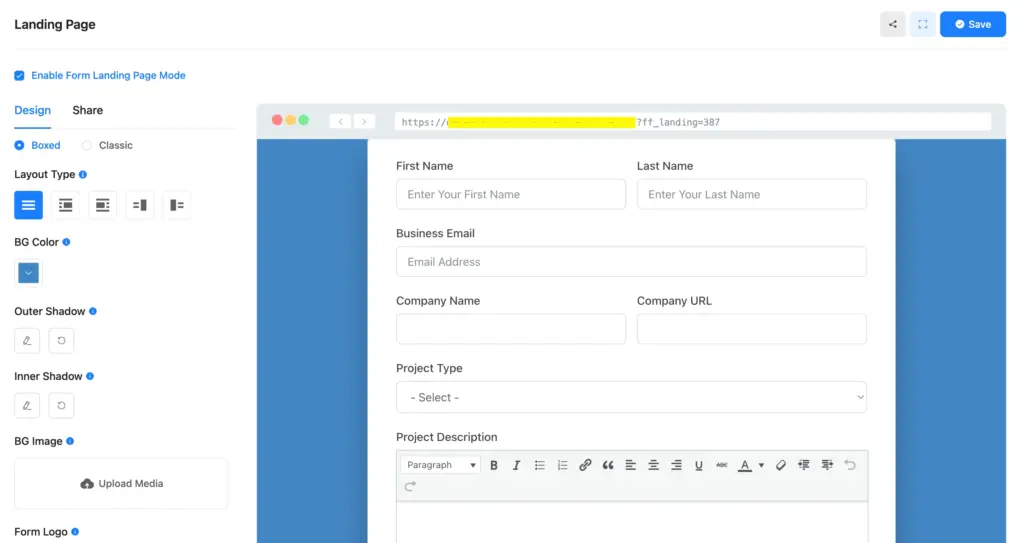
If you want a dedicated, distraction-free page for the form itself, Fluent Forms’ landing page module lets you publish it as a standalone page, which works well for a link you can share directly in outreach or ad campaigns.
To make a landing page form, go to Settings and Integrations again, and Enable Form Landing Page Mode. In this module, you can customize the form with Layout Type, BG Color, BG Image, Form Logo, Featured Image, Page Heading, etc.
Filter Your Next Project with Fluent Forms
A request for quote form is more than an upgrade to your contact page. It is the first checkpoint in a workflow that qualifies leads, standardizes the information you collect, and gets your team the details it needs to respond faster. Once you add payment collection for deposits or connect the form to your CRM and marketing tools, that single submission can trigger an entire follow-up sequence automatically.
Building this in Fluent Forms helps you provide every client with the same organized, professional experience from their very first message to you.
Frequently Asked Questions about Request for Quote Form
1. What is the difference between a request for quote form and a contact form?
A contact form is built for general inquiries and usually has a name, email, and open message field. A request for quote form gathers specific information about project details, attachments, budget, timeline, etc.
2. Do I need Fluent Forms Pro to build a request for quote form?
The free version of Fluent Forms covers the core fields needed for a basic RFQ form, including name, email, dropdowns, and text areas. Fields and features such as File Upload, Rich Text Input, and Advanced Form Styler require the Pro version.
3. Can I collect a deposit through the quote request form?
4. How do I stop unqualified leads from filling out the form?
You can stop unqualified leads by setting clear budget and timeline ranges, as well as the project type, or mentioning unavailable services, or applying conditions.
5. Can clients attach files to their quote request?
Yes. A file upload field lets clients attach reference material such as design briefs, floor plans, or product photos directly to their submission, instead of sending it separately by email afterward.
6. How do I get notified when someone submits a quote request?
Email notification settings can be configured to alert a specific team member as soon as a form is submitted. You can add CC and BCC from the form’s settings, and add shortcodes to summarize the quote request.
7. Can I connect the form to a CRM?
Yes. Fluent Forms integrates with CRM and email marketing tools including HubSpot, FluentCRM, Salesforce, and Mailchimp, so a new quote request can automatically create a lead or contact record without manual entry.
8. Where should I place the request for quote form on my site?
The form works well embedded directly on a services or pricing page, or on its own dedicated landing page linked from outreach emails and ad campaigns.

Hi, this is Aparup. I am a Literature postgraduate, mixing my creative thoughts with my experience in the tech industry to surpass AI. Professionally, I am a content marketer seeking solutions to users’ problems regarding WordPress.



Leave a Reply