How to Create a Credit Card Application Form on WordPress

Whether you have a long list of customers in the savings account holder folder or businessmen in the current account folder, they are all potential leads for credit cards. Once they access and complete a credit card application form at the right time, consider them to be in the final stage of the consumer funnel and a credit card holder of your banking organization.
In this blog, I’ll show you the steps and best practices for building a credit card request form in WordPress, which will help you gain a comprehensive understanding of creating other financial forms for the organization you work for.
Necessary fields for a credit card application form
The beauty of application forms for banking clients is that you can ask for every kind of personal information that other organizations may not think of. Now, all that matters is the proper sequence based on the essentiality.
Basic fields for identity and address
Basic fields, such as the name field and a detailed address field, can help you get the core personalized data of a customer.
Phone/mobile, email field
A phone/mobile field with a validated phone number and auto country select can do the perfect thing a form submitter wants when they fill out that part. Along with the phone/mobile field, the email field helps you respond to the applicant immediately.
Dropdown, checkbox, etc
Dropdown and checkbox make the users to select from the best possible options without spending time writing. It becomes more convenient when it is combined with a conditional logic to implement dynamic responses.
Multi-column field
Multi-column fields help reduce the length of the form and can engage users easily. If a user clicks on a single field of the multi-column container, the other fields are seen spontaneously.
Numeric field
Whether it’s the salary range or preferred credit card limit, a numeric field can easily determine the answers based on the user’s choice. You can also show a numeric calculation displaying the cost or charges to clarify the whole process.
Image and file upload field
You are more likely to collect a copy of the user’s photo, ID, utility bills, etc. In that case, a file/image upload field is required to implement that easily and instantly.
Rich text input
Whether it’s a query or a request to get customized support, a rich text input field helps the user write down their messages and get feedback.
Radio fields
It takes only a few seconds to respond to several radio field questions. When the form gets long, converting the questions into radio fields can help users get engaged easily.
Save and resume field
Users may become confused or want to compare the facilities, so they don’t always feel like submitting a form immediately. That is how a save and resume helps them: getting back to the space where they left it.
Bonus field: accordion & tab
Fluent Forms comes with space-saving fields, such as accordions and tabs. Using that field, users will see the complete view of the field they want to open, and the other fields will remain closed inside the tab/accordion field. It helps the users focus on a specific field group at once. In short, Fluent Forms’ accordion and tab features help you make your long WordPress forms concise, with a better UI.
Options Fluent Forms offers to create an online credit card request form
Using Fluent Forms, you can access several methods to create any kind of form. In each form-building type, you will be able to customize the fields and get the relevant settings and features.
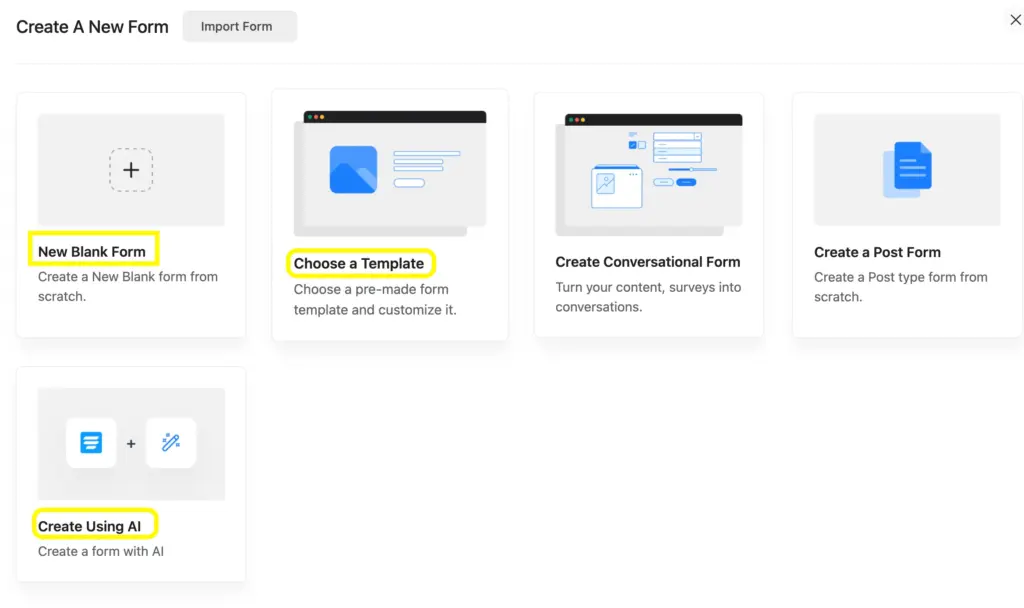
Use a template: customize if required
You can choose an exact or a similar template to make a form for your WordPress site using Fluent Forms, whether it’s the Free or Pro version.
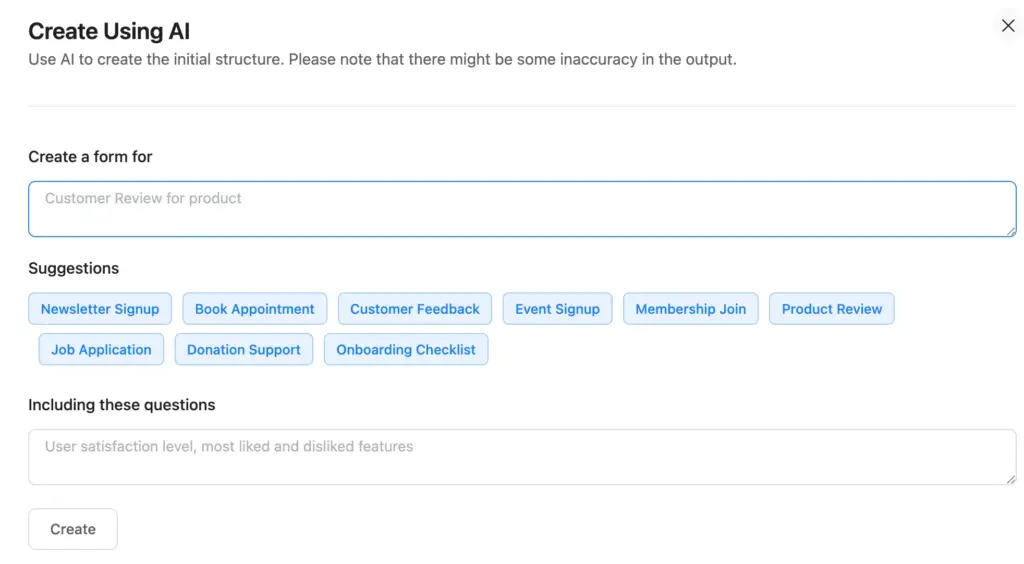
Create using AI: customize with full freedom
With the AI form builder of Fluent Forms, you can simply put a prompt, which is also comprised of suggestions to add or not to add something. You can give your prompt with field names, too. The Fluent Forms AI form builder works best when you know the ins and outs, and later on, you customize a little.
Create a new blank form: start from scratch
When you choose a new blank form, Fluent Forms opens its editor page and provides you with full freedom to build the form with your own visualization. You can pick any fields that best match your form-building propositions, and implement numeric calculation, conditional logic, custom coding, and settings based on the performance of integrations.

Simple steps to create a credit card application form on WordPress
Form-making in WordPress is fun when you have the right form plugin to access the flexibility. So, here we will experiment with building a credit card form using Fluent Forms on a new blank form.
Step 1: add required fields
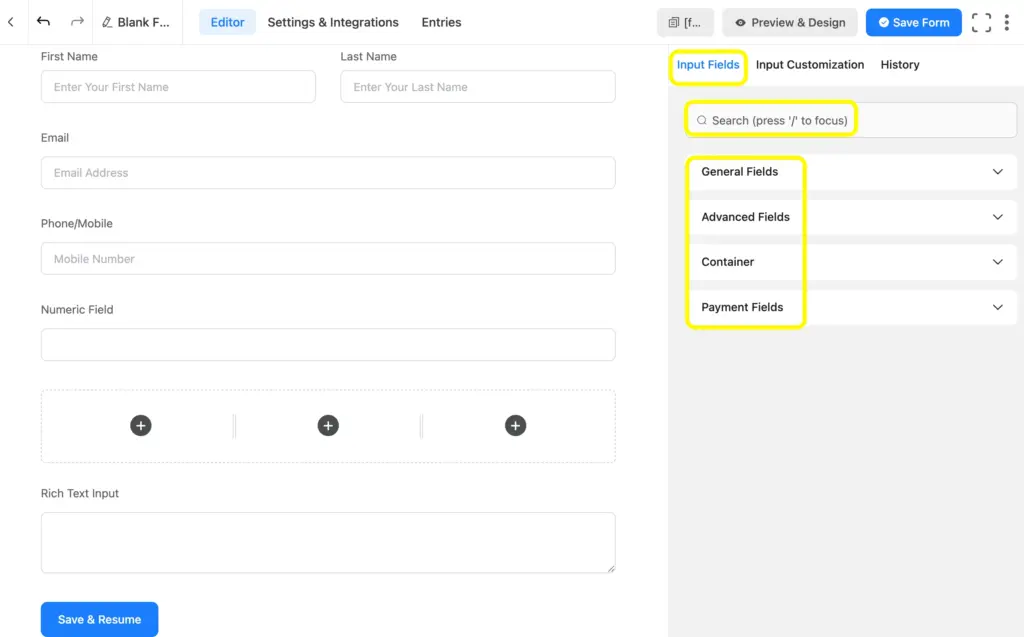
First of all, let’s add the required and relevant fields. Here I’ve added a few fields from the options for adding 60+ input fields, including the General Fields, Advanced Fields, and Payment Fields.
You can simply drag and drop the fields from the Input Fields on the right side of the Editor page, or you can click on your preferred field name to add it to the form. You can also search the field name on search bar at the top right side of the editor page.
Anyway, here I’ve added a few fields in the form: Name, Email, Phone/Mobile, Numeric Field, Three-column container, Rich Text Input, and Save and Resume fields, which I’ll be customizing later.
Step 2: customize the fields
Whether you are building a form using AI form builder or a template, you can customize easily, even with zero coding skill when you are using Fluent Forms.
You can customize any field by clicking on the field, which will open the Input Customization option.
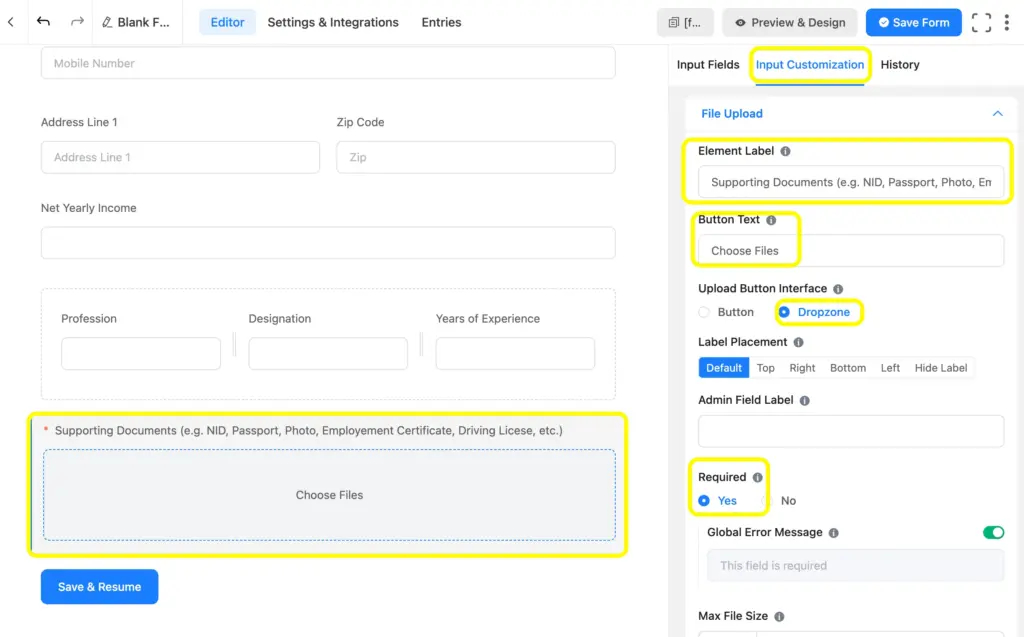
As you can see in the above image, I have customized a File Upload field here to show you the example of an Input Customization. Here, I’ve customized the Element Label and Button Text, and also marked the field Required.
As the customization is much expanded, you can see here I’ve customized a bit more, including Max Files Count and Allowed Files.
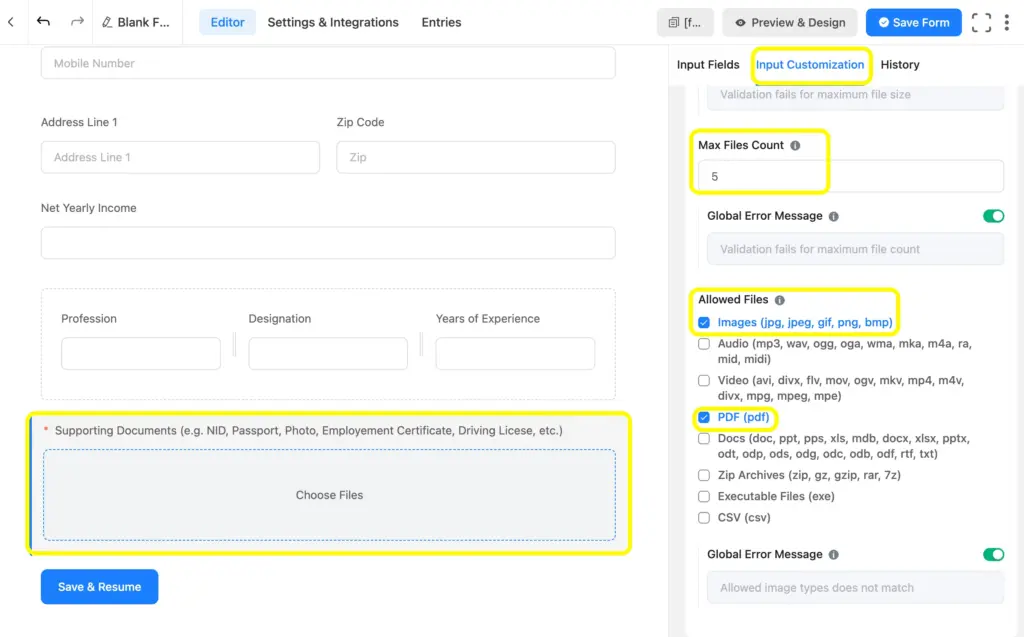
Also, you can customize other fields similarly.
Step 3: send confirmation message and enable notification
Once you have customized your form, you can set up confirmation and notification. In Fluent Forms, a confirmation message appears when you set up the confirmation message in the Settings and Integration page of the respective form.
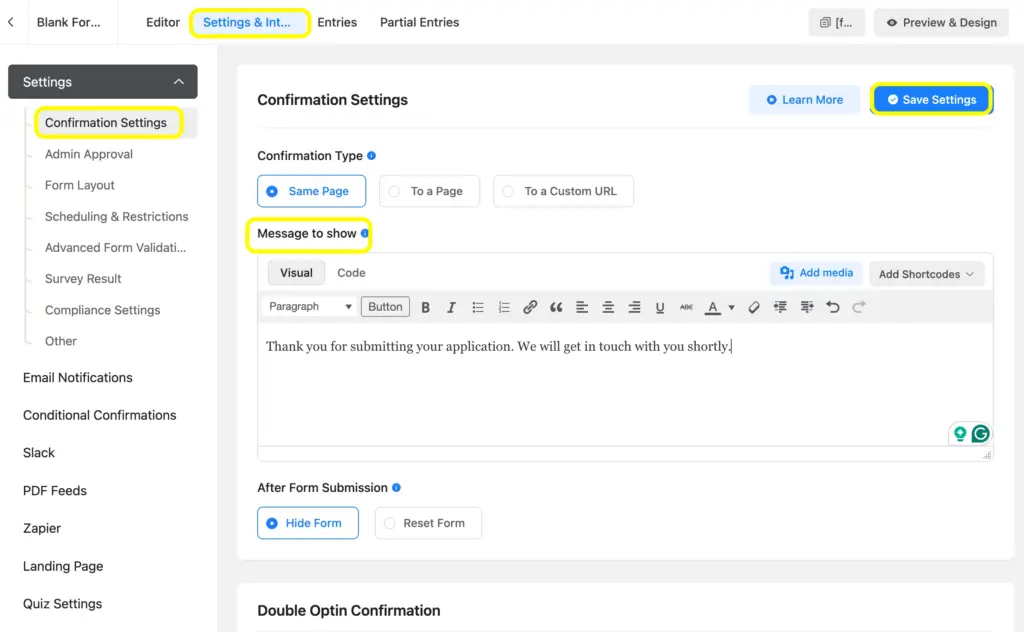
As you see here, I’ve customized the Message to show and clicked on the Save Settings button to make the confirmation work.
You can also set Conditional Confirmation for a specific form built by Fluent Forms. Here, I have shown how you can apply conditional logic for the credit card form’s confirmation.
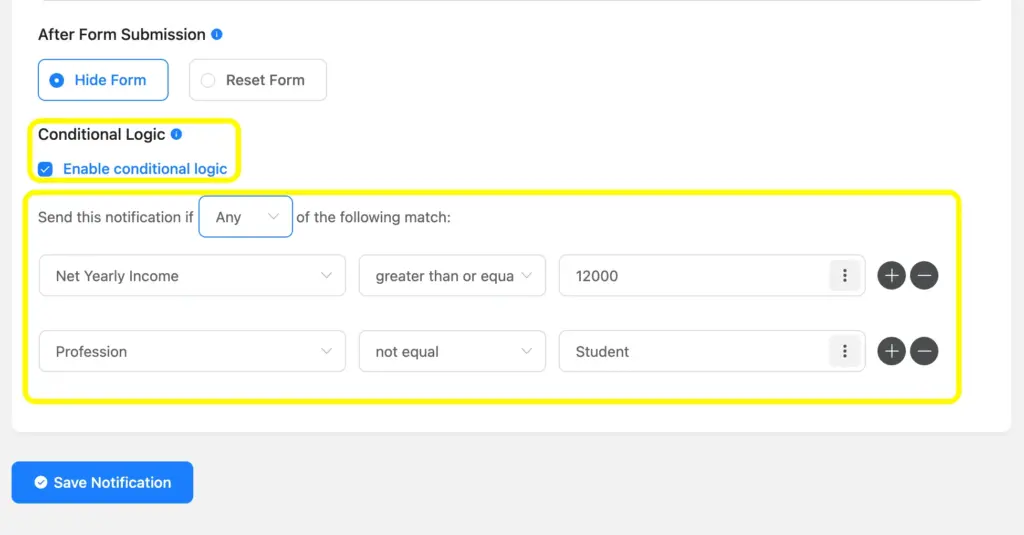
I have put a condition that the confirmation will only be sent when the submitter has a yearly net income above 12000 and is not a student by profession.
You can enable Admin Email Notification from the Email Notification settings, which you can easily edit and customize. You can also add various team members’ emails or other departments in your organisation to send a form notification email if needed.

Step 4: check the preview and publish the form
Once you’ve done customizing the fields and settings, check the preview to finalize the changes before you publish the form. While checking the preview, you can change the form style and device-responsiveness as well.
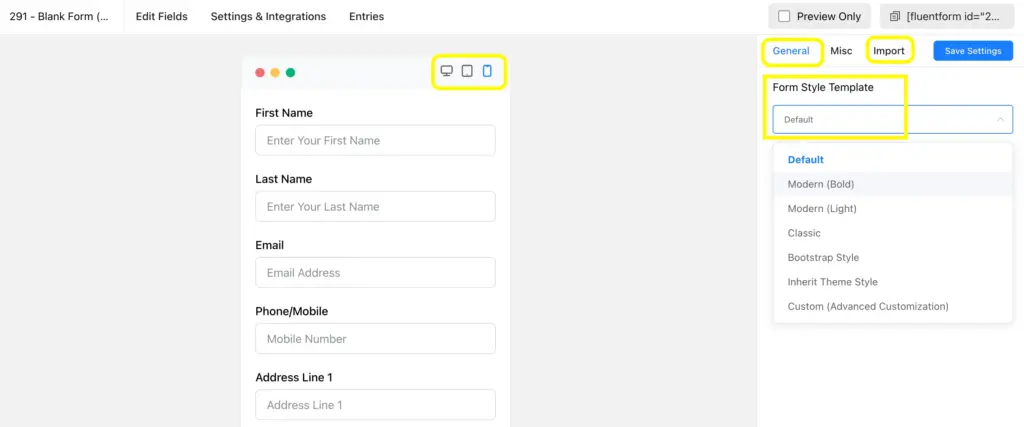
Fluent Forms Advanced Forms Styler can help you design your form with 4 styles, including inheriting your theme style. You can also customize the design as you wish using the Advanced Customization.
Rename the form and copy the shortcode for publishing:
You can simply copy and rename the form by editing the current form name, which is usually named as a blank form with a number. visible at the top left side. And, you can copy the shortcode from the top right side to paste in the page or post you want to publish the form.

If you are a Gutenberg block fan, you can easily embed the form in your post or page block, use our Gutenberg Form Styler to design the form within blocks.
Bonus step: landing page
As a credit card application form is more likely to get published in a landing page, Fluent Forms allows you to easily enrich a landing page with an updated form using a nice feature.
From the Landing Page option of Settings and Integrations, you can easily customize the design which will be all set for a landing page. Here, you can Enable Form Landing Page Mode and edit the Layout Type, BG Color, BG Image, Form Logo, etc. This also has a Share button so that you can market your credit card form to the target audience.
Note: Don’t forget to click on the Save button once the editing is done.
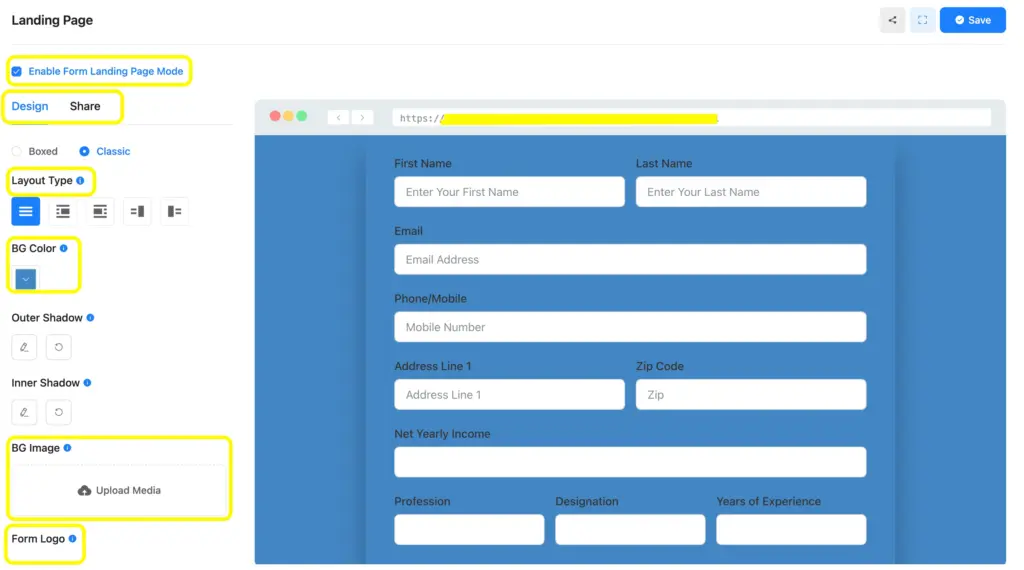
These are the no-code steps on how you can create a proper credit card request form.
Real-life examples of credit card application forms
Here, I have added a few real-life examples to provide you with an idea about the industry trends. You can also follow your organization’s standards while making a proper credit card request form.
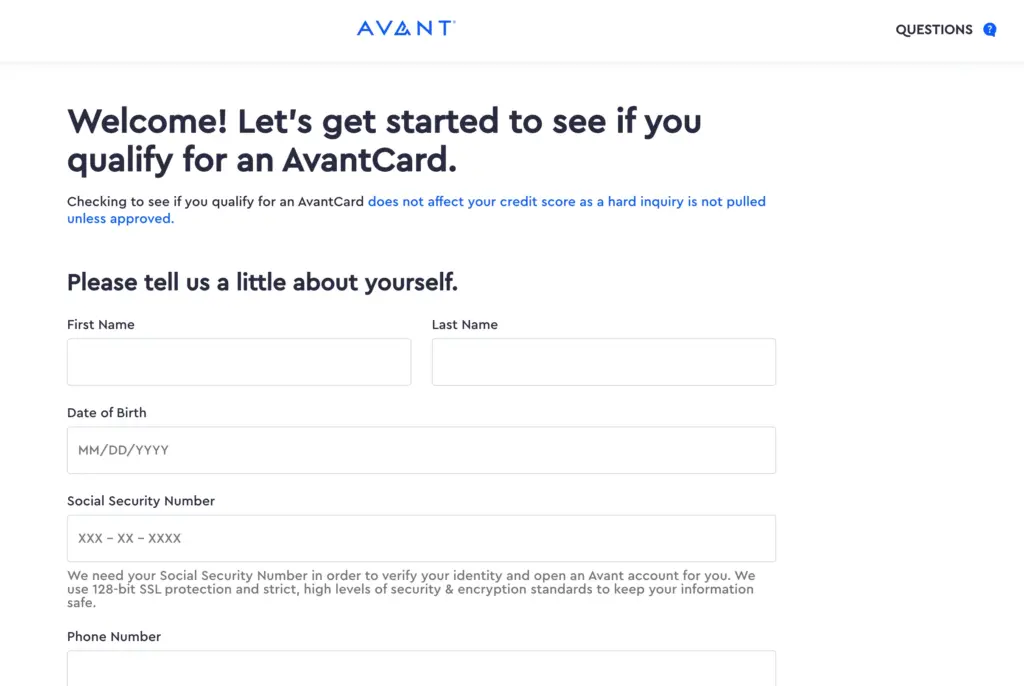
Courtesy: Avant
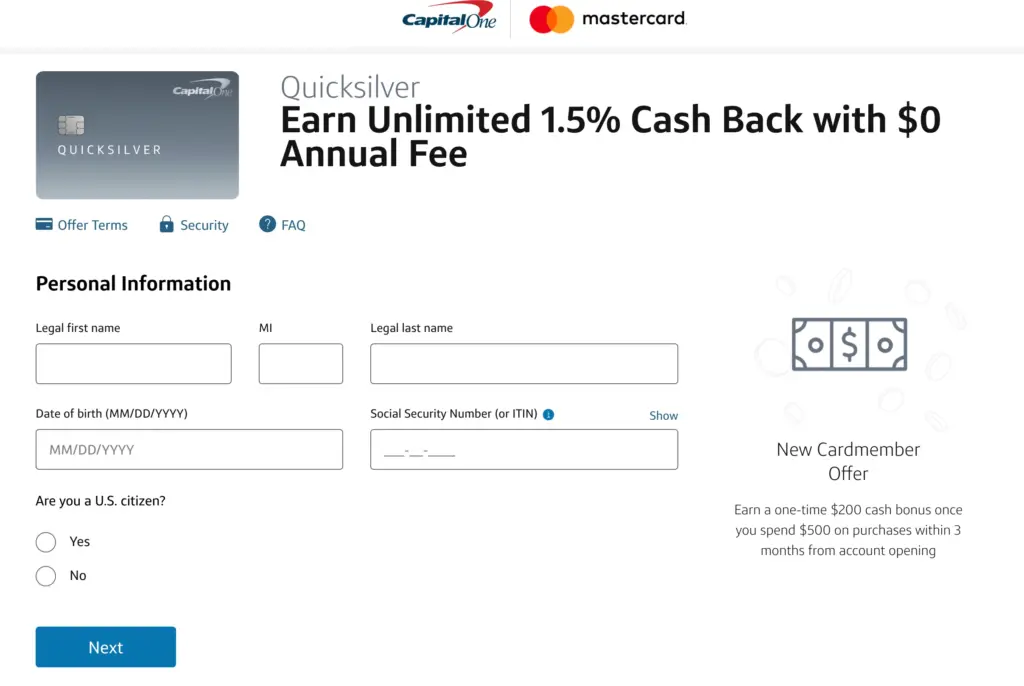
Courtesy: Capitalone
Here is how you can create a credit card application form to help your customers submit their card sanction requests easily. You can check Fluent Forms features to build a credit card application form with more functionalities.
Fluent Forms features that will help you build a credit card form
Conditional logic
With the conditional logic in Fluent Forms, you can set conditions on a field based on the responses in previous fields. This feature allows the form to get submitted with dynamic responses. Overall, it makes you get a concise form entry.
Numeric Calculation
Go far beyond the simple form building and implement calculations with the numeric calculation of Fluent Forms. It also helps you set up the minimum or maximum value. While calculating precisely, this makes the form submission faster.
Address Autocomplete
The address autocomplete feature of Fluent Forms helps users get the advantage of having the address fields populate automatically. As users type a few letters, they will get address suggestions. The suggested addresses are set up with alphabetic sequence. The Google Maps integration helps detect the current location of users.
Form to PDF
Most of the financial documents need to be printed or stored with a constant copy. That’s why a PDF version of your credit card form entries helps you get better usability. While customizing the PDF, you can also protect it with a password. Try Fluent Forms PDF generator for any kind of official documents, and keep up the privacy.
Form Security
With high-quality security measures, you can get customers’ trust easily. In terms of any financial form, multiple security systems back up each other. Fluent Forms ensures form security powered by several tools, including Akismet, Turnstile, reCAPTCHA, hCaptcha, etc.
Multi-Step Form
Long forms requiring entries in every field may lose engagement, no matter how serious it is. So, the multi-step form feature comes with a page break to divide the form into several sections. It upholds the engagement and shows the form-submission progress, so that users don’t get bored.





Leave a Reply