
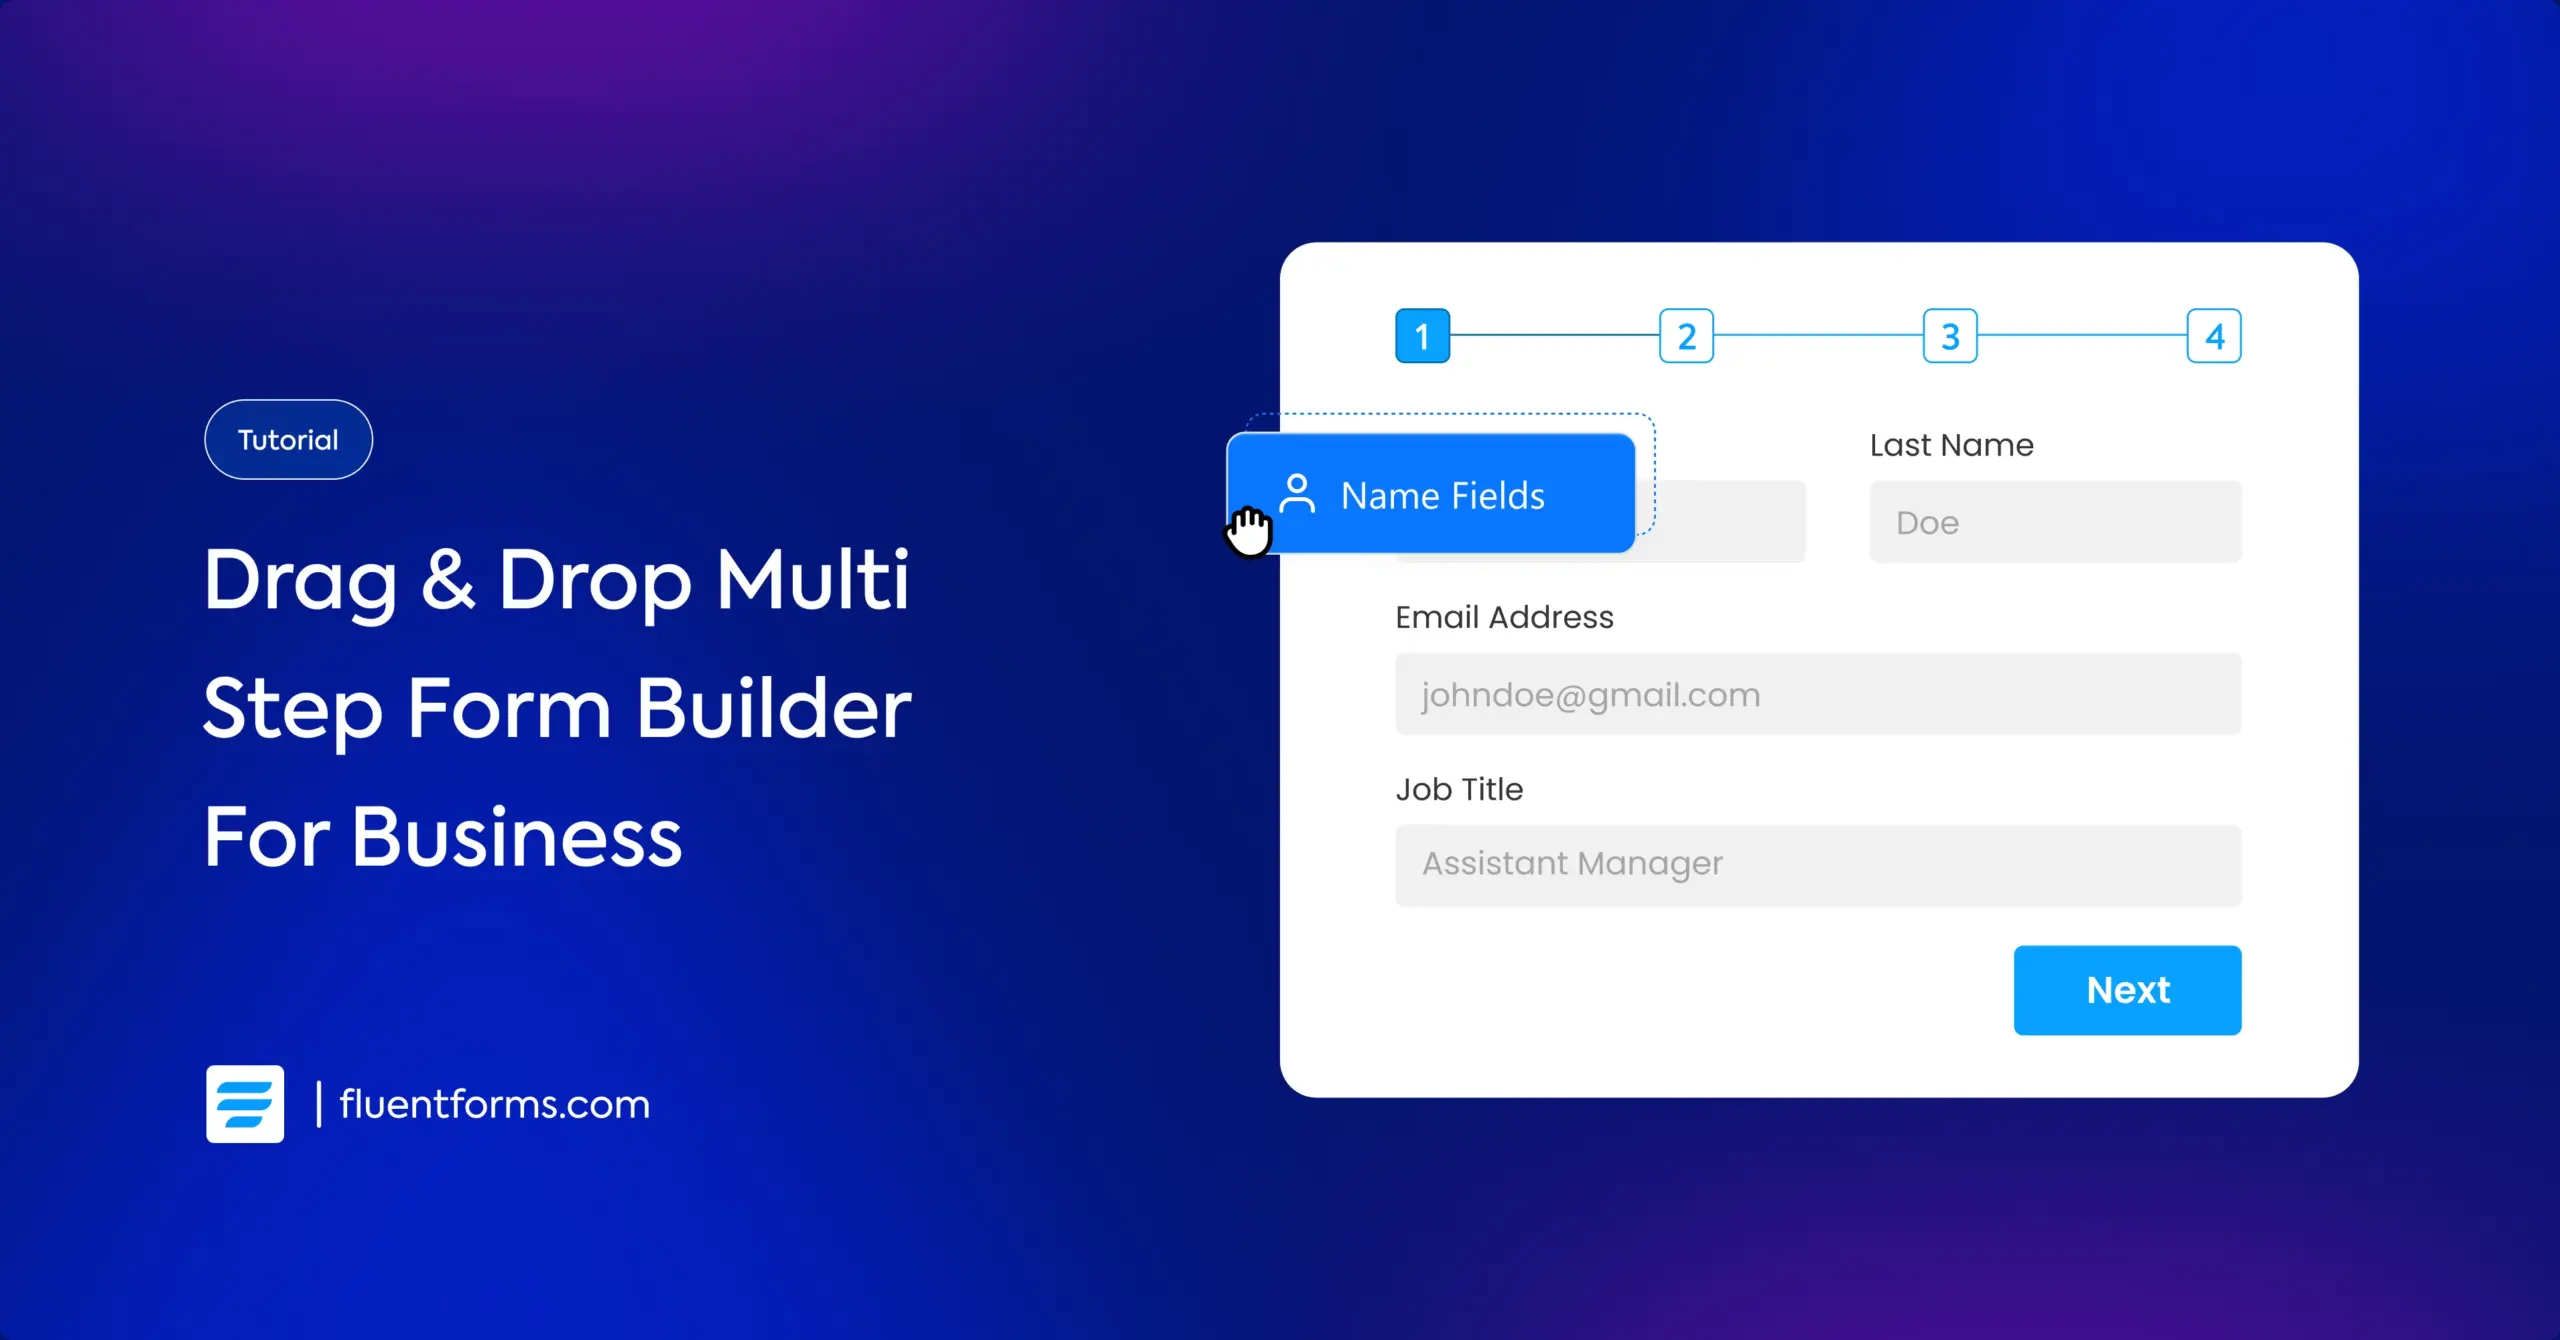
Powerful Drag & Drop Multi Step Form Builder for Your Business
A recent A/B test shows that using multi-step forms instead of single-step forms led to a 214% increase in leads for a software firm. Similarly, BrokerNotes experienced significant conversion rate growth from 11% to 46%.
It’s evident that, in many cases, multi-step forms or multi-page forms are far more user-friendly than single-page long forms. Businesses are increasingly turning to multi-step form builder plugins for their data collection needs.
If you’re running a business and still not utilizing multi-step forms, you’re missing out on current trends and numerous benefits.
Today, we’ll introduce you to an efficient multi step form builder tool that can lead your business to a different level. We’ll not only discuss what, why, and how, but also the best practices along the way.
Stay tuned and get in.
TL;DR
- Multi-step forms divide long forms into multiple pages or sections, with each step containing related fields grouped together. This leads to higher completion rates and better user engagement.
- Key advantages include progress indicators (motivates users), per step data validation & save, conditional logic for personalization, and reduced form abandonment.
- Fluent Forms’ multi-step form offers customizable progress indicators, partial entry saving (allowing users to return later), multiple animation options, and customizable step titles and button designs.
- To easily create a multi-step form: install the Fluent Forms plugin, create your form, add the Step Form input field & configure the step settings, save & style the form, and publish via shortcode.
- Best practices include keeping forms simple with logical flow, using clear progress bars & enabling save progress features.
- Multi-step forms provide valuable analytics showing where users drop off, allowing for targeted improvements to increase conversions.
What are multi-step forms
What we usually picture when talking about a form is typically a single-step form with multiple input fields. No break, we need to fill up the fields one after another. The opposite of the single-step form is the multi-step form.
|
Feature |
Single-step Form |
Multi-step Form |
|---|---|---|
|
Structure |
Consists of a single page where all form fields are displayed at once. |
Divides the form into multiple pages or steps, with each step containing a subset of form fields. |
|
User Experience |
Provides a straightforward experience with all fields visible at once, suitable for short and simple forms. |
Offers a guided experience, breaking down complex or lengthy forms into manageable sections, reducing user fatigue. |
|
Completion Rate |
May experience lower completion rates for longer or more complex forms due to potential overwhelming nature. |
Tends to have higher completion rates, as users are less likely to feel overwhelmed by the segmented structure. |
|
Data Validation |
Typically validates all form fields upon submission, potentially leading to more errors displayed at once. |
Allows for real-time validation at each step, enabling users to correct errors immediately, enhancing usability. |
|
User Engagement |
May lack interactivity and engagement, as users complete the form in one go without much interaction. |
Enhances user engagement by providing clear progress indicators, encouraging users to proceed through each step. |
Multi-step forms, also known as wizard forms are web forms that are divided into multiple sections or steps. It presents all the related form fields on a single page, and users go through a series of steps, with each step focusing on a specific set of information/actions.
The goal of multi-step forms is to break down boring complex or lengthy forms into smaller, more manageable sections. It efficiently makes the overall process more user-friendly and less overwhelming.
Why are multi-step forms more effective than single-step forms
Multi-step forms are often considered more effective than single-step forms for multiple reasons. While single-page forms are also effective in many cases, here we are going to explore why multi-step forms still outperform single-step forms. Here are the key advantages of using multi-step forms:
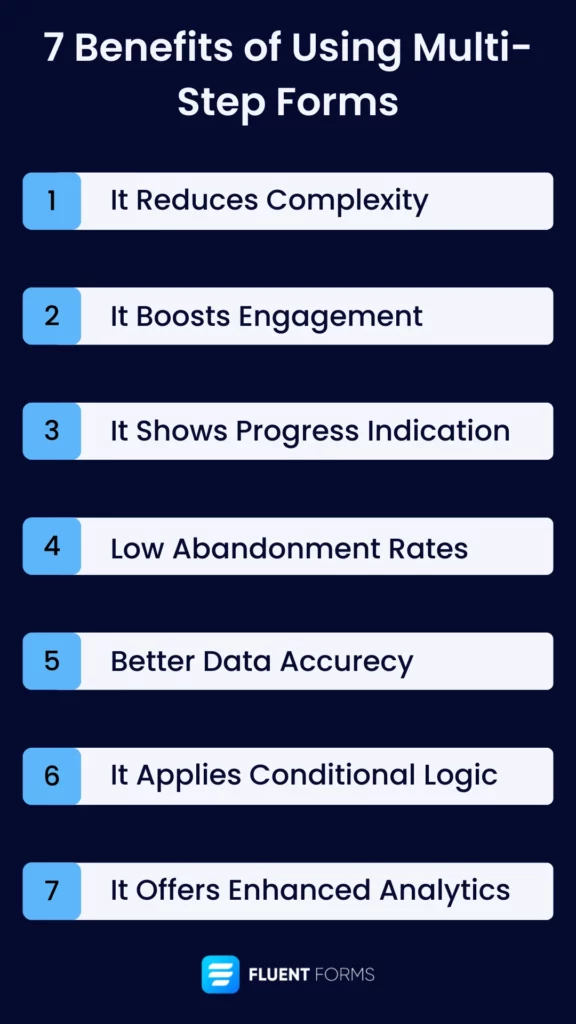
- It reduces complexity by breaking a lengthy form into multiple steps that make it easy for users.
- Multi-step forms encourage users to engage with the content in smaller, more digestible portions. This can lead to a higher likelihood of completing the entire form.
- It shows progress Indication that shows how far they’ve come and how much is left to complete. This transparency can motivate users to continue.
- Users are less likely to abandon a multi-step form compared to a long, single-step form.
- Breaking information into smaller chunks allows users to focus on specific details at each step which ensures data accuracy.
- Multi-step forms allow the integration of conditional logic. This dynamic approach personalizes the user experience and makes it more relevant and engaging.
- Multi-step forms provide valuable insights into which specific steps may cause users to drop off and allow targeted improvements.
Certainly, employing multi-step forms in your workflow can have a positive impact on your business. Therefore, let’s introduce you to the best multi-step form builder plugin you can rely on.
Introducing Fluent Forms’ multi step form builder
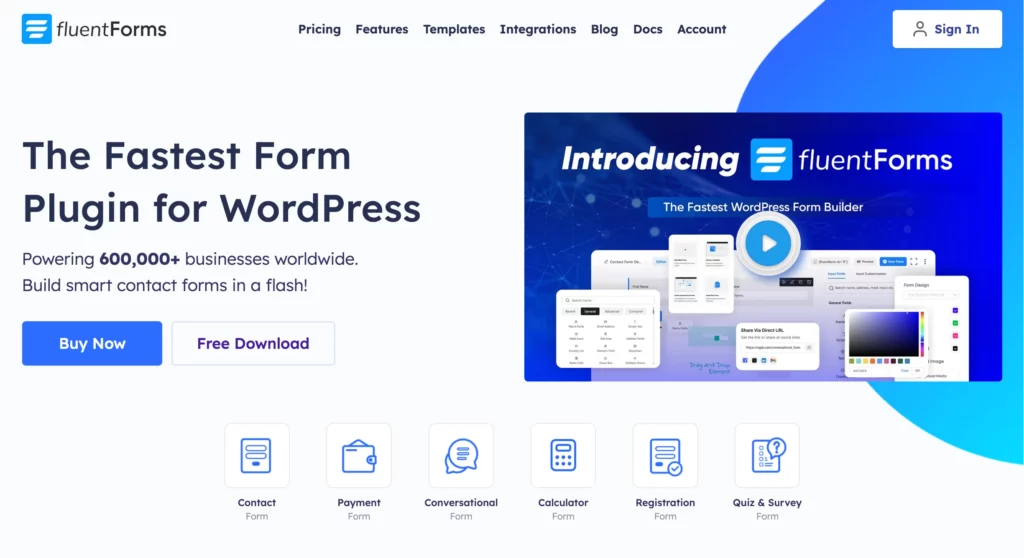
Fluent Forms is the fastest multi-step form builder plugin for WordPress. Fluent Forms is serving 600K+ businesses worldwide and earned the name as the most efficient multi-step form builder among users. With numerous functionalities, this form builder stands out as the sole tool for any of your form-building needs.
Let’s explore the dedicated features of Fluent Forms’ multi-step form builder that brings ease and efficiency to your workflow.
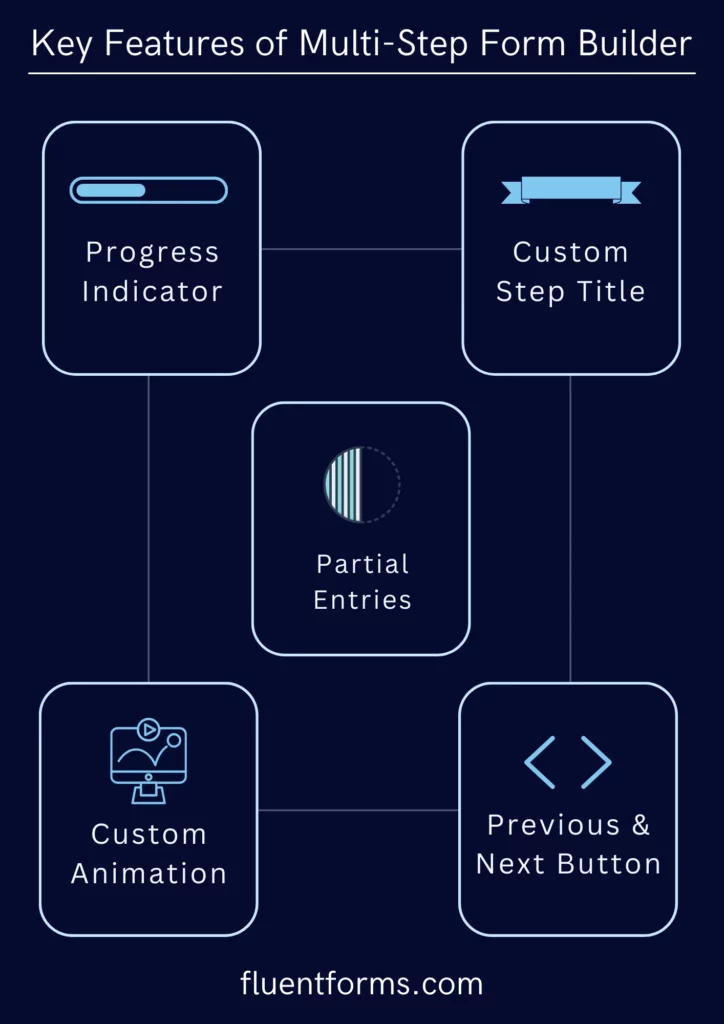
1. Progress Indicator Customization
Fluent Forms provides customizable progress indicators for your multi-step forms that ensure seamless user guidance while maintaining your brand aesthetics.
Whether you want minimalist or vibrant, you can tailor the progress bars to match your brand’s unique style.
2. Partial Entries Saving
Addressing a common concern, Fluent Forms’ multi-step form builder provides a solution for users who only complete a few steps of your multi-step form before abandoning it.
With the partial entries feature, users can rest assured that their progress is not lost. This acts as a safety net that allows users to return later and pick up right where they left off, enhancing user experience and reducing form abandonment rates.
3. Customizable Animation Types
This multi-step form builder offers three different soothing animation types for transitioning between form steps.
Whether you prefer subtle fades, dynamic slides, or eye-catching flips, you can pick the animation type that matches your brand’s vibe and enhances the overall user experience.
4. Customizable Step Titles
Every step of the multi-step form journey is an opportunity to provide clarity and guidance to your users. With Fluent Forms, you can customize step titles to make them unique and informative.
By crafting step titles to match the content of each form section, you can effectively guide your users through the form completion process and ensure a smooth experience.
5. Previous & Next Button Design
You can design the previous and next buttons according to your brand’s aesthetic preferences. Whether you like sleek and modern buttons or something more playful and colorful, you can customize the design effortlessly to align with your brand’s identity.
These dedicated features of Fluent Forms’ multi-step form builder empower you to create highly customizable and user-friendly forms that capture essential data and boost the overall interaction and engagement with your audience.
Moreover, while multi-step form building is obvious, you can effortlessly build a range of different forms you might need for your business using Fluent Forms. For example, you can create:
- Effective contact forms
- Interesting conversational forms
- Hassle-free payment forms
- Powerful calculator forms
- User-friendly registration forms
- Engaging quiz & survey forms,
and certainly, you can seamlessly create hundreds of other kinds of forms for your business.
Now, let’s explore how you can create a multi-step form for your business quickly and efficiently.
How to create a multi-step form using Fluent Forms
Let’s walk through how to create a multi-step form in WordPress using Fluent Forms in 5 simple steps.
Step 1: Install the Fluent Forms Plugin
Follow the steps to install Fluent Forms effortlessly.
- Go to your WordPress dashboard.
- Find the “Plugins” option on the left menu bar
- Select “Add New”
- Search for the “Fluent Forms”
- You’ll have Fluent Forms listed among the search results.
- Now, just click on “Install”
- As installation is complete, click on “Activate”
- You need to upgrade to Fluent Forms PRO for multi-step features
You can also watch the video for more clear understanding.
Done installing Fluent Forms? Let’s start creating your multi-step form.
Step 2: Create a multi-step form
As you have installed Fluent Forms PRO, follow the steps below:
- Go to your dashboard
- Find “Fluent Forms” on the left-hand side menu and click
- Then you’ll have a dedicated “Add New Form” button
- Click on it to start crafting your multi-step forms

Clicking on “Add New Form” will show you three different choices to pick from-
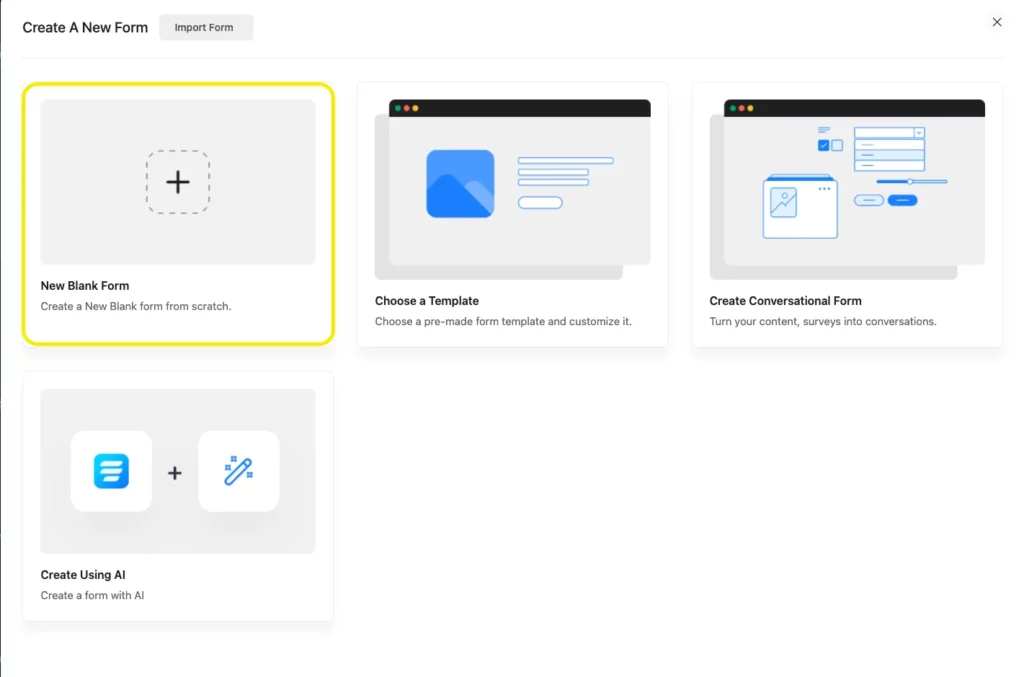
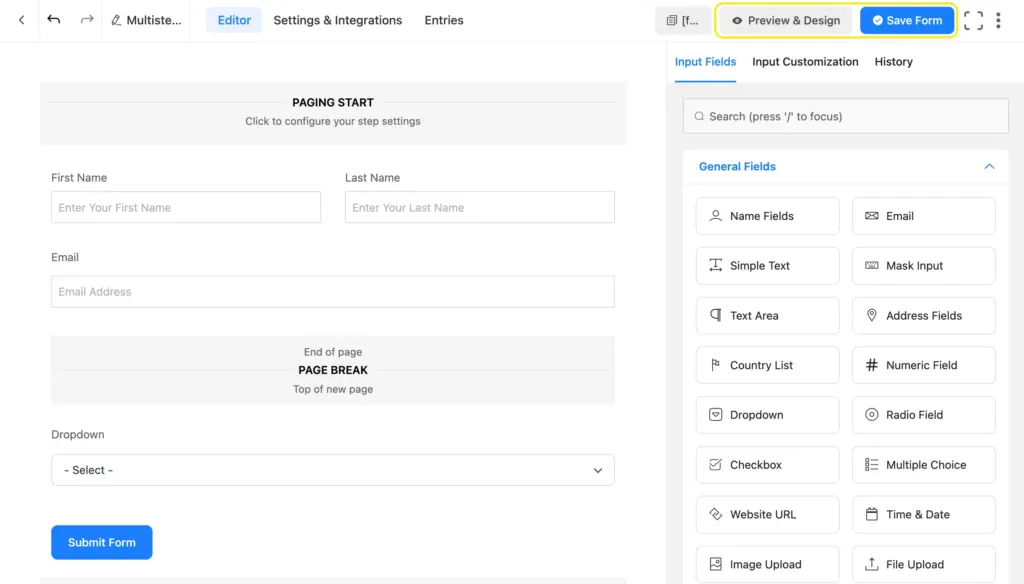
For a multi-step form builder, you need to select New Blank Form. You will find such an interface as shown below.

At this point, you need to add the input fields you need. Then employ the Form Step field as far as you need.
The Form Step comes in 3 main parts.
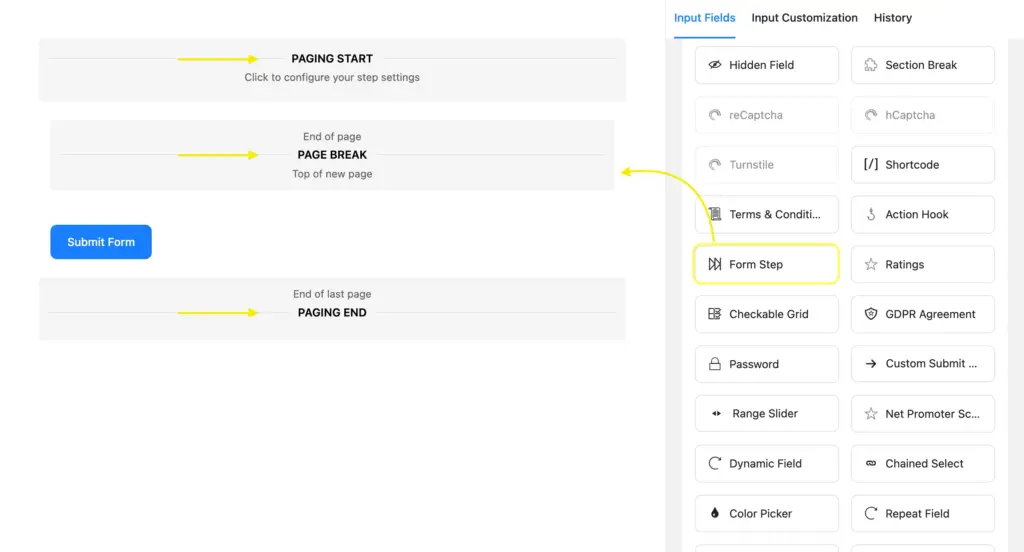
1. Paging Start
This is the first part you will notice when you add the Form Step input field. Paging start contains the first page of the multiple-page form. When you add the first part of the form, it will automatically load into the Paging Start section.
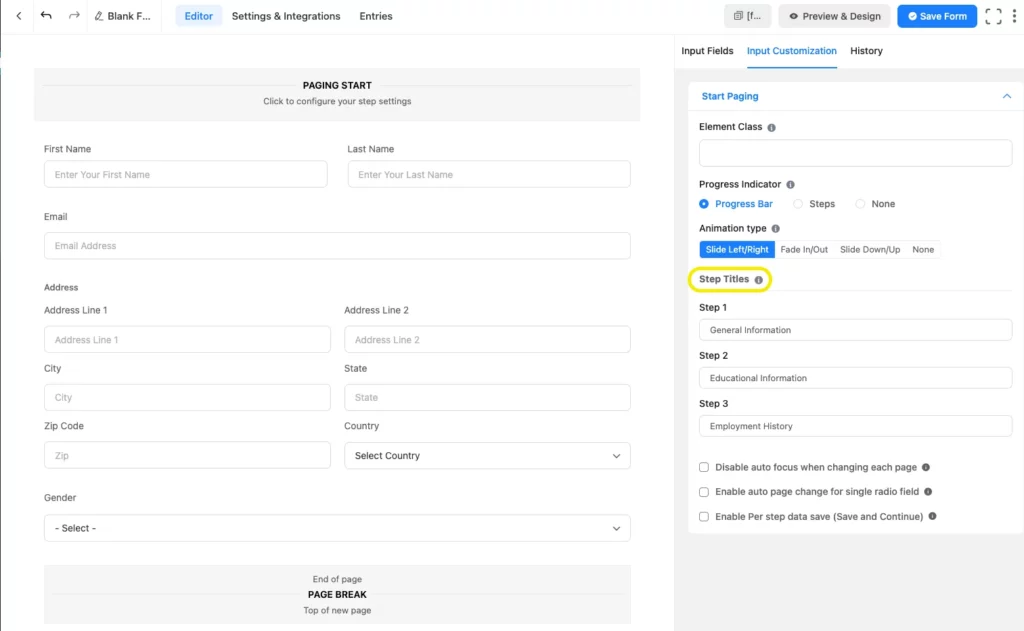
You can easily customize this part by clicking the edit icon, and you will get these:
- Element Class: It allows you to add custom CSS classes to the input field itself.
- Progress Indicator: You will find 3 options for the indicator bar style.
- Progress Bar: It shows users a progress bar in the form that helps users to have a numeric idea of their progress.
- Step titles: With this section, you can set a name for each form step or part.
2. Page Break
The Page Break section of the form automatically creates a new step or section. When you need to create a new step, just click or drag and drop Form Step on the builder point.
Then you will find a new space has been set to input a new field for the next step.
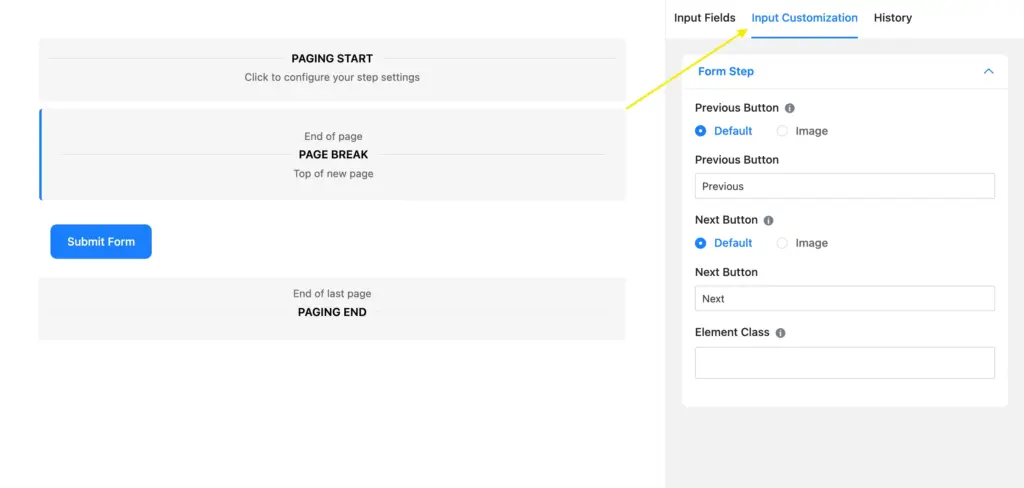
You can customize this part by clicking the edit icon when hovering over the field. You will find these:
- Previous Button: Select from the 2 options:
- Selecting default shows a text button for the previous page
- Selecting image shows an icon of your choice.
- Previous Button Text: You can edit the previous button text or add the icon link to show an image.
- Next Button: Pick from the 2 options:
- Selecting default shows a Text button for the next page
- Selecting image shows an icon of your choice.
- Next Button Text/Image: Edit the Next button text or add the icon link to show an image.
- Element Class: Add custom CSS classes to the input field itself.
3. Paging End
The Paging End section is the last section of the Form Step. It indicates the ending of the multiple-page form.
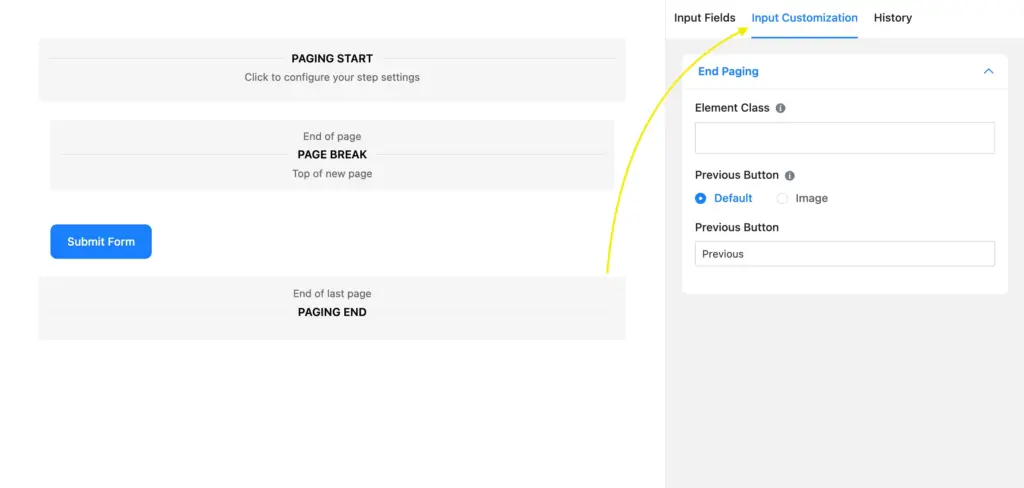
You can customize this part with these:
- Element Class: You can add custom CSS classes to the input field.
- Previous Button: Select from 2 options:
- Selecting default shows a Text button for the previous page
- Selecting image shows an icon of your choice.
- Previous Button Text: Edit the previous button text or add the icon link to show an image.
As you have added all the input fields and the steps, this is the time to move on to the 3rd step.
Step 3: Save, preview, and design your form
Once you have all the necessary fields in place, you have the option to preview and design your multi-step form to resonate with your audience.
You can find the preview button in just the upper right corner of the interface, besides the “Save Form” button. Remember that before you preview and design, don’t forget to save your form.
Clicking the “Preview & design” button will show you an interface with a range of options to design your multi-step form.
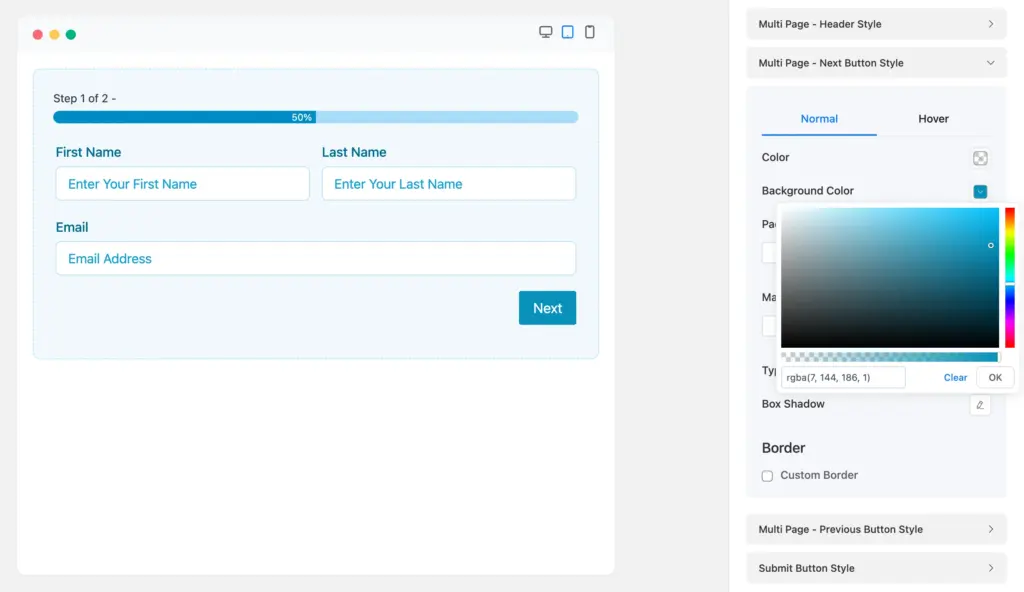
You are equipped with lots of options to customize your form such as changing your form’s style, the container’s color, the margin & padding, the asterisk style, the after-submit message style, button color, and whatnot.
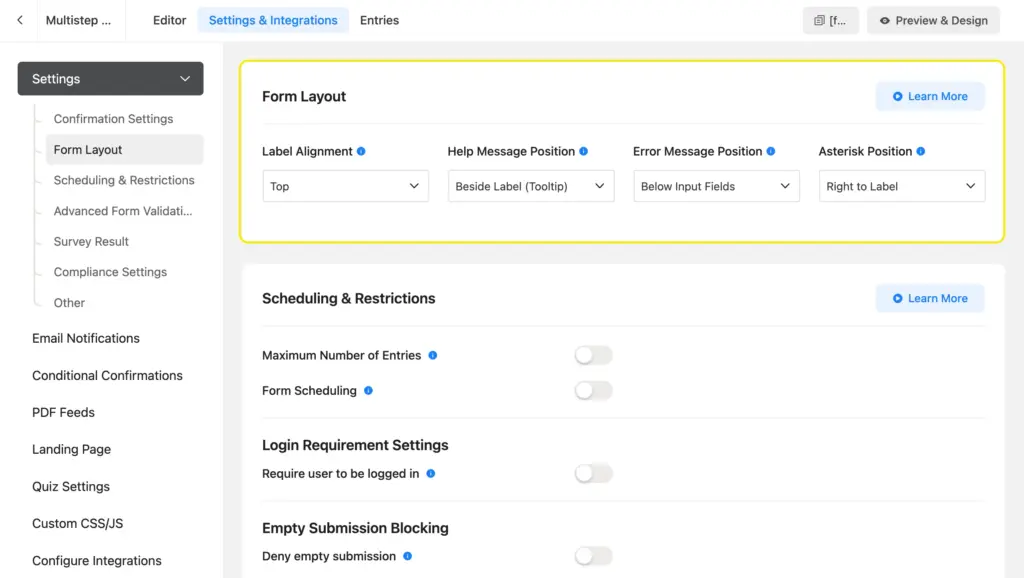
Step 4: Setting up your multi-step form
To customize the form settings, you need to go to the settings and integrations part of the form editor.

Here, you will get multiple form setting options. You can customize the form confirmation settings, form layout, scheduling & restrictions, advanced form validation, survey results, compliance settings, and more.
In the confirmation settings option, you can set the after-form submission settings like confirmation type, message to show after submission, what to do after submission on the after-submission section, and more.

Also, you can enable the double opt-in confirmation.
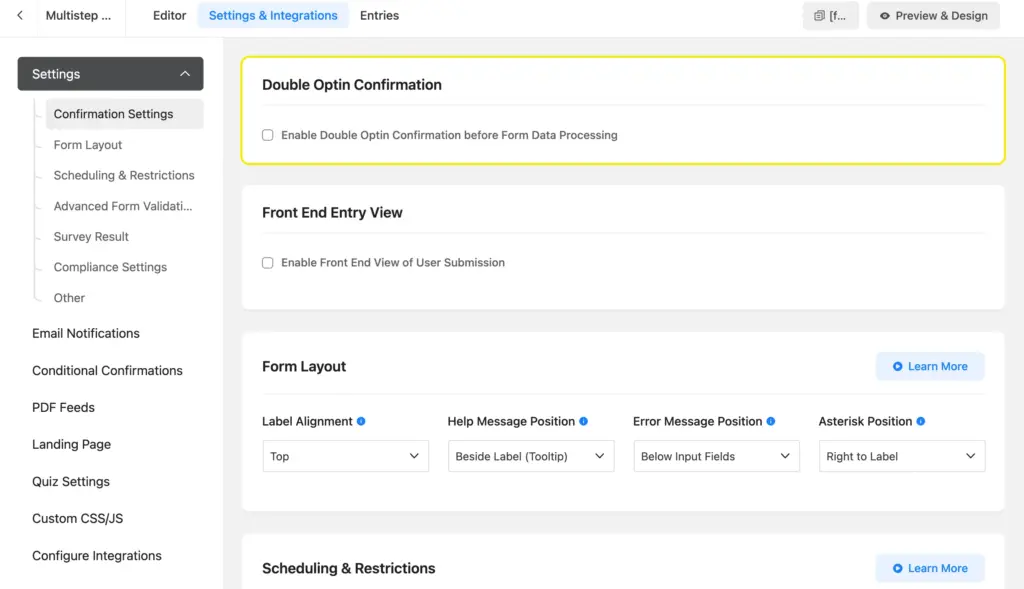
In the Form layout section, you can set up the label alignment, help message position, error message position, asterisk position, etc.
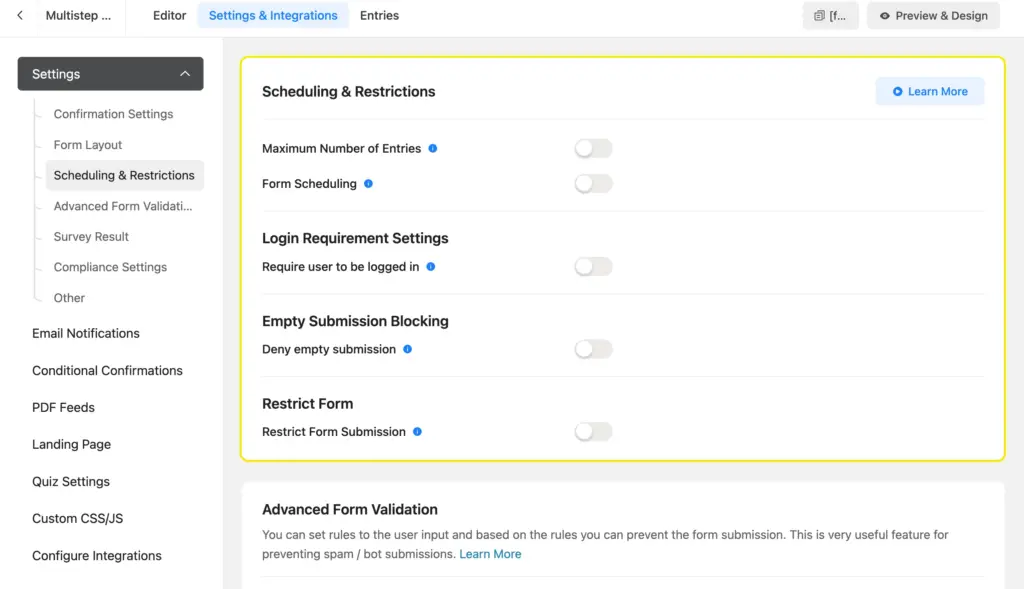
The scheduling & restrictions option is for determining the maximum number of entries, form scheduling timing, form waiting & expiration messages, and more.
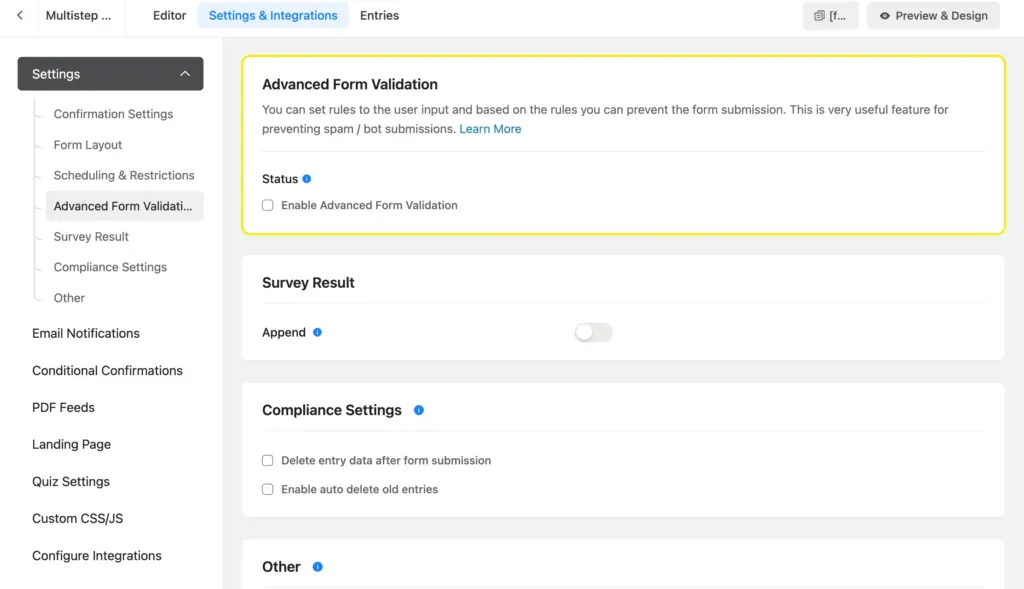
The advanced form validation is a very useful feature for preventing your forms from spam and bots.
Once you set all the above-mentioned settings, let’s move on to the Email Notification setting. Here you can set the sending email notifications to your users whenever they submit a form.

In the final part, which is about marketing automation and CRM integrations, you can add any integration to your form to expand your functionality.

Step 5: Publish your multi-step form
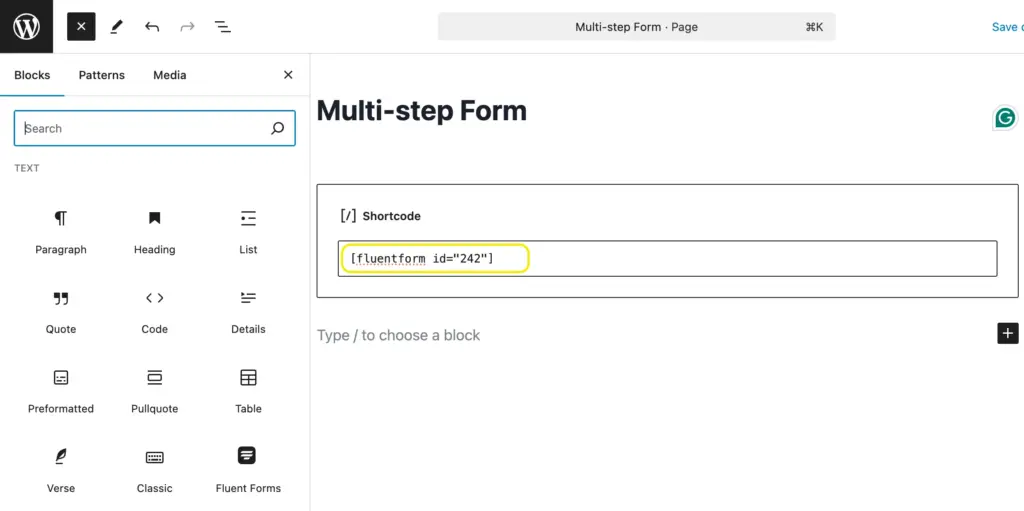
There are multiple ways to publish your form. The easiest way is to just copy the shortcode and paste it to a page or post.
Also, you can also use Fluent Forms’ dedicated landing page feature.
To publish your step form on a page, you need to go to “Pages” from your WordPress dashboard.
You can add a new page or you can publish it on an existing page.
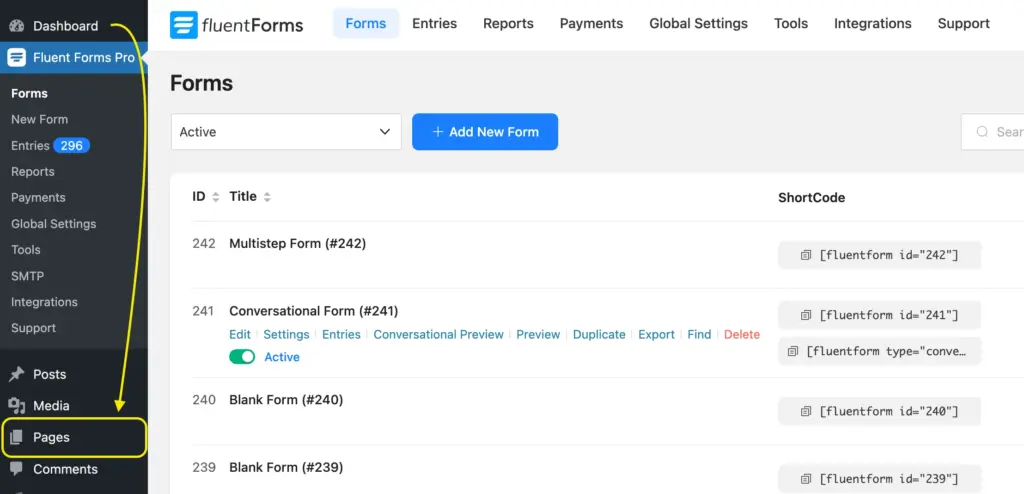
Find your form’s shortcode in the upper right corner of the interface.
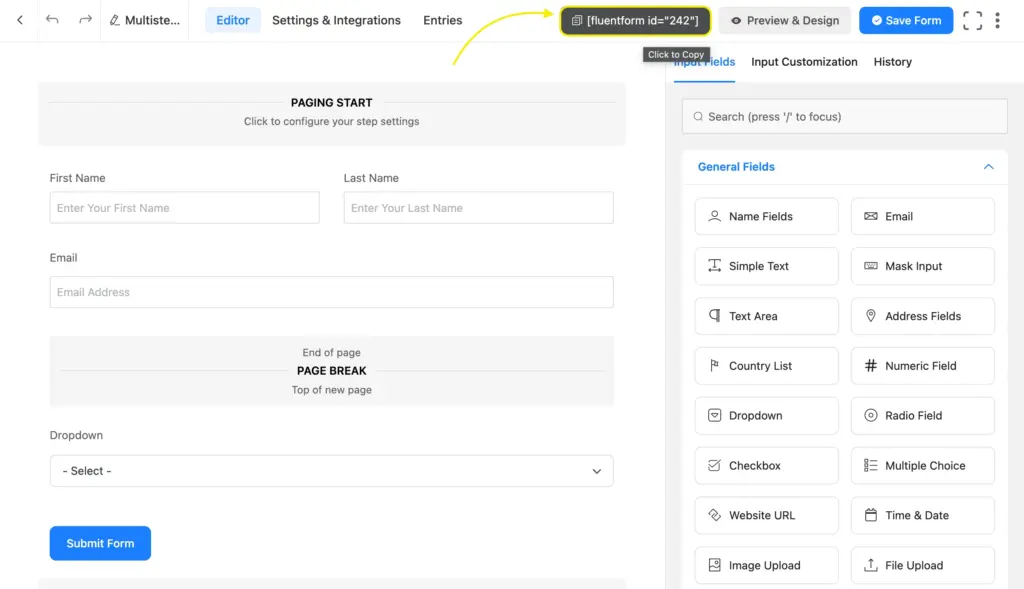
And on your web page, insert your form’s shortcode.
Once you set your shortcode, your form is all functional.
And your form will appear on your web page like this:
Best practice for multi-step from creation
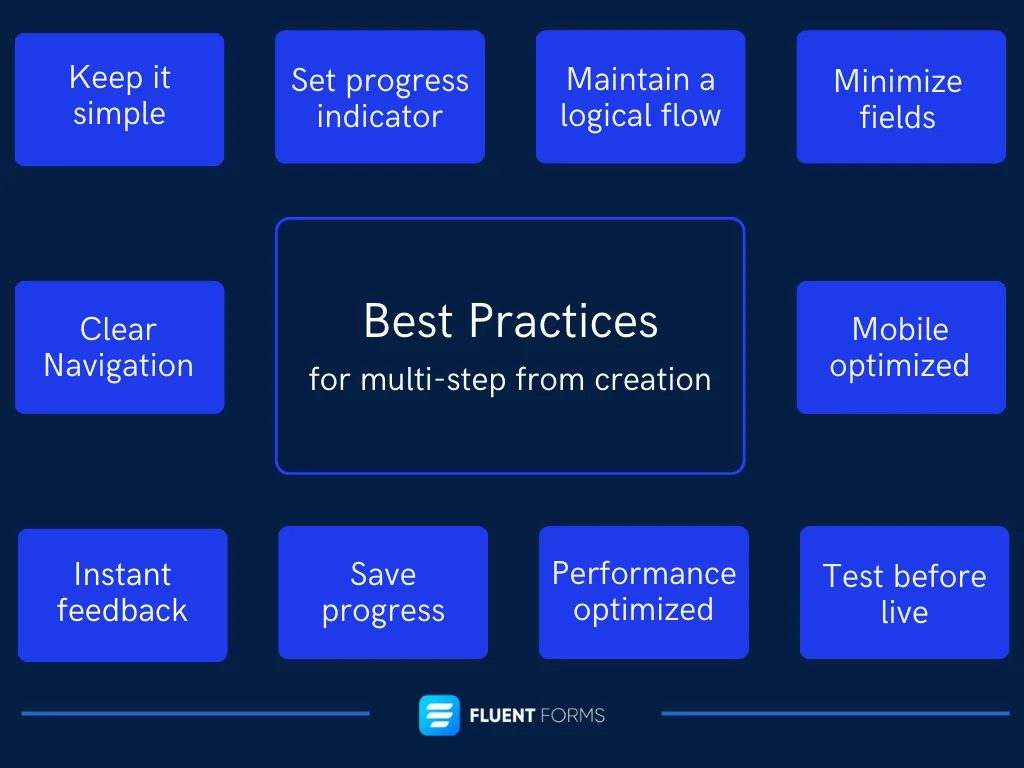
When you’re creating a multi-step form, there are some best practices you should follow to ensure a smooth and effective user experience:
- Keep it super simple: You should aim for simplicity in both design and functionality. Each step should have a clear purpose so users can immediately understand what information is required at each stage.
- Set a progress indicator: Don’t forget to include a progress indicator to show users how many steps are left and where they are in the process. This effectively helps manage expectations and reduces abandonment rates.
- Maintain a logical flow: Organize form input fields in a logical sequence. Start with basic information and gradually move to more detailed or specific questions.
- Minimize fields: Only include essential fields to minimize friction and reduce the time it takes to complete the form. You can consider using conditional logic to show relevant fields based on user responses.
- Ensure a clear Navigation: Ensure clear navigation options, such as “Next” and “Previous” buttons, to allow users to move forward and backward in the form.
- Make it mobile optimized: Optimize your multi-step form for mobile devices to ensure an effortless experience across different screen sizes.
- Instant feedback and validation: Provide real-time feedback and validation to help users correct errors and prevent submission issues. You should clearly indicate required fields and provide informative error notifications when necessary.
- Ensure save progress feature: Consider utilizing a feature that allows users to save their progress and return to the form later. This is particularly helpful for longer forms or if users get interrupted during the form-filling process.
- Make it performance optimized: Optimize the form’s performance by minimizing loading times between steps. This helps maintain user engagement and prevents frustration.
- Test before going live: Test your multi-step form extensively to identify any usability issues or inconveniences before deploying.
These best practices can help you gain the maximum responses from your audience effectively and effortlessly.
Wrapping up
The multi-step form is a game-changer when it comes to improving engagement, conversion, and completion rates. A multi-step form builder can significantly enhance a business by seamlessly collecting critical data from customers.
Fluent Forms’ multi-step form builder ensures all the features needed to effortlessly create step forms in no time. Finally, by following the best practices discussed above, you can create a perfect and conversion-friendly multi-step form tailored to your business needs.

Ashik Elahi is a seasoned Digital Marketer with a passion for Content Marketing. He believes in the power of storytelling and crafting valuable content that resonates with readers.


Leave a Reply