Connect ActiveCampaign with Your WordPress Form and Collect Leads

There are many critical aspects of digital marketing. Lead generation and email automation being some of the most crucial ones. Whether you are starting your business or have been here for a while, you are always going to bring in new customers and continue selling products to existing ones.
To make sure your sales follow your expected curve and increase conversion rates, you are going to need the best tools out there. That’s where Fluent Forms’ ActiveCampaign integration comes in. You can use the swift form builder, Fluent Forms for lead generation and leverage the contacts.
So how to do that? Let’s get started.
ActiveCampaign

An intelligent answer to all your email automation troubles is ActiveCampaign. Whether you run an eCommerce platform, a B2C company, or a B2B one, it has everything you need to make your customer experience an enjoyable one.
Some of the features that you can get with ActiveCampaign are:
- Dynamic content
- Segmentation
- Contact management
- CRM
- Lead scoring
- Site messaging
- Engagement tracking
- Advanced reporting etc.
Why Fluent Forms
Fluent Forms is one of the best WordPress form plugins. It lets you create excellent forms for your WordPress website. It provides a ton of fantastic features to meet your data collection and lead generation requirements.
Fluent Forms allows you to design a wide range of forms, from simple contact forms to more advanced payment forms.
The key features of Fluent Forms are –
- 60+ input fields to collect any type of information
- Numeric calculation to create forms with calculators
- Multi-step forms to break long forms into multiple steps
- Conversational forms to provide a better form-filling experience
- Advanced post creation to collect user-generated content
- Conditional logic to show/hide input fields based on user behavior
- Integration with popular payment gateways to collect payments and donations
- Spam protection using hCaptcha, reCAPTCHA, Turnstile, Honeypot, Akismet
- Quiz and survey with advanced scoring
- Advanced form styler to align form with your brand identity
- Custom CSS and JS to create more advanced forms
- Export entries in CSV, Excel, ODS and JSON format
- PDF add-on to turn form submissions into PDF files
- Form scheduling and restriction based on different rules
- Double opt-in confirmation to ensure efficient data collection
- Email notification after form submission
- Conditional confirmation to show confirmation messages based on predefined conditions
- Advanced form validation to accept eligible submissions
- Fully responsive and accessible to ensure inclusivity
- 55+ integrations to expand core functionalities
Currently, more than 500K websites use this form builder plugin, and the number is constantly growing. Although the free version of Fluent Forms can handle most of your basic needs, the Pro edition further pushes the limit.
Integrate ActiveCampaign with Fluent Forms in 4 steps
To integrate ActiveCampaign with Fluent Forms, you have to follow the steps below –
- Install Fluent Forms Pro
- Enable ActiveCampaign integration
- Configure ActiveCampaign integration
- Create ActiveCampaign feed
These steps are elaborated for you below.
Step 1: Install Fluent Forms
First and foremost, you need to have Fluent Forms installed. If you already do, skip on to step 2. And for those of you who do not, let’s get it done.
Head to the WordPress repository and download Fluent Forms.
Now, head to your WordPress dashboard and locate the plugins section.
Upload the Fluent Forms zip file.
And now install it.
Notice this is a free version of the form builder. So to access the ActiveCampaign integration and many others, you will need to upgrade to a premium license.
Step 2: Enable ActiveCampaign integration
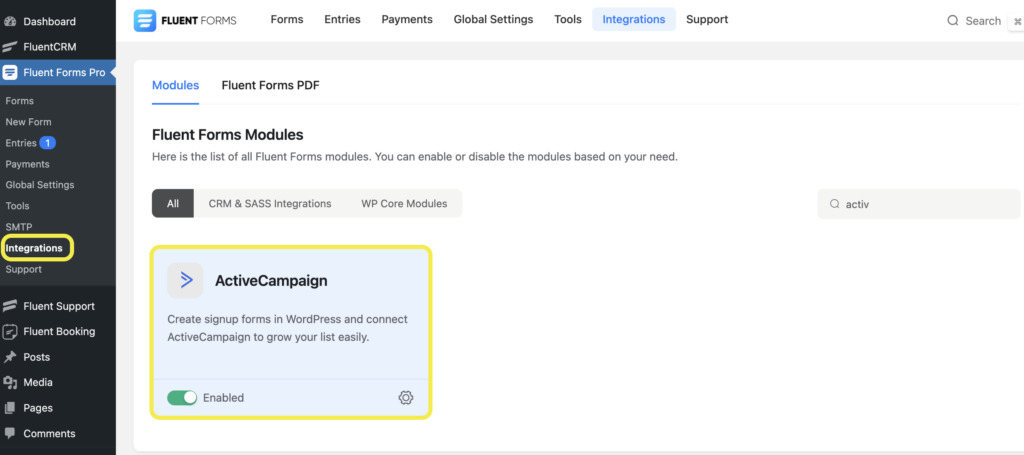
After you have installed and activated the Fluent Forms plugin, it’s time to enable the integration module. Locate the Integrations tab.
Scroll down to the ActiveCampaign module or use the search bar and toggle it on to enable it.
Step 3: Configure ActiveCampaign integration
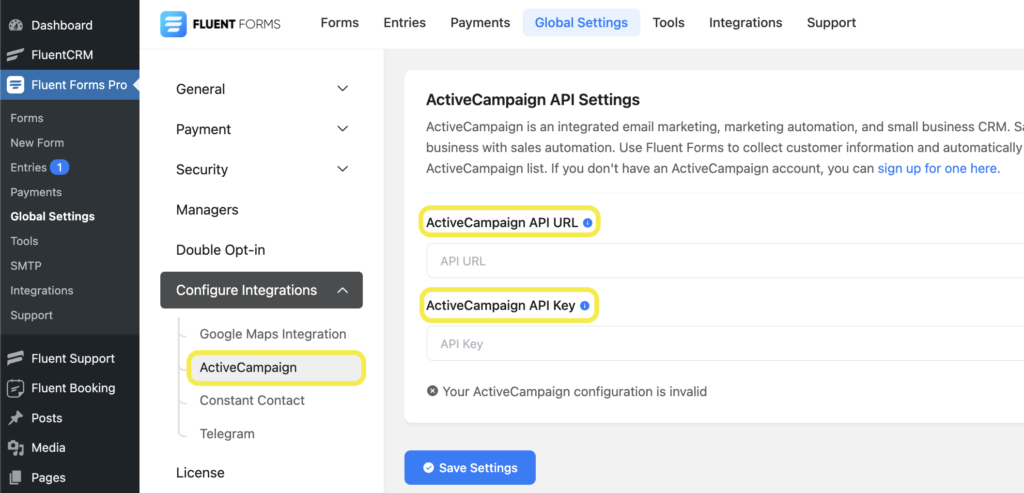
After enabling the ActiveCampaign integration module, it’s time to configure it. To do that, click on the settings icon on the bottom-right corner of the module.
You will be asked for an API URL and an API Key. You will get them from your ActiveCampaign account. So log in to your ActiveCampaign account and go to Settings>Developer.
You will notice an API URL and an API Key. Copy them and paste them on Fluent Forms’ ActiveCampaign settings tab.
Don’t forget to save the settings.
Step 4: Create ActiveCampaign feed
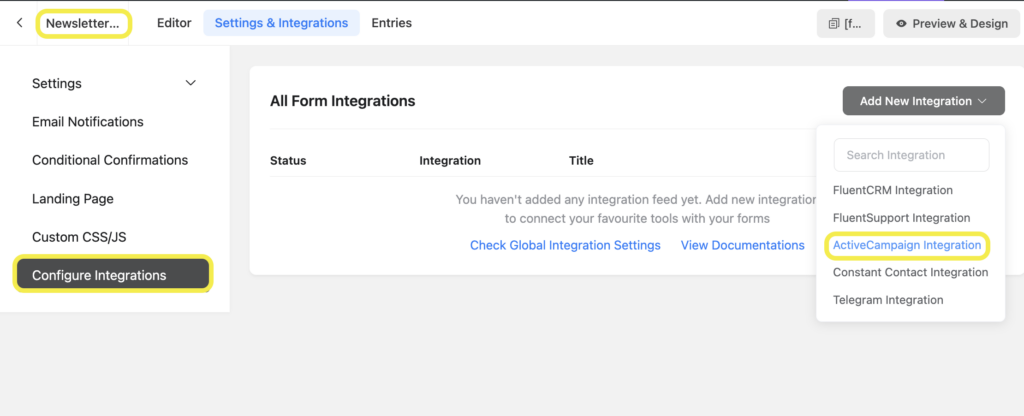
Now open the form you want to work with. Go to the Settings & Integrations and scroll to the Configure Integrations from the side menu.
Click on the Add New Integration button on the right and select ActiveCampaign from the dropdown menu. Define things like the name and map the fields.
You can also enable Instant Responders and Conditional Logic if needed. Click on Enable ActiveCampaign feed when you are done.
Related resource: ActiveCampaign integration with Fluent Forms documentation.
ActiveCampaign integration in a nutshell
See how effortless the whole procedure is? Fluent Forms has more of this magic in store. Just go to this link, and give it a try. And if you don’t like it, money back is guaranteed.
60+ Third-party Integrations
Expand your form functionality with seamless integrations.





Leave a Reply