

Automate Lead Qualification with Form Data and FluentCRM Segmentation
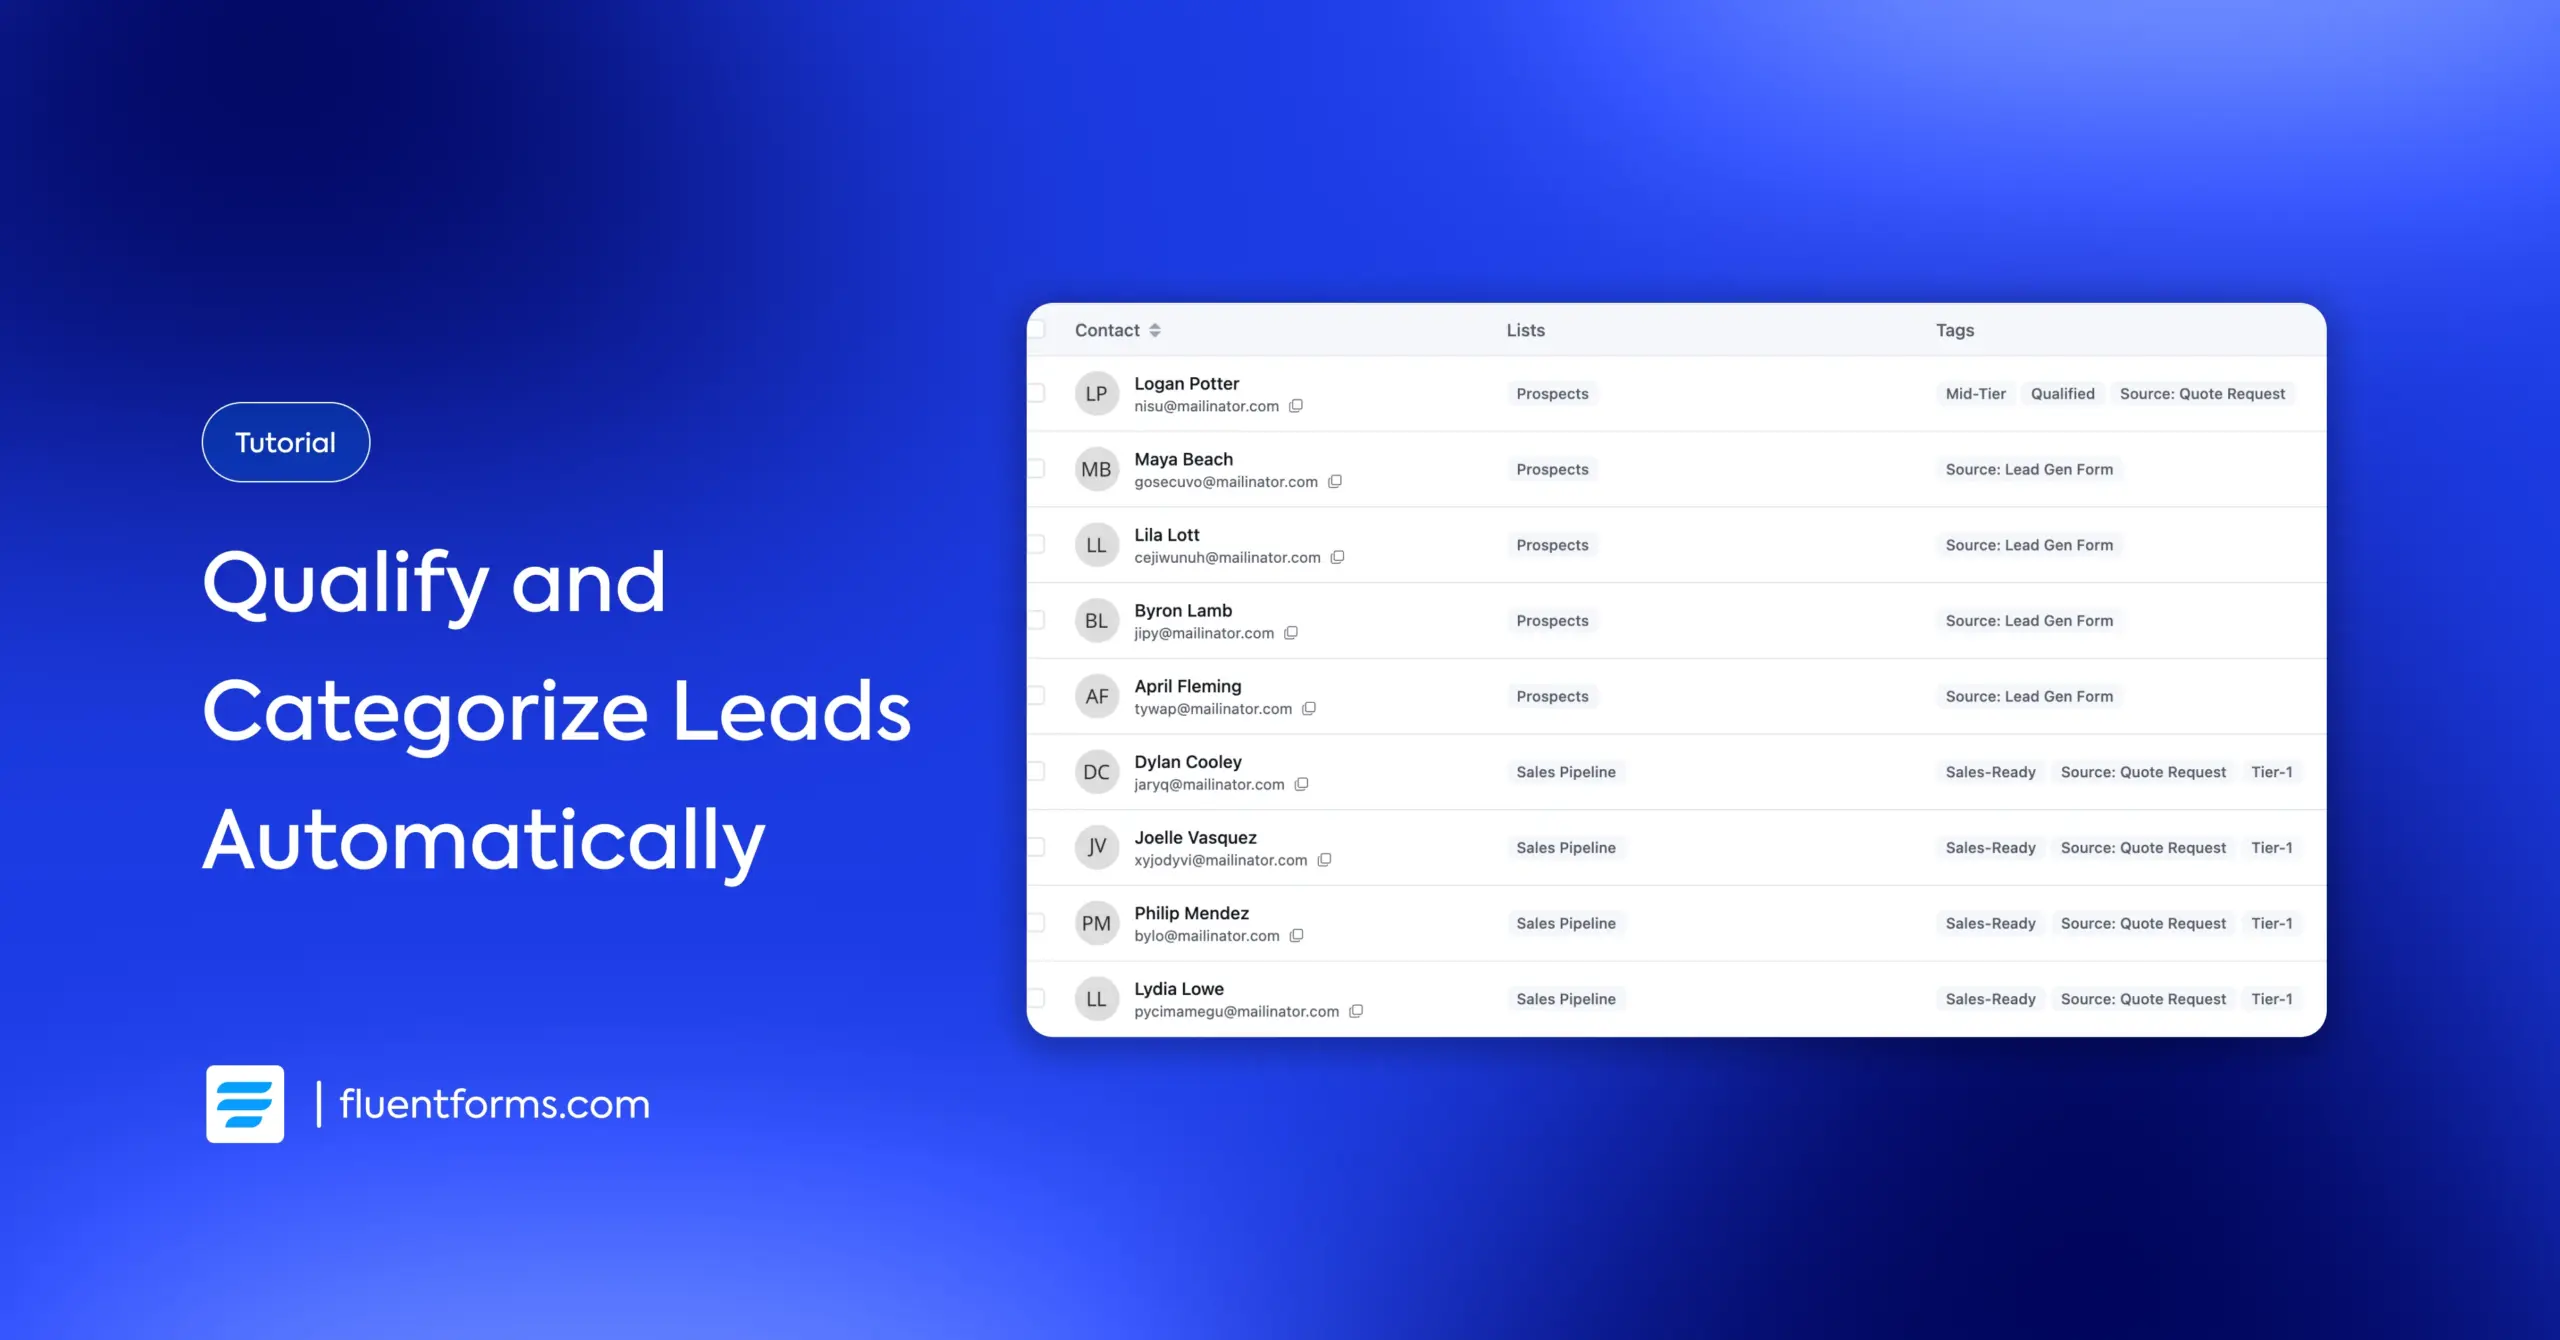
A prospect fills out your quote request form. Based on their budget, timeline, and project type, FluentCRM tags them as a Tier-1 lead and sends them a personalized follow-up within minutes.
Another person fills out the same form but selects “Just exploring” and a budget under $1K. They get tagged as Low-Priority and enter a slower nurture sequence instead.
You don’t have to do anything manual after the initial set-up. This is automatic lead qualification. Fluent Forms collects the qualifying data. FluentCRM tags, categorizes, and routes the follow-up automatically. I’ll show you how to set it up step by step.
TL;DR
- Use qualifying questions in your Fluent Forms (budget, timeline, decision role) to collect the data FluentCRM needs to categorize leads.
- Build two forms: a lightweight lead-gen form for top-of-funnel, and a detailed quote/consultation form for bottom-of-funnel.
- Create a tiered tag system in FluentCRM: Tier-1, Sales-Ready, Mid-Tier, and Low-Priority, plus status tags like Qualified and Nurture.
- Use conditional logic on your FluentCRM integration feeds to apply different tags based on form answers.
- Build separate follow-up automations for each tier so high-fit leads get fast, personal outreach and lower-fit leads get educational content.
Why Lead Qualification Matters
When every lead gets the same follow-up, you waste time on the wrong people. Someone with a $15K budget and a deadline of “next month” sits in the same queue as someone who’s “just exploring.” By the time you respond to the first one, they may have already booked a call with your competitor.
Qualification fixes this by answering two questions before you open your inbox: “How well does this lead fit what I sell?” and “How ready are they to buy?”
All you need to answer those questions are the right fields on your form and the right tags in your CRM.
The Qualification Workflow at a Glance
Here’s what the finished system looks like:
Form 1: Lead Gen Form (top-of-funnel)
Collects name and email. Tags the contact as “New Lead.” Triggers a nurture automation.
Form 2: Quote Request Form (bottom-of-funnel)
Collects name, email, company, budget range, timeline, and project type. Based on the answers, FluentCRM applies a tier tag (Tier-1, Mid-Tier, or Low-Priority) and a status tag (Sales-Ready, Qualified, or Nurture). Each tier triggers a different follow-up automation.
Step 1: Design Your Tag System
Before you touch a form, set up your tags in FluentCRM. Go to FluentCRM > Contacts > Tags and create the following.
Lead tier tags
These represent how well the lead fits your ideal client profile.
| Tag | What it means |
| Tier-1 | High budget, urgent timeline, strong fit |
| Mid-Tier | Moderate budget or longer timeline, still a real opportunity |
| Low-Priority | Low budget, no urgency, or poor fit |
Qualification status tags
These track where the lead is in your qualification process.
| Tag | What it means |
| Sales-Ready | Qualified and ready for direct outreach |
| Qualified | Good fit but not urgent. Worth following up |
| Nurture | Not ready now. Needs education or time |
| Nurtured | Has completed the nurture sequence |
| Followed Up | A team member has made initial contact |
| Unqualified | Not a fit. No follow-up needed |
Source tags
These tell you where the lead came from.
| Tag | What it means |
| Source: Lead Gen Form | Came through the lightweight lead capture form |
| Source: Quote Request | Came through the detailed quote/consultation form |
You can adjust these tags to fit your business, but ensure you have them ready before you create the forms and feeds.
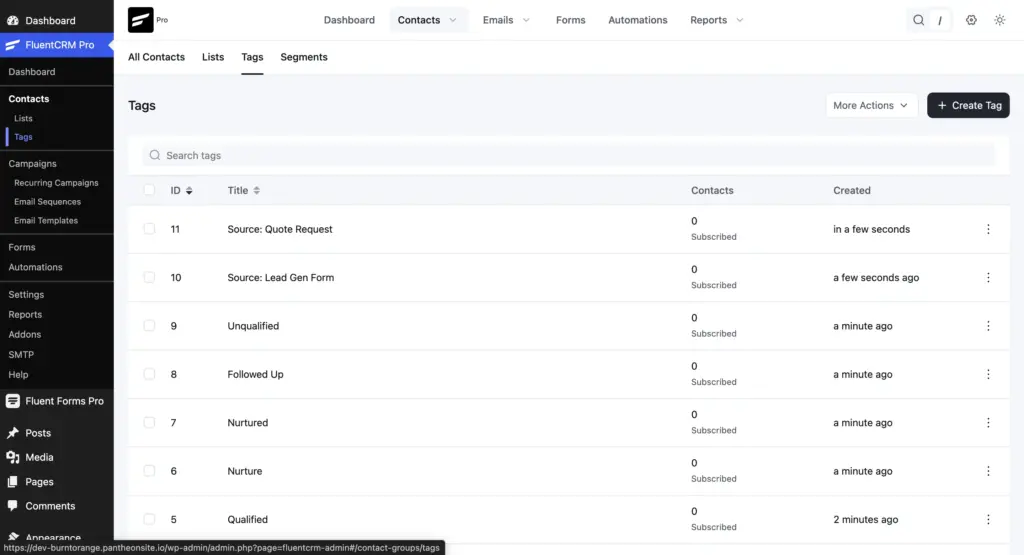
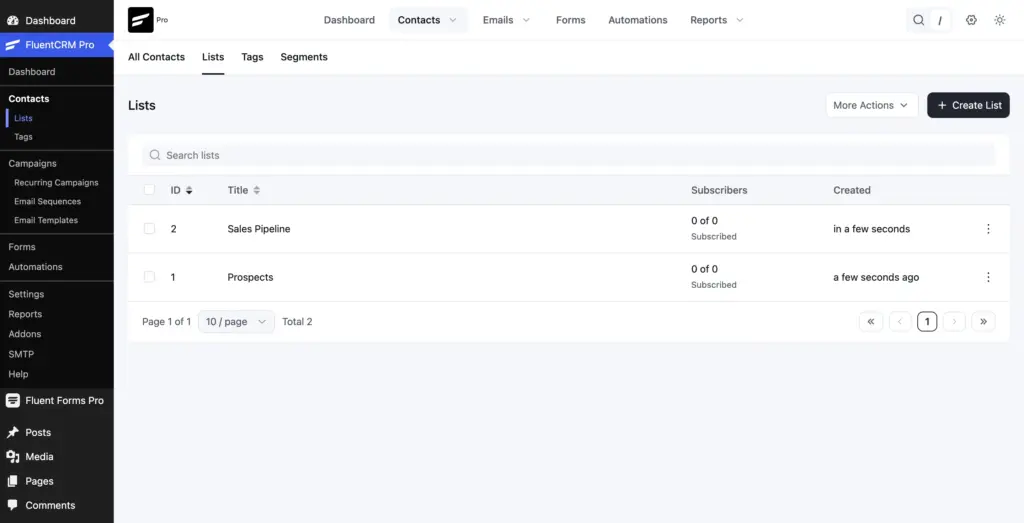
Also create two lists: Prospects (for all incoming leads) and Sales Pipeline (for qualified leads you’re actively targeting).
Step 2: Create Custom Fields for Qualifying Data
Tags tell you which tier a lead belongs to. Custom fields tell you why. When you open a contact’s profile in FluentCRM, you’ll see their budget range, timeline, project type, and decision role right there, without switching to Fluent Forms to check the original submission.
Custom fields also let you use qualifying data in emails (via SmartCodes) and filter contacts by specific answers using Advanced Filters or Dynamic Segments.
Go to FluentCRM > Settings > Custom Fields and click + Add Field. Create the following:
| Label | Field Type | Options |
| Budget Range | Select Choice | Under $1,000 / $1,000 – $5,000 / $5,000 – $15,000 / $15,000+ |
| Timeline | Select Choice | ASAP / Within 1-3 months / Within 3-6 months / Just exploring |
| Project Type | Radio Choice | Web Design / Branding / Marketing Strategy / Development |
| Decision Role | Radio Choice | I’m the decision maker / I’m researching for my team / I’m evaluating options for my boss |
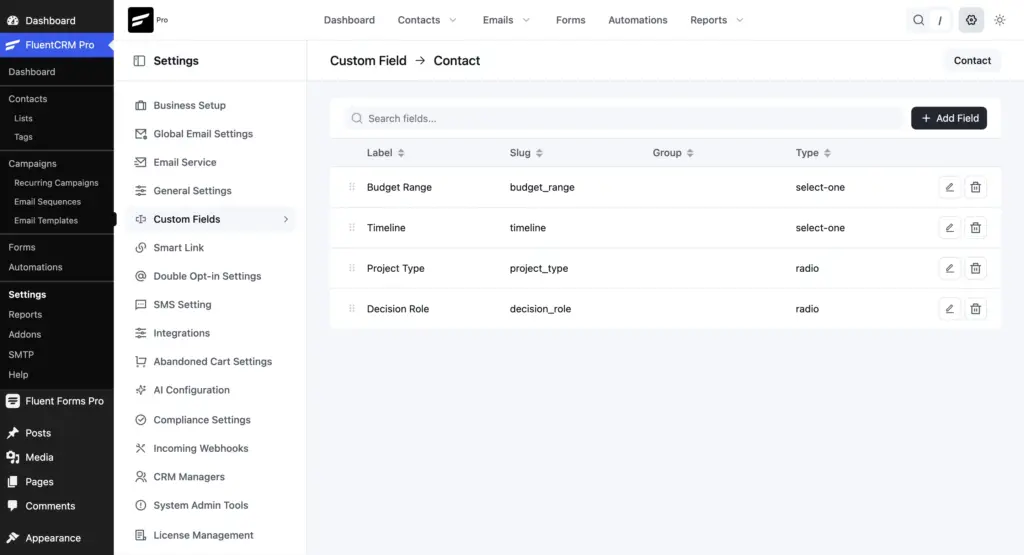
Slugs auto-generate from the label. You can edit them before saving.
Later, when you set up the FluentCRM integration feeds on your quote form (Step 3), you’ll map each form dropdown to its matching custom field under Other Fields. It keeps the qualifying data attached to the contact. The mapping looks like this:
| FluentCRM Field | Form Field |
| Budget Range | What’s your estimated budget? |
| Timeline | When do you need this completed? |
| Project Type | What type of project do you need help with? |
| Decision Role | What’s your role in this decision? |
Step 3: Build and Connect Your Lead Gen Form
This is your top-of-funnel form. It goes on blog posts, landing pages, sidebar widgets, and anywhere you want to capture interest without asking too much.
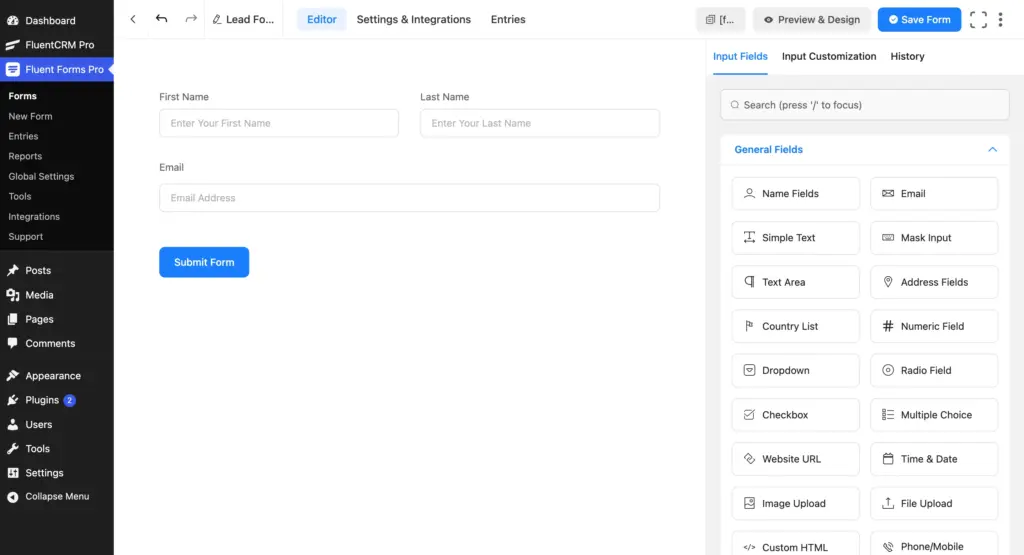
Suggested fields
- Name (First and Last)
- Email (required)
That’s it, two fields. The goal is volume, not qualification. You qualify later if they come back through the quote form.
Connect it to FluentCRM
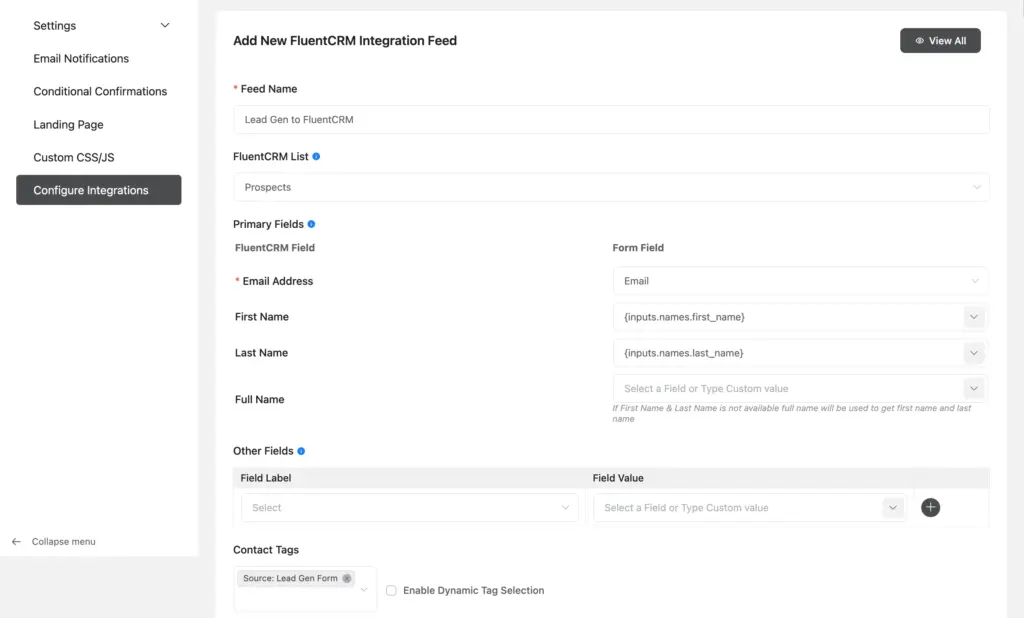
Open the form. Go to Settings & Integrations > Configure Integration > Add New Integration > FluentCRM Integration.
Configure the feed:
- Feed Name: “Lead Gen to FluentCRM”
- List: Prospects
- Primary Fields: Map Email and Name
- Tags: Select “Source: Lead Gen Form”
- Status: Subscribed (or Pending if you want double opt-in)
Click Save Feed.
Every submission through this form now creates a contact in FluentCRM, tagged as a New Lead from the lead gen form.
Step 4: Connect Your Quote Request Form
This is where qualification happens. The form asks questions that tell you whether the lead is a Tier-1 prospect or someone who needs nurturing.
Create the form with qualifying questions
Go to Fluent Forms > Forms > + Add Form. Build a multistep form with these fields:
Contact info:
- Name (First and Last)
- Email (required)
- Phone
- Company Name (single line text)
Qualifying questions:
- What type of project do you need help with? (Radio)
- Web Design
- Branding
- Marketing Strategy
- Development
- What’s your estimated budget? (Dropdown)
- Below $1,000
- $1,000 – $5,000
- $5,000 – $15,000
- $15,000+
- When do you need this completed? (Dropdown)
- ASAP
- Within 1-3 months
- Within 3-6 months
- Just exploring
- What’s your role in this decision? (Radio)
- I’m the decision maker
- I’m researching for my team
- I’m evaluating options for my boss
- Tell us about your project (Textarea, optional)
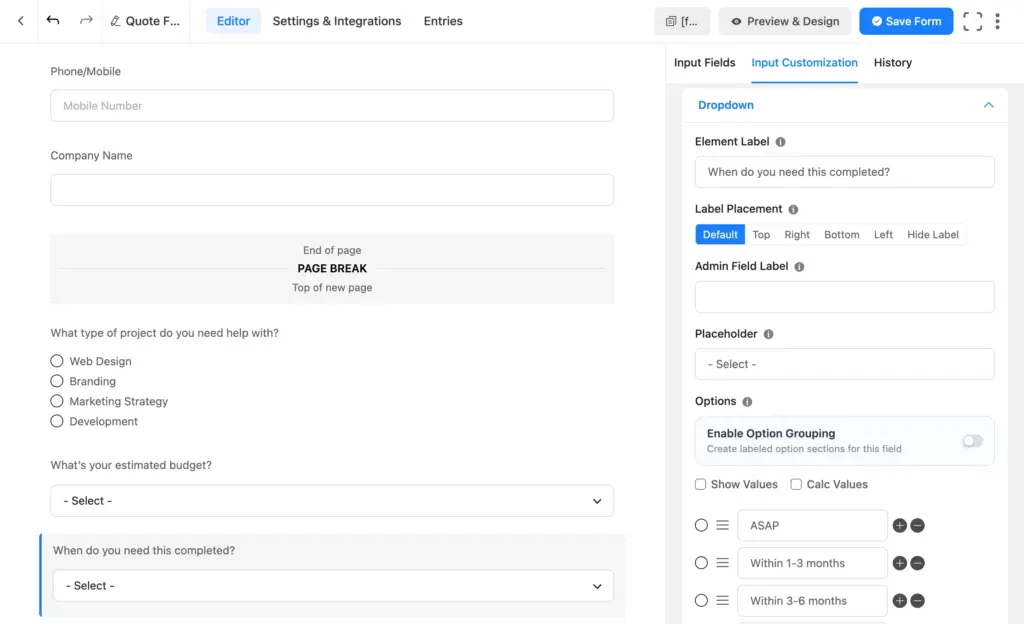
Adjust these questions for your industry. A law firm might ask about case type; an agency might ask about team size. The key qualifying criteria are budget, timeline, and decision authority. The answers to these three questions determine the lead’s tier.
Set up conditional tagging with multiple feeds
This is the core of the qualification system. You’ll create separate FluentCRM integration feeds on this form, each with conditional logic that applies different tags based on the answers.
Go to Settings & Integrations > Configure Integration.
Feed 1: Tier-1 / Sales-Ready
- Click Add New Integration > FluentCRM Integration.
- Feed Name: “Tier-1 Sales-Ready”
- List: Sales Pipeline
- Primary Fields: Map Email, First Name, Last Name
- Other Fields: Map Phone, Company Name, and the qualifying fields to custom contact fields (created in step 2)
- Tags: Select “Tier-1”, “Sales-Ready”, and “Source: Quote Request”
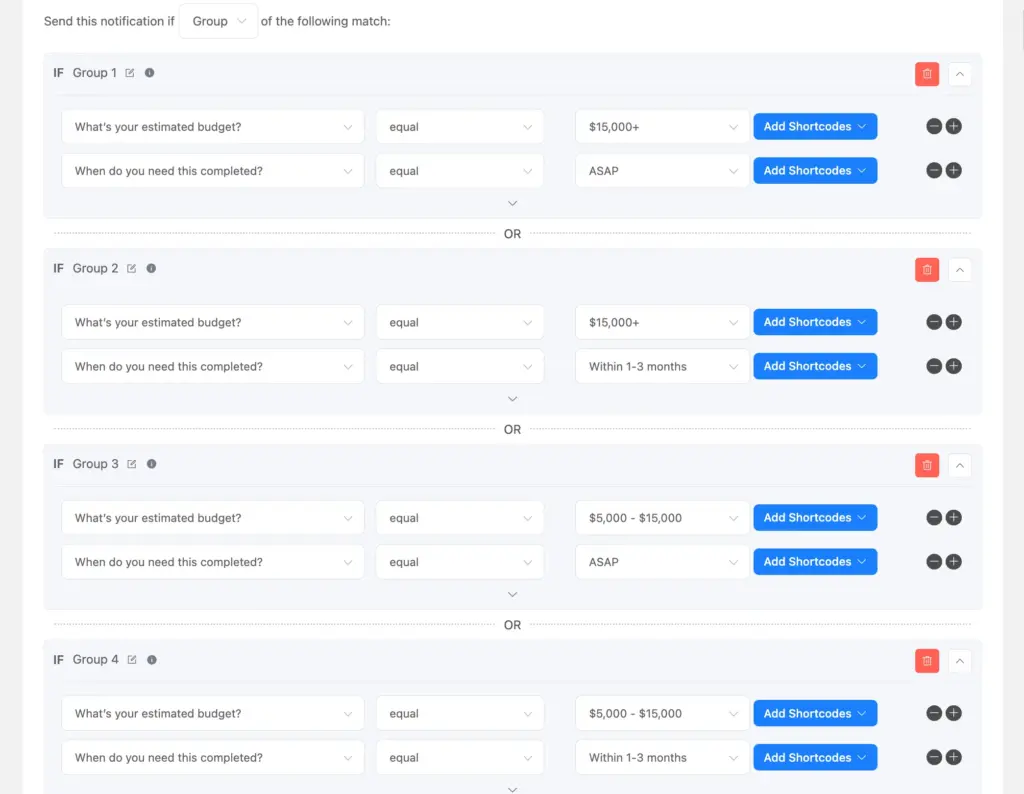
- Conditional Logic: Enable it. Set the conditions:
- Budget equals “$15,000+” AND Timeline equals “ASAP”
- OR Budget equals “$15,000+” AND Timeline equals “Within 1-3 months”
- OR Budget equals “$5,000 – $15,000” AND Timeline equals “ASAP”
- OR Budget equals “$5,000 – $15,000” AND Timeline equals “Within 1-3 months”
- Click Save Feed.
Feed 2: Mid-Tier / Qualified
- Click Add New Integration > FluentCRM Integration again.
- Feed Name: “Mid-Tier Qualified”
- List: Prospects
- Tags: Select “Mid-Tier”, “Qualified”, and “Source: Quote Request”
- Conditional Logic: Enable it. Set:
- Budget equals “$1,000 – $5,000”
- AND Timeline does not equal “Just exploring”
- Map the same primary and other fields.
- Click Save Feed.
Feed 3: Low-Priority / Nurture
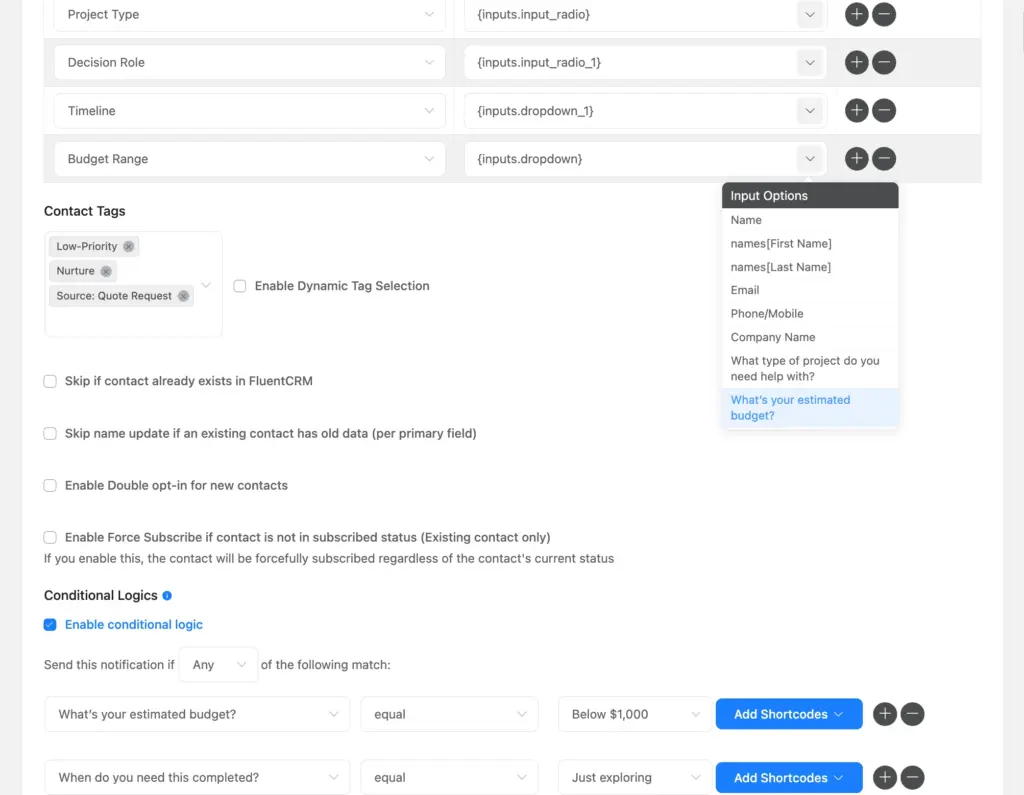
- Click Add New Integration > FluentCRM Integration again.
- Feed Name: “Low-Priority Nurture”
- List: Prospects
- Tags: Select “Low-Priority”, “Nurture”, and “Source: Quote Request”
- Conditional Logic: Enable it. Set:
- Budget equals “Under $1,000”
- OR Timeline equals “Just exploring”
- Map the same primary and other fields.
- Click Save Feed.
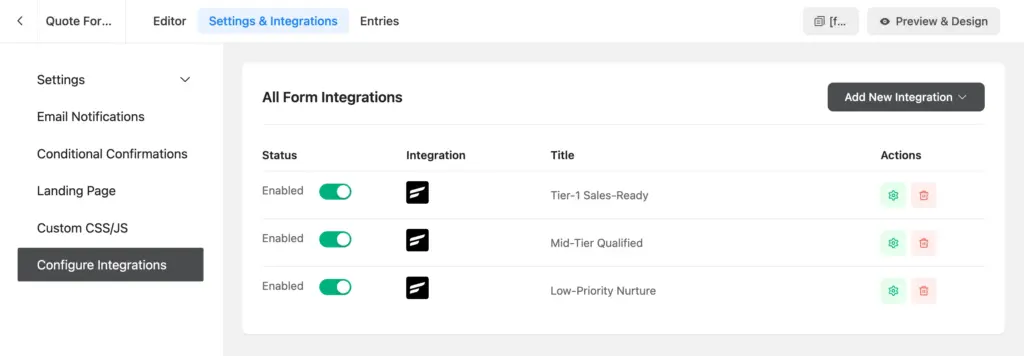
Now when someone submits the quote form, only the feed whose conditions match will trigger. A $10K budget with an ASAP timeline triggers Feed 1. A $3K budget with a 3-month timeline triggers Feed 2. A $500 budget or “Just exploring” triggers Feed 3.
Want to build this system faster? Fluent Forms Pro includes conditional logic on all integration feeds, multi-step forms, and 60+ native integrations. See Fluent Forms Pro.
Step 5: Create Follow-Up Automations
Now you build the automations that respond to each tier differently.
Automation 1: Nurture sequence for new leads
This handles contacts from the lead gen form. They gave you a name and email but nothing else.
- Go to FluentCRM > Automations > + New Automation.
- Select the Tag Applied trigger.
- Choose the tag: Source: Lead Gen Form.
- Click Continue and name the automation “New Lead Nurture.”
Add these actions:
- Send Custom Email: A welcome email introducing yourself and linking to your best content or case studies.
- Wait: 3 days.
- Send Custom Email: A follow-up with a specific resource (guide, portfolio, or case study).
- Wait: 5 days.
- Send Custom Email: A soft CTA to fill out the quote request form if they’re interested in working together.
- Apply Tag: “Nurtured” (so you know they’ve been through the sequence).
- End This Funnel Here.
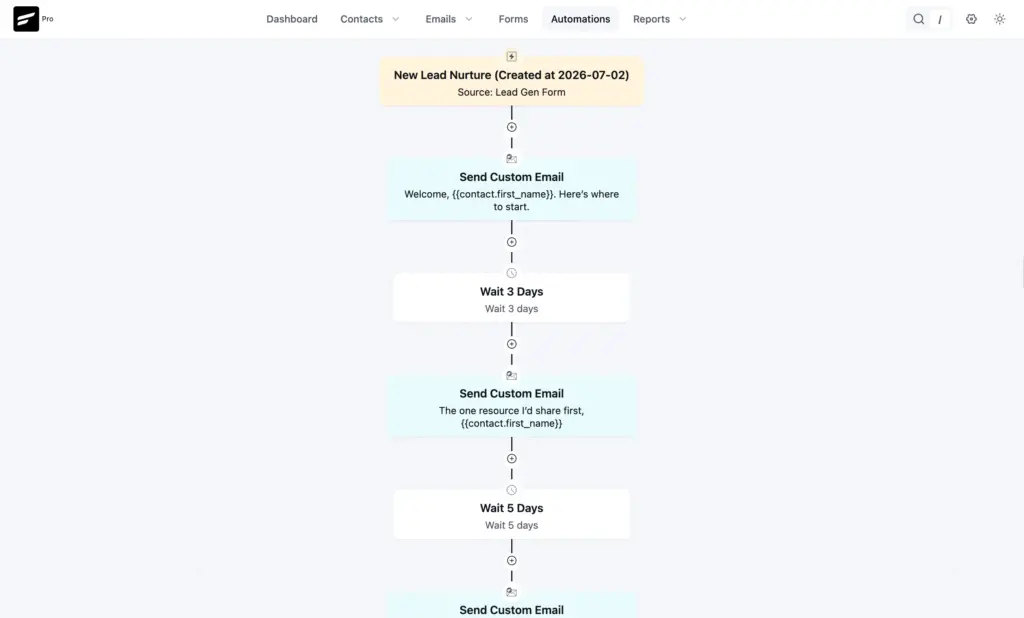
The goal is to move cold leads toward the quote form. If they fill it out, the quote form’s feeds take over and tag them into the right tier.
Automation 2: Priority follow-up for sales-ready leads
This handles Tier-1 contacts who came through the quote form with high budget and urgent timelines.
- Create a new automation with the Tag Applied trigger.
- Choose the tag: Sales-Ready.
- Name it “Sales-Ready Priority Follow-up.”
Add these actions:
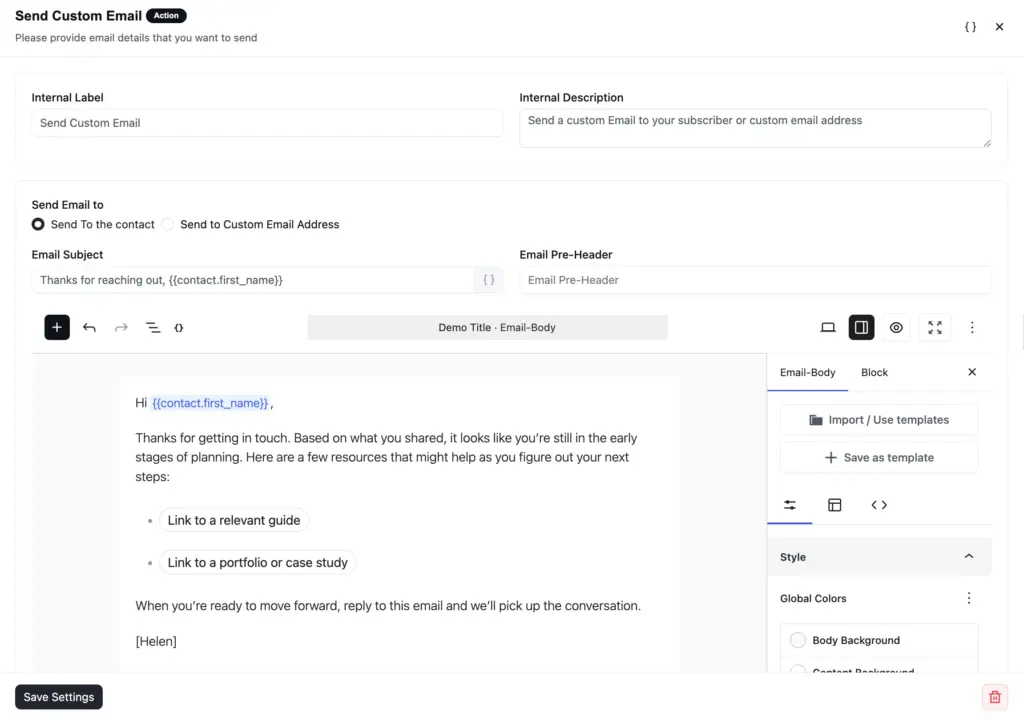
- Send Custom Email: A personalized response acknowledging their project, confirming you received their request, and offering a specific next step (e.g., “I’ll follow up personally within 24 hours” or a link to book a call). Sample subject: Got your project details, {{contact.first_name}}. Let’s talk. Sample body: Hi {{contact.first_name}}, Thanks for the details on your project. I’ve reviewed what you sent, and it looks like a strong fit for what we do. I’ll follow up personally within 24 hours with some initial thoughts. If you want to get ahead of that, you can book a call directly here: [booking link]. Looking forward to it,
[Your Name] - Add Notes & Activities: Add an internal note with the activity type “Call” and the title “Follow up with Tier-1 lead: {{contact.full_name}}”. This creates a reminder on the contact’s profile.
- Wait: 1 day.
- Apply Tag: “Followed Up”.
- End This Funnel Here.
You can also build a Mid-Tier automation that sits between these two. Give them a standard follow-up (not as urgent as Tier-1, not as passive as Low-Priority) with a 2-day response window and a link to book a call.
Step 6: Use Dynamic Segments to Monitor Your Pipeline
Once you start collecting leads, you’ll want to see how many are in each tier at a glance.
Go to FluentCRM > Contacts > Segments and create these custom segments:
Segment 1: Sales-Ready Leads
- Name it “Sales-Ready Leads.”
- In the AND block, click Add Property > Contact Segment > Tags.
- Set the operator to includes all of.
- Select Sales-Ready and Tier-1.
- Click Create Custom Segment.
Segment 2: Qualified Mid-Tier
- Name it “Qualified Mid-Tier.”
- In the AND block, click Add Property > Contact Segment > Tags.
- Set the operator to includes all of.
- Select Qualified and Mid-Tier.
- Click Create Custom Segment.
Segment 3: Nurture Pool
- Name it “Nurture Pool.”
- In the first AND block, click Add Property > Contact Segment > Tags, set the operator to includes, and select Nurture.
- Add a second row: Add Property > Contact Segment > Tags, set the operator to Does not include (in any), and select Nurtured.
- Click + OR to add a second block.
- In the second AND block, add Contact Segment > Tags, set the operator to includes, and select Low-Priority.
- Add a second row to that block: Contact Segment > Tags, operator Does not include (in any), and select Nurtured
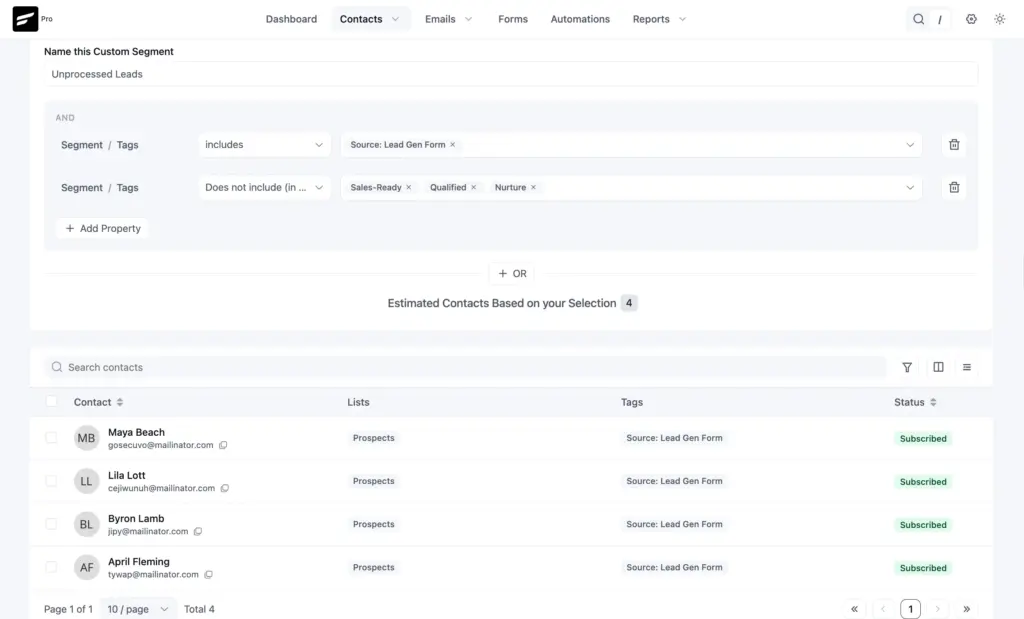
Dynamic segments update in real time. As contacts get tagged through the forms and automations, they’ll appear in the right segment automatically.
Test the Full Workflow
Before you go live, run through each path manually.
Test 1: Lead gen form
- Submit the lead gen form with a test email.
- Check FluentCRM > Contacts. The contact should have the “New Lead” and “Source: Lead Gen Form” tags, and sit in the Prospects list.
- Confirm the New Lead Nurture automation started (check under Automations > open the funnel > view contacts).
Test 2: Quote form (tier-1)
- Submit the quote form with a budget of “$15,000+” and timeline of “ASAP.”
- Check FluentCRM. The contact should have “Tier-1”, “Sales-Ready”, and “Source: Quote Request” tags and sit in the Sales Pipeline list.
- Confirm the Sales-Ready automation started. Check your inbox for the follow-up email.
Test 3: Quote form (low-priority)
- Submit the quote form with a budget of “Under $1,000” and timeline of “Just exploring.”
- The contact should have “Low-Priority”, “Nurture”, and “Source: Quote Request” tags.
- Confirm the Low-Priority educational automation started.
Test 4: Check dynamic segments
Go to Contacts > Segments. Each test contact should appear in the matching segment.
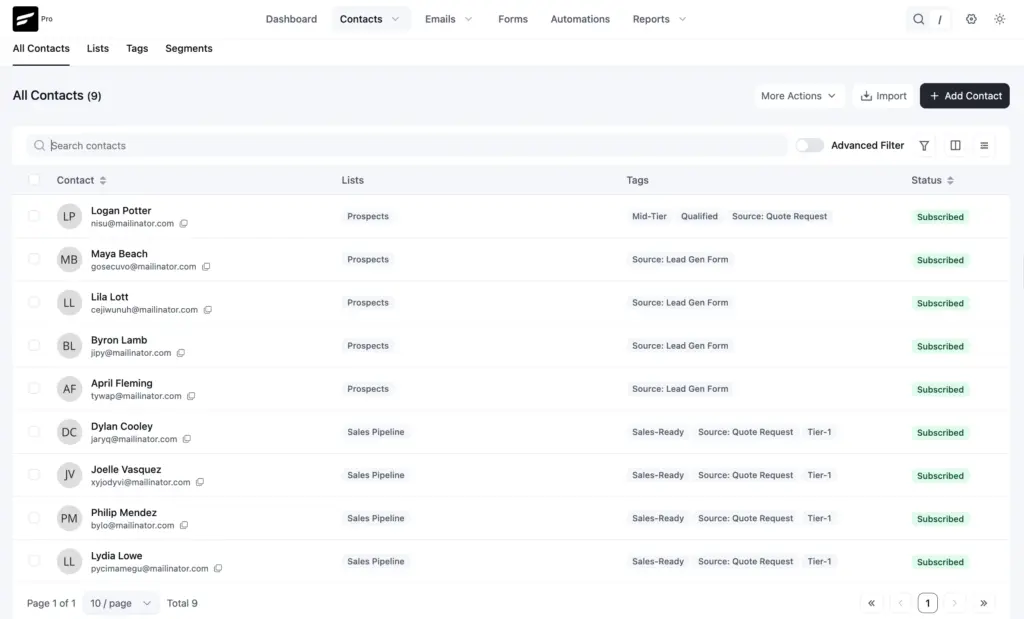
If a test contact ends up with the wrong tags, check the conditional logic on your feeds. The most common issue is overlapping conditions where a submission matches more than one feed.
Sort Smarter, Sell Faster
The only way to tell your hot and cold leads apart is to ask the right lead qualification questions. In your form fields, add options that perfectly fit the different stages of your lead funnel and let users’ answers do the sorting.
Connect the right FluentCRM tags to each option. This will automatically categorize any new lead your forms capture. Set up automated follow-up workflows based on how well they fit. Invest your time reviewing the high-priority leads while your automated email sequence educates the colder leads.
Build Smarter Forms for Free

Sarika writes for Fluent Forms and loves to offer insights into small businesses. She’s curious and enjoys discussing ideas, interests, and perspectives. In her free time, she’s either marvelling at architectural beauties or trying different cuisines.


Leave a Reply