
Create an Awesome Summer Camp Registration Form in WordPress
Are you operating a summer camp and looking for a way to introduce a paperless, simpler way for parents to register their children for the camp? Creating a summer camp registration form for your website enables you to give your customers a smooth experience of enrolling their children in a summer camp in just a few minutes.
In this article, we will walk you through the step-by-step process of how to create an awesome summer camp registration form. Without further ado, let’s get started.
Why summer camps?
Summer camps are a great way for the children to spend their summer and meet other kids. It’s a great opportunity for children to experience fun, learning, new friendships, and memories that will last a lifetime at these summer camps.
Packed with excitement, discovery and adventure, summer camps can be of different types, such as educational camps, performing arts camps, sports camps, gender-specific camps, fitness camps, etc. Some camps are daylong, while some might last for weeks. There are also some camps with age restrictions.
Ensuring the campers experience the best summer is crucial for a summer camp which starts with the registration process. That is why the camp operators need to provide an effortless way for participants to register.
Choosing the right form builder plugin for summer camp registration
Creating an online form for your WordPress website requires a form builder plugin. There are so many WordPress form plugins available in the market right now. But we have chosen Fluent Forms to build the summer camp registration form. We considered the following few factors while choosing Fluent Forms over other form builder plugins –
- Fluent Forms is a drag-and-drop form builder plugin that gives a smooth user experience
- It has dozens of useful pre-built form templates for quick form building
- Conversational forms make Fluent Forms stand out
- You can use conditional logic for more control over your forms
- With Fluent Forms, you can use 45+ native integrations for additional functionality
- It gives you the ultimate freedom of using a multi-column form layout
- Fluent Forms has calculated fields for measuring numbers based on inputs
- The payment feature lets you accept payments from your clients in a seamless way
As we have selected the tool, let’s jump into the form-building process.
Create a summer camp registration form in 5 steps
Follow the steps below to create a beautiful summer camp registration form with no coding experience –
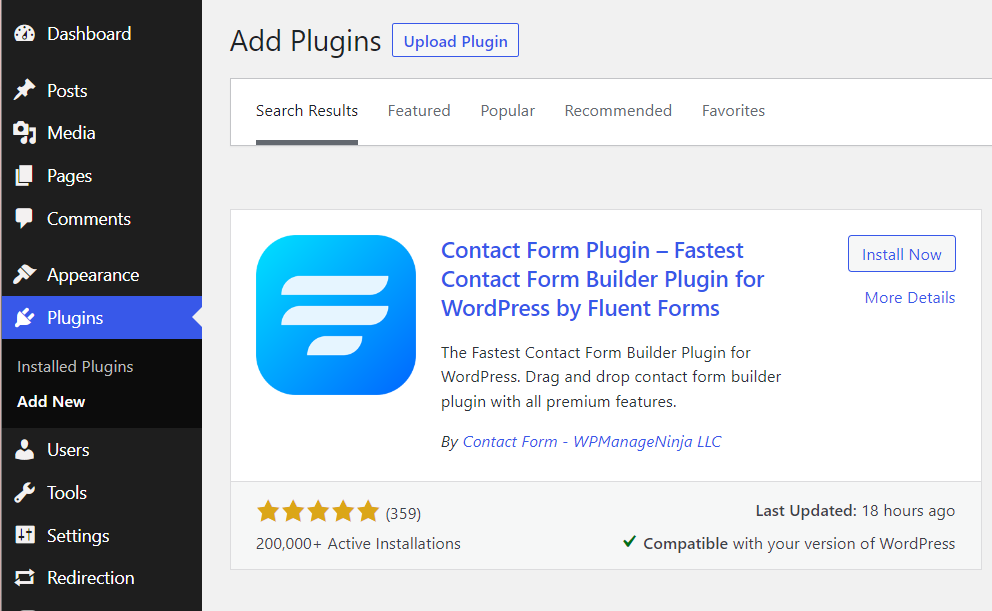
Step 1: Installing Fluent Forms
Installing Fluent Form is easy and takes the same approach as installing any other WordPress plugin. To install Fluent Forms, go to the Plugins from your WordPress dashboard and click on the Add New button. Search for Fluent Forms, install it and activate it.
You will need to upgrade to the Pro edition of Fluent Forms to use the payment option that we will use in creating the summer camp registration form. You can access even more features and functions in the Pro version.
Step 2: Adding input fields
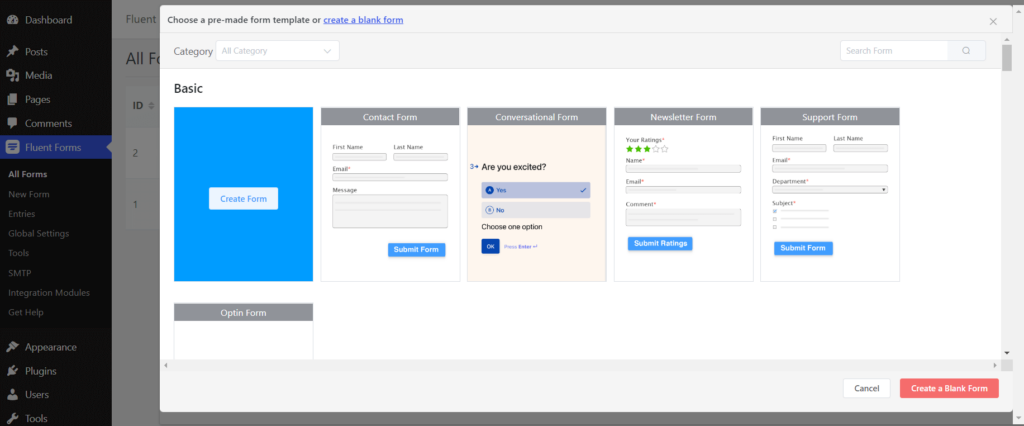
Now that you have installed Fluent Forms, you are free to start creating the registration form for summer camp. Start by clicking on the Add a New Form button from the Fluent Forms interface. A window will appear. Hover over New Blank Form and click Create Form.
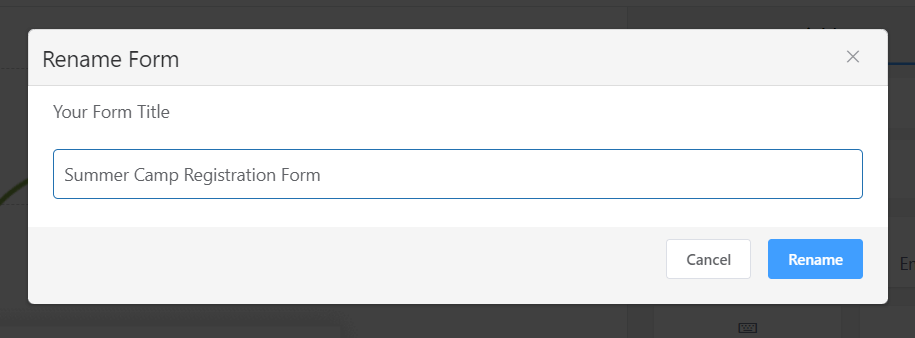
Give the form a name. Let’s call it Summer Camp Registration Form.
Let’s now add some input fields to our form. We want our forms to collect information about the child, their parent and emergency contact information. Also, we want to add a payment method to our form so that campers can pay their registration fees directly through the form.
To add any input field to our form, all you need to do is to click on the desired fields. Or you can also drag and drop the field anywhere in the form. Clicking on an added input field gives you plenty of Input Customization options.
First, add a Custom HTML field for the Child Information section heading.
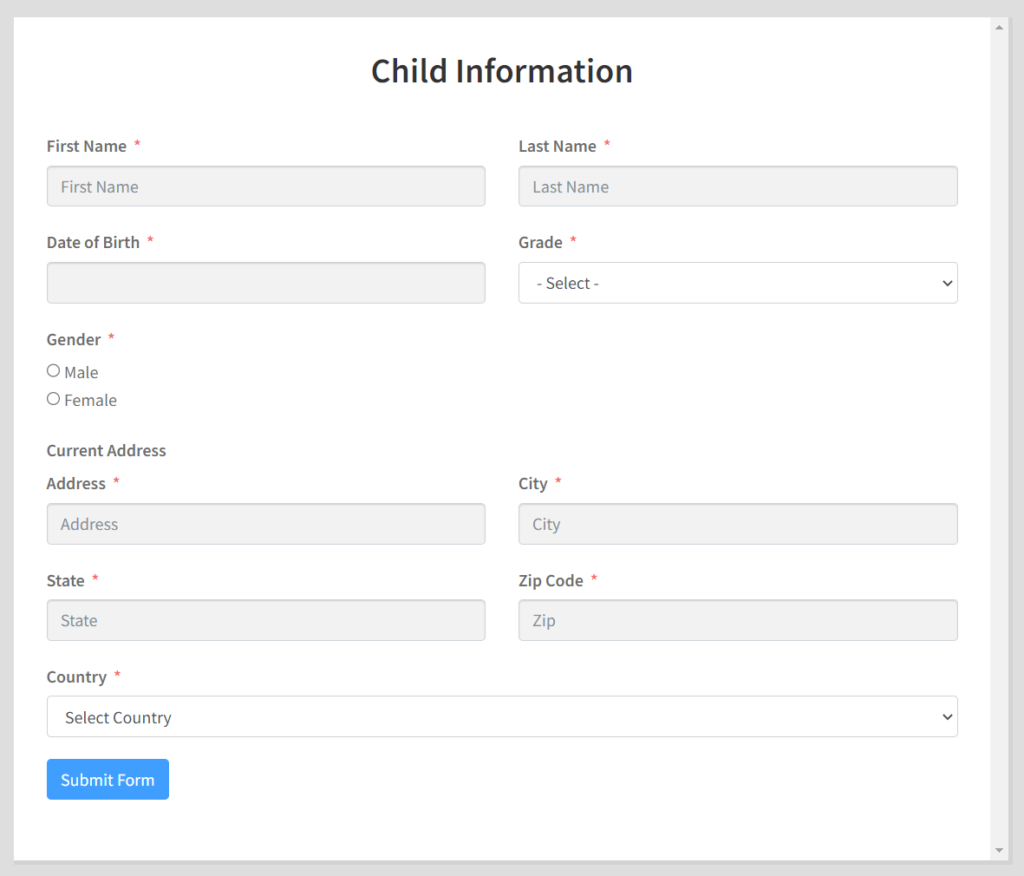
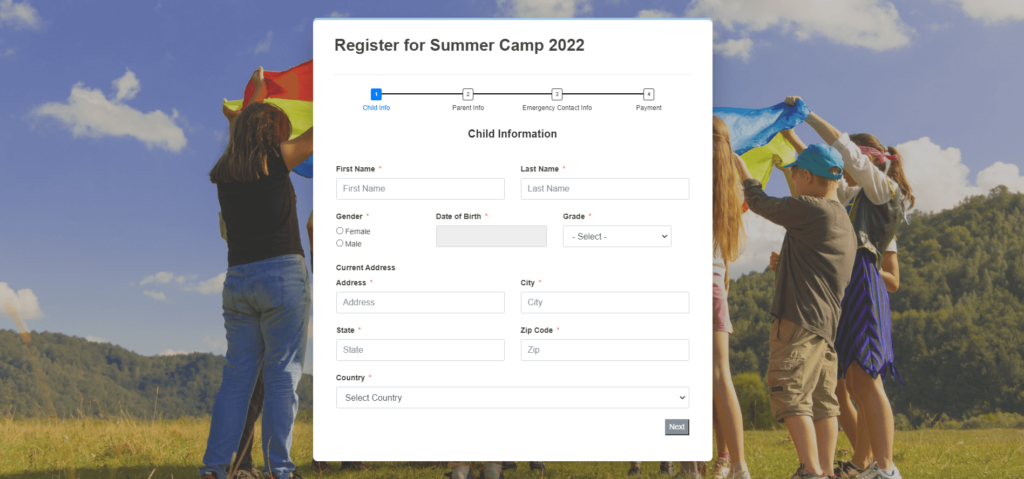
Now add the input fields for the information you want to collect about campers. We will add fields to collect –
- Name
- Date of Birth
- Grade
- Gender and
- Address
To add fields for Name, just click on the Name Fields from the Input Fields tab on the right side of the window. Then if you click on the Name fields, you will get different options for customizing Name fields. Here you can change the placement of the label, make the fields mandatory, or enable Conditional Logic.
Next, add a Time & Date input field for collecting the Date of Birth of the campers. We have changed the element label to Date of Birth and also made this field mandatory. Moreover, you can customize the date format.
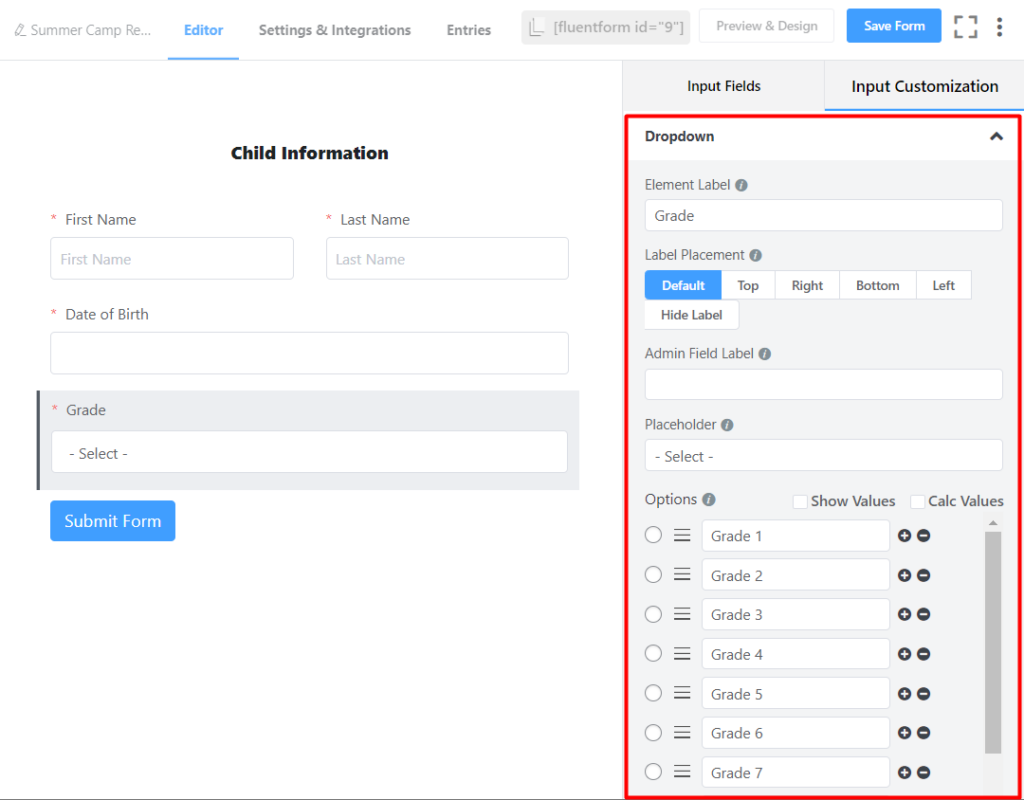
To add the field for Grade, insert a Dropdown input field. Change the element label to Grade. Now add different grade options for the users to select from.
Now, click on the Radio Field, change its element label to Gender and provide the options.
We will add the Current Address field for the last information about the camper. To do that, just click on the Address Fields. You can make necessary customization by clicking anywhere on the Address Fields. There are six customizable fields to collect the addresses of the respondents in Fluent Forms. You can turn off any field according to your needs.
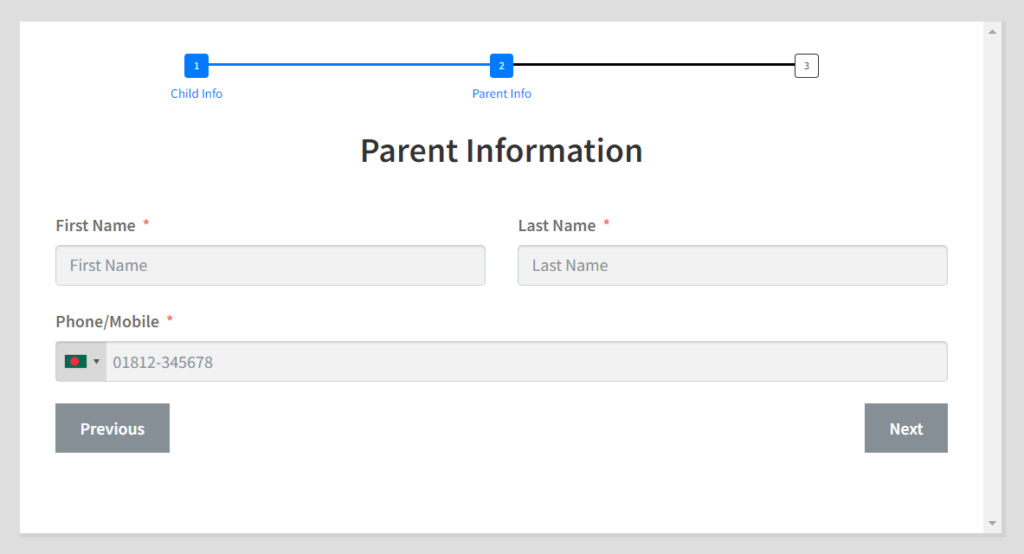
You have successfully completed building the first step of the summer camp registration form. We want to create a multi-step form for our users, so they don’t feel bored filling out a long registration form.
Creating multi-step forms is effortless with Fluent Forms. All you have to do is to expand the Advanced Fields section and click on Form Step. You can configure the form steps by clicking on the Paging Start section on top of the form editor interface.
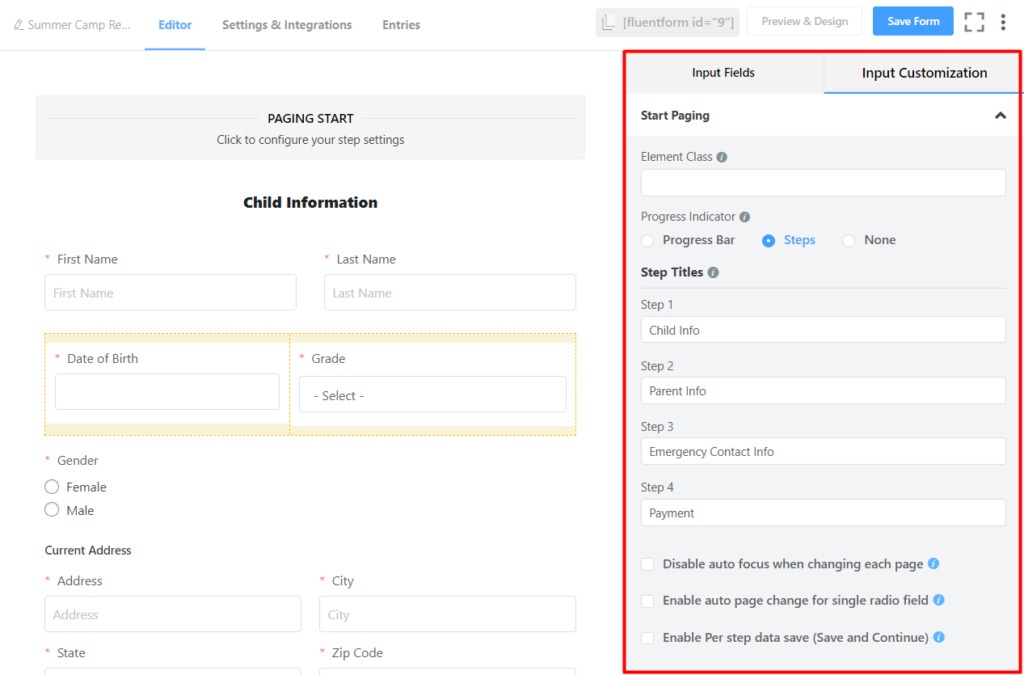
Here you can change the Progress Indicator and name each step.
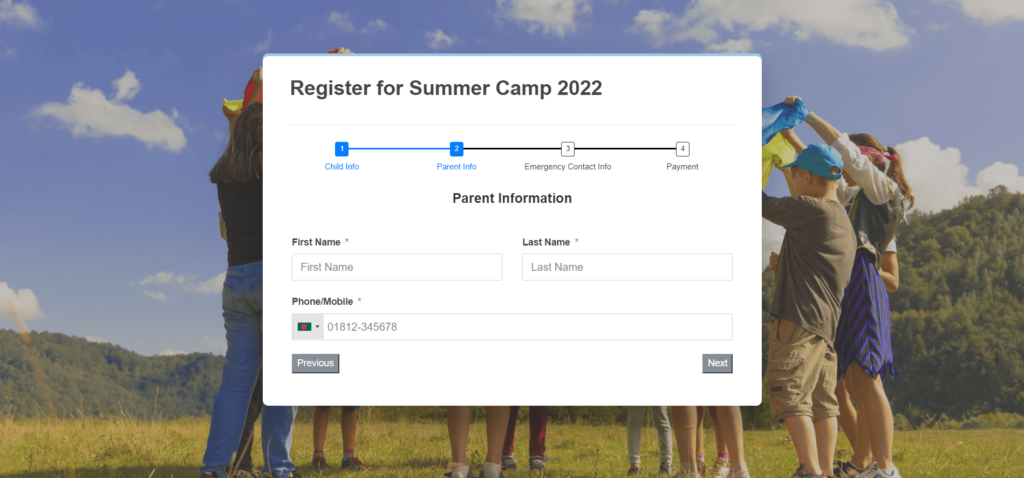
As we did in the previous part of the form, add a Custom HTML field for the Parent Information section header.
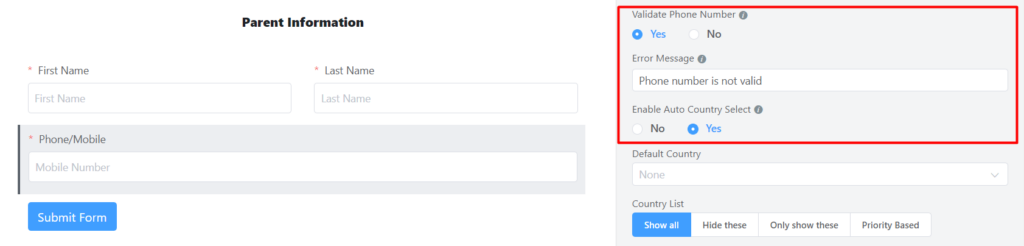
We will collect parents’ names, mobile numbers, and emails by adding fields for each of them. Fluent Forms has ready-to-use input fields to collect all this information. You can also make necessary customization according to your specific needs. Fluent Forms can also validate the phone numbers customers provide in the form.
Our second part of the form is ready to collect information about the camper’s parents.
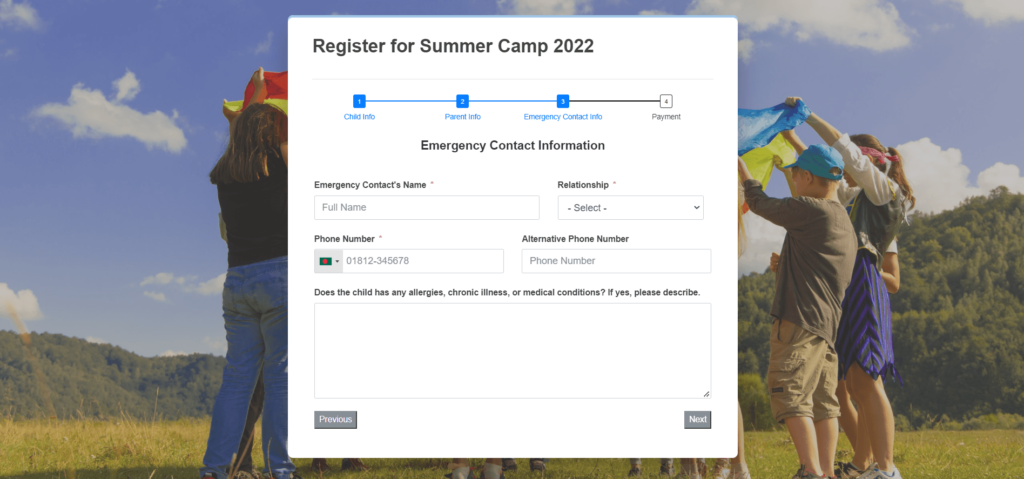
Again, we will add a Form Step in the form for the emergency contact information. This time we will add Emergency Contact’s Name, Relationship with the camper, Phone number, and a text area to provide details regarding the child’s health condition. The dropdown input field was used to let respondents select the relationship of the emergency contact with the camper.
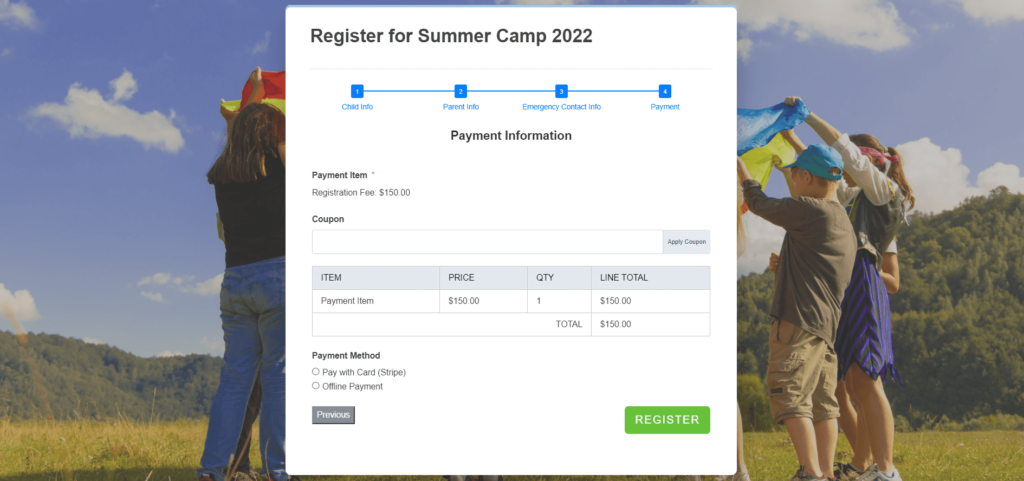
Step 3: Adding payment methods
Lastly, we will add payment methods to enable the users to pay the registration fees directly through the form. This way, you can provide your users with the ultimate hassle-free registration process. Fluent Forms can accept payments through –
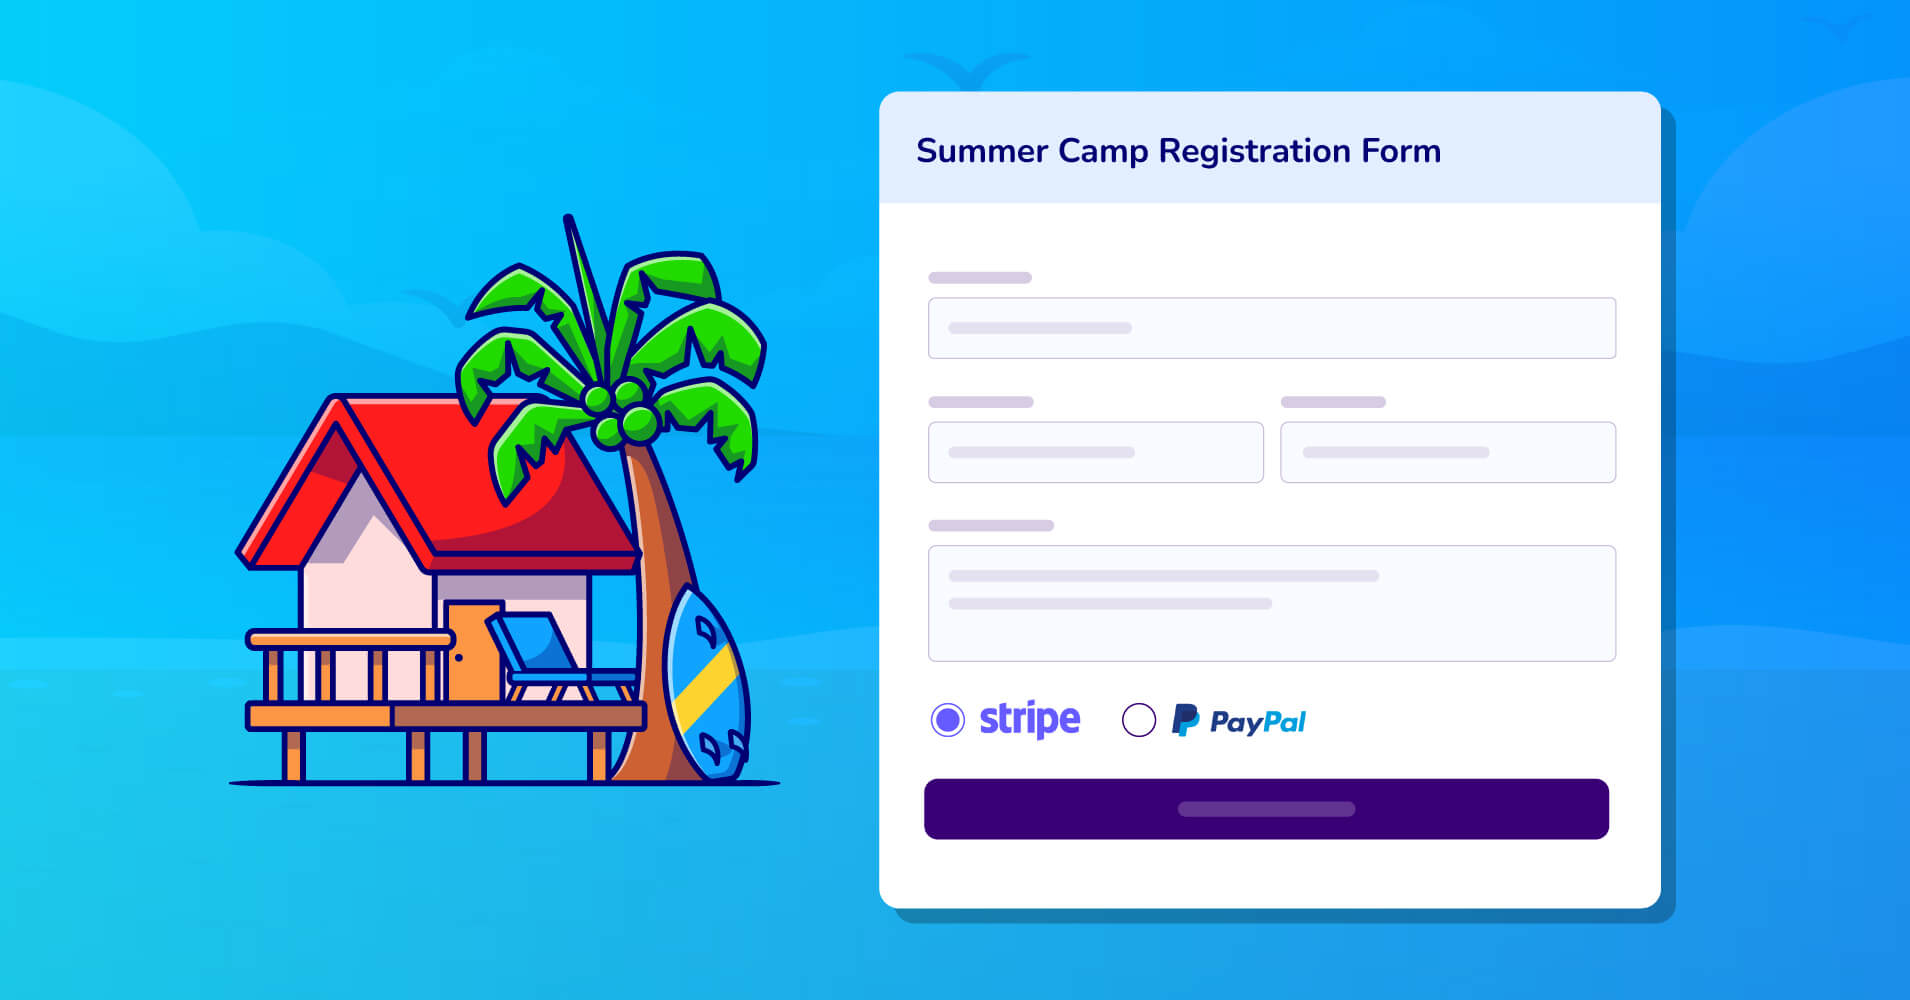
- Stripe
- PayPal
- Mollie
- RazorPay
- Paystack
- Square
- Paddle
- Authorize.net
For our summer camp registration form, we will add the following fields for our Payment part of the form –
- Payment Field
- Coupon
- Payment Summary
- Payment Method Field
After adding the necessary field to our form, you have to configure the Payment Settings in Fluent Forms. Go to Fluent Forms Global Settings to access the Payment Settings and Enable Payment Module. Here you have other settings that you can play with if you want to. Don’t forget to hit the Save Settings button when you are done.
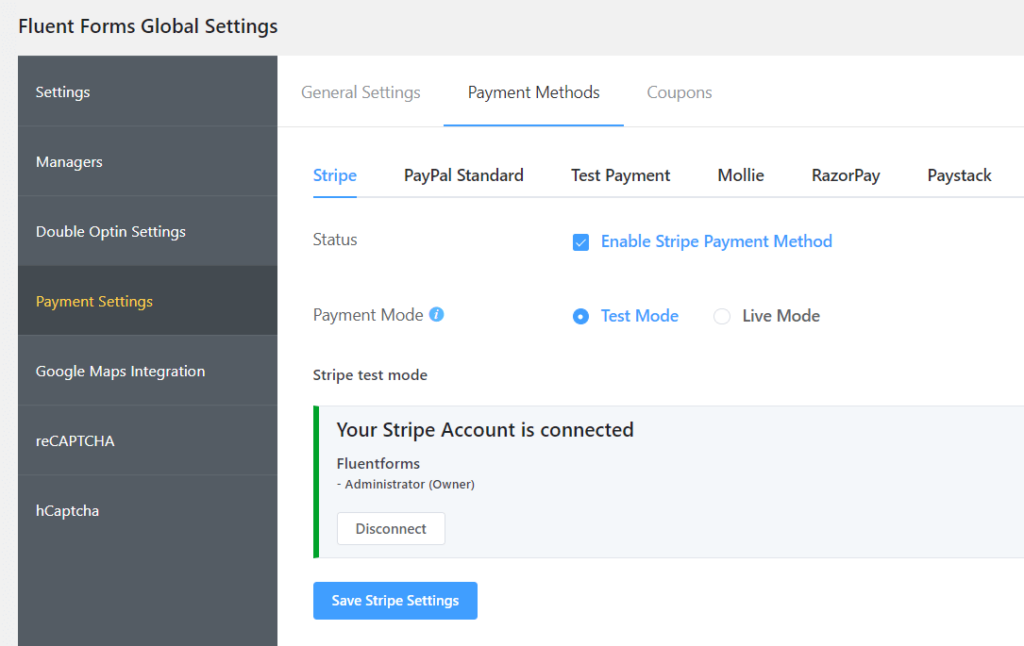
Then from the Payment Methods tab, Enable Stripe Payment Method to accept payments through Stripe. You have to integrate Stripe with Fluent Forms to test the payment method before accepting real payments.
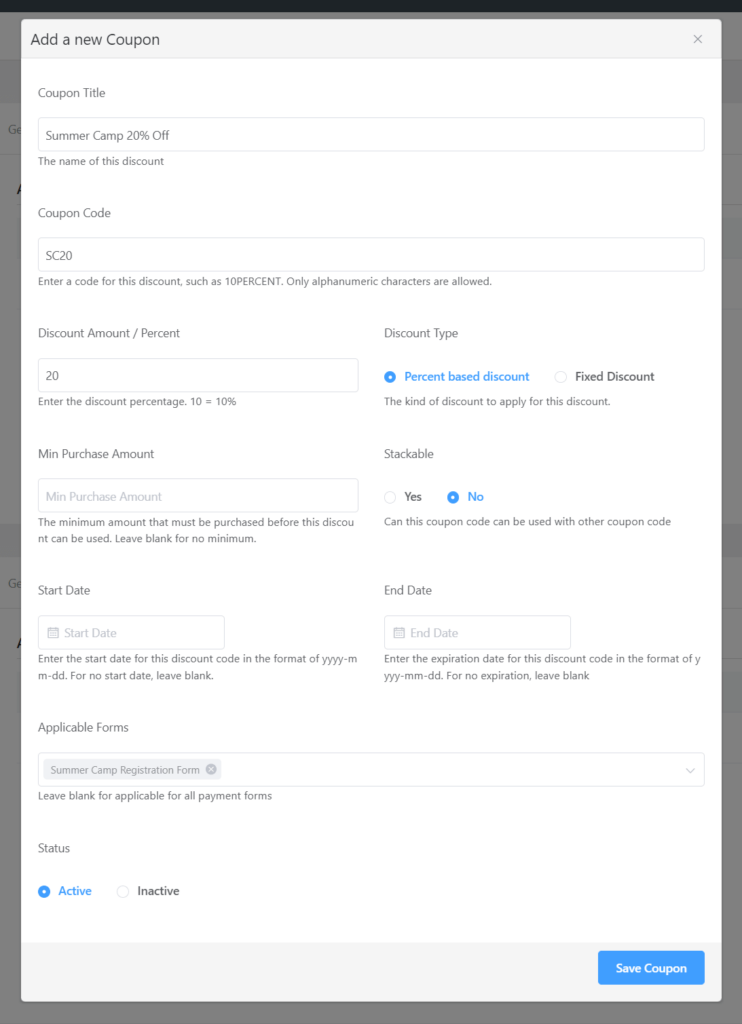
From the Coupons tab, you can add any coupon for your customers to avail and get a special discount. To do so, click on the Add New Coupon button, and a popup window will appear where you will be asked to provide the coupon details.
Step 4: Configuring form settings
Once we are done adding necessary fields to our forms, it’s time to configure our forms. But before jumping into configuring the form settings, let’s quickly customize the Submit button. You can change the text, style, size, and alignment of the Submit button.

Go to the Settings & Integrations tab to work with different form settings. Let’s check out what Fluent Forms has to offer as configuration settings for your forms –
- Confirmation Settings: You can customize the confirmation message shown to a user after submitting a form.
- Form Layout: Changing the form layout includes changing the label alignment, help and error message position and asterisk position.
- Scheduling & Restrictions: You can schedule the form to show it on your website on certain days of the week. This configuration setting also lets you restrict form entries based on set rules.
- Advanced Form Validation: You can enable advanced form validation based on predefined rules.
- Email Notifications: You can enable this option to receive email notifications on form submissions.
- Payment Settings: Payment settings can be configured here. You can select the Currency, Transaction Type and make necessary changes in Stripe Settings.
- You can also create a landing page dedicated to your form.
- Writing custom CSS for your form can be done here.
- New integrations can be added to increase the form functionality.
After form submission, you can show the confirmation message to the respondents in three ways –
- Showing the message on the same page
- Send users to another page on your site
- Redirect them to a custom URL
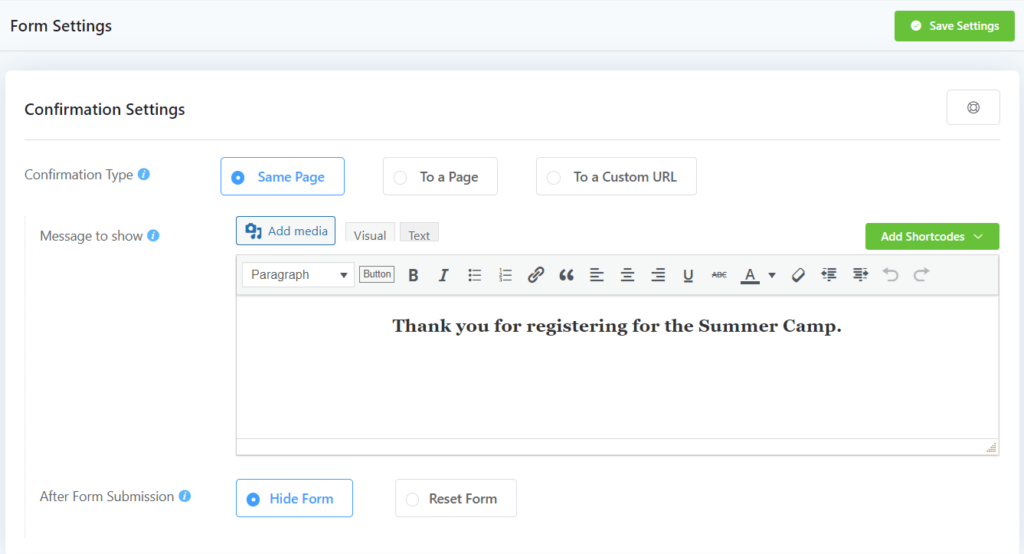
The confirmation message is fully customizable. Also, using the Add Shortcodes option, you can display dynamic confirmation messages based on user input. Once you are happy with the settings, click on Save Settings.
Step 5: Bringing your form live
As the form building is completed, you are all set to bring your form live on your WordPress website. Now you can do this in multiple ways.
One way to do that is to add a new page and, using the WordPress default block editor, add a block of Fluent Forms. This will give you a dropdown list to select the form to be displayed on that page.
Alternatively, you can publish your form using Fluent Forms’ Shortcode feature. Each form comes with a shortcode that you can use anywhere on your website to display the form.
Lastly, you can also design a dedicated landing page for your form. Go to Settings & Integrations from the form editor window, and you can Enable Form Landing Page Mode from the Landing Page tab.
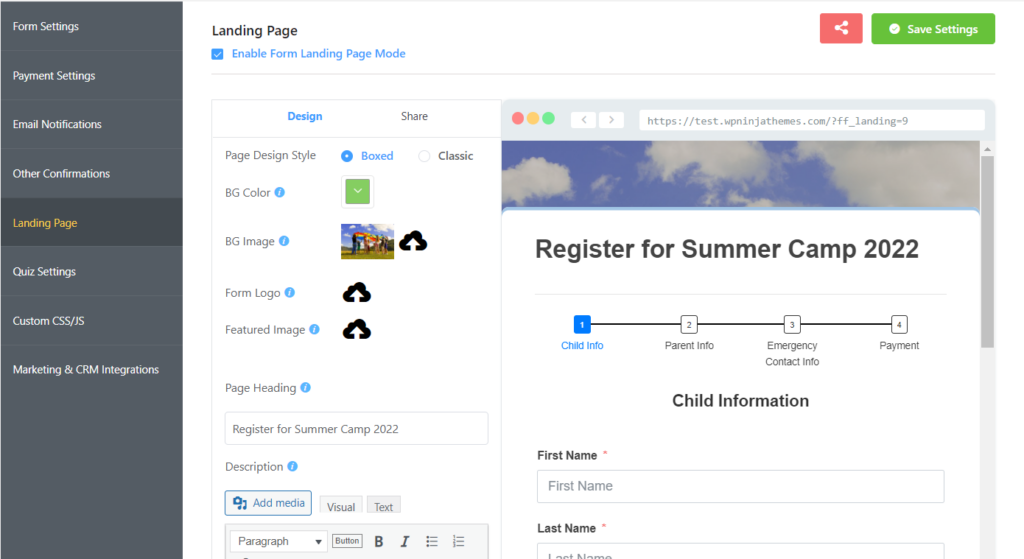
Now, let’s take a look at the final look of our form on a landing page.
Try out this demo summer camp registration form below:
Your data will be automatically deleted after form submission. We don’t store them.
Conclusion
Summer camps are meant to be fun, and so is the registration process. As a camp operator, you should prioritize the seamless registration process for the best camping experience for your customers.
In this article, we walked you through the step-by-step process of how to create a stunning summer camp registration form. Comment down below if you have any queries or confusion. Keep an eye on the Fluent Forms blog for more tutorials like this.

An Econ major turned into a Digital Marketer by choice. Hello! This is Ashraf and I am here to enlighten you on various WordPress topics and help you make informed decisions.


Leave a Reply