
The Ultimate WordPress Security Checklist You Must Follow [25-step Guide]
You’re about to launch your WordPress site and are now concerned about your site’s security. We’d say you’re right to be concerned. Without proper security measures in place, it’s quite easy to hack into a WordPress site.
However, you’ve come to the right place. Because we’re going to break WordPress security down for you here, you’ll find a comprehensive WordPress security checklist that will cover all your security concerns.
These checklist steps are really easy to follow, making the list beginner-friendly. You don’t need any prior knowledge or setups to follow these. The best part is that they take care of most of the potential vulnerabilities and threats. It’s how we and most other reputable WordPress users protect their sites.
Let’s dive into the details so you’re reassured that protecting your website is easier than you think with the right knowledge.
Why should you follow a comprehensive WordPress security checklist
Following a security checklist is essential to protect your WordPress site from security threats. However, if you don’t follow a comprehensive checklist, chances are you’ll miss important points, and those will make your site vulnerable to attacks.
Attackers find new ways of exploiting your site every day. But following a well-thought-out WordPress security checklist protects your site from most of those attempts. The key is to review regularly and stay updated on emerging threats and new security measures.
Always update your software, keep backups handy, use strong passwords, implement 2FA, and limit login attempts. These are the basics. However, there are a lot more crucial security steps that you must follow to ensure overall security for your site. Here’s a thorough breakdown of the can’t-miss security steps that you must check at regular intervals.
WordPress security checklist: 25 essential steps to protect your site
Follow the WordPress security checklist steps below to learn how to protect your site against malware, DDoS attacks, brute-force attacks, unauthorized access, data breaches, and more.
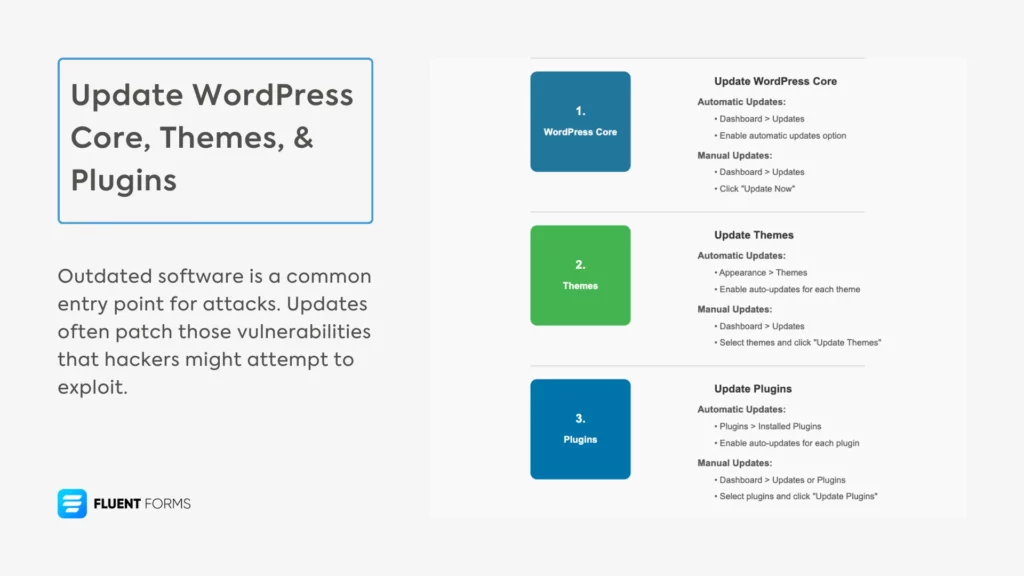
1. Update WordPress core, themes, & plugins
Outdated software is a common entry point for attackers. Updates often patch those vulnerabilities that hackers might attempt to exploit.
Hackers often succeed in exploiting the vulnerabilities in outdated software. Updates usually close those entry points to make your site impregnable.
Moreover, updates enhance your site’s performance, ensure compatibility with modern PHP versions, browsers, and servers, introduce new features and bug fixes, and help you rank higher on search engines.
Here’s a step-by-step guide on how to update WordPress core, themes, & plugins:
WordPress Core
WordPress automatically applies minor core updates (e.g., 6.3.1 to 6.3.2) unless disabled. You can conduct manual updates in 4 steps.
- Log in to your WordPress admin panel.
- Navigate to Dashboard > Updates.
- If a new version is available, click Update Now.
- Wait for the process to complete without interruption.
Themes
Automatic Updates:
- Go to Appearance > Themes.
- For each theme, click Enable auto-updates (if available).
Manual Updates:
- Go to Dashboard > Updates or Appearance > Themes.
- If updates are available, check the themes you want to update and click Update Themes.
Plugins
Automatic Updates:
- Go to Plugins > Installed Plugins.
- For each plugin, click Enable auto-updates in the Automatic Updates column.
Manual Updates:
- Go to Dashboard > Updates or Plugins > Installed Plugins.
- Check the plugins with available updates and click Update Plugins.
Always create a full backup (files and database) before installing an update. Remember to test the updates on a staging site first. Update one thing at a time so you can detect the source easily in case of an issue. Moreover, it’s best to maintain a changelog to document the date, version, and issues found in an update so you can easily keep track.
Besides, off-peak hours are ideal for performing updates. You can put your site in maintenance mode during updates to display a friendly message to visitors.
2. Keep your PHP version updated
Older PHP versions no longer receive security fixes, which makes them vulnerable to attacks. Moreover, newer PHP versions offer significant speed improvements, increase compatibility, and improve user experience. Therefore, it’s essential to keep your PHP version updated. Let’s see how you can do that.
Step 1: Check Your Current PHP Version
Go to Tools > Site Health > Info in your WordPress admin panel. Look under the Server section for the PHP version.
Step 2: Access your hosting provider’s control panel:
- Log in to cPanel.
- Find MultiPHP Manager or Select PHP Version.
- Choose the desired PHP version (only actively supported PHP versions) from the dropdown.
- Apply changes.
However, these might not apply to every hosting provider. Check your host’s documentation for specific instructions. For example:
- SiteGround: Log in to SiteGround’s Site Tools. Go to Dev > PHP Manager. Select the latest version and save.
- WP Engine: Log in to the WP Engine User Portal. Go to Sites > [Your Site] > PHP Version. Select the latest version and confirm.
- Kinsta: Log in to MyKinsta. Go to Sites > [Your Site] > Tools. Under PHP Engine, select the latest version and restart PHP.
Step 3: Test the New PHP Version
Most hosts (e.g., SiteGround, WP Engine) offer staging environments. Update PHP there first. Check for errors in key areas (homepage, forms, e-commerce, etc.), both in the front and back end. You can use a plugin to identify PHP compatibility issues as well. Moreover, turn on WordPress debugging to catch errors during testing. Additionally, ensure your PHP settings are optimized.
Subscribe to PHP or WordPress newsletters to stay updated on versions and security information & follow your hosting provider’s announcements for PHP version availability. Before updating, make sure your server meets the requirements for newer PHP versions (sufficient memory, compatible extensions, etc.).
3. Use unique & strong passwords
Bots use brute force attacks or dictionary attacks to hack into your site. A brute force attack involves random combinations of characters, while a dictionary attack uses a list of common words and variations. They can also combine the two to enforce a hybrid attack. A bot can try a hundred different passwords every second. This makes it possible for them to break into sites with weak passwords.
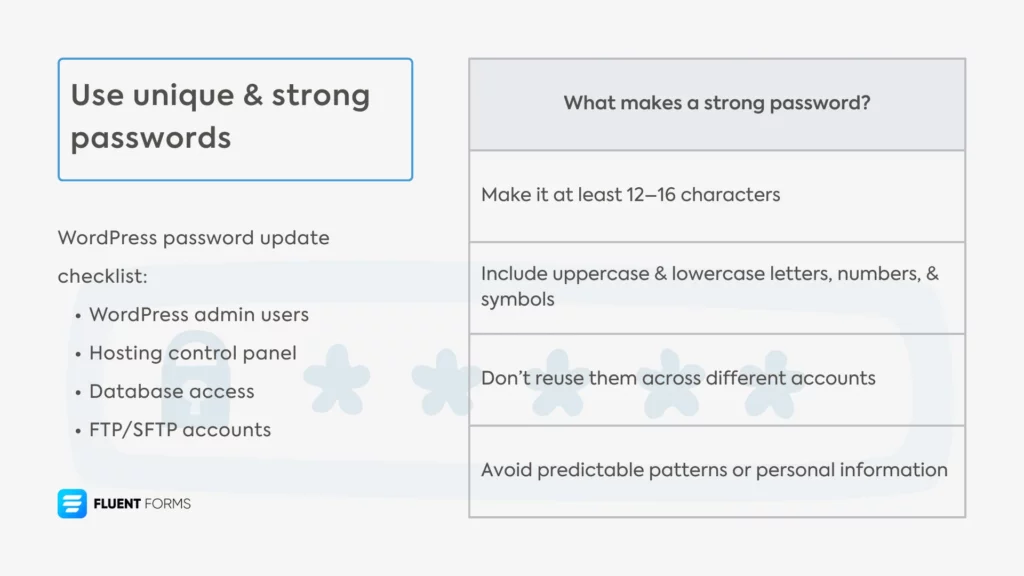
The stronger your passwords are, the harder it is for bots to guess them. It helps further if you use unique passwords for each account and change them regularly. Let’s see how you can use strong passwords to harden your site security.
What makes a strong password?
1. Long: Make it at least 12–16 characters.
2. Complex: Include a combination of
- Uppercase letters (A–Z)
- Lowercase letters (a–z)
- Numbers (0–9)
- Special characters (!, @, #, $, etc.)
3. Unique: Don’t reuse them across different accounts or sites.
4. Random: Avoid predictable patterns, personal information (e.g., name, birthdate), or common words (for example, “password123”).
You can generate and manage strong passwords yourself or use a password manager for the task. Popular choices include LastPass, 1Password, Bitwarden, etc.
WordPress password update checklist:
- WordPress admin users
- Hosting control panel
- Database access
- FTP/SFTP accounts
In addition, online tools like Kaspersky Password Checker or Bitwarden’s Password Strength Tester can be used to test password strength.
4. Enable two-factor authentication
Enabling two-factor authentication adds an extra layer of security to your accounts. It’s a security method that requires two forms of identification to access data. Therefore, guessing your password alone isn’t enough to hack you, because hackers would also need the code sent to your email or device to break into your site.
WordPress doesn’t have built-in 2FA, but you can easily activate it from your security plugin’s settings. After that, log out and log back in to test if the 2FA setting is working. Enable 2FA for your hosting account, email accounts, FTP/SFTP accounts, and domain registrar as well. Besides, save recovery codes to regain access in case you lose your 2FA device.
5. Install a trusted security plugin
WordPress security plugins protect your site against malware, brute force attacks, data breaches, unauthorized access, etc. However, if you don’t install the security plugin from a trusted source, chances are your site isn’t receiving the protection it needs.
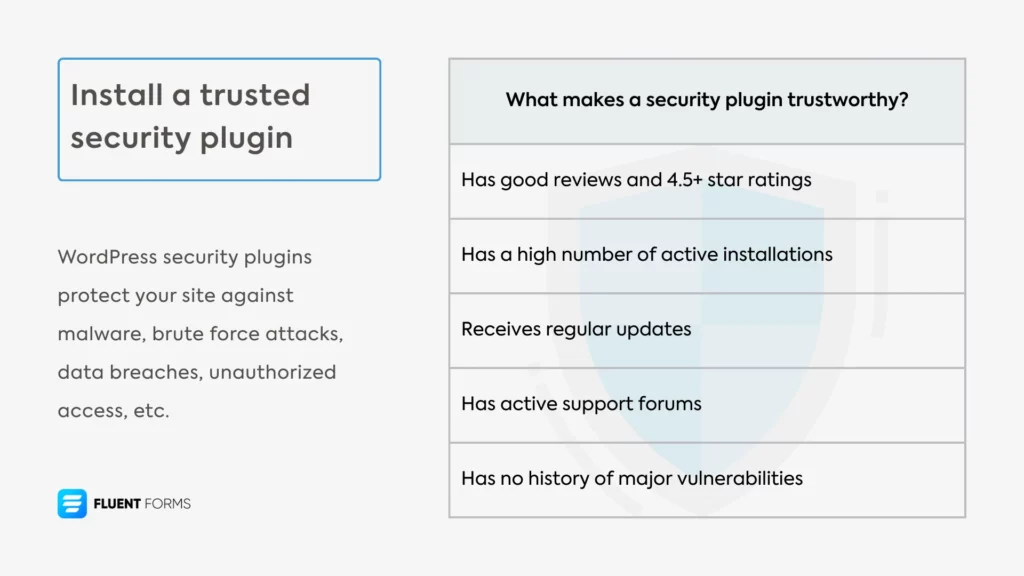
So, what makes a security plugin trustworthy?
- It has good reviews and 4.5+ star ratings
- Has a high number of active installations
- Receives regular updates
- Has active support forums
- Has no history of major vulnerabilities
Installing the plugin is easy. Simply download the .zip file. Go to your WordPress dashboard and navigate to Plugins > Add New > Upload Plugin. Then click Choose File, select the .zip file, and click Install Now. After installation, click Activate and enter the license key if applicable. Now you’re all set with a security plugin.
6. Use a web application firewall (WAF)
A web application firewall (WAF) protects your site by filtering and blocking malicious traffic, such as SQL injections, cross-site scripting (XSS), brute force attacks, etc. It basically scans all incoming traffic by running their IP against known databases of malicious IPs and allows access once they’re confirmed as safe traffic.
For added security, you need more than one firewall at different layers in your network environment. Initially, you can go with a cloud-based WAF and a plugin firewall. Cloud-based WAF filters traffic before it even reaches your server; this way, your server doesn’t have to handle any unnecessary pressure and runs smoothly.
A plugin firewall protects your site against all WordPress-specific attacks, including vulnerabilities in WordPress core, plugins, themes, databases, wp-login, etc. It’s the last line of defense for your site. Most popular security plugins also offer a plugin firewall solution.
7. Schedule regular scans
You can detect a security issue early by conducting scheduled scans. Regular scans help you identify compromised files, detect spam, track file changes, monitor for blacklisting, maintain site health, etc.
Go to your security plugin from your WordPress dashboard. Navigate to “Scan Options and Schedules.” Set scan frequency (daily or weekly, based on traffic and activity). Choose low-traffic hours to schedule scans.
Finally, review scan results regularly and check all red flags marked by your security plugin. If any malware is detected, assess and remove the malware without delay.
8. Back up your site & store them on a separate server
Backing up your site is a very important security step. Why? Because if your site gets compromised, you’d need a clean backup to rebuild from.
You can take a hundred security precautions so your site isn’t breached, but if it ever is attacked, there is only one safety net: the backup. It’s the one thing that can help you recreate your site. And the later your backup version is, the easier it is to recover your site from it. That’s why you need frequent backups.
So, what should you back up? Well, necessarily all files (core, themes, uploads, plugins, media) and databases (content, settings, users, comments, etc.) Schedule daily backups if you run an active site and weekly if you have a static site. Some tools also offer smart backup options, where they only back up the changes made since the previous backup.
You can use your hosting provider’s backup solution or a separate plugin (like UpdraftPlus) for this purpose. However, it’s best to always store 3 to 5 recent backup versions off-site (preferably in 2FA-enabled cloud storage) so the backups don’t get compromised. You should also test your backups on a staging site from time to time.
9. Monitor user activity
Monitoring user activity on your WordPress site is essential for detecting suspicious behavior (new admin accounts, plugin installs, etc.), ensuring security, and maintaining site integrity (detecting hidden post edits, SEO spam, etc)
User activity monitoring keeps tabs on actions like logins, content changes, plugin updates, settings modifications, etc. You can use plugins, hosting tools, or manual methods to monitor activity. Navigate to live traffic/activity log. Look for user logins/logouts, user role changes, post, page, or comment edits, plugin, theme, or core updates, settings changes, etc.
Enable email notifications for critical actions like new admin creation. Use a secure email account with 2FA for this purpose. Review activities regularly and act on suspicious behavior (block malicious IPs, reset passwords, etc.)
Assign minimal roles (editor, author, etc.) to team members to minimize risks, reserving admin for essential users. Additionally, maintain a changelog of suspicious activity to keep track.
10. Review user access and permissions
Reviewing WordPress user access and permissions prevents unauthorized access, mitigates malware risks, ensures accountability, etc. A user role hierarchy is given below:
- Administrator: Has full site control and can manage plugins, themes, and users
- Editor: Can manage all content, publish/edit posts, and has access to limited site settings
- Author: Can publish own posts and edit personal content
- Contributor: Can write posts, but cannot publish them
- Subscriber: Can view content and manage profile
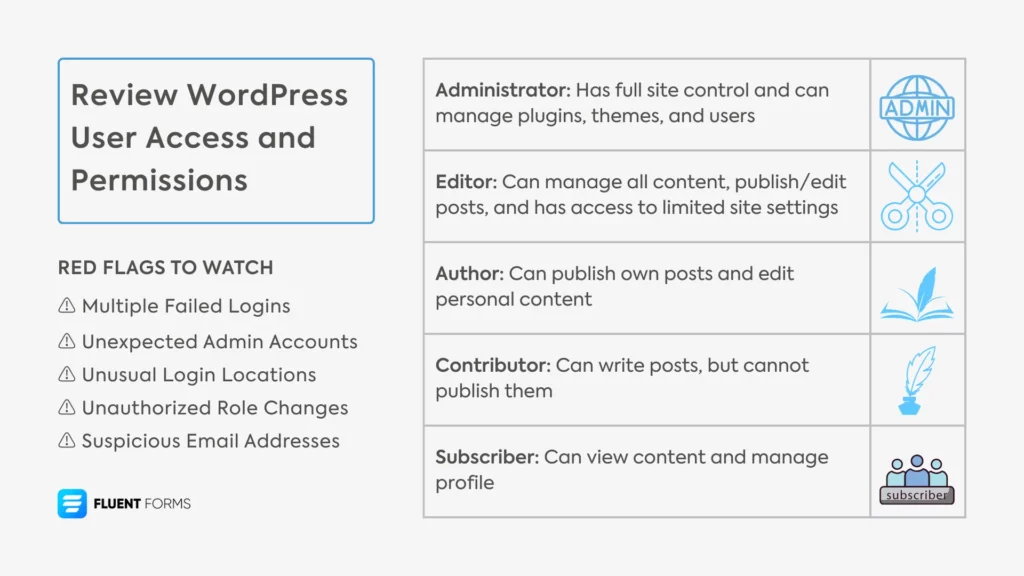
Conduct an audit to see if there have been any suspicious user activities. Check all user accounts, verify usernames, confirm email addresses, review last login dates, and identify suspicious accounts. Besides, track actual vs. required permissions and the role change history. Lastly, remove inactive users and enable two-factor authentication.
11. Limit the number of login attempts
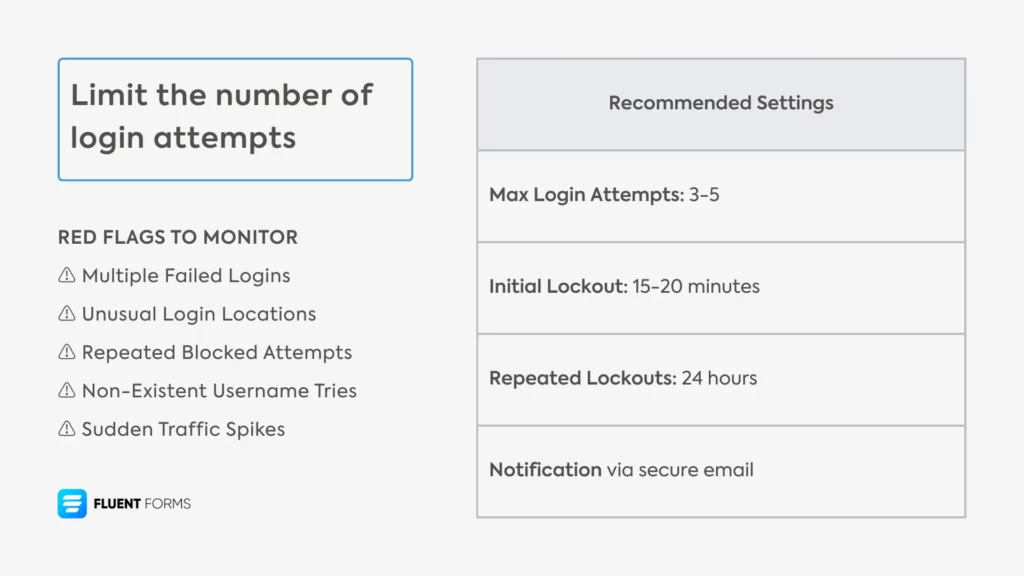
Bots can try thousands of password and username combinations in minutes. However, that becomes impossible if you limit the number of login attempts.
For example, if you set the limit to 5 attempts, then those bots will be locked out for 20 minutes after every 5 login attempts. This will slow them down to a great length and improve your site’s security. You can set the allowed number of login attempts using most security plugins.
12. Use a CDN
When you use a CDN (Content Delivery Network), copies of your site’s static files (e.g., images, stylesheets, scripts) are stored on edge servers worldwide. When a user visits your site, the CDN delivers content from the nearest server, reducing the delay in content delivery.
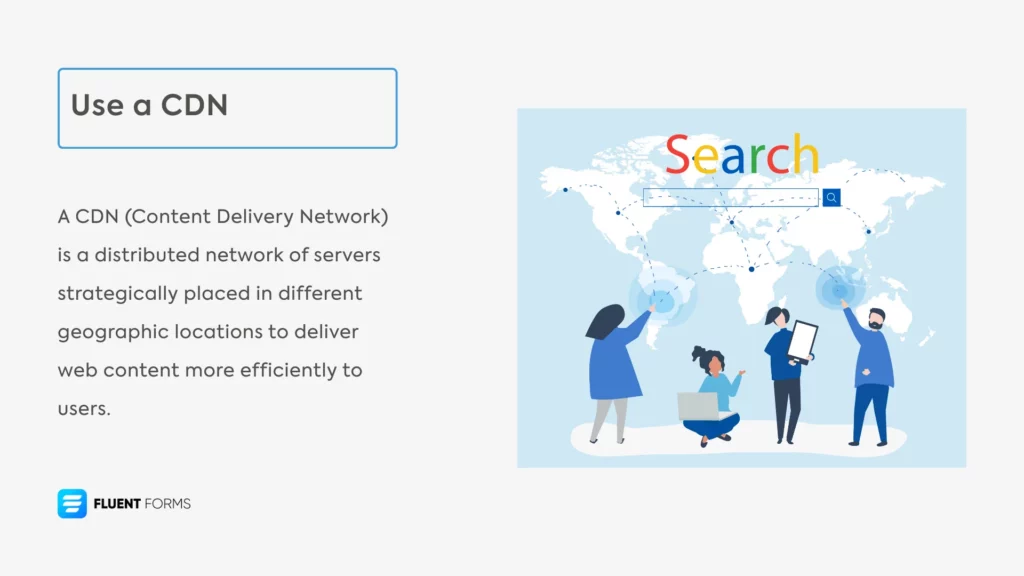
Many CDNs offer DDoS protection. They have large networks with significant bandwidth capacity that can absorb and mitigate distributed denial-of-service attacks by distributing traffic across multiple servers.
Besides, many CDNs include WAF capabilities that filter out malicious traffic before it reaches your origin server, protecting against common web vulnerabilities like SQL injection, cross-site scripting (XSS), etc. Moreover, CDNs simplify the implementation of HTTPS across your site, handling certificate management and providing edge encryption for data in transit.
13. Install an SSL certificate
An SSL certificate encrypts data between your website and visitors. It enables HTTPS connections and displays a padlock icon in browsers to indicate security.
Installation steps:
- Get the certificate from a trusted source
- Install the certificate: Apply to your domain via hosting or Cloudflare
- Update WordPress: Change URLs to HTTPS from Settings > General
- Force HTTPS: Redirect all traffic to a secure connection
- Test and verify: Check for the padlock and use SSL Labs
Combine SSL with strong passwords and 2FA for better security.
14. Enable SFTP
SFTP is a secure protocol for transferring files over an encrypted SSH connection. Unlike FTP, SFTP protects your WordPress files from unauthorized access. It offers encrypted file transfers, secure backup management, protection against attacks, and GDPR/PCI compliance support. Here’s how you can set up SFTP:
Step 1: Log in to your hosting control panel
Step 2: Create an SFTP account with a strong password
Step 3: Get SFTP credentials (note your server’s hostname, created username, the password, and the default port 22)
Step 4: Download an SFTP client and enter your credentials to connect and verify access
Step 5: Restrict SFTP to your IP and use 2FA
Test SFTP settings on a staging site first. Regularly check SFTP logs for unauthorized access. Lastly, create a backup before uploading files via SFTP.
15. Delete inactive WordPress themes and plugins
Deleting inactive themes and plugins reduces vulnerabilities and server load, improving speed and performance. It simplifies updates and site management as well.
Deleting inactive themes:
Step 1: Navigate to Appearance > Themes from your WordPress Dashboard
Step 2: Identify inactive themes (active theme is highlighted)
Step 3: Click an inactive theme’s thumbnail to open details
Step 4: Click Delete (bottom-right corner) and confirm
Step 5: Repeat for all unused themes, keeping one default theme.
Step 6: Refresh Themes to ensure only the active theme and the default remain
Step 7: Check site functionality to confirm nothing’s broken
Deleting inactive plugins:
Step 1: Navigate to Plugins > Installed Plugins from your dashboard
Step 2: Look for plugins marked Inactive and select all
Step 3: From the Bulk Actions dropdown, select Delete and click Apply
Step 4: Confirm deletion and refresh to check
Step 5: Test site features to ensure no functionality is affected.
Create a full backup before deleting, in case a critical dependency is removed. Run a security scan to detect errors or vulnerabilities after the deletion.
16. Assess new plugins and themes
Installing plugins and themes from untrusted sources might break your site or make it vulnerable to potential threats. That’s why it’s important to assess them before installation. Here’s a step-by-step guide on how to assess themes and plugins before you install them.
Step 1: Check if they’re listed on a reputable repository (like WordPress.org)
Step 2: Check the star rating and the number of active installations and compare to competitors
Step 3: Check recent user reviews
Step 4: Check the changelog to see if it’s updated regularly
Step 5: See if it’s compatible with your WordPress and PHP versions
Step 6: Test on a staging site first; look for load time and user-friendliness
Step 7: Check if there’s enough documentation available
Step 8: Look for active support forums
Prevention is better than cure. That’s why you should always assess any themes or plugins before installation. Once you check the desired plugin/theme, test it on your staging site to see if nothing breaks before installing it on a live site.
17. Invest in a secure hosting provider
Your hosting provider hosts your entire site and plays an important role in its security. It offers you cloud-level firewalls, backup options, SSL certificates, automated scans and cleanup, staging solutions, etc., depending on the plan you choose.
Whether you run a small or a large site, these features come in handy when it comes to your site’s security and credibility. That’s why you need to invest in a trusted hosting provider so your visitors feel safe interacting with your business. Go with a hosting provider that lets you scale up in features and security as your business grows.
18. Change the default admin username
The default “admin” username is targeted in WordPress brute force attacks. If that’s your admin username as well, then hackers only need to guess the password right to break into your site. However, changing the default username makes breaking into your site twice as hard since bots have to guess both the username and password.
Here’s how you change the default username:
- Create a New Admin User from Users > Add New
- Fill in your new unique username, a secure email, and a strong password, and select the admin role
- Click Add New User
- Log out and log back in with the new username and password
- Select previous posts and pages and reassign them to the new user
- Finally, delete the old admin account after attributing all content to the new admin user
19. Hide your WordPress version
There are always certain vulnerabilities in each version of WordPress. If hackers find out which WordPress version you use, they might try to exploit those vulnerabilities to hack into your site. That’s why it’s always best to hide your WordPress version.
You can hide your WordPress version easily from your security plugin. Navigate to WordPress version info from security settings or options. Hide WordPress Version to remove the generator tag and save changes.
20. Limit wp-admin access to authorized IP addresses
Limiting wp-admin access reduces attack attempts, protects sensitive admin operations, prevents blacklisting, etc. To enhance your site security. You can easily limit wp-admin access using your security plugin. Simply navigate to Firewall Options from your security plugin and add your IP to “Whitelisted IPs.” Enable Restrict wp-admin access to whitelisted IPs or create rules to block all IPs except whitelisted ones from wp-admin.
If possible, use a static IP for this purpose. Enable 2FA and keep emergency access ready. Lastly, test after implementation and document all changes.
21. Change the default WordPress login page URL
Changing the default login URL reduces brute force attacks and protects sensitive admin data. You can configure a new login URL using your security plugin.
Navigate to settings and enter a unique, non-guessable slug in the Login URL field. Set a redirect URL for blocked access attempts (for example, yoursite.com/404 or homepage to avoid revealing the login page) and save changes.
Log out and visit the new link to ensure you can log in. Test from a non-whitelisted IP if you’ve restricted wp-admin access to confirm compatibility.
Create backups before making changes. Choose a URL that’s not obvious and monitor blocked attempts at the old login URLs. Document changes and inform team members.
22. Disable PHP error reporting
Disabling PHP error reporting in WordPress prevents information disclosure (server paths, versions, etc.) It also helps with GDPR/PCI-DSS compliance and reduces attack vectors.
Disabling PHP error reporting via wp-config.php
Step 1: Create a full backup of your site
Step 2: Connect via SFTP to /public_html/wp-config.php. Or use your hosting file manager
Step 3: Open wp-config.php and add or modify the following lines before the /* That’s all, stop editing! */ comment:
define(‘WP_DEBUG’, false);
define(‘WP_DEBUG_DISPLAY’, false);
define(‘WP_DEBUG_LOG’, true);
ini_set(‘display_errors’, 0);
ini_set(‘display_startup_errors’, 0);
Step 4: Save the file
Step 5: Test changes.
23. Block hotlinking
Hotlinking refers to other websites embedding your media files directly from your server. Blocking hotlinking protects bandwidth and server resources.
Additionally, it enhances security by preventing unauthorized media use. You can block hotlinking using hosting tools, security plugins, Cloudflare, or .htaccess.
Add the following code to your .htaccess:
<IfModule mod_rewrite.c>
RewriteEngine On
RewriteCond %{HTTP_REFERER} !^$
RewriteCond %{HTTP_REFERER} !^http(s)?://(www\.)?yoursite.com [NC]
RewriteCond %{HTTP_REFERER} !^http(s)?://(www\.)?google.com [NC]
RewriteCond %{HTTP_REFERER} !^http(s)?://(www\.)?bing.com [NC]
RewriteRule \.(jpg|jpeg|png|gif|svg|mp4|webm)$ – [NC,F,L]
</IfModule>
Replace yoursite.com with your domain. Test and verify changes to ensure legitimate access still works.
24. Change the default database prefix
Changing the default database prefix prevents SQL injection attacks and blacklisting, protects sensitive form data, and enhances security.
You can change the database prefix via security plugins or manually through phpMyAdmin. You can also install a dedicated plugin for this purpose. Choose random prefixes that are hard to guess and keep a backup before implementing changes. Additionally, monitor for errors after you make changes.
25. Manage file permissions
Managing file permissions prevents unauthorized access. It also protects sensitive data in wp-config.php and uploads.
File permissions in WordPress are set using numeric values (e.g., 644, 755) that define access for three user types:
- Owner: The user who owns the file (typically the server user)
- Group: Users in the same group as the owner
- Others: Everyone else (public, including potential attackers).
Each digit represents permissions for read (r=4), write (w=2), and execute (x=1):
644: Owner can read/write (4+2=6); Group/Others can read (4).
755: Owner can read/write/execute (4+2+1=7); Group/Others can read/execute (4+1=5).
Recommended WordPress Permissions:
Files: 644 (read/write for owner, read-only for others).
Directories: 755 (read/write/execute for owner, read/execute for others).
Sensitive Files (e.g., wp-config.php): 600 (read/write for owner only).
You can manage file permissions using SFTP or your security plugin. To manage permissions via SFTP, create a full backup first, then connect via SFTP and set permissions. Finally, test functionality and verify.
Summing up
It’s crucial to protect your and your users’ data to earn trust and credibility among users. Besides, keeping your site secure enhances its performance, resulting in an improved user experience. Follow this WordPress security checklist to harden your site security and cover all bases.
Always keep backups before making any changes in security settings, and store those backups on a separate server. Test the changes on a staging site before implementing them on your main site.
Remember, following a security checklist isn’t a one-time thing. You need to check the items on a regular basis, depending on your site’s size and incoming traffic. This way, you’re always up to date on the security front, and the risk of an attack becomes minimal.
Let us know what you think of our WordPress security checklist, and comment your suggestions and queries below!

Sarika writes for Fluent Forms and loves to offer insights into small businesses. She’s curious and enjoys discussing ideas, interests, and perspectives. In her free time, she’s either marvelling at architectural beauties or trying different cuisines.


Leave a Reply