Forms with Calculation: Calculate Values in WordPress Forms

WordPress forms have gone way past the elementary newsletters with a name field and an email field. They are regularly used to partake in various sophisticated tasks like payment collection, signature collection, built-in calculation, etc.
In fact, now you can design forms as complex as an order bump, create payment forms with calculation, and so much more. So today, we curated this piece with detailed instructions on how to create WordPress forms with calculations. We will be using repeat fields, but other fields like numeric, payment, etc., also allow calculation.
How to create WordPress forms with calculation

Fluent Forms is an excellent form builder plugin for WordPress. It is a lightweight and comfortable tool. Anyone can create any kind of form with its smooth interface. Its drag-and-drop feature makes it easier for users to make any form within a few minutes. Furthermore, Fluent Forms comes with 60+ input fields and 70+ pre-built templates to make the form-making process sleeker. You can also get 60+ third-party integrations with the plugin.
Moreover, advanced post creation, Stripe and PayPal integration, PDF entry generation, file upload, conditional logic, etc., functions are also available in Fluent Forms. You don’t need to worry about the security with this tool, as it is secured with reCAPTCHA, Honeypot, and Akismet.
Some form builders require you to use additional add-ons to calculate input values. Not Fluent Forms.
So we will be using this WordPress form builder to demonstrate how you can swiftly create forms with calculations in 4 simple steps. If you have Fluent Forms Pro already installed. So let’s go.
Step 1: Install Fluent Forms Pro
Chances are, you already have Fluent Forms Pro installed. For those of you who haven’t (what are you thinking?), just follow the steps mentioned below, and you’ll install Fluent Forms Pro in no time.
- Visit fluentforms.com and select the license that caters to your needs. All licenses include the same features and functionalities, so don’t worry about missing out.
- Check out the plan you chose.
- Go to your WordPress dashboard, and locate Plugins in the left sidebar.
- Click on the Add New button, Upload the zip file, and Install Now.
Now that we have that out of the way, let’s get to the actual process of creating WordPress forms with calculation.
Step 2: Create a form

The real first step of creating a form with calculation is to go to the Fluent Forms dashboard. Here, you’ll see an Add a New Form button. Click on it to reveal a pop-up with 70+ prebuilt form templates. You can search for the form template you need in the search box. But we’ll just go with a blank form.
Step 3: Create a shipping cost calculator form
Now that you have a blank form in front of you, it’s time to fill it out with all the form fields you need. We’ll design a simple shipping cost calculator form, so we’ll drag the fields suitable for the cause.
You can also design a product order form if you want, and enable calculations for the total amount of the product purchased.
We started by using a Custom HTML field for the heading of the form.

Next, we need the Payment Items field. You can add Element Label from the input customization section, as well as modify the product display type. Adding an image of the product is a must.

Step 4: Enable calculation
Now, we are going to need a numeric field to enable calculation. Drag a Numeric Field and label it as necessary. We labeled it as ‘Payment Total’ as we’re going to calculate the total cost.

After we’re done with labeling the field, we have to enable calculations, because that’s what we need our form to perform.
Go to the Advanced Options of the Numeric Field and click on Enable Calculation. Then, put the formula you need to calculate the cost.
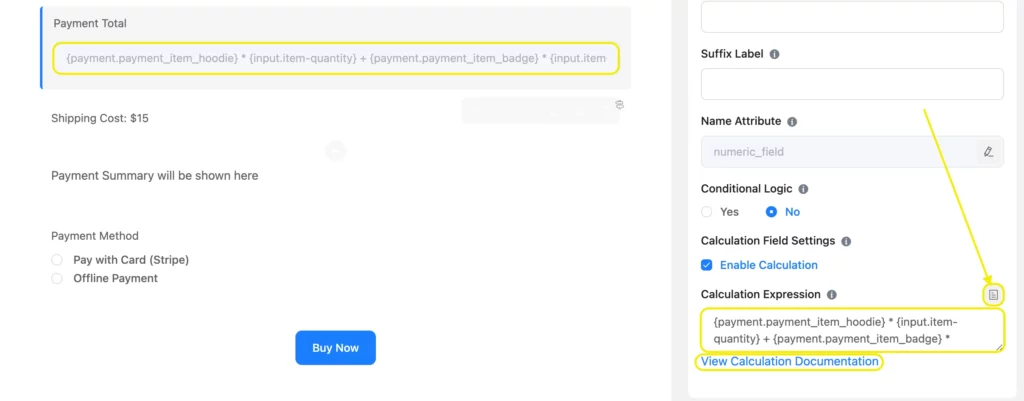
Click on the Ticket icon on the right side of the Calculation Expression box to select the fields that need to take part in the calculation. You can also go to the calculation documentation page for any help you need.
This is how your calculator is going to look. Try this one to see if it really works:
You can also check out many other types of calculators for inspiration. The demo calculators are ready to use, so you can just download them and modify them as per your needs.
Calculators you might want to check out
Discover WordPress forms
You’ve seen how easily you can create forms with calculations. 4 simple steps and boom! You have a working WordPress form in your hands that will swiftly sum your input values. But that’s not all your form is capable of.
Automatic address suggestion, checkable grid, GDPR agreement, color picker, advanced post creation, multi-column layout, subscription payment, conditional email routing, etc., are only some of the features that come with Fluent Forms. To get the full Fluent experience, make sure you give Fluent Forms a go.




Leave a Reply