How to Build Multi-Attendee Event Registration Forms Using the Repeater Field
If you’ve ever had to set up a form where one person signs up on behalf of a group, a team workshop, a family cooking class, or a corporate meetup, you’ve probably run into the same frustrating workarounds: duplicating fields manually for Attendee 1, Attendee 2, Attendee 3, and so on; or asking every single attendee to submit the form themselves. Neither approach is clean, and neither scales.
There’s a better way. Fluent Forms Pro includes a Repeater field that lets a single registrant add as many attendees as needed in a single form submission, with each row collecting the same structured data (name, email, date/time preference) without any manual field duplication on your part.
This tutorial walks you through building that form from scratch.
TL;DR
- The Repeater field lets one registrant sign up multiple attendees in a single form submission, no field duplication, no data chaos.
- Static field duplication, individual submissions, and textarea workarounds all fail at scale; the Repeater solves all three.
- Add primary registrant fields first (name, email, phone), then drop in a Repeater beneath them.
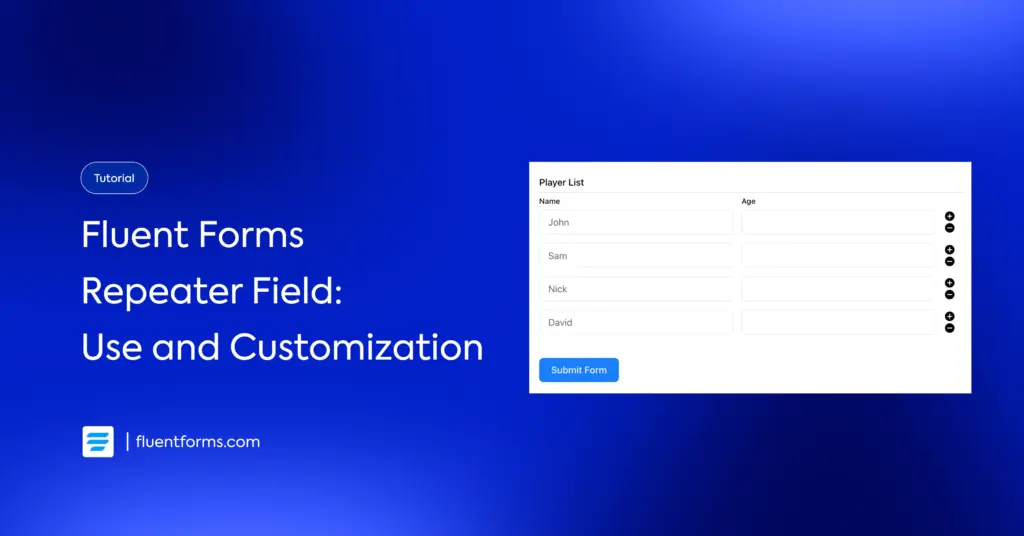
- Build each Repeater row with three fields: Attendee Name, Attendee Email, and a Date/Time picker for selecting the session.
- Set a minimum of 1 row and a maximum that matches your event capacity.
- Preview the form, apply the Form Styler to match your branding, then publish via shortcode or the Landing Page module.
- The Repeater field is exclusive to Fluent Forms Pro.
Why Standard Fields Break for Multi-Attendee Events
Here’s what most people try first when they need multi-attendee registration:
Duplicating static fields
You add “Attendee 1 Name,” “Attendee 1 Email,” “Attendee 2 Name,” “Attendee 2 Email,” and so on. The problem? You have to guess in advance how many attendees a registrant might bring. Cap it at five, and a registrant with six people hits a wall. Leave room for ten, and your form looks overwhelming to someone registering alone.
Asking each attendee to submit separately
This technically works, but it creates data chaos. How do you group the submissions? How do you know which attendees belong to the same party? You’re left piecing things together manually in your notification emails and entries dashboard.
Using a textarea as a workaround
Some folks just drop in a large text box and ask registrants to type in attendee details freehand. No validation, no consistent formatting, and a support nightmare when the data comes back looking like “John Smith [email protected], Mary / mary@mail / June 10 3 pm.”
The Repeater field solves all three problems. Each row is a structured, validated set of inputs. Registrants add exactly as many rows as they need. You receive clean, consistent data for every attendee in a single submission.
Steps to Build a Multi-Attendee Event Registration Form Using the Repeater Field
Prerequisites
- WordPress site with Fluent Forms Pro installed and activated
- A basic familiarity with the Fluent Forms drag-and-drop builder
Step 1: Add and customize the primary fields
Start by creating a new form. Go to Fluent Forms → Add New Form, choose a blank form, and give it a name like “Multi-Attendee Event Registration Form.”
These first fields belong to the person submitting the form, typically the organizer or group lead, not the attendees themselves.
Fields to add:
- Name: The primary registrant’s full name. Use the Name field (supports First/Last split if needed).
- Email: Their contact email. The notifications will go here.
- Phone: Optional, but useful for event-day communication.
- Event Selection: If you’re running multiple events, add a Dropdown or Radio Button field listing your upcoming event dates or names.
To add a field, drag it from the right panel onto the form, or click the field name.
Tip: Keep primary registrant fields lean. The Repeater section, coming next, is where registrants will invest more time, so you want this opener to feel quick.
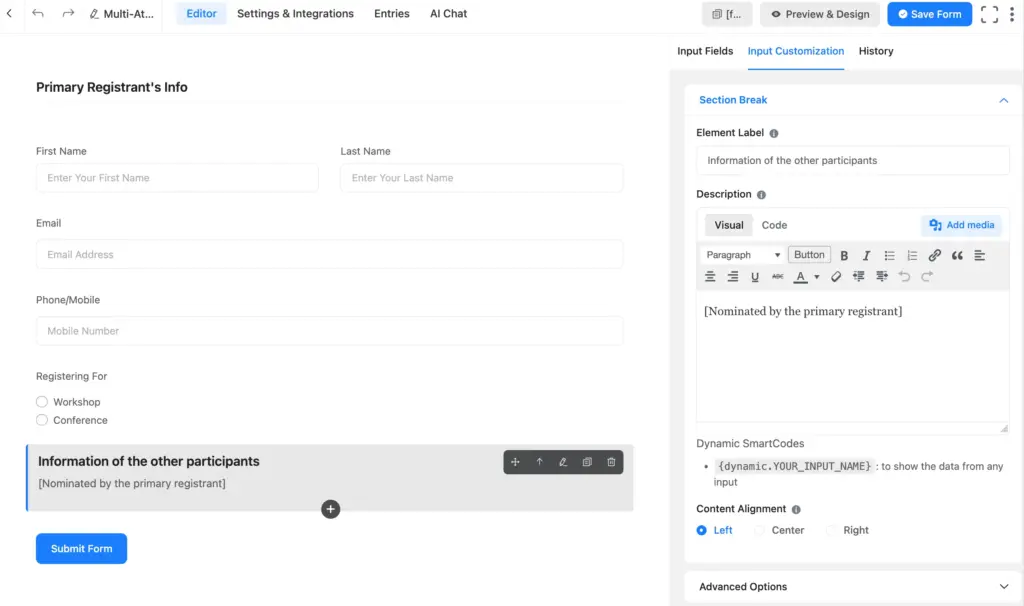
Optionally, you can add a form step or a section break to separate the main registrant and the fellow registrants’ details. I’m adding the Section Break to help understand better.
Customizing individual fields is straightforward: click any field and use the Input Customization panel to edit the label, placeholder, conditional logic settings, and more.
Step 2: Add the Repeater Field and configure min/max rows
With your primary fields in place, it’s time to add the Repeater.
In the left field panel, scroll down to the Advanced Fields section (Pro fields live here) and drag the Repeater field below the primary fields.
Bring the repeater field. You’ll configure a few key options here:
Add Columns: You can add columns using the + icon, which you’ll find on the right side, in the Input Customization section.
Label: You can change the repeat field’s label as well as the column’s label.
Maximum Rows: This depends on your event capacity. For a workshop with a hard cap of 10 seats per group, set this to 10. For an open-enrollment webinar, you might set it higher or leave it uncapped.
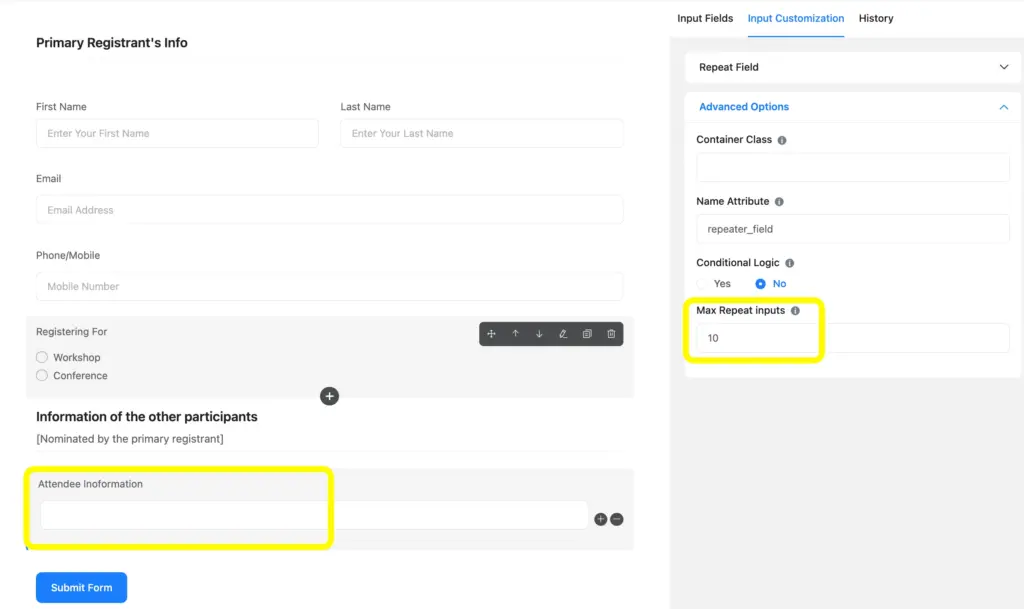
Note: The Repeater field is a Fluent Forms Pro exclusive feature. If you don’t see it in your field panel, check that you’re on an active Pro license. You can compare plans at Fluent Forms Pricing Page.
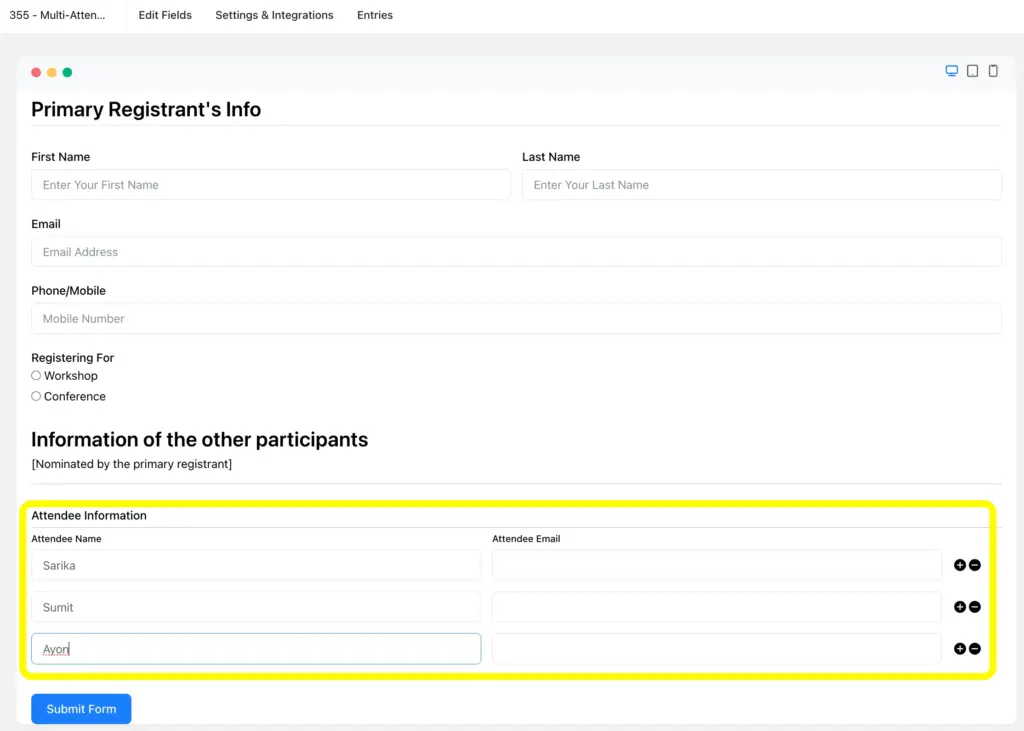
Step 3: Build the repeater row for name, email, etc.
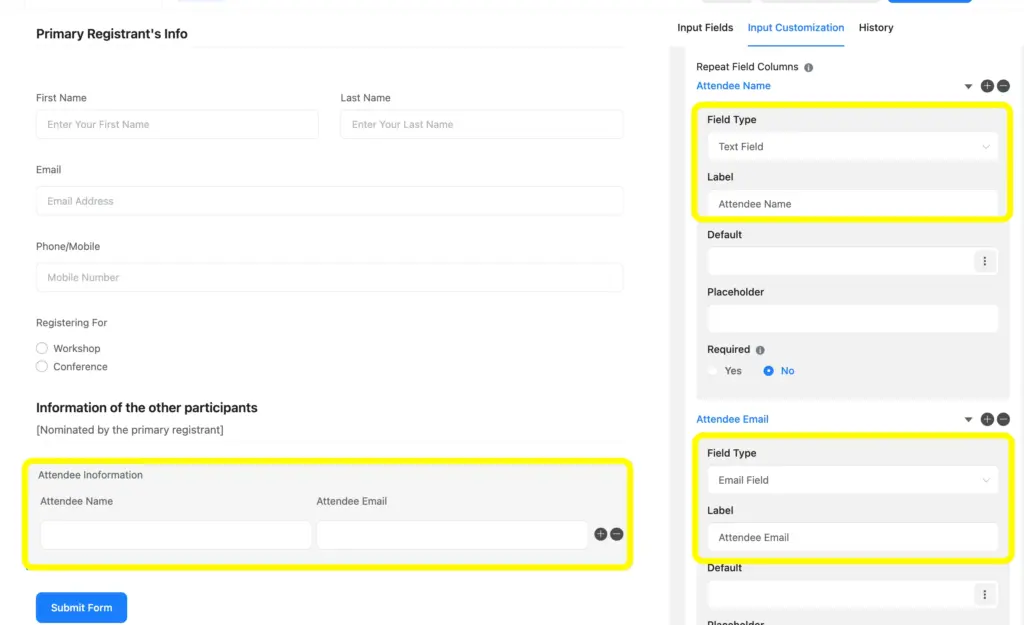
This is where the repeater field serves its purpose. Inside the Repeater field’s settings, you’ll find an area to define what fields appear in each row. Every row a registrant adds will contain this same set of fields.
Click “Add Field” inside the Repeater configuration panel to start building the row structure.
Attendee Name
Add a Text field (or a Name field if you want first/last split). Label it “Attendee Name.
Attendee Email
Add an Email field. Label it “Attendee Email.” You can mark it as required, as well as enable email validation along with a global error message.
Once all three fields are configured inside the Repeater, your row structure is set. Registrants will see one pre-loaded row when the form opens, with a + icon to get the columns opened.
Step 4: Check the preview, apply the styler, and publish the form
Before publishing, always preview the form from a registrant’s perspective.
Preview the form
Click the Preview button in the top right of the form builder. This opens a live preview in a new tab.
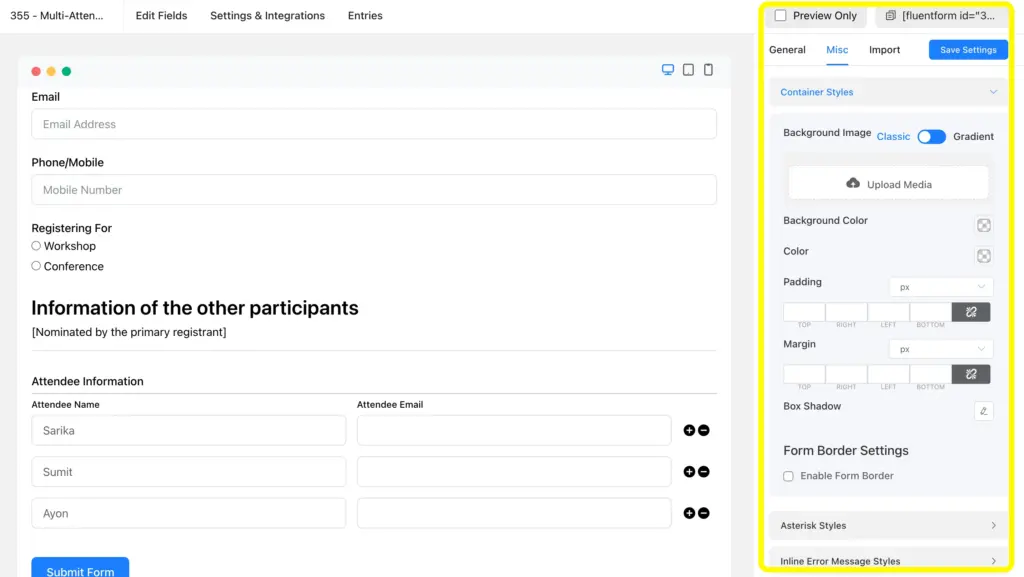
Apply the styler
Fluent Forms includes a visual Form Styler that lets you customize colors, fonts, field border radius, button styles, and more, without touching CSS.
You can also style the form from within the preview itself. The Advanced Form Styler is accessible there, letting you adjust color, padding, border, and more without switching back to the builder.
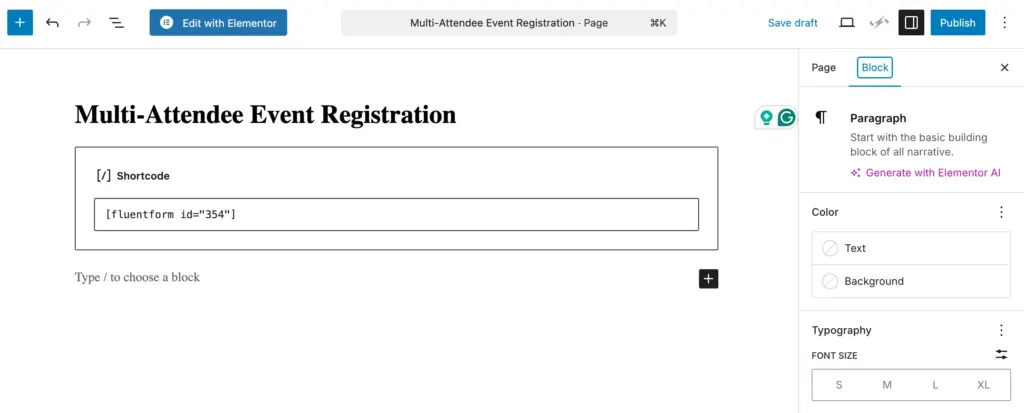
Publish the form
When everything looks right, close the preview tab and publish your form. Copy the shortcode and paste it into the WordPress page or post where your event registration lives.
Related Features Worth Exploring
Landing Page Module
Convert your registration form into a branded, full-screen landing page in one click. It’s a clean alternative to embedding the form inside a page, especially useful when you’re driving traffic from ads or email campaigns where a focused experience improves conversions.
Multi-Step Forms
If your event registration collects a lot of information, such as dietary restrictions, t-shirt sizes, and session preferences, consider splitting it across multiple steps. Fluent Forms’ multi-step feature adds a progress bar and breaks the form into digestible sections without requiring separate forms or pages. Combine it with the Repeater field to keep attendee data collection in one dedicated step.
Build Smarter Event Registration with Fluent Forms Pro
The Repeater field turns a clunky multi-attendee problem into a clean, one-submission workflow. No guesswork, no data chaos, just structured attendee data every time. And it’s one of dozens of Pro features waiting for you.
Check the free vs Pro comparison, or go straight to the pricing page and grab the plan that fits your site.

Hi, this is Aparup. I am a Literature postgraduate, mixing my creative thoughts with my experience in the tech industry to surpass AI. Professionally, I am a content marketer seeking solutions to users’ problems regarding WordPress.


Leave a Reply