

Create a Post Form to Accept User-generated Content on WordPress

If you run a blog, a magazine, community, agency, or academic site, or any site that depends on fresh content, you’ve probably needed to accept content from guest writers, team members, or contributors.
To make this workflow easier on your WordPress site, you either need to grant contributors access to your WordPress dashboard or ask them to email you a document and do the rest manually.
Neither option can make the workflow smoother. Dashboard access is a security risk waiting to happen, and manual copy-pasting eats up time you’d rather spend on editing or strategy.
With Fluent Forms, you can build a frontend form that lets anyone submit a post directly from your website, no login required, and have it land in your WordPress dashboard as a draft ready for review (or published automatically, as per your preference).
TL;DR
- Fluent Forms’ Advanced Post Creation add-on turns any frontend form into a post submission tool.
- Visitors fill in fields like title, content, and featured image, and their entry becomes a real WordPress post on submit.
- You choose whether submissions publish instantly or sit as drafts until you review them.
- Form fields map directly to post fields, so titles, content, images, and categories land in the right place automatically.
- Contributors never need dashboard access, and you never need to copy-paste from an email.
- Built-in confirmation messages and email notifications keep both sides informed without extra manual work.
Why Accept User-generated Content through a Form
Letting visitors submit content isn’t just about saving yourself work, though that’s a nice side effect. It changes what your site can be.
A safer front door than dashboard access
A submission form provides contributors with a controlled entry point rather than a login. They never see your dashboard, your plugins, or your other drafts, just a clean form with the exact fields you want filled in and nothing else. That helps you get rid of the security risk that comes with creating extra WordPress accounts, since every additional login is one more username and password that could be guessed, phished, or simply forgotten once someone stops contributing.
More consistent submissions
When someone emails you a post instead, you need to reformat headings, resize images, or chase down a missing category before it’s ready to publish. A form built with the right fields can make the content structured as you actually need. So what lands in your dashboard is already close to publish-ready rather than a wall of unformatted text.
Full editorial control, without the manual work
Because the whole process runs through a form and a feed you configure, you decide the rules. You choose whether submissions publish immediately or wait as drafts, which categories are even available to pick from, and what happens right after someone hits submit, whether that’s a thank-you message, an alert to your editorial team, or both.
Common Use Cases for a Post Submission Form
This kind of setup fits more situations than you might first think:
- Blogs and online magazines accepting guest posts or reader stories without onboarding every writer into WordPress.
- News and community websites that want local voices contributing updates or op-eds.
- Membership and directory sites where members submit listings, profiles, or announcements.
- Nonprofits collecting volunteer stories or event recaps from people in the field.
- Course platforms where students submit assignments or project write-ups as posts.
- Agencies managing client sites, giving clients a safe way to add content without touching the backend.
- Marketing and HR teams collecting testimonials, case studies, or employee spotlights for internal or public blogs.
- Event organizers gathering speaker proposals or session summaries ahead of a conference.
If any of those sound like your site, the setup below will take you maybe twenty minutes.
Steps to Accept User-generated Content on WordPress
Step 1: Enable the Post/CPT creation module
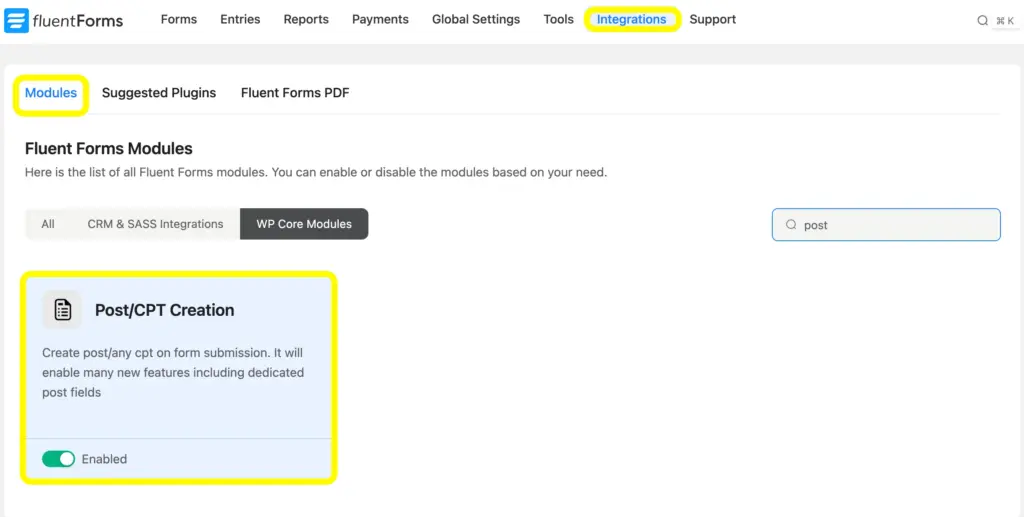
You’ll need to switch the Post/CPT Creation module on before anything else works. Open your WordPress dashboard, find Fluent Forms Pro in the left menu, and go into its Integrations tab. From the list of available modules, toggle Post/CPT Creation to active.
Step 2: Create a post form
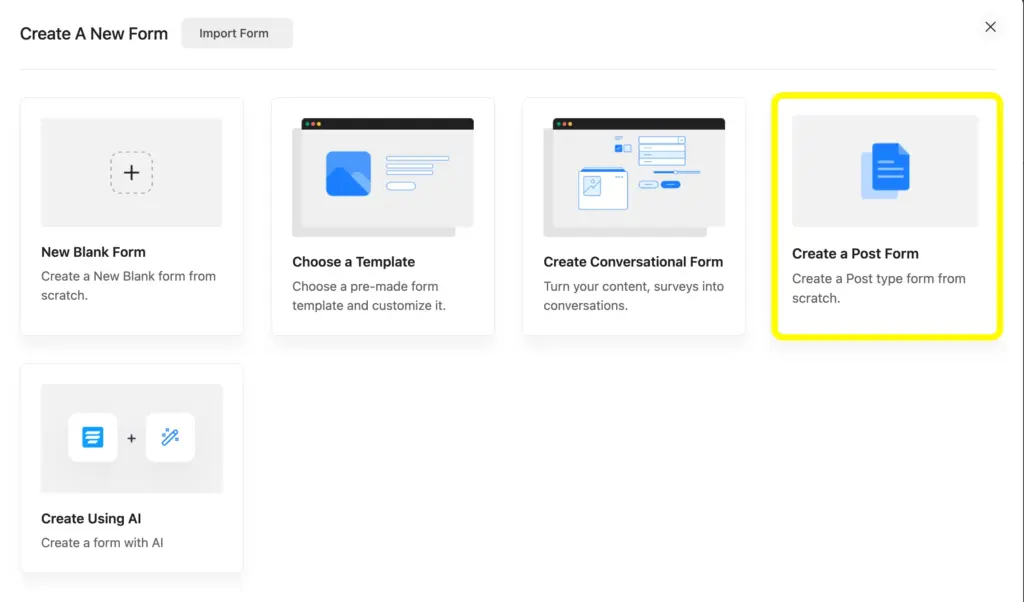
From your forms list, click Add New Form, then pick Create a Post Form from the options shown. A dropdown will ask what type of content this form should generate. Select Post and hit Continue.
Rename the form to something you’ll recognize later, like “Guest Post Submission” instead of the default “Form 3.” Future you, scrolling through a long list of forms, will appreciate it.
Step 3: Add and customize the required fields
Now, add and customize the fields. For a basic post submission form, you’ll want:
- Post Title
- Post Content (a rich text or text area field)
- Featured Image for the thumbnail
- Categories so submitters can tag their own post
- Name and Email Address fields to capture who’s writing
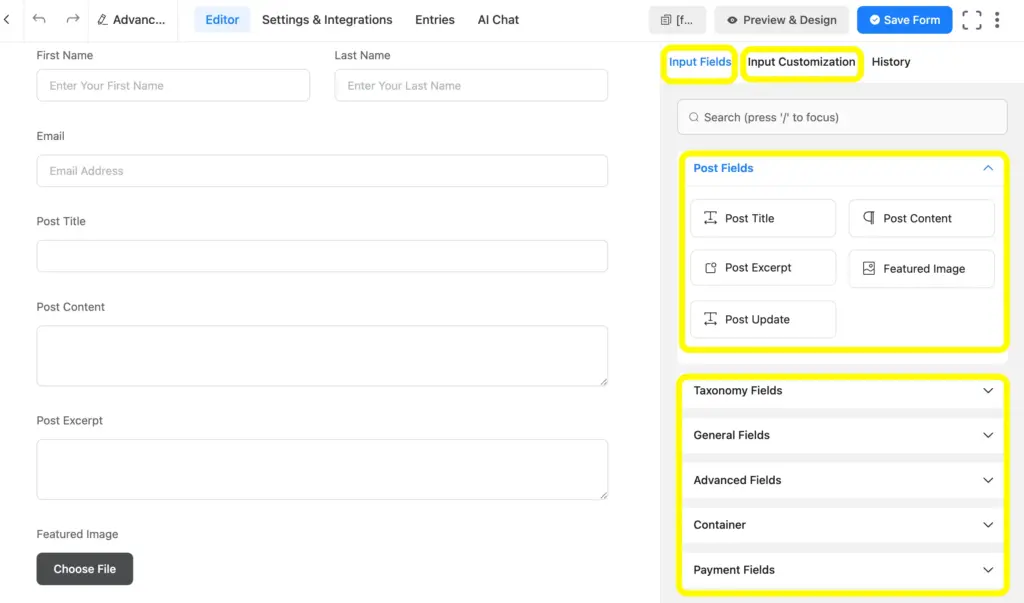
Fluent Forms lets you customize each field’s label, placeholder text, help message, and label placement, so take a minute to make the form feel like part of your site rather than a generic form dropped into a page. Once everything looks right, click Save Form.
Step 4: Configure the post feeds
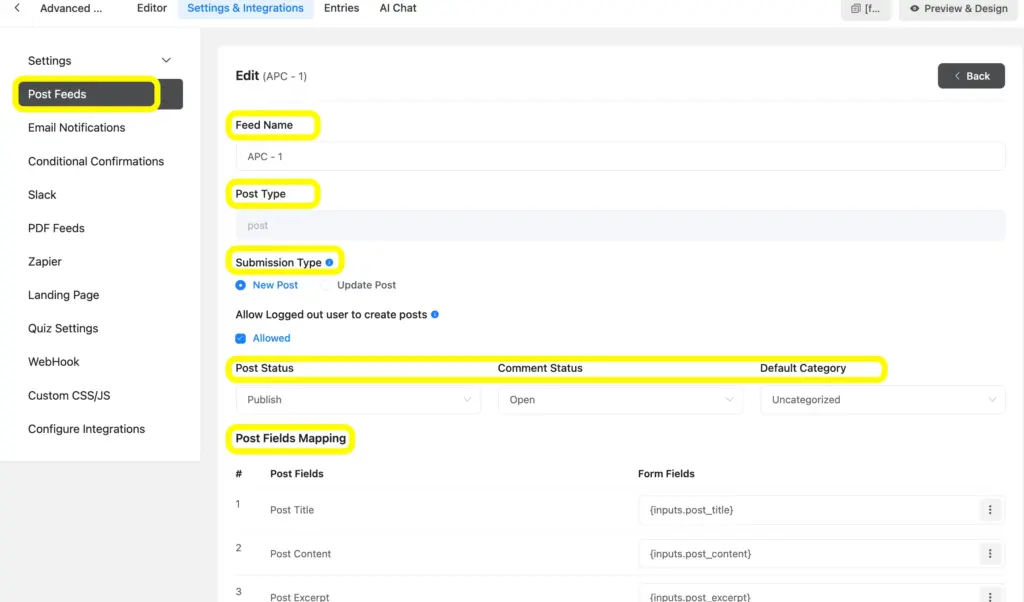
Go to Settings & Integrations at the top of the form editor, then click Post Feeds followed by Add Post Feed.
Name the feed something descriptive, then choose your Submission Type. Pick New Post if this form creates fresh posts, or Update Post if you’re using it to let contributors revise existing content. If you want the form usable by people who aren’t logged into WordPress at all, check the Allow Guest box.
From there, set the Post Status (draft is the safer default if you want to review before anything goes live), the Comment Status, and a Default Category.
In the Post Fields Mapping, match each Post Field to the corresponding Form Field, so the title field on your form feeds into the post title, the content field feeds into the post body, and so on. You can also turn on conditional logic here if you only want the feed to fire under certain conditions, for example, only when a specific category is selected. Click Save Feed, and you’re set.
Step 5: Set up confirmation and notification
You can show a custom confirmation message thanking the submitters and letting them know when to expect a response, or redirect them to a specific page.
You can show the confirmation message on the Same Page, To a Page you prefer, or To a Custom URL.
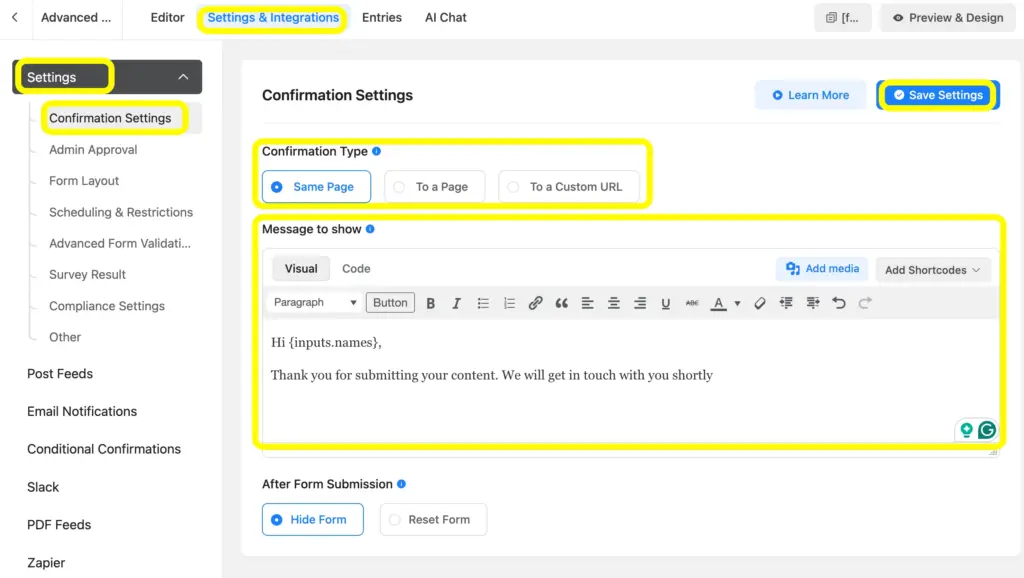
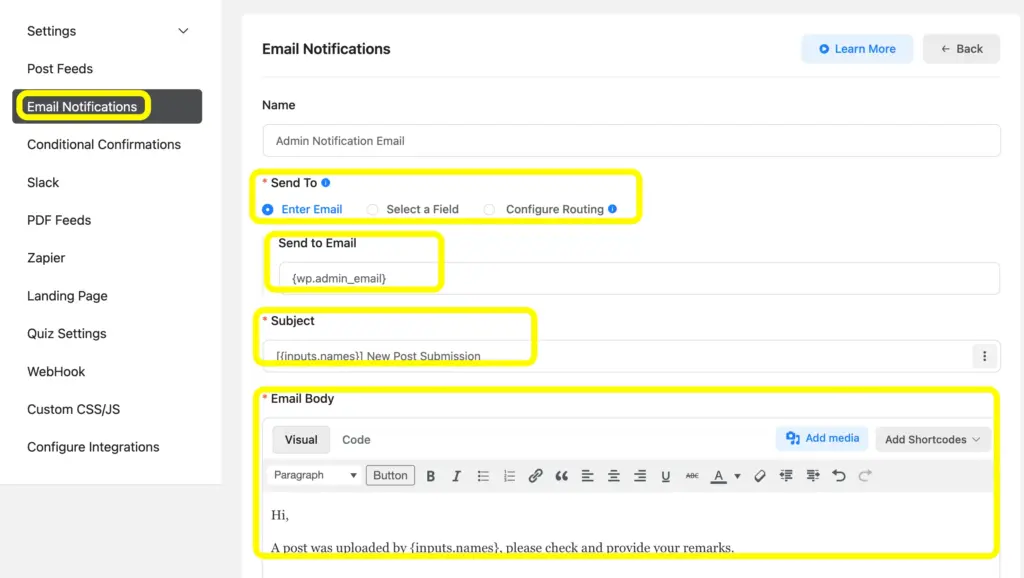
On your end, set up an email notification so your editorial team knows the moment a new submission lands, rather than constantly checking the dashboard. You can also send a confirmation email back to the contributor, which goes a long way toward making the whole experience feel professional rather than like shouting into a void.
In the top right corner, you’ll get the button ot Add Shortcodes, to make the notification more detailed and specific.
Step 6: Embed the post creation form
With the form built, drop it onto a page using the Fluent Forms block or shortcode, wherever makes sense for your contributors to find it. A dedicated “Submit a Post” or “Write for Us” page tends to work best, since it gives the form its own clear purpose instead of getting lost on a general contact page.
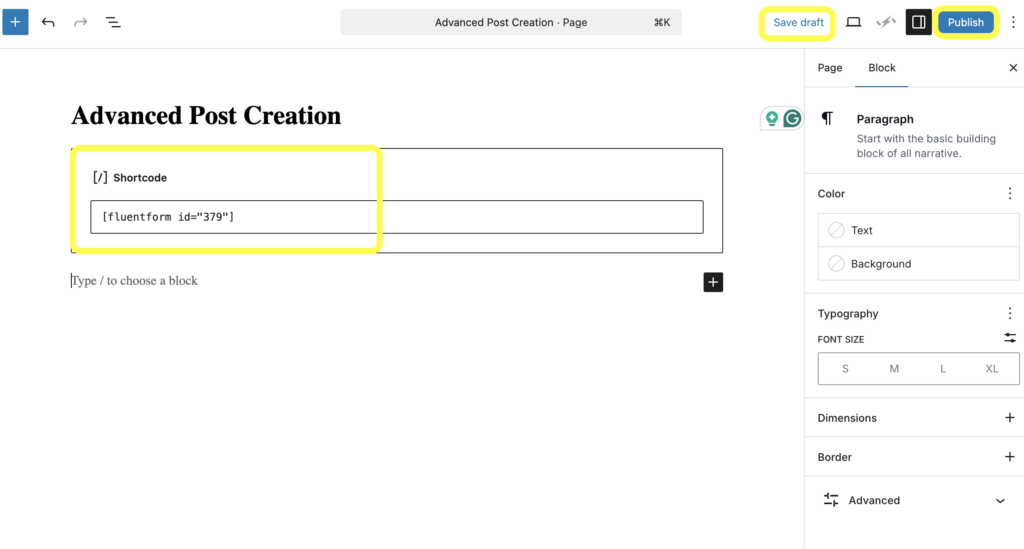
Once embedded, users can directly post the content while filling out the fields.
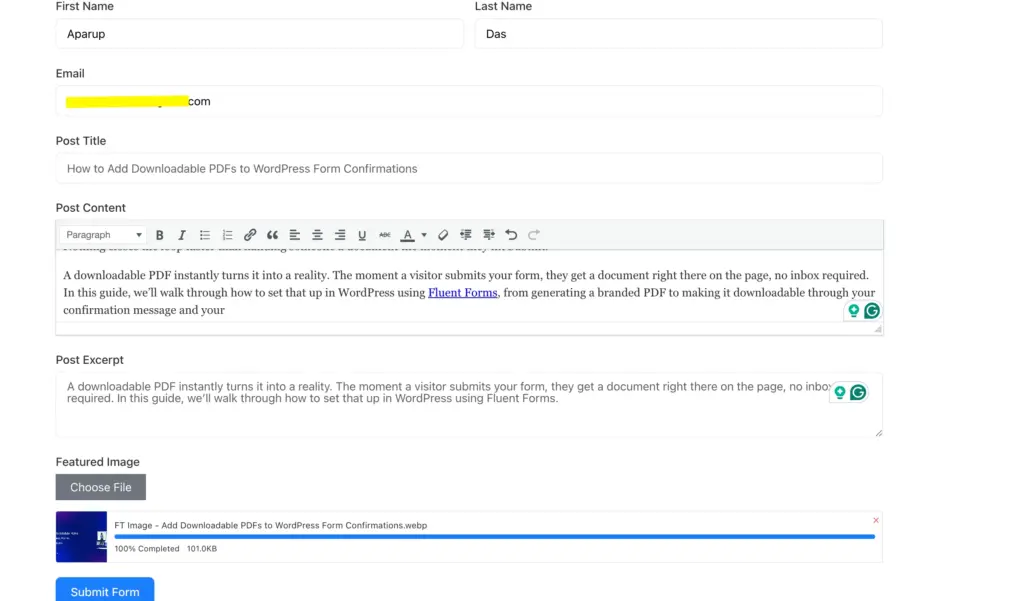
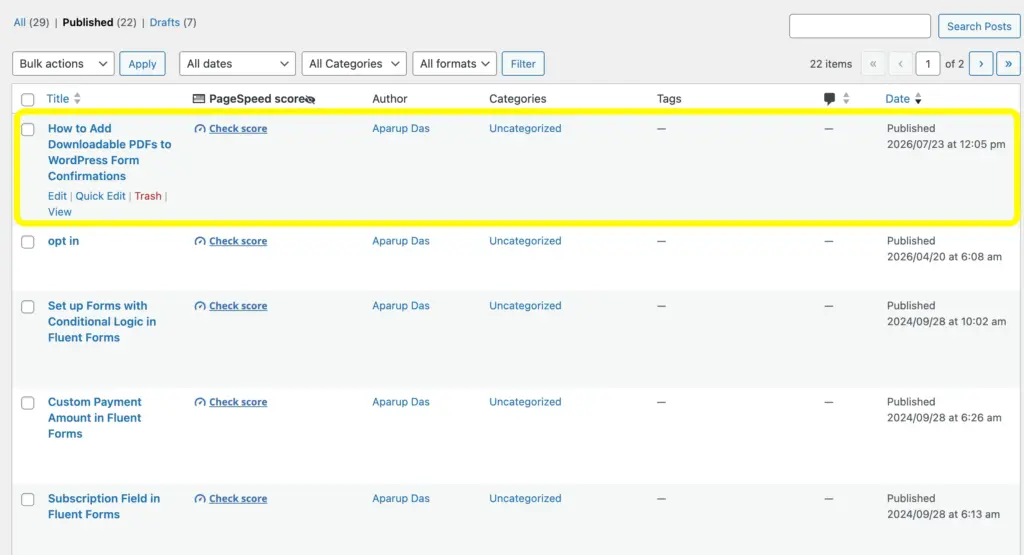
Back in your WordPress dashboard, you can see the submitted posts on Drafts or as published, depending on the preference set earlier.
Best Practices for Managing User-generated Content
A few habits will save you headaches down the road.
Default to draft status
Even when most of your contributors are people you trust, it’s worth routing every submission into draft first rather than letting it publish instantly. A quick pass before anything goes live catches typos, awkward formatting, and the occasional post that’s just off-brand for your site. That short review window costs you a few minutes and saves you from having to walk something back after it’s already public.
Keep required fields minimal
Every extra field you add is another reason for someone to abandon the form halfway through. Ask for the title, the content, and whatever else you genuinely need to publish, and leave the rest optional or off the form entirely. A shorter form almost always means a higher completion rate.
Set clear categories
Rather than letting contributors type in whatever category name comes to mind, give them a fixed list to choose from. This keeps your taxonomy tidy on the backend and means you won’t end up with five slightly different versions of the same tag scattered across your site.
Moderate featured images
Images that visitors upload are usually the first thing worth double-checking before a post goes public. A quick look at each featured image before publishing takes seconds and avoids anything low-quality or off-message ending up on your homepage.
Communicate what happens next
Contributors want to know their submission actually went somewhere. A short note on the confirmation screen, something like “we review submissions within three business days,” sets expectations up front and cuts down on the follow-up emails asking whether their post disappeared into a black hole.
Automate Your UGC Workflow
Once the form, feed, and notifications are in place, the whole process runs itself. A contributor fills out the form, Fluent Forms creates a draft post behind the scenes, your team gets pinged by email, and the contributor gets their own confirmation. Nobody needs a WordPress login, nobody’s copying and pasting from an email thread, and your editorial team can review submissions from the dashboard like any other draft.
That’s the real value of building this with Fluent Forms. You can use this form builder to collect content consistently, protecting your site’s privacy. Whether you’re running a community blog or managing content intake for a client site, advanced post creation turns what used to be manual admin work into something that just happens in the background.

Hi, this is Aparup. I am a Literature postgraduate, mixing my creative thoughts with my experience in the tech industry to surpass AI. Professionally, I am a content marketer seeking solutions to users’ problems regarding WordPress.



Leave a Reply