

How to Create Fundraising Event Registration Forms on WordPress

If you’re organizing a fundraiser for your nonprofit, school, church, or community group, you already know registration can turn into its own project. Someone emails to say they’re coming, someone else fills out a paper form at the front desk, and a volunteer is stuck reconciling it all in a spreadsheet the night before the event. Add donations or ticket payments into the mix, and tracking who’s paid what gets messy fast.
An online fundraising event registration form fixes that in one move. Attendees sign up, pay a fee or add a donation if that applies, and everything lands in one place automatically, no spreadsheet-wrangling required. With Fluent Forms, you can build that form right inside WordPress. No developer, no extra plugins, no code. Here’s what a solid fundraising registration form should include, and how to actually build one.
TL;DR
- Build your fundraising form that collects attendee information, ticket selections, donations, and payments in one place.
- Configure payment gateways, confirmation messages, and automated email notifications to streamline the registration process.
- Customize the form’s design to match your event and embed it anywhere on your WordPress site.
- Follow proven best practices to reduce registration drop-offs and improve fundraising event participation.
What Should a Fundraising Event Registration Form Include
A compact fundraising registration form balances two things: collecting enough information to run the event smoothly, and keeping the form short enough that people actually complete it.
Essential attendee information
At minimum, you’ll want a name, email address, and phone number. Depending on the event, you might also ask for a mailing address (useful for tax receipts on donations) or a company or organization name if you’re expecting corporate sponsors or teams.
Event information
If your event has multiple ticket types, sessions, or time slots, give attendees a way to choose. A dropdown or radio button field works well here, whether that’s “General Admission vs. VIP” or picking a specific seating time.
Donation section
Many fundraising events combine a registration fee with an optional donation on top. A simple field where attendees can add a custom donation amount or pick from a few suggested amounts tends to raise more than asking for a flat number alone.
Payment
If there’s a ticket price, sponsorship tier, or donation involved, you’ll need a payment field connected to a gateway like Stripe or PayPal. Fluent Forms’ payment fields support one-time payments, so attendees can pay their registration fee (and any added donation) in a single transaction.
Consent
For anything involving personal data, photos at the event, or email marketing sign-ups, include a simple consent checkbox. It’s a small addition that keeps you compliant and builds trust with attendees who care about how their information gets used.
Steps to Create a Fundraising Event Registration Form on WordPress
Here’s how to put all of this together using Fluent Forms.
Step 1: Create a new form
From your WordPress dashboard, go to Fluent Forms and click Add New Form. You can start from a blank form or pick a pre-built template. Fluent Forms includes templates built specifically for event management and for non-profit organizations, which you can use directly, accessing the customizations as well.
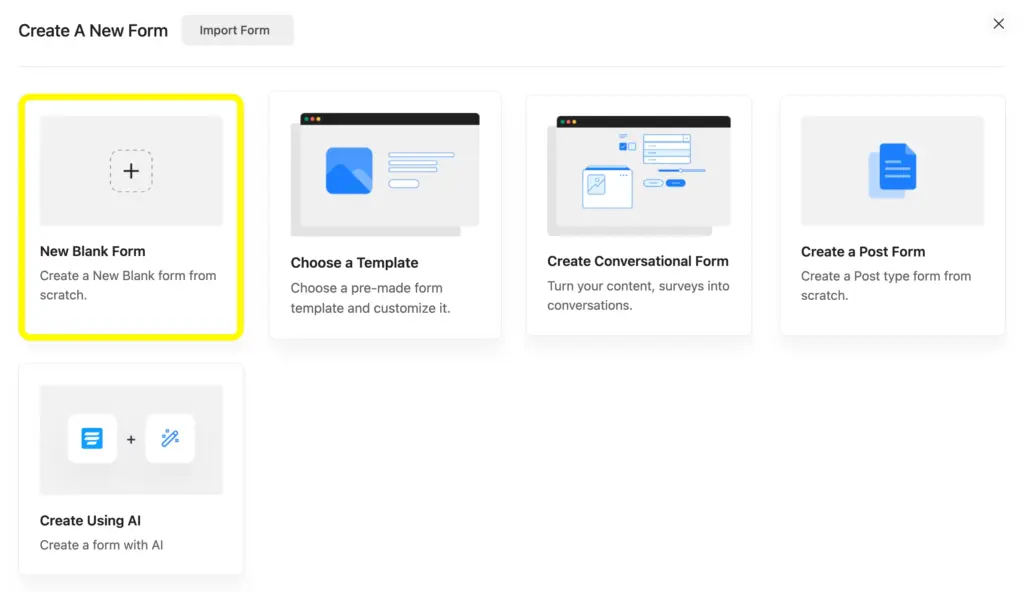
Step 2: Add registration fields
Using the drag-and-drop builder, add the required fields including name, email, phone, ticket type, and any event-specific questions. Fluent Forms offers a wide range of input fields to choose from, including dropdowns, radio buttons, and repeater fields if you need attendees to register multiple guests at once.
Keep labels specific and skip anything you don’t actually need. Every extra field is one more reason for someone to abandon the form partway through.
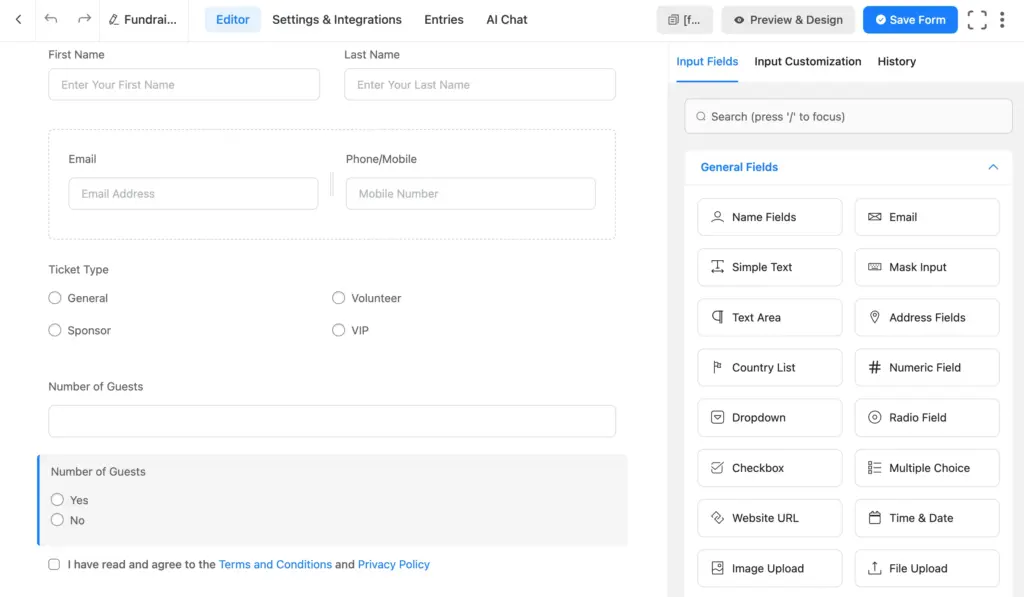
You can also use Fluent Forms repeater fields to turn your form into a multi-attendee event registration form.
Step 3: Configure payment options
If your event involves a registration fee or donation, add a payment field and connect it to your preferred gateway. You can set a fixed ticket price, let attendees pick from multiple options, or add an open donation field where they choose their own amount. Fluent Forms calculates totals automatically, so if someone registers for a ticket and adds a donation, the payment field reflects the combined amount.
Step 4: Configure confirmation messages
Once someone submits the form, they should see an immediate confirmation; without it, people are often left wondering if their registration actually went through. Under Confirmation Settings, write a thank-you message confirming their spot and, if applicable, their payment. You can also check our tutorial on showing a confirmation message in WordPress forms, which covers the setup in detail.
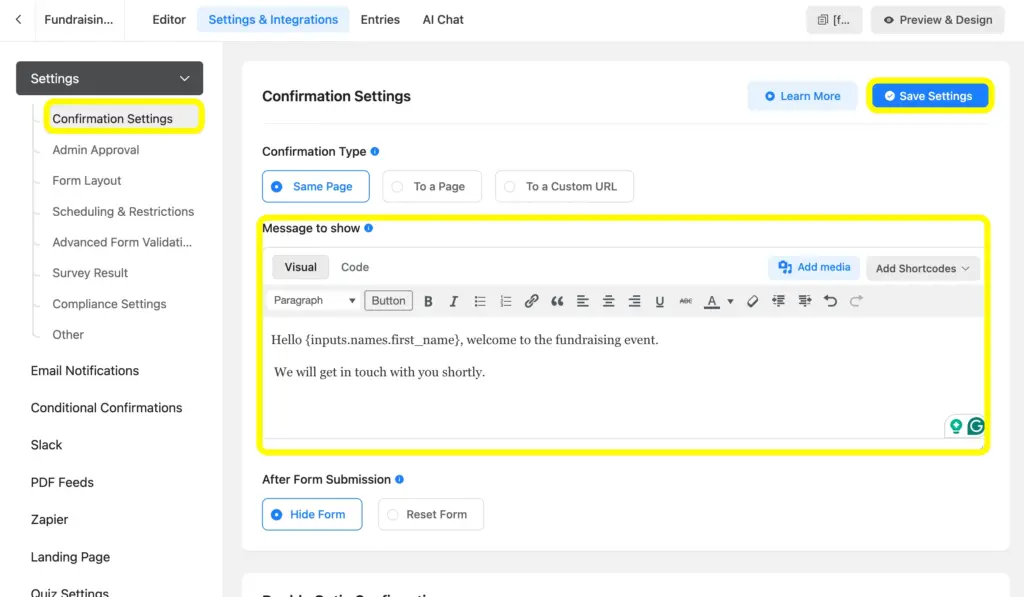
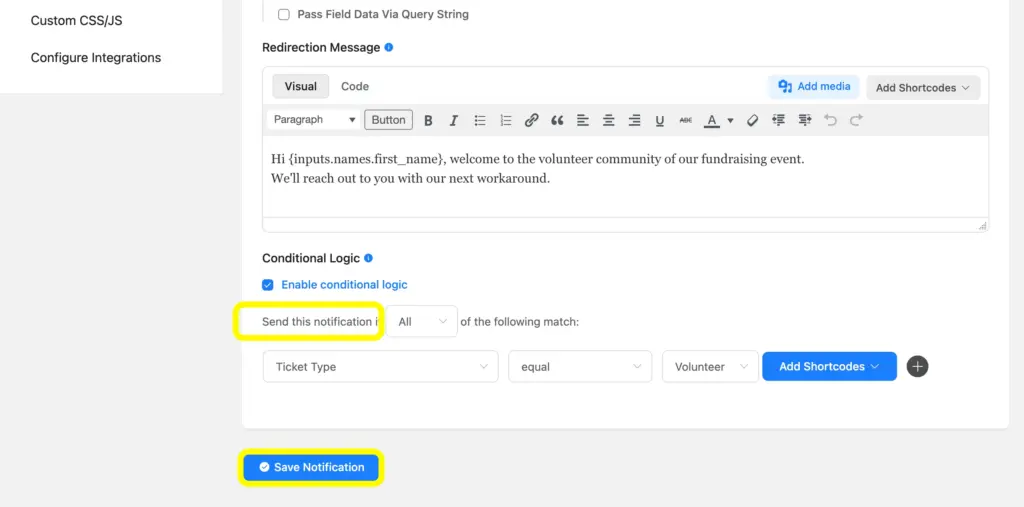
If you’re running multiple ticket types or a mix of paid and free registrations, you can also set up conditional confirmation messages. Hence, each attendee sees a message relevant to what they actually signed up for.
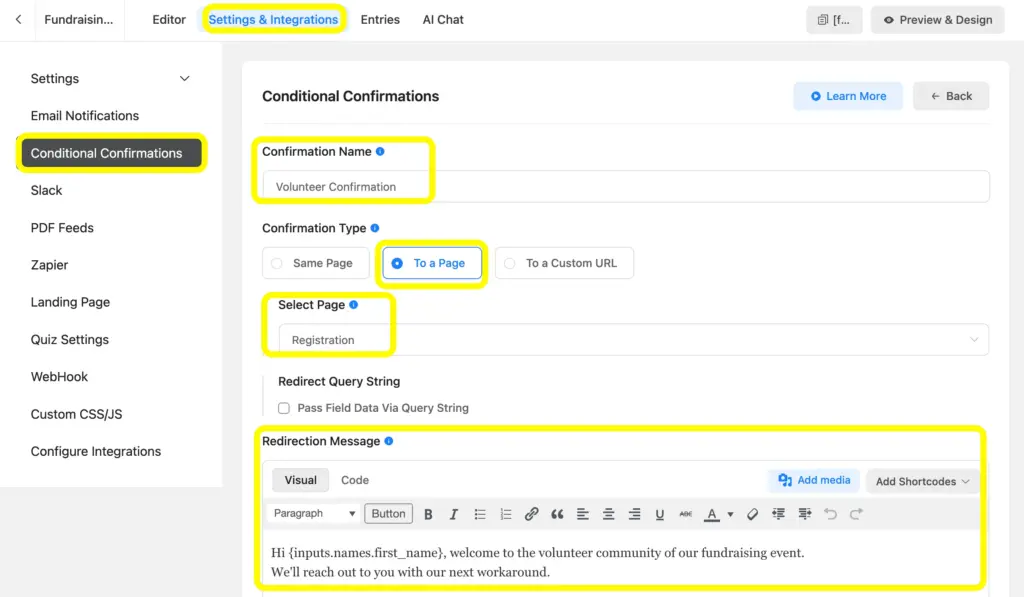
Set the conditional logic as per your preference and Save Notifications once you’ve positioned your preference.
Step 5: Set up email notifications
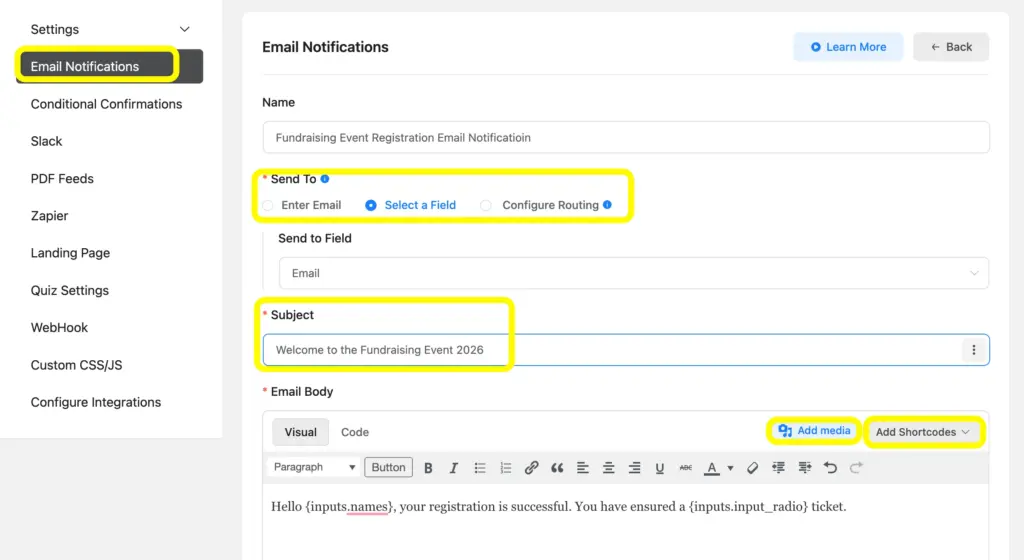
A confirmation on-screen is helpful, but an email gives attendees something to refer back to later, especially useful for event details, directions, or a receipt. Set up your notification under Email Notifications, and check out this guide on sending confirmation emails for the full walkthrough. You can also configure a separate notification to alert your team whenever a new registration or donation comes in, which is covered in this guide on sending email notifications to your WordPress users.
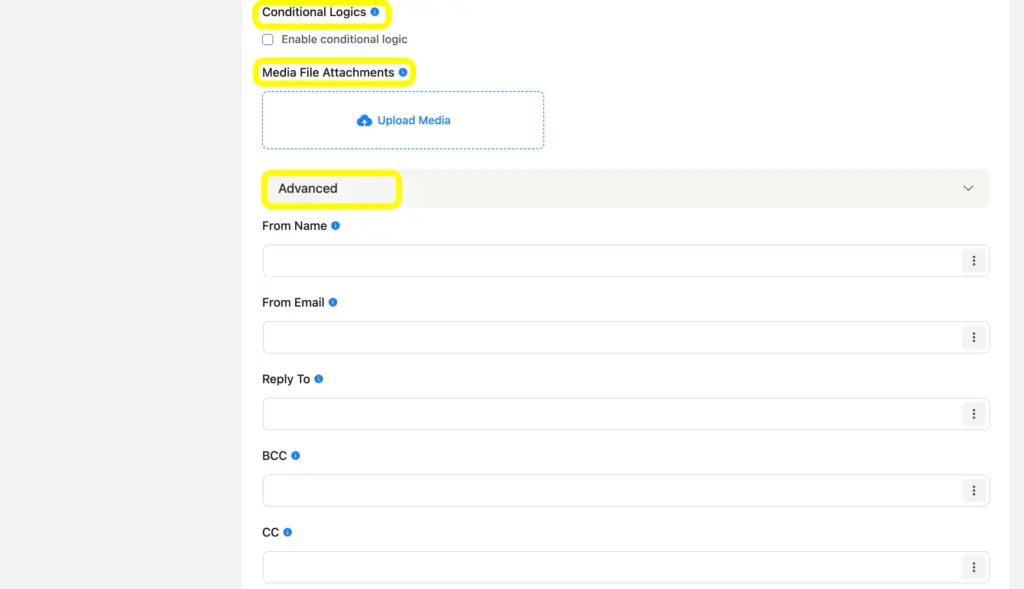
You can also apply conditional logic here and attach files. There are Advanced options too, which you can use to add Form Name, Form Email, CC, BCC, etc.
Step 6: Style your form
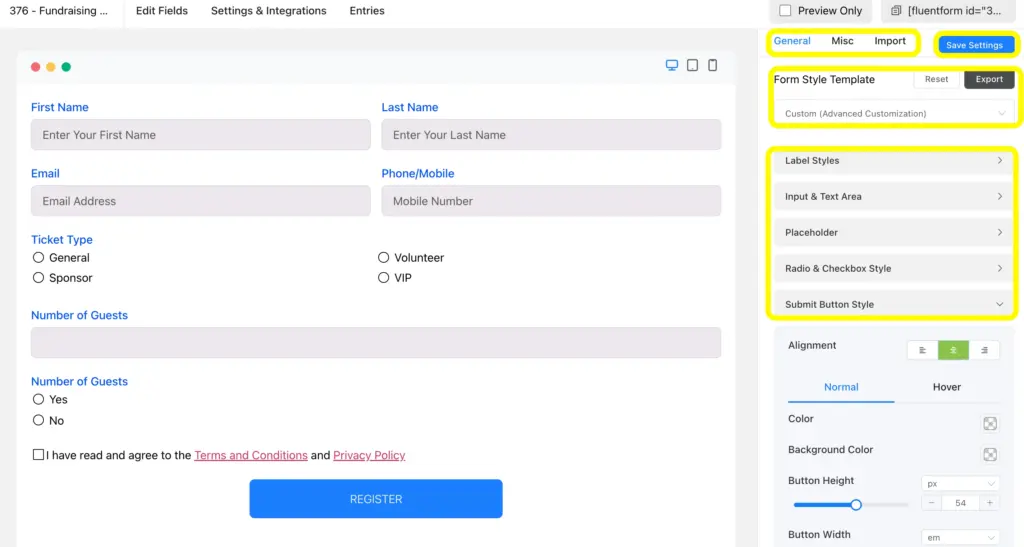
Match the form style to your event’s branding; colors, fonts, and layout can all be adjusted without touching CSS. A form that looks consistent with the rest of your site feels more trustworthy, which matters when you’re asking people to hand over payment information.
Step 7: Embed the form
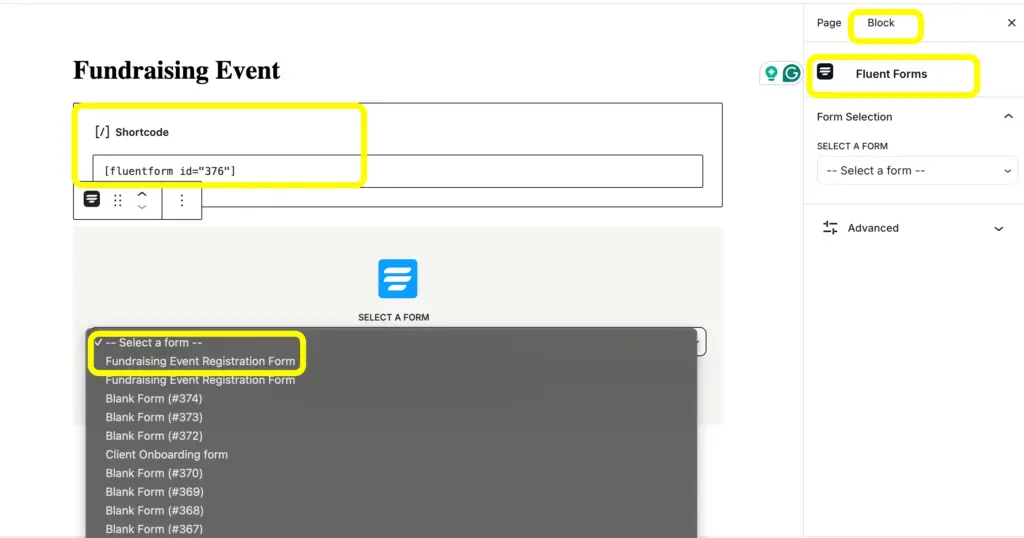
Once everything’s set up and tested, embed the form on your event page using the Fluent Forms block or shortcode. Test it yourself first, submit a sample registration and confirm the payment, confirmation message, and notification emails all work as expected before sending the link out to supporters.
Best Practices for Higher Event Registration Rates
A few small adjustments tend to make a noticeable difference in how many people actually finish registering:
- Keep the form short. Only ask for what you genuinely need to run the event.
- List ticket prices and any fees clearly before the payment step, not as a surprise at checkout.
- Suggest donation amounts, as it’s better than a blank field with no guidance.
- Send a confirmation right away. People want to know their registration and payment went through immediately, not minutes later.
- A large share of registrations happen from a phone, so check that your form looks and works well on a small screen before launch.
Get More Out of Your Fundraising Events
A well-built registration form takes one of the more tedious parts of running a fundraising event, chasing down attendee details, tracking payments, sending confirmations, and puts it on autopilot. Once it’s live, you can spend your time on the event itself instead of managing a spreadsheet of sign-ups. Check out the full range of Fluent Forms features to see what else you can build alongside your registration form.
Ready to simplify your next fundraising event? Get Fluent Forms Pro and start building your registration form today.
Enjoying this article?
We regularly publish actionable content on our blog. Subscribe to get them delivered straight to your inbox.
We won’t spam you. You can unsubscribe whenever you want.

Hi, this is Aparup. I am a Literature postgraduate, mixing my creative thoughts with my experience in the tech industry to surpass AI. Professionally, I am a content marketer seeking solutions to users’ problems regarding WordPress.



Leave a Reply