

How to Create a Parental Consent Form on WordPress
If your school, camp, or activity program still relies on printed permission slips, you are going to experience a few problems: slips going missing in backpacks and signatures being hard to read.
A parental consent form built directly into your WordPress site solves the problem of missing information. Parents fill it out online, sign it digitally, and their submission lands in one organized place you can review anytime. This tutorial is a simpler guide to creating a complete parental consent form using Fluent Forms and its Signature add-on, from adding the first field to publishing the form on your site.
TL;DR
- A digital parental consent form replaces paperwork regarding consents with an online submission you can track easily.
- Fluent Forms lets you collect the child’s and parent’s details, along with a checked terms-and-conditions box and a digital signature, all in a single virtual form.
- The Signature add-on Pro captures a legally recognizable electronic signature directly on the form.
- You can mark required fields, set up confirmation messages, and get notified by email the moment a form is submitted.
- Once structured, the consent form is reusable for field trips, camps, sports programs, extracurricular activities, and photo or video release scenarios.
Practical Use Cases for Guardian Consent Forms
A structured parental consent form can be reused many times by making subtle changes to it. You can use it for different purposes that are centred on the parents:
School field trip permission
Parents confirm a child can leave campus for an off-site trip and provide emergency contact details.
Extracurricular activities
Clubs, tutoring programs, and after-school activities often need signed permission before a student can join.
Summer camps
Camps typically need consent for participation along with health notes, allergy information, or emergency contacts.
Sports programs
Coaches and athletic departments need permission on file before a minor can participate in practices or games.
Photography and video permission
Schools and organizations use release forms before publishing a child’s photo or video on a website or in marketing materials.
School events
Dances, assemblies, and other events sometimes require signed acknowledgement of event rules or liability terms.
Building a flexible form template means you can duplicate and adjust it for each of these situations instead of starting from scratch every time.
What a parental permission form should include
Before building the form, it helps to know what a complete parental consent form actually needs to collect. Most forms are built around five core sections.
Child’s information
This covers the basics: the child’s full name, date of birth, grade or class, and any relevant medical or allergy notes depending on the activity.
Parent’s information
The parent or legal guardian’s name, phone number, email address, and relationship to the child should always be collected so you know exactly who granted permission.
Terms and conditions
This is where the actual consent language lives. It should state clearly what the parent is agreeing to, whether that’s participation in an activity, a liability waiver, or permission to use photos and video.
Digital signature
A signature field confirms the parent has read and agreed to the terms. This is the part that turns a simple form into a legally documented consent record.
Supporting information
Depending on the use case, you might also collect emergency contacts, medical conditions, dietary restrictions, or a file upload for supporting documents like a medical form.
Fluent Forms comes with 65+ input fields covering all of these categories, so you do not need custom code to build any of this.
Steps to create a parental consent form in WordPress
Here’s how to put all of this together inside Fluent Forms Pro.
Step 1: Add a new form
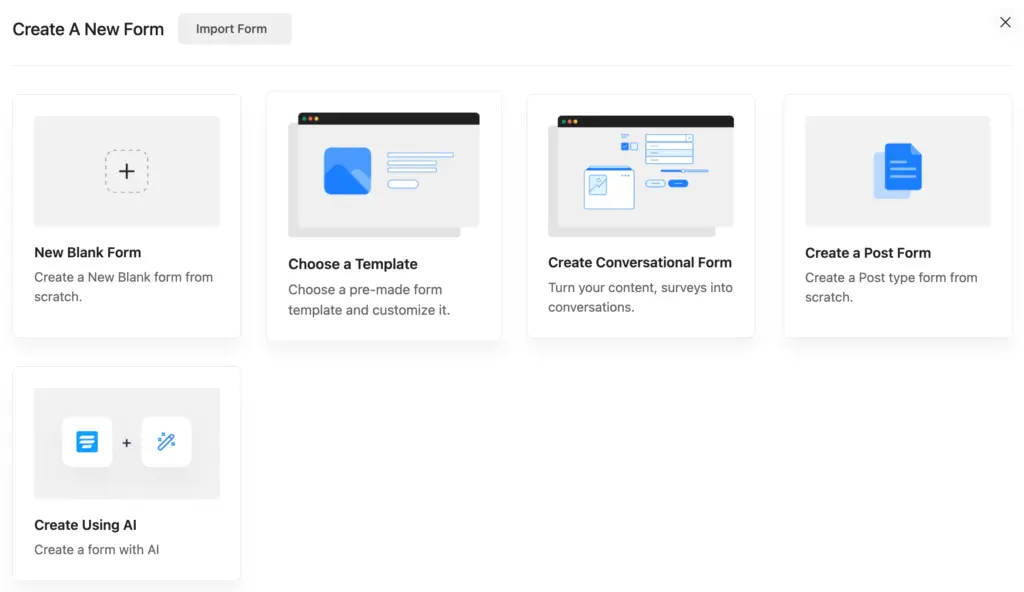
From your WordPress dashboard, go to Fluent Forms and click Add New Form. You can choose a parental consent form template to use as a starting point, then adjust the fields to match your use case.
Step 2: Add and customize child’s and parent’s information fields
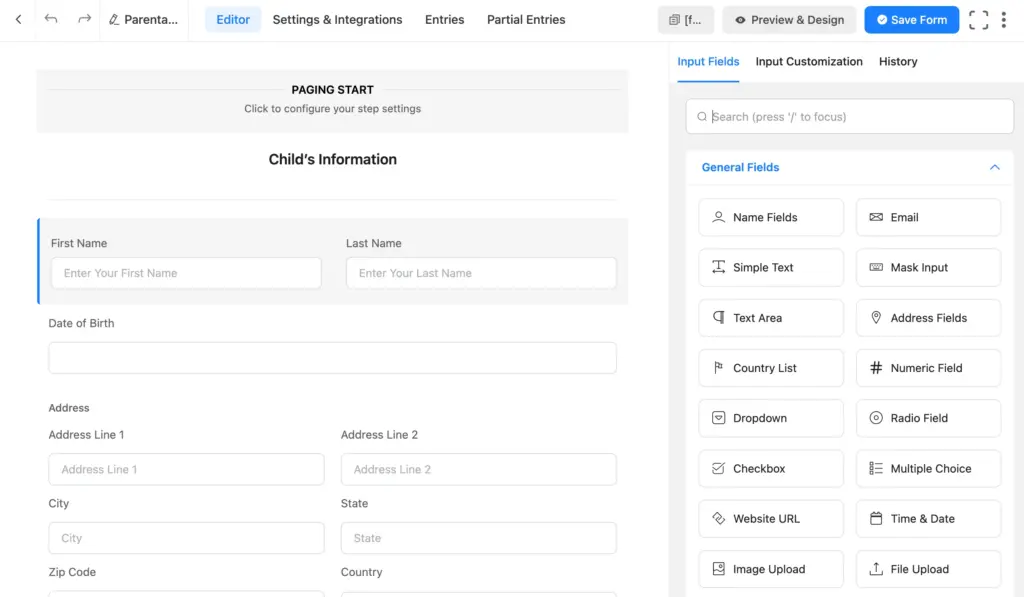
Drag Name Fields, Address Fields, Email, Phone/Mobile, and Simple Text fields onto the form to collect the child’s details and any relevant information for the parent or guardian. You can add a Section Break field for clear segmentation, and a Form Step field to make the form more user-friendly.
Step 3: Add consent terms
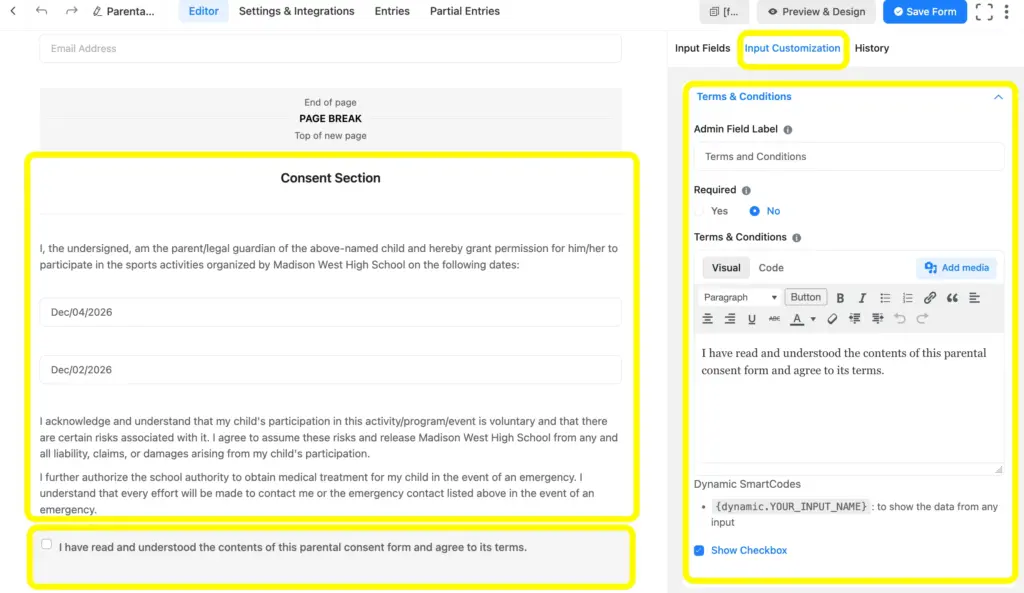
Add a Terms & Conditions field from the Advanced Fields section and paste in your consent language. This field displays your terms and requires the parent to check a box confirming they’ve read and accepted them before submitting the form. Before that, make sure you’ve clearly stated all the terms and conditions above the relevant field.
Step 4: Add a digital signature field
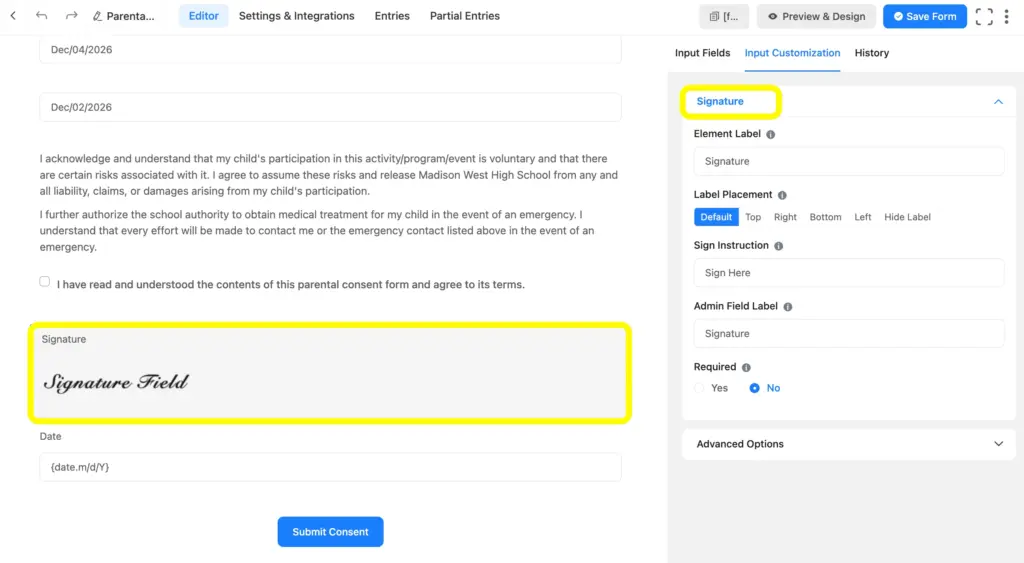
Install the Fluent Forms Signature add-on Pro along with Fluent Forms Pro, then open the Advanced Fields section of the form editor and drag the Signature field onto the form.
Parents can sign using a mouse, touchpad, or touchscreen, and Fluent Forms converts the signature into an image that’s stored with the rest of the submission. Read our full guide for creating a digital signature with Fluent Forms.
Step 5: Choose and configure required fields
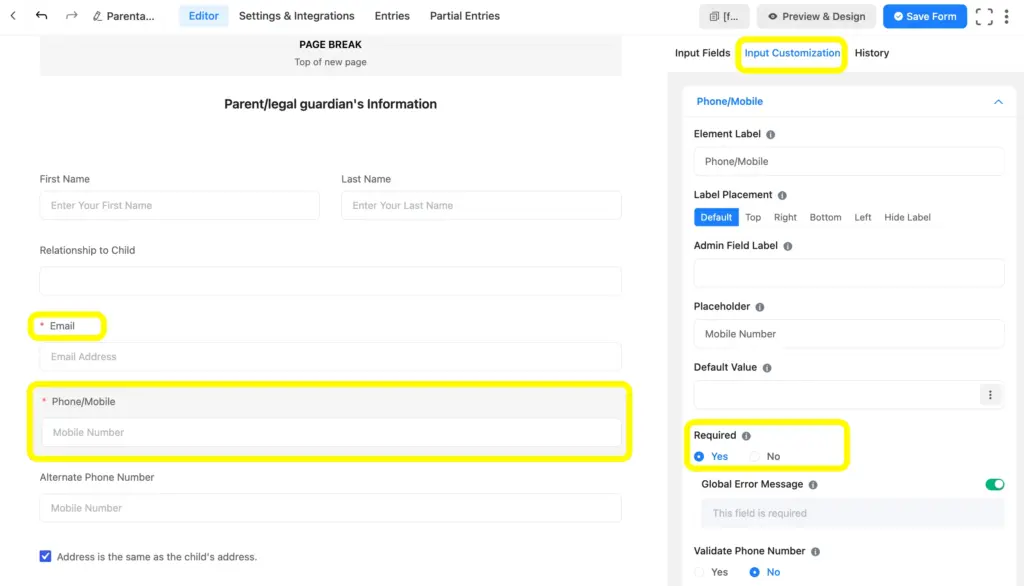
Click on each field that must be filled out, such as the email, phone number, signature, etc., and toggle on the Required option in the Input Customization of each field. This prevents parents from submitting the form with missing information.
Step 6: Configure confirmation and notification
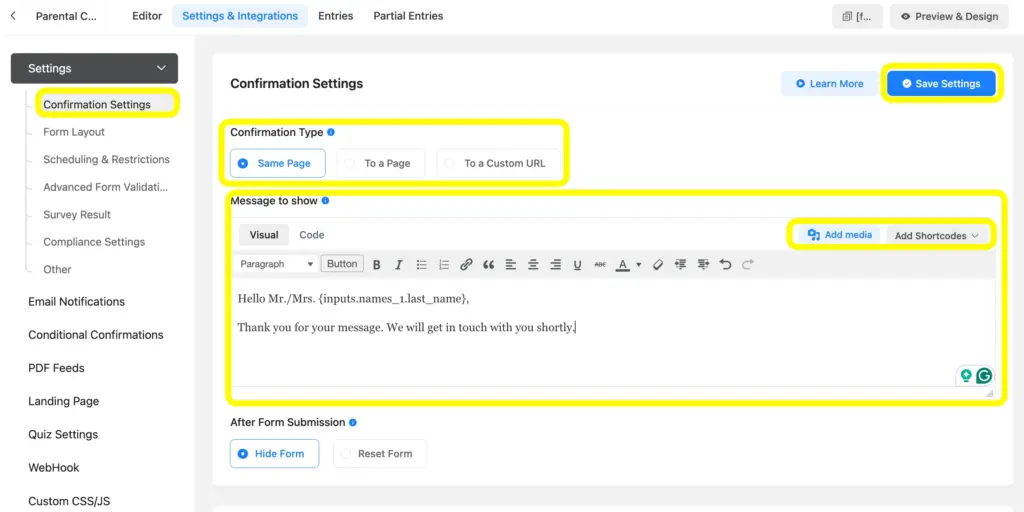
In the form’s Settings & Integrations tab, set up a confirmation message that lets parents know their consent was received. You can use the Add Media and Add Shortcodes to make the confirmation more tailored.
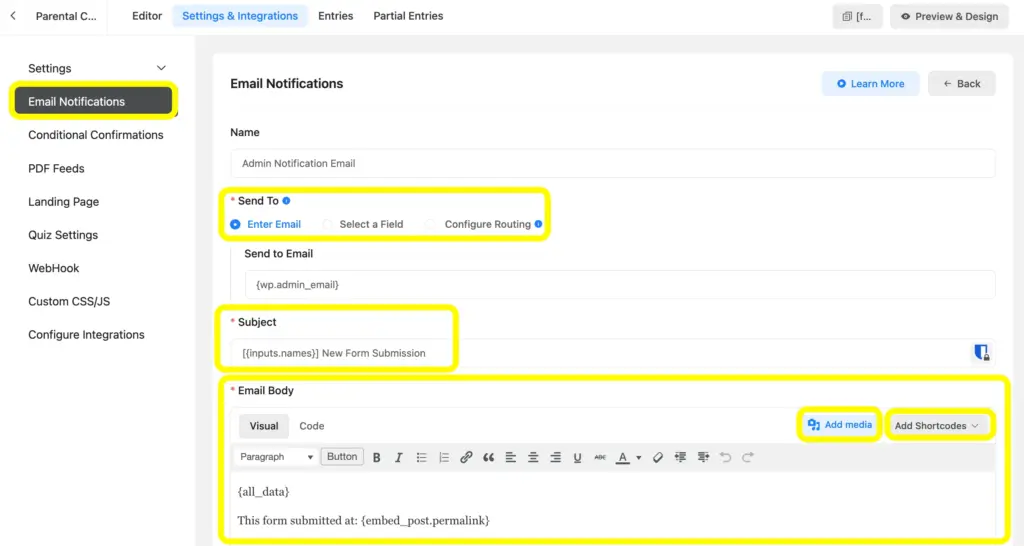
Go to the Email Notifications to configure an alert to set notifications whenever a new consent form comes in, so you never have to log in and check manually. You can configure the email notifications depending on whom you want to get notified.
For a full walkthrough of setting this up, read this full guide on form submission notification.
Step 7: Preview and style the form
Click the Preview & Design button on the top-right side of the editor page to check how the form looks and behaves from a parent’s point of view, including the signature pad and terms checkbox.
Use Fluent Forms’ Advanced Form Styler to adjust colors, spacing, and layout so the form matches the rest of your site.
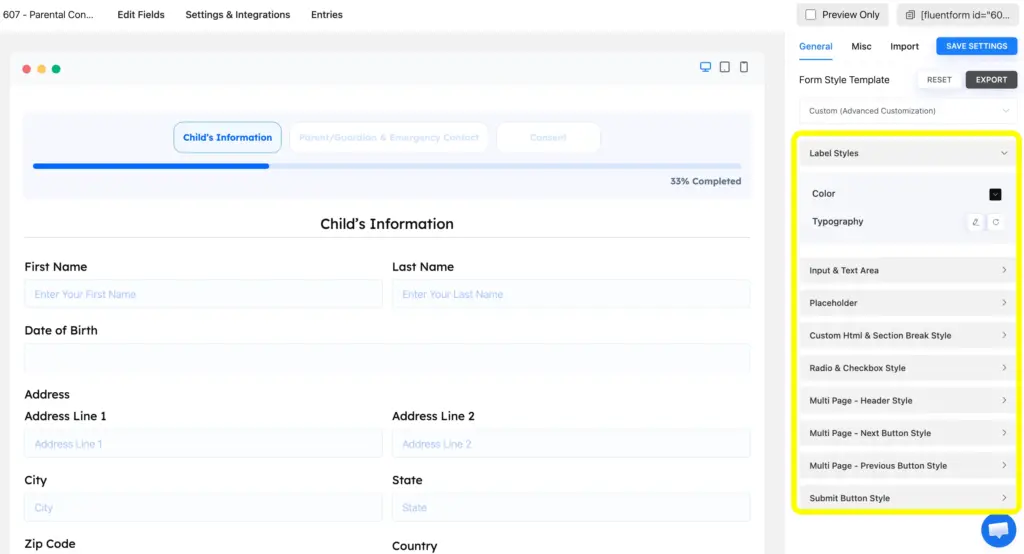
Step 8: Embed the form to your WordPress site
Embed the form on your WordPress website once the form is built, configured, and styled. You can embed the form by copying the form’s Shortcode from the top right side of your form, or adding it directly using the Fluent Forms block in the WordPress block editor.
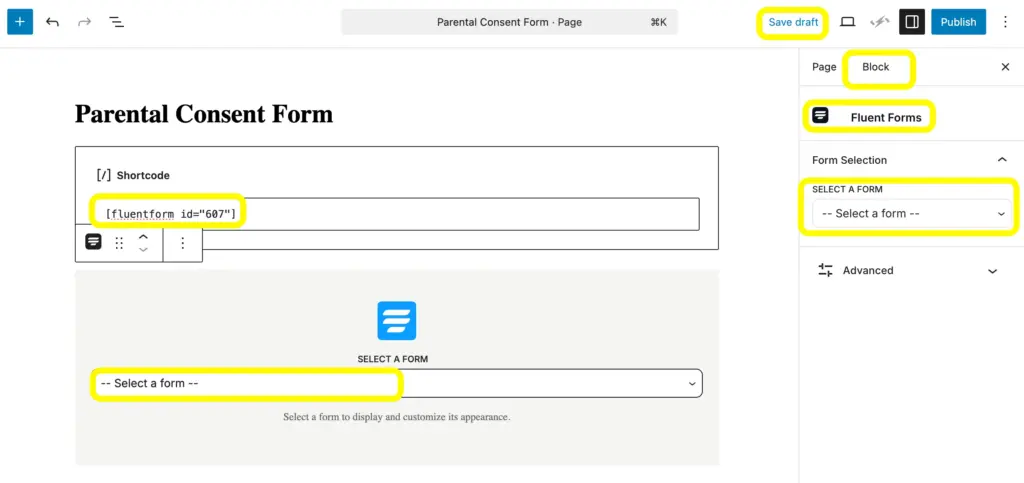
To create a separate Parental Consent Form displayed on a landing page on your site, use the Fluent Forms’ landing page module and publish the form with a separate entity on a new page of your website.
To make it a landing page form, go to Settings & Integrations and enable the Landing Page Mode. You can easily customize the form according to your brand’s unique style there.
Take Control of Your Agreement Process with Fluent Forms
Once the parental consent form is built, test the form’s preview and settings, and embed it on your WordPress site. You can duplicate the form for a variety of purposes, including field trip permission, summer camp permission, and other similar ones, while customizing it a little. You can also import and export forms for different sites. Fluent Forms’ use doesn’t end in building forms; it also helps you ease your entire workflow and reduces manual work. Get Fluent Forms Pro and start building forms for quizzing, surveys, agreements, appointments, and other purposes.
FAQs
1. Can I create different parental consent forms for different activities?
Yes. You can create separate forms for different activities, such as field trips, sports programs, camps, or extracurricular activities. Each form can have its own fields, consent terms, notifications, and confirmation messages.
2. Can I reuse a parental consent form for another activity?
Yes. You can duplicate an existing form and modify the fields, consent terms, dates, and other details for a new activity. This can save time when your organization regularly collects similar types of consent.
3. Can I use conditional logic in a parent’s permission form?
Yes. Conditional logic can show or hide fields based on a parent’s previous selections. For example, you could display additional questions only when a parent selects a particular activity or program.
4. Can parents complete the same consent form for multiple children?
Yes, you can design the form to accommodate multiple children. For example, you can use a repeater field so a parent can enter information for more than one child without submitting separate forms.
5. Can I allow parents to save a partially completed consent form?
Yes. A save and resume feature can be useful when the form contains several sections or requires information that parents may not have immediately available. Parents can return later to complete their submission.
6. Can I create a separate confirmation message for different activities?
Yes. Conditional confirmation messages can display different responses based on information submitted through the form. For example, parents selecting different programs can receive activity-specific instructions after submission.
7. Can I send a copy of the submitted consent information to the guardian?
Yes. You can configure an email notification that sends a copy or summary of the submitted information to the email address provided by the parent or guardian. This can give them a record of their submission.
8. Can I generate a PDF from a submitted guardian consent form?
Yes. Using the Fluent Forms PDF Generator, you can generate a PDF containing the submitted form information. This can be useful when an organization needs a downloadable or printable record of a completed submission.

Hi, this is Aparup. I am a Literature postgraduate, mixing my creative thoughts with my experience in the tech industry to surpass AI. Professionally, I am a content marketer seeking solutions to users’ problems regarding WordPress.



Leave a Reply