

How to Create an Appointment Booking System for Your Law Firm with Fluent Forms and FluentBooking
Someone looking for a lawyer usually wants two answers from your website: do you handle my kind of case, and when can I talk to someone?
You can answer both on one page with Fluent Forms and FluentBooking. I’ll show you how to build a booking form that asks the right intake questions for each practice area, then books the consultation on the matching attorney’s calendar.
TL;DR
- One form handles intake and booking: the client picks a practice area, answers a few questions about their matter, and books a consultation slot.
- A FluentBooking field per practice area, shown with Conditional Logic, sends each booking to the right attorney’s calendar.
- The Fluent Forms and FluentBooking integration is free, and FluentBooking’s free plugin covers one-on-one consultations, availability, buffers, and email reminders.
- An “other parties involved” field gives your firm the information needed to run a conflict check before the meeting.
- A Terms & Conditions checkbox makes clear that booking doesn’t create an attorney-client relationship.
- Paid consultations run on free Fluent Forms payment fields with Stripe. Video meeting links, calendar sync, and SMS reminders need FluentBooking Pro, and the Phone field and routed team emails need Fluent Forms Pro.
- FluentCRM can tag each new contact by practice area and follow up after a consultation is cancelled or completed.
Why Your Law Firm Needs an Online Booking System
Most firms still book consultations the slow way. A visitor fills out a contact form or leaves a voicemail, someone calls back to find out what the case is about, and then the two of them trade times until one works for the right attorney.
An online booking system cuts out those steps:
- Clients book when they’re ready. A visitor who finds your site at 9 p.m. can book right away instead of waiting for your office to open.
- You know the matter before the meeting. The attorney walks in knowing the practice area, the type of case, and any deadlines.
- The right attorney gets the booking. A custody question lands with your family lawyer, not on a general calendar for someone to reassign.
- You can screen for conflicts early. Collecting the names of other parties lets your staff check them before anyone shares details of the case.
- Clients get reminders. Automatic confirmation and reminder emails mean fewer people forget the appointment.
How the Booking System Works
The whole system runs on one form. Fluent Forms handles the intake questions and the logic, and FluentBooking handles calendars, time slots, and booking emails. The two connect through the FluentBooking field, a native integration that shows open time slots inside the form.
From the client’s side, it works like this:
- They enter their name, email, and phone number.
- They choose a practice area, such as Family Law or Criminal Defense.
- The form shows only the questions for that practice area.
- They list any other parties involved and briefly describe their situation.
- They pick a time from that practice area’s calendar.
- They accept the disclaimer and submit.
On submit, FluentBooking creates the booking on the attorney’s calendar and sends the confirmation emails. Fluent Forms saves the full intake as an entry and sends your team a notification. You can see the form answers on the booking details page in FluentBooking and in the entry in Fluent Forms.
What You Need Before You Start
You need two plugins and a short list of decisions.
- Fluent Forms: The free plugin covers everything in the main build except the Phone field and routed team notifications, which need Fluent Forms Pro. Check the full breakdown.
- FluentBooking: A separate booking plugin from the same team (WPManageNinja) with its own free plugin and paid Pro plan. The free plugin includes unlimited calendars and hosts, one-on-one events, availability, buffer times, and email confirmations and reminders. Zoom, Google Meet, and Microsoft Teams links, Google or Outlook calendar sync, payments, SMS reminders, and round-robin scheduling require FluentBooking Pro.
- Your practice areas and who handles each one. Write down every practice area you want on the form and the attorney who takes its first consultations.
The connection between the two plugins is free. Once FluentBooking is active, the FluentBooking field appears in the Fluent Forms editor automatically, with no module to switch on.
Plan Your Practice Areas and Calendars
The simplest setup is one FluentBooking calendar per practice area, hosted by the attorney who takes those consultations. Add one more general calendar for clients who aren’t sure which practice area fits, and have your intake attorney or office manager host it.
Here’s an example plan. Adjust the lengths and questions to how your firm actually runs first meetings.
| Practice area | Calendar host | Consult length | Questions to ask on the form |
| Family Law | Family law attorney | 45 minutes | Type of matter, children under 18 involved |
| Commercial / Business Law | Business attorney | 30 minutes | Business name, your role, type of matter |
| Intellectual Property | IP attorney | 30 minutes | Type of IP, application already filed, application number |
| Criminal Defense | Criminal defense attorney | 30 minutes | Booking for self or someone else, charge category, in custody |
| Not sure / Something else | Intake attorney or office manager | 20 minutes | Brief description only |
If one attorney covers two practice areas, give them a separate calendar for each anyway. That keeps consultation lengths, availability, and reminder wording specific to each type of case.
Set Up Your Consultation Calendars in FluentBooking
Build the calendars first, since the form’s booking fields need a calendar to map to. Install FluentBooking from Plugins → Add New Plugin, activate it, and then set up each calendar from your plan.
Create a calendar and event for each practice area
- In your WordPress dashboard, go to FluentBooking → Calendars.
- Create a calendar for the attorney who takes family law consultations. FluentBooking calls the person behind a calendar its host.
- Click New Event Type and choose One-to-One.
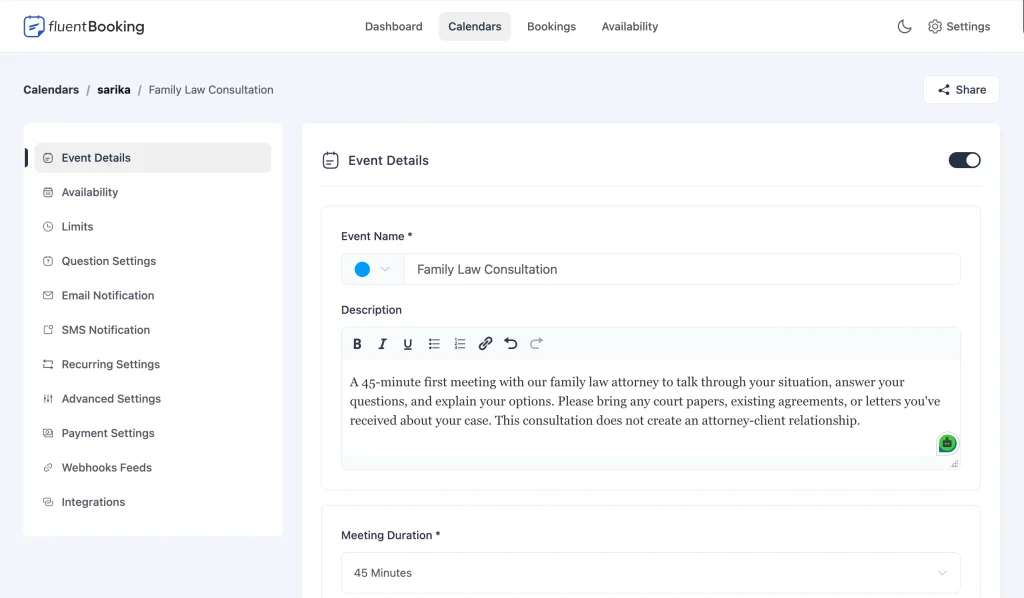
- Enter an Event Name such as “Family Law Consultation.” This name shows to clients when they book.
- Add a short Description, such as what the meeting covers and what to bring.
- Set the Meeting Duration, for example, 45 minutes.
- Choose a Location. An in-person meeting at your office or a phone call works on the free plugin. To add more than one option, click + Add another location option.
- Click Continue to open the event’s settings.
Repeat these steps for Commercial / Business Law, Intellectual Property, Criminal Defense, and your general consultation calendar.
Set availability and booking limits
Open each event’s Availability tab and set the days and hours that attorney takes consultations. Use date overrides for court days, holidays, or time off. FluentBooking converts time zones automatically, so a client in another state sees slots in their own local time.
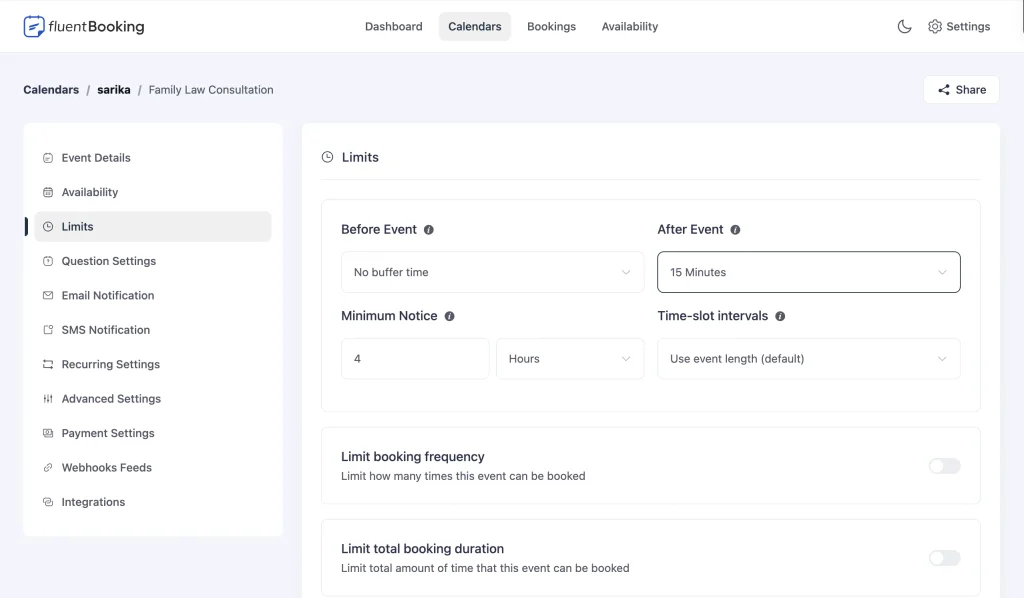
Then go to FluentBooking → Calendars → select the calendar → Edit → Limits. The settings that matter most for a law firm:
- Buffer Time: adds a gap before or after each consultation, so the attorney has time to write notes or prepare.
- Minimum Notice: stops last-minute bookings. A day’s notice suits most practice areas, while criminal defense usually needs a much shorter window, since clients often need help the same day.
- Booking Frequency Limits: caps how many consultations an event takes per day, week, or month, so first meetings don’t take over an attorney’s billable time.
Turn on email reminders
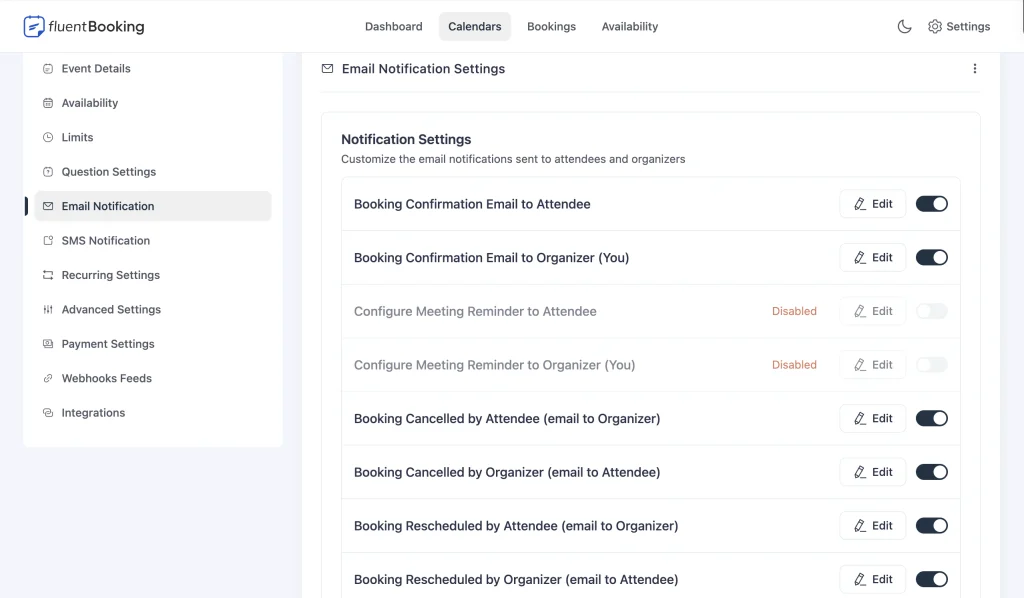
Open the event’s Email Notification tab. FluentBooking sends booking confirmations to the client and the attorney, plus cancellation and rescheduling notices. Add one or more reminders, such as one a day before and one an hour before the consultation.
Edit the reminder text so it sounds like your firm. Mention the office address or the phone number you’ll call from, and what the client should bring, such as court papers or a business contract.
With the calendars ready, you can build the form that feeds them.
How to Build the Law Firm Booking Form
Each step below adds one part of the form, in the order a client will see it. The FluentBooking fields come after the intake questions, so clients answer everything first and pick a time last.
Step 1: Create a new form
Go to Fluent Forms → New Form and choose Create a Blank Form. Give it a recognizable name, like “Consultation Booking.”
Step 2: Add contact fields
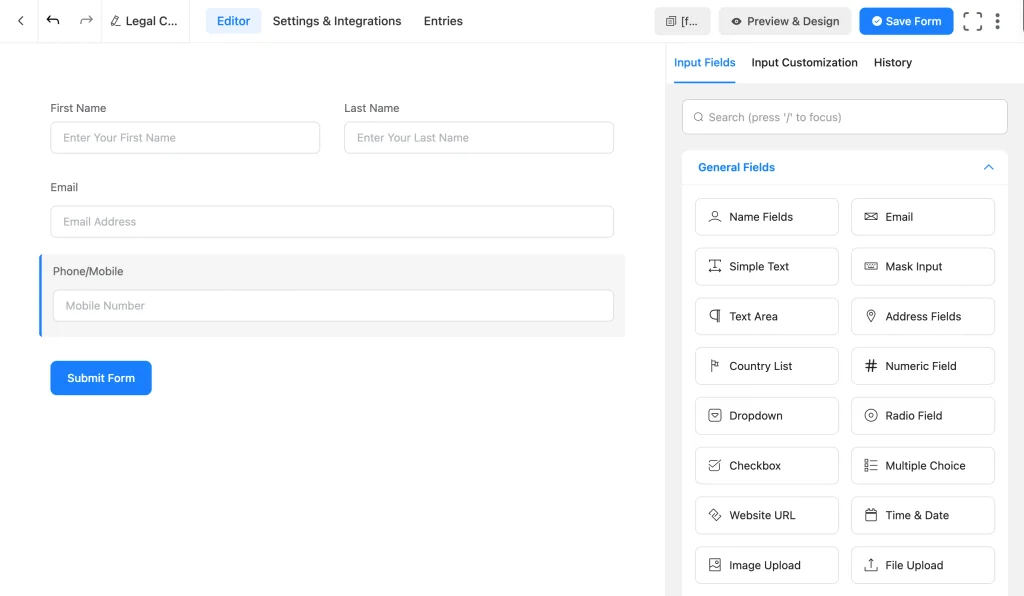
Start with the details your staff need to reach the client:
- Name: first and last name. Mark it required, because the booking fields use it to name the booking.
- Email: required for the same reason. FluentBooking sends the confirmation and reminders here.
- Phone/Mobile: useful for phone consultations and urgent callbacks. This field requires Fluent Forms Pro; on the free plugin, a Simple Text field labeled “Phone number” does the job without number formatting.
The Name and Email fields need to be on this form before you add the booking fields in step 6, since each booking field maps to them.
Step 3: Add the practice area field
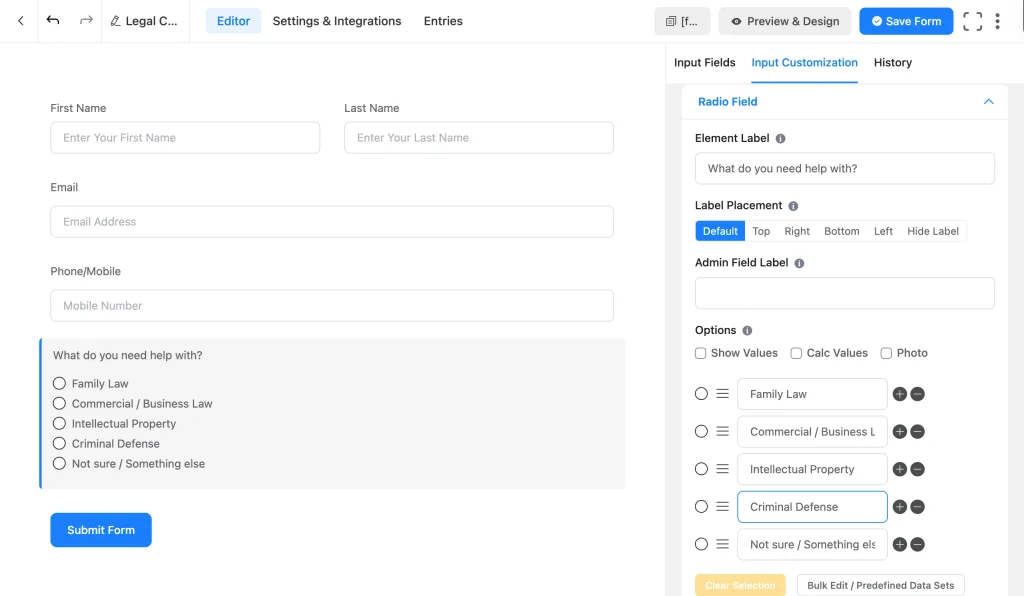
Add a Radio field labeled “What do you need help with?” with these options:
- Family Law
- Commercial / Business Law
- Intellectual Property
- Criminal Defense
- Not sure / Something else
Mark it required. Radio works better than Dropdown here because clients see every practice area at once. Without a “Not sure” option, people pick the closest match and can land on the wrong attorney’s calendar. Every question and booking field from here on depends on this answer.
Step 4: Add questions for each practice area
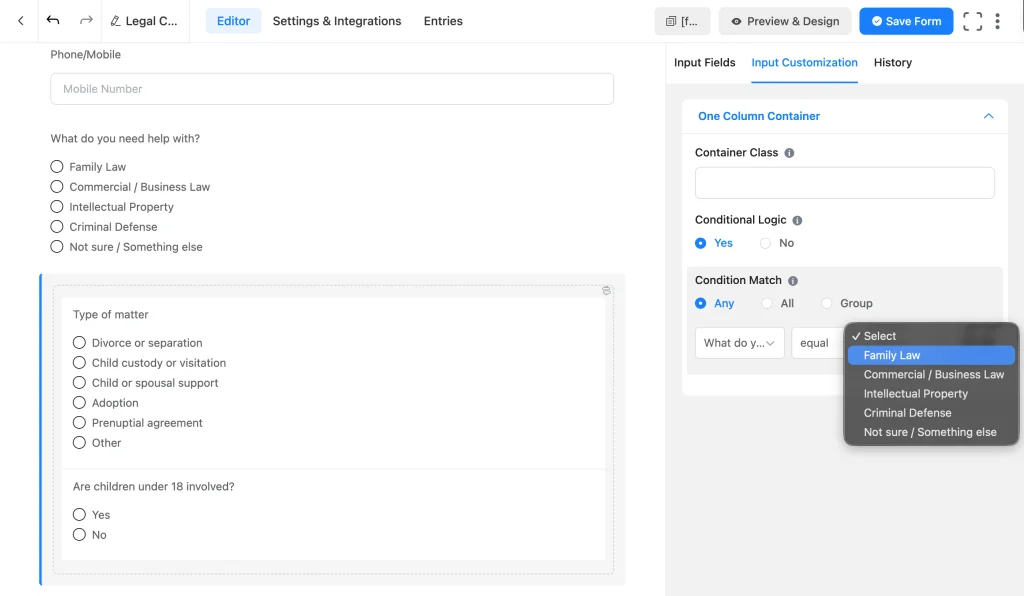
Each practice area gets its own set of questions, grouped in a container that only appears when the client picks that area. One Conditional Logic rule on the container shows or hides every question inside it, so you don’t have to repeat the same rule on each field.
- Drag a One Column Container below the practice area field.
- Add the Family Law questions (listed below) inside the container.
- Click the container to open its settings, turn on Conditional Logic, and set the rule to show it when “What do you need help with?” equals Family Law.
- Repeat with a new container for Commercial / Business Law, Intellectual Property, and Criminal Defense.
If a practice area only needs one question, skip the container and put the Conditional Logic rule on that field.
Here’s a starting set of questions for each area. Keep it short; the consultation is where the details come out.
Family Law
- Type of matter (Radio): Divorce or separation, Child custody or visitation, Child or spousal support, Adoption, Prenuptial agreement, Other.
- Are children under 18 involved? (Radio): Yes, No.
Commercial / Business Law
- Business name (Simple Text).
- Your role (Radio): Owner or partner, Executive, In-house counsel, Other.
- Type of matter (Radio): Business formation, Contract drafting or review, Dispute or litigation, Buying or selling a business, Other.
Intellectual Property
- What do you want to protect? (Radio): Trademark, Patent, Copyright, Trade secret, Not sure.
- Have you already filed an application? (Radio): Yes, No.
- Application or registration number (Simple Text). Give this field its own Conditional Logic rule inside the container, so it only shows when the previous answer is Yes.
Criminal Defense
- Who is this consultation for? (Radio): Myself, A family member or friend. Family members often book on behalf of someone who has been arrested.
- Charge category (Radio): DUI or DWI, Drug offense, Assault or violent offense, Theft or property offense, White-collar, Other, Not charged yet.
- Is the person currently in custody? (Radio): Yes, No.
The “Not sure / Something else” option gets no extra questions. The summary field in the next step covers it.
Step 5: Add urgency, conflict-check, and summary fields
These fields apply to every practice area, so only the date field needs a Conditional Logic rule.
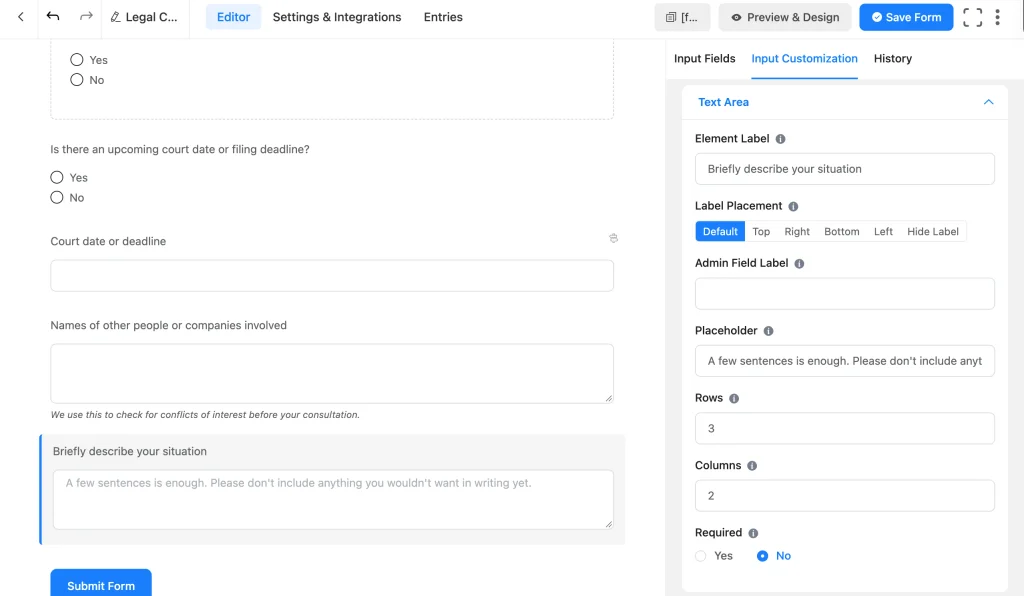
- Is there an upcoming court date or filing deadline? (Radio): Yes, No. Hearings and deadlines come up in family, criminal, and commercial cases alike.
- Court date or deadline (Time & Date field), shown with Conditional Logic only when the answer above is Yes. Your staff can then prioritize the bookings with the nearest dates.
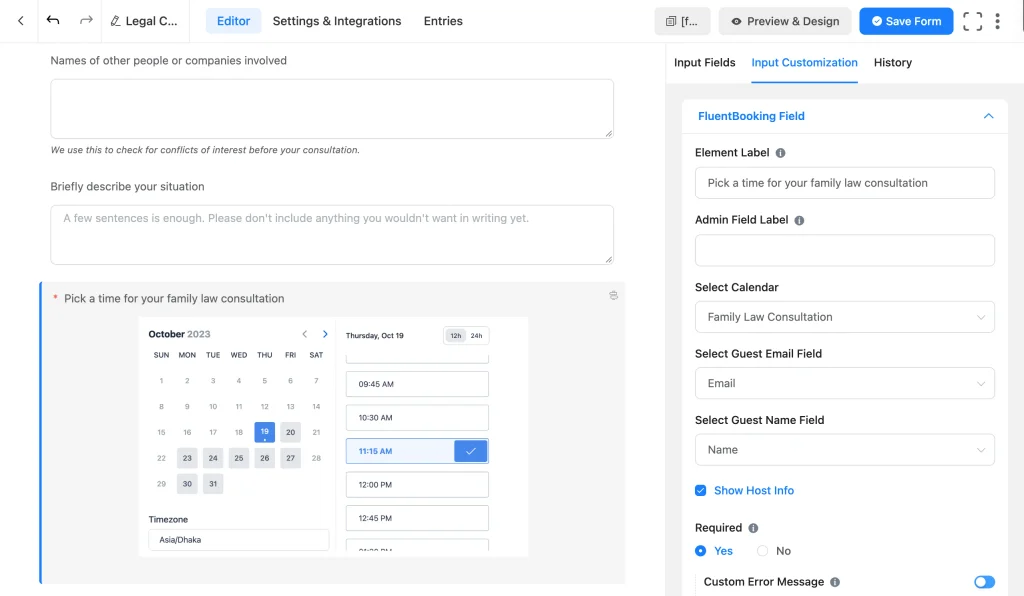
- Names of other people or companies involved (Text Area). Add a Help Message such as “We use this to check for conflicts of interest before your consultation.” Leave it optional, since some matters, like a trademark filing, have no other party.
- Briefly describe your situation (Text Area). A placeholder like “A few sentences is enough. Please don’t include anything you wouldn’t want in writing yet.” keeps answers short.
Your staff can run the other parties’ names through your conflict check before the consultation. That way, an attorney never sits down with a prospective client only to learn the firm already represents the other side.
Step 6: Add a booking calendar for each practice area
This is where each client lands on the right attorney’s calendar. You’ll add one FluentBooking field per practice area and show only the one that matches the client’s choice.
- Click the plus icon in the editor, open Advanced Fields, and drag the FluentBooking field below the summary field.
- Click the field to open its settings and set the Element Label, for example “Pick a time for your family law consultation.”
- Under Select Calendar, choose the Family Law calendar you created.
- Set Select Guest Name Field to your Name field and Select Guest Email Field to your Email field.
- Tick Show Host Info so clients see which attorney they’re booking with.
- Mark the field Required.
- Open Advanced Options, turn on Conditional Logic, and show the field when “What do you need help with?” equals Family Law.
Repeat for each remaining practice area, mapping each field to its own calendar and its own Conditional Logic rule. The “Not sure / Something else” option maps to your general consultation calendar.
Because only one booking field is ever visible, the client sees a single calendar with that attorney’s open slots. A hidden field doesn’t count as required, so the form still submits.
Step 7: Add the disclaimer and consent fields
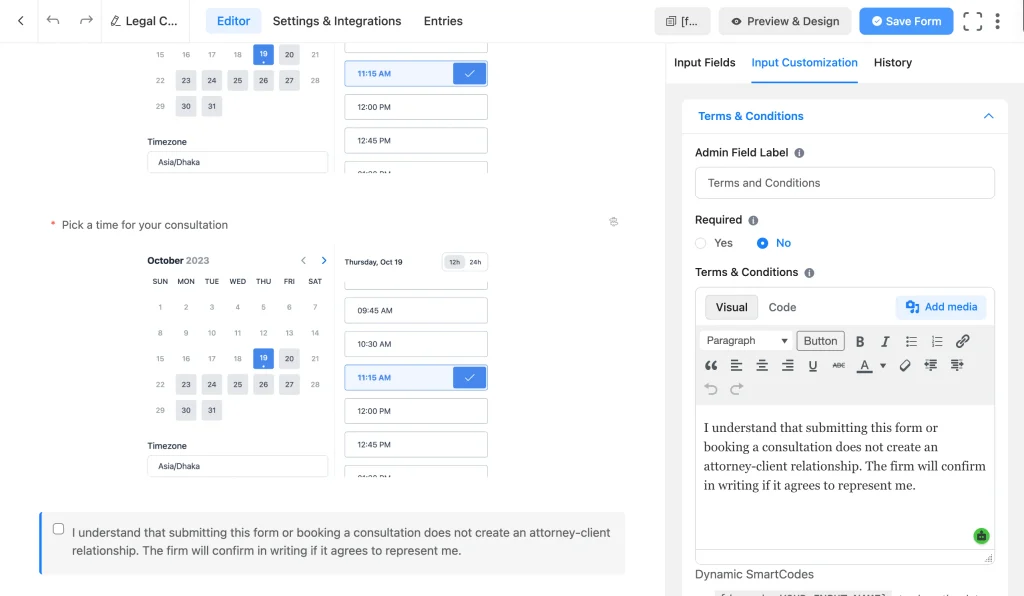
A law firm booking form needs one thing most booking forms don’t: a clear statement that booking a consultation doesn’t make the visitor your client. Add a Terms & Conditions field, mark it required, and write the agreement text. For example:
I understand that submitting this form or booking a consultation does not create an attorney-client relationship. The firm will confirm in writing if it agrees to represent me.
Treat that wording as a starting point only. Rules on prospective clients, advertising, and disclaimers vary by jurisdiction, so have your firm’s ethics counsel or your state bar’s guidance set the final text.
If you take clients from the EU or UK, add a GDPR Agreement field too. It’s built to explain how you collect, store, and use personal data, which is a different job from the Terms & Conditions checkbox.
Step 8: Add spam protection
A public booking form attracts bots, and every fake submission can take a real time slot. Fluent Forms includes reCAPTCHA, hCaptcha, Turnstile, and a Honeypot, all free.
- Add your CAPTCHA provider’s keys under Fluent Forms → Global Settings → Security.
- Drag the matching field (for example, Turnstile) into the form, just above the submit button.
- Turn on the Honeypot under Global Settings → General → Miscellaneous for a second, invisible layer.
Step 9: Write the confirmation message
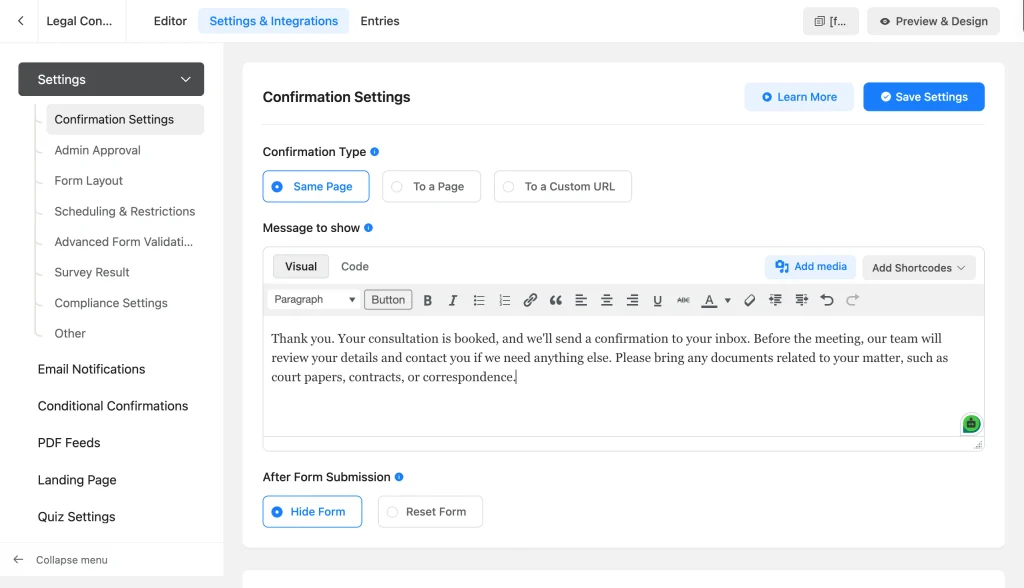
FluentBooking emails the booking details, so the on-screen message can focus on what happens next. Go to Settings & Integrations → Confirmation Settings and write a confirmation message:
Thank you. Your consultation is booked, and we’ll send a confirmation to your inbox. Before the meeting, our team will review your details and contact you if we need anything else. Please bring any documents related to your matter, such as court papers, contracts, or correspondence.
One message for every practice area works on the free plugin. If you want a different message per practice area, for example, a list of documents specific to family law, Conditional Confirmation requires Fluent Forms Pro.
Step 10: Set up notifications for your team
FluentBooking already tells the attorney about the booking. A Fluent Forms notification sends your intake staff the full set of answers, including the other parties, so they can start the conflict check.
- Go to Settings & Integrations → Email Notifications and edit the admin notification.
- Set Send To to your intake inbox, such as [email protected].
- Write a subject line that includes the practice area, so staff can sort requests at a glance.
To send each request to a different practice group’s inbox, set Send To to Configure Routing and add a rule per practice area, such as family law requests to the family law team. Routing requires Fluent Forms Pro. Set up FluentSMTP to reliably deliver the emails.
Step 11: Test every practice area
By now, every part of the system is in place: calendars, reminders, questions, booking fields, confirmation, and notifications. Test it the way a client would use it.
- Click Preview in the form editor.
- Choose Family Law and check that only the family law questions and the family law calendar appear.
- Book a slot and submit.
- Confirm the booking shows on the right calendar in FluentBooking, the entry shows under Fluent Forms → Entries, and the confirmation, attorney, and team emails all arrive.
- Repeat for every practice area, including “Not sure / Something else.”
- Check the form on a phone. Plenty of clients will book from one.
- Cancel the test bookings in FluentBooking so the slots open up again.
Step 12: Embed and publish the form
Copy the form’s shortcode from the top of the editor, or add the Fluent Forms block in the block editor. Put it on a dedicated page, such as yourfirm.com/book-a-consultation, then publish the page.
Link to that page from your main navigation, your contact page, and every practice area page. A “Book a consultation” button at the end of your family law page sends the visitor straight to the form, one click from a time slot. After publishing, make one more booking from the live page to confirm everything works.
That’s the core system. The next few sections cover paid consultations, upgrades, and follow-up.
Take Payment for Paid Consultations
Many firms offer a free first consultation in some practice areas and charge in others, such as a paid strategy session for business clients. Since clients already book through your form, you can collect the fee in the same submission with the free Fluent Forms payment fields.
If you charge for any practice area, add these fields before you test the form in step 11, so your test covers the payment too.
- Go to Fluent Forms → Global Settings → Payment → Payment Methods and connect Stripe.
- In the form editor, add a One Column Container directly below the booking fields from step 6.
- Give the container the same Conditional Logic rule as the paid practice area, for example “What do you need help with?” equals Commercial / Business Law.
- Inside the container, add a Payment Item field. Name it “Business Strategy Session,” set its Display Type to Single, and enter the price.
- Add a Payment Summary field below it, so the client sees the fee before submitting.
- Add a Payment Method field and make sure Stripe is enabled in it.
Because the fee is a single fixed item, the client can’t submit the form without paying. The consultation is only booked once the payment goes through, so unpaid requests never take a slot on the attorney’s calendar.
Clients in the free practice areas never see the container, so they book without a payment step. Mention the fee in the paid area’s booking field label as well, such as “Pick a time for your strategy session ($150),” so nobody is surprised when the payment fields appear.
Stripe works on the free plugin, with a 1.9% Fluent Forms fee per transaction on top of Stripe’s own charges. Fluent Forms Pro removes that fee and adds PayPal, Mollie, Razorpay, Paystack, Square, Paddle, and Authorize.net.
Upgrades for Busier Firms
The free setup handles in-person and phone consultations for a small team. As the firm grows, these upgrades take more manual work off your staff.
From FluentBooking Pro:
- Video consultations: Zoom, Google Meet, or Microsoft Teams links are created for each booking automatically.
- Calendar sync: two-way sync with Google, Outlook, Apple, and Nextcloud calendars, so a court appearance already on an attorney’s calendar blocks that slot.
- Round-robin scheduling: spreads consultations across several attorneys in one practice group instead of tying a calendar to one person.
- SMS reminders: text reminders through Twilio alongside email.
From Fluent Forms:
- Slack alerts (free): the Slack integration posts each new request to an intake channel.
- PDF copies (free): the Fluent Forms PDF add-on turns an intake entry into a PDF for the client file.
- Google Sheets (Pro): sends every request to a shared spreadsheet for weekly intake reviews.
Follow Up With Prospective Clients in FluentCRM
A booked consultation doesn’t always become a signed client. FluentCRM, a separate email marketing and CRM plugin from the same team with its own free and paid plans, keeps track of those prospects and follows up automatically.
Connect it from both plugins:
- From Fluent Forms: under Settings & Integrations → Configure Integrations, add a FluentCRM feed, map the name, email, and phone fields, and use Dynamic Tag Selection to pair each practice area option with a tag, such as “Family Law.” The connection is free.
- From FluentBooking: under each event’s Integrations tab, add a FluentCRM integration to put attendees on a list or apply tags.
FluentCRM automations can start from four FluentBooking events: New Booking, Booking Cancelled, Booking Complete, and Booking Rescheduled. Two follow-ups worth setting up:
- Booking Cancelled: email a short note with a link back to the booking page, so the client can pick a new time.
- Booking Complete: send a thank-you and the next steps, such as how to sign the engagement letter or what documents the attorney asked for.
Keep Client Information Secure
Prospective clients share sensitive details on this form, even in a few sentences. A few habits protect them and your firm:
- Keep data on your own site. Fluent Forms is self-hosted, so entries stay in your WordPress database instead of a third-party form service.
- Limit who sees entries. Under Fluent Forms → Global Settings → Permissions, give entry access only to the staff who handle intake.
- Use HTTPS. Make sure your whole site runs on an SSL certificate, which most hosts include for free.
- Ask only what the first meeting needs. Leave detailed facts and documents for after the firm has cleared conflicts and agreed to take the matter.
- Skip file uploads at this stage. Collect documents once there’s an engagement in place, through whatever secure channel your firm uses.
Free vs Pro at a Glance
Fluent Forms and FluentBooking each have a free plugin and a Pro version, sold separately.
| Feature | Plugin | Free | Pro |
| Name, Email, Radio, Text Area, Time & Date fields | Fluent Forms | Yes | Yes |
| Phone/Mobile field | Fluent Forms | No | Yes |
| Field-level Conditional Logic | Fluent Forms | Yes | Yes |
| FluentBooking field | Fluent Forms + FluentBooking | Yes | Yes |
| Terms & Conditions and GDPR Agreement fields | Fluent Forms | Yes | Yes |
| reCAPTCHA, hCaptcha, Turnstile, Honeypot | Fluent Forms | Yes | Yes |
| Routed email notifications (Configure Routing) | Fluent Forms | No | Yes |
| Conditional Confirmation | Fluent Forms | No | Yes |
| Slack integration | Fluent Forms | Yes | Yes |
| Google Sheets integration | Fluent Forms | No | Yes |
| Payment Item, Payment Summary, Payment Method fields | Fluent Forms | Yes | Yes |
| Stripe payments | Fluent Forms | Yes (1.9% fee) | Yes (no fee) |
| PayPal and other payment gateways | Fluent Forms | No | Yes |
| FluentCRM connection (FluentCRM sold separately) | Fluent Forms | Yes | Yes |
| Unlimited calendars and hosts, one-on-one events | FluentBooking | Yes | Yes |
| Availability, buffer time, booking limits | FluentBooking | Yes | Yes |
| Email confirmations and reminders | FluentBooking | Yes | Yes |
| Zoom, Google Meet, Microsoft Teams links | FluentBooking | No | Yes |
| Google, Outlook, Apple calendar sync | FluentBooking | No | Yes |
| Payments on FluentBooking events | FluentBooking | No | Yes |
| SMS reminders (Twilio) | FluentBooking | No | Yes |
| Round-robin scheduling | FluentBooking | No | Yes |
Tips to Get More Consultations Booked
- Put the booking link where people decide. Every practice area page should end with a link to the form.
- Keep the form short. Five or six questions per practice area is plenty. Save the rest for the meeting.
- Show the attorney. With Show Host Info on, clients see who they’re meeting, which makes booking feel less anonymous.
- Open more slots for urgent practice areas. Criminal defense clients often need an urgent call, so give that calendar shorter notice and more availability.
- Say what’s free. If the first consultation costs nothing, say so in the field label and on the page.
- Keep a phone option. Some clients still want to call. Put your number next to the form.
- Review your calendars every month. Remove slots that never get booked and add hours where the calendar fills up.
Frequently Asked Questions
Do clients need an account to book a consultation?
No. Anyone can fill out the form and book a slot without logging in or creating an account on your site.
Do I need FluentBooking Pro for this setup?
Not for the main build. The free FluentBooking plugin covers one-on-one consultations, availability, buffer times, and email reminders, and the Fluent Forms integration is free. You need FluentBooking Pro for video meeting links, calendar sync, SMS reminders, and round-robin scheduling.
You can even offer paid consultations without buying FluentBooking Pro, as the free version of Fluent Forms allows you to collect the consultation fee via Stripe (1.9% charge applicable per transaction with the free version).
Can each practice area go to a different attorney?
Yes. Create a FluentBooking calendar for each practice area hosted by the right attorney, then add one FluentBooking field per area and show it with Conditional Logic. Each booking lands on the calendar that matches the client’s practice area.
What if a client doesn’t know which practice area fits?
Include a “Not sure / Something else” option and map it to a general consultation calendar. Your intake attorney or office manager can then pass the matter to the right person after the first call.
Can I offer video consultations?
Yes, with FluentBooking Pro, which creates Zoom, Google Meet, or Microsoft Teams links for each booking. On the free plugin, you can offer phone consultations alongside in-person meetings.
How does the form help with conflict checks?
The “other people or companies involved” field collects names your staff can check against your client records before the consultation.
Does booking a consultation create an attorney-client relationship?
Your form should state that it doesn’t, which is why the build includes a required Terms & Conditions checkbox with that disclaimer. The exact obligations to prospective clients depend on your jurisdiction, so check your state bar’s rules or ask your ethics counsel for the final wording.
Can I charge for consultations?
Yes, with the free Fluent Forms payment fields. Put a Payment Item (Display Type: Single), a Payment Summary, and a Payment Method field in a container that only shows for the paid practice area, then connect Stripe. The form can’t be submitted until the client pays, so the slot is only booked after payment. The free plugin adds a 1.9% fee per Stripe transaction, which Fluent Forms Pro removes.
Will bookings show up on my Google or Outlook calendar?
With FluentBooking Pro, bookings sync both ways with Google, Outlook, Apple, and Nextcloud calendars. That also means existing events, like court appearances, block those times from being booked.
Where do I see all the bookings and intake answers?
Bookings appear in FluentBooking, and each booking’s details page shows the form answers. The full intake is also saved under Fluent Forms → Entries, where you can filter and export it.
Is client information stored securely?
Fluent Forms stores entries in your own WordPress database. Restrict entry access under Global Settings → Permissions, run your site on HTTPS, and only ask for what the first consultation needs.
Put Your Consultation Calendar on Every Practice Page
With this setup, a prospective client can go from a practice area page to a confirmed consultation without a phone call. The attorney knows the matter before the meeting, and your staff has the names they need for a conflict check.
Everything in the main build runs on the free versions of both plugins, apart from the Phone field and routed team emails. Start free with Fluent Forms, add FluentBooking, and put your first booking form on your site this week.

Sarika writes for Fluent Forms and loves to offer insights into small businesses. She’s curious and enjoys discussing ideas, interests, and perspectives. In her free time, she’s either marvelling at architectural beauties or trying different cuisines.




Leave a Reply