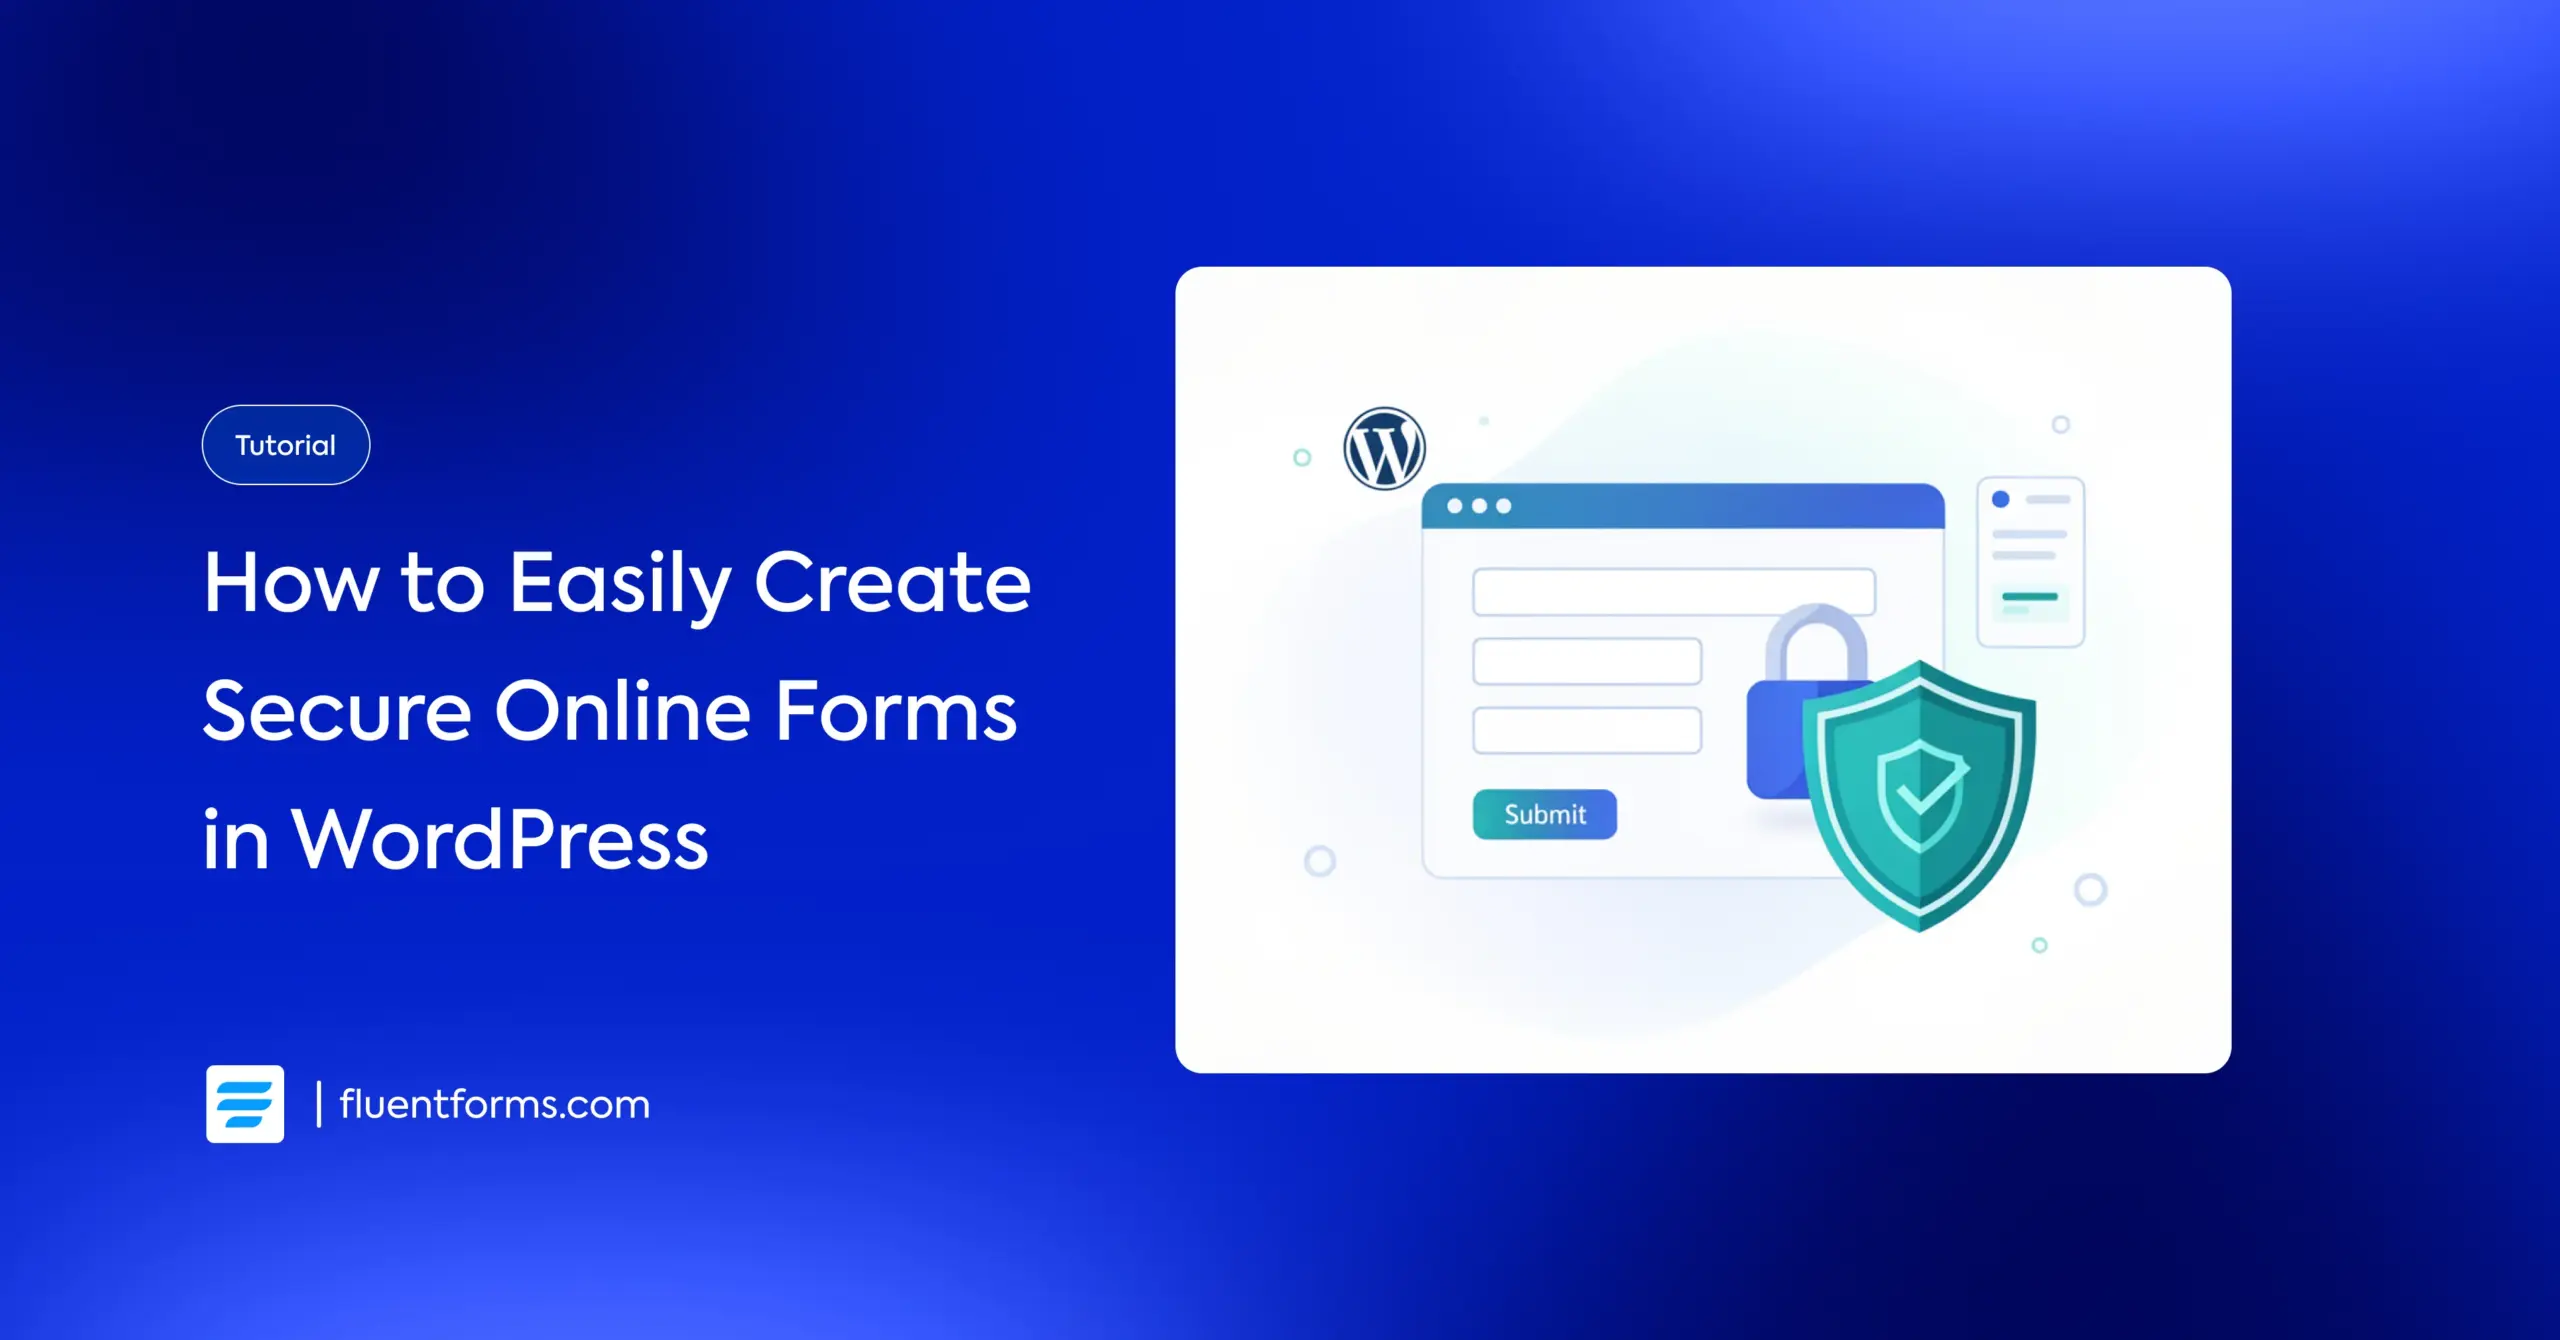
13 Point Checklist to Create Secure Online Forms in WordPress
A friend of mine runs a small design studio. A few weeks ago, she mentioned how frustrated she was with her contact form. The spam submissions led her to check it less frequently, and she ended up missing a big project. When she saw it a week later, the client had already moved on.
The thing is, it could’ve been worse. The site could’ve been flagged as unsafe, causing her brand to lose reputation. It could’ve even been hacked, resulting in compromised client data. And all for a slight oversight!
I’m going to share with you now how I helped her secure her forms. The best part is that you won’t require any technical expertise for this. Just follow a few setup steps that you can forget about afterward.
In this blog, I’ve compiled 13 measures to create secure online forms. However, you won’t need all of them for a medium/low-traffic site. Just combine 5 or 6 security steps that work best for you, and you won’t have to worry about receiving spam submissions ever again.
TL;DR
- Start with a secure foundation. Get an SSL certificate. Use strong passwords, 2FA, & reliable hosting, as form security also relies on site security.
- Use a form plugin that sanitizes data automatically (Fluent Forms strips all malicious scripts before storing data. Your site cannot be hacked via forms).
- Enable these built-ins for instant protection: honeypot (traps bots) + token-based spam protection (rejects fake submissions) + block empty submissions (stops lazy bots).
- Add Cloudflare Turnstile. It silently scores every visitor and blocks bots before they even submit.
- For extra filtering, integrate Akismet (checks submissions against billions of known spam patterns) or CleanTalk (blocks spammers before the form loads).
- Use CAPTCHA only if needed. reCAPTCHA v3 (invisible) or hCaptcha (privacy-friendly) work well; avoid v2 puzzles if possible.
- Enable double opt-in. It holds submissions until the sender clicks a confirmation link (bots and fake emails never complete this step).
- Don’t allow executable file uploads. Permit only safe & necessary file types.
- For member/client sites: enable login requirement + role manager (only specific user roles can manage or view forms).
- Use IP/country restrictions if you serve a local audience & block submissions from countries with which you don’t do business.
- Low-traffic sites need only 4/5 built-in features; medium-traffic sites add one integration (Turnstile or Akismet); high-traffic sites stack multiple layers.
- Most features are free in Fluent Forms; Pro unlocks double opt-in, IP/country restriction, advanced validation, and full role manager.
What you need to create secure online forms
You need a secure environment to host your forms and a form builder equipped with modern safety features so you can create secure online forms without hassle. Here’s how you can achieve that.
A secure website
Securing your website is non-negotiable. Securing your forms is pointless if your site is vulnerable to attacks. Go for a trusted hosting provider. If you run a business site, it’s better not to go for shared hosting. Go for VPS, dedicated, or cloud hosting instead for better control.
In addition, follow these security protocols:
1. Get your website SSL certified: An SSL certificate encrypts the data stream (login credentials, personal information, financial data, and more) between a user’s browser and a website’s server. Even if someone illegally accesses the data, they can’t read it without the cypher key. An SSL certificate makes your site HTTPS from HTTP.
2. Use a strong password: Make sure you use a long password that combines uppercase & lowercase letters, numbers, and symbols. Keep it random.
3. Limit login attempts: Hackers use bots to run brute force attacks (bots keep trying thousands of random passwords every second until one is correct). Limiting login attempts slows them down. Try a 2-hour block after 5 wrong guesses.
4. Enable 2FA: Two-factor authentication (2FA) ensures that hackers can’t access your site even if they manage to crack your password. It sends a one-time password (OTP) to your email as an additional login requirement. Without access to your email, attackers can’t access your site with a password alone.
5. Use reputable and updated software: Make sure you only use plugins and themes from trusted sources. Tools downloaded from shady sites might have hidden backdoors. Besides, developers fix vulnerabilities in software updates. Always keep them updated, or attackers might exploit those vulnerabilities.
Learn more about how to secure your WordPress site.
A secure website makes sure no unauthorized person can access your forms or the user data. Now, let’s see why a secure form builder is important for creating safe forms.
A secure form plugin
Security threats for forms usually include spam/bot submissions, messages with links to phishing sites, cross-site scripting, etc. A secure form plugin comes with the necessary features to protect your forms against all these security threats.
Without a comprehensive plugin, you’d need third-party developers to take care of your form’s security issues. But Fluent Forms makes it easy with its built-in security measures and direct integrations with popular spam-protection tools. I’ll show you how to implement them in the following section.
Q. Can your site get hacked via contact forms?
Yes, if your forms aren’t secure enough. Attackers can inject malicious scripts via your input fields. If your form builder doesn’t sanitize that data before storing it, the script runs and steals your admin cookie.
Q. Can your site get hacked via forms if you use Fluent Forms?
No. Fluent Forms sanitizes data before storing it. Basically, it converts all suspicious HTML tags/scripts into harmless text. Unless you/a developer override the default settings, it’s not possible to hack your site via Fluent Forms.
13 points to create secure online forms with Fluent Forms
In this section, I’ll show you how different security settings protect your contact forms and how you can enable them for your forms.
1. Block empty submissions
Blocking empty submissions filters out lazy bots. These bots can’t find certain fields and hit submit, hoping that will lead to more. Blocking empty submissions prevents those forms from being submitted. It’s a form-specific setting in Fluent Forms (meaning, you have to enable it for each form individually). It saves your effort and storage.
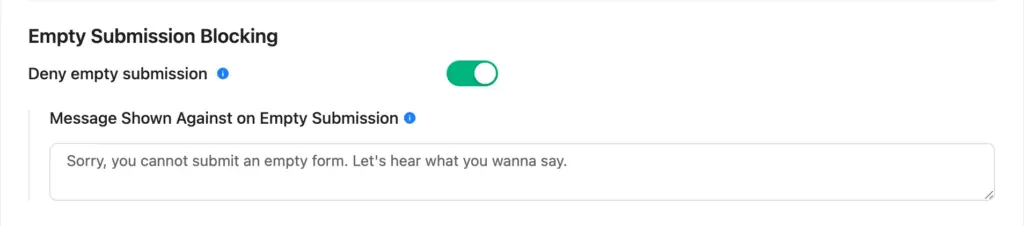
Learn how to restrict empty form submission using Fluent Forms.
2. Enable honeypot
Honeypot is a trap for bots. Basically, it’s an input field that remains hidden to humans. Since bots don’t access a form the way a human does, they can’t tell that the field is hidden. Therefore, they fill it out like any other field. An input in that field flags it as a bot attempt, and the submission fails.
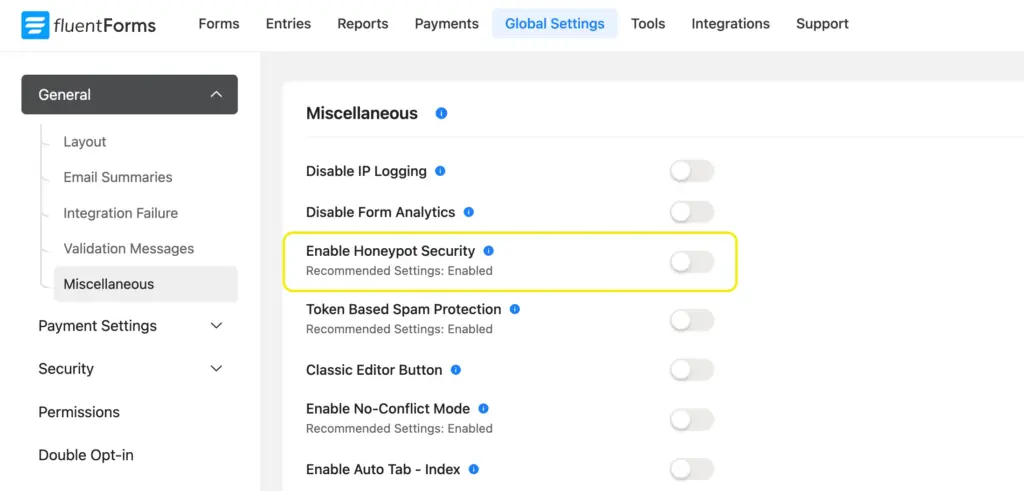
Honeypot is a global setting in Fluent Forms. Enabling it means it works for all of your forms. You’ll find the honeypot setting in Fluent Forms > Global Settings > General > Miscellaneous.
3. Enable token-based spam protection
This is what happens when you enable token-based spam protection:
- When a user visits your form page, your server generates a unique token (a random string of cryptographic characters).
- The server temporarily saves the token & also embeds it in the form inside a hidden input field.
- When the user fills out their form and hits “Submit,” the browser sends the visible data (Name, Email) plus the hidden token back to the server.
- If the tokens match, the form is processed. If they don’t match (or the token is missing), the server rejects the submission as spam.
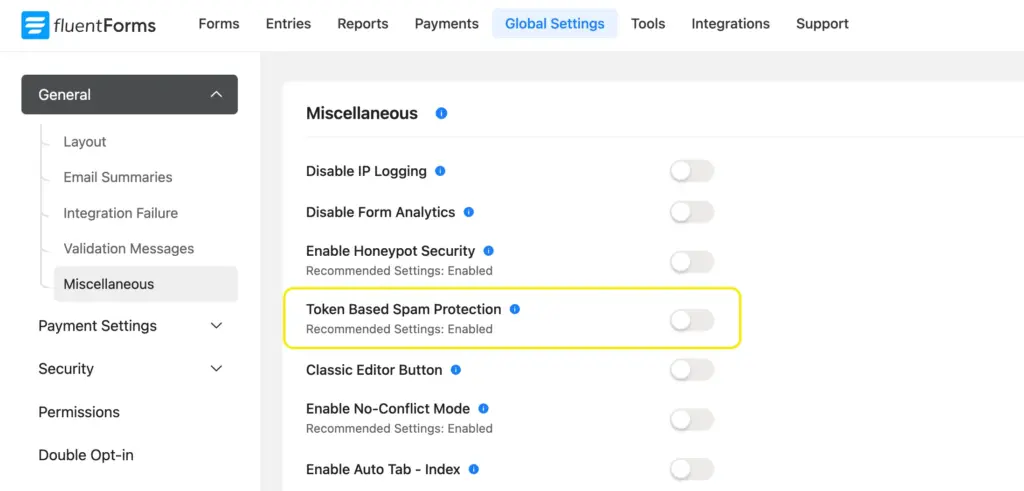
Token-based spam protection is a global setting in Fluent Forms. Enabling it means it works for all your forms. You can access the setting from Fluent Forms > Global Settings > General > Miscellaneous.
4. Integrate Cloudflare Turnstile
The best part about Cloudflare Turnstile is that it never asks a real human to prove anything (no checkbox or traffic light pictures).
It runs silently in the background the moment the page loads, and collects tiny signals. For example, how a user moved the mouse in the first 3 seconds, how they scrolled, their previous behavior on millions of other Cloudflare-protected sites, etc.
After analysis, Cloudflare’s AI gives them a secret score.
- If the score is high, Cloudflare generates a token for the user (the same process as token-based spam protection is followed, and form submission proceeds if the tokens match).
- For a very low score, it automatically tags the user as a bot.
- For a suspicious score, it forces the user’s browser to solve a math problem in the background. The problem requires a small amount of processing power to solve. A human user’s computer solves it in milliseconds without them noticing. However, bots often strip out the JavaScript engines needed to solve these math problems.
Turnstile explicitly promises not to use the data for ad retargeting, ensuring privacy and data safety. You can integrate it into Fluent Forms from Global Settings > Security > Turnstile. Enter the site key & secret key. Save the settings, and you’re all done.
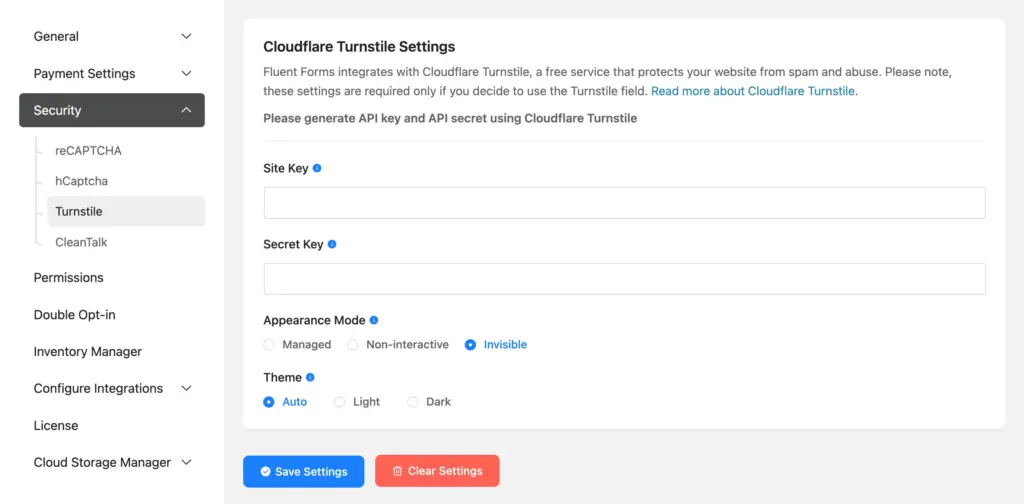
Learn more about Fluent Forms integration with Cloudflare Turnstile.
5. Use Akismet
Akismet filters the submitted data after the submission. Every single submission gets sent to Akismet’s servers for a fraction of a second before it reaches your database/inbox.
Akismet already knows literally billions of spam messages because it’s been watching WordPress comments and contact forms for a long time now. It tests your form’s entries against them and checks if they’re an exact match or if their pattern matches the spam. It also checks the sender’s reputation (whether their IP/other fingerprint has been used for spam before).
Learn more about Fluent Forms integration with Akismet.
6. Integrate Cleantalk
CleanTalk stops spam before the visitor even sees your form. The moment the page loads, it fingerprints the browser and IP and checks them against a real-time global blacklist updated every few minutes across 5.5 million sites. If they’ve spammed anywhere once, they’re blocked instantly.
It also analyzes behavioral traits, such as how quickly the form was filled out, and scans the text for spam keywords or languages that do not match your website settings. It even stops paid human click-farm spam because after 3 – 5 submissions, their IP gets banned everywhere forever.
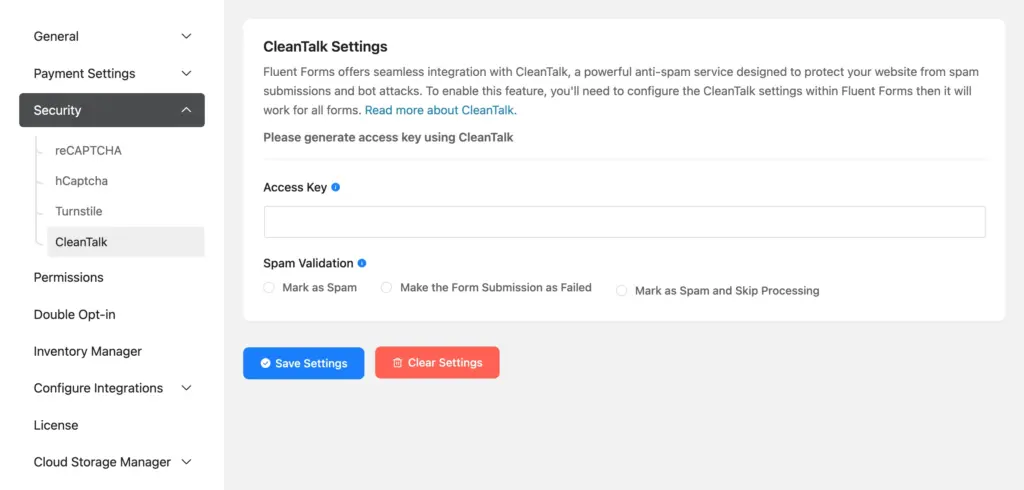
You can integrate it from Fluent Forms > Global Settings > Security > CleanTalk. Enter the access key and save settings.
Learn more about Fluent Forms integration with Cleantalk.
7. Use Captcha
Captcha presents a challenge designed to be easy for humans to pass but difficult for automated scripts. Fluent Forms integrates with Google reCAPTCHA v2 and v3, as well as hCaptcha. Here’s how each of them works.
Google reCAPTCHA v2: It analyzes the user’s mouse movement and timing as they approach the “I’m not a robot” checkbox. If the movement looks suspicious or the user has no history, it triggers an image challenge.
Google reCAPTCHA v3: Instead of a puzzle, it tracks the user’s behavior across your website (mouse movements, time spent, history, typing, and navigation patterns). It assigns the user a score from 0.0 (bot) to 1.0 (human). The site owner defines thresholds for actions like blocking suspicious traffic, based on this score.
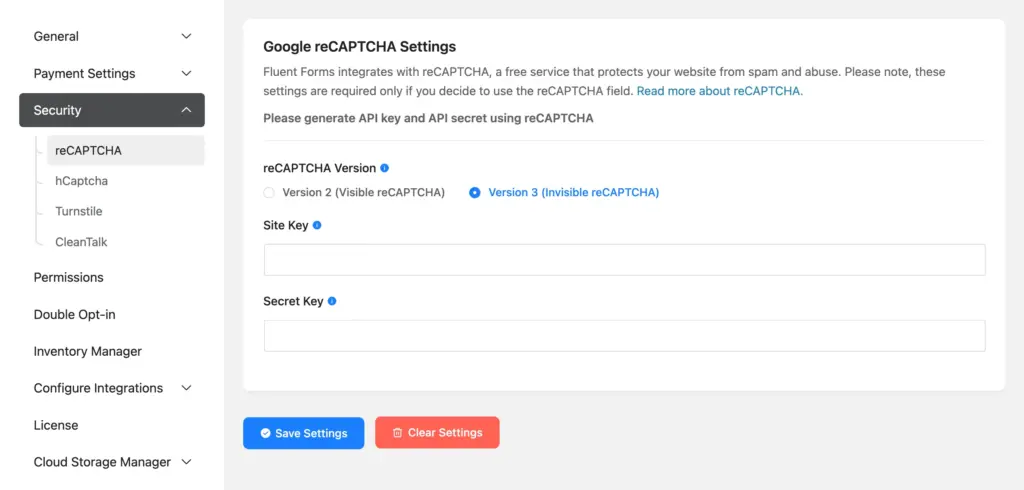
You can integrate Captcha from Fluent Forms > Global Settings > Security > reCAPTCHA/hCaptcha. Enter the site key & secret key and save the settings.
Learn more about reCAPTCHA integration with Fluent Forms.
hCaptcha: It presents image puzzles similar to Google but doesn’t track user history or use their data for advertising. It is GDPR compliant and works in countries where Google is blocked.
Learn more about hCaptcha integration with Fluent Forms.
8. Enable double opt-in
When a form is submitted, the system holds it and instantly sends a confirmation email to the sender’s address with a unique “Yes, I sent this”/”Proceed Submission” link. Only after they click it (you can set the timeframe for which the submission stays on hold) does the message get forwarded to your inbox/database.
Bots and human spammers rarely complete the click because they use fake emails or don’t want to waste time opening inboxes.
In Fluent Forms, you have to enable double opt-in in two layers. First globally, and then from the individual forms where you want it enabled. To set it globally, navigate to Fluent Forms > Global Settings > Double Opt-in and customize the Global Settings. Save settings once you’re done.
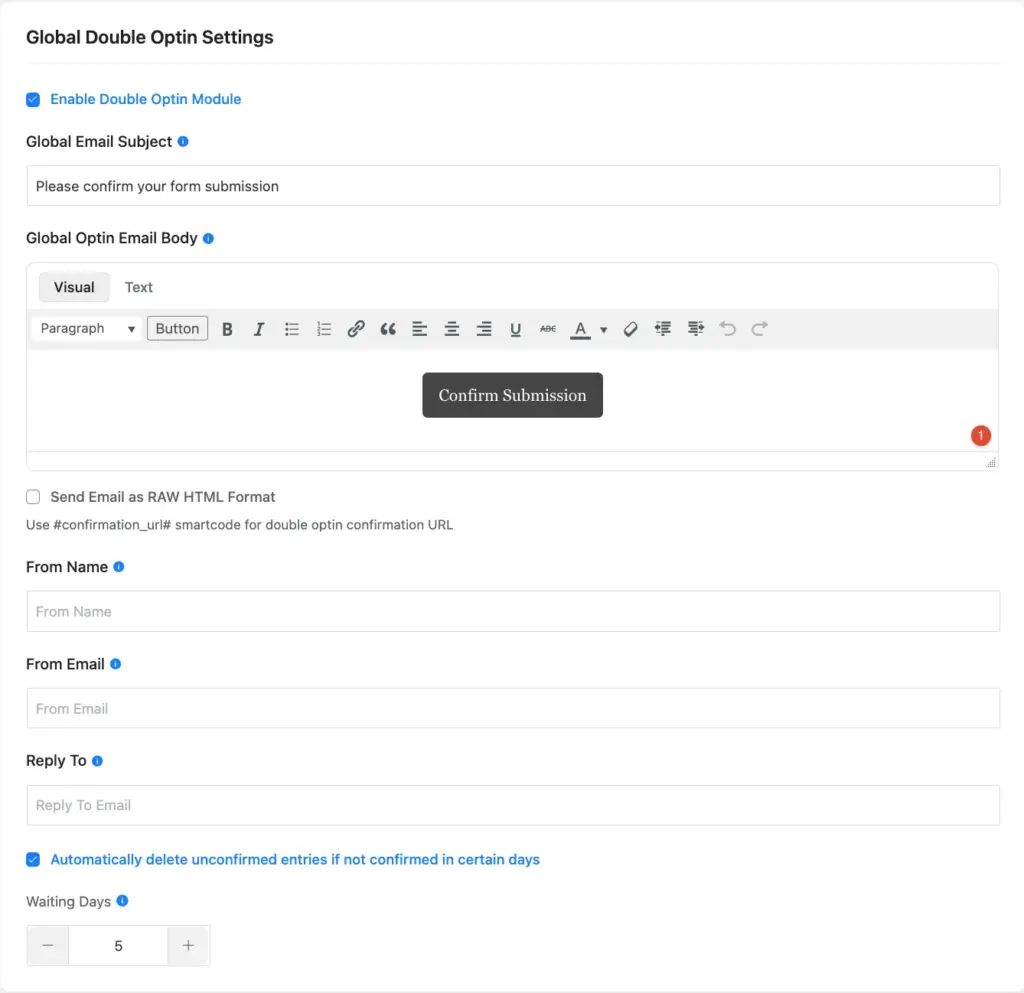
To enable double opt-in for individual forms, go to the specific form’s settings. Navigate to Confirmation Settings and scroll down to Double Optin Confirmation. Enable it, customize, and save settings.
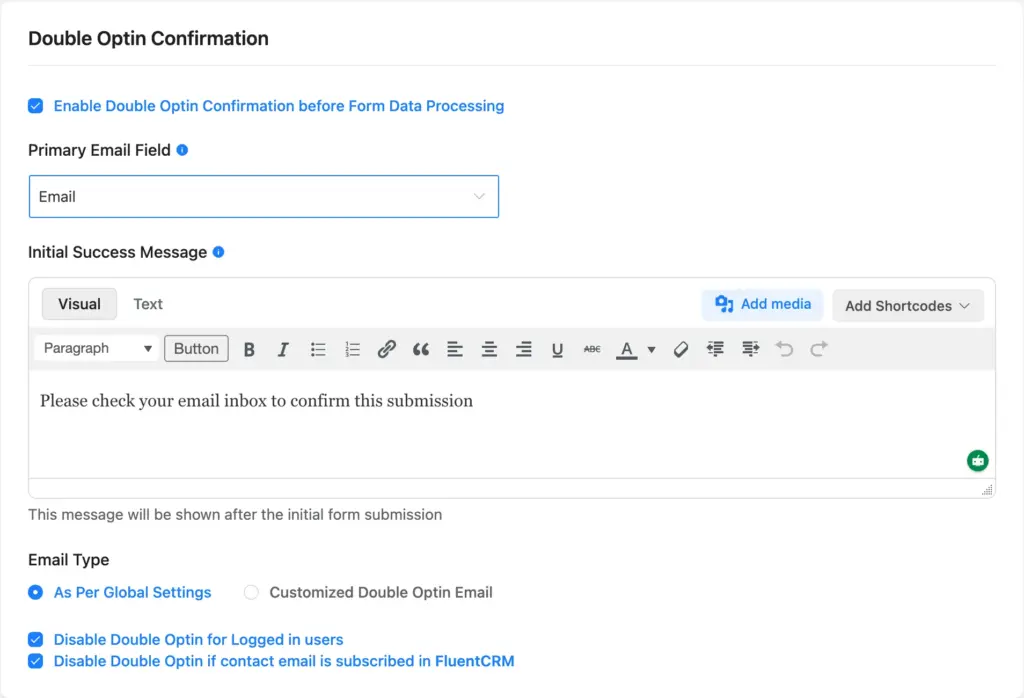
Learn more about Fluent Forms’ double opt-in confirmation settings.
9. Restrict harmful file uploads
Attackers often upload executable files that can run code on your server and give them full control.
Fluent Forms’ file upload field lets you choose which file types are allowed. Never allow any unnecessary file types. If you need images, only allow the image file types. If you’re collecting CVs, only allow PDF or Docs.
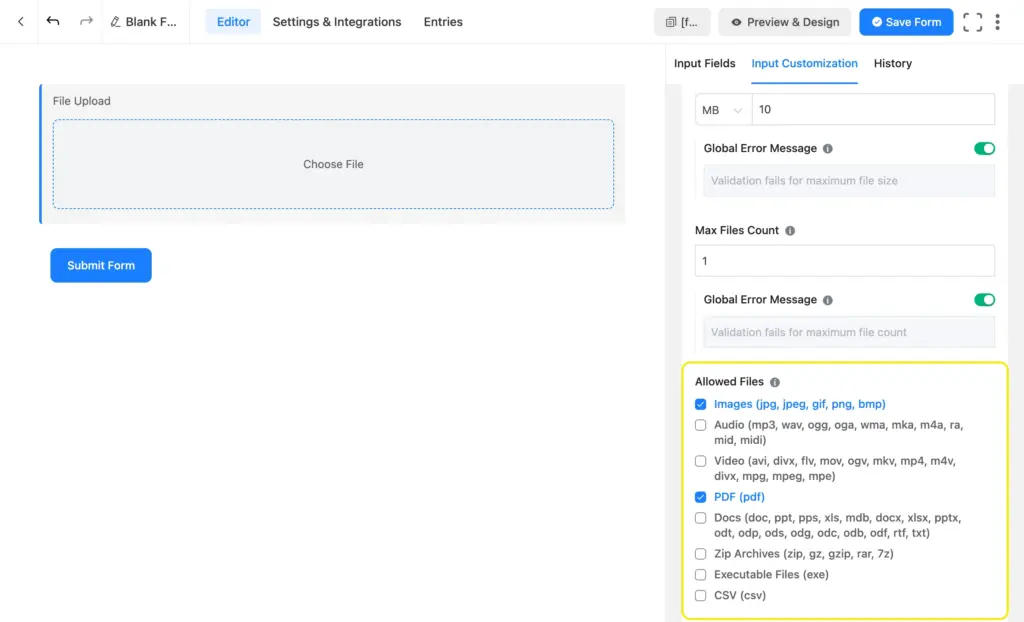
Never allow any executable file types (.php, .php5, .phtml, .pht, .phpt, .phar, .exe, .sh, .js, .svg, .htaccess, .py, .pl, .cgi, .asp, .aspx, .jar, .bat, .cmd, .vb, .ps1, .html, .htm, etc.) to ensure your site’s safety.
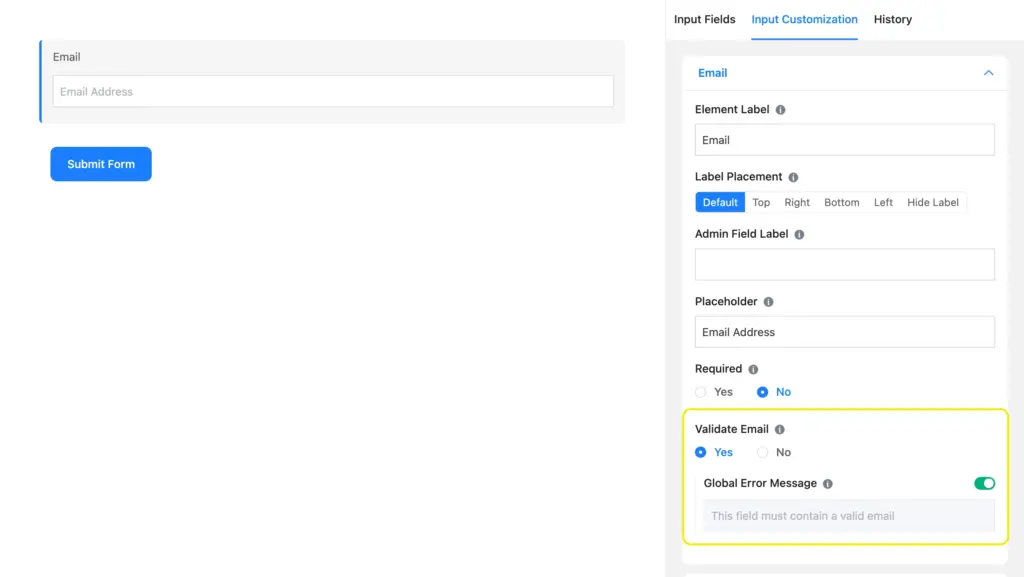
10. Use form validation
Data validation makes sure your form only accepts data in an accurate format. For example, no letters/texts in the phone number field or email addresses follow a certain pattern. Here’s how different types of validation work:
Field validation: In some cases, field validation works automatically (for example, a simple text field only accepts alphanumeric characters, a numeric field only accepts digits, etc.). For other fields, you have to enable field validation from input customization (for example, phone field, email, URL, etc.).
Unique field validation: Validating a field as unique ensures there are no duplicate entries for that field. For example, if you validate the email field as unique, one email address can be used only once to fill out that form.
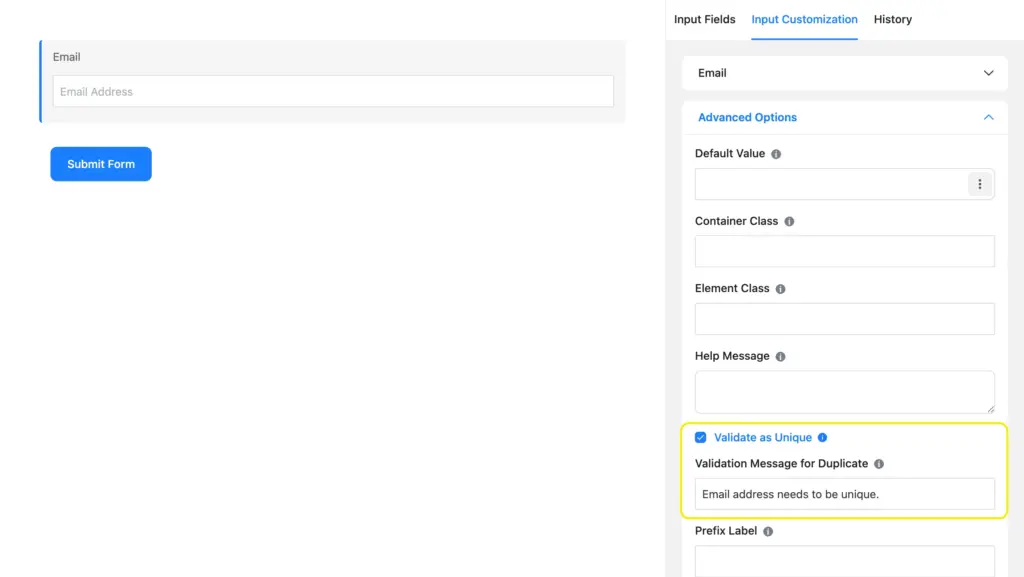
Learn more about Fluent Forms’ unique field validation.
Advanced validation: With advanced validation, you can create a single rule or a set of rules. Then you can set whether to proceed/fail with the submission if the rules match.
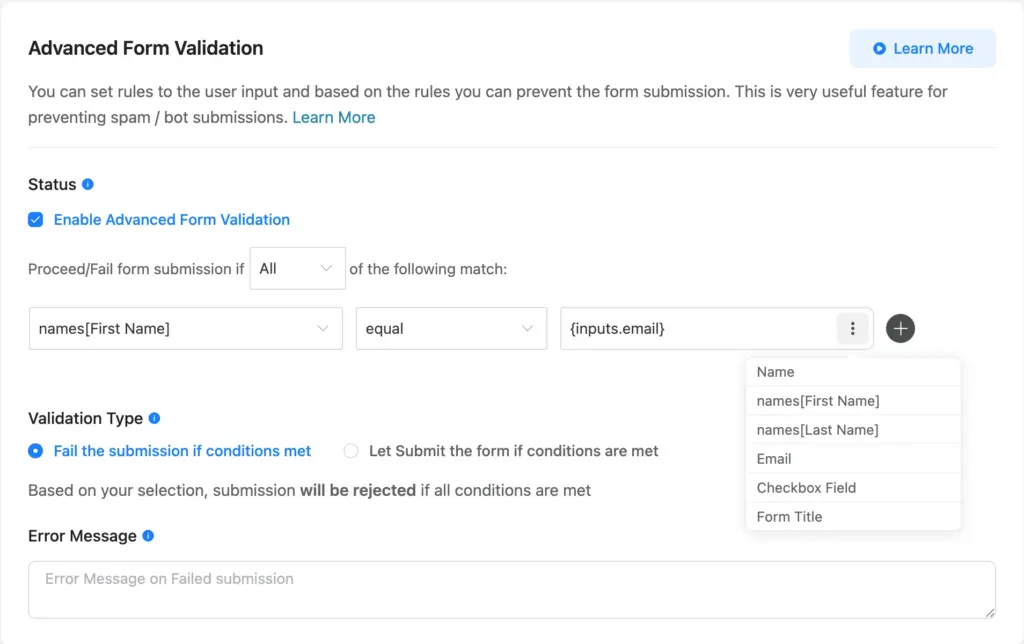
Learn more about Fluent Forms’ advanced form validation.
11. Turn on the login requirement
Requiring a log-in places the form behind a shield. Instead of the form being public on the web, it is only visible to registered users who have successfully logged in and authenticated their identity. Since every submission is tied to a specific User ID, you can ban a user if they act maliciously or spam.
However, don’t enable the login requirement for forms like “Contact Us” or Sales forms, where you need more leads. It’s recommended for established relationships like customer support portals, membership sites, employee forms, wholesale B2B portals, etc.
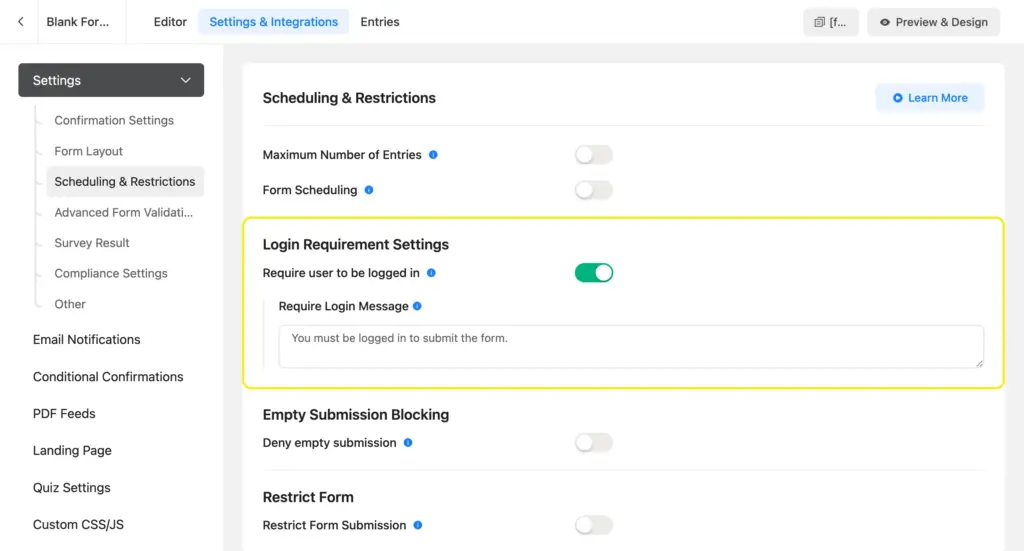
To turn on login requirements for a form, go to that form’s settings. Navigate to Scheduling & Restrictions and scroll down to Login Requirement Settings. Toggle it on and save settings.
12. Turn on IP/country/keyword-based restriction
With Fluent Forms, you can block submissions/only accept submissions from specific IPs or countries. This especially helps when you have a local business, and you don’t need a global audience to fill out your forms. Simply customize the settings to only accept submissions from your own country. You can also block malicious IPs using this feature.
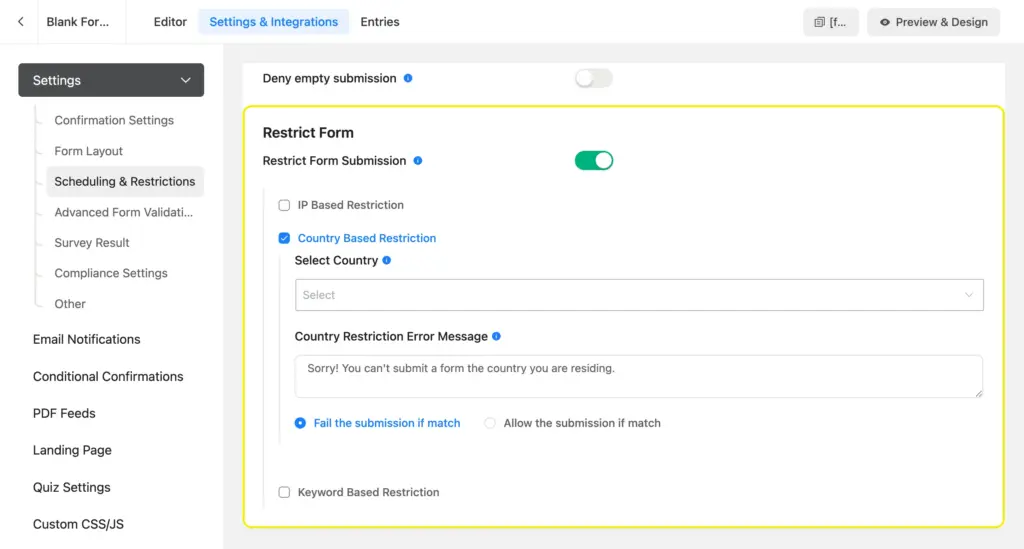
Go to a specific form’s settings. Navigate to Scheduling & Restrictions and scroll down to Restrict Form. Toggle it on. Select whether you want to restrict/allow submissions based on IP, Country, or keywords. Save the settings.
Learn more about IP, country, and keyword-based form restriction.
13. Utilize the role manager
Fluent Forms gives you more control in terms of who can access or manage your forms. You can add an existing user’s email via “Add Manager” and give them specific permissions. This way, you can allow a user to view the forms or entries without giving them full control over your forms. You can also give them access to specific forms, so only you can manage & view the highly private forms.
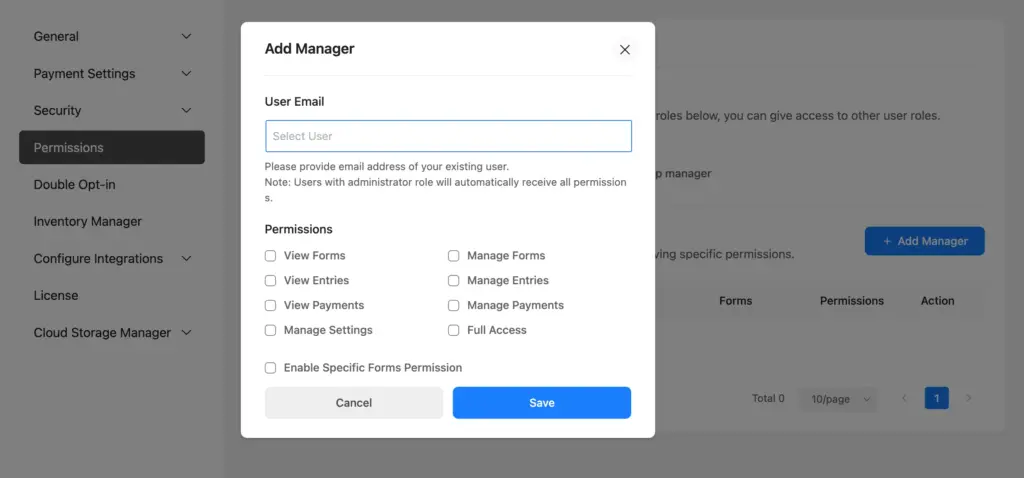
Navigate to Fluent Forms > Global Settings > Permissions and click “Add Manager” to manage user roles for your forms.
This is the complete list of spam protection features to create secure online forms. If this list feels overwhelming and you don’t know how many you need or where to start, the next section is for you. I’ll break down which features you need and why.
Q. Which spam protection features are available in the free version?
Most spam protection features are available in Fluent Forms’ free version. However, some of the security features are available in Fluent Forms Pro only. Here’s a list:
Available in the free version
- Honeypot
- Token-based spam protection
- Empty submission blocking
- Login requirement settings
- Field validation & unique field validation
- Integration with security tools (Akismet, Cleantalk, Turnstile, reCAPTCHA & hCaptcha)
- Keyword-based restriction
- Role manager (can enable specific forms permission only)
Available in Fluent Forms Pro
- Double opt-in confirmation
- IP & Country-based restriction
- Advanced validation
- Role manager (all features)
Which security options do you need
You don’t need all the security measures mentioned above unless you’re managing high-traffic sites.
For portfolio & low-traffic sites, only the built-in features are enough. You can enable honeypot, token-based spam protection, empty submission blocking, field validation, and double opt-in to be safe. And remember not to allow executable files.
For small business sites with medium traffic, you can go for the built-in options, plus one of the integrations (Cloudflare Turnstile/Captcha/Akismet). However, remember users don’t like solving puzzles, so the frictionless experience of Cloudflare Turnstile results in a higher conversion rate.
For high-traffic sites, you can use an additional spam tool like Akismet. It’ll filter the submitted data, which passed through multiple bot detectors.
Build Smarter Forms for Free

Implement the other settings, like IP/country-based restriction, login requirement, unique/advanced validation, etc., on a need basis. Fluent Forms offers multiple options so there’s a solution for everyone. Simply pick the one you’re comfortable with and enable it today.
Protect user data with secure online forms
It’s your responsibility to protect your user data. Fluent Forms understands that responsibility. That’s why it comes with all the spam protection features you’ll need to create secure online forms. And you just saw how easy they are to set up. So no more leaving your forms vulnerable to attack.
You don’t even need all of them. I enabled the built-in solutions (honeypot, double opt-in confirmation, and token-based spam protection) for my friend, and she stopped receiving spam. Maybe you can start there as well. And when you start getting more traffic, use an additional tool. Oh, and don’t forget to thank me when you see your spam rate drop magically!

Sarika writes for Fluent Forms and loves to offer insights into small businesses. She’s curious and enjoys discussing ideas, interests, and perspectives. In her free time, she’s either marvelling at architectural beauties or trying different cuisines.


Leave a Reply