

Fluent Forms Image and File Upload Fields: Setup, Limits, and Use Cases

Some forms can’t do their job with text alone. A job application needs a resume, a support request needs a screenshot, and a sponsorship form needs a logo.
Fluent Forms handles this with two fields: Image Upload and File Upload field. I’ll show you how to set up each one, choose limits that keep junk off your server, decide where files are stored, and style the upload area so it fits the rest of your form.
TL;DR
- File Upload accepts images, audio, video, PDFs, documents, archives, and CSV files. Image Upload accepts images only and adds optional cropping.
- Both fields support WebP and AVIF images, and both require Fluent Forms Pro.
- Set a max file size, a max file count, and only the file types you need. Your server’s own upload limit still applies on top.
- Files can go to Fluent Forms’ default storage or your WordPress Media Library, per field or site-wide.
- Style the upload button or dropzone from Preview & Design → Image or File Button Style, with separate Normal and Hover states.
- To keep large files off your hosting, Cloud Storage Manager for Fluent Forms sends uploads to Google Drive, Dropbox, Amazon S3, OneDrive, or Cloudflare R2.
File Upload vs Image Upload: Which One Do You Need?
Use File Upload when you need documents or mixed file types. Use Image Upload when you only want pictures and care about their shape or size.
| Feature | File Upload | Image Upload |
| Accepted formats | Images, audio, video, PDF, documents, zip archives, executables, CSV | JPG, PNG, GIF, WebP, AVIF |
| Upload interface | Button (default) or Dropzone | Button (default) or Dropzone |
| Image cropping | No | Yes (optional) |
| Limit file size and file count | Yes | Yes |
| Storage choice (Fluent Forms Default or Media Library) | Yes | Yes |
| Best for | Resumes, contracts, press kits, spreadsheets, audio or video samples | Logos, headshots, product photos, profile pictures |
A quick rule: if a visitor might need to send a PDF, pick File Upload. If every submission should be an image, pick Image Upload so you can crop it and restrict formats more tightly. Both fields require Fluent Forms Pro.
How to Add a File Upload Field
Once you have Fluent Forms Pro installed and active,
- Go to Fluent Forms → All Forms and open the form you want to edit, or create a new one from Fluent Forms → New Form.
- In the Input Fields panel on the right, find File Upload and drag it into your form.
- Click the field in the editor to open Input Customization.
- Set the label, button text, interface, and limits (explained below).
- Click Save Form.
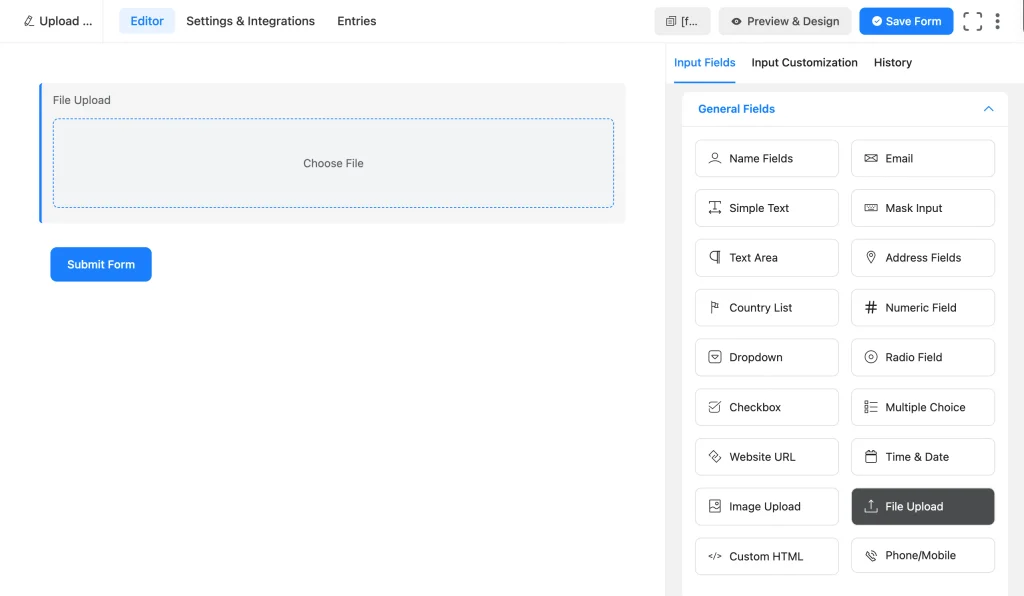
File upload settings
General Settings:
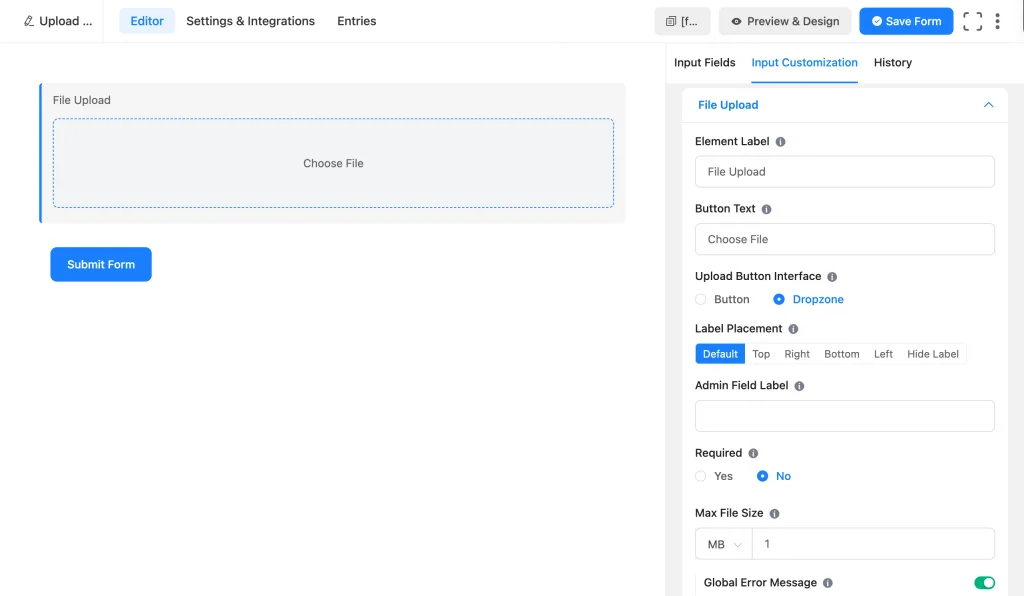
- Element Label: The field title visitors see, like “Upload your resume.”
- Button Text: The text on the upload button or inside the dropzone. “Choose File” by default.
- Upload Button Interface: Button (the default) is a compact button, and the Dropzone is a larger area. Both allow visitors to drag files and open the file picker if clicked.
- Label Placement: Position the label at the Top, Right, Bottom, or Left, hide it, or keep the form’s default.
- Admin Field Label: A separate name shown only in your entries and emails. Useful when the public label is long.
- Required: Blocks submission until a file is attached.
- Max File Size: The largest single file allowed, set in KB or MB.
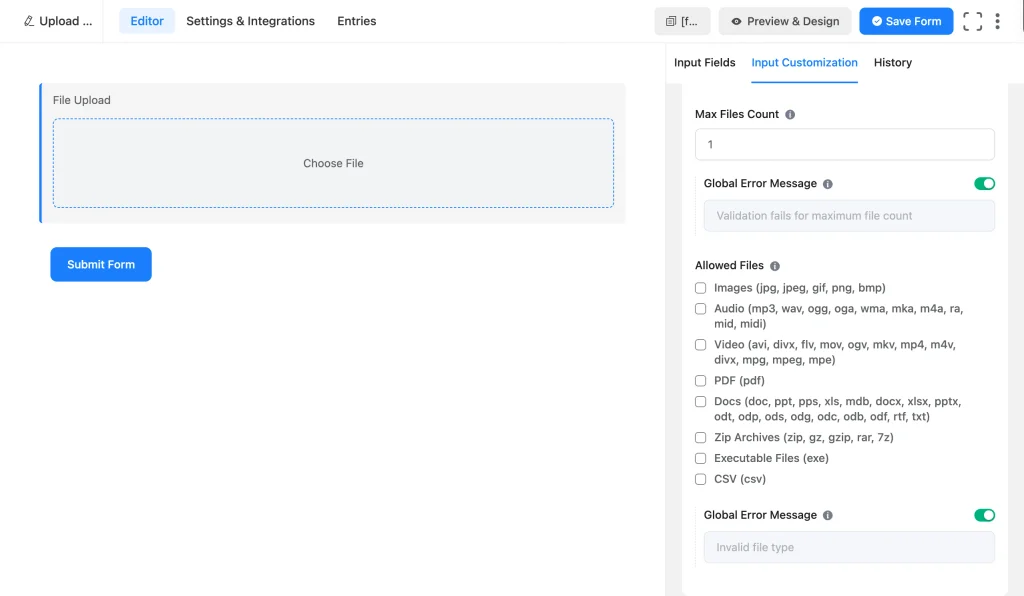
- Max Files Count: The highest number of files one visitor can attach to this field. Raise it above 1 for multi-file submissions.
- Allowed Files: Tick the file categories you’ll accept. The options are Images (jpg, jpeg, gif, png, bmp, plus WebP and AVIF), Audio, Video, PDF, Docs (Word, Excel, PowerPoint, OpenDocument, RTF, and TXT files), Zip Archives, Executable Files, and CSV.
- Global Error Message: Each limit (size, count, type) has its own toggle. Leave it on to use the site-wide message, or toggle it off to write a custom message specific to this field, like “Please upload a PDF under 5 MB.”
Advanced options:
Scroll down and expand Advanced Options. Image Upload has the same set, so I’ll cover them once here.
- Container Class: Adds a CSS class to the field’s wrapper for custom styling.
- Element Class: Adds a CSS class to the upload input itself.
- Help Message: A short hint shown near the field, such as the accepted formats and size limit.
- Name Attribute: The field’s internal name (for example, file-upload). Leave it as is unless you’re referencing the field in code or URL parameters.
- Conditional Logic: Show the field only when another answer matches, for example only when someone selects “I have a portfolio.” Field-level show and hide is available on Fluent Forms’ free plan.
- File Location Type: Where this field’s files are saved.
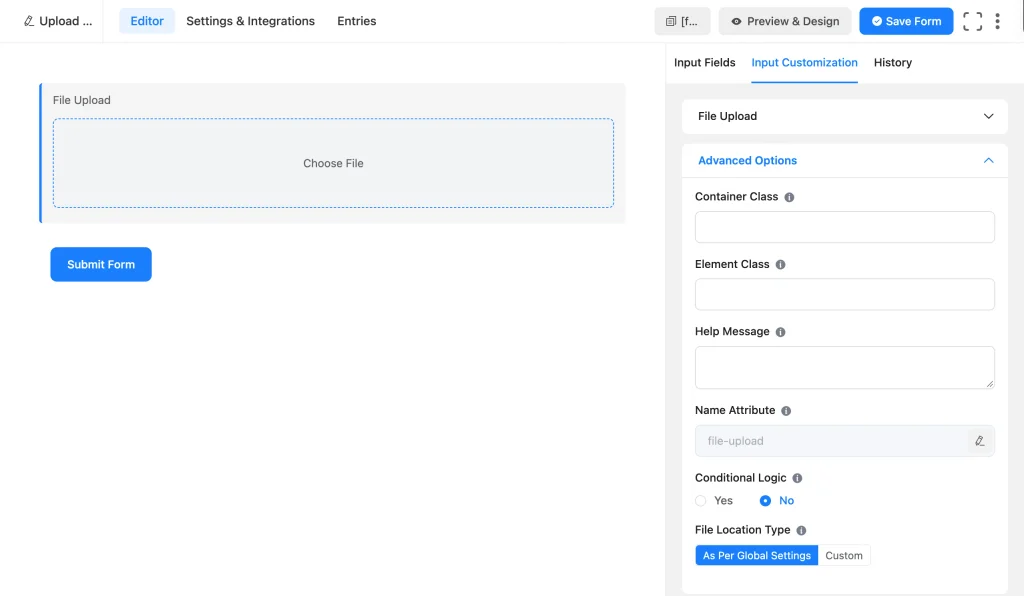
Image Upload works the same way, with a few differences.
How to Add an Image Upload Field
Adding the field follows the same path: drag Image Upload from the Input Fields panel into your form, click it, and adjust its settings under Input Customization.
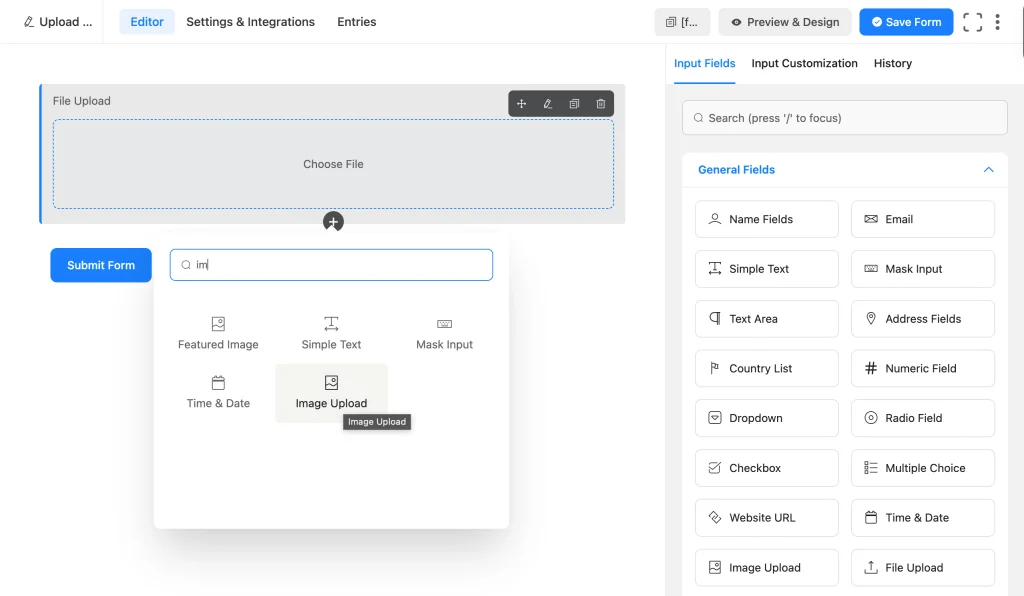
Image upload settings
Element Label, Button Text, Upload Button Interface, Label Placement, Admin Field Label, Required, Max File Size, and Max Files Count work exactly as they do on File Upload. Here’s what’s different:
- File Location Type: Sits in the main settings panel rather than under Advanced Options.
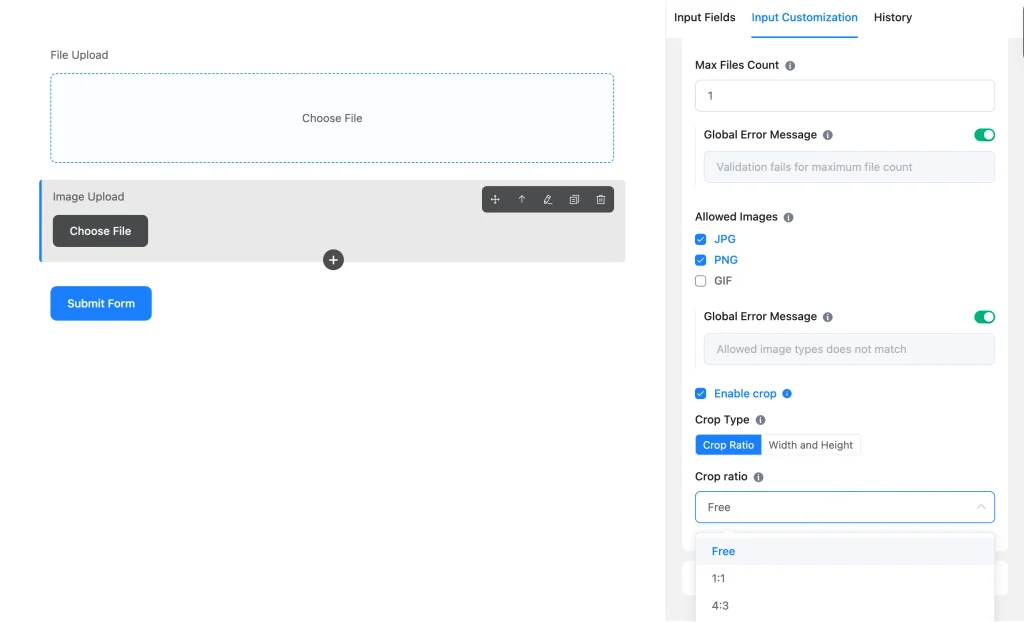
- Allowed Images: Tick the image formats you accept: JPG, PNG, GIF, WebP, and AVIF. WebP and AVIF are smaller than JPG at similar quality, which helps if you plan to display the images on your site later.
- Global Error Message: A separate message for mismatched image types (“Allowed image types does not match” by default), alongside the size and count messages.
Crop images before upload
Cropping is the main reason to choose Image Upload over File Upload. Tick Enable crop, and visitors see a crop window after they pick an image, before it uploads.
- Aspect ratio: Free (no restriction), 1:1, 4:3, 16:9, 3:4, or 9:16. Use 1:1 for profile photos and 16:9 for banners.
- Fixed dimensions: Require an exact width and height in pixels, for example 400 × 400 for a directory headshot.
The crop is also enforced on the server, so only the cropped image is accepted. A visitor can’t skip the crop window and send an uncropped file instead.
How to Set Upload Limits
Setting limits keep your inbox and server clean without blocking submissions.
- Match file size to the job: A resume rarely needs more than 5 MB; a logo or headshot, 2 MB. Video and audio samples need more.
- Allow only the types you’ll open: For a resume, tick PDF and Docs. For a logo, tick Images. Don’t select any extra category.
- Leave Executable Files unticked: There’s rarely a reason to accept .exe files through a public form, as they carry obvious risk.
- Set a file count: One file is the default. Raise it only when the form needs several, like a portfolio or a set of receipts.
- Check your server’s upload limit: Your hosting sets a maximum upload size in PHP (often shown in WordPress under Media → Add New Media File). If your field allows 50 MB but the server caps uploads at 8 MB, files above 8 MB will fail. Ask your host to raise it if needed.
- Write clear error messages: “Validation fails for maximum file size” is accurate but not helpful. “Files must be under 5 MB. Try compressing your PNG.” tells the visitor what to do.
- Tell people the rules up front: Put the accepted formats and size in the Help Message, so visitors know the rules before picking a file.
Upload fields might attract spam bots. Pair them with reCAPTCHA, hCaptcha, Turnstile, or the Honeypot.
Where Your Uploaded Files Are Stored
Every upload field has a File Location Type setting with two choices:
- As Per Global Settings: The field follows your site-wide default. This is the easiest option when all your forms should behave the same way.
- Custom: Set storage for this field only, choosing between Fluent Forms Default and Media Library.
Fluent Forms Default keeps uploads in Fluent Forms’ own upload folder, separate from your site’s media. You can access them through the form’s entries. Media Library saves each upload to your WordPress Media Library, where you can browse, search, and reuse it like any other media file.
Media Library works well for images you’ll publish, such as sponsor logos or community photos. For private documents like resumes or ID scans, keep them out of the Media Library so they aren’t mixed in with public site media.
Finding files in entries
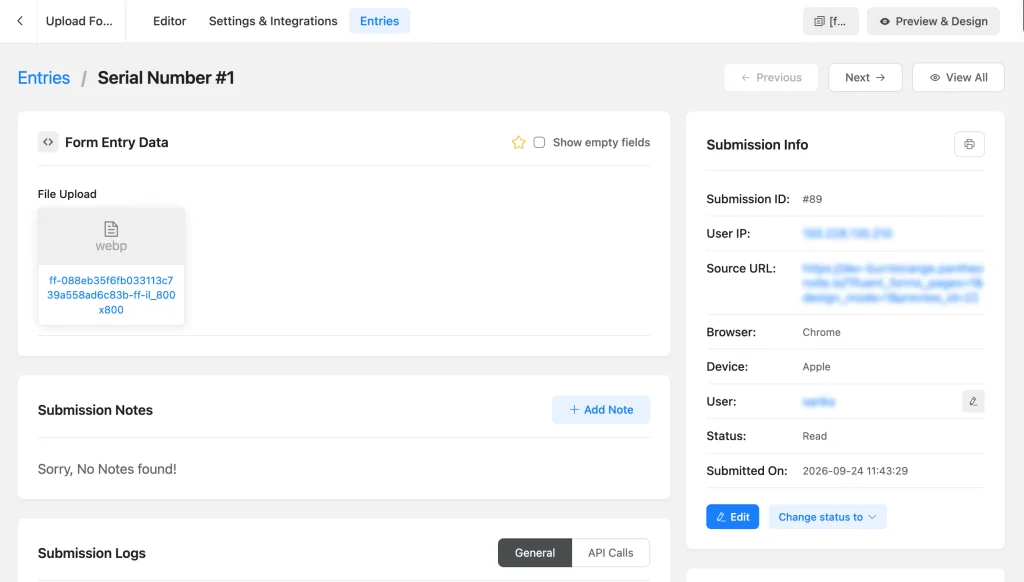
Open Fluent Forms → Entries (or the Entries tab inside a form) and click any submission. Uploaded files appear as links or image previews you can open and download.
Getting files by email
Your email notifications (Settings & Integrations → Email Notifications) can include uploaded files, so the right person gets them without logging in. Fluent Forms recommends sending through SMTP when emails carry attachments, since attachments are more likely to land in spam otherwise.
Bonus: send uploads straight to cloud storage
Both storage options above keep files on your own server. If you collect large video, audio, or design files, or simply a lot of uploads, your hosting space fills up quickly. To avoid that, you can directly send them to the cloud with Cloud Storage Manager for Fluent Forms.
It’s a separate plugin made by FluentWiz, an approved WPManageNinja agency, not a built-in Fluent Forms feature. It works with Fluent Forms Pro, since the upload fields themselves need Pro.
- Free version: Google Drive and Dropbox.
- Cloud Storage Manager Pro: adds Amazon S3, Microsoft OneDrive, and Cloudflare R2.
- Auto-cleanup: Delete the local copy after it reaches the cloud, and remove cloud files when you delete the entry.
- Organized folders: Automatically build subfolders from form data, such as one folder per applicant.
- One destination at a time: Only one cloud storage service can be active at once.
How to Style Your Upload Fields
You can match both the upload button and the dropzone to your brand from the form styler, without writing CSS.
- Save your form, then click Preview & Design in the top bar.
- In the styling panel, click the General tab, then check Customize Selected Preset and open Image or File Button Style.
- Pick the Normal tab to style the default state, then the Hover tab to style what visitors see when their cursor is over it.
- Adjust the settings below and watch the preview update.
- Use the desktop, tablet, and mobile icons above the preview to check each screen size.
- Click Save Settings.
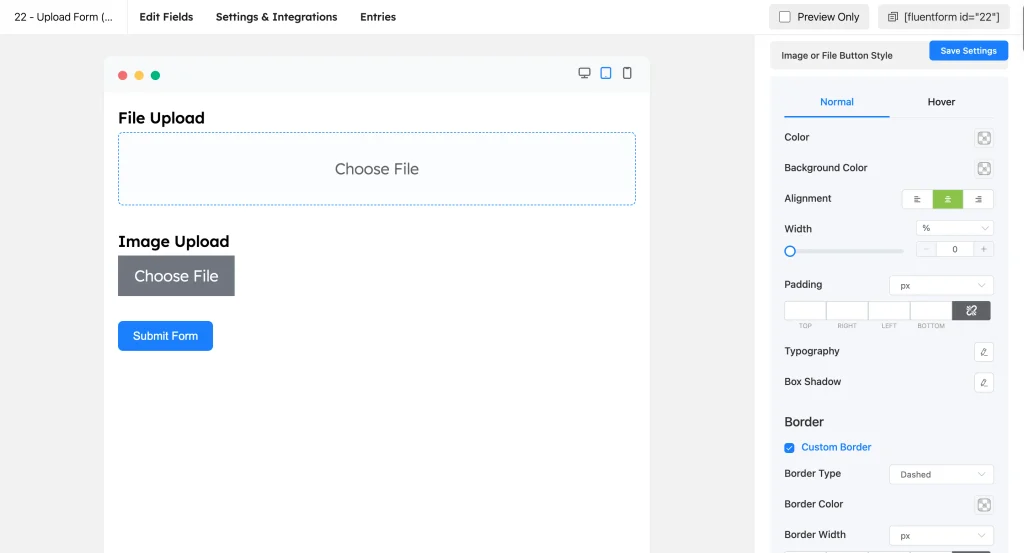
Here’s what each setting controls:
- Color: The text color of the button or dropzone label.
- Background Color: The fill behind the button or inside the dropzone.
- Alignment: Left, center, or right.
- Width: Button width in % or other units. Set it to 100% for a full-width button on mobile.
- Padding: Space inside the button, per side or linked.
- Typography: Font size, weight, line height, letter spacing, and text decoration.
- Box Shadow: Adds depth so the upload area stands out from text inputs.
- Border: Tick Custom Border to set the Border Type (solid, dashed, dotted, double, etc.), Border Color, Border Width, and Border Radius. A dashed border tells visitors “drop files here” at a glance.
When to Use File and Image Upload Fields
Job and program applications
Collect resumes and cover letters with File Upload, limited to PDF and Docs, 5 MB, up to 2 files. If you’re reviewing applications in stages, you can build a custom application tracker along with the entries.
Press kits and media requests
Artists, speakers, and brands often send a bio PDF, a few photos, and an audio or video sample. File Upload with PDF, Images, Audio, and Zip Archives covers it.
Sponsorship and partner logos
Image Upload limited to PNG and WebP keeps logos usable for your sponsor page, since both formats support transparent backgrounds. Save them to the Media Library so they’re ready to place on the site.
Support requests with screenshots
A screenshot often explains a bug faster than a paragraph. Add an optional Image Upload field, up to 3 images at 2 MB each.
Profile photos and directory headshots
Image Upload with crop on, a 1:1 aspect ratio, so every photo in your directory or team page look consistent.
Multi-file project submissions
Client briefs, contest entries, and assignments often come as several files. Raise Max Files Count so visitors can drag everything in at once. The Multi-file Upload Form template gives you a ready starting point with name, email, title, message, and upload fields.
Free vs Pro at a Glance
| Field / Feature | Free | Pro |
| File Upload field | No | Yes |
| Image Upload field | No | Yes |
| Image crop | No | Yes |
| Advanced form styler (Image or File Button Style) | No | Yes |
| Field-level Conditional Logic | Yes | Yes |
| Entries view and export | Yes | Yes |
| reCAPTCHA, hCaptcha, Turnstile, Honeypot | Yes | Yes |
Cloud Storage Manager is a separate plugin with its own free and Pro versions, so it isn’t listed here.
Frequently Asked Questions
Is the file upload field free in Fluent Forms?
No. Both File Upload and Image Upload require Fluent Forms Pro. The rest of a typical form, such as Name, Email, and Text Area, works in the free plugin.
What’s the difference between File Upload and Image Upload?
File Upload accepts many file types, including PDFs, documents, audio, video, and archives. Image Upload accepts only images (JPG, PNG, GIF, WebP, AVIF) and can crop them to a set shape or size before upload.
Does Fluent Forms support WebP and AVIF uploads?
Yes. Both the File Upload and Image Upload fields accept WebP and AVIF images.
Can visitors upload more than one file?
Yes. Raise the Max Files Count on the field. The limit applies per field, so you can also add separate upload fields for different documents, like one for a resume and one for a portfolio.
Why do large files fail even though I set a high Max File Size?
Your server has its own upload limit, which overrides the field’s setting. Check it in WordPress under Media → Add New Media File, and ask your host to raise it if needed.
Can uploaded files go to the WordPress Media Library?
Yes. Set File Location Type to Custom and choose Media Library for that field, or set it site-wide and leave the field on As Per Global Settings
Can I send uploaded files to Google Drive or Dropbox?
Yes, with Cloud Storage Manager for Fluent Forms, a separate plugin from FluentWiz. Its free version covers Google Drive and Dropbox; its Pro version adds Amazon S3, OneDrive, and Cloudflare R2.
Can I make the upload field appear only for certain answers?
Yes. Turn on Conditional Logic under the field’s Advanced Options and set the rule, for example showing a portfolio upload only when someone answers “Yes” to “Do you have work samples?”
Start Collecting Files Through Your Forms
You now have everything you need to replace “email it to us” with an upload field: the right field for the job, limits that keep submissions clean, storage that fits how you work, and a button or dropzone styled to match your form.
Start with one form that currently relies on email attachments, add a File Upload or Image Upload field, and send a test submission. Both fields come with Fluent Forms Pro, along with the form styler and all Pro features.

Sarika writes for Fluent Forms and loves to offer insights into small businesses. She’s curious and enjoys discussing ideas, interests, and perspectives. In her free time, she’s either marvelling at architectural beauties or trying different cuisines.




Leave a Reply