

How to Create a Support Request Form in WordPress
A good support request form does three things: it asks for the details you need, sorts each request by type, and sends it to the right team. You can build one in WordPress with Fluent Forms in a few minutes, mostly using free features. I’ll show you the whole setup, from planning your categories to routing requests and sending an automated success message.
TL;DR
- A support request form collects structured details (category, subject, description, attachment) so you can prioritize and route requests.
- Plan your categories and the team that owns each one before you build. This keeps setup fast and routing accurate.
- Use a Dropdown field for the main category, then show category-specific sub-issue dropdowns with conditional logic so the form stays neat.
- Core fields (name, email, dropdown, simple text, text area) are free. File Upload, conditional email routing, and conditional confirmations are Pro features.
- Route each category to the right team with a conditional email routing per category, and add an admin notification as a backup.
- Confirm submission with an on-screen message and a user notification email so requesters know their request is received.
- Connect Fluent Support to manage submissions as help desk tickets as your business grows.
Support Request Form: What It Is and Purpose
A support request form is a structured intake form that lets visitors report a problem or ask for help. It captures who they are, what type of issue they have, and the details you need to act, all in one submission.
A plain contact form asks for a name, an email, and a message. That works for a general query. But it falls short for support, because every request adds to the same pile with no category, no priority, and often no useful detail.
A support request form fixes that by adding structure. You ask the requester to pick a category, describe the issue, and attach any screenshots. Now each submission arrives sorted and ready to assign. That difference turns a generic inbox into a workflow.
Why a Categorized Support Form Beats a Shared Inbox
A shared inbox treats every request the same. A billing question, a login bug, and a partnership inquiry all land next to each other, and someone has to read each one to sort them.
A categorized form does that sorting up front. Here’s what you get:
- Faster sorting: the category tells you where a request belongs before anyone reads the full message.
- Routes to the right team: a billing request goes to billing, a technical request goes to your developers. No forwarding chain.
- Fewer follow-up emails: the form asks for the details you always end up requesting, so you get them on the first pass.
- Cleaner records: every request is stored as an entry you can search, filter, and export.
What You’ll Need to Create an Effective Support Form
Before you build, make sure you have:
- A WordPress website
- Fluent Forms installed and activated (the free version is enough to start)
- A short plan of your support categories and which team owns each one
Most of this form runs on free fields. A few features need Fluent Forms Pro, and I’ll flag each one as we reach it. Here’s the split:
| Feature | Free | Pro |
| Name, Email, Dropdown, Text, Text Area fields | Yes | Yes |
| Conditional logic to show or hide fields | Yes | Yes |
| Spam protection (reCAPTCHA, hCaptcha, Turnstile) | Yes | Yes |
| File Upload field (for screenshots) | No | Yes |
| Conditional email notifications (route by category) | No | Yes |
| Conditional confirmation messages | No | Yes |
If you’re new to the plugin, start with the Fluent Forms starter guide.
Plan Your Categories and Fields
Outline the form before you open the builder.
Define your support categories
Start with 3 to 5 categories that cover most of what people contact you about. If you don’t list enough categories, users keep selecting “Other.” If you define too many, they start overthinking on the first question.
For this tutorial, I’m using three:
- Technical issue: bugs, login problems, integration errors.
- Billing or account: payments, subscriptions, invoices, account access.
- General question: product questions, partnerships, feedback.
Map each category to a team
Decide who receives each type of request. This map becomes your routing rules later.
| Category | Goes to | Owner email |
| Technical issue | Support engineers | [email protected] |
| Billing or account | Billing team | [email protected] |
| General question | Front desk/general support | [email protected] |
Decide your core fields
Keep the form short. Every extra field lowers the chance someone finishes it. These fields cover most support requests:
- Name and Email, so you know who to reply to.
- Category, the dropdown that drives routing.
- An optional sub-issue dropdown that appears based on the category.
- Subject, a one-line summary.
- Description, the full details.
- Attachment, so requesters can add screenshots.
How to Build a Support Request Form in Fluent Forms
With your plan ready, the build in Fluent Forms is quick. Follow these steps in your WordPress dashboard.
Step 1: Create a new form
Go to Fluent Forms > New Form. You have two ways to start:
- From a template: You can start with the Support Form template. It comes with a category dropdown and conditional sub-issue fields already set up, so you can tweak instead of build from scratch. From your dashboard, navigate to Fluent Forms > New Form > Create A New Form > Choose a Template. Search for the Support Form Template.
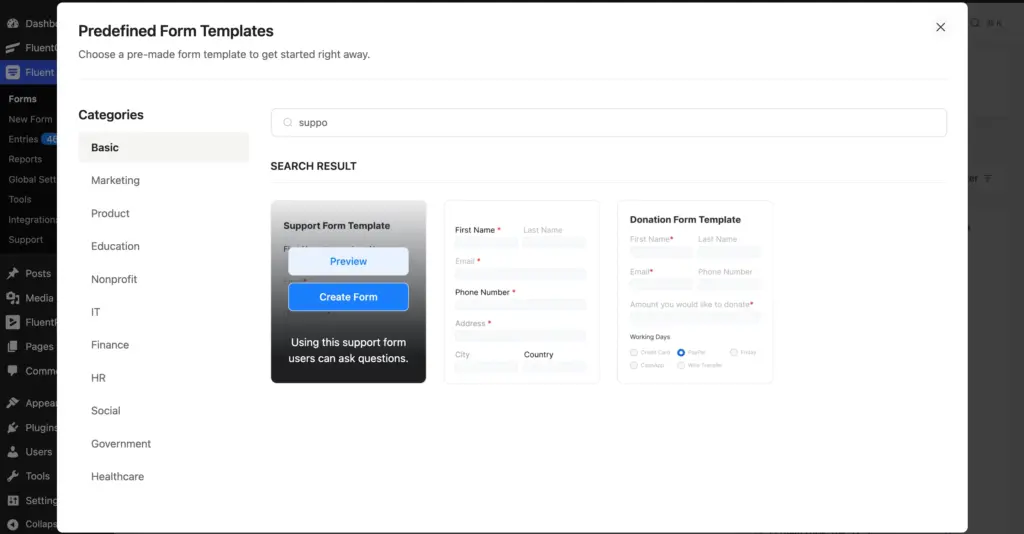
- Start from Scratch: choose Create a Blank Form if you’d rather add each field yourself. This is the approach we’re taking in this tutorial.
Give your form a name, like “Support Request Form,” in the editor.
Step 2: Add contact fields
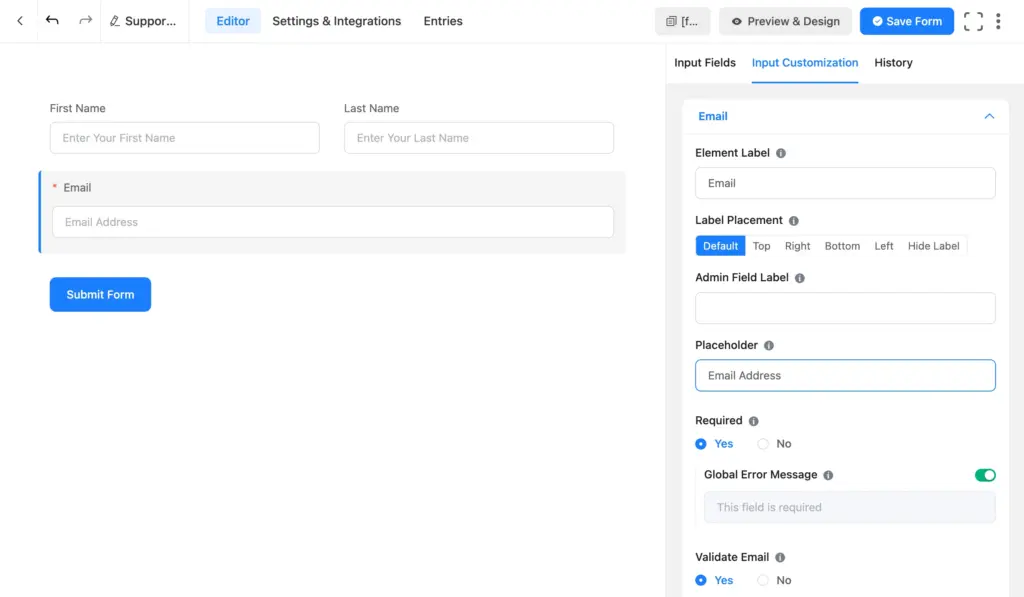
From the input fields on the right, drag a Name field and an Email field onto the form.
Click each field and mark it required under Input Customization. You need a valid email to reply, so the email field should always be required.
Step 3: Add the category dropdown
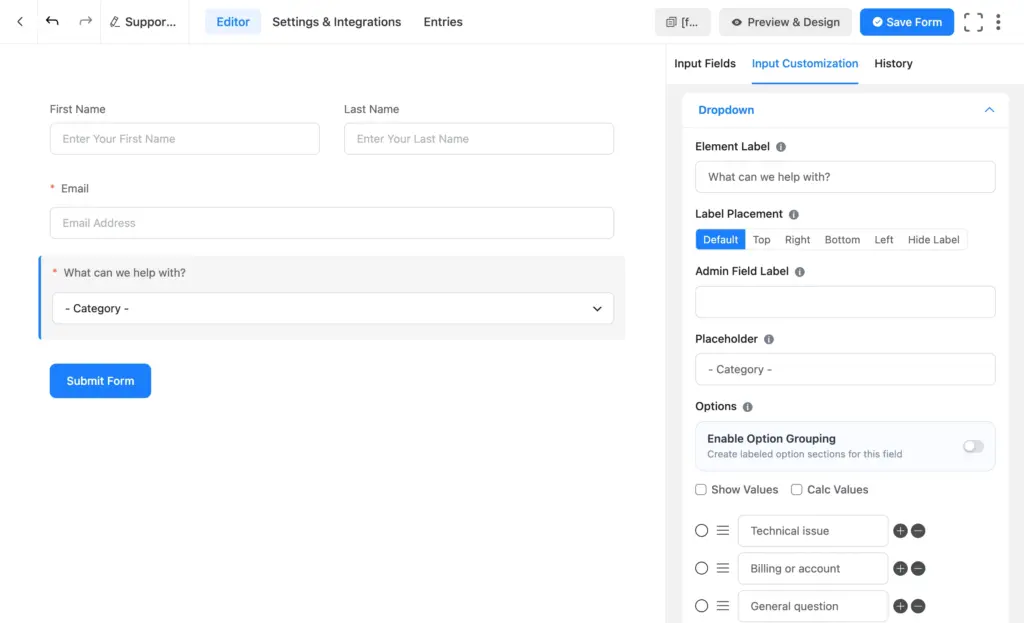
Drag a Dropdown field onto the form below the contact fields. In Element Label, type “What can we help with?” or “Category.”
In the Options section, add your categories:
- Technical issue
- Billing or account
- General question
Mark the field required, as you’ll need to route email notifications to respective teams based on category.
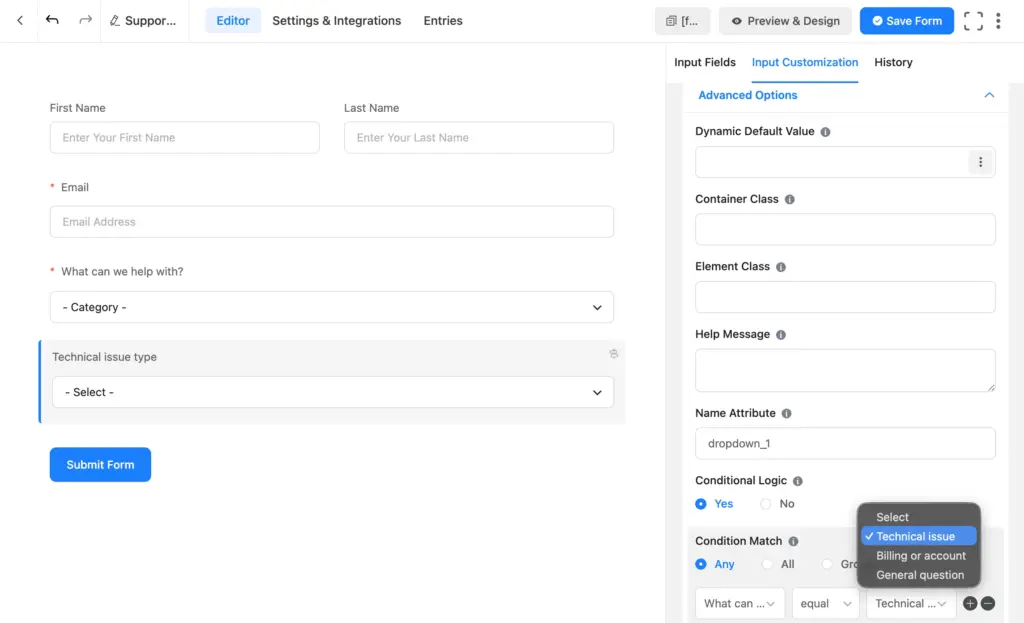
Step 4: Add conditional sub-issue fields
A sub-issue dropdown narrows the request without cluttering the form. You’ll add a sub-issue field per category and show it only when that category is selected.
Drag a second Dropdown field and label it “Technical issue type.” Add sub-options like Software bug, Integration problem, and Other.
Now apply conditional logic. In Fluent Forms, you always set the condition on the field you want to show or hide, not on the category field. So:
- Click the “Technical issue type” dropdown.
- Open Advanced Options and turn on Conditional Logic.
- Create the rule: show this field when Category equal Technical issue.
Repeat this for a “Billing issue type” dropdown and a “General question type” dropdown, each with its own condition tied to its category. Click Save Form when you’re done.
Step 5: Add subject, description, and file upload
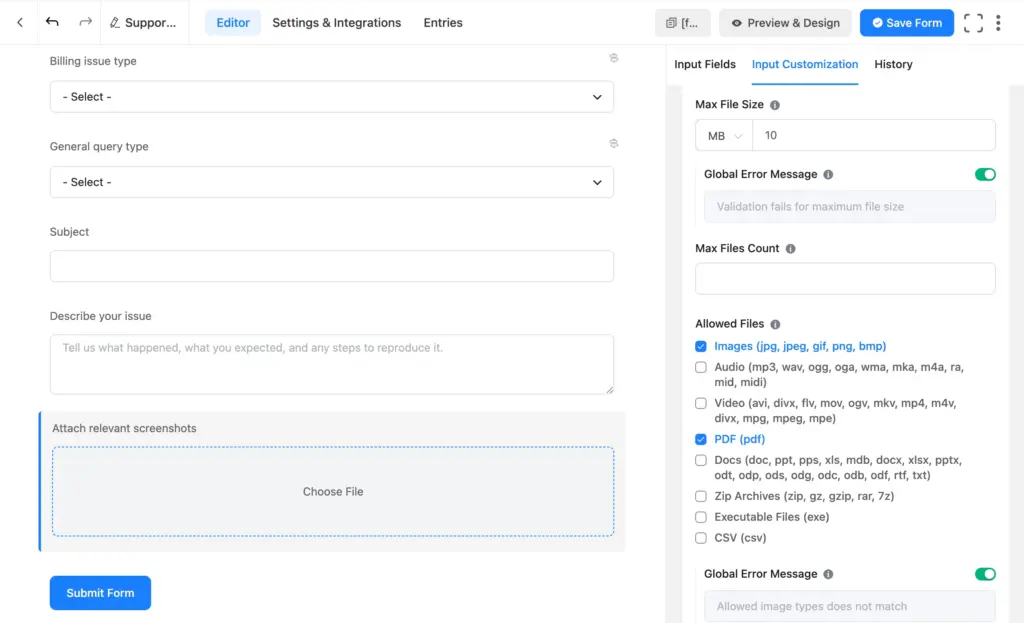
Drag a Simple Text field and label it “Subject.” This gives you a scannable one-line summary in your entries list.
Next, drag a Text Area field labeled “Describe your issue.” Add placeholder text that prompts good detail, such as “Tell us what happened, what you expected, and any steps to reproduce it.” If you’d like requesters to format their description with headings, bold, lists, or links, use a Rich Text field instead (it’s a Pro field).
To let requesters attach a screenshot, drag a File Upload field onto the form. File Upload is a Pro field. Set the allowed file types (images and PDFs cover most support cases) and a size limit so uploads stay manageable.
Step 6: Add spam protection
Public forms attract spam. Drag a reCAPTCHA, hCaptcha, or Turnstile field onto the form, then connect your keys under Global Settings. All three are available in the free version.
Click Save Form. Your fields are ready. Now let’s route each request to the right place.
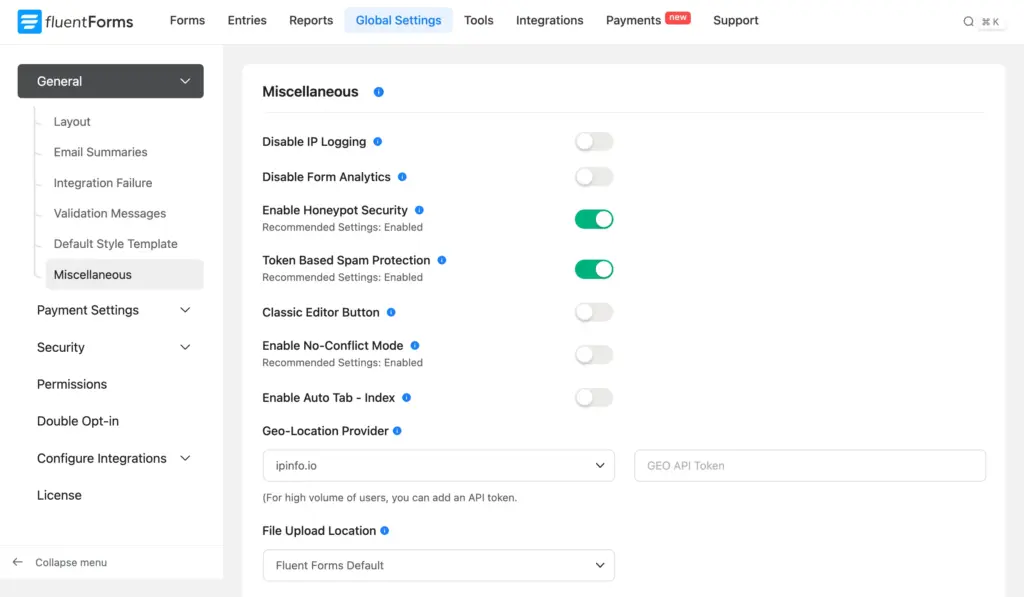
Fluent Forms also offers built-in spam protection options. Enable Honeypot Security under Global Settings > General > Miscellaneous to catch bots with a trap (hidden field that humans never see). Token-based spam protection in the same panel rejects any submission missing a valid form token. And under an individual form’s settings, you can block empty submissions by lazy bots. Honeypot, token-based protection, and empty-submission blocking are all free.
For an extra layer, double opt-in sends a verification link to the requester’s email and holds the submission until they click it, so bots and fake emails never qualify. It’s a Pro feature and needs to be enabled in two layers: globally under Global Settings > Double Opt-in, then per form under Settings & Integrations > Confirmation Settings > Double Opt-in Confirmation.
Route Requests to the Right Team
Instead of every submission coming to the same inbox, each category goes straight to the team that handles it. You’ll set this up with email notifications.
Set up the default admin notification
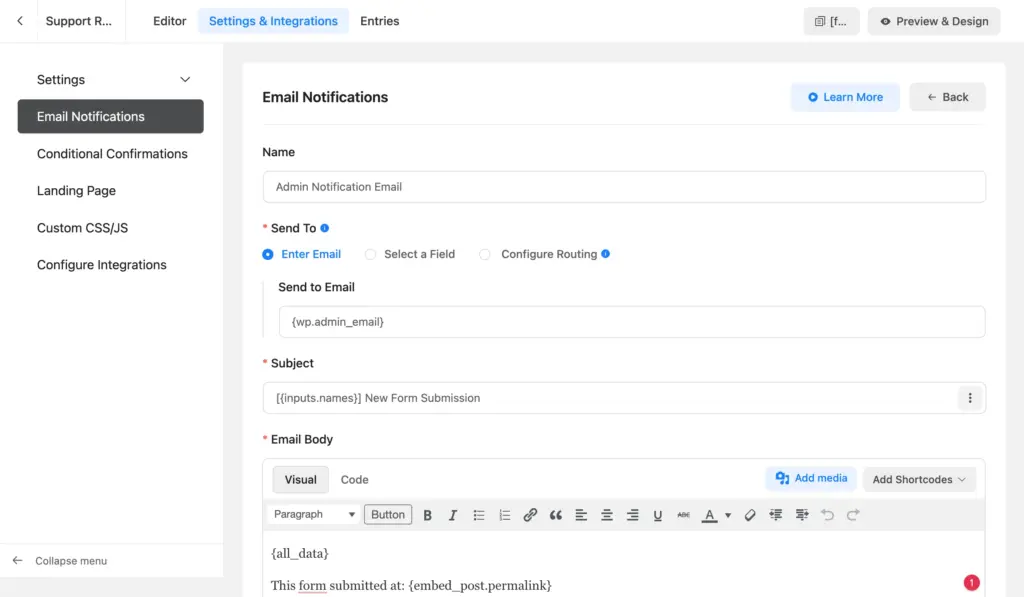
Go to Settings & Integrations > Email Notifications. Fluent Forms creates a default admin notification for you. Open it and set the Send To address to {wp.admin_email}.
This notification acts as your backup. Even if a routing rule misses, someone still sees every request. Use the Email Body shortcodes to pull in the requester’s name, email, category, subject, and description so the notification is useful on its own. Scroll down to Email Attachments and check Attach relevant screenshots.
Route each category to designated teams
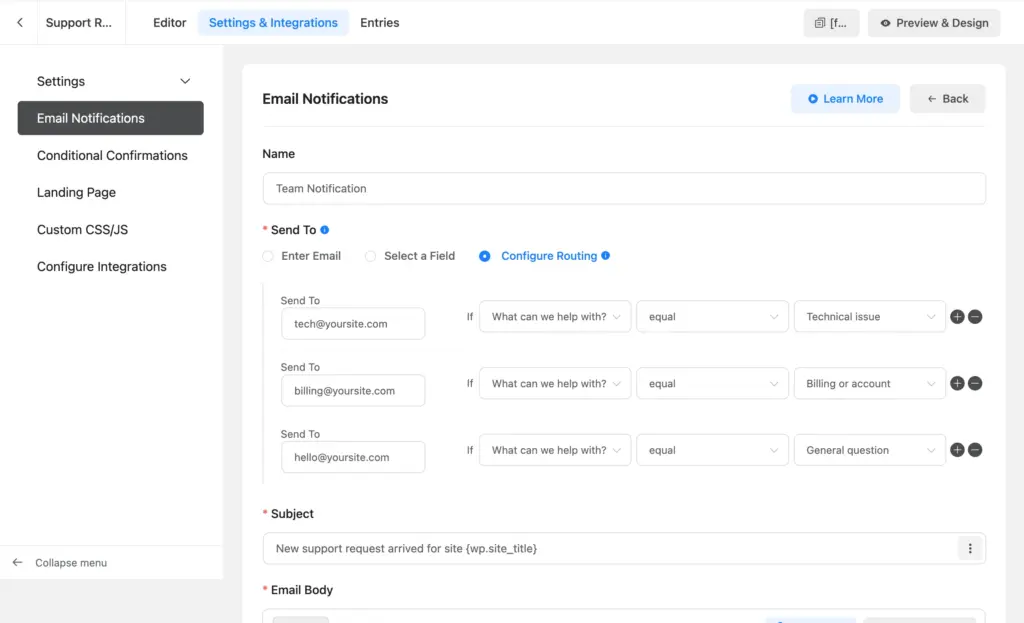
You can route emails to different teams from a single notification using conditional email routing (Pro). Go to your form’s Settings & Integrations > Email Notifications and click Add Notification. Give it a name like “Support routing,” then set the Send To option to Configure Routing.
Now add one row per team. In each row, enter the team’s email address and set the condition:
- Enter the email address, like [email protected].
- Set the condition: select Category in the first box, equal in the middle box, and Technical issue in the last box.
- Click the Plus icon to add another row, then repeat for billing ([email protected]) and general ([email protected]), each with its matching category condition.
Write a clear subject and body, and pull in the requester’s details with the field shortcodes so each team gets a useful email. Click Save Notification.
Now notifications automatically route to concerned teams: a billing request emails billing, a technical request emails your engineers, and the admin notification you set earlier still logs everything.
Other ways to get notified
Email isn’t your only option. If your team lives in Slack, the Slack integration (a Pro feature) posts a message to a channel on every submission, so new requests show up where you already work. And every request is stored under Entries in your dashboard, where you can search, filter, and export them, even if an email is missed.
Confirm Submission to the Requester
People want to know their request went through. Two settings handle this.
First, the on-screen confirmation. Go to Settings & Integrations > Confirmation Settings and write a message that tells the requester what happens next, like “Thanks, we’ve received your request and will reply within one business day.” On Pro, you can use Conditional Confirmations to show a different message per category.
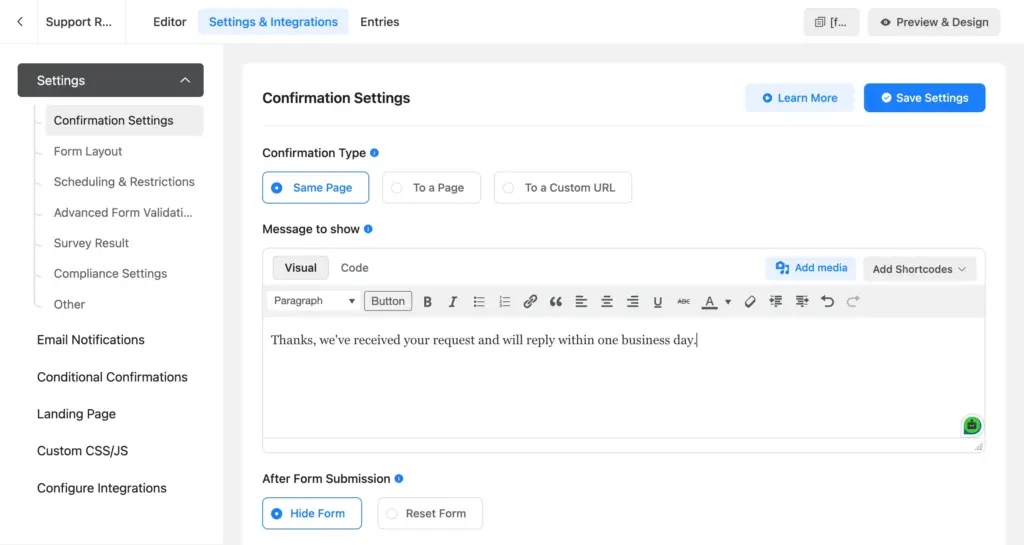
Second, a confirmation email to the requester. Add another notification under Email Notifications, set Send To to the email shortcode from your form’s email field, and write a short “we got your request” message. This closes the loop without any manual work.
Connect FluentSMTP for these emails to reach the inbox reliably (without going to spam).
Publish Your Support Form
Your form is ready to go live. You have a few options:
- Gutenberg block: edit any page or post, add the Fluent Forms block, and pick your support form.
- Shortcode: copy the form’s shortcode from the editor and paste it into any page, post, or widget.
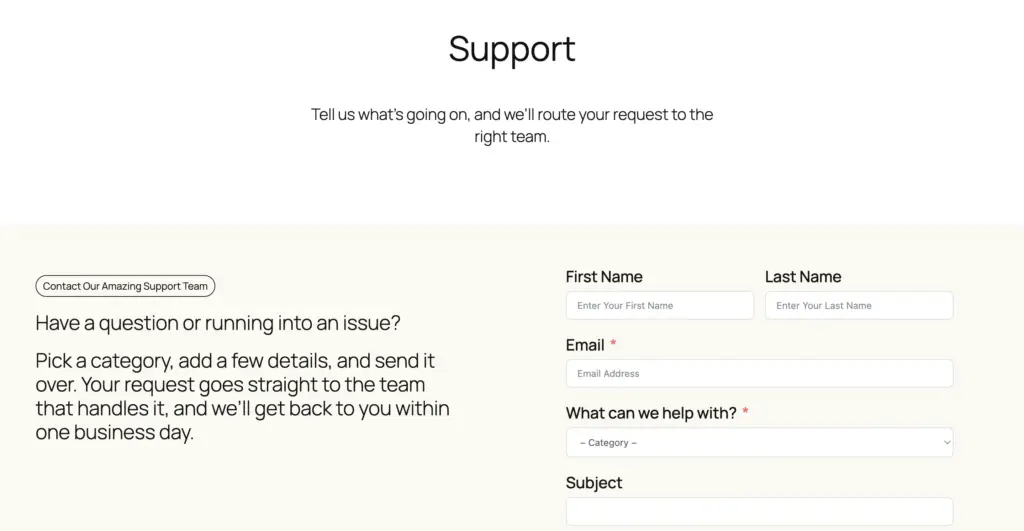
- Dedicated support page: create a page called “Support” or “Contact Support,” embed the form, and link to it from your main menu and footer.
A dedicated support page is the strongest choice. It gives requesters an obvious place to go and keeps support traffic separate from general contact.
Turn Submissions Into Managed Tickets (Optional)
Email routing works well for lower volumes. As requests grow, you’ll want status tracking, assignment, and a history per customer. That’s where a help desk comes in.
Fluent Support is a help desk plugin for WordPress from the same team as Fluent Forms, and the two connect directly on the free tier. If you have Fluent Support configured, each form submission opens a ticket automatically once you create an integration feed. Your support request form entries go into a full ticketing workflow with statuses, agents, and replies in one place.
Here’s how to connect the two:
- Install and activate the Fluent Support plugin on your site.
- In your Fluent Forms dashboard, go to Integrations, search for Fluent Support, and turn on the toggle to enable the module.
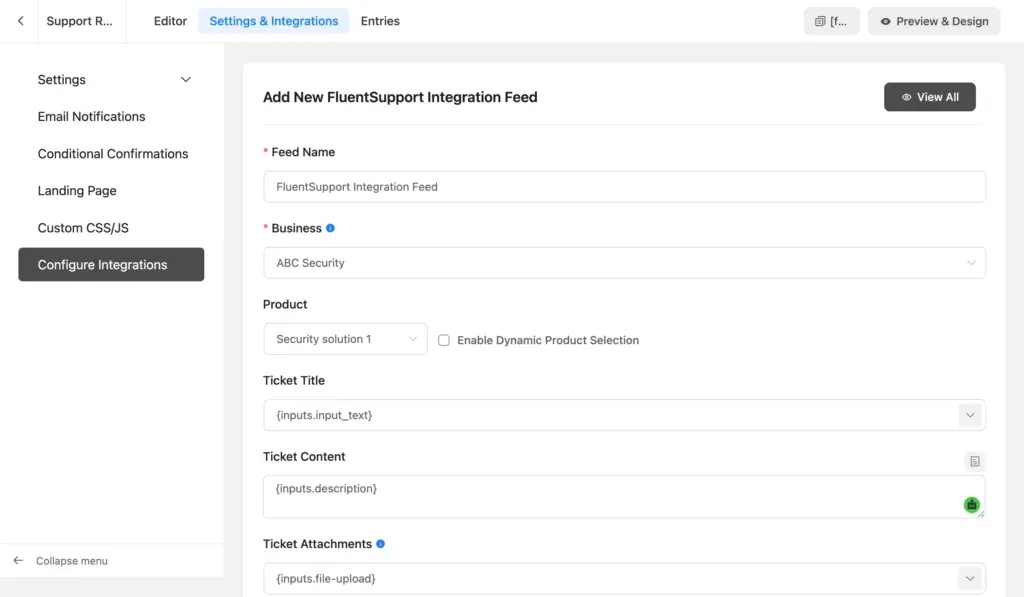
- Open your support form and go to Settings & Integrations > Configure Integrations. Open the Add New Integration dropdown and select Fluent Support Integration.
- Give the feed a name, then pick the Business (inbox) and Product the tickets should land under.
- Map your form fields to the ticket fields: name, email, subject, and description should connect to the matching ticket field. You can map the category to a ticket tag so requests stay organized.
- Click Save Feed.
Now every submission creates a ticket in Fluent Support, assigned to the right inbox and ready to work. You don’t need this to launch. Start with the form and email routing, then add Fluent Support when your volume calls for it.
Tips to Create a Helpful Support Form
- Ask only for what you’ll act on: Every field you cut lifts your completion rate. Add fields when a category genuinely needs them, using conditional logic.
- Write helpful placeholder text: A description prompt like “what happened, what you expected, steps to reproduce” gets you better first submissions and fewer follow-ups.
- Test every category path: Submit one request per category and confirm the right sub-issue field appears, and the right team receives the email.
- Keep option labels stable: Renaming a category option can break the conditional rules that depend on it. If you rename one, recheck every rule that references it.
- Set expectations on the confirmation: Tell people when they’ll hear back. It reduces “did you get my message?” follow-ups.
Build Your Support Request Form Today
A support request form turns messy, scattered requests into a clean, routed workflow. Requesters pick a category, add the details you need, and attach relevant screenshots. Each request routes to the right team, and everyone gets a confirmation that it arrived.
You can build the whole system with Fluent Forms, most of it on free fields, and add Pro routing and file uploads when you’re ready. Plan your categories, drop in the fields, set up the notifications, and publish.
Download Fluent Forms free and start from the Support Form template. When your request volume grows, connect Fluent Support to manage the requests as tickets.
Build Smarter Forms for Free

Sarika writes for Fluent Forms and loves to offer insights into small businesses. She’s curious and enjoys discussing ideas, interests, and perspectives. In her free time, she’s either marvelling at architectural beauties or trying different cuisines.



Leave a Reply