How to Create Reservation Forms Online to Get Booking Requests
Are you running a small or medium business in the industry of hospitality, food and beverage, travel and tourism, or community programmes? Do you often need to get requests from your website visitors about reservations?
This blog will lead you to creating reservation forms for hotels, restaurants, guest houses, party and community halls, and all relevant spaces.
Let’s dive into the context, requirements, and steps to build reservation forms for WordPress websites–
Most common types of reservation forms
Reservation forms have multiple business purposes. If you have created an online reservation form for your website, you can reuse it multiple times by making slight changes.
Hotel reservation form
A hotel reservation form or hotel room booking form is a crucial page on a hospitality business website. It can easily be linked to a promotional email or social media ad with a ‘Book Now’ button. Users can place a reservation or simply check the cost, availability, and payment method after filling out the form.
Restaurant reservation form
Whether it’s a restaurant’s special zone, buffet dinner, or a whole reservation for an event, you can use a decorated reservation form for all similar purposes. You can add the preference of dishes, additional guests, etc your restaurant reservation form.
Travel reservation form
A travel reservation form gathers and forwards the data on where a traveler is going to stay, and how many days, including the food preference, places wished to see, vehicles, and their departure time, participation in events, payment details, special requests, and so on.
Guest house reservation form
A guest house reservation form is not limited to just check-in and check out time, payment, food, or confirming the number of guests, it can be decorated with preference of direction to the sun, timing of using the pool, BBQ details, privacy and hospitality terms, child care faciliy, and many useful and exciting points which bring more engagement.
Event reservation form
An event reservation form is a significant online business form for party centers, clubs, community halls, conference centers, and similar ones. An event booking form concerns a broad arena, including conferences, wedding ceremonies, school parties, graduate parties, cultural programmes, concerts, and corporate events.
It’s not about a simple form with just date and time, number of attendees, and payment. An event reservation form can be built with superb concentration that includes special dietary requests, optional services, a digital signature regarding an agreement, parking allotment, event media/document upload fields, etc.
Fields and features that make a reservation form great
Every reservation form needs some basic and advanced fields packed with a few actionable features. A reservation forms look great when it’s at a time a contact form, a booking form, and a payment form.
Basic fields
In terms of a reservation form, a form submitter’s name, email, address, phone, and organization/company name are very basic fields. If you use a booking template, you will find this at a glance.
Conditional logic
Conditional logic in a booking or appointment form specifies the exact matches depending on the conditions.
Confirmation message
Your site visitors should know once they have successfully submitted a reservation form. If you add proper shortcodes to the confirmation email, the submitters will get the summary of their reservation data along with the reservation confirmation.
Date and time range
A calendar embedded with a proper range of dates, eliminating invalid dates, and then your users are all set to choose a reservation date.
Steps to create a reservation form on WordPress
Creating a reservation form for WordPress requires a contact form plugin like Fluent Forms, the fastest WordPress form builder trusted by 600,000+ businesses. You can follow a few simple steps to create a WordPress reservation form with the necessary field inputs and some customization.
Step 1: Create a new form
First of all, you need to install Fluent Forms on your WordPress website. Now go to Fluent Forms on your WordPress Dashboard, and then click on Add New Form. This will take you to a form-building page.
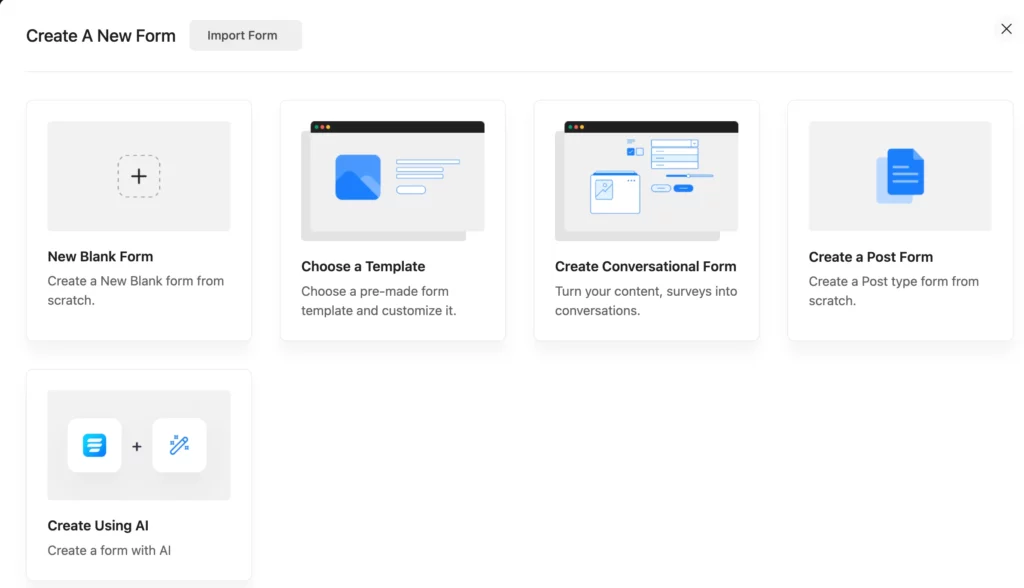
As you see, you can create the whole form to your preference using the New Blank Form option, or you can also go for the Choose a Template or Create Using AI (Fluent Forms has a free AI form Builder!).
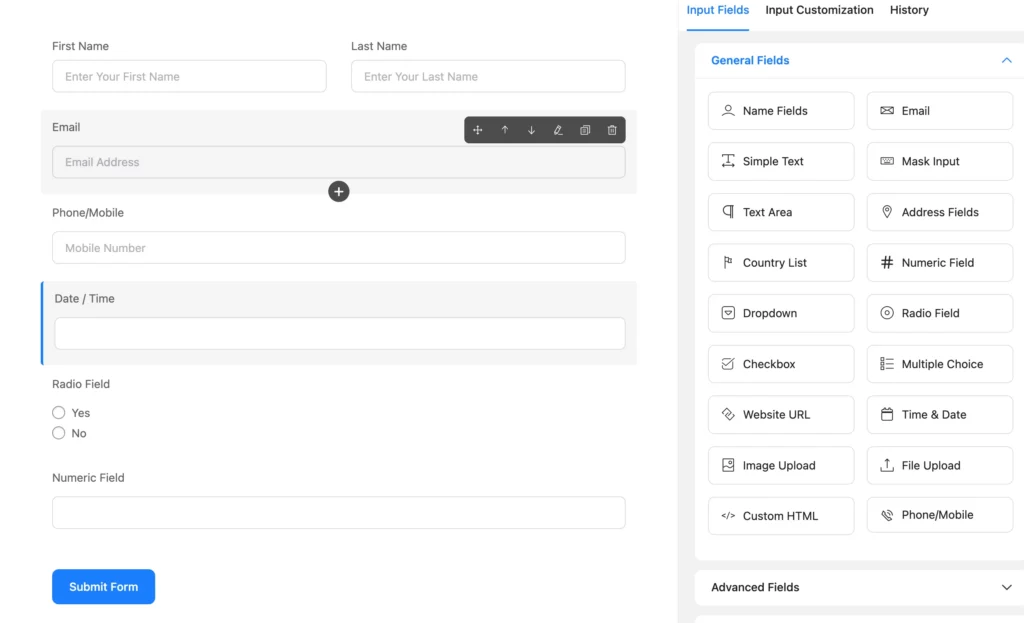
Step 2: Add necessary fields
Let’s say you are creating your reservation form using the new blank form, you need to gather the relevant data depending on your business pattern.
You will need entry fields for name(or company/organization name), address, email, phone number, date and time, payment method, number of guests/attendees, allotment summary, special requests, etc.
So, you need to select Fluent Forms fields by just clicking on the required field buttons, or you can simply drag and drop.
Step 3: Customizing the fields
Let’s customize the fields of this form to your needs.
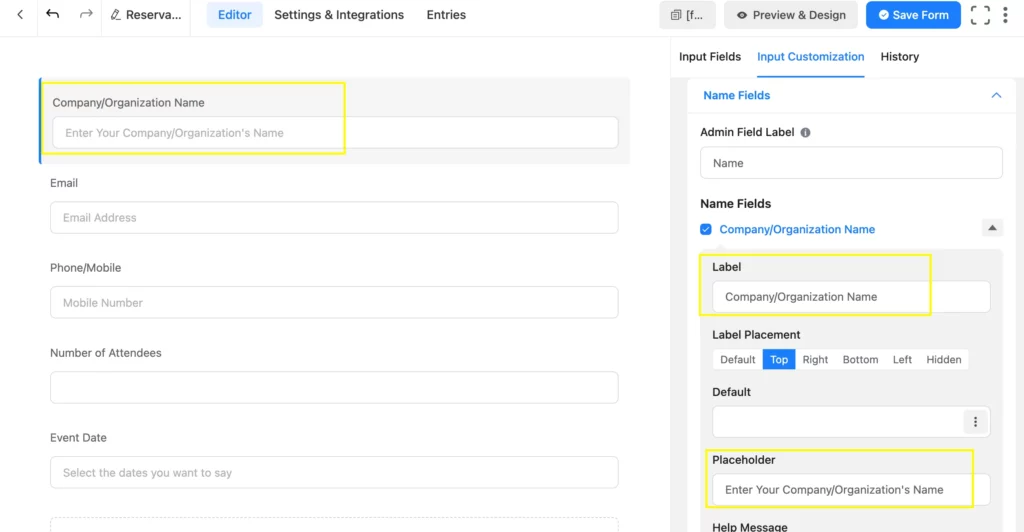
Step 3.1: Customizing the name field
You need to customize the fields according to the requirements of your business. For example, you can change the First Name and Last Name buttons to a single name field as Company/Organization Name.
As you can see here in the image below, you can customize the name Label and Placeholder by using the Input Customization.
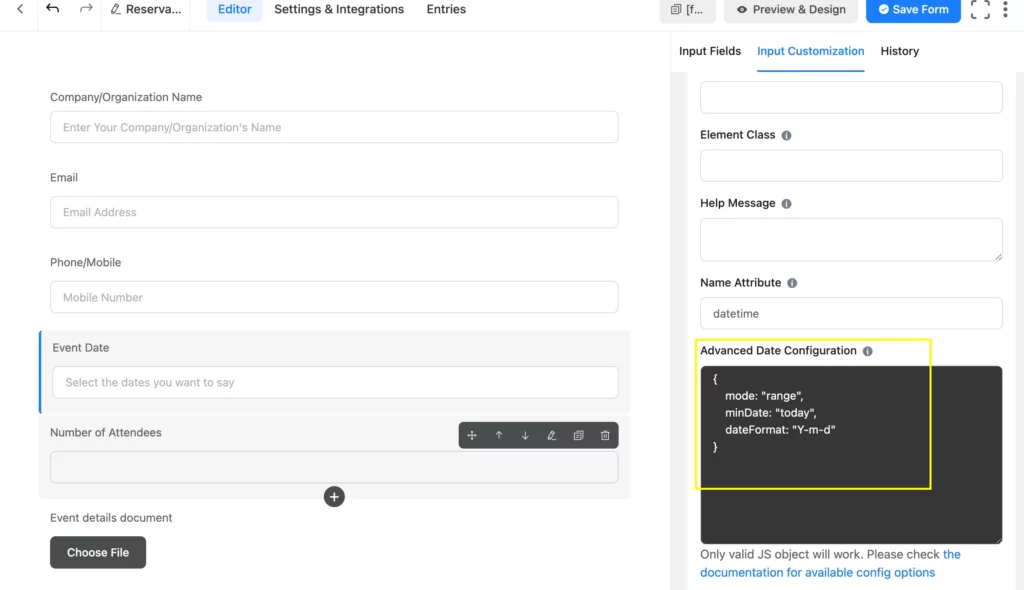
Step 3.2: Customizing the date and time with a range
You can simply use the event starting date and ending fields back to back or provide a range. To put a date range using Fluent Forms, you need to customize a little with JS code.
Select the date/time field and go to Input Customization, and then go to Advanced Date Configuration. This will help you allow users to select a date range.
You can use this code in the selected area:
{
mode: “range”,
minDate: “today”,
dateFormat: “Y-m-d”
}
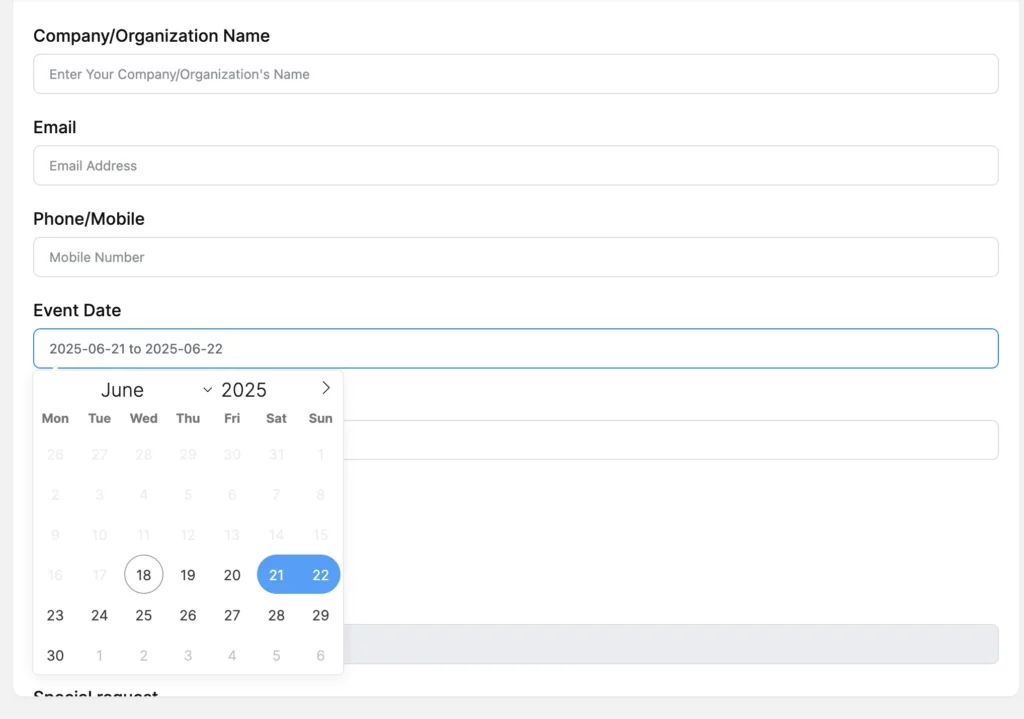
Let’s see how this will appear once done correctly:
Step 4: Numeric calculation
Using Fluent Forms Container Fields, you can use two or more column containers available in the input fields.
Here is an example of how you can have the calculation accessible:
Here I’ve selected a Three Column Container field: Payment Item, Item Quantity, and Numeric Field; then changed the Fields’ names respectively to: ‘Cost per person’, ‘Number of Attendees’, ‘Total cost per day’.
Enabling Calculation: Select the Numeric Field, and then the Input Customization options appear. Now go to the Advanced Options and select the Enable Calculation, and input your calculation command by selecting codes from the top-right corner of the box. For example, if you want to multiply, put the multiplication sign [ * ] in between the codes.
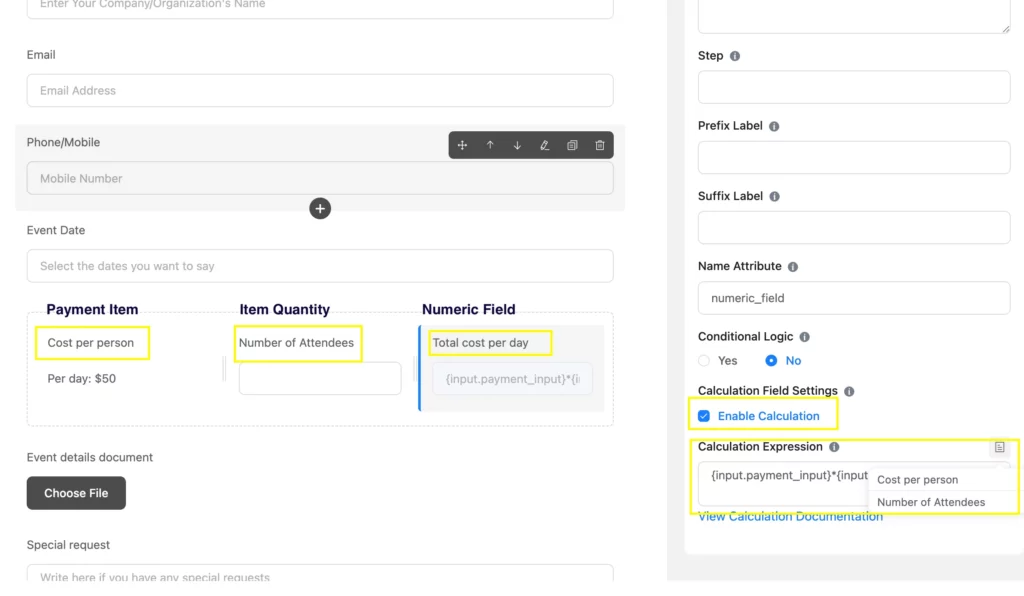
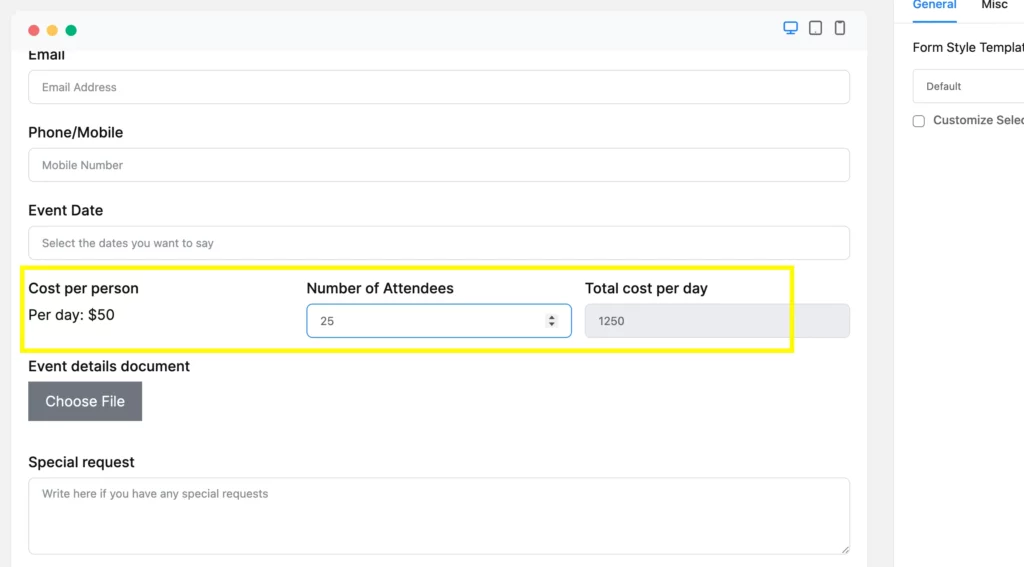
Let’s see how this will appear:
Learn more about Fluent Forms “Numeric Calculation” feature.
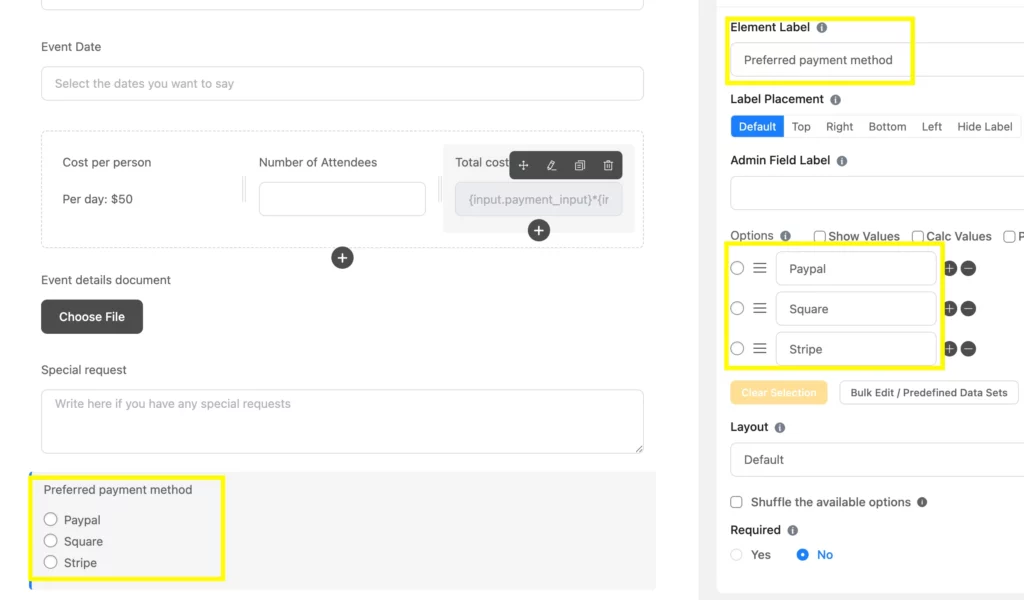
Step 5: Add and customize other fields
Here you can see the Element Label– ‘Preferred payment method’ added from the Radio Field. The options can also be included or excluded, as you can see in the image.
You can also see the ‘File Upload’ field, here labeled as ‘Event details document’, followed by a Text Area field labeled as ‘Special request’.
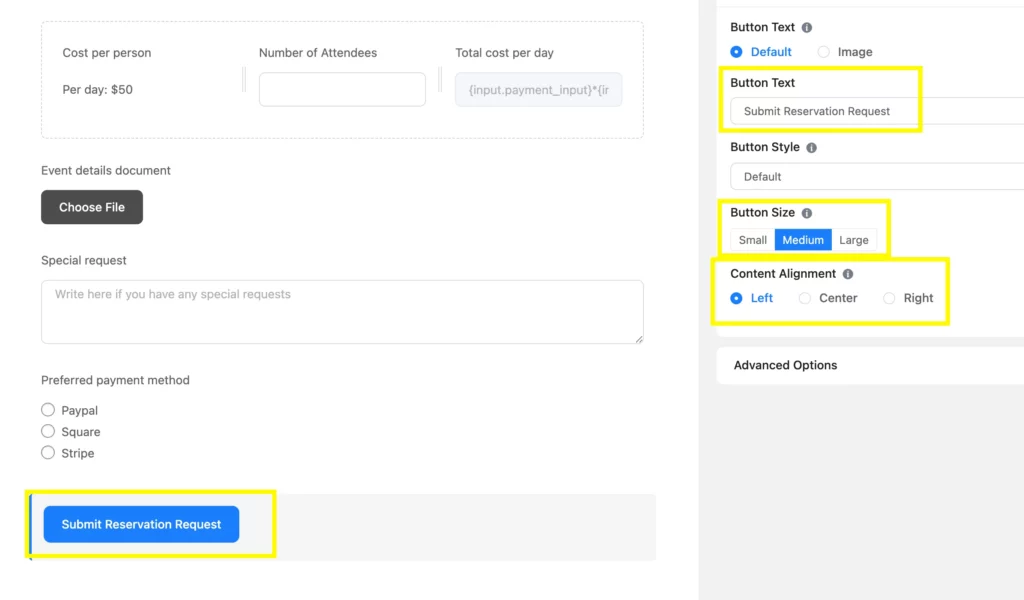
Step 6: Customize the submit button
You can easily customize the Submit Form button using the Input Customization like Button Text, Button Size, and Content Alignment.
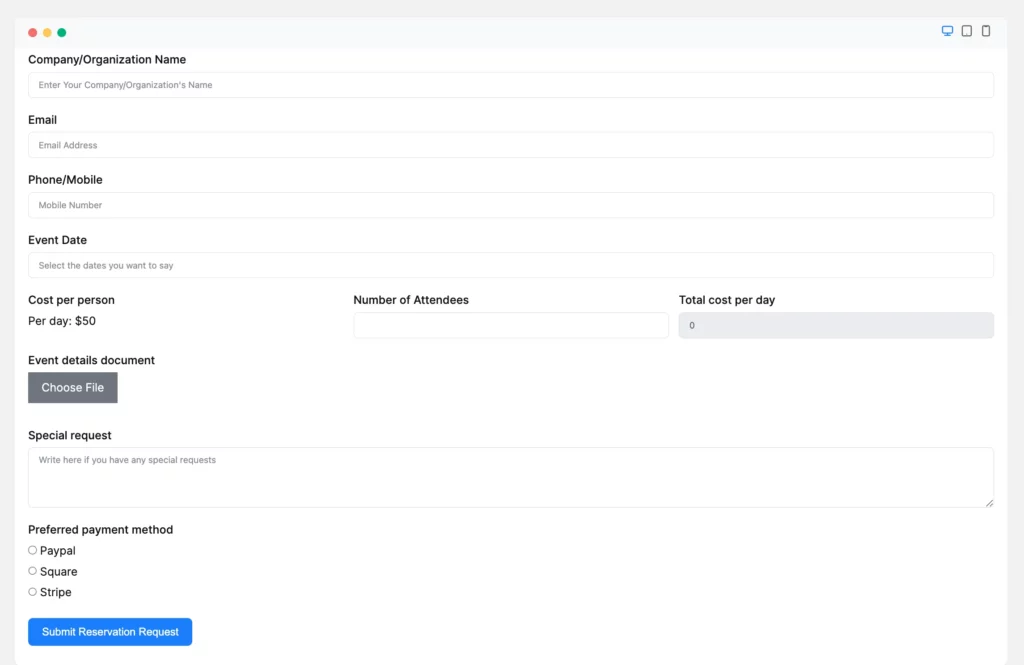
Step 7: Check the preview
Once you complete building a form, always Save Settings on the upper right corner and then click on the Preview and Design to check how your form looks.
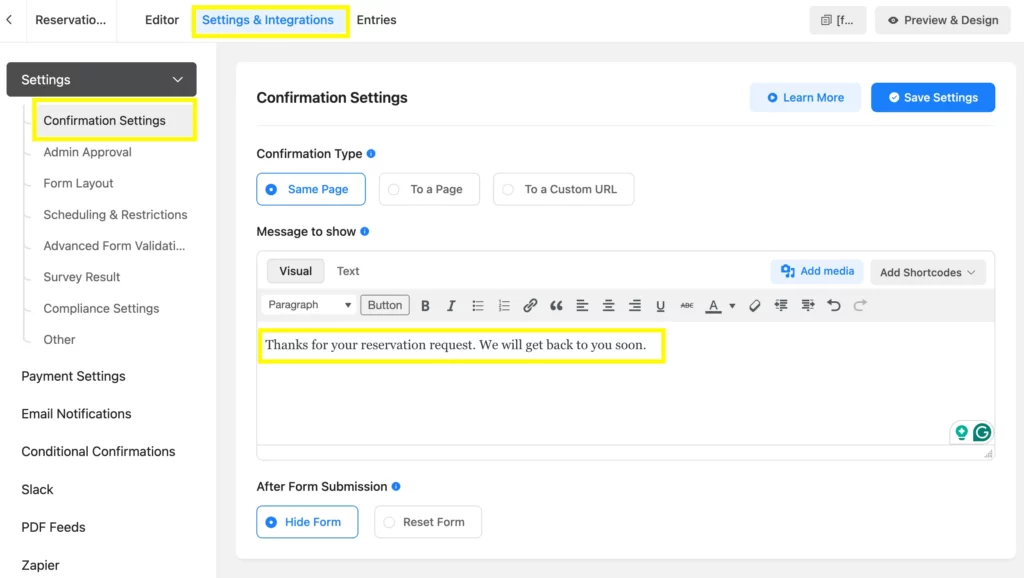
Step 8: Submission confirmation
To provide the visitors a submission confirmation, go to the Settings and Integrations, then Confirmation Settings. And then select or write the message to show.
Related Features
Multi-step forms
In most cases, reservation forms need to include many fields. So, to keep consistency and engagement, you can bring a page break in a form through the multi-step feature of Fluent Forms. Besides this, you can add a progress indicator to show the level of completion.
Conditional logic
This is one of the finest features for making a web form designed with more specificity. You don’t need to create a mess with irrelevant and extravagant form fields displayed in a form. The conditional logic feature of Fluent Forms will eliminate the other irrelevant fields and will only display the next relevant field following the command of the previous fields.
Payment integration
Fluent Forms comes to you with the most popular, practical, and demanding payment integrations so that users can easily choose the right one. Streamline the transaction experience with PayPal, Stripe, Square, Mollie, and many more. You can customize currency, test payment, and show a dynamic summary. Plus, you can organize your transaction records with a transactions database, whereas the ‘add coupon’ feature will be a plus.

Hi, this is Aparup. I am a Literature postgraduate, mixing my creative thoughts with my experience in the tech industry to surpass AI. Professionally, I am a content marketer seeking solutions to users’ problems regarding WordPress.


Leave a Reply