
How to Create a Brand Awareness Survey on WordPress

Where do you stand when users think about the product or service your brand provides? If you want to know this, you need to ask the users. Brand awareness surveys help your brand get recognized and recalled. Eventually, you get the scope to come to the top of mind of your users.
The brand awareness surveys you conduct today will come up with the fruit of sharpening the branding strategy of your business.
Let’s explore the power of a brand familiarity survey and the simplest way to create it.
TL;DR
- A brand awareness survey is basically a market research survey, set with questions that bring consumers’ perceptions regarding a particular brand
- Brand awareness surveys help you identify the familiarity and acceptance of your brand while detecting the limitations and strengths
- This type of survey should contain questions about brand recognition, recall, perception, usage, comparison, and advocacy
- Using a conversational form structure is a great scope for conducting a brand awareness survey, which you can easily access with Fluent Forms
- Optimized fields, such as checkbox, radio field, and multiselect, synced with conditional logic, and partial submissions make a brand survey more functional
What is a brand awareness survey
A brand awareness survey is a questionnaire completed by consumers to evaluate how they recognize or remember a brand. A brand awareness survey determines how your prospective customers perceive, define, and identify your brand. It indicates how many customers consider your brand over competitors and how many view it as a generic option for purchasing a product.
A brand recall or recognition survey also determines your position among competitors and helps you identify your weak points and strengths, focusing on areas that need improvement.
Why create a brand awareness survey
A brand awareness survey clarifies the productivity of your brand, along with the products and services you have. Evaluating a brand survey, you can easily get clarity about whether a product or marketing campaign has made a difference in the market or has been able to uphold your brand’s reputation. It also helps people opine about your brand’s product quality and credibility.
Brand awareness survey best practices
- Categorize the questions according to the purpose
- Avoid those questions that people don’t know the answers to
- Avoid those questions that people think they don’t know the answers to
- Prioritize questions and put them in descending order
- Accept partial submissions and save progress
Brand awareness survey demo questions
You can categorize the questions and help users avoid inapplicable questions. In that case, Conditional Logic helps you make it relevant.
Brand Recognition
Have you heard about our brand?
How did you hear about us?
Brand Recall
What comes to your mind when you hear about our brand?
Which product do you think is the identifier of our brand?
Brand Perception
How would you describe our brand to a competitor?
What thoughts drive us to purchase from our brand?
Brand Usage
How often do you use a form?
Are you currently using any of our products?
Have you ever stopped any of our products?
Brand Comparison
Which brand do you prefer to ours in terms of (product name)?
Which brand do you think is a better alternative in (category name)?
Brand Advocacy
How likely are you to refer our brand to a friend?
Which of our products would you like to refer to?
Steps to create a brand awareness survey on WordPress
To create a survey on WordPress, you need to install a form plugin like Fluent Forms– the fastest WordPress form builder plugin. Here, we will proceed to the steps of taking Fluent Forms as an ideal form builder.
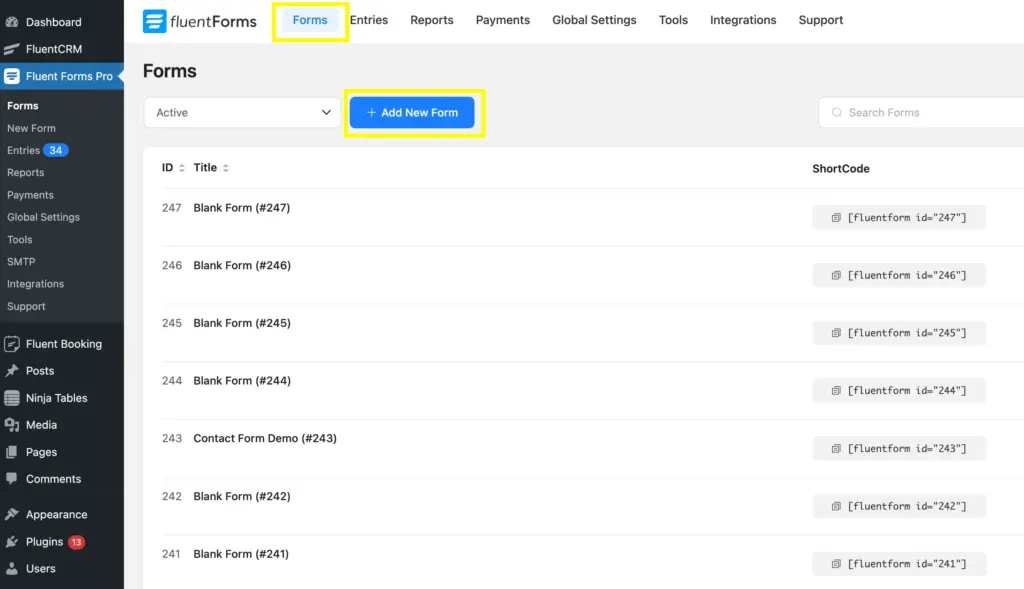
Step 1: Add a New Form
First, you need to go to the Fluent Forms Dashboard and then to the Forms page. Now, click on the Add New Form button to see the options to create a new form.
Step 2: Create a New Form
Once you have clicked on the Add New Form button, you will see the Create A New Form options to select New Blank Form, Choose a Template, Create Conversational Form, etc.
Here, we will select the Create Conversational Form option to create a more interactive survey.

Step 3: Add Necessary Fields
After clicking on the Create Conversational Form button, the Fluent Forms editor page will appear. As you have selected the conversational form, you will get a few ready fields, such as Your Name, Email, Subject, Your Query, etc.
Now, see, once you hover over any field, you will get 4 icons on the top-right of that field that contain customization, editing, and deleting options. You will also see the + icon in the centre-bottom that allows you to drag the field so that you can drop it to any position.
Clicking on the required field will also allow you to get the editing options in the Input Customization.
You can add new fields to the form from the Input Fields. This allows you to add both General Fields and Advanced Fields.

Here, we will delete the Subject and Your Query fields and add a few fields, including Radio Fields, Checkbox fields, and Multiple Choice.

Step 4: Put Your Questions and Customize the Input Fields
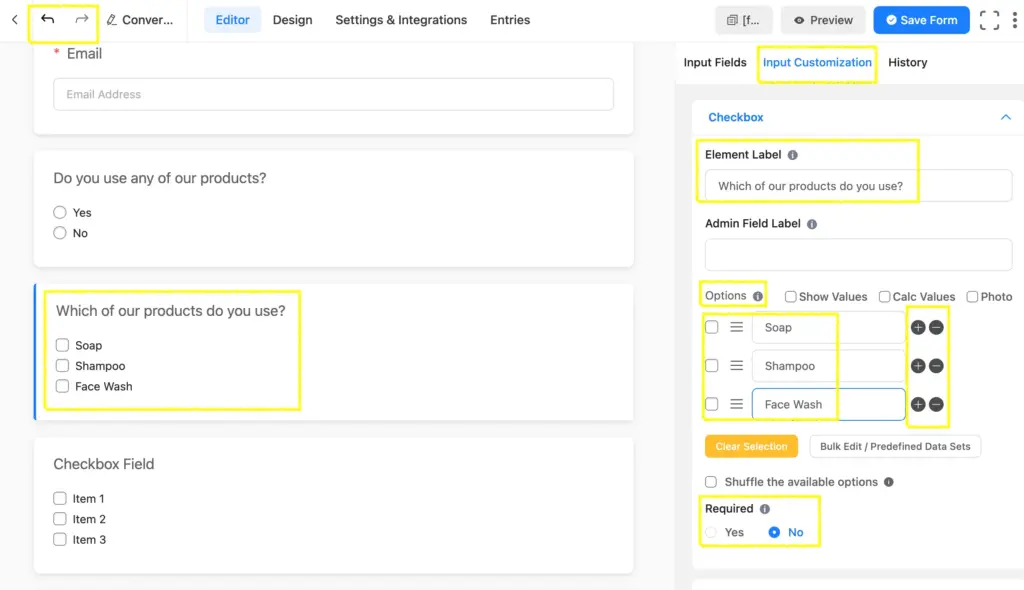
To put your questions in the Checkbox, Multiple Choice, or Radio Fields, you need to place your questions on the Element Label and provide the Options.
You can customize the input fields by clicking on the field body. Here, you can see the Element Label, which I’ve edited to put the question. Below the I’ve also put three Options which are customizable too. You can change the positions of the Options by dragging them up or down. You can also add/deduct options by clicking on the + or – icons.
If there are any unnecessary changes made, you can change them simply using the undo/redo buttons in the top-left corner of the editor. And, there are options to make a field Required, and Fluent Forms allows you to Shuffle the available options, which you will find in the bottom part of the Input Customization.
Step 5: Apply Conditional Logic
The conditional logic feature of Fluent Forms comes with a personalized form submission experience for the users. It omits the unnecessary fields and logically adds fields/questions based on the previous input(s) by the user. So, it’s a very useful feature, especially in terms of surveys.
Here, we will take a few fields to apply conditional logic. I’ve taken three consecutive questions to apply a conditional logic
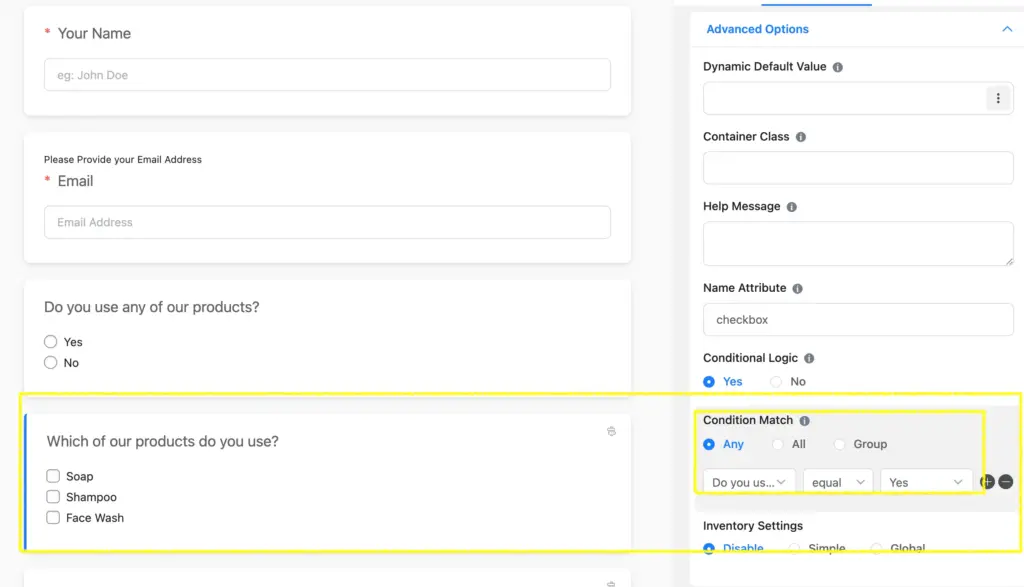
Condition 1:
We will apply conditional logic to the previous fields. The question: ‘Which of our products do you use?’ will appear if the question ‘Do you use any of our products?’ is answered with Yes.
To apply the condition mentioned above, you need to go to the Advanced Options of the Input Customization and choose Yes to Conditional Logic. Then you will find options for Condition Match, which are: Any, All, and Group.
If the previous question (‘Do you use any of our products?’) is answered ‘ Yes, the new question ( ‘Which of our products do you use?’) will appear.
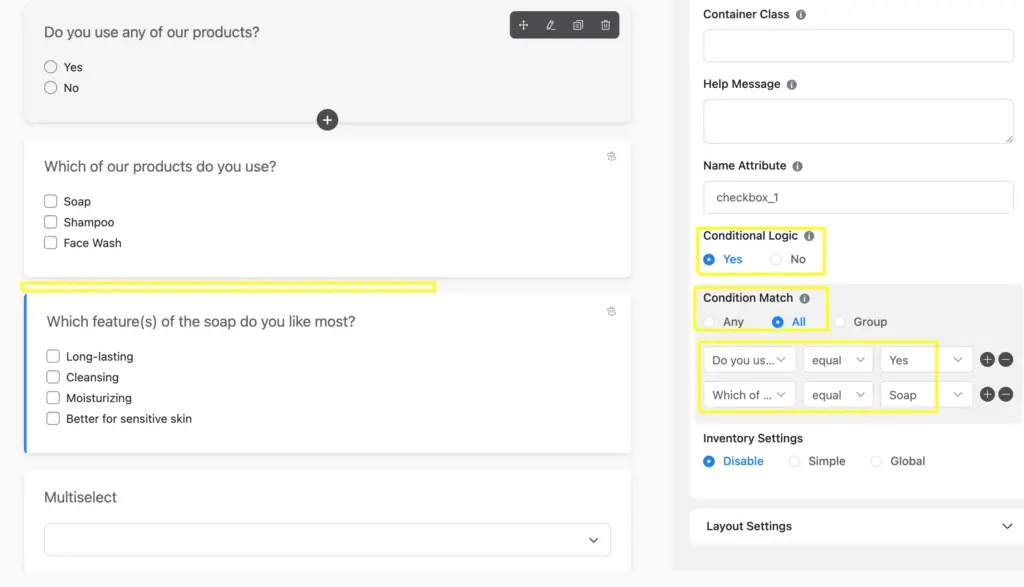
Condition 2:
Now, we will apply the condition to the next question.
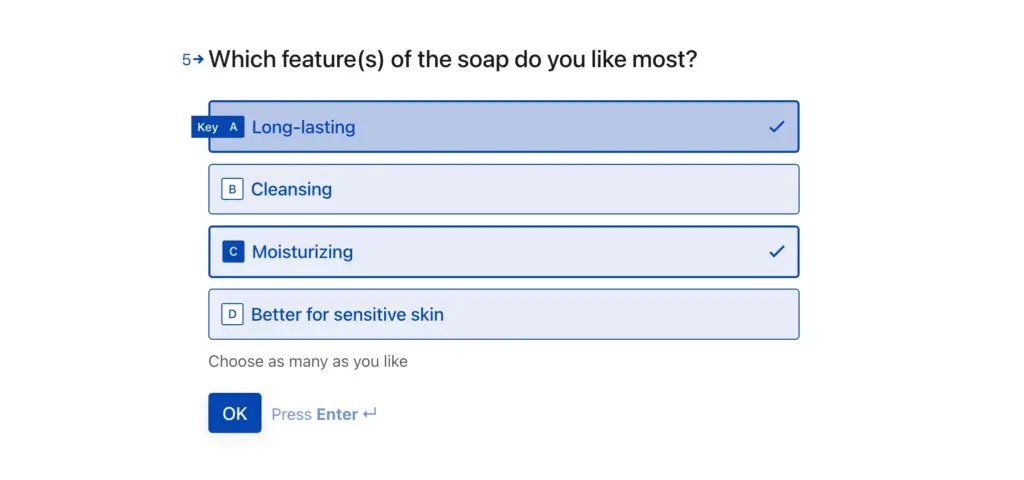
Applying this condition, the question: ‘Which feature(s) of the soap do you like most?’ will only appear if the previous question– (‘Do you use any of our products?’) is answered ‘ Yes, and ‘Which of our products do you use?’ is answered Soap.
Here, we will again go to the Advanced Options and choose Yes to Conditional Logic. We will select the Condition Match as ‘All’ as there needs to be two conditions matched.
Step 6: Post-process your form
Once you have completely drafted a form, you are now a few steps away from publishing it. You can save the form by clicking on the Save Form button in the top-right corner.
Now, you check the Preview and copy the shortcode from the top.
You can also rename the form as per your needs.
You can also convert the conversational form to a regular form by clicking on the 3-dots in the top-right corner, choosing Convert to Regular Form, and then saving it.

How it appears
As it is a conversational form, it will appear on several pages. You can have a look at an instance of how it usually appears:
Relevant features
Advanced form styler
The advanced form styler feature of Fluent Forms comes to you with extensive form decoration, including color & typography, shadow & border, margin & padding, etc. You can also import styles from previously designed forms. It’s an all-in-one feature for stylish and interactive forms.
AI form builder
Fluent Forms AI form builder makes your form-building experience faster and smoother. You can easily create and customize stylish and concise forms with this up-to-date feature. One good news is that the AI form builder of Fluent Forms comes with its free version.
Enjoying this article?
We regularly publish actionable content on our blog. Subscribe to get them delivered straight to your inbox.
We won’t spam you. You can unsubscribe whenever you want.

Hi, this is Aparup. I am a Literature postgraduate, mixing my creative thoughts with my experience in the tech industry to surpass AI. Professionally, I am a content marketer seeking solutions to users’ problems regarding WordPress.


Leave a Reply