
How to Create an Equipment Checkout Form in WordPress
If you’ve ever worked in an office, school, or any organization with shared equipment, you know the struggle. Someone needs the projector, but nobody knows who took it last. The good camera is missing again. And that one portable charger is lost forever.
An equipment checkout form is a simple solution to this issue. It tracks when someone borrowed an item and when they’re supposed to return it, meaning no more mysterious disappearances.
In this post, I’ll walk you step-by-step through creating your own equipment checkout form in WordPress. Whether you’re managing a small office, a university department, or a creative studio, you’ll have a comprehensive equipment checkout system by the end.
Let’s get to it.
TL;DR
- An equipment checkout form tracks who borrowed what item and when it’s due back, keeping shared assets organized and accountable.
- Unlike supply order forms (for consumables), checkout forms are for items that must be returned.
- You can create an equipment checkout form in WordPress using Fluent Forms with three main steps: equipment selection, requester information, and checkout details.
- Use accordion fields to categorize equipment, radio/checkbox fields for selection, and conditional logic to show relevant options only.
- Collect borrower name, ID, contact info, checkout/return dates, purpose, and terms acceptance.
- Enable double opt-in and restrict form access to logged-in users for security.
What’s an equipment checkout form
An equipment checkout form helps an organization keep track of company assets (laptops, tools, cameras, etc.). Individuals can request items based on their availability after providing their ID, contact details, and purpose. This process keeps a record of who has what items and when they’re due back. Here’s some typical information included in an equipment checkout form:
- Borrower’s name and contact information
- Equipment description (item name/model)
- Check-out date & expected return date
Organizations, such as offices or educational institutions, use equipment checkout forms to monitor their inventory and the locations of the equipment. It also creates user accountability, so items are returned on time and in proper condition.
Equipment Checkout Form vs. Supply Order Form: What to use?
Both the equipment checkout form and the supply order form are internally used within an organization/institution to request items. However, their purpose varies in the item’s return policy.
Equipment Checkout is about borrowing. The item is a fixed asset (like a laptop or camera) that must be returned. The focus is on accountability and ensuring everyone can use common assets when necessary.
Supply Order is about consuming. The item is a consumable (printer paper, pens, or coffee) that will be used up. The focus here is on quantity and ensuring you’re stocked. However, assets can also be consumable (for example, a department orders a new computer from the university fund for permanent use).
Let’s see how you can easily create an equipment form in WordPress without any coding.
How to create an equipment checkout form in WordPress (using Fluent Forms)
Here, I’ll show you how to create a comprehensive equipment checkout form using Fluent Forms, the fastest form builder solution for WordPress. No worries if you haven’t used it before, because the plugin is completely self-explanatory. Follow these steps for installation:
- Go to your WordPress dashboard.
- Find the “Plugins” option on the left menu bar.
- Select “Add New.”
- Search for the “Fluent Forms” plugin.
- Click “Install.”
- Activate the plugin when installation is complete.
Since equipment checkout forms are usually longer, I’ll use some Fluent Forms Pro features (multi-step form, sections, etc.) to keep the form clean and organized. This is optional, and you can create a fully functional equipment checkout form using the free version.
Now, let’s move on to creating our form. Navigate to Fluent Forms > New Form > New Blank Form from your left-hand menu.

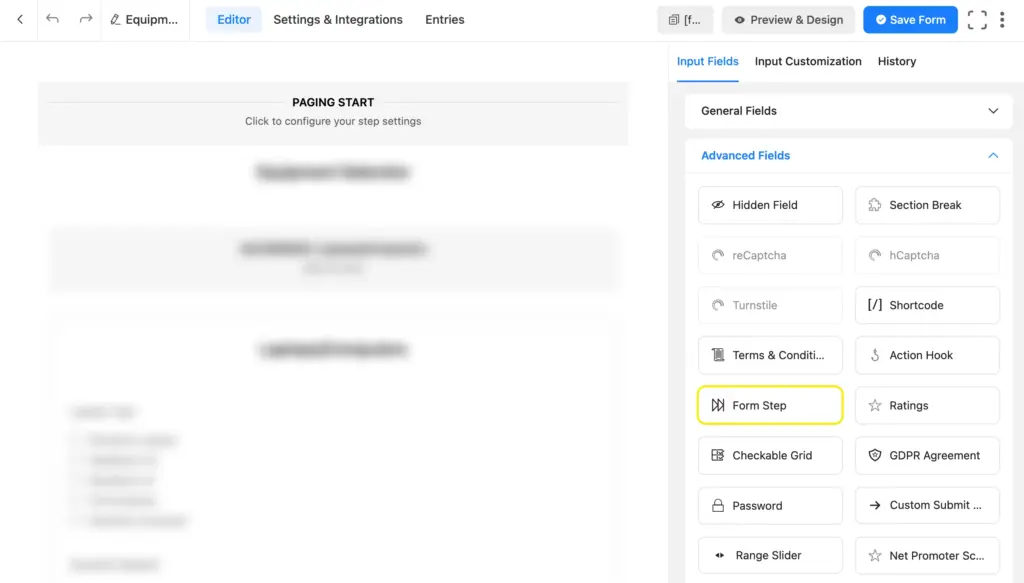
It’ll lead you to the form editor tab. You’ll find the input fields on the right side in four categories: general fields, advanced fields, containers, and payment fields. Start by renaming your form from the top left corner.

Next, let’s create the structure of our form. We can segment the form into three major parts: equipment selection, borrower information, and checkout information. Let’s take one step at a time for each of these segments.
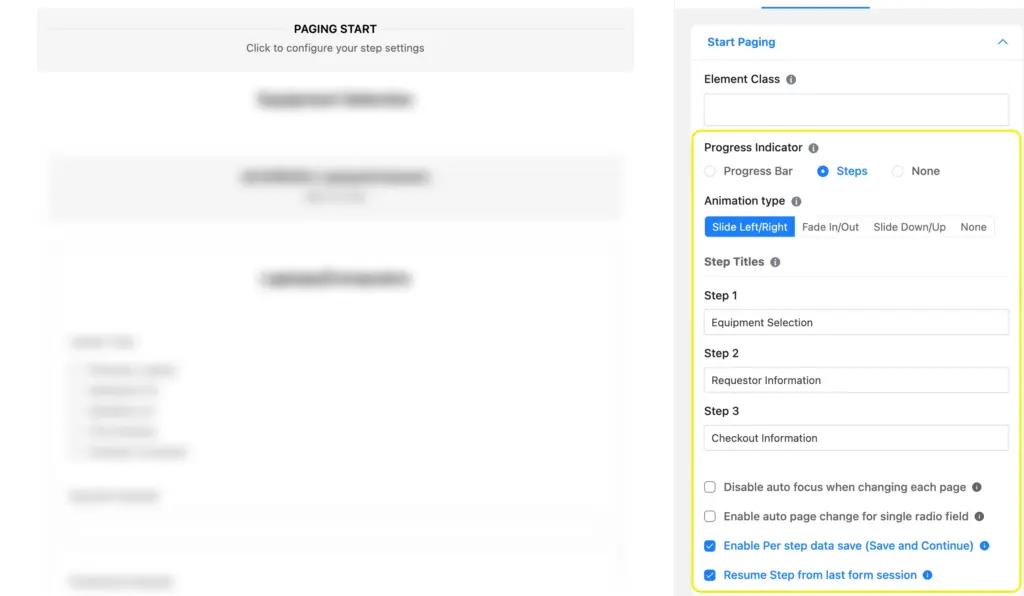
Now, we’ll customize the steps: assign step names, select style and animation type, customize next & previous button text, data-save settings, etc. Clicking the step field opens up its customization options.
We’ll add the necessary fields to collect information relevant to each step inside the steps.
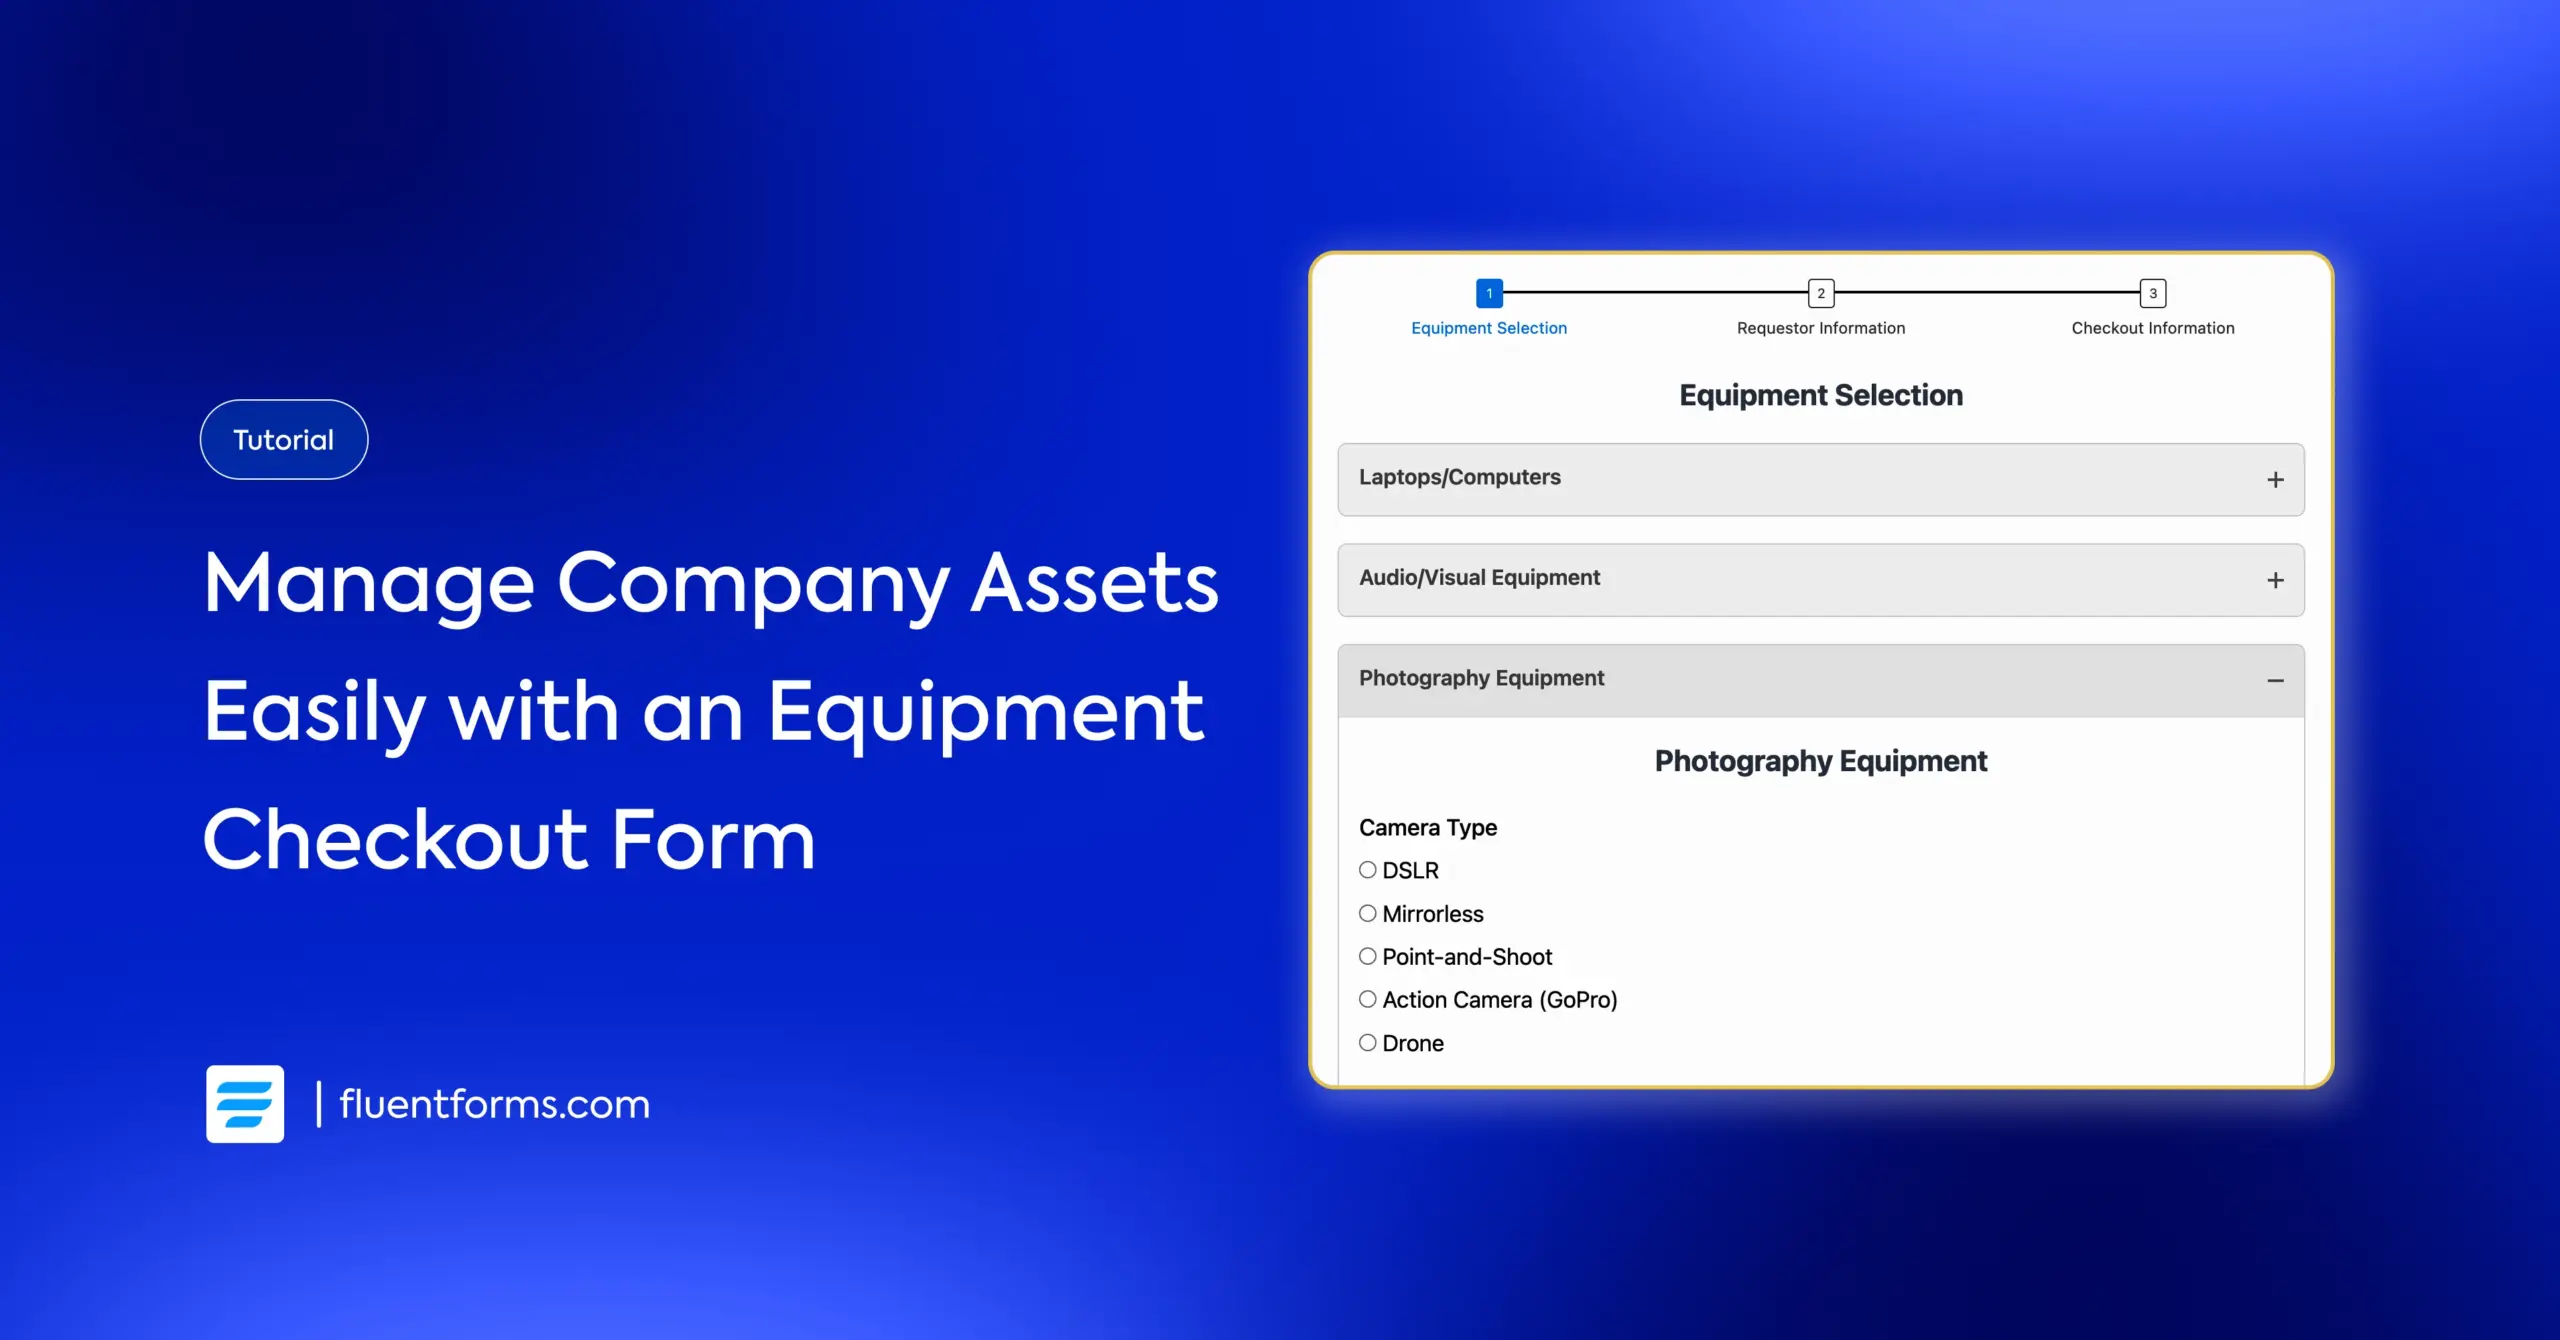
Step 1: equipment selection
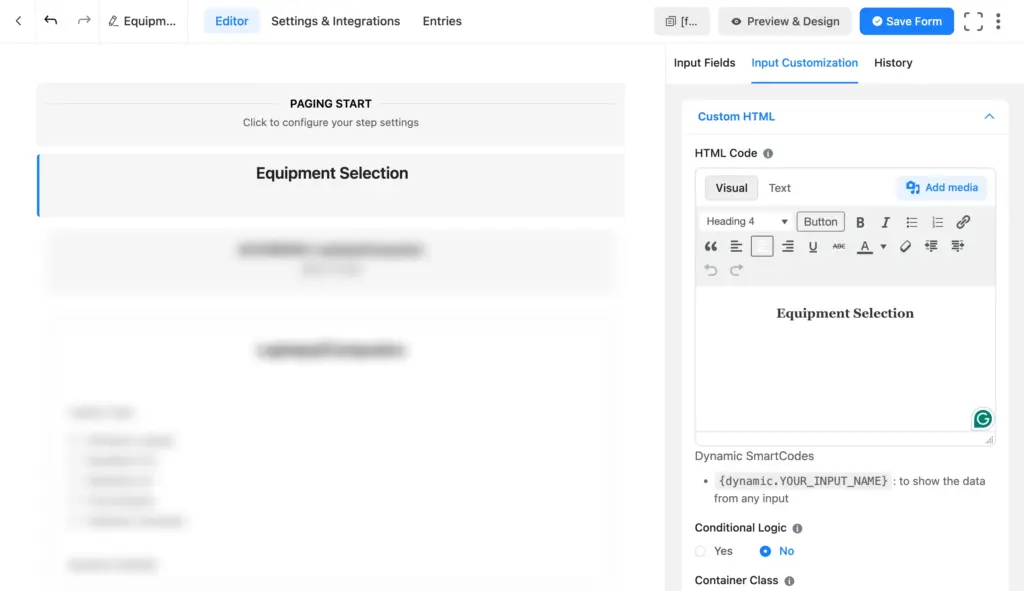
First, we’ll display the step title on top. This way, the step’s purpose becomes clear immediately, even before the user begins scanning it. Let’s take the custom HTML field from the general fields. You can edit it visually, without any HTML knowledge.
After we’ve made the step’s purpose clear, we’ll move to displaying the selectable equipment names. I’m taking accordion fields (from the container fields) to categorize the different types of equipment.
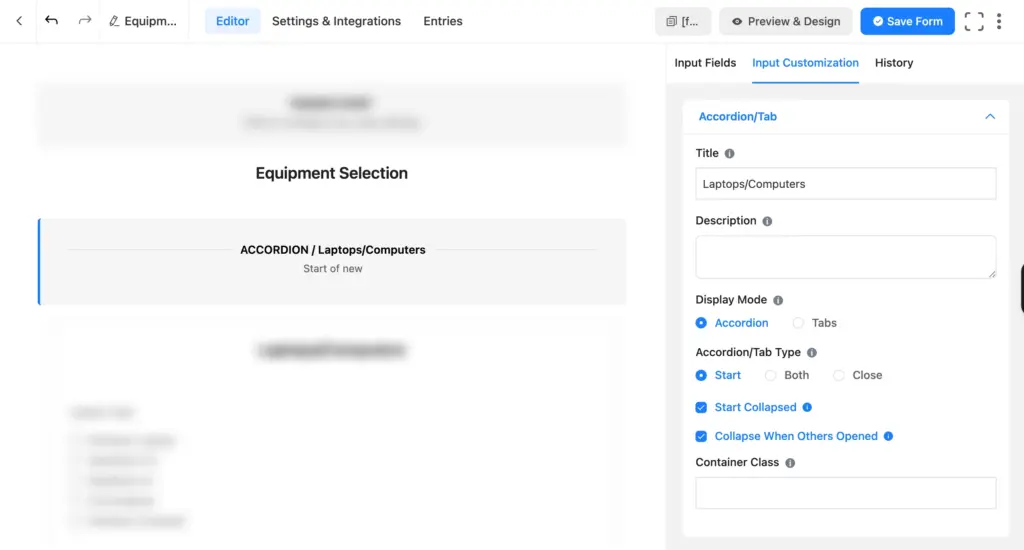
Accordions are collapsible sections, which expand on click (settings are adjustable). We’ll add suitable accordion titles, as they remain visible when sections are collapsed. This way, users can easily navigate to the desired section and expand it.
Learn more about using collapsible accordion/tab sections.
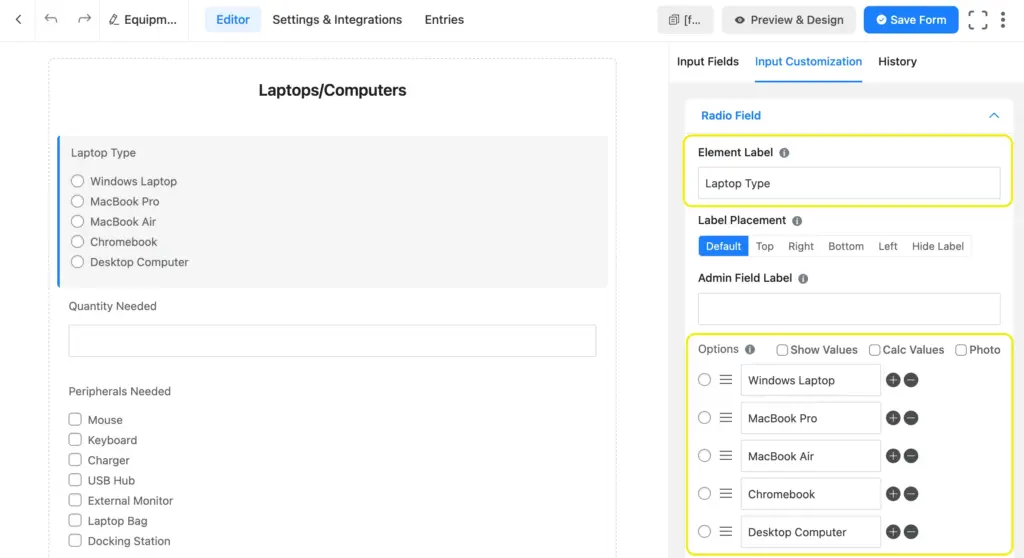
I named our first section Laptops/computers. Inside, let’s display the available laptop/computer models for users to select. I’ve taken a radio field (allows selection of only one option) to list the laptop models.
Next, I added a numeric field and renamed it to “Quantity Required” from the element label. Here, users can specify how many laptops they need. Finally, I added a checkbox field to let them select computer accessories (keyboard, mouse, cable, etc.) The checkbox field allows them to select multiple items.
You can easily repeat this process for sorting equipment of other categories. My form has four sections for laptops/computers, audio/visual equipment, photography equipment, and presentation equipment.
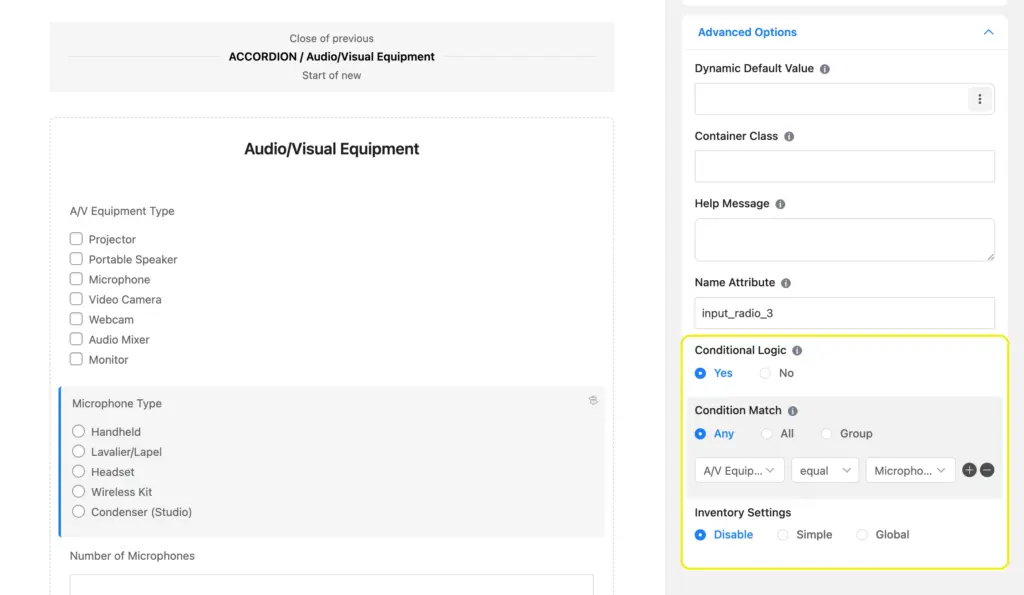
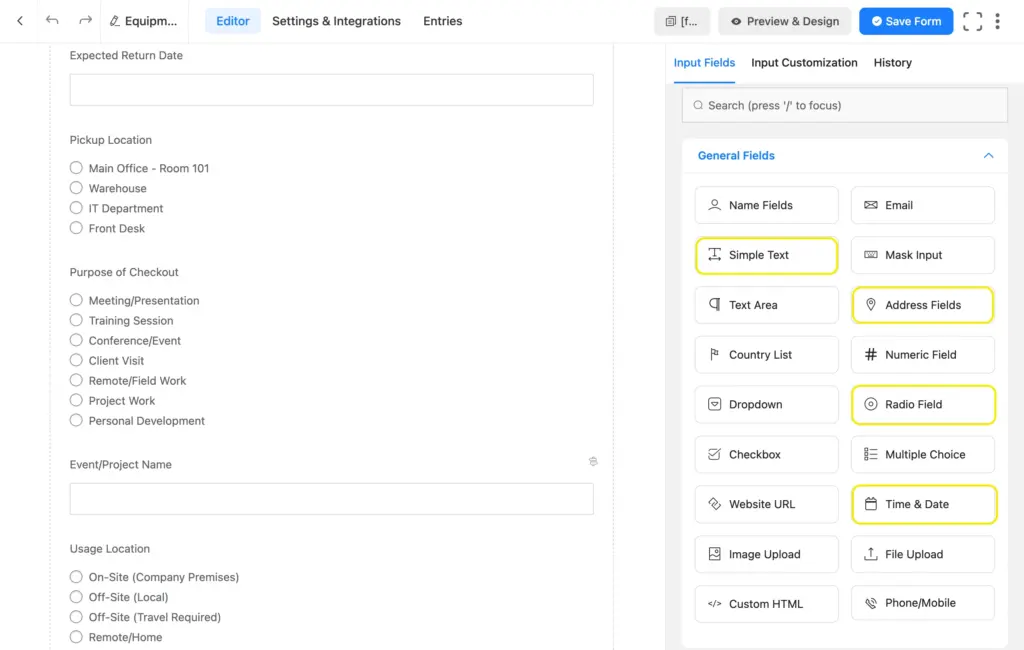
Here’s a peek from the A/V category. I’ve listed the A/V equipment in checkboxes to allow multiple selection. I’ve also added available microphone types and speaker sizes and applied conditions in a way that they only become visible if users select microphones or speakers from the A/V equipment.
Applying conditions is really easy. Scroll to advanced options from input customization and select yes below conditional logic. Inside the condition match, select “A/V equipment type” in the first box, “equal” in the second box, and “microphone” in the last box. This means, show this field (microphone type) if the A/V equipment type equals microphone.
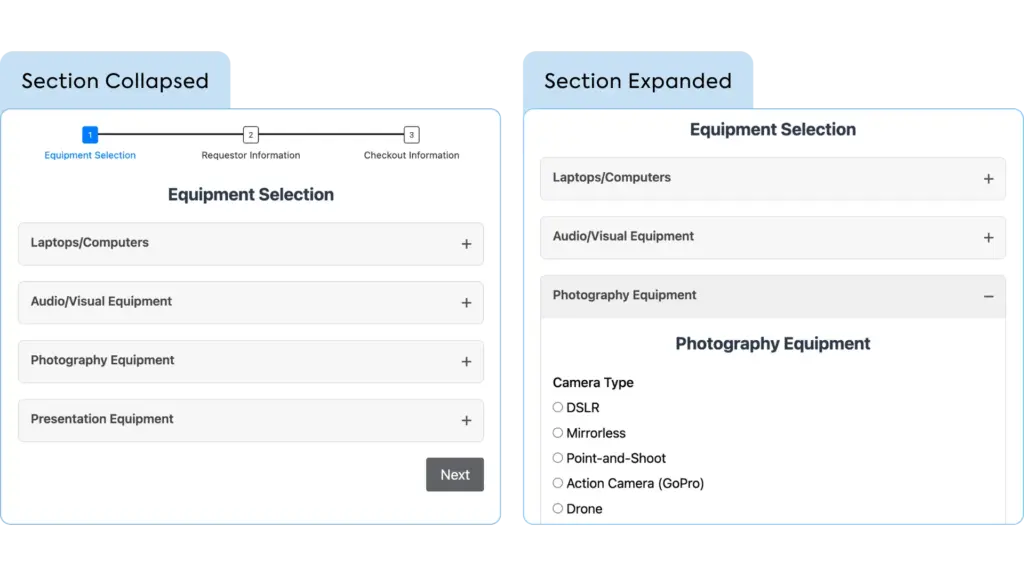
This is what our equipment selection step looks like.
Let’s move on to collecting requester information in the next step.
Step 2: requester information
The requester information helps identify which employee/student/team member is in possession of certain equipment. I’m going to add the following fields here to keep the identification process flawless.

- Name Fields: Collect the requester’s first & last name
- Numeric Field: Collects the employee ID/student ID (a unique identity number)
- Email & Phone/Mobile Field: For emergency & backup contact information
- Radio Field: Requesters can select their department from the radio options
- Simple Text Field: A single-line text field for collecting additional information like role/designation/grade, etc.
Now, let’s move on to the final step of our equipment checkout form.
Step 3: checkout information
Checkout information entails equipment checkout & return date/time, pickup/drop-off location, purpose of issuing, location where the item will be used, etc. Here’s a list of fields that we’ll need for this step:
- Time & Date Field: It’s an interactive date & time picker with a visual calendar interface. Date and time formats are customizable. Let’s insert this field twice for collecting the checkout date & the expected return date.
- Radio Field: For letting requesters select a convenient checkout location, the purpose of checkout, usage location, etc.
- Simple Text Field: Collects event/project name if users select event/project as their purpose of checkout. Helps track the events covered using your equipment.
- Address Field: Conditionally appears if users select off-site as the usage location and is mapped to collect the precise locations.
- Terms & Conditions Field: Allows the borrower to accept responsibility for any damage caused during their possession.
Here’s how our equipment checkout form turned out.
Download this equipment checkout form template.
Aside from these, you can add any other field that you deem necessary to your checkout form and streamline the process further. When you’re done, click “Save” from the top-right corner. Once saved, let’s look at some important settings that you should configure on your equipment checkout form.
Necessary settings
Now that your form is complete, let’s look at some important settings to save you and your employees/students from spammers. Click the “Settings & Integrations” tab right beside the editor tab. It’ll take you to the form-specific settings.
Enable the double opt-in confirmation from settings > confirmation settings. This way, whenever a request is submitted, the requester will receive a verification email. The request will only proceed if they confirm it from their email, which ensures their privacy.
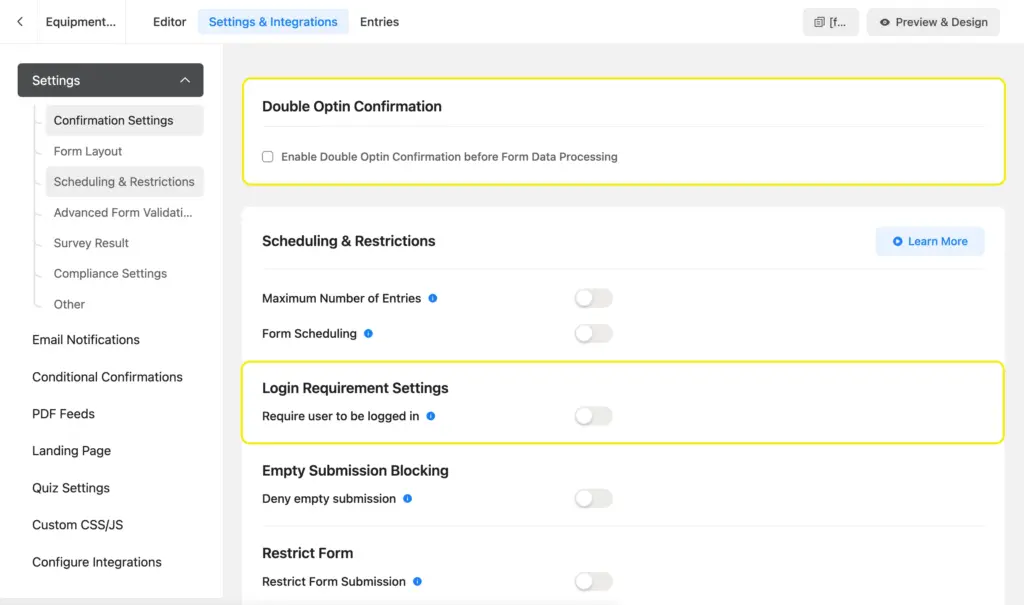
Moreover, the equipment checkout form is only for internal use within an organization. Therefore, you can make it accessible only to logged-in users, ensuring no outsiders request items.
Next, set up an email notification to instantly notify your inventory staff whenever a new request takes place. This helps them review the request on time. To set it up, go to email notification > add notification.
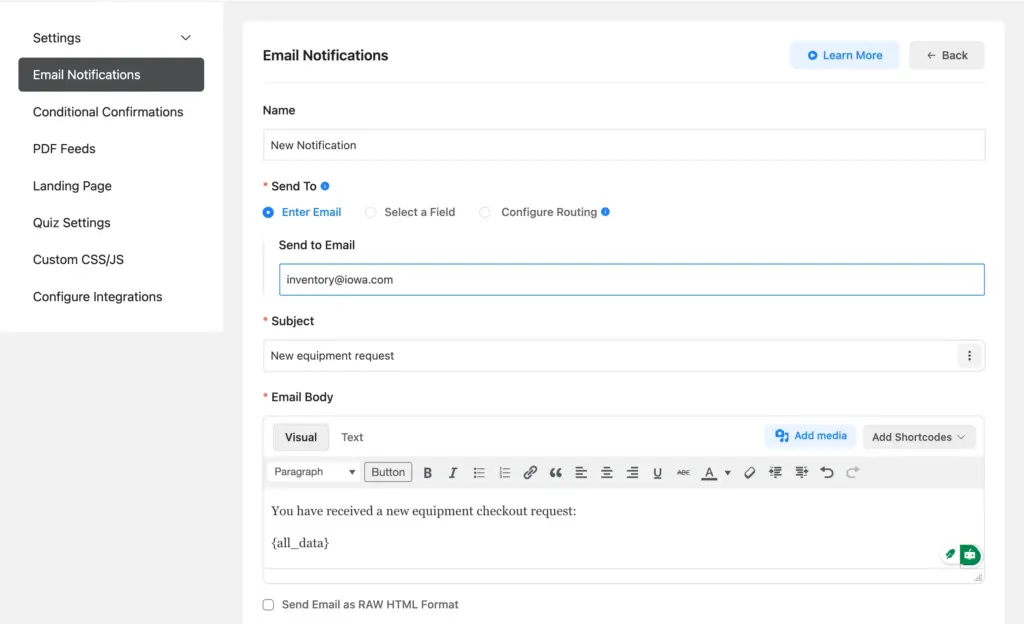
Write the notification name, the inventory manager’s email address, and the email subject in their designated places. Next, click the “add shortcode” button in the email body to select which of the form data you want in the email body dynamically for your staff to review. When you’re done, click “Save Notification” at the bottom.
Build Smarter Forms for Free

Now, let’s go through some real-life examples of equipment checkout forms to provide you with a more practical overview.
Examples of equipment checkout forms
You can get inspiration from the thousands of equipment request forms available online. They’ll help you sort your assets, assign them proper categories, and draw a comprehensive terms & conditions sheet regarding their use. Let’s look at some great examples.
University of Washington equipment checkout form
Here’s the equipment checkout form of the Department of Statistics, University of Washington. The form asks for names, ID, and checkout date. In the final part, the form shows a list of equipment that students can select to borrow.
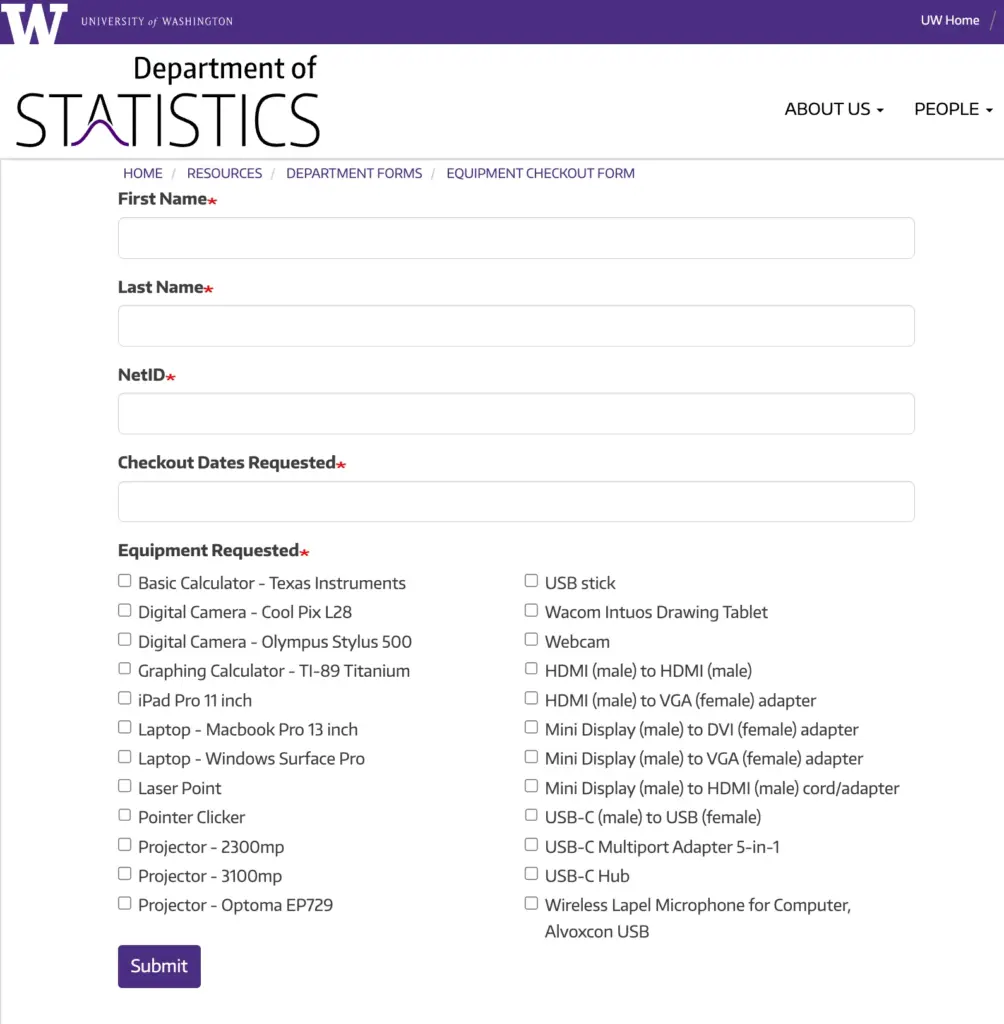
This form doesn’t categorize the items to keep the length shorter. This works for them because they don’t have a lot of items to list. For a longer list, however, grouping related items creates a great navigational experience.
Longwood University equipment checkout form
Longwood University’s equipment checkout form looks clean and easy. They collect the requester’s name, email, and phone number. They also ask students to fill out the anticipated start (checkout) and end (return) date.
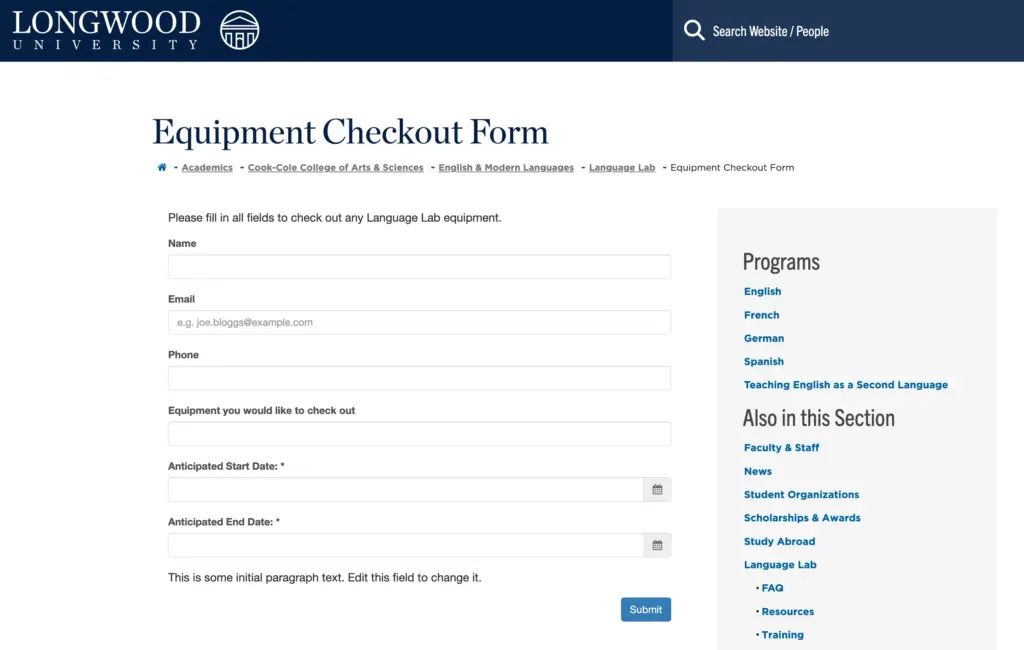
However, their form doesn’t contain a list of assets/equipment. Students are required to type the name of the equipment they need in a text box. This approach only works if students are familiar with the kinds of equipment you offer, or their instructor asks them to request a particular asset.
Santa Ana College equipment checkout form
Santa Ana College’s equipment checkout is a PDF document that users need to download, fill out, and then submit manually to their department. As you can see, there’s no button to submit online via the website.
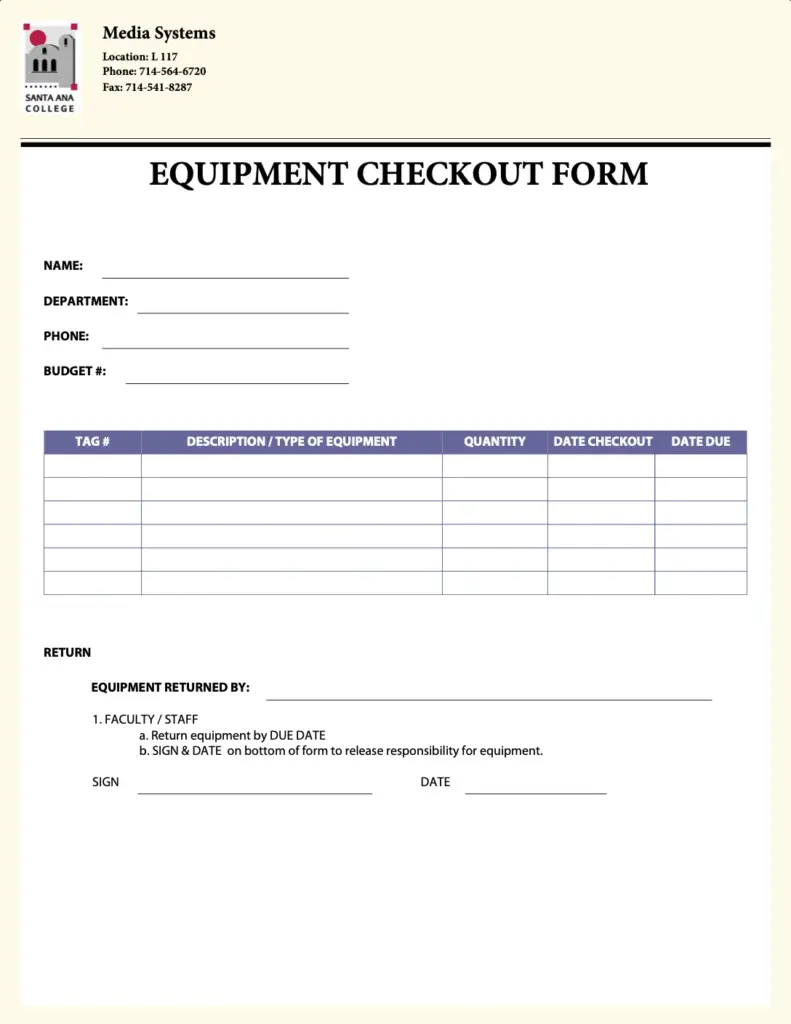
The form asks for name, department, phone number, and budget. Below that, there’s a table with columns for tag, equipment type, quantity, checkout & due date. Students can list the desired equipment in rows. There’s also a faculty section for the supervisor to confirm the equipment’s return, with the date and signature.
Texas A&M Engineering Experiment Station equipment checkout request form
This equipment checkout form is also a PDF document that needs to be downloaded, filled out, and submitted manually. The form starts with empty text areas where employees can fill out the number and description of the assets they need to borrow.
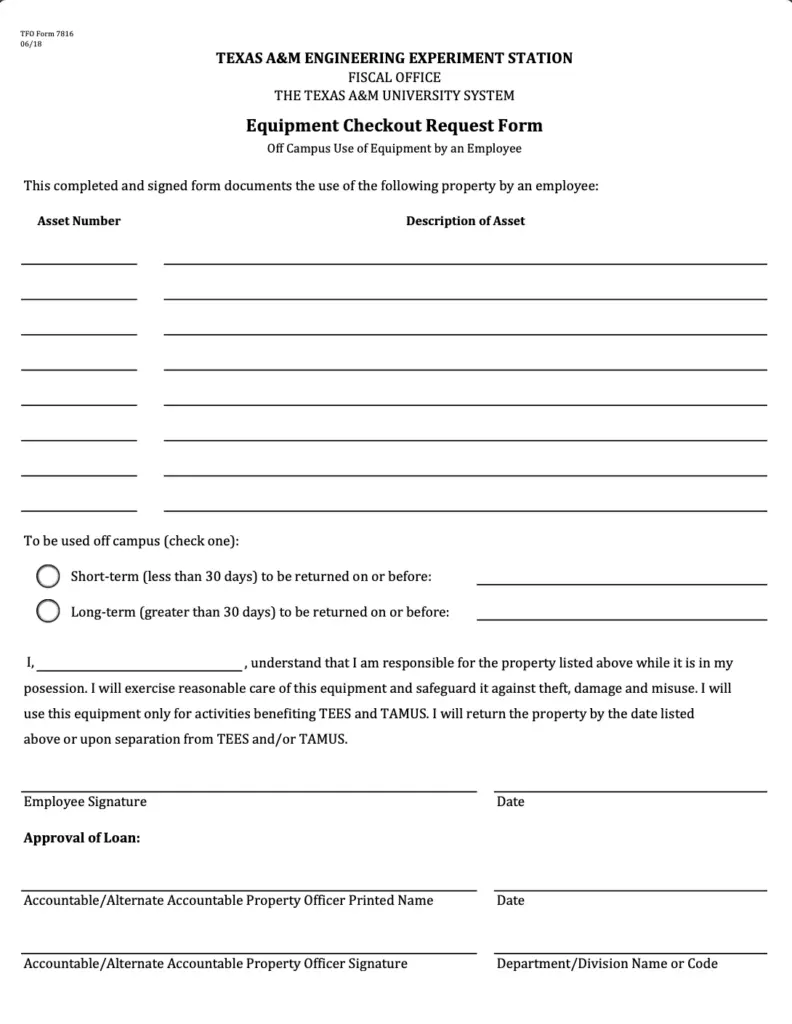
The item listing section is followed by the time period for which the item will be borrowed. Next, there’s a terms & conditions statement, where the borrower needs to write their name to accept responsibility for the asset during their use. Next, there’s a section for the borrower’s signature and the date of the application.
The final section of the form is to be filled out by the approval committee, stating the property officer’s name, department, and approval date.
Winthrop University ITC equipment checkout form
Winthrop University’s ITC equipment checkout form is a 2-part PDF application to be filled out by the borrower and the ITC staff.
The first section collects the borrower’s name, phone number, university email & ID, and whether they’re a student/faculty/staff. Next, the form records the date of equipment reservation, purpose of checkout, terms & conditions agreements, and pickup & return dates with signatures.

The second part is to be filled out by the ITC staff, where they select the checked-out equipment, review stock, record overdue notices when applicable, etc.

Equipment checkout forms make inventory management much easier and streamlined. It reduces manual work, and there’s always a record of who has what equipment, minimizing item loss. So what do you say? Are you ready to move beyond spreadsheets and transition to a centralized equipment checkout form? Let me know if you need any help.
Enjoying this article?
We regularly publish actionable content on our blog. Subscribe to get them delivered straight to your inbox.
We won’t spam you. You can unsubscribe whenever you want.
Easily manage assets with equipment checkout forms
Moving your inventory process from spreadsheets to an online form isn’t just about saving time or manual labor; it also offers peace of mind. With a well-planned equipment checkout form, you’re creating a culture of accountability where equipment is treated with care and returns to the shelf when it’s supposed to.
With the right fields and a little conditional logic, you can build a system that practically runs itself. When someone needs an item, they fill out the form. When they return it, you have a complete record.
You can easily design a form to match your organization’s needs. Add more equipment categories, include additional approval steps, or keep it minimal, whatever works for you. And let us know how it turned out once the form is up and running!

Sarika writes for Fluent Forms and loves to offer insights into small businesses. She’s curious and enjoys discussing ideas, interests, and perspectives. In her free time, she’s either marvelling at architectural beauties or trying different cuisines.


Leave a Reply