

How to Create an Electronic Press Kit (EPK) Request Form in WordPress
A promoter opens your press kit. They want your high-res photos and stage plot. Instead of back-and-forth emailing, they fill out an EPK request form and get what they need. You get their name, their venue, and a new contact in your list.
The EPK request form stays on your press kit page, sends the right materials to the right people, and keeps a record of everyone who asked. I’ll show you how to build one in WordPress step by step with Fluent Forms, the fastest form plugin for WordPress.
TL;DR
- An EPK request form lets journalists, promoters, managers, and fellow artists request your press materials through your site instead of over email.
- Host it on your press kit page in WordPress so it stays current, shareable by link, and works on any device.
- Build the form in Fluent Forms from a blank form or a contact template, then drag in the fields you need.
- Use conditional logic to show role-specific fields, so a journalist and a promoter each see the right questions.
- Set an email notification, a confirmation message, and spam protection before you publish.
- Deliver gated files on the confirmation page or by email, and attach a one-sheet PDF when you need to.
- Every submission is stored in your Entries dashboard and can flow into FluentCRM for follow-up.
- Add matching forms later: booking, collaboration, and fan testimonials.
What an EPK Request Form Is and Why You Need One
An electronic press kit is your professional record in digital form. It holds your bio, photos, music, videos, press coverage, and contact details in one place. It helps people considering booking or featuring you find what they need in seconds.
An EPK request form gates the parts you don’t want to make public. Some assets belong on the page for everyone. Others, like print-ready photo packs, unreleased tracks, or your technical rider, are better handed out on request. The form collects who is asking and what they want, then gives you control over what to share.
What belongs in your press kit
Here’s what your press kit should include:
- A short and long bio
- High-resolution photos for print and web
- Music samples or streaming links
- Live performance video
- Press quotes and coverage
- Discography and recent releases
- Tour dates
- Contact details for you, your manager, or your booking agent
Why gate some materials
Posting every asset has a downside. Your print-ready photos get used without context, your rider is visible to anyone, and you never learn who downloaded what.
A request form fixes that. You share sensitive files only with people who identify themselves. Each request tells you a journalist’s publication, a promoter’s venue, or a date they have in mind. Over time, those submissions become a contact list you can reach out to for your next release or tour.
What a request form saves you
Without a form, you get the same questions repeatedly. Do you have high-res photos? Where’s your bio? Can you send your stage plot? You answer them one at a time.
The EPK request form saves you that work. It looks professional, is active all the time, and gives you a searchable list of everyone who wants to work with you.
Why Build It in WordPress with Fluent Forms
Your press kit works best as a page on your own site, at a clean URL like yourband.com/epk. A page you can update is better than a PDF or a folder for maintaining your press kit’s freshness.
Hosting it in WordPress keeps the kit easy to manage and share, and readable on the phone. Search engines also index the page, so the right people find you.
For the form itself, Fluent Forms gives you the full build in one plugin, with no code. It’s lightweight, so it won’t slow your page down, and the drag-and-drop editor lets you assemble the form in minutes.
Everything the form needs in one plugin
- 65+ input fields and a visual builder, so you build the form by dragging fields onto the canvas.
- Conditional logic and multi-step forms, so you tailor questions to journalists, promoters, and venues without one long form.
- Email notifications and a stored Entries dashboard, so you get alerted on every request and keep a clean record.
- FluentCRM integration, so submissions become tagged contacts ready for follow-up.
- Spam protection and a PDF Generator, so you block bots and attach a one-page press summary on submission.
The native FluentCRM connection works with the free version, so you can start free and get the Pro license only when you need paid features.
How to Build Your EPK Request Form in Fluent Forms
Install and open Fluent Forms
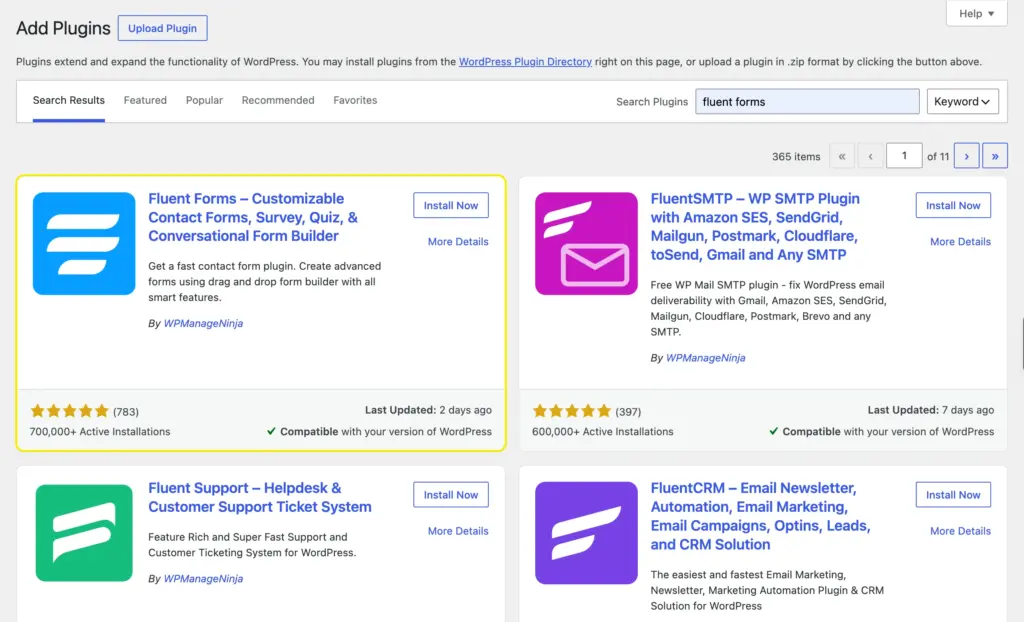
From your WordPress dashboard, go to Plugins > Add New. Search for Fluent Forms, then click Install Now and Activate. Fluent Forms appears in your admin menu, ready to use.
Create a new form
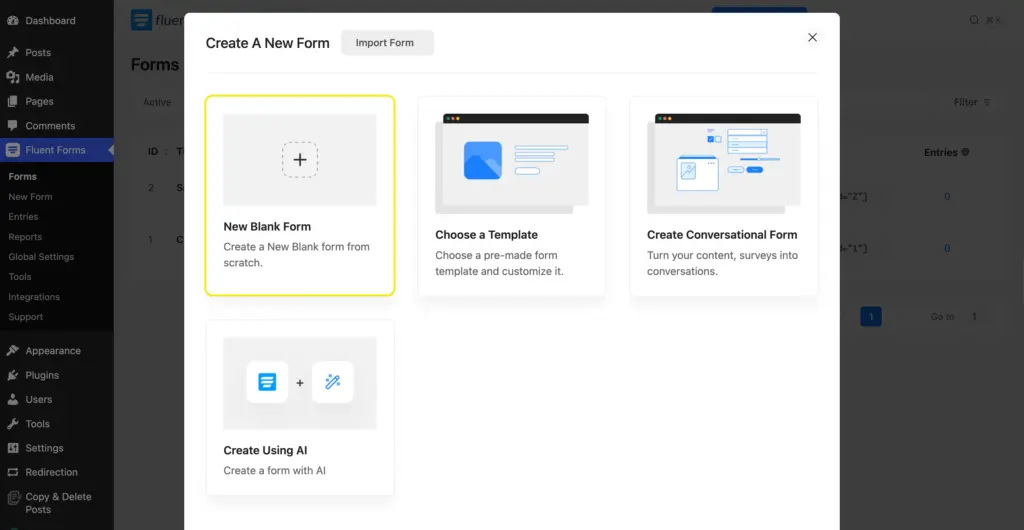
Go to Fluent Forms > New Form. You can start from a contact template and edit it, or pick New Blank Form for full control. I’ll build from blank so you can follow each field.
Add and label your fields
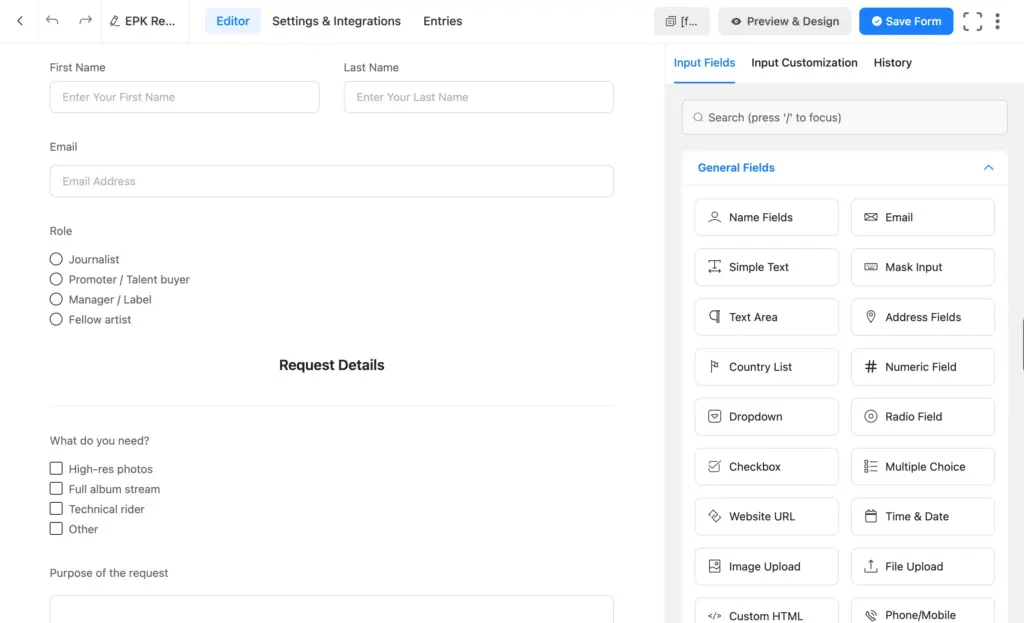
In the editor, the Input Fields panel sits on the right and the form canvas on the left. Drag each field onto the canvas, then click it to edit its label and settings.
Build the request form with these fields:
- Add a Name field for the person making the request.
- Add an Email field and set it to required (you’ll reply to this email).
- Add a Dropdown or Radio field labeled Role, with options like Journalist, Promoter/Talent buyer, Manager/Label, Fellow artist.
- Add a Checkboxes field for the materials they want, such as high-res photos, full album stream, or technical rider.
- Add a Textarea field for the purpose of the request.
- Add a GDPR Agreement or Terms & Conditions field so they consent to being contacted.
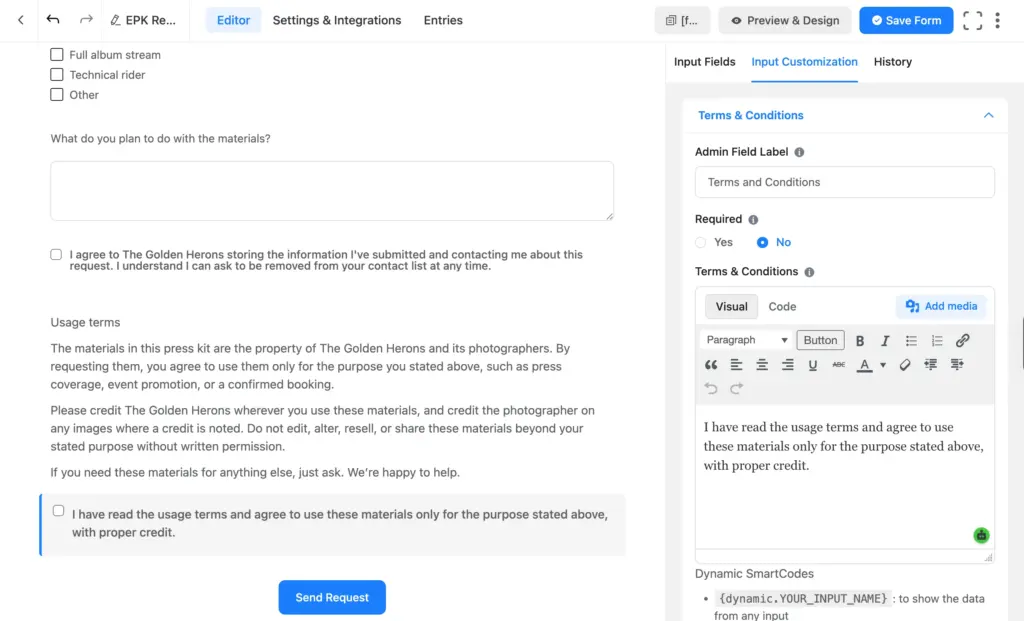
- Add a Custom HTML field with your usage terms, then a second Terms & Conditions checkbox so they agree to them. This covers your materials, since you’re sending work that isn’t public.
Use a Section Break to separate contact details from the request details, so the form reads in clear blocks.
Show role-specific fields with conditional logic
A journalist and a promoter need different questions. Rather than showing everyone every field, reveal the extra ones only when they apply. Your shared fields (name, email, role, materials requested, and consent) stay visible to everyone. The role-specific fields sit in containers that appear when relevant.
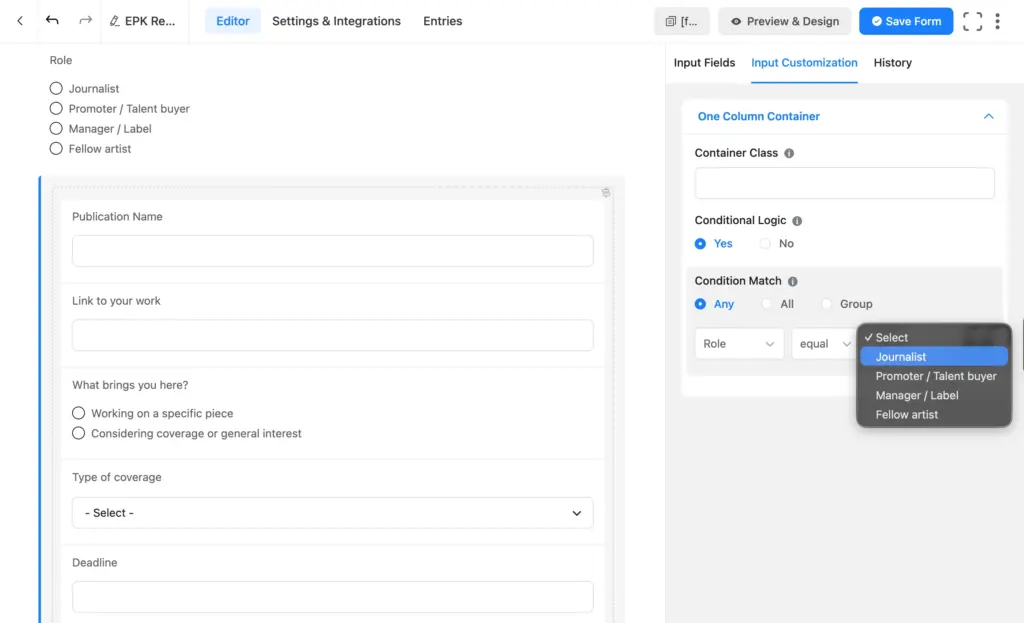
Conditional logic is a rule that says: if the user answers this way, show that field. Here’s how to build one:
- Add the field you want to hide (only show when relevant), then click it to open its settings.
- Go to the Advanced tab and turn on Conditional Logic.
- Set the rule to show the field when the Role matches, for example, when the Role is Journalist.
Repeat that for each role-specific field. To group several fields under one heading, you can drop them in a Container and set the same rule on the container. Just note that Fluent Forms doesn’t nest containers, so a container can’t sit inside another one.
Ask intent before you ask for details
People with varying interests might approach you. A journalist might be vetting you before pitching their editor, while a promoter might be ready to book. Your form should accommodate these early-interest people as well as those with an active plan.
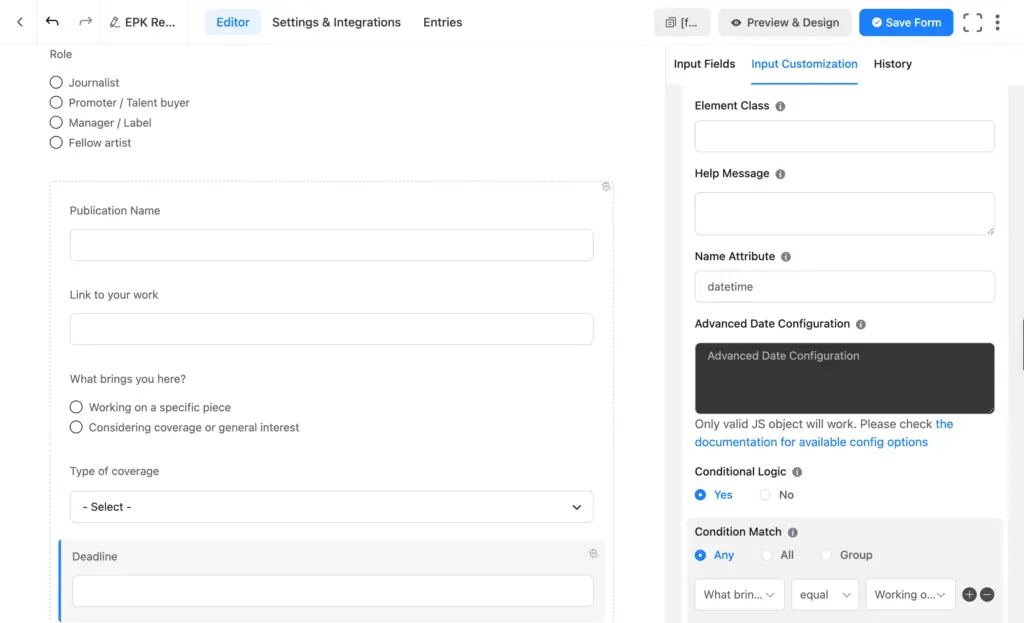
So ask intent first. Here’s how to set it up for journalists and promoters:
- Add a Radio field labeled “What brings you here?” and set it to show when Role matches.
- Add your detailed fields (deadline, event date, budget).
- On each detailed field, set one condition: show when the intent answer is the active option.
The table below maps each branch: column one is the role, column two is the primary questions everyone in that role sees (including the intent question), column three is the intent options, and column four is the extra fields that appear for the high-intent option.
| Role | Primary questions | Options | Fields for the high-intent option |
| Journalist | Publication name, link to their work | – | – |
| “What brings you here?” | Working on a specific piece | Type of coverage, deadline | |
| Considering coverage or general interest | – | ||
| Promoter / Talent buyer | Venue name and city, capacity | – | – |
| “What brings you here?” | Booking a specific date | Event date, event type, budget | |
| Vetting or general interest | – | ||
| Manager / Label | Company or label name, reason for reaching out, link to their roster or site | – | – |
| Fellow artist | Type of collaboration, link to their music, message box | – | – |
A vetting or early-interest contact skips the heavier fields and goes straight to requesting materials. You still capture them as a lead, just on a slower track. Every requester sees a form that fits them, and you get the details that matter for your reply.
Set your notification and confirmation
Go to Settings & Integrations > Settings > Email Notifications to notify the right person of each request (yourself or your manager).
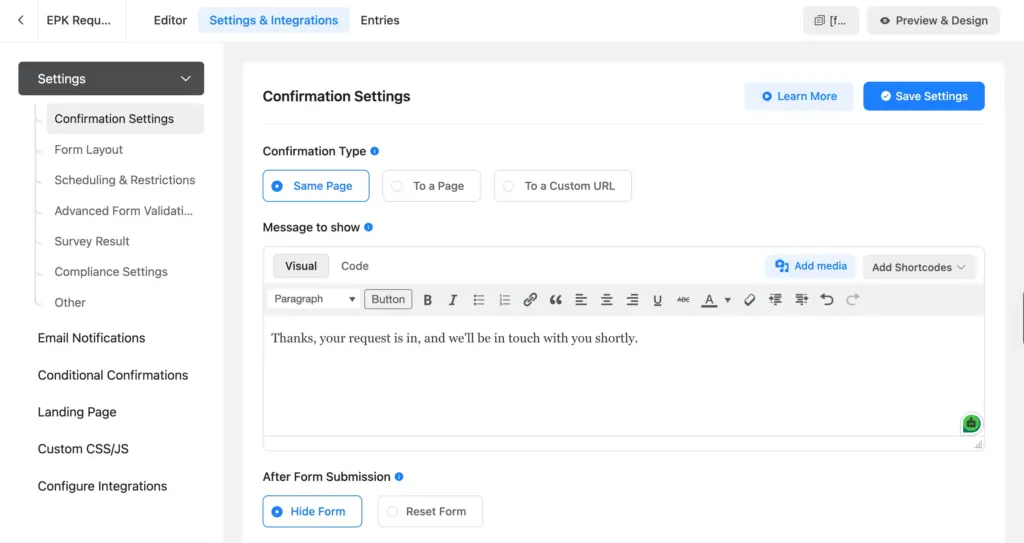
Then open Confirmation Settings to decide what the requester sees after they submit. A clear on-page message like “Thanks, your request is in, and we’ll be in touch soon” works well. You can add download links or next steps or redirect to a thank-you page as well.
Turn on spam protection
A public form draws bots. Enable Honeypot and token-based spam protection under Fluent Forms > Global Settings > General > Miscellaneous. For heavier traffic, add Cloudflare Turnstile, reCAPTCHA, or hCaptcha from Fluent Forms > Global Settings > Security.
Embed the form on your EPK page
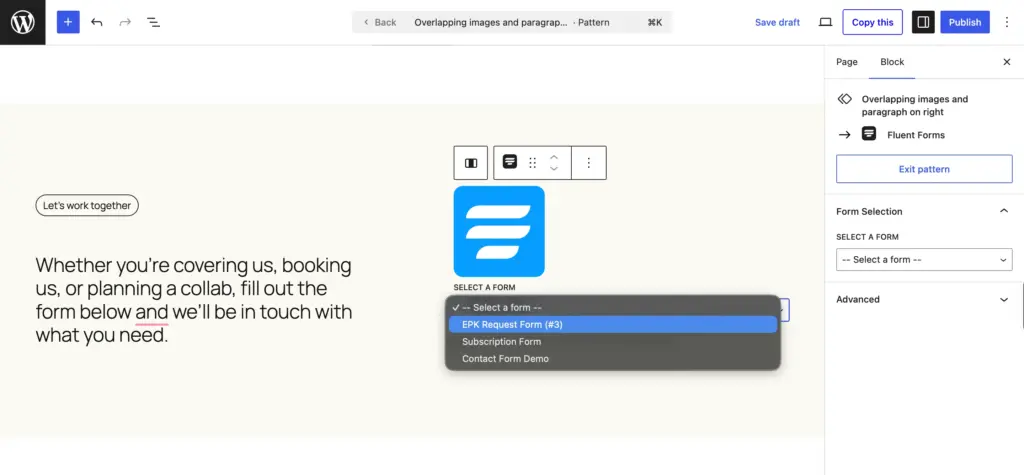
If you use the block editor, add the Fluent Forms Gutenberg block to your press kit page and pick your form from the dropdown. You can also copy the form’s shortcode and paste it anywhere WordPress accepts shortcodes, which helps with custom page templates.
Publish the page, and your request form is live.
Deliver Files and Build Your Contact List
The form collects requests. The next step is handing over materials and keeping every contact.
Send the materials
You have two clean options. For assets you’re happy to release to anyone, put download links on the thank-you page you set in Confirmation Settings. This way, requesters get them when they submit their information. For sensitive assets, skip the automatic links and send the files by email after you review the request, so you decide who gets them.
You can also use the Fluent Forms PDF Generator to attach a press one-sheet to the confirmation email. A one-sheet is your press kit boiled down to a single page: a short bio, your best press quotes, key stats, a photo, and contact details. It’s the quick overview a busy promoter reads first.
Set your usage terms
You’re handing over copyrighted work for a specific purpose, so state the terms. This is the usage checkbox from the build step. Add a Custom HTML field (no code) with a short statement in plain language, then a required Terms & Conditions checkbox tied to it. A clear statement covers the essentials:
- The materials stay your property (or your photographer’s).
- They’re licensed for the stated purpose only: press coverage, event promotion, or the specific booking.
- Photo credit is included where you require it.
- No editing, reselling, or sharing beyond that purpose.
The checkbox gives you a dated record that each requester accepted the terms, stored right in the entry. If your photos come from a hired photographer, their contract may set the credit and licensing wording, so match it. For anything high-stakes, have a professional review your terms.
Turn submissions into a list
Every submission is saved under your form’s Entries tab, timestamped and exportable to CSV. Connect the form to FluentCRM and each request also becomes a tagged contact. Tag by role, and you build a press list, a promoter list, etc., that you can email when you have a release or a tour to announce.
Test, Launch, and Keep It Current
Test before you share the link
Submit a test entry from the front end with a real email address. Then check three things:
- Go to Fluent Forms > Entries and confirm your submission appears.
- Check your inbox for the notification email.
- If you connected FluentCRM, open FluentCRM > Contacts and confirm the contact, list, and tags are right.
If the entry was saved but no email arrived, check your email delivery setup. FluentSMTP is a free option that routes email through a proper service so notifications don’t land in spam.
Keep it maintained
A press kit is only useful when it’s current. Refresh your photos, tracks, and tour dates, review new submissions on a set schedule, and reply while the interest is fresh.
When to Split a Request Into Its Own Form
You already handle booking, collaboration, and press as roles in the one request form. That’s the right call at first, since one form is easier to share and maintain. But when a single channel gets heavy, it earns its own dedicated form and page. For example:
- Booking form: If you gig often, a standalone booking form can work better than the promoter branch: how long you’ll play, what gear you need on stage, how tickets are handled, and whether you’re headlining or opening. Give it its own page so you can share the link directly.
- Collaboration form: If collab requests pile up, a dedicated form lets other artists attach demos and detail the project beyond what the fellow-artist branch asks.
You can add two more forms that serve a different audience:
- Fan testimonial form: Collects quotes and reviews from fans that you can use as press material.
- Update opt-in form: Lets industry contacts subscribe for a note when you release new materials.
Each takes minutes in Fluent Forms, reusing the same fields and conditional logic you’ve already built.
Build Your EPK Request Form Today
An EPK request form turns your press kit from a page people read into a page that works for you. It hands the right materials to the right people, keeps your sensitive assets under your control, and builds a contact list with every submission.
Download Fluent Forms for free, follow the steps above, and embed the form on your press kit page. Set it up once, and every promoter, journalist, and manager who visits gets the same professional experience.
Build Smarter Forms for Free

Sarika writes for Fluent Forms and loves to offer insights into small businesses. She’s curious and enjoys discussing ideas, interests, and perspectives. In her free time, she’s either marvelling at architectural beauties or trying different cuisines.


Leave a Reply