
How to Automatically Convert Form Submissions into WordPress Users
Every time someone fills out a form on your WordPress site, signing up for a course, registering for an event, or joining your community, they’re expressing intent to be part of your world. But by default, WordPress keeps forms and user accounts completely separate. Someone can submit your sign-up form and still not be a WordPress user.
That gap creates manual work: exporting entries, creating accounts one by one, and hoping nothing slips through the cracks. It also creates a frustrating delay between when someone signs up and when they actually get access.
With Fluent Forms Pro, you can automatically convert form submissions into WordPress users, no custom code, no manual imports, no friction. Here’s the exact setup.
TL;DR
Enable the module first: The User Registration or Update module (Fluent Forms Pro) is what connects form submissions to WordPress user creation. Activate it once under Fluent Forms → Integrations → Modules.
Any form can create a user: A contact form, event signup, or course enrollment form can all trigger user creation, not just a dedicated registration page.
Map your fields carefully: An unmapped email field causes user creation to silently fail. Always double-check before testing.
Control the post-submission experience: Set auto-login, a welcome redirect, and a confirmation email from the same integration feed.
Protect your user database. Enable spam protection and field validation before the form goes live.
Why Automate User Creation from Form Submissions
Manual user management doesn’t scale. If you run a membership site, an online course, or a client portal, creating WordPress accounts by hand is one of the first things that breaks as your audience grows. It’s time-consuming, error-prone, and creates a clunky experience for new users who have to wait for access they already signed up for.
Automating the process means:
- Instant access. Users get their accounts the moment they submit the form.
- Zero manual work. No CSV exports, no dashboard account creation, no follow-up emails asking people to “also register.”
- Consistent role assignment. Every registrant automatically gets the right WordPress user role.
- Better onboarding. You control exactly where users land and what they see next.
This is relevant whether you’re running a small community, onboarding clients into a portal, or processing hundreds of course enrollments per month.
How to Automatically Convert Form Submissions into WordPress Users
Step 1: Enable the User Registration or Update Module
Before building anything, activate the module that enables this.
Go to Fluent Forms → Integrations → Modules and find User Registration or Update. Toggle it ON.
This is a one-time, site-wide action; you won’t need to repeat it for every form you create. The module connects Fluent Forms directly to WordPress’s native user system.
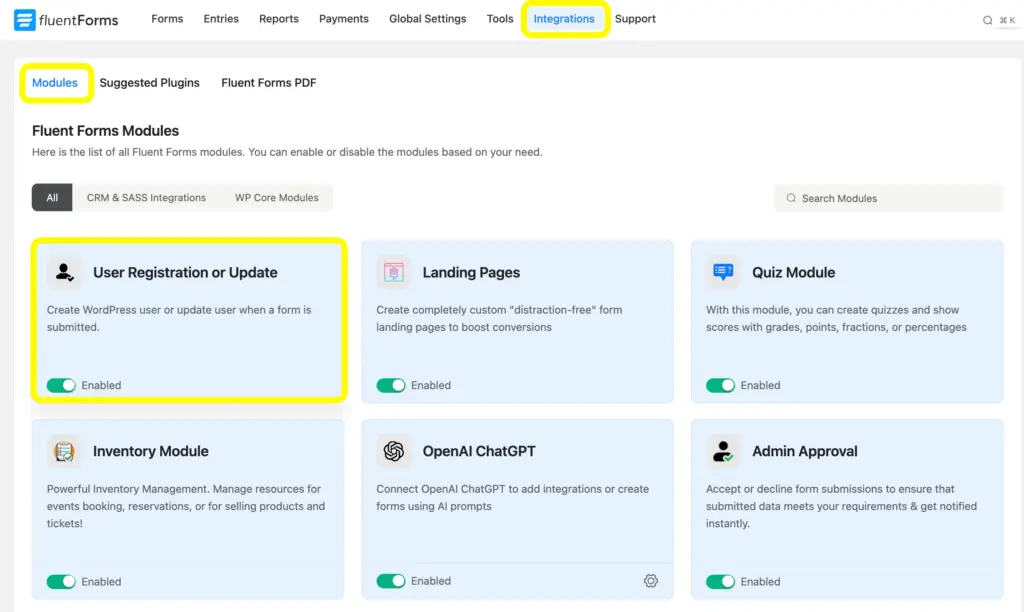
Note: The User Registration or Update module is a Fluent Forms Pro feature. If you’re on the free plan, you’ll need to upgrade. See everything Pro includes →
Step 2: Build the form with required fields
Now create the form that will generate user accounts on submission.
Go to Fluent Forms → Add New Form. You can start from a blank form or use a pre-built registration template. For a form that creates WordPress users, you’ll need, at a minimum, the following fields:
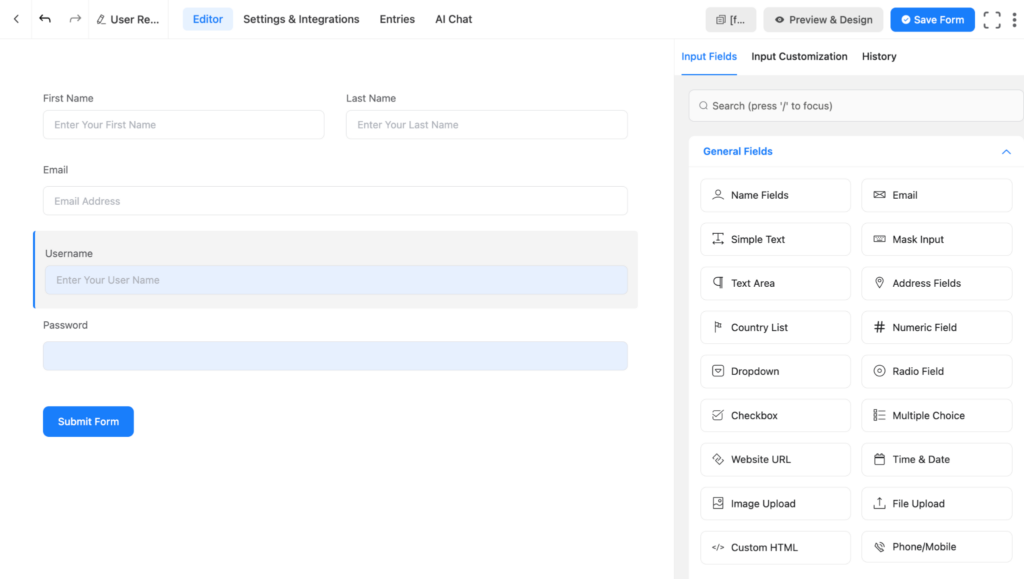
Here, I’ve put the name fields once, keeping those original, and once converted it to the Username, which you can consider as an optional field. On the settings and integrations page, you can directly use the email field as the username, too.
The email field and the password field are supposed to be the primary fields of a form’s user registration eligibility.
Fluent Forms gives you a full drag-and-drop form-building experience.
Step 3: Configure the Integration feed
This is the step that does the actual automation.
Go to your form → Settings & Integrations → Configure Integrations → Add New Integration → User Registration or Update Integration.

Once this is done, scroll down to the map fields and map your fields to the corresponding WordPress user properties:
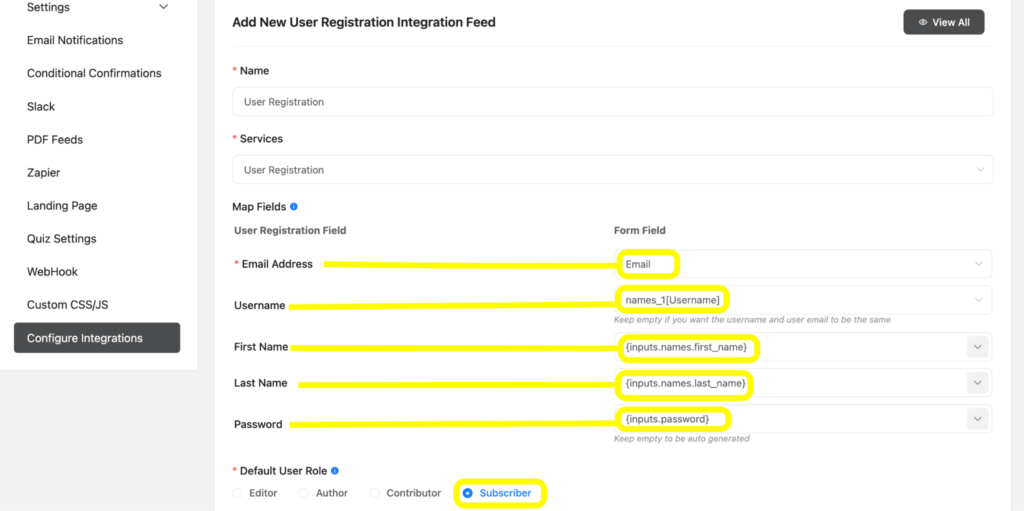
Set the Default Role thoughtfully
The subscriber works for most community and membership flows. If you’re building something more complex, like a tutoring platform where some users are teachers and others are students, create two separate registration feeds with conditional logic. Each feed works only when specific form answers are met, assigning the appropriate role automatically.
Critical: If your email field is not mapped, user creation will silently fail. Double-check all mappings before your first test.
Auto-Login
Inside the same feed settings, you’ll find an Auto-Login toggle. Enable this to log users in immediately after they submit the form; no separate login step is required.
Turn it on for community sites, course platforms, and membership flows where you want the smoothest possible first experience. Skip it if your site requires email verification before granting access, or if you’re protecting content that shouldn’t be visible to unverified accounts.
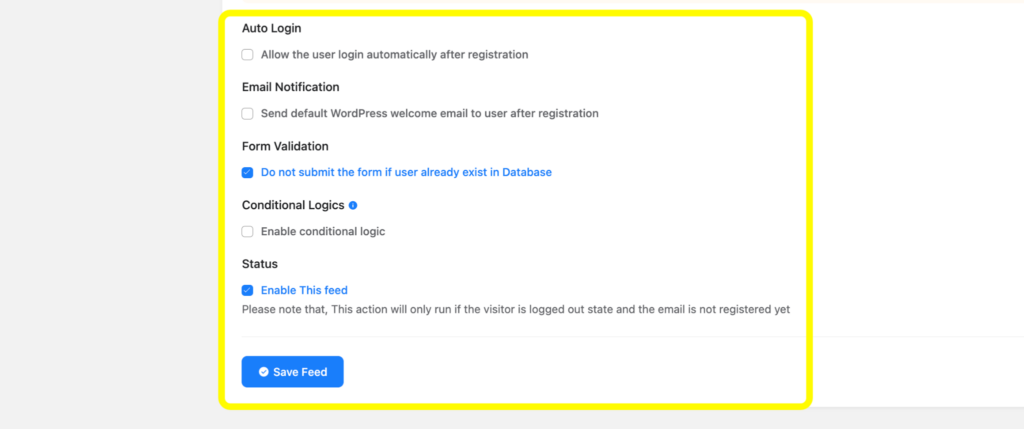
Post-Submission Redirect and Welcome Email
In the form’s Confirmation Settings, configure a redirect to send new users’ confirmation emails to a useful destination: a welcome page, their dashboard, or an onboarding checklist. A blank “thanks for submitting” screen is a missed opportunity.
Also set up a Notification Email to fire on form submission, confirm the account, share login instructions, and give the user their first clear next step.
Step 4: Set up the login system
Once users have accounts, they need a way to return. WordPress’s default login page works, but it’s plain, hard to brand, and disconnected from the experience you’ve built.
Option 1: Use FluentAuth (recommended)
FluentAuth is built by the same team as Fluent Forms and integrates natively with it. It gives you a fully customizable login page, social login (Google, Facebook), magic link login, two-factor authentication, and login attempt rate limiting, without writing a line of code. For any site with an ongoing user base, this is the cleanest and most complete solution.
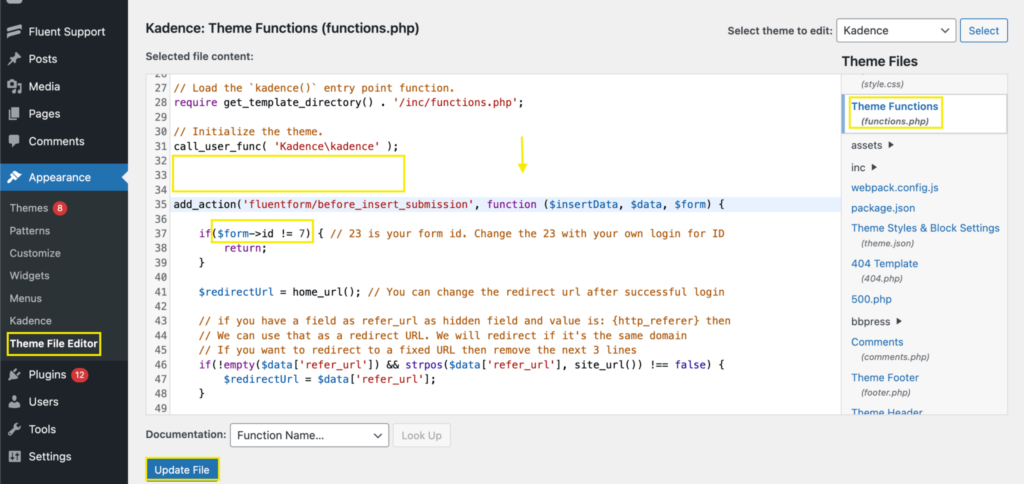
Option 2: Add custom PHP to your theme
If you prefer a lighter-weight approach, WordPress’s built-in wp_login_form() function lets you render a login form on any page template. This option requires comfort with PHP and direct theme file editing. For most site owners and non-developers, FluentAuth is the more practical choice.
Two Fluent Forms Features That Keep Your User Database Clean
Spam Protection
Any public form that creates user accounts is a target for bots. Fluent Forms includes multiple spam protection layers; use them before your form goes live. It includes multiple anti-spam shields, including reCAPTCHA, hCaptcha, Akismet, and Turnstile.
Prevent Empty Submissions
Mark every critical field as required and pair it with a clear, friendly validation message, so users know exactly what to fix before the form submits. Enable Empty Submission Blocking and restrict blank submissions.

Hi, this is Aparup. I am a Literature postgraduate, mixing my creative thoughts with my experience in the tech industry to surpass AI. Professionally, I am a content marketer seeking solutions to users’ problems regarding WordPress.


Leave a Reply