Your video player is a conversion tool. Viewers spend minutes on that one window, so it’s a natural place to capture an email or guide the next step, and most players aren’t built for it.
We designed FluentPlayer to solve that problem. I’ll show you every feature, where to find it, and how to set it up in this FluentPlayer guide. By the end, you’ll know exactly what FluentPlayer can do, why it is the best video player for WordPress and how to make it work for you.
TL;DR
FluentPlayer is a video and audio player plugin for WordPress from the WPManageNinja team, built to do more than embed a file.
It plays self-hosted video, YouTube, Vimeo, and audio in the free version, plus BunnyCDN, Mux, Cloudflare, Gumlet, and HLS in Pro.
You set your branding and a preset once, then reuse them on every video, with per-video overrides when you need them.
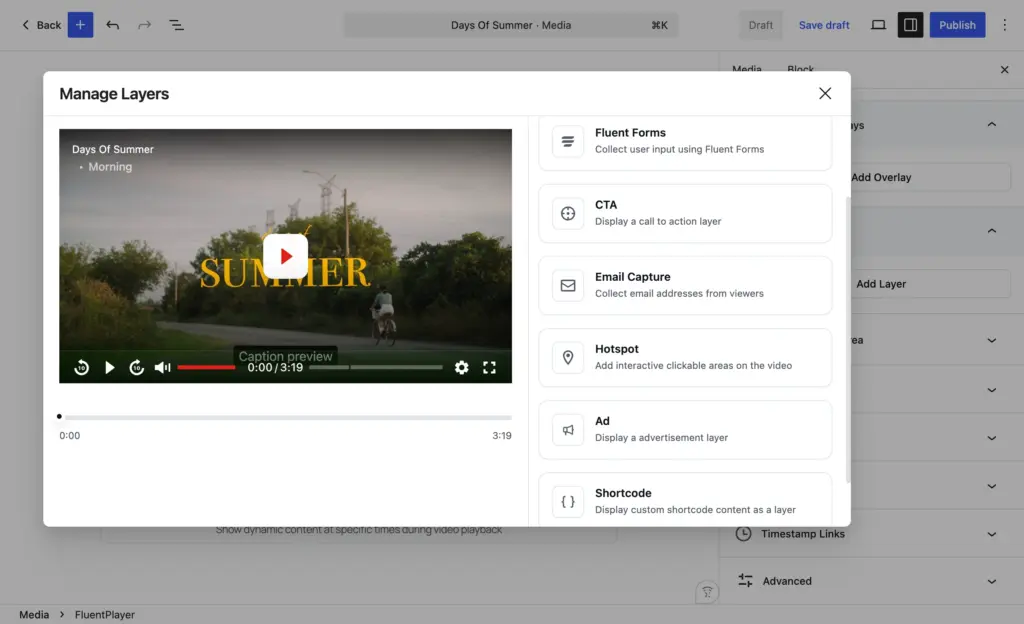
Interactive layers drop forms, email capture, CTAs, hotspots, ads, and shortcodes right inside the video at the moment you choose.
Captured leads flow straight into FluentCRM with no third-party bridge, and Fluent Forms layers can even take payment.
Pro analytics show views, watch time, completion rate, and the exact second viewers drop off, all stored in your own database.
Free is feature-rich for single videos. Pro adds playlists, analytics, timed content, subtitles, advanced layers, and more hosting.
What Is FluentPlayer
FluentPlayer is a video and audio player plugin for WordPress (no code) that lives on your own site and keeps your data with you. It sits inside the same Fluent ecosystem as Fluent Forms, FluentCRM, and FluentCommunity, so your video, your forms, and your contacts all run from one place.
It’s ideal for bloggers embedding a clip, course creators building lesson playlists, marketers capturing leads mid-video, membership sites gating content, and agencies keeping playback consistent across client sites.
Set Up FluentPlayer Once
Install the plugin
Install the free plugin for WordPress first, then add Pro if you need its premium features.
In your dashboard, go to Plugins › Add New and search for FluentPlayer, or upload the plugin file manually.
Click Activate.
Open FluentPlayer › Settings to set your defaults.
Set your site-wide defaults
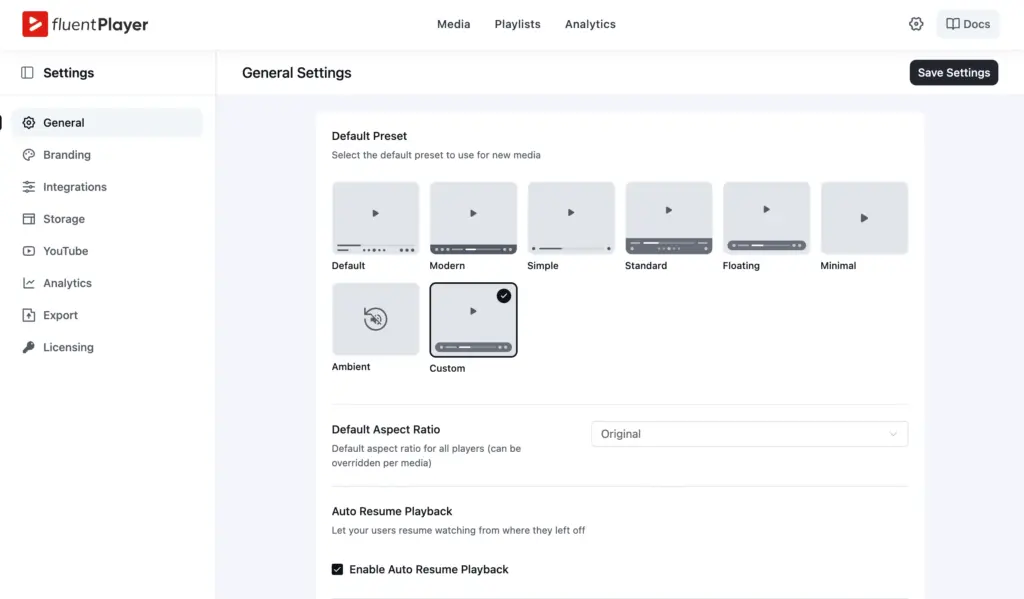
Under FluentPlayer › Settings › General, you set the defaults every new video starts from: the default preset, default aspect ratio, and auto-resume playback. You can add custom CSS here too. You can override any of them on individual videos later.
What are presets?
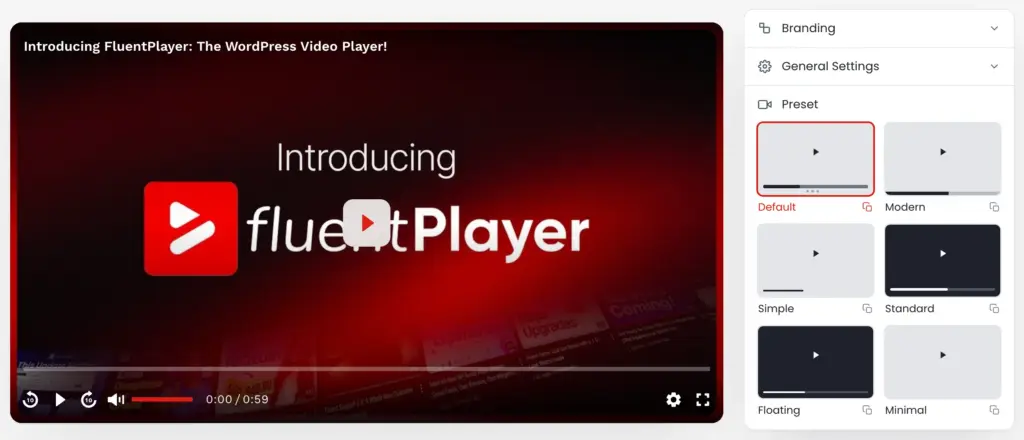
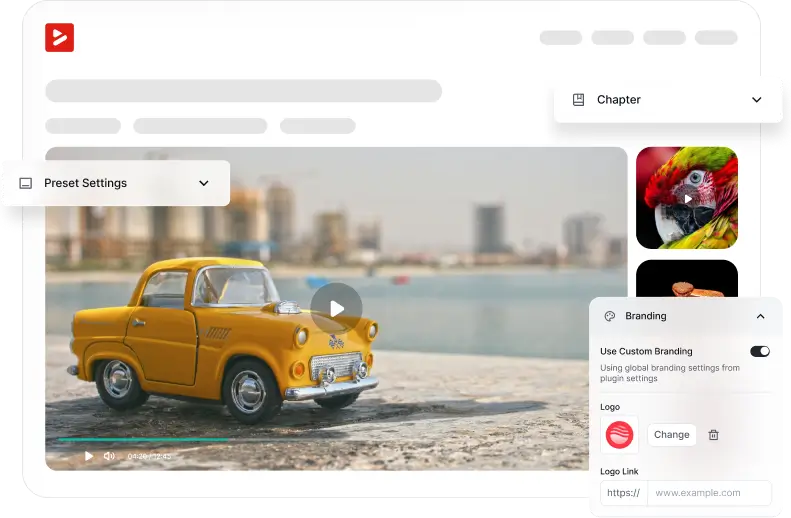
A preset is a saved player look and setup you can reuse, and it is the key to not repeating yourself on every video. FluentPlayer works on two levels: a global preset sets the look and behavior of your videos sitewide, and a per-video override changes one video only when you need it.
FluentPlayer ships with six free presets: Default, Modern, Simple, Standard, Floating, and Minimal. Pro adds an Ambient preset and fully custom presets.
Add your branding
Set your look once so every video matches your site.
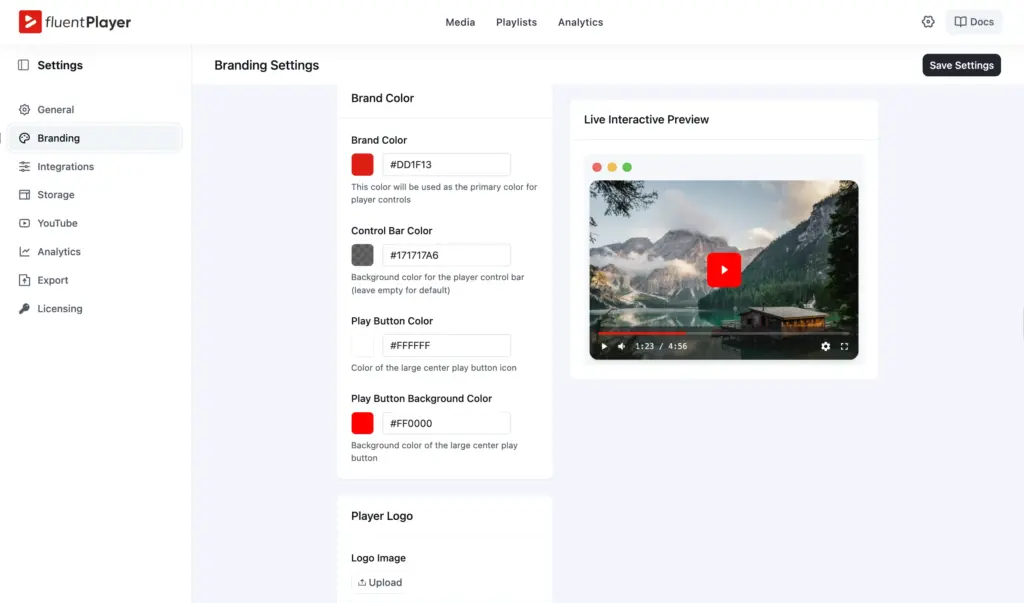
Go to FluentPlayer › Settings › Branding.
Set your brand color, control bar color, play button color, and play button background.
Upload your logo under Player Logo.
Watch the live preview update, then click Save Settings.
Add and Configure Your First Video
Add a video
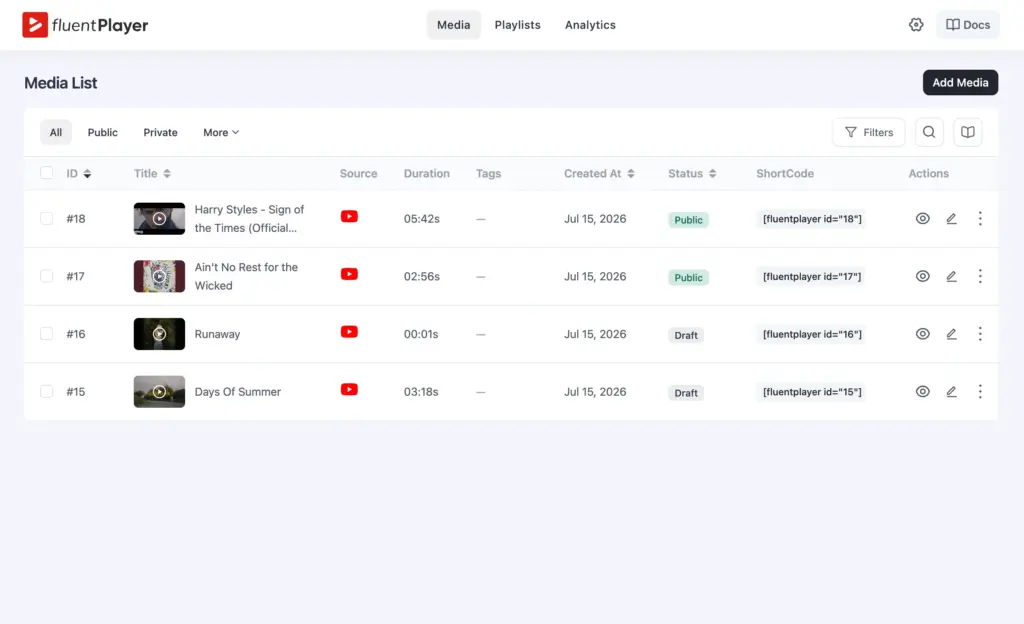
Every video you create lives in one library, so you manage it in a single place and embed it anywhere.
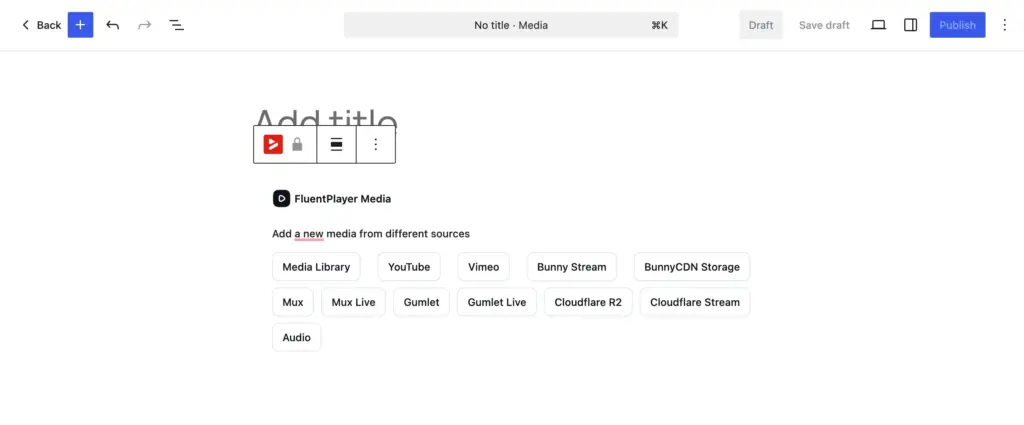
Go to FluentPlayer › Media and click Add Media.
Pick a source: Media Library, YouTube, Vimeo, Bunny Stream, BunnyCDN Storage, Mux, Gumlet, Cloudflare, or Audio.
Paste your URL or choose your file, then confirm.
Media sources
FluentPlayer keeps the same player no matter where the video is hosted.
Free sources: self-hosted uploads, YouTube, Vimeo, and audio files for podcasting.
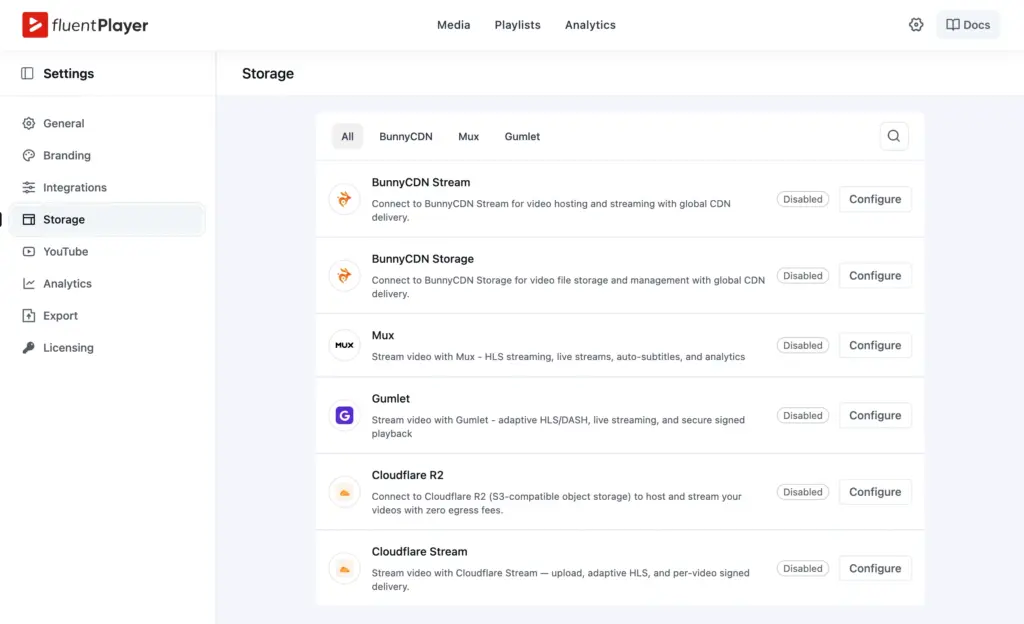
Pro sources: BunnyCDN Stream and Storage, Mux, Cloudflare R2 and Stream, Gumlet, and HLS streaming.
The CDN integrations support audio as well as video, so podcast or audio-only content hosted on BunnyCDN, Mux, Cloudflare, or Gumlet plays through the same player.
You connect hosting providers under FluentPlayer › Settings › Storage.
If you use YouTube, you can keep it from loading until someone hits play, so YouTube doesn’t track visitors who never watch. Set under FluentPlayer › Settings › YouTube with Privacy-Enhanced Mode.
FluentPlayer also supports Vimeo the same way it supports YouTube: privacy mode is on by default, and viewers get quality and playback-speed menus in the control bar. If your Vimeo videos have chapters or captions set up, FluentPlayer can pull those in too (captions are a Pro feature).
Choose a preset
Your video already uses the default preset you set earlier. To change it for this video, open the Preset panel in the block sidebar and pick another one. To brand this video differently, expand Branding and turn on Use Custom Branding.
Build a custom preset (Pro)
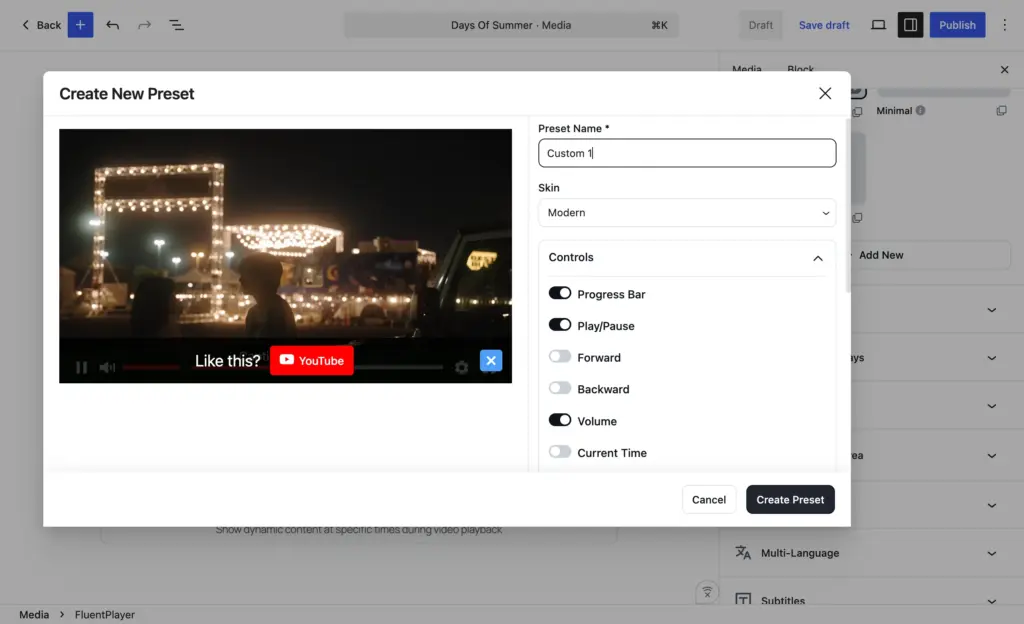
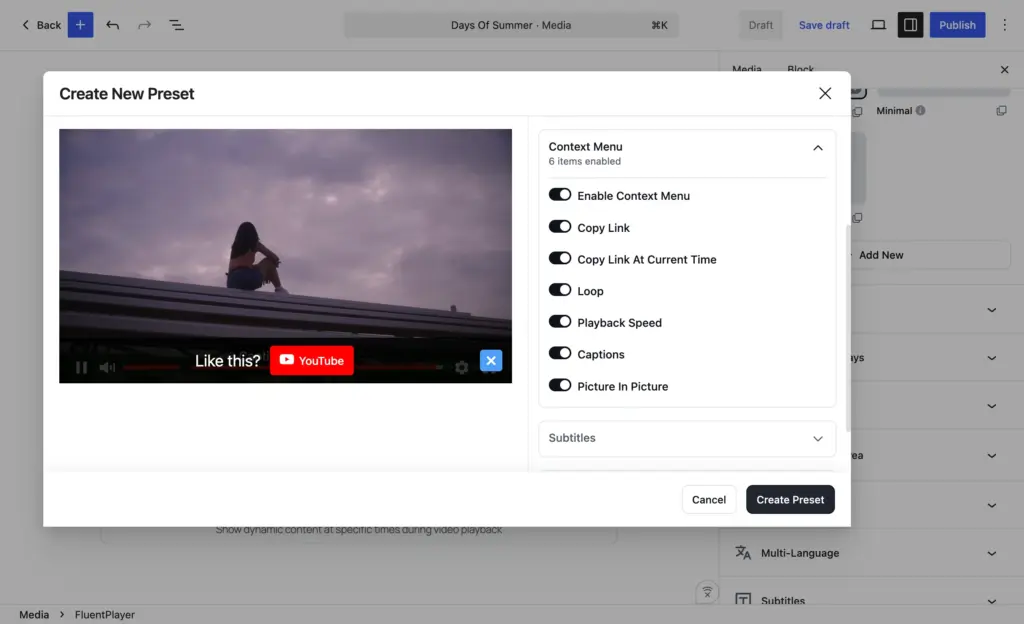
Custom presets let you choose the skin and controls, set playback behavior, subtitle style, email capture, call to action, action bar, and more.
In the block sidebar Preset panel, click Add New.
Name the preset and pick a skin.
Toggle controls on or off: progress bar, play/pause, forward, backward, volume, current time.
Set behaviors: autoplay, muted autoplay, save play position, plays inline, and which control groups to hide.
Adjust the context menu items, subtitle styling, and overlays.
Click Create Preset.
How to make a custom preset your site-wide default?
Once you create a custom preset, it joins your list of presets everywhere, so you can set it as the default for every new video from FluentPlayer → Settings → General.
Set how the video plays
You set playback behavior in two places. To reuse it, design a preset with ideal behavior settings and set that preset as global default. Or adjust it on one video from the block sidebar for per-video change.
Autoplay: start muted or with sound.
Muted Preview is a new autoplay mode: the video loops silently with controls hidden and a “Play with sound” overlay on top. When a viewer clicks it, the video switches to full playback with audio. Preview mode doesn’t activvate analytics, tracking, interactive layers, or Resume Playback.
Speed control: let viewers match their own pace.
Picture-in-Picture: viewers keep watching while they browse.
Play inline on mobile: the video stays on the page instead of jumping to full screen.
Aspect ratio and video end screen (loop/thumbnail): set per video from the Media tab.
Remember playback position (Pro): viewers resume where they stopped, and you can set it per video to override the preset.
Single Playback stops other players on the page automatically when one starts, so you never get two videos’ audio overlapping. It’s on by default; you can turn it off in General settings.
Keep your pages fast
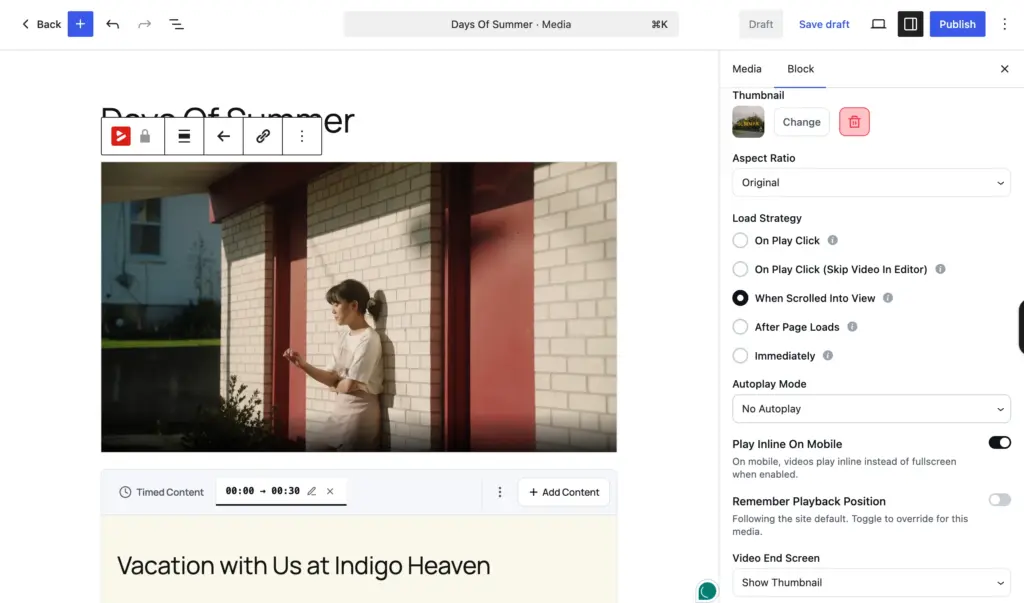
The Load Strategy setting controls when the player script loads. Hold a video that sits below the fold until it’s needed, so the rest of your page appears fast. You set this per video in the block sidebar, with options like When Scrolled Into View, On Play Click, After Page Loads, and Immediately.
Add chapters
Chapters let viewers jump to the moment they need, so a long video feels easy instead of endless. They are free and work with every source.
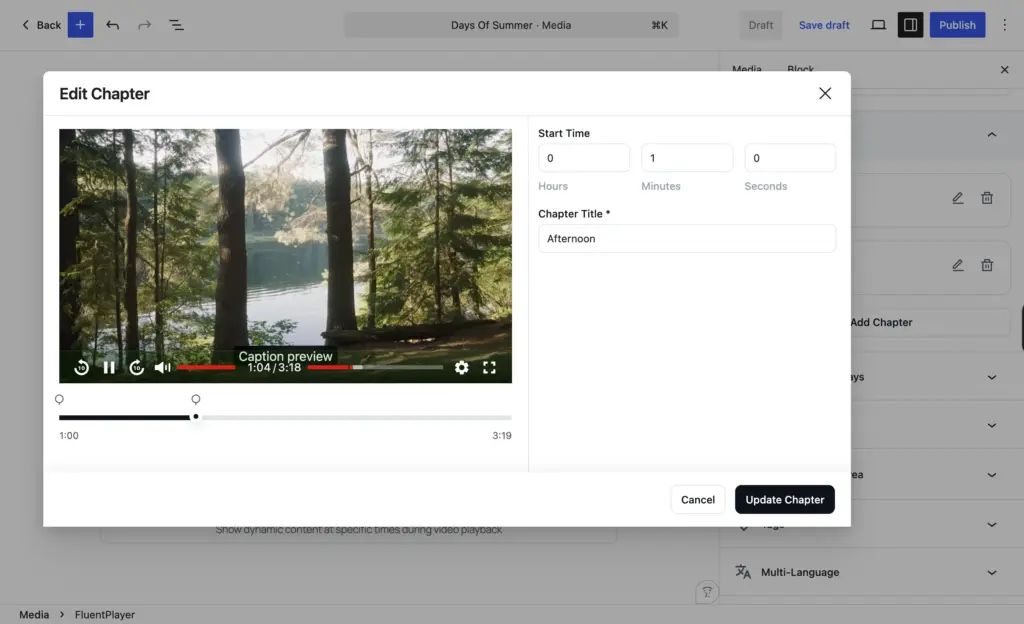
Open your video and expand Chapters in the block sidebar.
Click Add Chapter.
Set the start time in Hours, Minutes, and Seconds, then name the chapter.
Click Update Chapter.
Inline chapter strips (Pro) display your chapters as a horizontal, scrollable strip below the player instead of only inside the seek bar. Each chapter shows its title and start time, and viewers can click to jump to it. It’s keyboard-accessible.
Add subtitles for accessibility (Pro)
Subtitles make every video easier to follow, and they open your content to viewers who watch with sound off or speak another language. Open the Subtitles panel in the block sidebar, where you have two ways to add them.
1. Upload your own tracks: Under Add Subtitle, upload .vtt or .srt files.
2. Import from YouTube: In the YouTube Subtitle Import box (currently in beta), click Fetch to pull captions from the YouTube source instead of uploading them manually.
Once tracks are in, viewers turn captions on and switch subtitle languages right from the player.
Embed it on a page
You embed the same video two ways, and both look the same on the front end.
Block editor: add the FluentPlayer block and select your media.
Classic editor or page builders: paste the shortcode, for example . The shortcode uses the media ID, not the video file. Swap the source in the dashboard later, and every embed updates on its own.
Modal (lightbox/popup) playback (Pro): instead of embedding the player directly on the page, you can open it in a focused lightbox triggered by text, a button, an image, or an icon. Wrap any content in the modal shortcode:
The modal supports closing with Escape or by clicking the backdrop. It’s useful for embedding a video behind a “Watch the demo” link or thumbnail without the video taking up page space.
You can override a video’s saved settings directly from the shortcode using preset, autoplay, muted, or loop as attributes. The override applies only to that one embed, everywhere else, the video keeps its normal preset settings.
If you build pages with Elementor or Divi, FluentPlayer ships dedicated widgets/modules for both (Pro), so you can drop the player and playlist into your builder layout without the shortcode. Breakdance is also supported.
Keep Media Private
Media in your library can be set to Private. A private video won’t resolve on its own public URL for anyone who isn’t allowed to see it, visitors hit a standard 404 instead of the video page. This is separate from where you embed the video: you can still place a private video inside a page or course that’s already gated while blocking direct access to its standalone media URL.
Make Your Videos Interactive
Turn a video into an action
This is what sets FluentPlayer apart. You can place interactive elements as a layer at a specific point in the video.
Free layers: Fluent Forms and Email Capture.
Pro layers: CTA banner, Hotspot, Ad, and Shortcode.
You find them all in one place. Open a video under FluentPlayer › Media, expand Interactive Layers in the block sidebar, and click Add Layer to open the Manage Layers window.
Set up email capture (free)
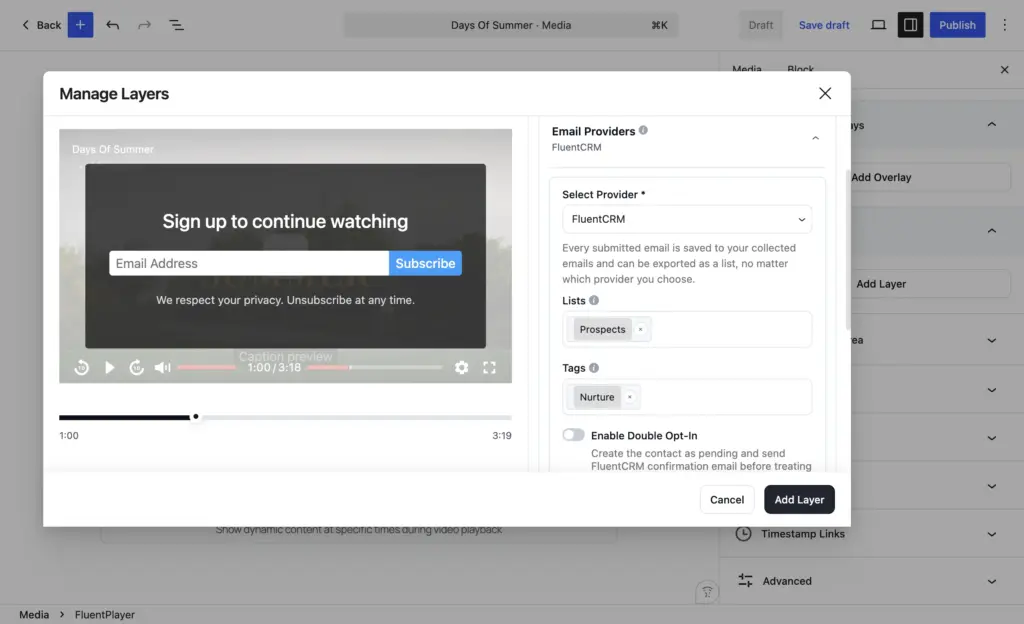
The email capture layer pauses the video and shows a signup form, so you grow your list without a separate pop-up plugin.
In Manage Layers, choose Email Capture.
In Display, set the exact start time in Hours, Minutes, and Seconds.
In Email Providers, add a provider such as FluentCRM, Mailchimp, or Webhook, then pick lists and tags.
In Content, write the headline, email placeholder, button text, and bottom note.
In Controls, set Allow Skipping on for a soft ask or off for a hard gate.
In Appearance, set button colors, layer background, and border radius.
Click Add Layer, then save the media.
If you don’t connect a provider, the layer still works. Every email is saved to your collected emails inside FluentPlayer, where you can export it as a list. A provider just sends new contacts to your list automatically as they come in.
A hard gate collects more emails. A soft gate gives a better viewing experience. Pick based on your goal.
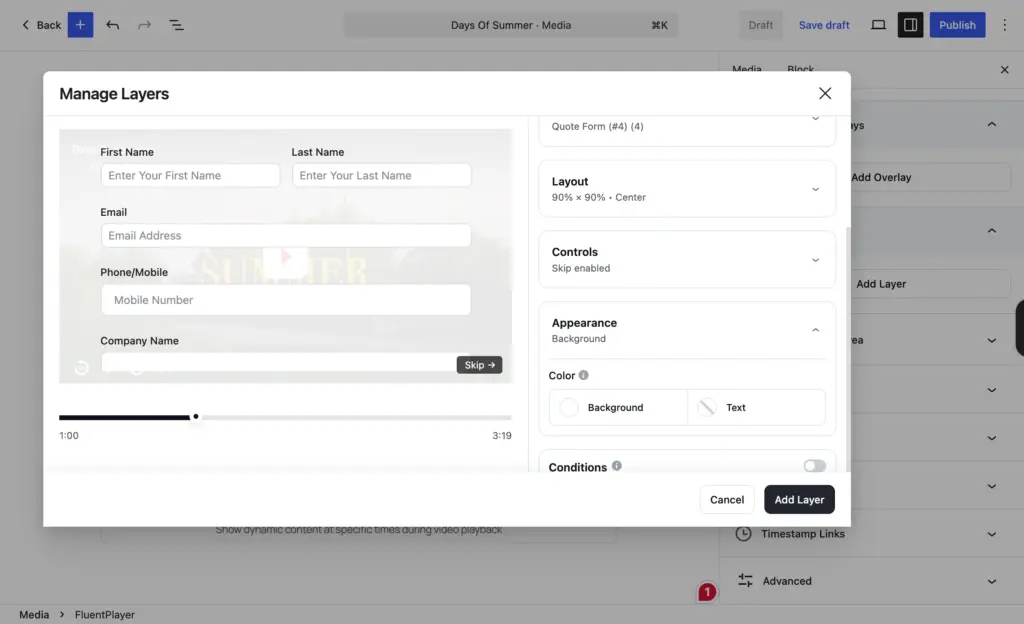
Use a Fluent Forms layer (free)
Drop any form from Fluent Forms inside the video to collect registrations, feedback, or leads. Because Fluent Forms supports payment fields, the same in-video layer can take a payment, so a viewer can buy a course or pay for a seat without leaving the video.
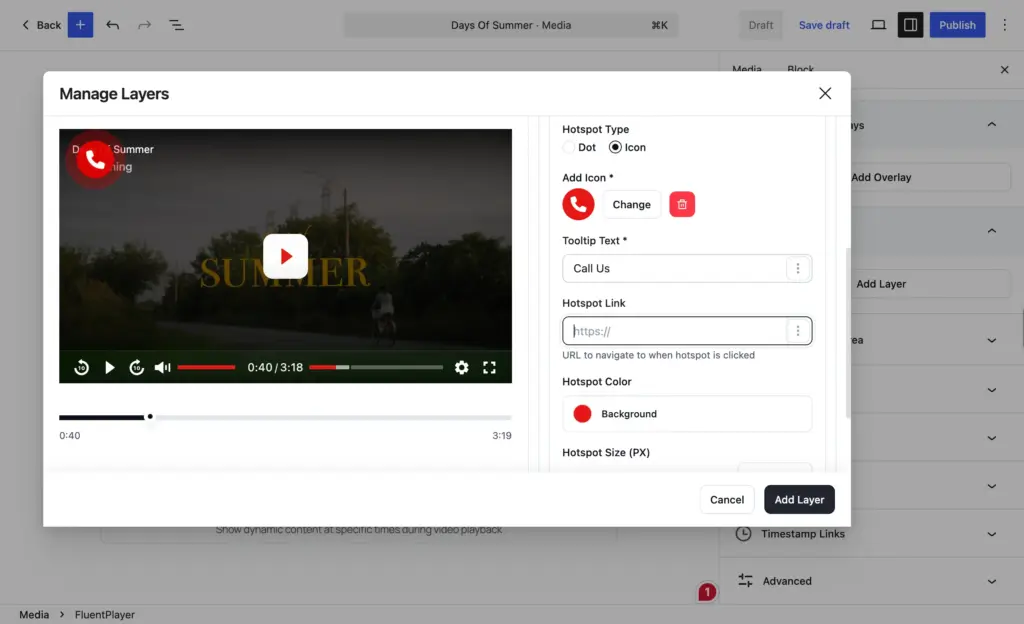
CTA, hotspot, ad, and shortcode layers (Pro)
CTA banner: a text-and-button prompt that guides viewers to the next step.
Hotspot: a clickable area on the video that links out or reveals more.
Ad: a sponsor message shown at a set time, with a skip option.
Shortcode: any WordPress shortcode rendered as a layer for custom content.
Show the right layer to the right viewer (Pro)
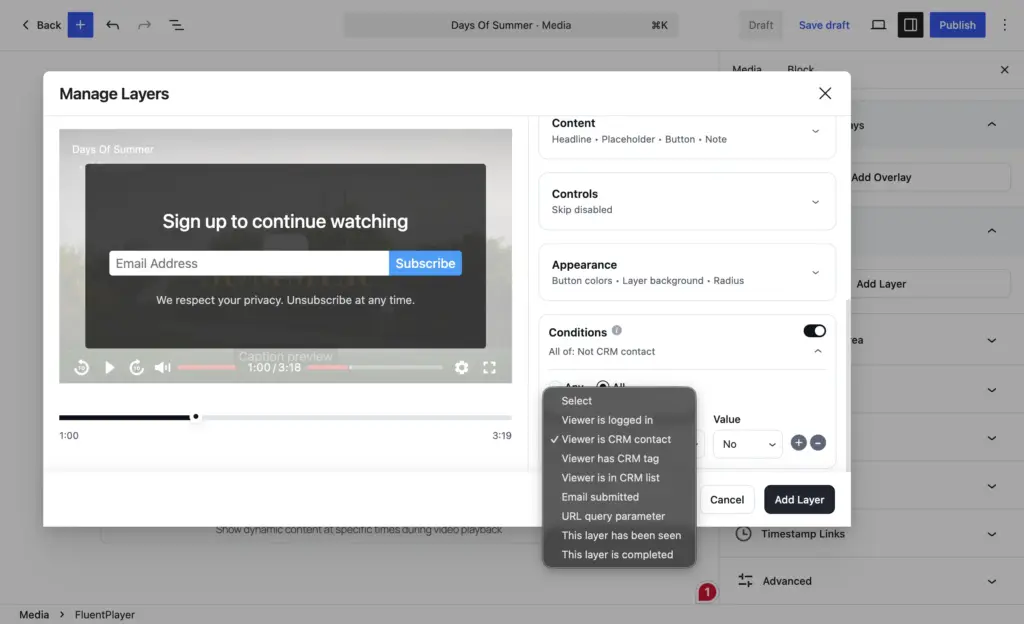
Conditional rules decide who sees a layer, using a simple Field, Operator, and Value setup. You build them in each layer’s Conditions panel.
You can show or hide a layer based on whether the viewer is logged in, is a FluentCRM contact, has a specific tag or list, has already submitted an email, arrived with a URL query parameter, or has already seen or completed the layer.
So a first-time visitor sees the email capture form, while a known contact skips it and gets a course offer instead.
Sync content below the player with timed content (Pro)
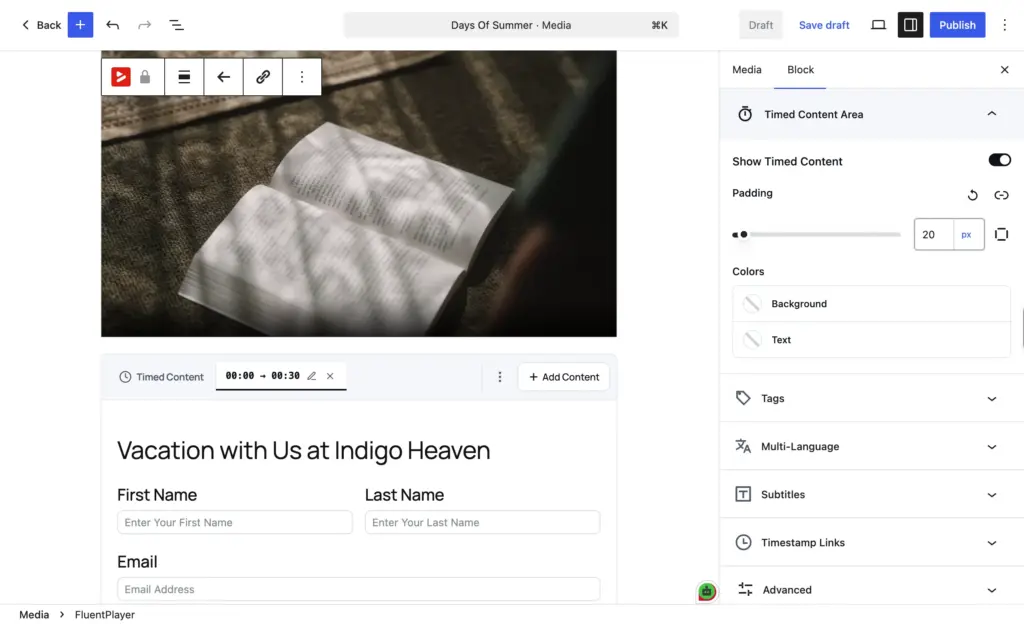
Timed Content shows the right supporting block below the video at the right moment, in sync with playback. It is unique to FluentPlayer.
Open your video and find the Timed Content area, then click Add Content.
Set a time range, for example 00:00 to 00:30.
Drop in any WordPress block: a Fluent Forms form, a button, an image, or a text block.
Style the padding and colors to match your page.
The block appears when the video reaches that range and changes as playback moves on.
Scale to a Video Library (Pro)
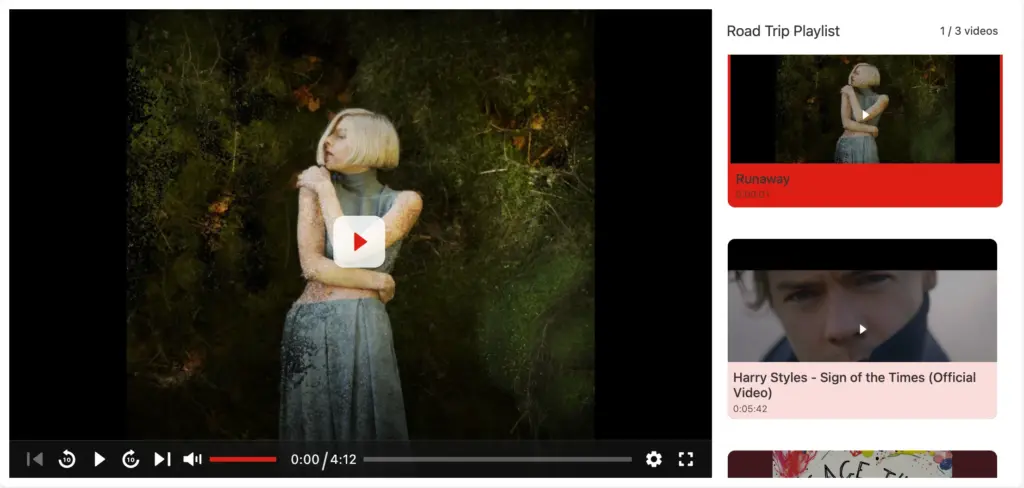
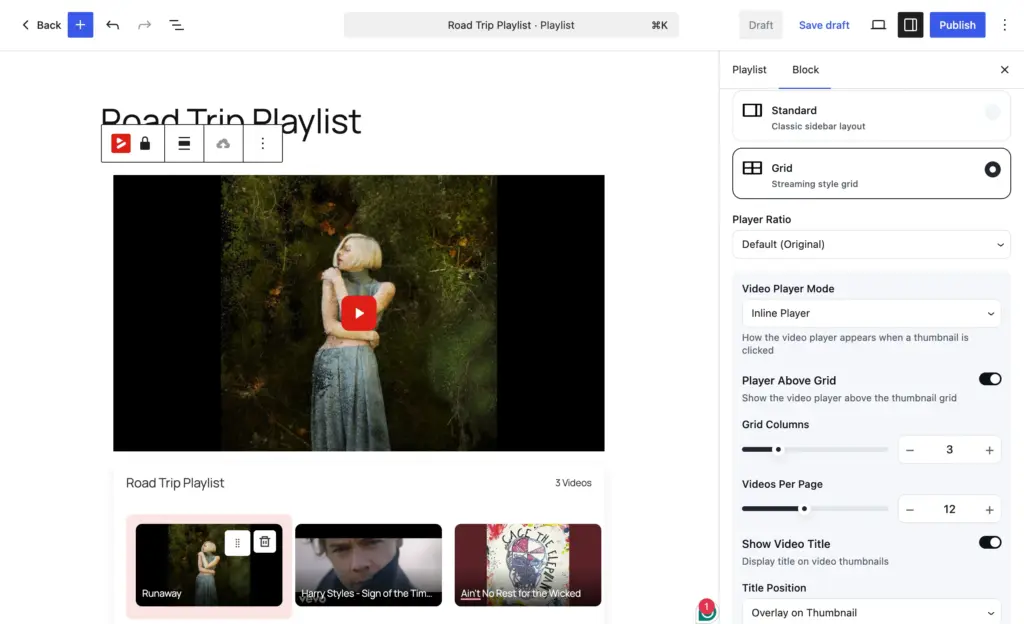
Once you have more than a few videos, playlists move viewers from one to the next (which reduces drop-off). It helps group topics course-wise, guides users through a series of tutorials, plays entertainment videos automatically episode-by-episode, etc.
Create a playlist, then add media to it.
Pick a layout: Standard, a classic sidebar, or Grid, a streaming-style layout.
Set behavior: continuous play, loop, previous and next buttons, and the playlist menu toggle.
Style it: typography, box shadow, colors, and grid columns.
Embed it with .
Measure and Connect
See how viewers interact with your videos (Pro)
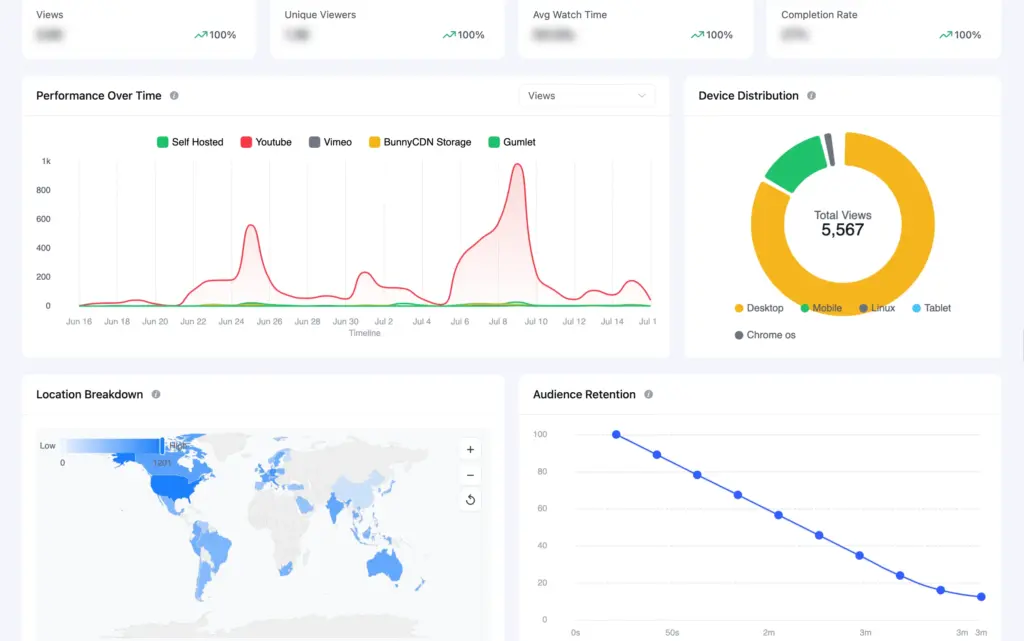
FluentPlayer analytics give you insight into audience behavior, and everything is stored in your own WordPress database. Turn it on under FluentPlayer › Settings › Analytics.
Core metrics: total views, unique viewers, average watch time, and completion rate per video.
Behavior: an audience retention graph showing the exact second viewers drop off, plus new versus returning, top videos, and top viewers.
Trends: device distribution and location breakdown over time.
You can also send events to Google Analytics from the same settings page to combine video data with your site-wide reporting.
Connect the tools you already use
FluentPlayer fits your existing setup perfectly. Connect these under FluentPlayer › Settings › Integrations.
Fluent ecosystem:FluentCRM syncs captured leads in real time with lists and tags, Fluent Forms powers in-video forms and payments, and FluentCommunity (Free) embeds video inside courses and gated spaces.
When a viewer submits an email capture or interacts with a video layer, FluentCRM logs that activity on the contact’s timeline, so you can see video engagement alongside a contact’s other activity in FluentCRM, not just in FluentPlayer’s own analytics.
Hosting and delivery (Pro): BunnyCDN, Mux, Cloudflare, and Gumlet.
Email and workflows (Pro): Mailchimp and Webhooks.
LMS (Pro): LearnDash for lessons and gated learning.
Reporting (Pro): Google Analytics.
Choose Your Plan
Free is a great choice for single videos. Pro is for scaling engagement and running video as part of a business.
The free version is enough to run branded, single videos with lead capture. You move to Pro when you need playlists, analytics, subtitles, and the advanced layers that turn viewing into action.
Plan
Sites
Price (one-time)
Best for
Personal
1 site
$199
Your own site or a side project
Freelancer
5 sites
$399
Freelancers with a handful of client sites
Studio
25 sites
$599
Growing studios and multi-brand sites
Agency
50 sites
$799
One license for every client
Currently, every plan is a lifetime license: one payment, all features, lifetime updates, and priority support, backed by a 14-day money-back guarantee. You can also split the payment for the Agency plan (9 payments of $89/mo).
FluentPlayer includes a one-click migration from Presto Player. It brings your media, branding, player presets, and analytics data tied to your media. You choose what transfers, and your Presto Player data stays untouched.
Get More From Every Video You Publish
You’ve seen everything FluentPlayer can do, from branding and presets to in-video forms, playlists, and analytics. Start with the free version: brand one video, add a chapter, and add an email capture layer. When you’re ready to see how people watch and add playlists or advanced layers, Pro is there.
Sarika Sarmin
Sarika writes for Fluent Forms and loves to offer insights into small businesses. She’s curious and enjoys discussing ideas, interests, and perspectives. In her free time, she’s either marvelling at architectural beauties or trying different cuisines.





Leave a Reply