

How to Create a Lead Generation Quiz on WordPress

Most contact forms ask for an email address before giving anything back. That connection feels one-sided to a visitor who has never heard of your brand. A quiz changes that dynamic. The visitor gets a result first: a score, a recommendation, an insight. They share their name and email after, once the exchange already feels fair. That single change in sequence is why quizzes outperform static lead forms.
Fluent Forms includes a built-in quiz module that handles the scoring, grading, and result logic without a separate plugin. This tutorial is a complete guide to planning a lead-generation quiz, capturing leads at the right moment, and routing them to the tools you already use.
TL;DR
- Quizzes convert better than plain lead forms because they offer value before asking for contact details.
- Fluent Forms Quiz Module supports simple scoring, advanced weighted scoring, grade systems, etc.
- Place lead capture fields mid-quiz and mark them as required so visitors are already engaged before they decide whether to share their details.
- Use personalized confirmations to show the score using the shortcode
- Connect the form to your CRM or email tool for further use of the leads.
- Test the full workflow before publishing, from question order to the confirmation message to the follow-up email.
Why Use Quizzes for Lead Generation
A newsletter box asks for an email in exchange for nothing tangible. A quiz asks for the same email in exchange for a result the visitor actually wants to see, which changes how people respond to the request. Here is why quiz-based lead capture consistently outperforms a plain opt-in form:
- Quizzes increase visitor engagement because answering questions is more interactive than filling out a form.
- A quiz offers value before requesting contact information, so the exchange feels fair rather than transactional.
- Responses tied to a score or outcome tend to produce better lead quality than a name and email alone.
- Every answer a visitor gives is a data point you can use to segment your audience by interest, need, or intent.
- Quiz results make it possible to personalize the follow-up campaign instead of sending the same generic sequence to everyone.
Suitable Types of Quizzes for Lead Capture
Not every quiz format fits every business. The right type depends on what you are trying to learn about the visitor and what you can credibly offer them in return.
Personality quiz
In a personality quiz, visitors answer a set of questions that categorize them based on their responses. This type of quiz works better to define a marketing style, a buyer persona, or a working style. This helps agencies and coaches segment leads by mindset rather than a numeric score.
Trivia quiz
A trivia quiz is a knowledge test with right and wrong answers. Educational brands, course creators, and anyone building authority around a subject can use this for better lead generation.
Graded quiz
A graded quiz is designed to let correct answers earn points, and shows the total maps to a grade or performance band. It’s common for training providers, certification programs, and recruitment screening.
Weighted quiz
A weighted quiz has each answer option carrying a different point value rather than a simple correct or incorrect flag. This is suitable for assessments where answers fall on a range instead of a binary right or wrong.
Product recommendation quiz
Here, answers steer the visitor toward a specific product, plan, or service. eCommerce stores and SaaS companies use this format heavily because it doubles as a soft sales tool.
What a Lead Gen Quiz Must Include
Before opening the form builder, it helps to know which fields, strategies, and features need to be in place to make a lead capture quiz bring the expected results. Here are the elements every lead gen quiz needs:
Lead capture field
A name and email field, preferably not making it essential before submitting the quiz response. Rather, you can make it marked as a required field while letting users continue the quiz, keeping the lead capture fields amid other fields.
Engaging quiz questions
Use clear, specific questions built using radio fields, checkboxes, dropdowns, or multi-select fields. These are the field types the quiz module can score, and these make the quizzing faster as well.
Automatic scoring and grading
Fluent Forms calculates scores from correct answers, converts them into percentages, or applies a custom grade system with labels you define.
Personalized quiz results
A pass or fail message, a full breakdown of the visitor’s answers, or a downloadable PDF summarizing their score.
Follow-up automation
A confirmation message, an email notification to the visitor, and an admin alert so your team knows a new lead just came in.
Steps to Create a Lead Generation Quiz on WordPress
Step 1: Enable the quiz module and add a new form
The Quiz Module ships with Fluent Forms Pro and needs to be turned on before any quiz-specific fields appear. From your WordPress dashboard, go to Fluent Forms, then Integrations, then Modules, and enable the Quiz Module.
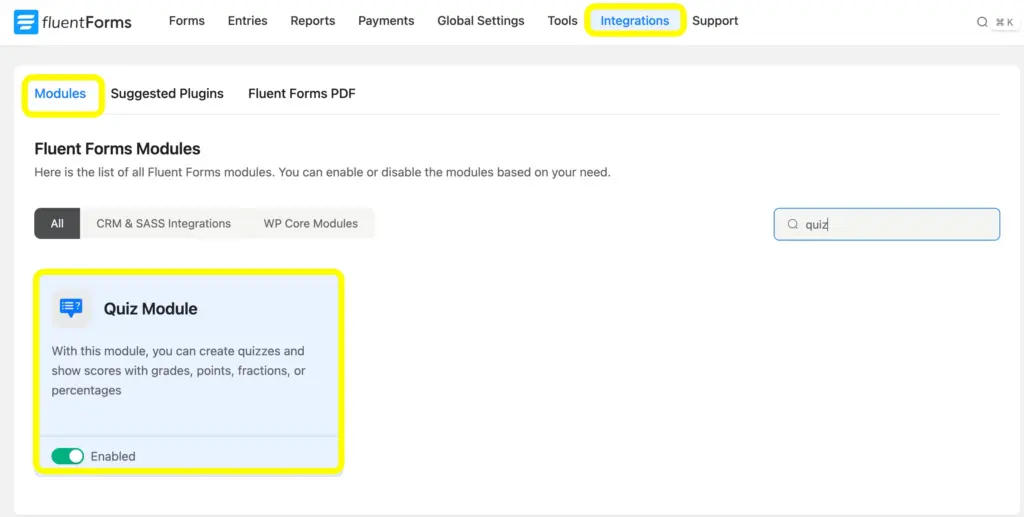
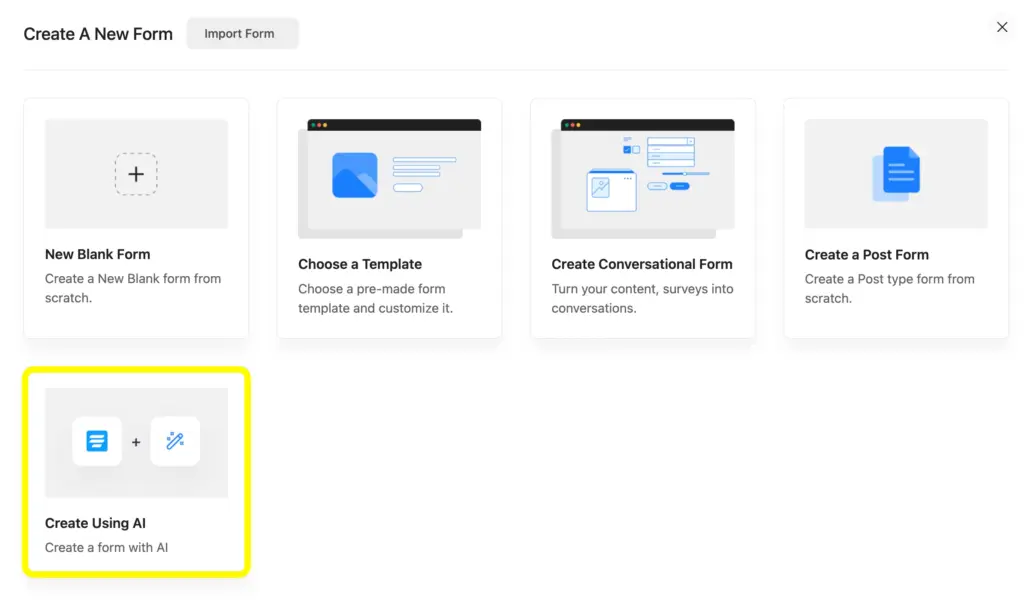
Once enabled, go to the Forms and click on the Add New Form button. You can start with a New Blank Form if you want full control over the layout, or use Create Using AI to generate a first draft of your quiz questions from a prompt describing your topic. You can also Choose a Template to access the pre-built form templates of Fluent Forms.
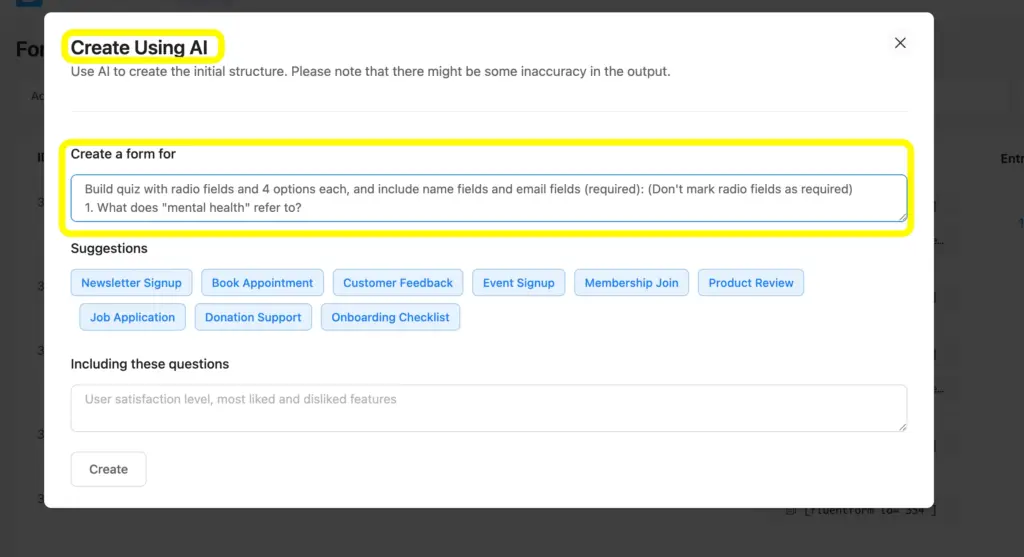
This time, I’ll go for Create Using AI, because here I can directly put the questions and answering options, and Fluent Forms AI Form Builder can fetch exactly what I put there. Using this, you will not need to write all these questions and options one by one inside the form editor; eventually, it saves time.
I’ve put a prompt along with all questions and options at once so that building the quiz becomes easier and faster:
Step 2: Add lead capture fields
Drag a Name field and an Email field onto the form. Mark both as required, since a quiz that lets visitors skip the contact fields defeats the purpose of building it in the first place.
Where you place these fields matters. The better approach is to let visitors answer a few questions first, then ask for their name and email partway through or near the end, once they are already invested in seeing their result.
If the form gets longer, you can add form steps to make the UX better and help users easily fill out the form.
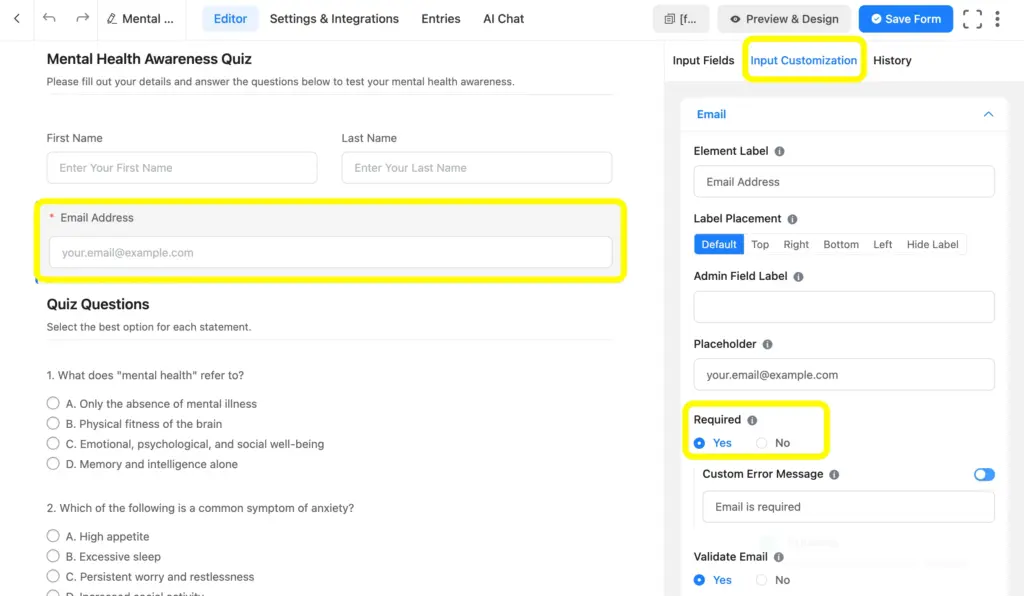
As I’ve put the questions and options at once, the AI Form Builder has made it instantly. Anyway, you can also put questions and options one by one.
Here, the Name and Email fields are put at the top, which you can also bring to the bottom
Also, Section Break fields can keep the lead capture and the quiz questions separate.
To make your lead capture work properly, mark the lead capture fields as ‘required’.
Step 3: Add and customize the fields for questions
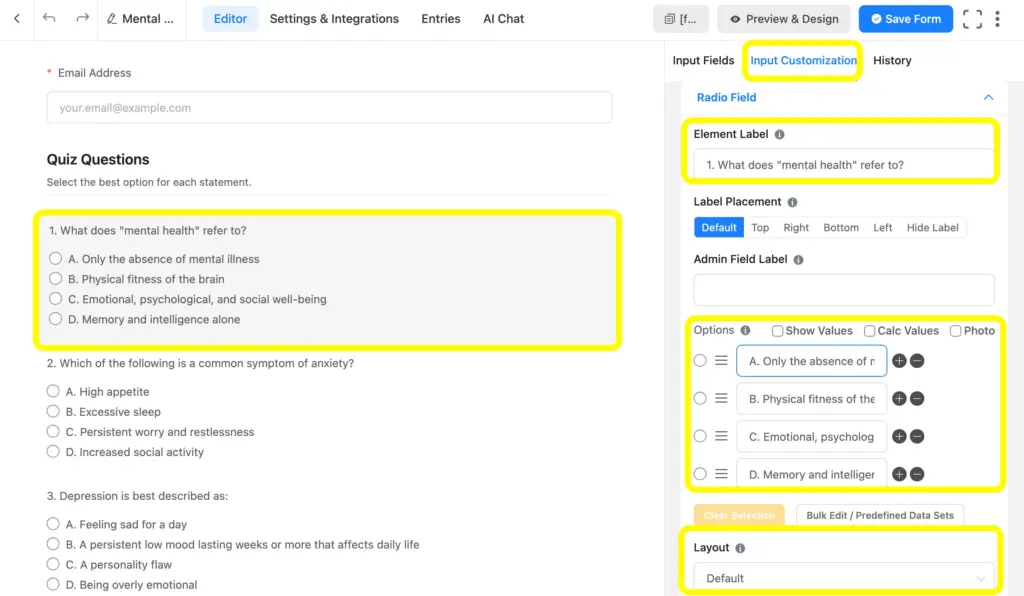
Add your questions using Radio, Checkbox, Dropdown, or Multi Select fields, since these are the field types Fluent Forms can score. Add the questions to the radio/checkbox and relevant fields and add Options in the Input Customization area. You can find this by clicking on the relevant fields.
As I said earlier, in the current quiz form, the AI Form Builder has set the questions and options, and I can make changes here, too, such as changing the Element Label to change the questions, changing the Label Placement, Options, Layout, Shuffle the available options, etc.
Step 4: Add and customize the quiz field
From the Advanced Fields section, drag in the Quiz Score field. This field is hidden from respondents and only visible to admins, and it’s what actually sums up the points behind the scenes. You can choose the Score Type as: Total Points, Total Correct Questions, Fraction Point, Grade System, and Percentage.
Once it is on the form, you can reference it in confirmation messages and email notifications using the shortcode.
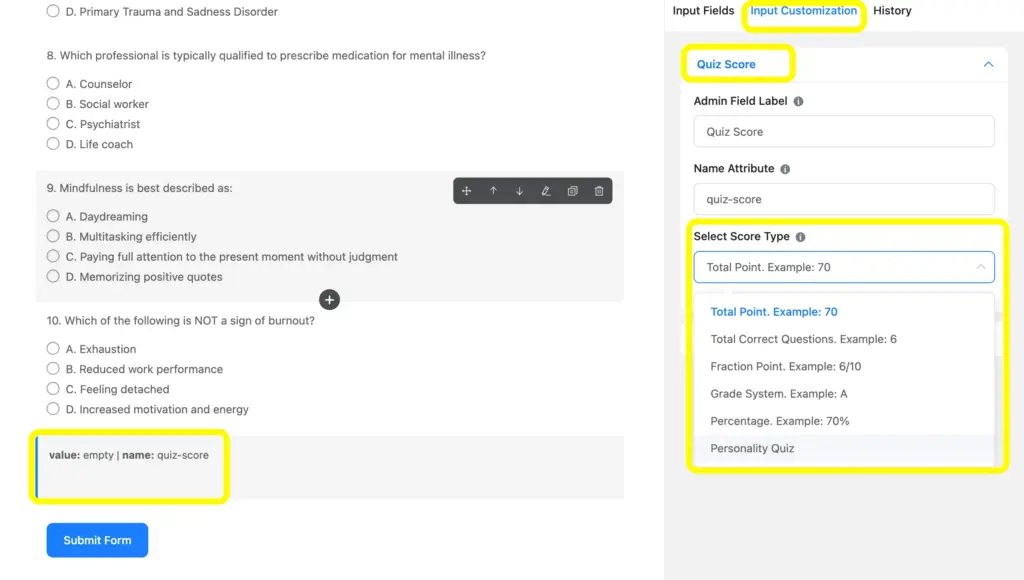
The Quiz Score field supports several score types depending on what your quiz needs to communicate:
- Total Point, which sums the value of every selected answer.
- Total Correct Questions, useful for straightforward knowledge tests.
- Fraction Point, showing correct answers out of the total number of questions.
- Grade System, mapping score ranges to letter grades or custom labels.
- Percentage, converting the result into a percentage score.
- Personality Quiz, which assigns each answer to a personality type and determines the result by the type with the most selections.
Step 5: Configure the quiz settings
Click on the Settings and Integrations tab from the Editor page, then Quiz Settings, and Enable Quiz Module for this specific form. A few options here shape how the quiz behaves.
Turn on Show Result on confirmation page if you want the score to appear automatically on the confirmation page. Randomize Questions shuffles question order on each load, which helps reduce pattern-based guessing if the same visitor takes the quiz more than once. Randomize Options does the same for the answer choices within each question.
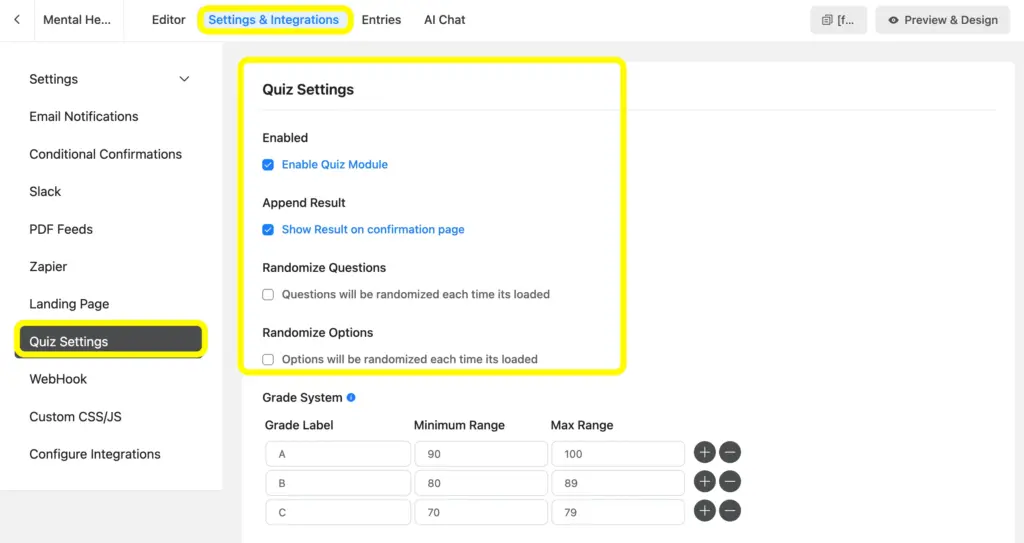
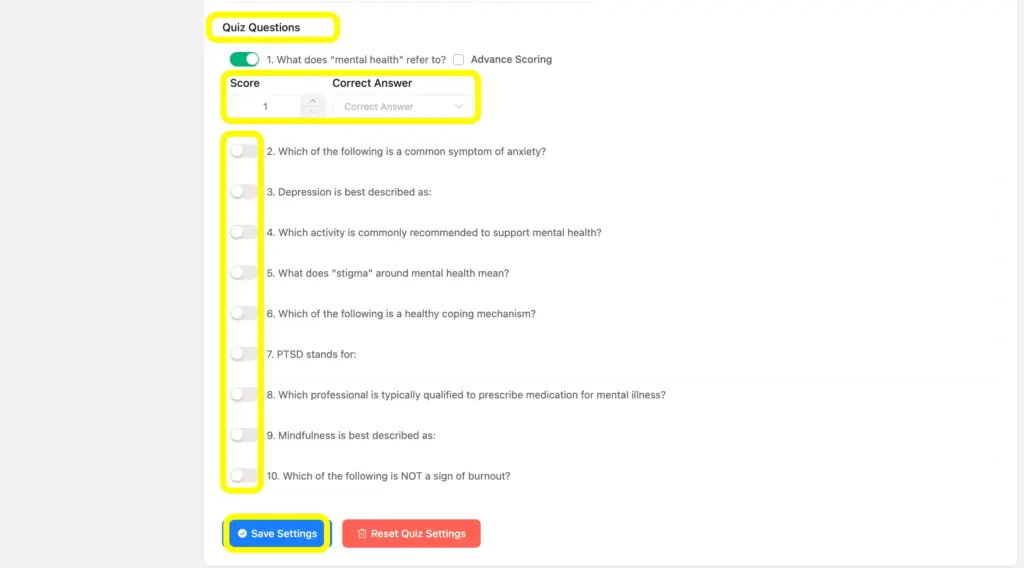
If you are using a grade system, this is where you define the labels and ranges, for example, setting 90 to 100 as an A and 80 to 89 as a B. For simple scoring, set the correct answer and point value for each question. For weighted assessments or personality quizzes, switch to Advanced Scoring, which lets you assign a different point value to every answer option instead of marking one as simply right or wrong.
Now, it’s time to set the correct answers and assign scores. Scroll to the Quiz Questions, and toggle on the buttons of each question to set the Score and Correct answer, which will later make your quiz work as a whole.
After configuring the quiz settings, click Save Settings before moving to the next step.
Step 6: Set up personalized results and confirmation messages
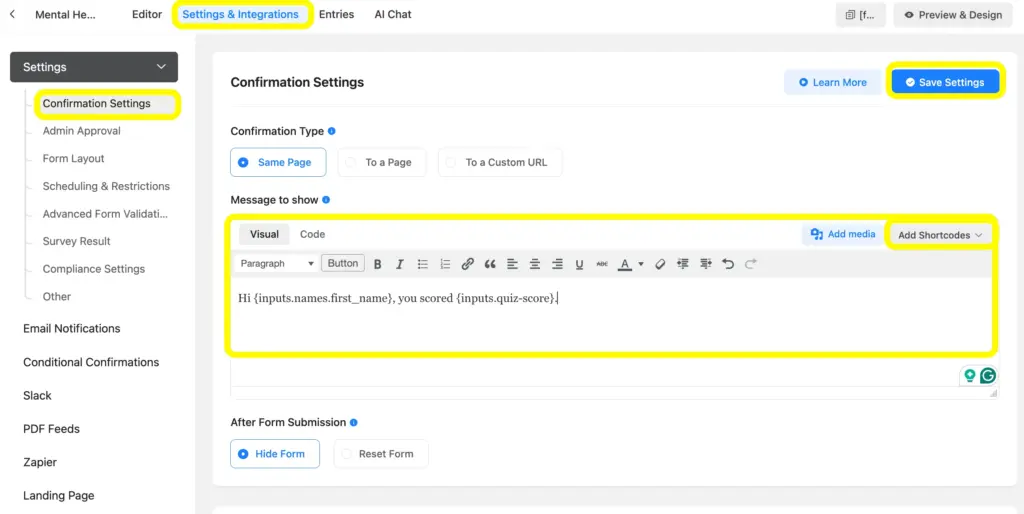
Go to Settings and Integrations, then Confirmation Settings, and edit the default confirmation message.
Two shortcodes do most of the work here. The name shortcode and the quiz score shortcode pull the calculated result from the Quiz Score field, formatted according to the score type you chose.
You need to make sure that you clicked on the Save Settings here as well.
Step 7: Generate a downloadable quiz result PDF (optional)
Some quiz formats benefit from a result the visitor can save or share, particularly certification style quizzes or anything tied to a report. Fluent Forms’ Forms to PDF add-on helps you attach a downloadable PDF to the confirmation page or the follow-up email, populated with the visitor’s answers and score using the same shortcodes available in the confirmation message.
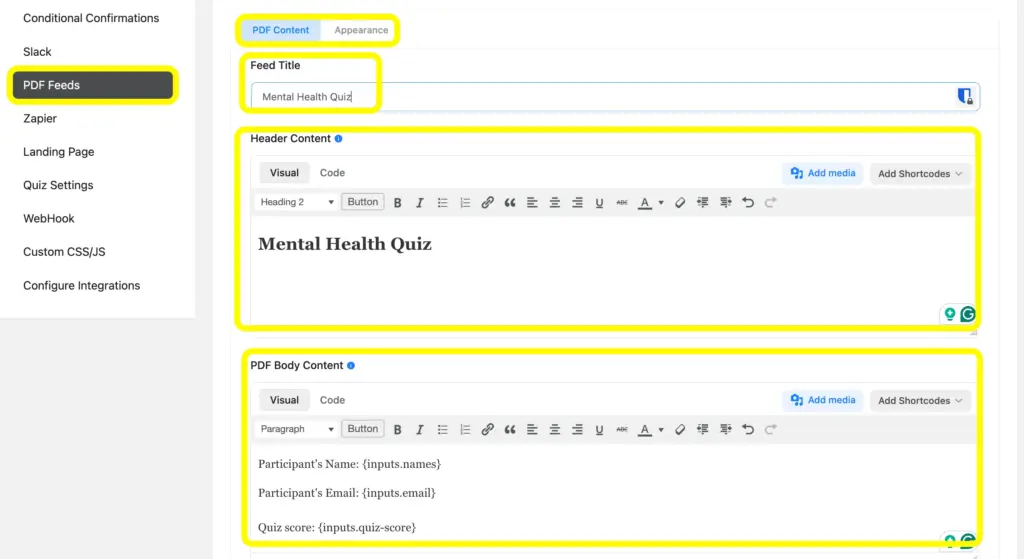
To do so, you need to configure the PDF Feeds and add the download link to the Confirmation Settings as a button.
In the PDF Feeds settings, you can easily customize the PDF Title, PDF Content and Appearance, Header Content, PDF Body Content, etc.
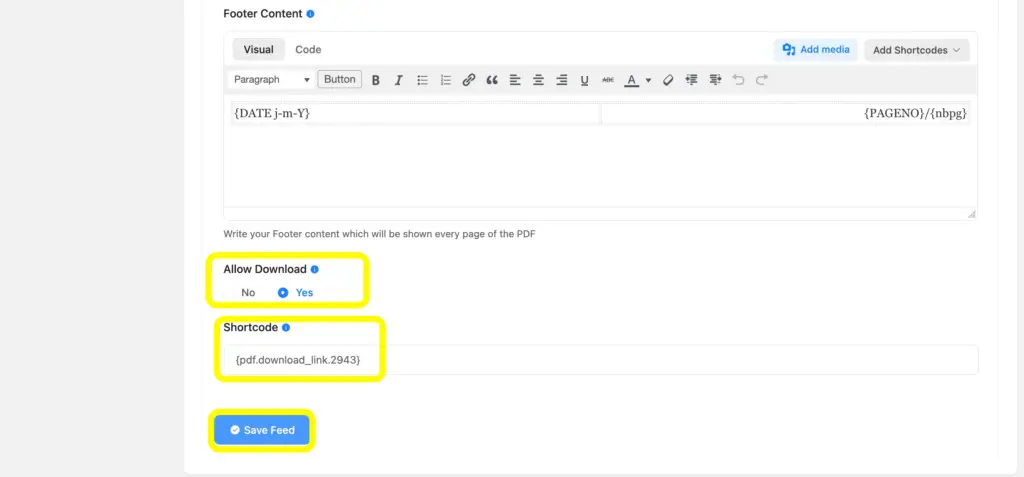
Once this is done, you need to click on the Allow Download button and copy the Shortcode to add this to a confirmation page’s button.
You can easily customize the Button and then add it to the confirmation page by adding this to the confirmation message.
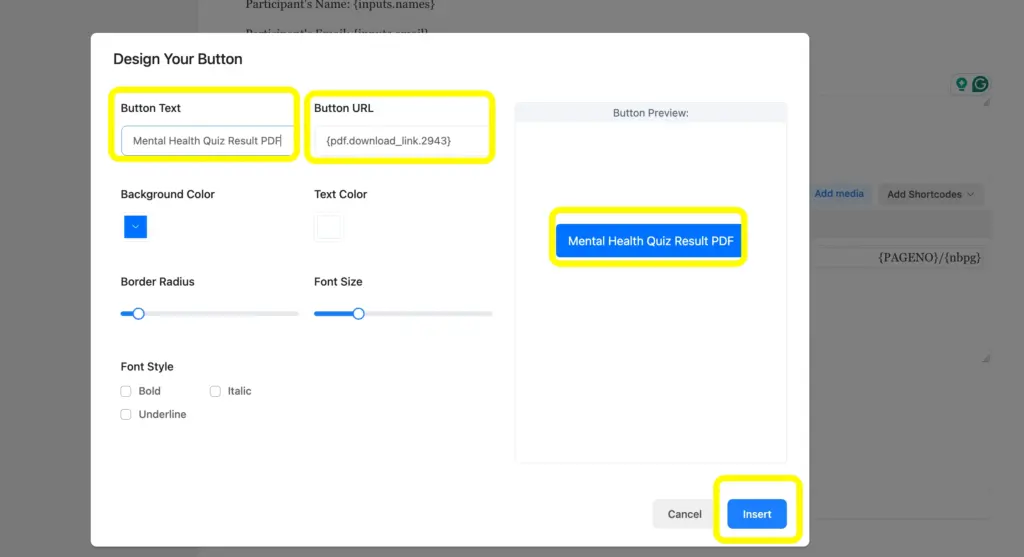
To bring this to the confirmation page, add the PDF Download Link’s Shortcode to the confirmation message.
Step 8: Test the quiz and embed it to the site
Preview the form and take the quiz yourself, checking that scoring calculates correctly, that the confirmation message displays as expected, and that the lead capture fields actually require input before submission goes through.
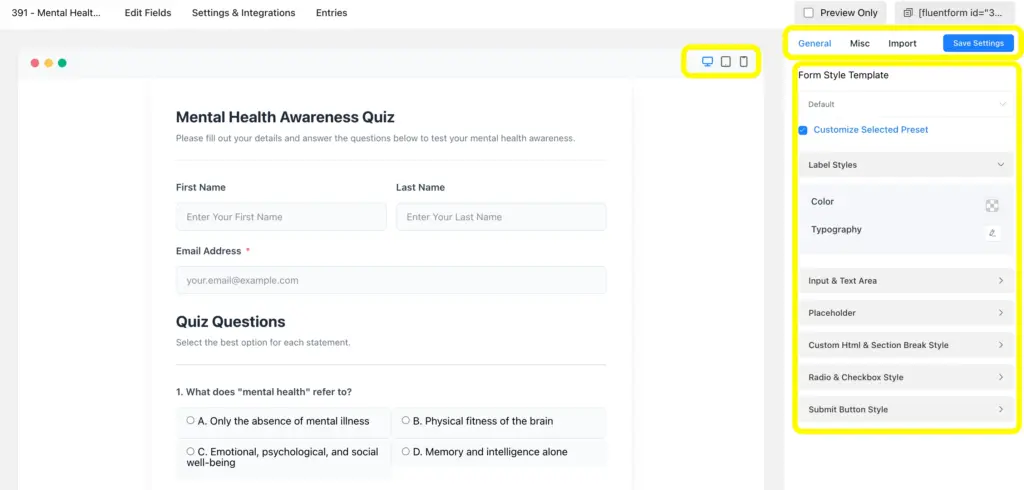
In the very first look at the preview page, you will find that you can customize the form’s appearance using Fluent Forms’ Advanced Form Styler. You can also check the device-responsiveness of your quiz form.
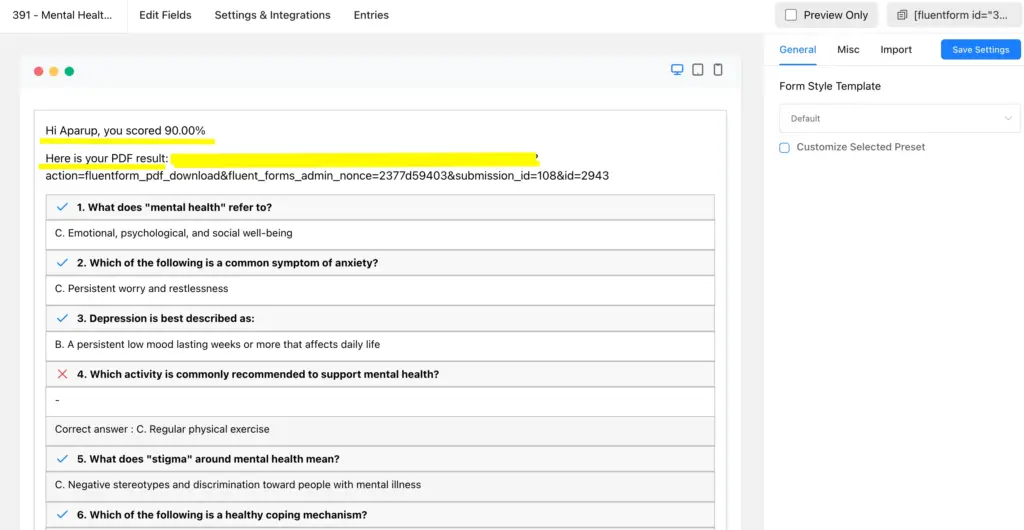
Before publishing the form, check the quiz results as well. To do so, answer the questions, and you will get the confirmation message exactly as you set it up.
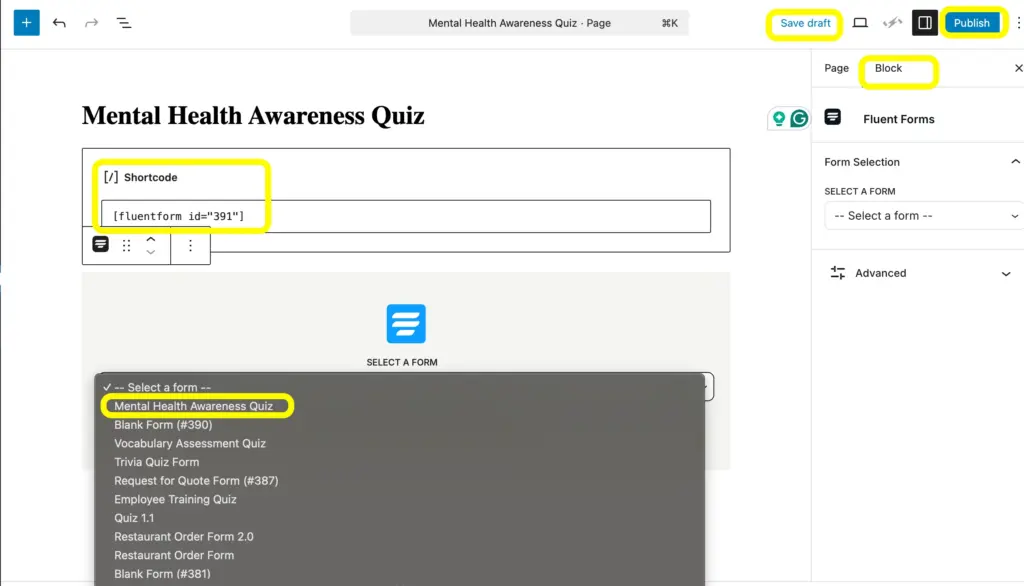
Once everything checks out, publish the quiz using whichever method fits your site: embed it directly in a page through the block editor, or paste the shortcode into an existing page layout.
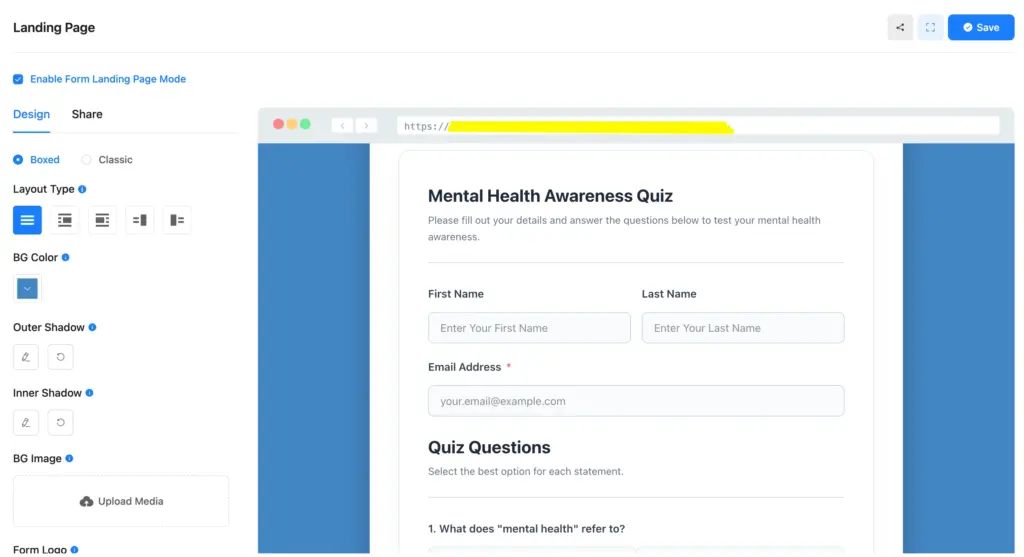
You can also embed your quiz to a new landing page, while allowing your audience to provide full attention, ensuring your brand style all over the page.
To embed your form to a landing page, go to the Settings & Integrations of the form and then to Landing Page Settings and Enable landing Page Mode.
You can customize the Layout Type, BG Color, Image, Logo, etc.
Managing and Nurturing the Captured Leads
Once you get a qualified lead generated from a quiz, the workflow after submission is what actually turns them into leads worth following up on.
View quiz entries
Every submission, including the score and individual answers, is stored under the form’s entries tab, so you can review responses without leaving WordPress.
Export submissions
Entries can be exported for reporting or for uploading into tools that do not connect directly through an integration.
Segment leads by responses
Because each answer is stored as data, you can filter entries by score range, selected answer, or quiz outcome to build targeted lists.
Integrate with CRM or email marketing tools
Fluent Forms connects with CRM and email marketing platforms including FluentCRM, HubSpot, Mailchimp, Insightly, Zoho CRM, Brevo, and ActiveCampaign, so a completed quiz can trigger a specific email sequence or tag automatically based on the visitor’s score or personality result.
Best Practices for Creating Quizzes on WordPress
Keep quizzes concise
A quiz that takes two minutes gets finished. One that takes ten gets abandoned halfway through, and an abandoned quiz captures no lead at all.
Write clear questions
Ambiguous wording forces visitors to guess what you are asking, which slows them down and increases drop-off. State each question plainly and keep the answer options genuinely distinct from each other.
Deliver valuable personalized results
The result page is the payoff the visitor was promised at the start. A generic thank you message undercuts that promise, while a specific, personalized result reinforces that the quiz was worth their time and makes them more receptive to what comes next.
Automate Quizzing with Fluent Forms
A lead generation quiz works because it reorders a familiar exchange: value first, contact details second. Fluent Forms handles the scoring, the personalized results, and the post-submission automation from inside.
Ready to build your first lead generation quiz? Get Fluent Forms Pro and turn your next quiz into a lead capture system that runs on its own.

Hi, this is Aparup. I am a Literature postgraduate, mixing my creative thoughts with my experience in the tech industry to surpass AI. Professionally, I am a content marketer seeking solutions to users’ problems regarding WordPress.



Leave a Reply