How to Connect Fluent Forms to Cloud Storage for Efficient File Management
Cloud storage integration has been one of the top feature requests we’ve received lately. However, the need was understandably diverse: some of you wanted an easy way to send files to Google Drive, while those managing larger sites often asked for scalable solutions like Amazon S3.
To deliver the best solution possible, we decided to team up with the specialists in this area, FluentWiz, to create a cloud storage manager that supports all four services.
FluentWiz is our official third-party developer with long-term experience creating scalable custom solutions, extensions, and add-ons for all Fluent plugins. This time, they have built the brilliant Cloud Storage Manager for Fluent Forms. It’s a dedicated add-on that brings integrations with Google Drive, Dropbox, Amazon S3, and even Cloudflare R2 in one go. Now, you can automatically upload form files to the cloud storage service you already use and love.
In this tutorial, I will show you exactly how to set it up and automate your file management for good.
TL;DR
- Cloud Storage Manager by FluentWiz connects Fluent Forms Pro to 4 cloud services: Google Drive, Dropbox, Amazon S3, and Cloudflare R2
- Google Drive and Dropbox integrations are free; Amazon S3 and Cloudflare R2 require the Pro version
- Files uploaded through Fluent Forms Pro are automatically sent to your chosen cloud storage without manual work
- You can auto-delete local files after cloud upload & cloud files after entry-delete
- You can download the uploaded cloud files from Fluent Forms plugin
- Custom folder organization lets you dynamically create subfolders using form data (like form title, submission ID, site name, etc.)
- Only one cloud service can be active at a time; switching to another service disconnects the previous one
- Each integration requires API credentials from the respective cloud service (setup steps provided for all four)
- Configuration is similar across all services: choose a parent folder, design subfolder structure, select which forms to enable, and set auto-delete preferences
- Files remain in local storage if connection is severed, and you can contact FluentWiz support for help
Cloud Storage Manager for Fluent Forms Pro: what does it do
Cloud Storage Manager for Fluent Forms Pro helps you create a cloud backup of any file uploaded to Fluent Forms. The available cloud services include Google Drive, Dropbox, Amazon S3, and Cloudflare R2. Among these, the Google Drive and Dropbox integrations are available in the Cloud Storage Manager plugin’s free plan.
Here’s what you can do:
- Automatically upload Fluent Forms files to Google Drive, Dropbox, Amazon S3, and Cloudflare R2.
- Automatically delete files from your local storage (to save storage) after they are uploaded to the cloud.
- Automatically delete a file from the Cloud if the corresponding form submission is deleted from Fluent Forms’ entries.
- Choose a folder/bucket folder (parent folder) as a designated space for your Fluent Forms’ files.
- Automatically create subfolders (for better organization) under the parent folder using shortcodes.
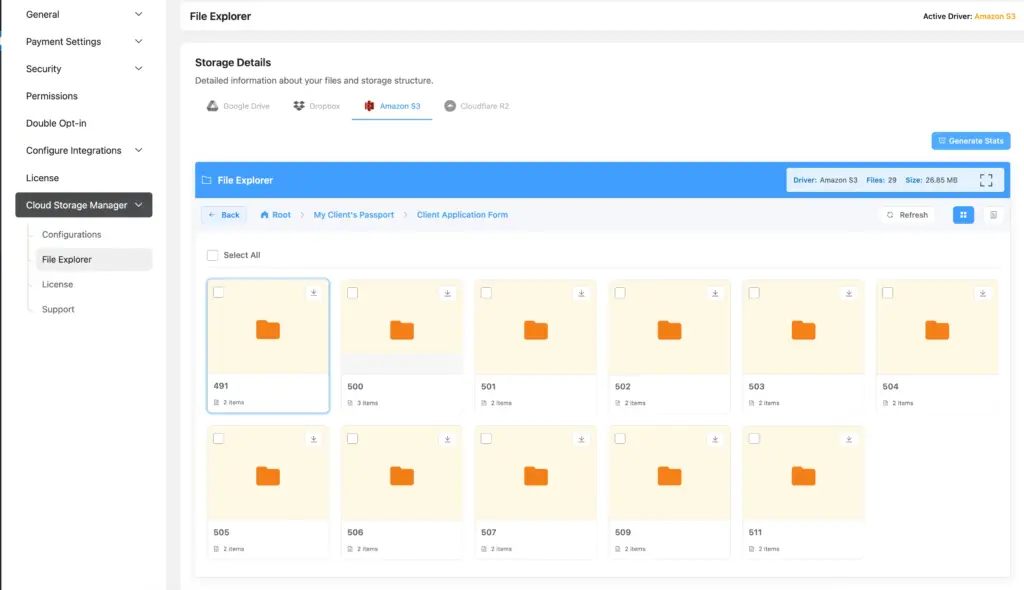
For example, you have multiple forms where users upload files (CV in a job application form, design briefs in a service order form, etc.) Let’s say your parent folder is titled “Fluent Forms.” If you create subfolders by form title, your parent folder will now have a separate folder for each form. Similarly, you can create subfolders within a subfolder for a more granular sorting. - Has a built-in file explorer (pro feature) that lets you download & manage the uploaded cloud files directly from the Fluent forms plugin.
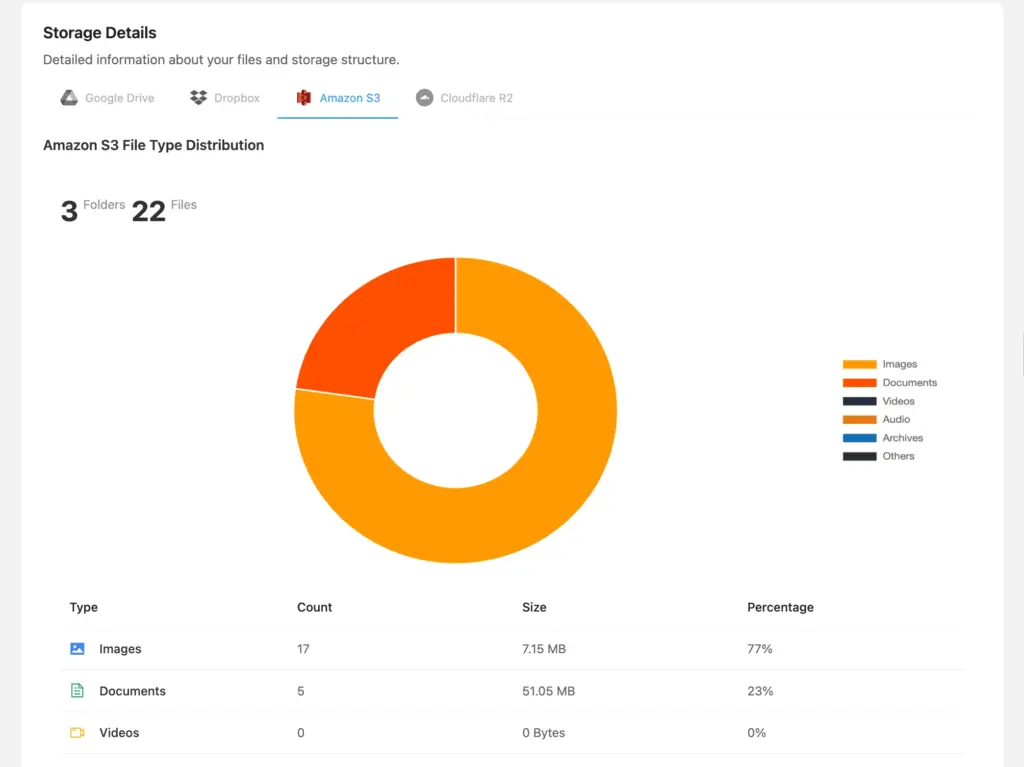
- You can view storage details and your file type distribution in a table and a visual doughnut chart.
Only one cloud storage remains active at a time. If you need to switch from one cloud service to another, simply connect and configure the desired service, and the former connection will be severed.
How to connect Fluent Forms Pro to cloud storage
Here are the initial primary steps required to connect Fluent Forms to any cloud storage:
- Go to your Dashboard > Plugins > Add new plugin
- Search for Fluent Forms
- Install and activate the Fluent Forms plugin
- Upgrade to Fluent Forms Pro (since file upload is a pro feature of Fluent Forms).
- Create one or more forms with the file upload field
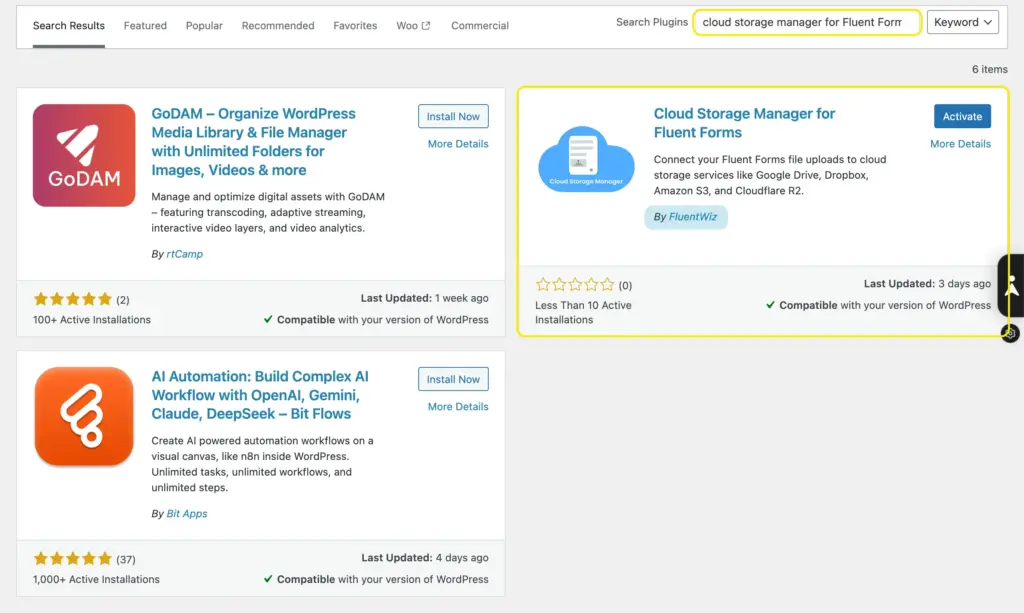
- Revisit Dashboard > Plugins > Add new plugin
- Search for Cloud Storage Manager for Fluent Forms. Install & activate the plugin.
If you’re connecting to Google Drive or Dropbox, the plugin’s free version will do. However, if you need to connect to Amazon S3 or Cloudflare R2 or require any advanced features (custom subfolders), you’ll need to upgrade to Cloud Storage Manager for Fluent Forms Pro. Simply purchase a license of your choice and apply the license key from your dashboard.
Next, we’ll see how the connection works for each cloud service.
Connect Fluent Forms to Google Drive
The steps to integrate Google Drive with Fluent Forms via Cloud Storage Manager are as follows:
Go to the Google Cloud Console and select APIs & Services.
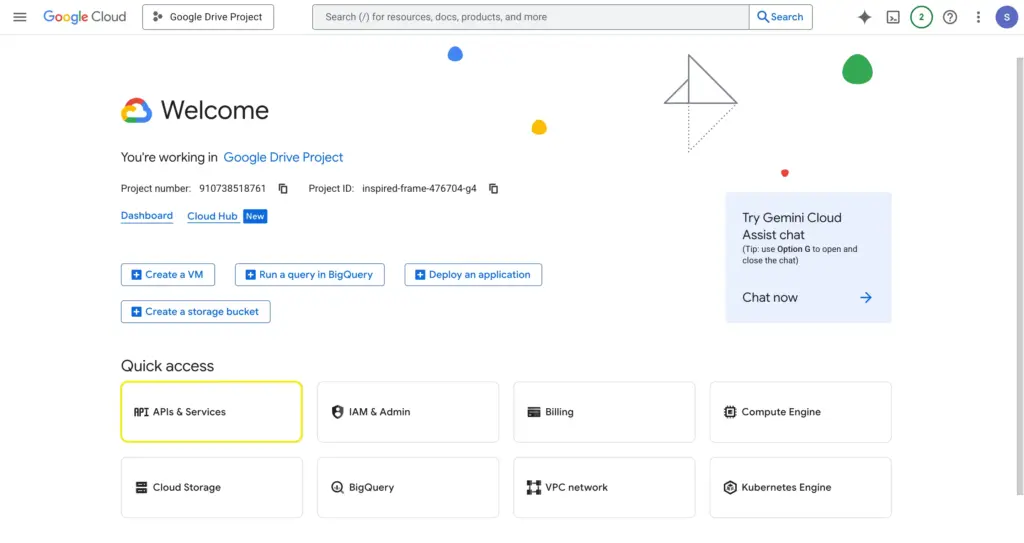
Select a project or create a new one.

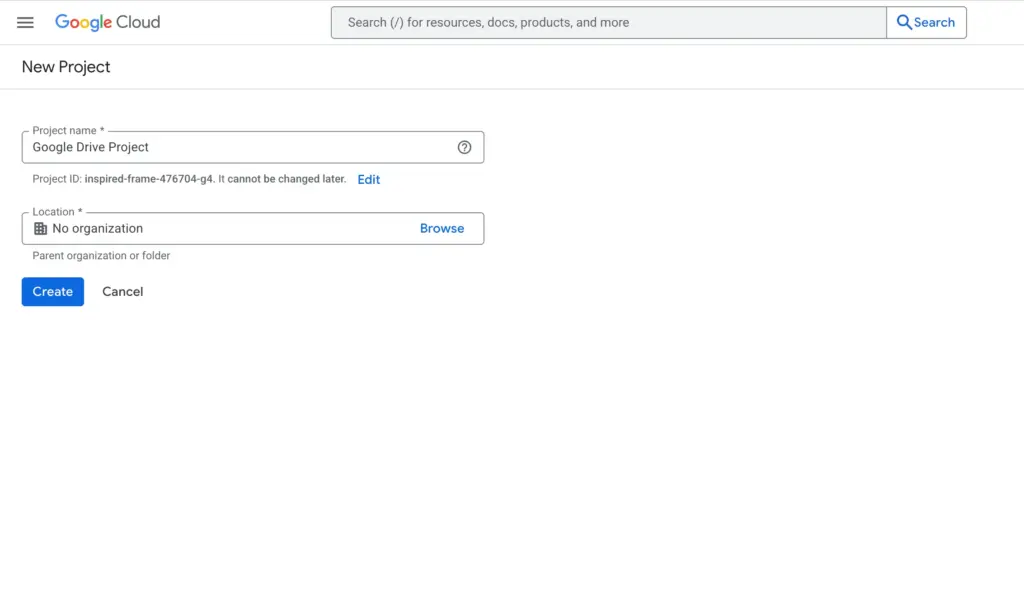
Click “New Project” to create a new project. Give your project a name and click the “Create” button.
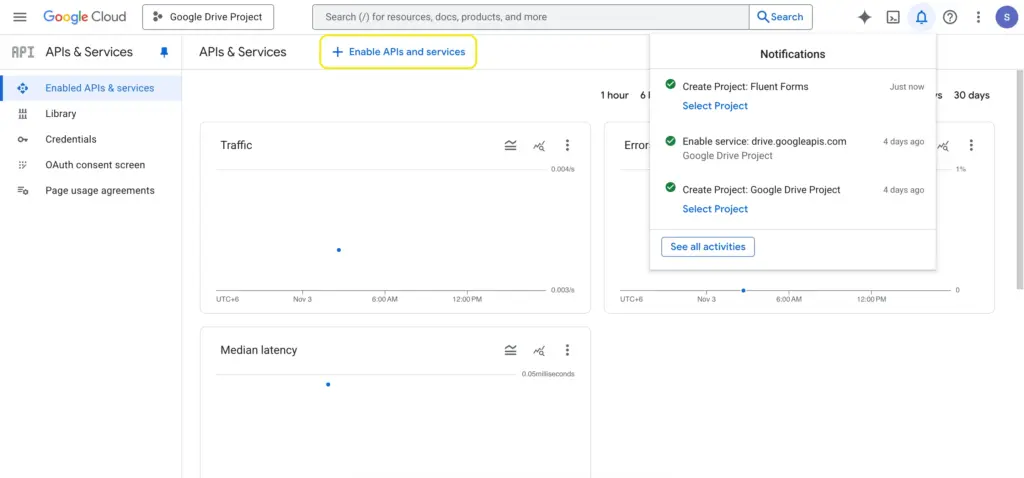
Once created, click “Enabled APIs and services.” You’ll be directed to the API library.
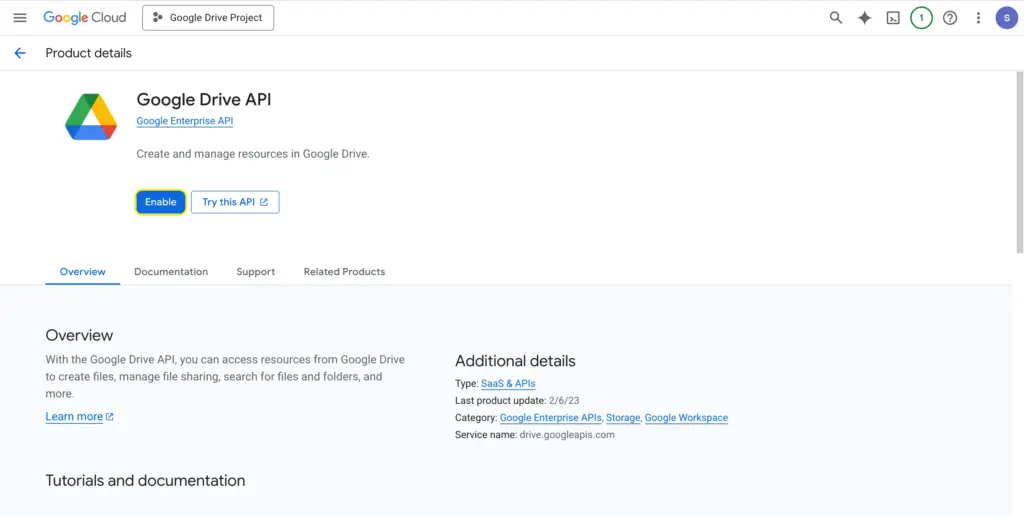
From the “API Library,” select “Google Drive API.”
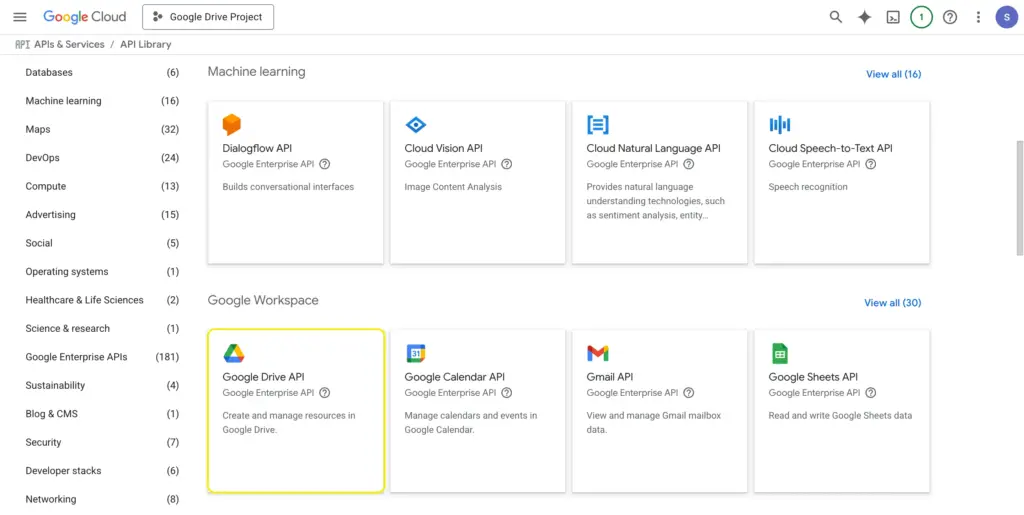
Now, click the “Enable” button to activate the Google Drive API.
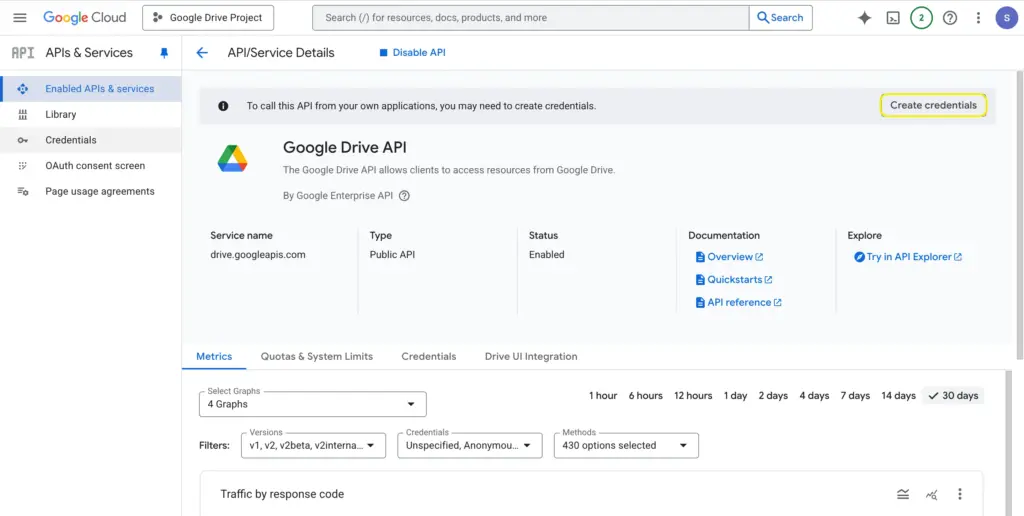
From there, click the “Create Credentials” button.
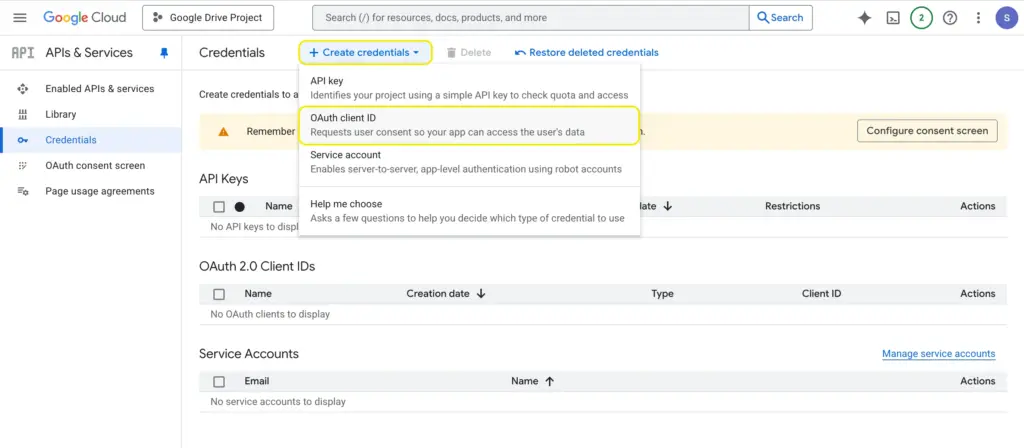
Next, from “Create Credentials,” select the “OAuth client ID.” Configure your consent screen if you’re required to do so.
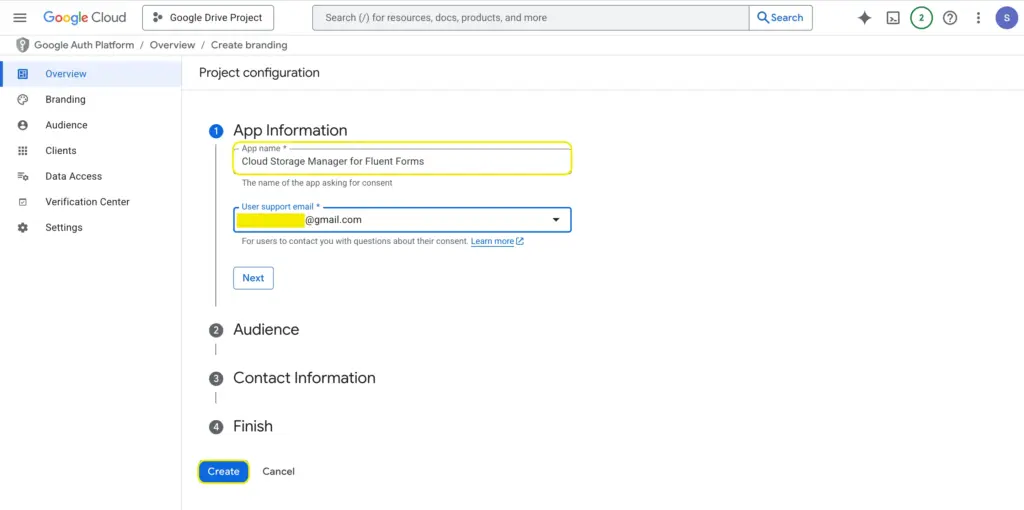
You’ll be directed to the project configuration. Enter an app name and user support email, and click “Create.” Once your app is created, you must publish it.
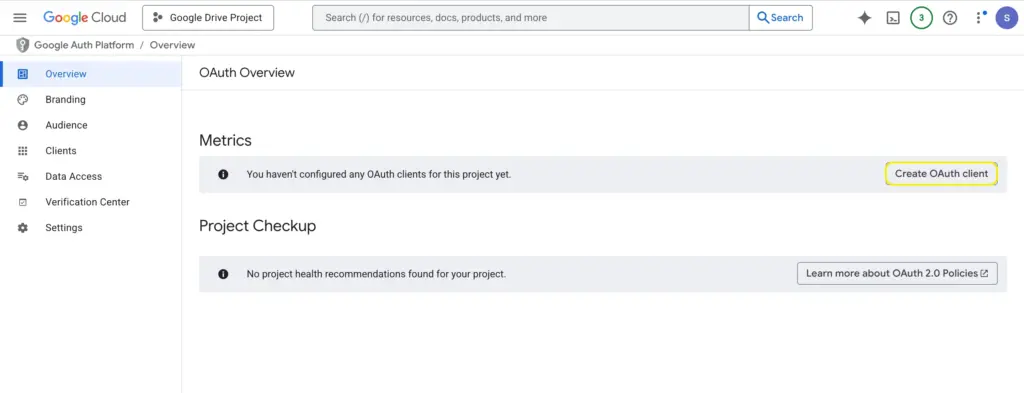
Then, in the “OAuth Overview” page, click the “Create OAuth client” button.
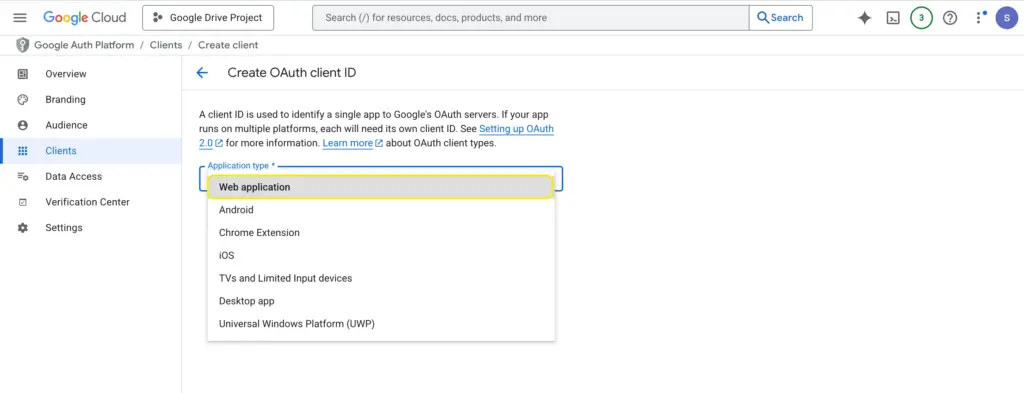
Select “Web application” while creating your OAuth client ID.
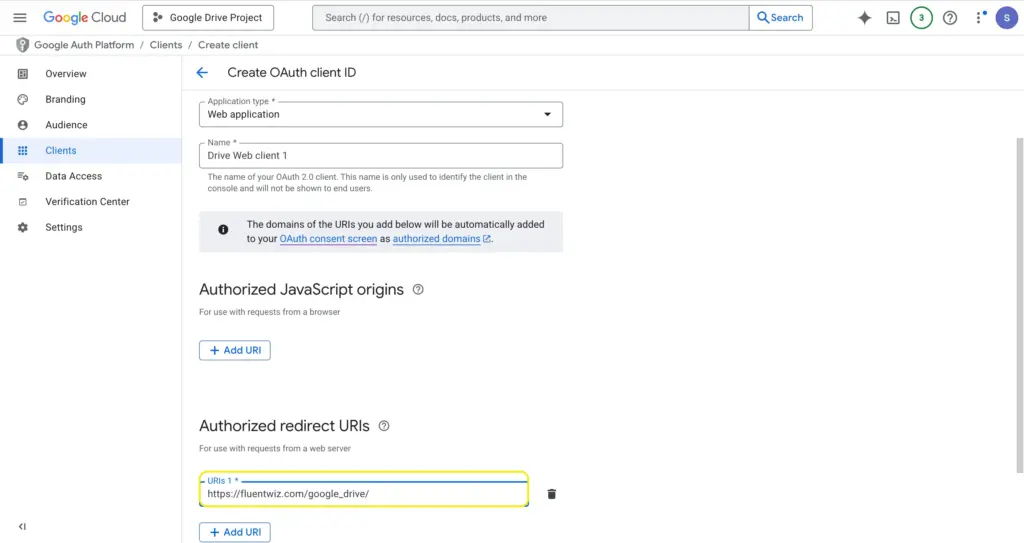
In the “Authorized Redirect URIs” section, add https://fluentwiz.com/google_drive/
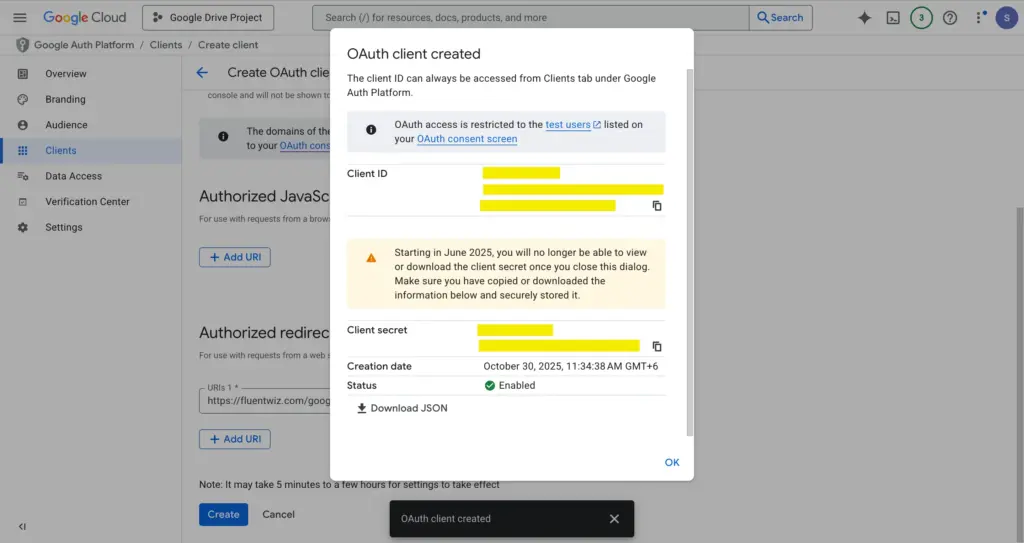
Finally, click the “Create” button at the bottom. You’ll be presented with your Client ID and Secret. Store them somewhere safe.
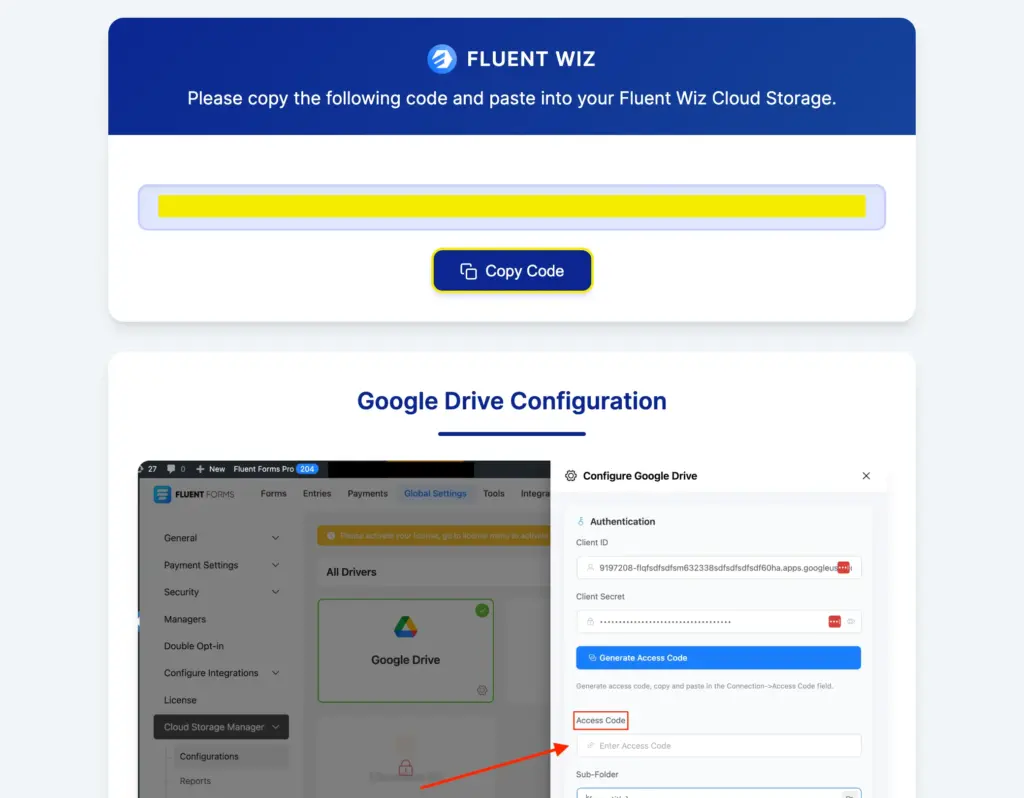
Now you have the credentials to connect Google Drive with Fluent Forms. Go to your dashboard > Fluent Forms to Cloud Storage Manager > Configurations > Google Drive. Enter your previously saved client ID and client secret. Click “Generate Access Code.”
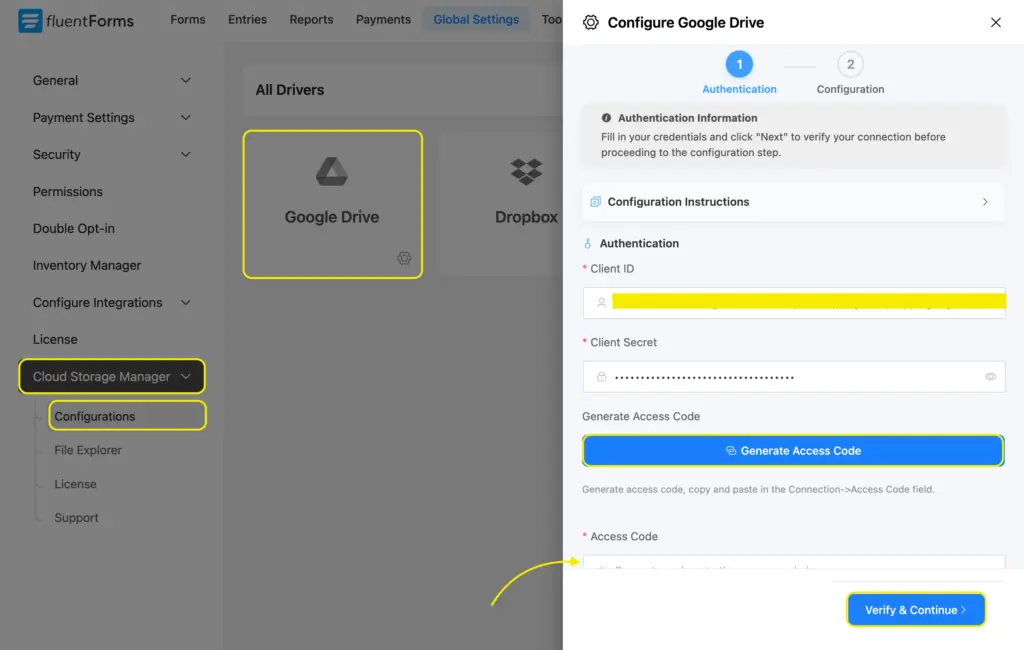
Copy the code and enter it in the box right below “Access code.” Lastly, click the button “Verify & Continue.”
Your connection is now made. The final part is configuration.
The configuration tab is divided into two parts: folder configuration and Fluent Forms settings. In the folder configuration section, you’ll get to select a Google Drive folder first (from the existing folders). All your Fluent Forms’ uploads will be sent to this folder.
Next, you’ll get to design a path to create subfolders dynamically within the parent folder you selected. Choose dynamic shortcodes (smartcodes) from the file icon, and place a “/” between two shortcodes. The folder hierarchy will be shown in a branch structure below.
Let’s say I use Fluent Forms on 4 sites. I want any file uploaded to any of those sites via Fluent Forms to be backed up in the same Google Drive folder. Because what’s better than having everything in one place?
However, I also want to locate the uploaded files easily. That’s why I’m creating the first subfolder by site title. That way, I’ll have 4 subfolders within the primary (parent) folder, one for each site. Inside each of these 4 subfolders, I’ll have another layer of subfolders by form title. This means all the uploads received through a form will be stored in a subfolder named after the form’s title.
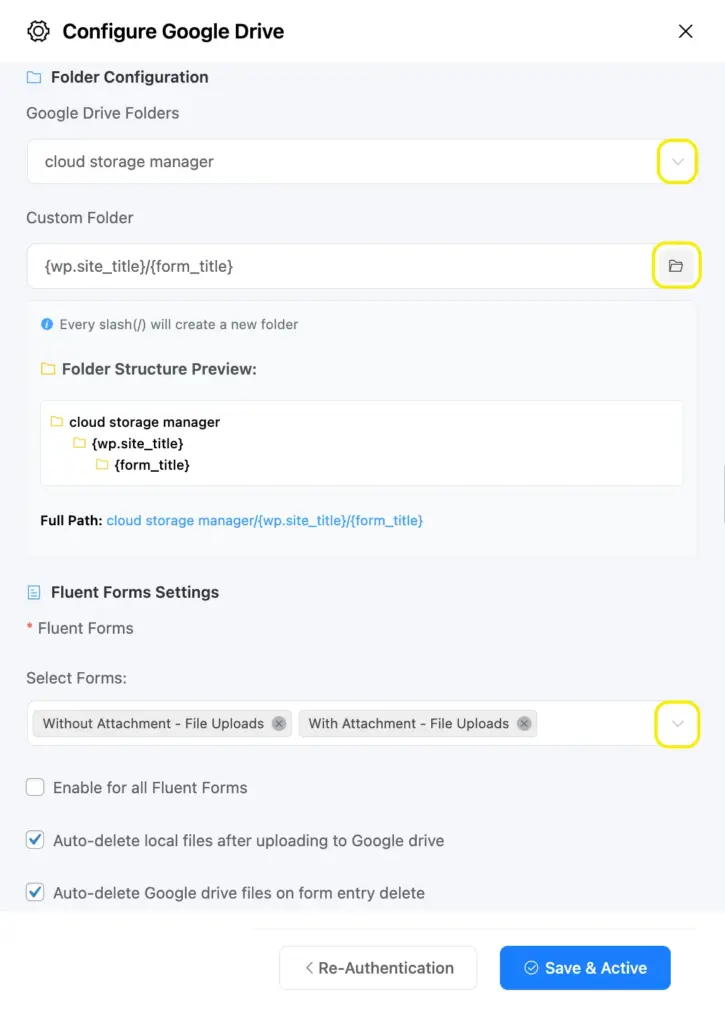
Next, we have to configure the Fluent Forms settings. You can enable the Drive backup for all your forms or select forms from a dropdown. Check the boxes if you want to automatically delete local files after uploading to Drive or corresponding Drive files once the form entry is deleted.
When you’re done, click “Save & Active.” Your Google Drive connection to Fluent Forms is now up and running.
Connect Fluent Forms to Dropbox
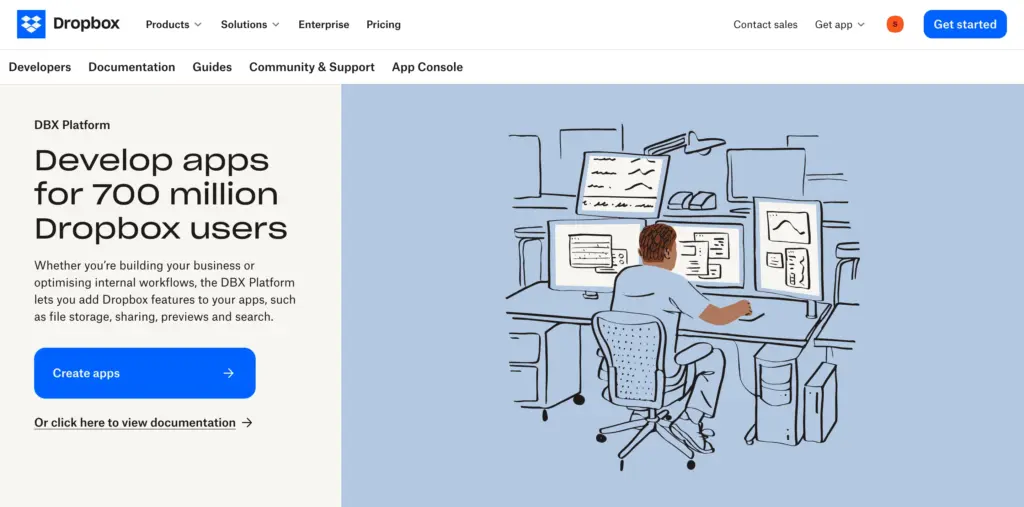
To get the required credentials, go to your Dropbox Account developer section and click the “Create Apps” button.
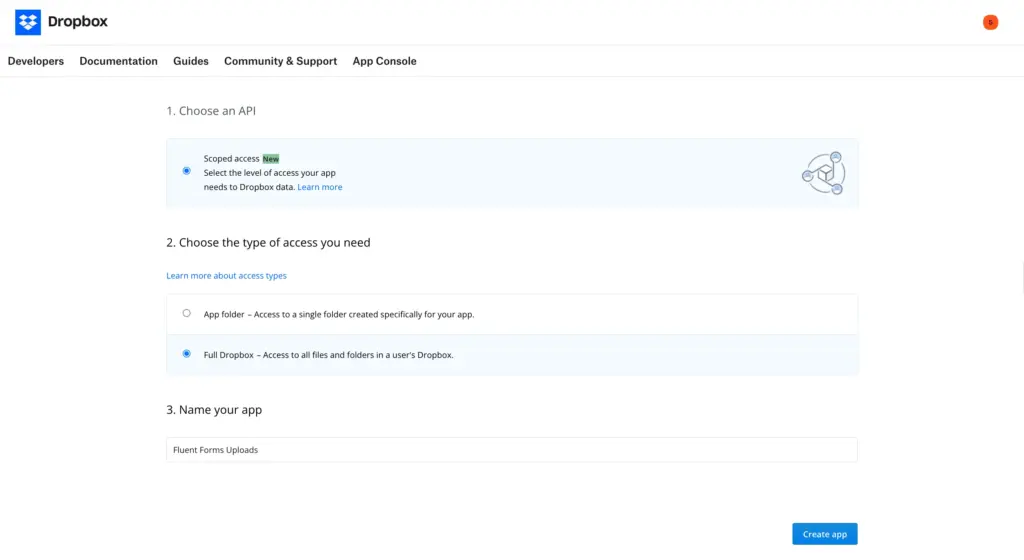
In the following screen:
- Select Scoped access for API type.
- Choose the access type that fits your needs:
- Full Dropbox (you’ll get to choose any Dropbox folder for storing your Fluent Forms’ files)
- App folder (you won’t get to choose a folder; the App folder will automatically become the parent folder)
- Give your app a unique name.
- Click “Create app.”
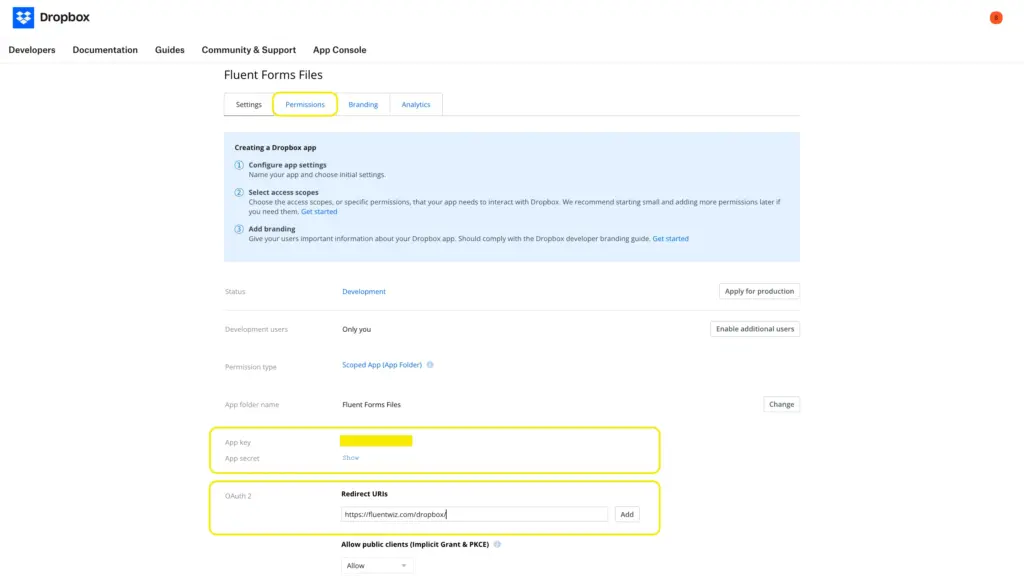
Configure Dropbox settings:
- Once the app is created, you’ll be directed to the Settings tab. Scroll to the OAuth 2 section.
- In the Redirect URIs section, add: https://fluentwiz.com/dropbox/
- Click Add to save the changes.
- Note your App key and App secret. You will need these to authorize Cloud Storage Manager.
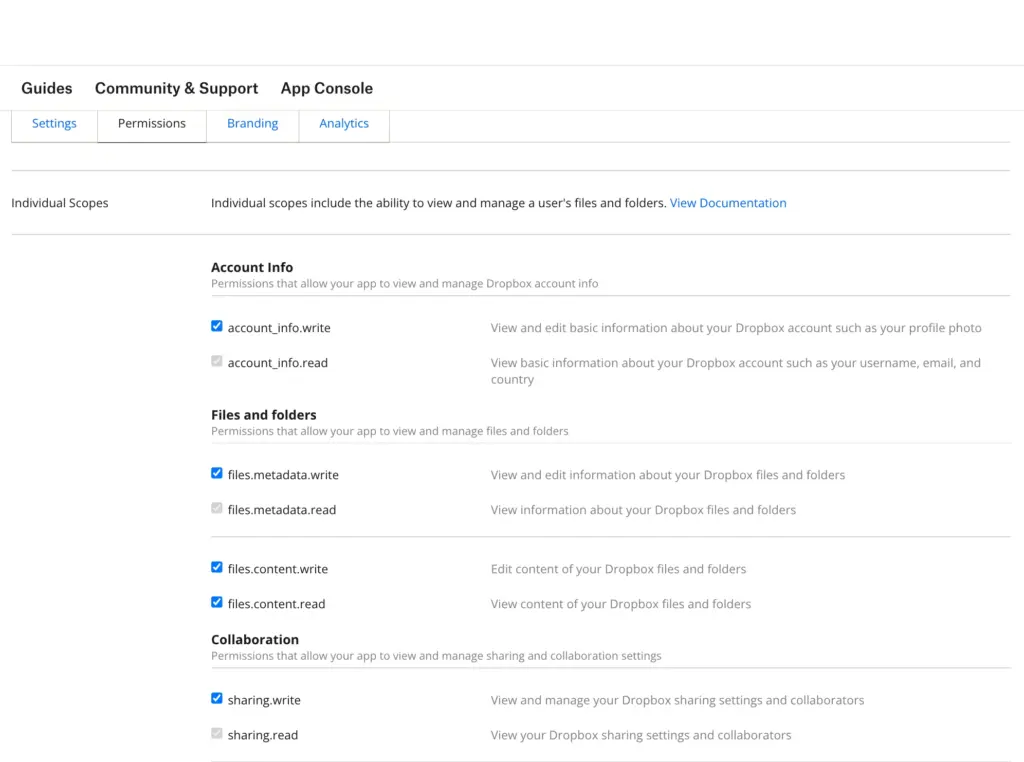
When you’re done, go to the “Permissions” tab.
From the Permissions tab, allow the following permissions:
- account_info.read
- files.content.write
- files.content.read
- files.metadata.write
- files.metadata.read
- Sharing.write
Click “Submit” when you’re done.
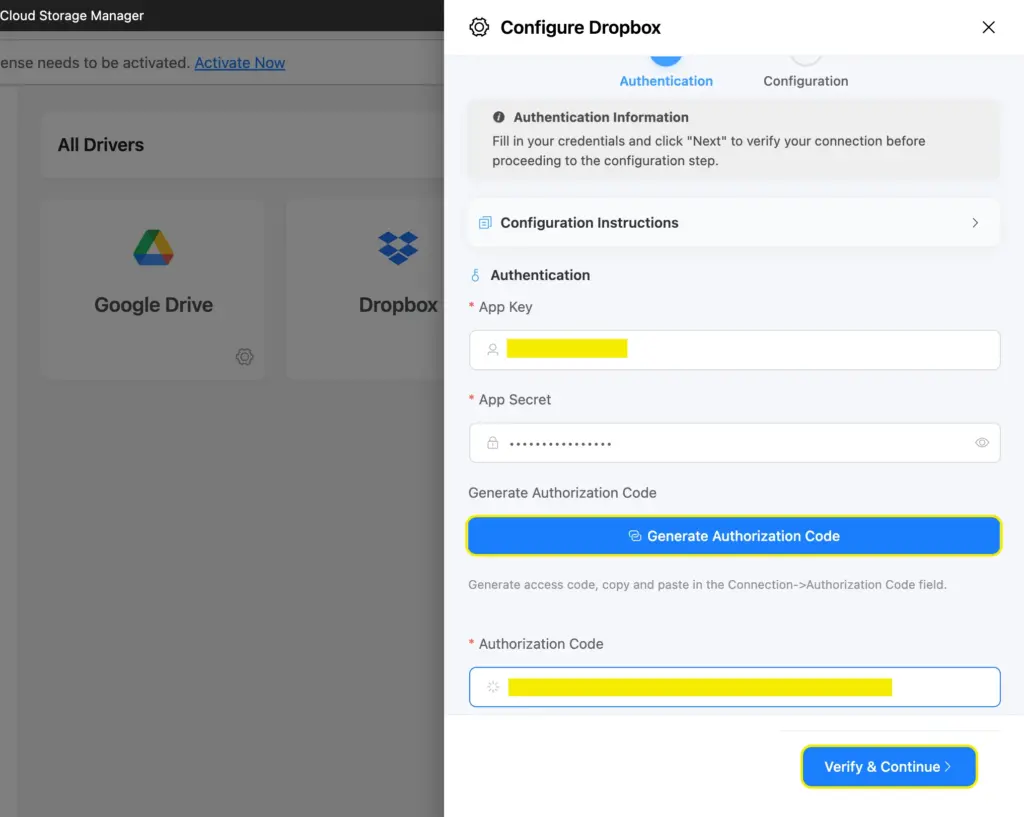
Your work in the Dropbox is now done. Go to your dashboard > Fluent Forms > Cloud Storage Manager > Configurations > Dropbox. Enter the App Key and App Secret you noted in Dropbox settings. Click “Generate Authorization Code.”
Enter the authorization code in the box below and click “Verify & Continue.”
You’ll be directed to the Dropbox configuration tab next. The process is similar to the Google Drive configuration. You’ll get to select a parent folder (if you’ve allowed Full Dropbox access), or the App folder will be auto-selected.
Next, you’ll get to engineer a path for auto-creating subfolders. For example, here, each submission of a form will be in a separate folder within the folder for the form, under the parent folder named test. You can see the folder architecture in the box below.
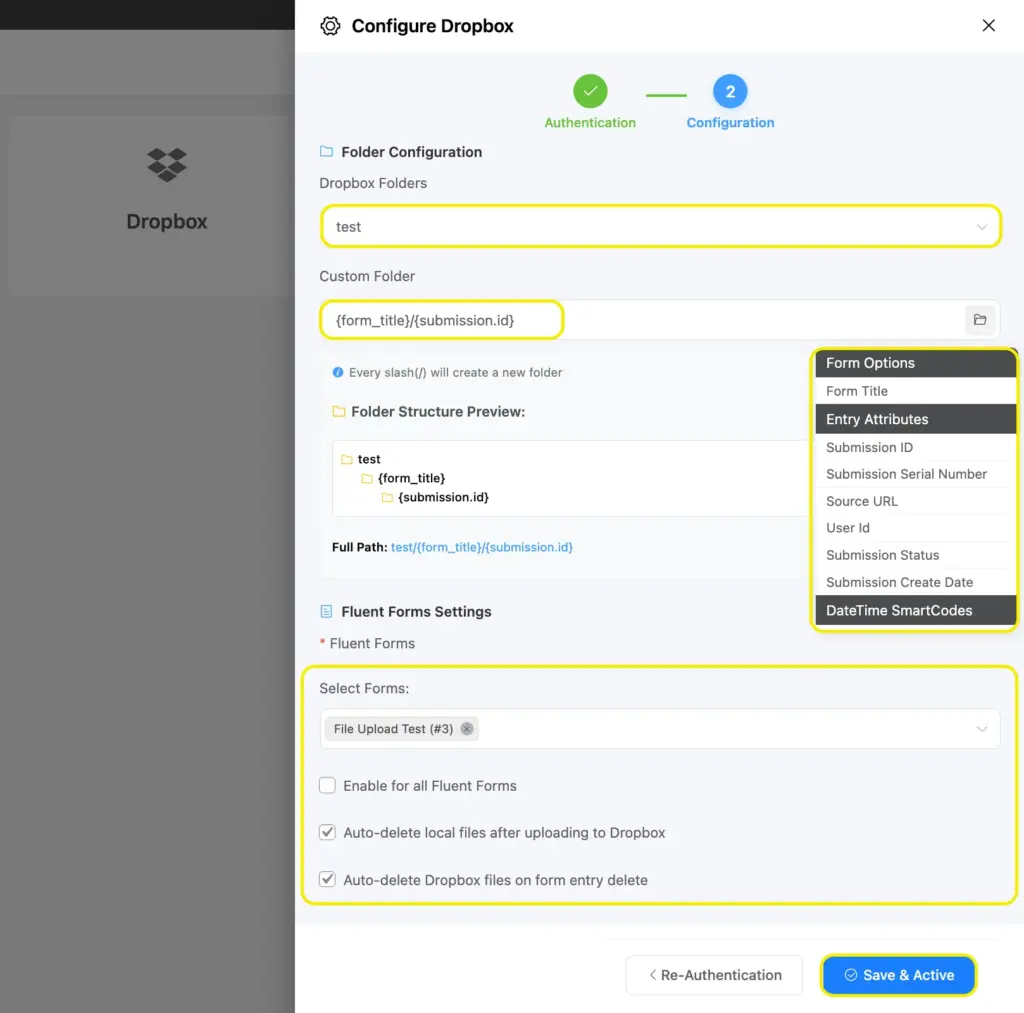
Finally, you have to configure the Fluent Forms settings, based on whether you want to:
- Enable for all Fluent Forms (if not, select desired forms from a dropdown)
- Auto-delete local files after uploading to Dropbox
- Auto-delete Dropbox files on form entry delete
Click Save & Active when you’re done, and your connection is live and working.
Connect Fluent Forms to Amazon S3
To connect Amazon S3 with Fluent Forms, please follow these steps in the AWS Management Console:
- Sign in to your AWS Management Console and navigate to the S3 service.
- Create a new S3 bucket or use an existing one. Take note of the Bucket Name and Region.
- Open the IAM (Identity and Access Management) console to manage access credentials.
- Create a new IAM user with Programmatic access enabled.
- Assign permissions to the IAM user. You can either:
- Attach the AmazonS3FullAccess policy for full S3 access.
- Or create a custom policy that grants access only to your specific bucket.
- After user creation, download or copy the Access Key ID and Secret Access Key. These are shown only once.
Enter your Access Key ID, Secret Access Key, Bucket Name, and Region in the Authentication and Configuration section.

For more detailed instructions, check out the Amazon S3 Integration Documentation by Cloud Storage Manager for Fluent Forms Pro.
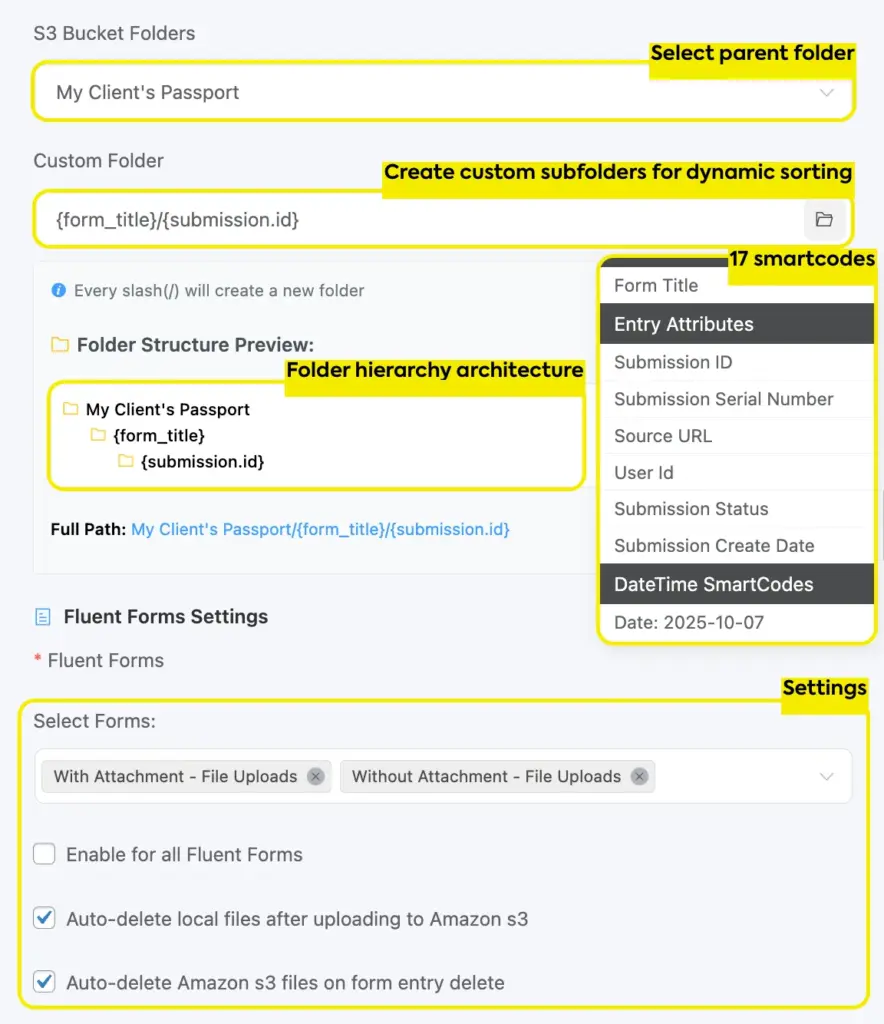
Next is the configuration part, which is similar to that of Google Drive and Dropbox:
- Select an S3 Bucket folder
- Create a custom subfolder branching using dynamic shortcodes and slashes (/) in between.
- Enable for all Fluent Forms or select desired forms from a dropdown
- Auto-delete local files after uploading to Amazon S3
- Auto-delete Amazon S3 files on form entry delete

When you’re done configuring, click “Save and Active” to get your connection working.
Connect Fluent Forms to Cloudflare R2
To connect Cloudflare R2 with Fluent Forms Pro, please follow these steps in the Cloudflare Dashboard:
- Log in to your Cloudflare Dashboard and select your account.
- In the left-hand menu, go to R2 Object Storage.
- Create a new R2 bucket or choose an existing one. Take note of the Bucket Name.
- Go to R2 > Manage R2 API Tokens to generate access credentials.
- Click Create API Token and set the following permissions:
- Select the R2 Storage template.
- Choose Edit access for your target bucket.
- Once the token is created, Cloudflare will show your Access Key ID and Secret Access Key. Be sure to copy and store these securely; they won’t be shown again.
- In your integration settings, enter the following:
- Account ID.
- Access Key ID and Secret Access Key.
- Bucket Name.
- Region.

For more detailed instructions, read the Cloudflare R2 Integration Documentation by Cloud Storage Manager for Fluent Forms Pro.
Next is the configuration part, which is similar to that of the other cloud storage:
- Select an R2 Bucket folder
- Create a custom subfolder branching using dynamic shortcodes and slashes (/) in between.
- Enable for all Fluent Forms or select desired forms from a dropdown
- Auto-delete local files after uploading to Cloudflare R2
- Auto-delete Cloudflare R2 files on form entry delete
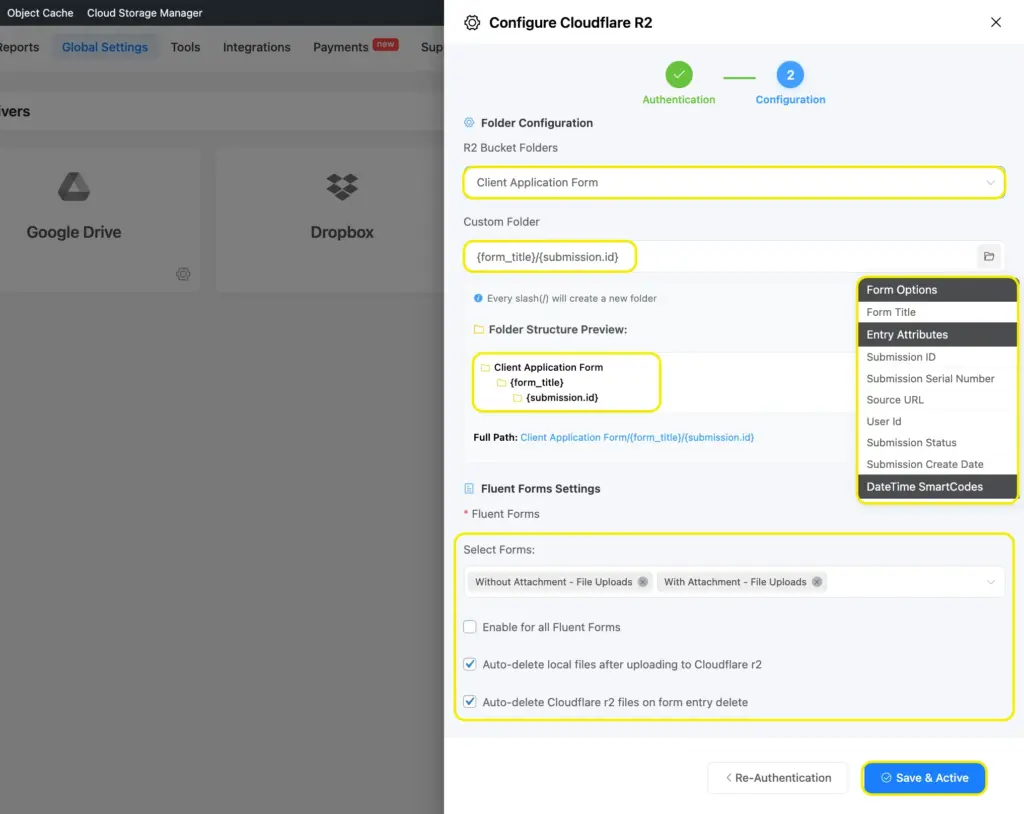
After configuring the required settings, click “Save and Active” to get the connection working.
Now that we’ve covered the cloud storage connection, including the folder configuration and form settings, let’s move on to the result. In the next section, we’ll see the step-by-step journey of your files.
The upload workflow: from form submission to cloud storage
In this section, we’ll see the simplest workflow that your Fluent Forms files go through while being backed up in cloud storage.
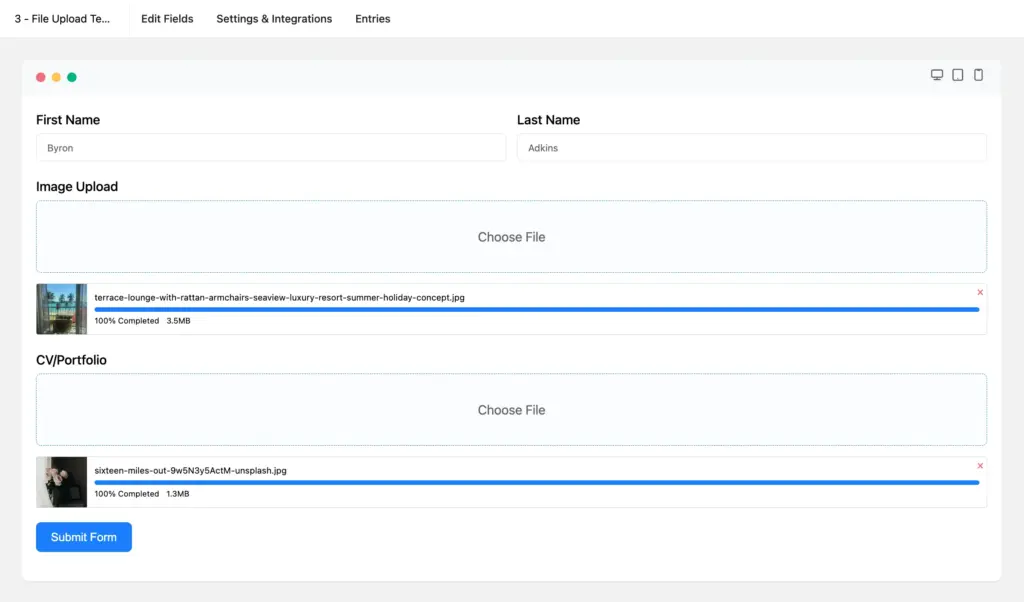
Let’s start at the beginning, with a form submission. Say a user uploads a file via a file upload/image upload field and submits the form.
Following submission, the files will first go to your entries. At this point, the cloud upload automation starts processing.
To view the process, go to entries from Fluent Forms and open an individual entry. Go to the bottom of the individual submission page. You’ll find the process start time and upload completion time recorded there. If you’ve checked “auto-delete local files after uploading” in settings, you’ll also see a warning saying the local files have been deleted.
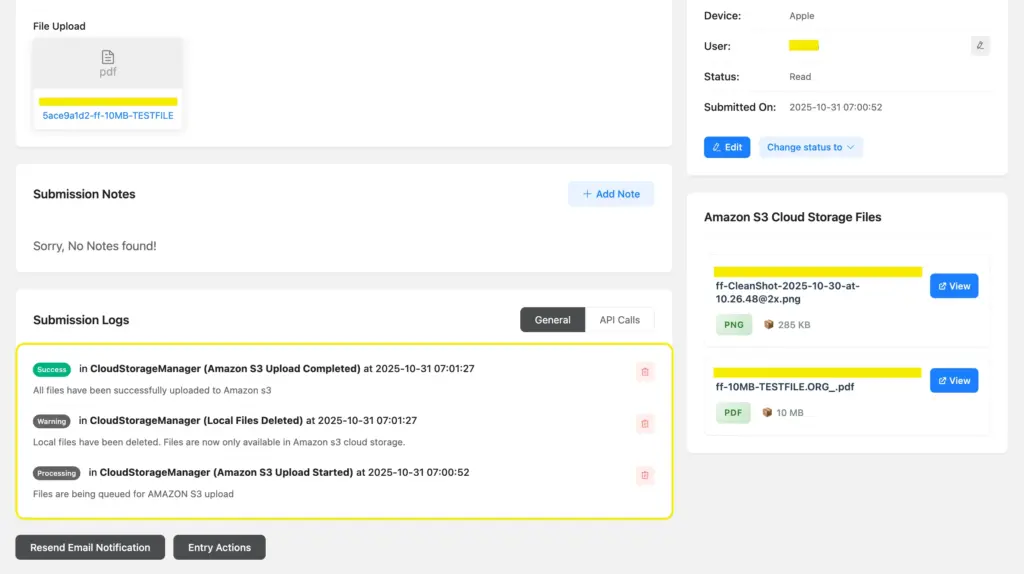
While the upload process to Amazon S3 and Cloudflare R2 is super fast, Google Drive and Dropbox might require a couple of minutes to complete the uploads due to how these services process data.
If you’ve enabled the setting to auto-delete uploaded files from local storage, you can easily download them to your server again right from the Fluent Forms plugin. Simply select the files to download from the “File Explorer” and click the download icon to start downloading.
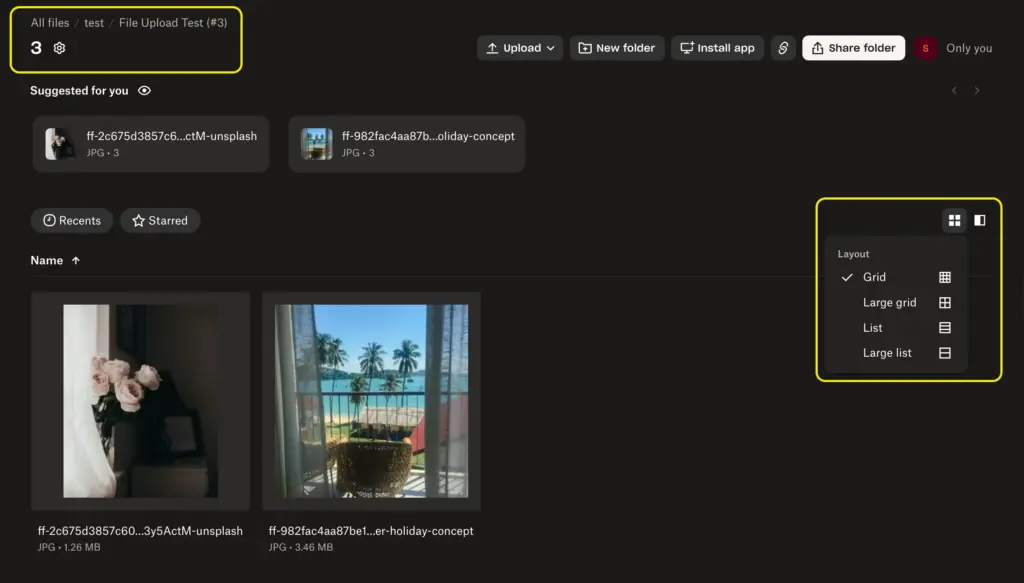
Now let’s locate our files in the cloud. According to my Dropbox configuration, these files are stored in All files > test (parent folder) > File Upload Test (form title) > 3 (submission ID). You can change the file preview layout from Dropbox settings.
If you face any issues regarding setup or file upload, contact the FluentWiz customer support anytime.
Say goodbye to manual file management
Pretty amazing, right? With a simple integration, you can save infinite time and energy. What used to mean manual downloads, re-uploads, and constant storage worries is now completely automated.
Your Fluent Forms uploads now go right where you need them, whether you choose Google Drive for easy collaboration, Dropbox for simplicity, Amazon S3 for scalability, or Cloudflare R2 for performance. You’re now working smarter, not harder.
Ready to make it happen? Get the Cloud Storage Manager now and connect your cloud account in minutes.

Sarika writes for Fluent Forms and loves to offer insights into small businesses. She’s curious and enjoys discussing ideas, interests, and perspectives. In her free time, she’s either marvelling at architectural beauties or trying different cuisines.


Leave a Reply