

How to Create a Certificate from Every Fluent Forms Submission
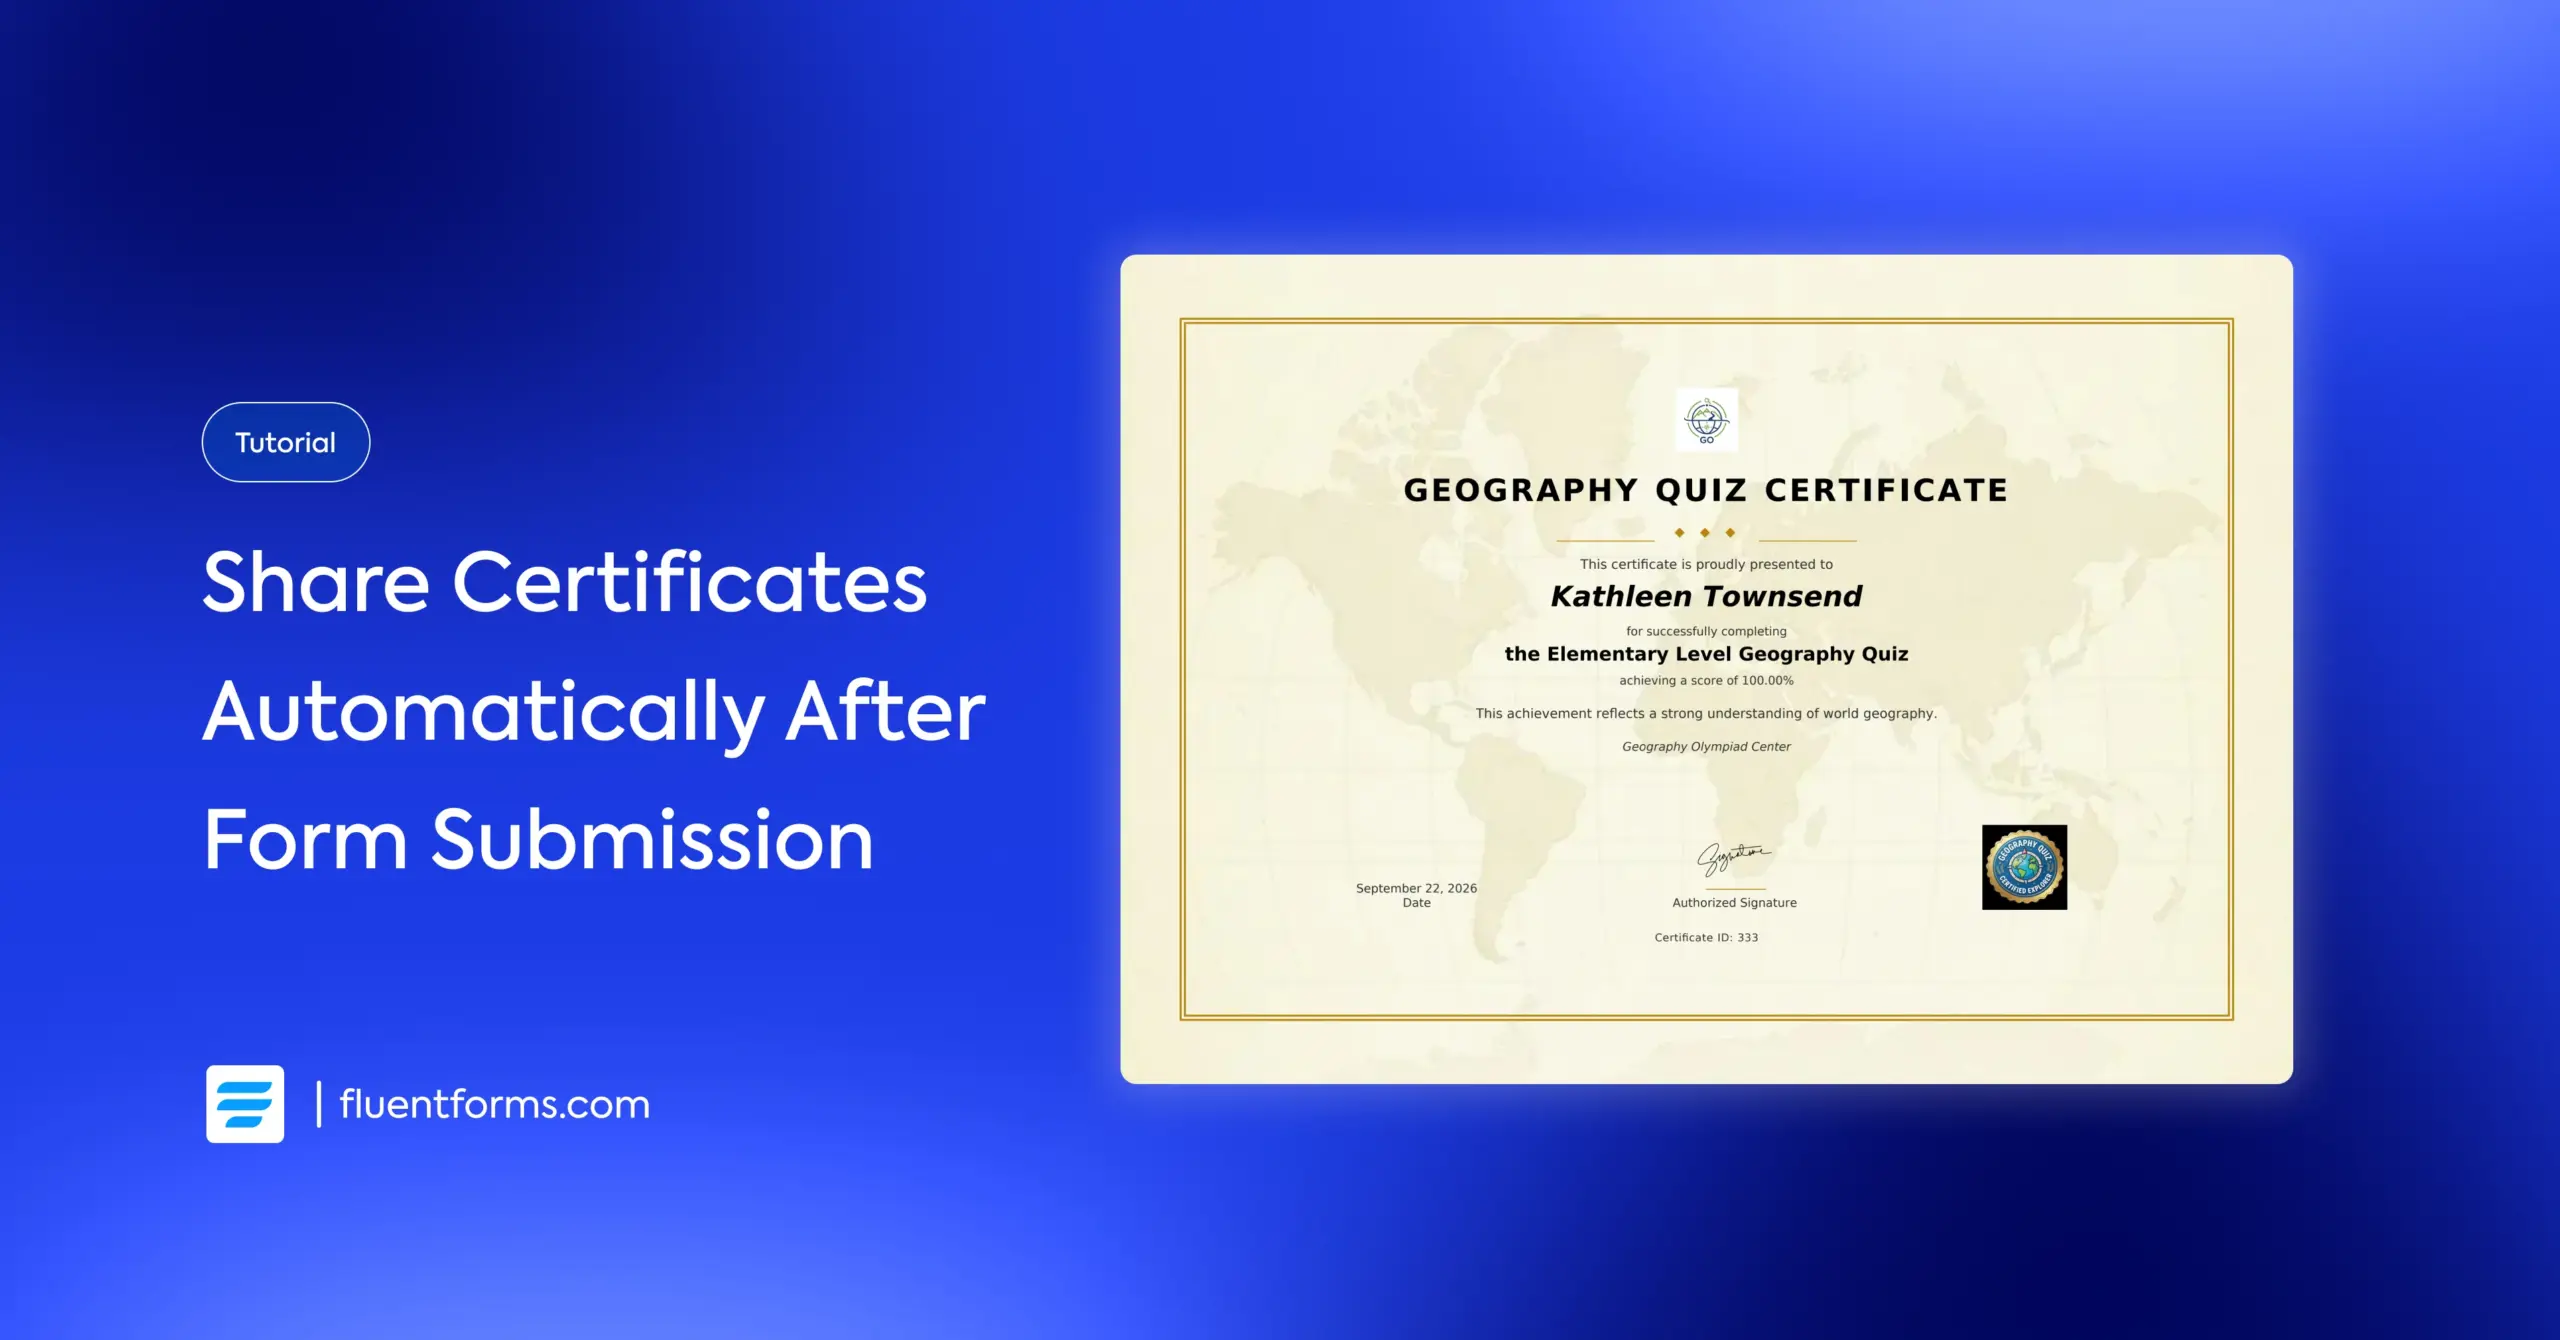
Most quizzes, courses, and workshops end the same way: the respondent finishes, closes the tab, and has nothing to show for it beyond an email in their inbox.
Fluent Forms can change that. Its PDF add-on has a certificate template that fills in a respondent’s name, score, course, completion date, etc., straight from their submission, ready to download or land in their inbox automatically. I’ll show you how to create a certificate using Fluent Forms’ Geography Quiz template as the example.
TL;DR
- Fluent Forms’ free PDF add-on has a certificate template with a logo, signature, seal, and background, built for exactly this job.
- You map each certificate field to form data with shortcodes, so a name, a score, or a course title fills in automatically, no per-submission editing.
- One feed works for any form: quizzes, courses, webinars, workshops, volunteer programs, compliance training.
- Give respondents an instant download link, or set Fluent Forms to email them the certificate automatically.
- The certificate template and the PDF add-on itself are free. The only Pro requirement in this tutorial is the quiz scoring on our example form.
Why Automate Certificate Delivery
Making one certificate by hand is easy. Open a template in Canva or PowerPoint, type in a name, export a PDF, email it. To make fifty certificates, you have to repeat the same job fifty times.
A PDF feed removes the retyping. The moment someone submits your form, Fluent Forms reads their name, score, or course from their submission and drops it into the template. You design the certificate once. Every submission after that produces its own copy, correctly filled in, without you opening it.
What You Can Certify With Fluent Forms
Any submission can end in a certificate. These are a few ideal scenarios:
- Online course completions: hand a learner proof once they finish a lesson series or pass a final quiz.
- Quiz and training scores: our example below auto-scores a quiz, then certifies the actual result.
- Webinar and workshop attendance: confirm someone showed up (or watched a recording) with a certificate they can keep for a portfolio or continuing-education file.
- Volunteer and event participation: give races, fundraisers, and community programs a keepsake that works as proof of hours served.
- Employee and compliance training: document that a required course was completed, with a certificate ID your HR team can file.
- Membership and program milestones: onboarding certificates, belt or level tests, scout badges, anything with a “you did it” moment worth marking.
Whatever the use case, the mechanics underneath stay the same: a PDF feed reads data from a submission and uses it in your certificate template.
What You Need Before You Build One
Three things, and you likely already have the first two:
- Fluent Forms installed on your WordPress site. The free plugin covers the certificate build itself; you’d only need Fluent Forms Pro if a field on your form requires it, which is the case with our example.
- The free Fluent Forms PDF Add-on, installed separately from Fluent Forms itself (step 1 below).
- A form that already captures who you’re certifying and what they did. At minimum, that’s a name field. Most certificates also reference a score, a course name, or a date.
For this walkthrough, I’m using Fluent Forms’ Geography Quiz template. It collects a first name, last name, and student ID, then runs 15 multiple-choice questions across three rounds and calculates a percentage score the moment someone submits. We’ll add the email field to this template.
Before we start: that automatic scoring runs on Fluent Forms’ Quiz Score Input field, which needs Fluent Forms Pro. The certificate feed itself doesn’t. If you’re on the free plugin, you can still follow every step here, just swap the score line for a course name or a completion date, or drop it entirely.
Want to create your own quiz first? Get started with the Quiz Module instead. Build your first quiz step by step and implement automatic scoring.
How to Build a Certificate Feed for Your Form
Here’s the full build, from installing the add-on to sending a finished certificate.
1. Install the Fluent Forms PDF add-on
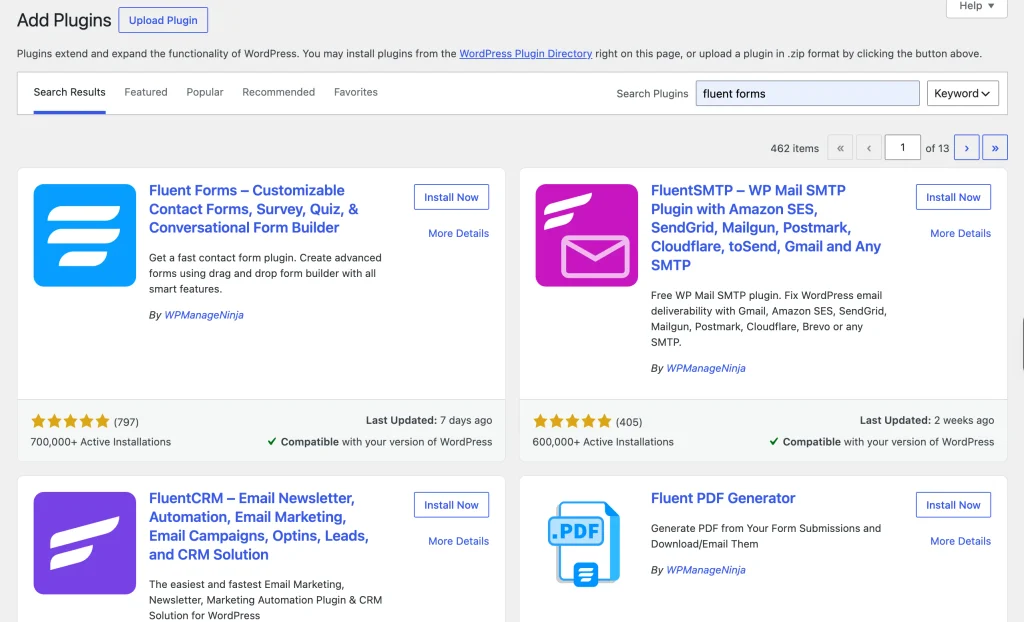
From your WordPress dashboard, go to Plugins → Add New Plugin, search for “Fluent Forms PDF,” then install and activate it. It’s a separate, free plugin that works with both the free and Pro versions of Fluent Forms. If you don’t have Fluent Forms, install and activate it as well.
If you plan to use a decorative or non-Latin font later, go to Integrations → Fluent Forms PDF and click Install Fonts, before you start building. Leave the window open until it finishes.
2. Create a PDF feed and pick the Certificate template
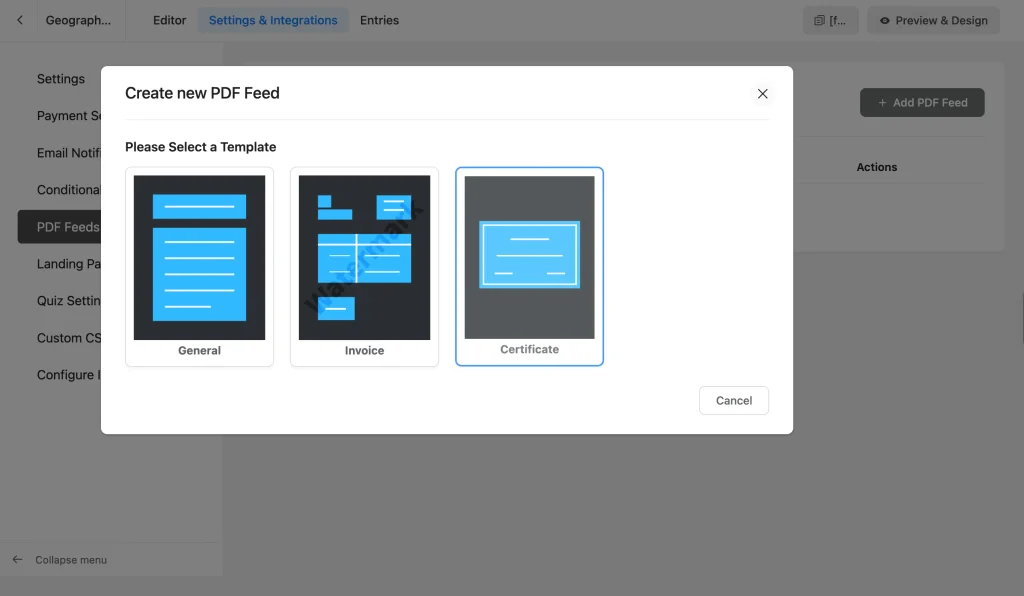
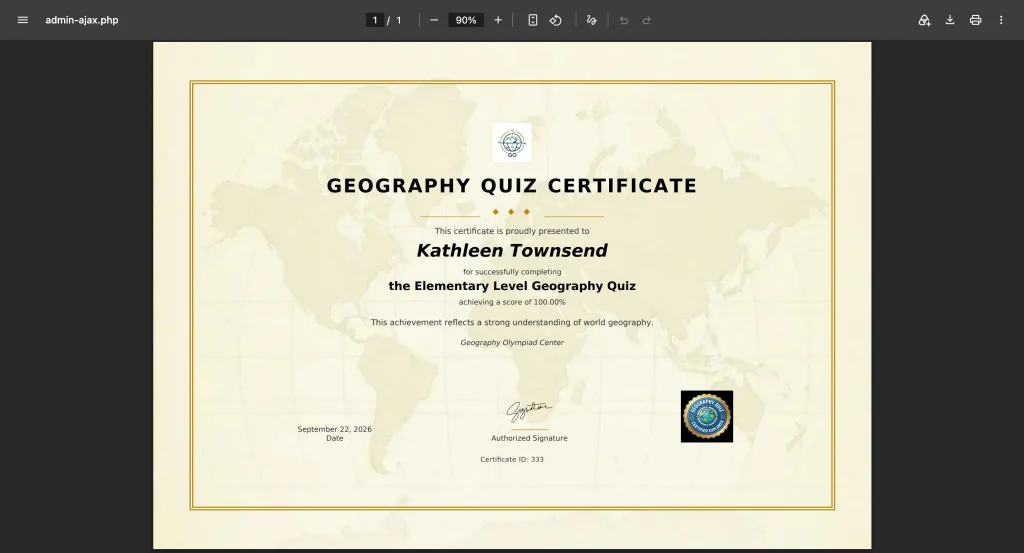
Open the form you want to certify, in our case, the Geography Quiz, and go to Settings & Integrations → PDF Feeds → Add PDF Feed. A popup asks you to choose a template; pick Certificate. Name the feed “Quiz Certificate,” and Fluent Forms opens the feed editor with two tabs: PDF Content and Appearance.
3. Add your logo and set the title
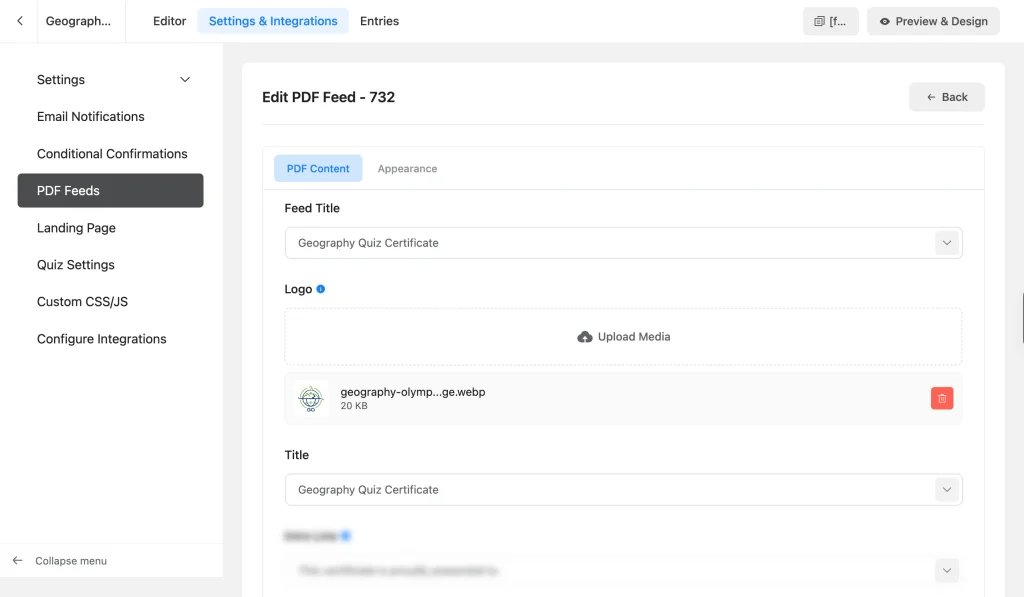
Upload your organization’s logo. Then edit the Title field, it defaults to “Certificate of Achievement,” but you can change it to match what you’re actually certifying, like “Certificate of Completion” or “Geography Quiz Certificate.”
4. Personalize the recipient and reason lines
Fill in the following, in order:
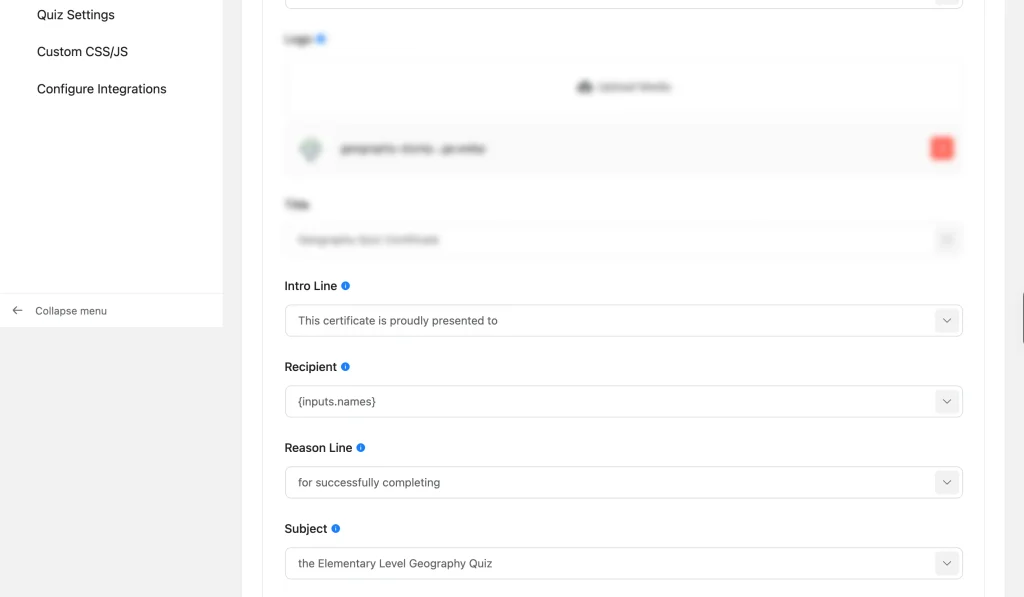
- Intro Line: the sentence before the name, for example “This certificate is proudly presented to.”
- Recipient: click into the field and choose the respondent’s name field from the dropdown. Fluent Forms inserts a shortcode like {inputs.names}, so each certificate pulls the actual submitter’s name automatically instead of a placeholder.
- Reason Line: what they’re being recognized for, for example “For successfully completing.”
- Subject: the name of the quiz, course, or program. Type it directly if it’s the same on every certificate (“The Geography Quiz”), or map it to a field if your form covers more than one course.
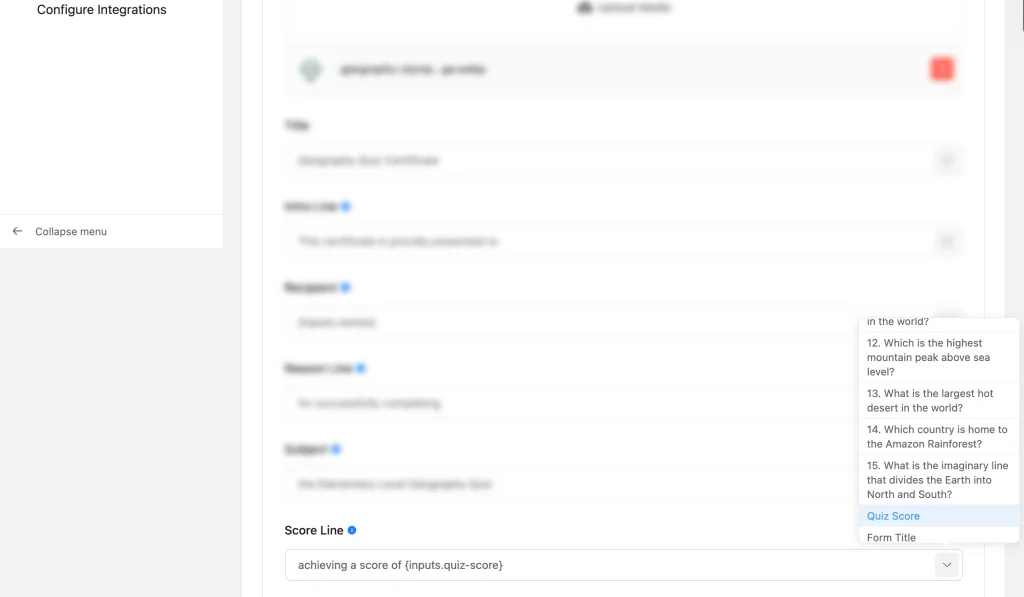
5. Show the result
Click into Score Line and select your form’s score field from the dropdown. If your form uses Fluent Forms’ Quiz Score Input field as our example does, choose that field here to display the percentage. Building a course-completion certificate instead? Skip this field, or repurpose it for a completion date or grade.
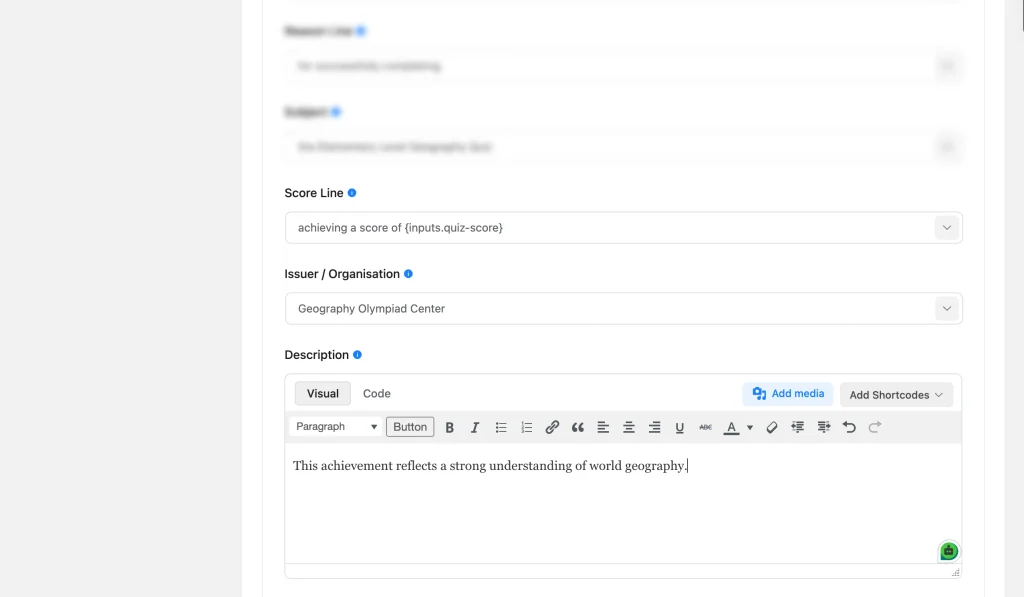
6. Add the issuer and description
Set Issuer / Organisation to your academy, school, or brand name. Then use the Description field’s rich text editor for a short closing line, something like “This achievement reflects a strong understanding of world geography.” Keep it to a sentence or two; a certificate shouldn’t contain a long paragraph.
7. Choose a border and divider style
Pick a Certificate Border (Double, Single, or None) and a Divider Style (Diamonds, Line, or None). A double border with a diamond divider reads as formal, closer to an academic diploma; a single border with a plain line reads lighter, better suited to a workshop or webinar certificate. Both settings are purely visual, so try a couple of combinations before settling on one.
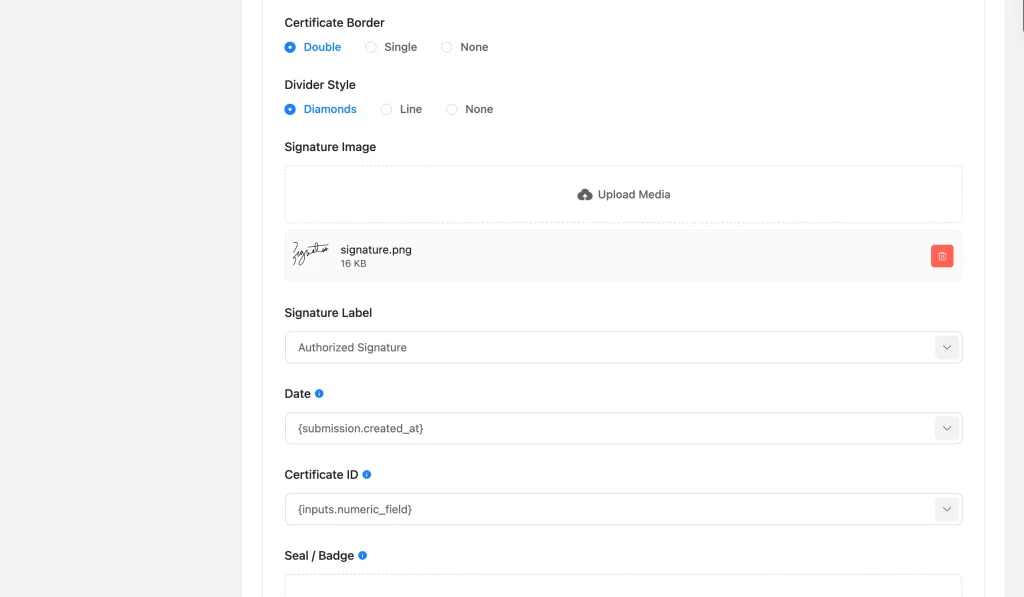
8. Add a signature, date, and certificate ID
Upload a Signature Image (a scanned or digital signature works fine), then set a Signature Label underneath it, like “Authorized Signature” or an instructor’s name and title.
The Date field defaults to {submission.created_at}. That pulls the date and time from your site’s configured timezone, so the printed date matches when the respondent submitted.
For Certificate ID, map it to a field or a submission shortcode so every certificate gets a distinct reference number, useful if anyone ever needs to verify one later.
9. Add a seal and background
Upload a Seal / Badge image if you want a stamp-style graphic, and a Background Image if you want a full-page background behind the certificate. Drop Background Opacity down to somewhere around 15 to 25 so the text on top stays easy to read instead of fighting the artwork.
Set Background Fit to Stretch for an image sized to match your paper’s proportions, Contain if you’d rather keep the image’s original proportions with some empty space around it, or Repeat for a small pattern or texture tiled across the page.
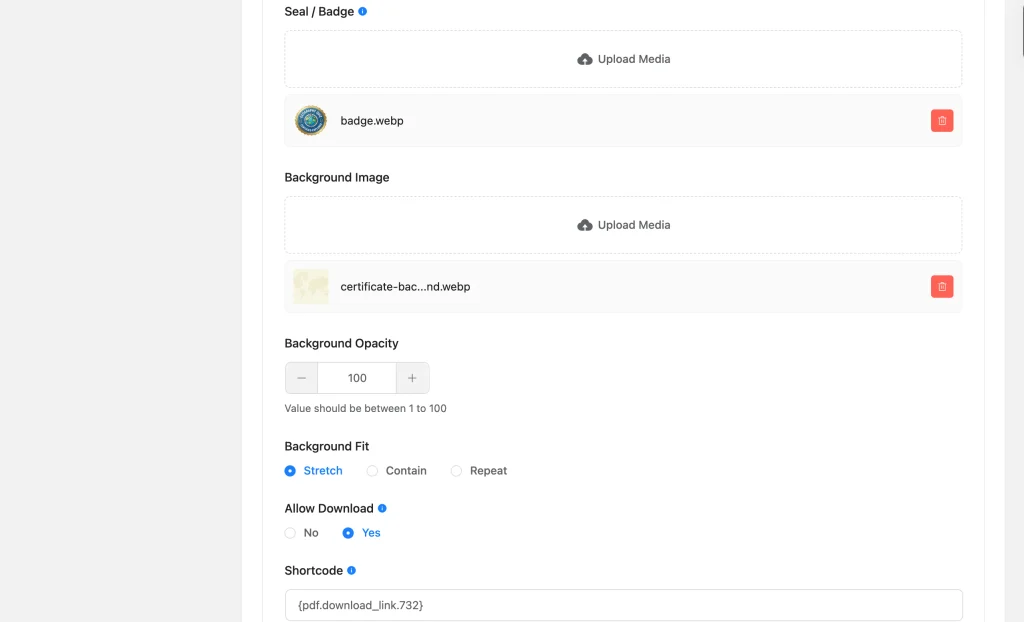
10. Decide whether visitors can download their certificate
Set Allow Download to Yes if you want a public download link generated for each submission. Note that the link stops working if you trash the entry, so cleaning up bad submissions also retires their certificate. Click Save Feed at the bottom.
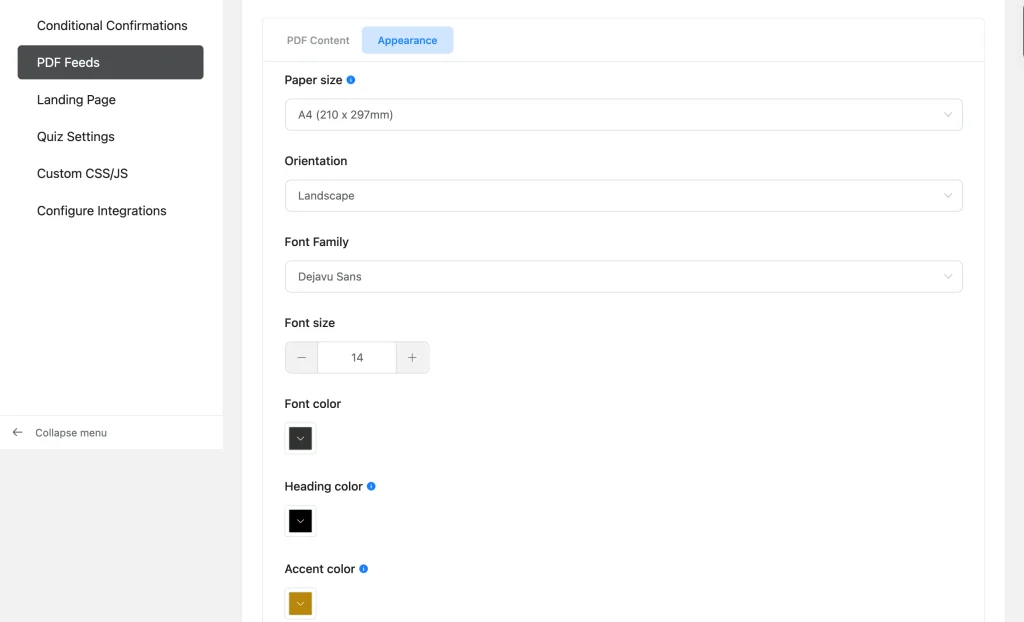
11. Style the certificate under the Appearance tab
Switch to the Appearance tab and work through the layout settings:
- Paper size: choose from Fluent Forms’ full library of sizes, including A4 and Letter.
- Orientation: landscape suits most certificates better than portrait.
- Font Family: pick from the installed set, or install more first (step 1).
- Font size, Font color, Heading color, Accent color: match these to your brand rather than leaving the defaults.
- Language Direction: switch to RTL for Arabic, Hebrew, or Urdu certificates.
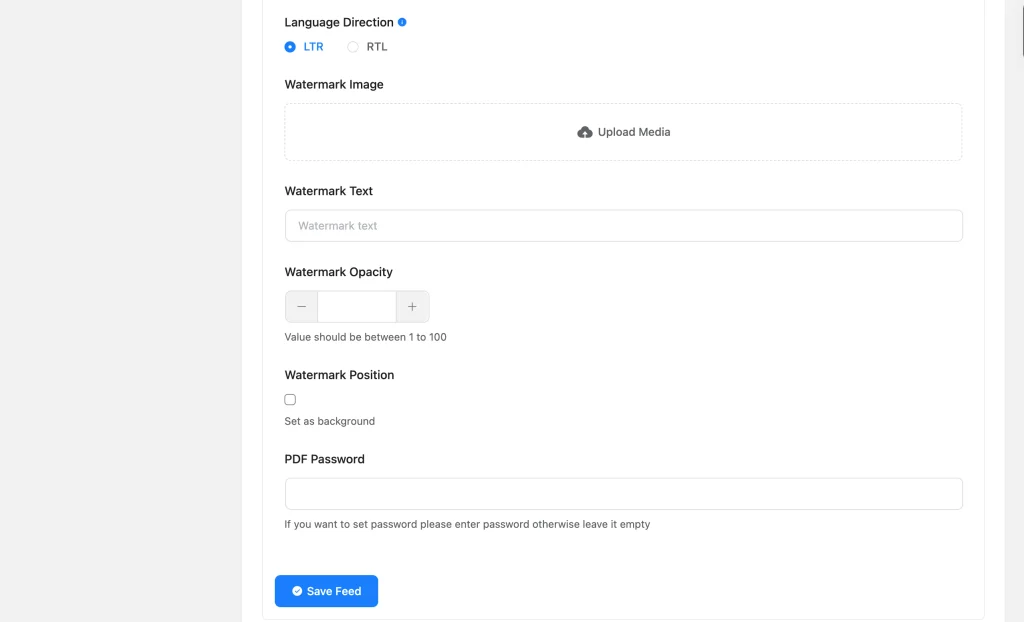
12. Add a watermark and password protection
Both are optional, and neither matters for most certificates. Add a Watermark Image or Watermark Text (a faint “SAMPLE” or your logo, for instance), adjust its Watermark Opacity, and check Set as background if you want it behind the content.
Set a PDF Password only if the certificate carries information that should stay private between you and the recipient, a compliance record, or a professional certification, for example; a class quiz certificate rarely needs one.
13. Save the feed
Click Save Feed. The feed activates immediately, and its Shortcode field fills in with a download link (looks like {pdf.download_link.710}) now that the feed has an ID to point to.
14. Share the certificate
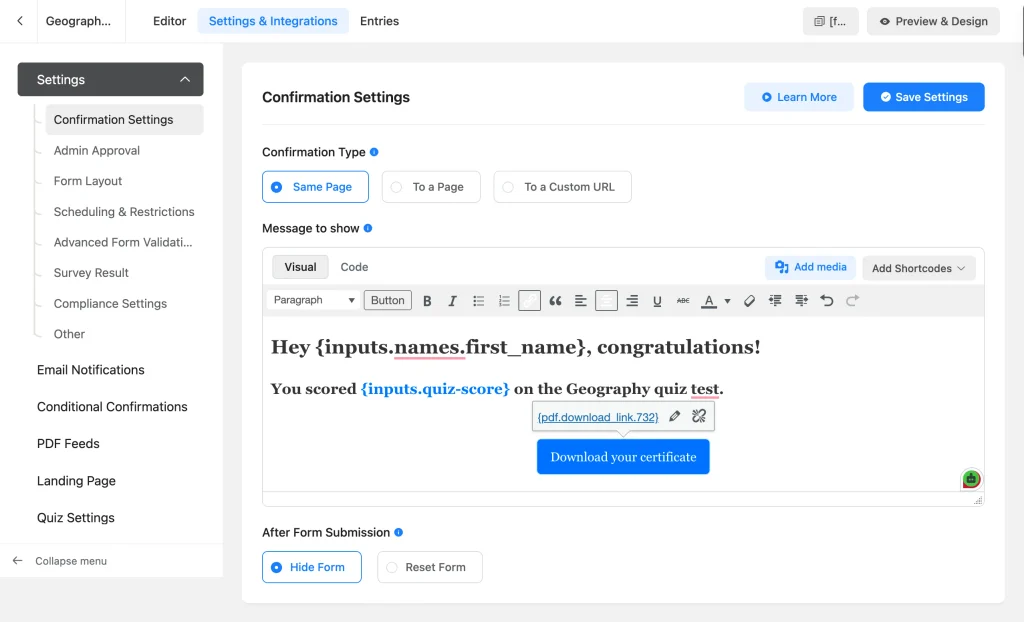
You’ve got two delivery options. Once with the submission confirmation message, and again as an email attachment.
- Copy the feed’s Shortcode (it looks like {pdf.download_link.710}). Go to your form’s Settings & Integrations → Confirmation Settings message. Add a button, and use the shortcode as the button URL. This offers respondents a direct download link as soon as they submit.
- Go to Settings & Integrations → Email Notifications → Add Notification. Choose Select a Field under Send To to create a user notification feed. Select the email field so the respondent’s email gets selected dynamically. Under PDF Attachments, choose your certificate feed. Fluent Forms attaches the finished PDF automatically, whether the notification goes to the respondent, your team, or both.
15. Test it with a real submission
Submit a test entry following exactly as a respondent would.
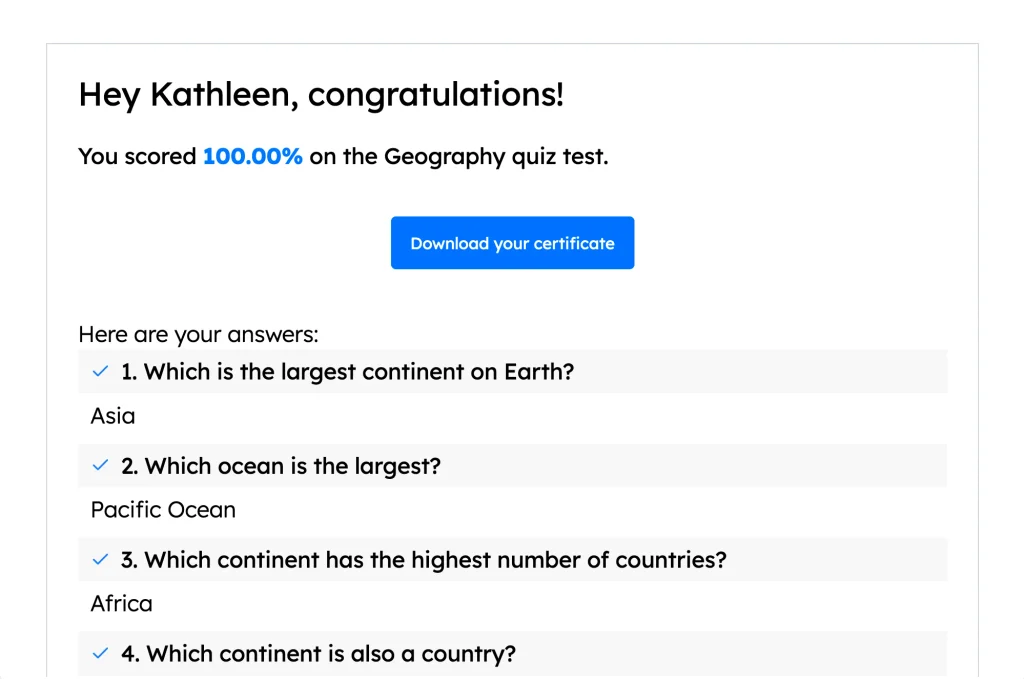
Click the download link on the confirmation page, or check your inbox if you attached the certificate to an email notification. Verify that the images load and the participant name, score, and course name are pulled in correctly.
Bonus: Only Certify Passing Scores
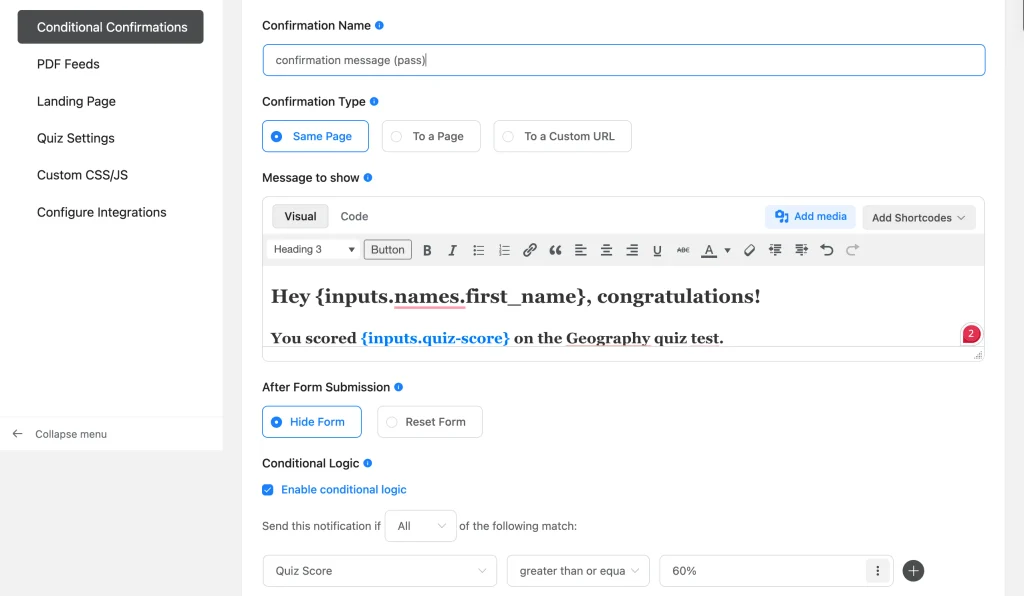
PDF feeds don’t carry their own conditional logic. You have to gate delivery instead, using a conditional confirmation message or conditional logic in the participant email notification. Both require Fluent Forms Pro. With the conditional logic set up, the notification with the certificate attachment will only send when the score field meets your passing threshold. Everyone can still submit the quiz; only qualifying respondents get the emailed certificate.
Certificate Ideas for Different Kinds of Forms
The same feed adapts to most of the use cases from earlier with a few small changes to the fields you already built.
Quiz or training certificate
Keep the build above the same: Score Line shows the result, Reason Line reads “For successfully completing,” and Subject names the quiz. If you want only certain participants to receive the certificate, pair this with the gating tip (in the bonus section above) so only passing scores actually receive one.
Course completion certificate
Drop the Score Line, or repurpose it to show a completion date instead of a percentage. Set Subject to the specific course or module name (“Introduction to Watercolor Painting,” not just “Course”), and map Certificate ID to a field that tracks which cohort or intake the learner belonged to, so a support request months later is easy to trace back to the right group.
Webinar or workshop attendance
Change the reason line to “For attending,” and use the subject for the session title and date. Registering isn’t the same as attending, so if you want the certificate to reflect real attendance, add a short confirmation step first, a checkbox after watching a recording, or a separate short form sent only to people who joined live.
Volunteer or event participation
Swap Subject for the event name and use Description for hours served or a role description (“Contributed 6 volunteer hours as a registration desk lead”). A badge-style seal/badge image tends to fit this case better than a formal stamp, and a lighter single border keeps the tone more like a thank-you (instead of a diploma).
Tips for a Certificate That Looks Professional
- Landscape orientation reads better than portrait for almost every certificate layout.
- Keep body font size legible when printed, not just on screen; anything under 10pt tends to disappear on paper.
- Test with your longest expected name. A border that looks fine with “Sam Lee” can crowd “Alessandra Konstantinidou.”
- Match the accent color to your brand color.
- Keep the description to one or two sentences. A short line feels curated, while a paragraph reads as filler.
Free vs Pro at a Glance
| Feature | Free | Pro |
| Fluent Forms PDF add-on and Certificate template | Yes | Yes |
| Border, divider, font, color, watermark, and password settings | Yes | Yes |
| Public download link and shortcode | Yes | Yes |
| Attaching the certificate to email notifications | Yes | Yes |
| Quiz Score Input field (percentage, points, or grade scoring) | No | Yes |
| Conditional email routing/confirmation message (to gate certificates by score) | No | Yes |
FAQs
Is the Fluent Forms PDF add-on free?
Yes. It’s a separate plugin from the WordPress.org repository, and it works perfectly whether your main Fluent Forms install is free or Pro.
Do I need Fluent Forms Pro to create certificates?
No. The Certificate template comes with the free PDF add-on. You’d only need Pro if a field on the form itself requires it, like automatic quiz scoring.
Can I generate certificates for any form, not just quizzes?
Yes. Any form with a name field, and whatever else you want to reference, a course, a date, a score, can get a certificate feed.
Can respondents download their certificate right away?
Yes. Turn on Allow Download and add the feed’s shortcode to your confirmation message; it produces a direct download link the moment they submit.
Can I email the certificate automatically instead of relying on a download link?
Yes. Attach the certificate feed to an email notification under PDF Attachments, and Fluent Forms sends the finished PDF as an attachment.
Can I only issue a certificate to students who pass?
Not directly on the feed itself. Route it through a conditionally-sent email notification instead (see the Bonus section above), which needs Fluent Forms Pro.
Can I create a certificate in a language other than English?
Yes. Set Language Direction to RTL under Appearance for right-to-left scripts, and install a font that supports the language you need first.
What if I want a unique certificate ID or verification number?
Map the Certificate ID field to a serial-number shortcode for a clean sequential number, or to the raw submission ID if that’s good enough for your records.
Can I password-protect a certificate?
Yes. Set a PDF Password under the Appearance tab. Anyone opening the file needs that password, even with the download link in hand.
Will a deleted entry’s certificate still be downloadable?
No. The public download link stops working once you trash or mark the entry as spam.
Set It Up Once and Certify Every Submission
Offering an elegant certificate at the end of a course or workshop conveys your professionalism. And generating that certificate automatically saves you time and effort. Now that you can create the entire process for free, install Fluent Forms, add the PDF add-on, and turn your next form submission into a certificate. Once the feed is saved, every submission after it generates its own certificate with no extra work from you.
Build Smarter Forms for Free

Sarika writes for Fluent Forms and loves to offer insights into small businesses. She’s curious and enjoys discussing ideas, interests, and perspectives. In her free time, she’s either marvelling at architectural beauties or trying different cuisines.



Leave a Reply