

How to Create an Employee Information Form on WordPress

Every HR team has a version of the same problem. An employee’s ID copy sits in an old email, and the supporting documents are scattered among hundreds of folders. Every new hire means repeating the same back-and-forth to collect information that should have been captured once.
An employee information form fixes this by giving HR a single, structured entry point for employee data. Employees fill out one form, submit their files alongside it, and HR gets a clean, organized record. This tutorial walks through creating employee data record forms with Fluent Forms on your WordPress site, from structuring fields to collecting documents and embedding the finished form.
TL;DR
- An employee information form centralizes personal, contact, employment, and emergency details in one submission.
- Fluent Forms lets you organize fields into logical sections using the Section Break or Form Step.
- File upload fields let employees attach IDs, certificates, and resumes directly with their submission.
- Confirmation messages reassure employees, while notification emails alert HR the moment a form is submitted.
- Submitted entries remain within WordPress, and you can export or import them as needed.
- The same form structure can be reused for onboarding, record updates, or document collection.
Why Use an Employee Information Form
Before you start building, it helps to understand what a dedicated form solves for an HR team or office administrator.
Centralize employee information
Every field an employee fills in lands in the same database instead of scattered across emails, PDFs, and spreadsheets. HR always knows where to look.
Reduce manual data entry
When employees submit their own details, nobody on the HR side has to retype information from a paper form or a forwarded email into a spreadsheet.
Collect supporting documents
Identification, certificates, and resumes can be uploaded directly within the same form using a file upload field. So, you need not collect files individually.
Standardize employee records
A fixed set of fields means every employee record follows the same structure, which makes searching, comparing, and reporting on employee data far easier.
Improve the employee onboarding experience
A single, well-organized form feels more professional to a new hire than a scattered chain of onboarding emails, and it sets a clear expectation for what information is needed upfront.
What an Employee Information Form Should Include
A well-structured employee information form is usually broken into five sections. Here’s what each one typically covers.
Basic Employee Information
Full name, employee ID, profile photo, and date of birth are the identifying details that anchor the rest of the record.
Contact Information
Email address, phone number, home address, and city, state, or country fields make sure HR can reach the employee outside of work systems if needed.
Employment Information
Job title, department, employment type, date of joining, and manager or supervisor information are the professional side of the record.
Emergency Contact Information
Emergency contact name, relationship to the employee, and phone number matter a lot in terms of any emergency.
Supporting Documents
Identification documents, certificates, and a resume or CV give HR the paperwork it needs without a separate email request.
Steps to Create an Employee Information Form in WordPress
With the structure planned out, here’s how to actually build the form using Fluent Forms.
Step 1: Add a new form
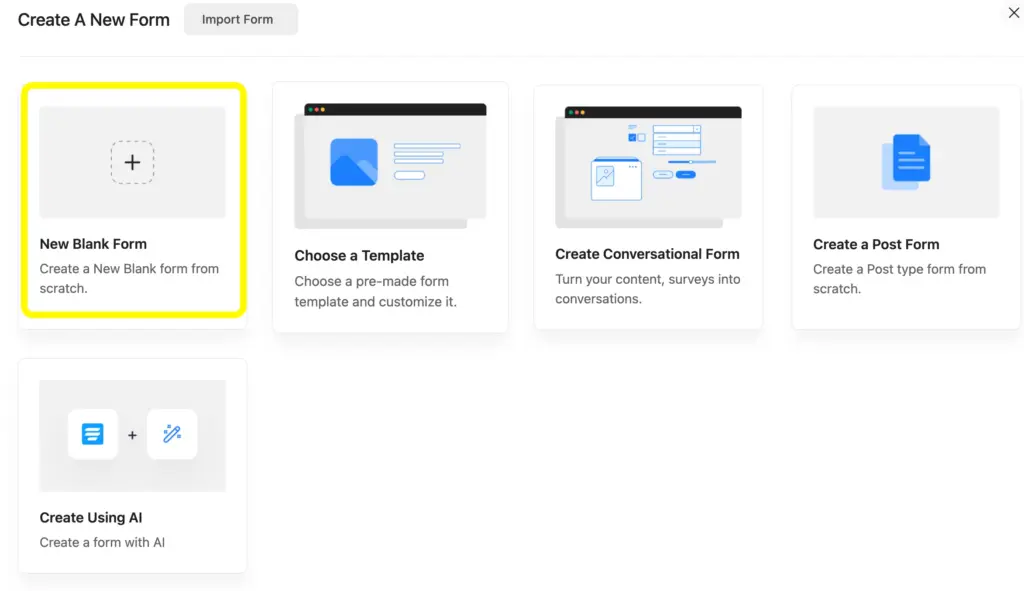
From your WordPress dashboard, open Fluent Forms and click Add New Form.
Here, you can create a new form by selecting: New Blank Form, Choose a Template, Create Using AI, etc. For this tutorial, we’re using a blank form, but you can also choose a template or use the AI builder..
Step 2: Add and customize employee information form fields
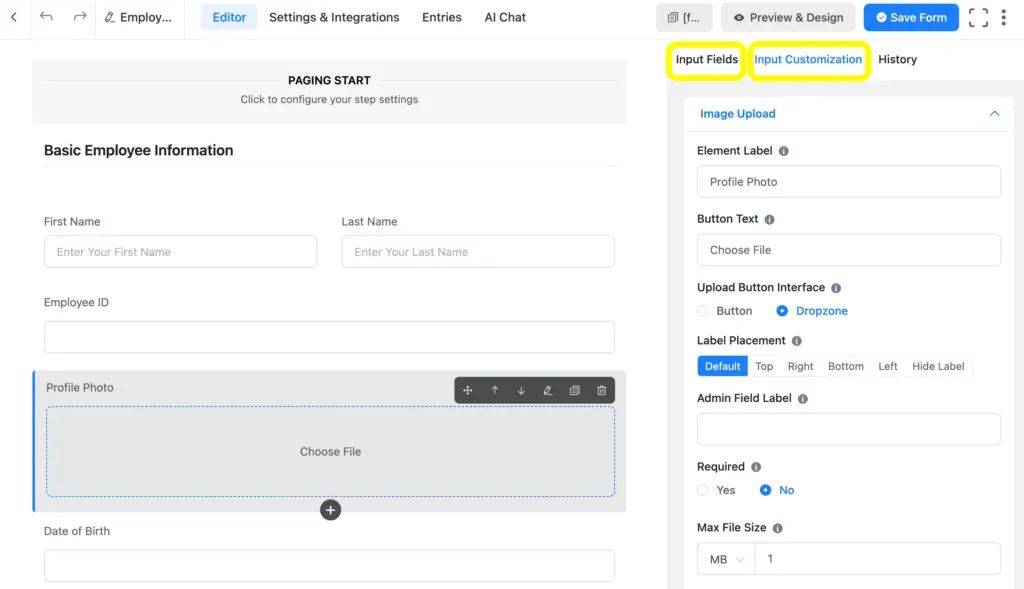
This is where the five sections from earlier come together. Use the Section Break field, or the Accordion/Tab fields to segment the parts of the form. I’ve used Section Break and Form Step to separate each group of information.
Within each section, you can use your preferred ones from Fluent Forms’ 60+ input fields:
Here is the list of fields that I’ve used:
Basic Employee Information: Name Field, Numeric Field (for Employee ID), Image Upload (Profile Photo), Time & Date (Date of Birth).
Contact Information: Email, Phone/Mobile, Address Fields.
Employment Information: Simple Text (Job Title), Dropdown (Department), Time & Date (Date of Joining), Simple Text (Supervisor’s Name).
Emergency Contact Information: Name Fields, Simple Text (Relationship to the Employee), Phone/Mobile.
Supporting Documents: File Upload fields for Identification Documents, Certificates, and CV/Resume.
I’ve included Section Break fields for each section’s title, and Form Step fields after each section to segment the form into several steps.
Step 3: Choose and configure required fields
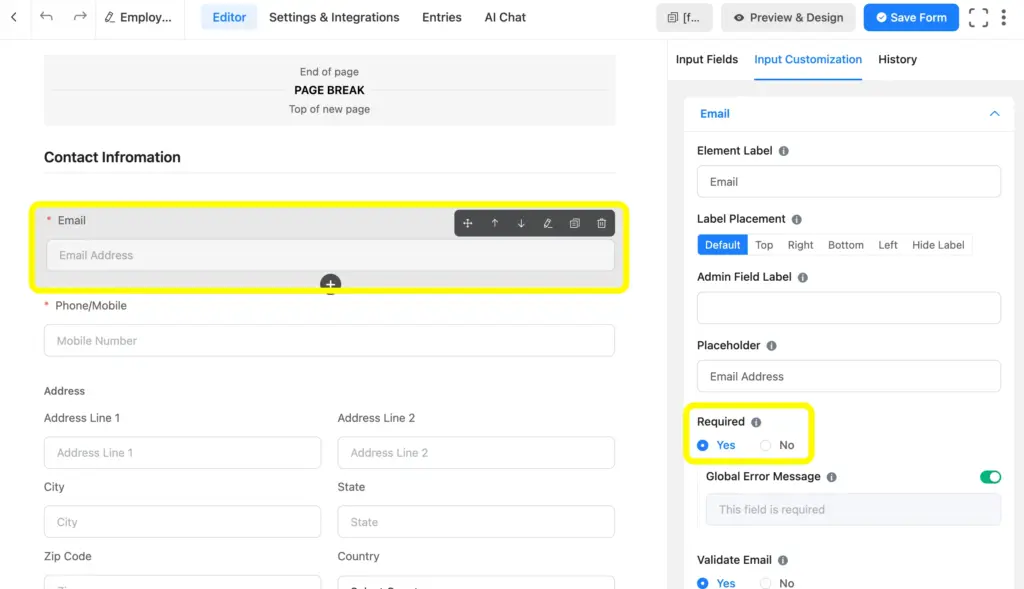
Not every field needs to be mandatory, but the core ones do. Here I’ve marked a few fields as required, which means the form cannot be submitted without filling out those fields.
You can easily mark any fields as ‘Required’ by clicking on the field, which opens the Input Customization tab, and then you can mark ‘Yes’ under the ‘Required’ option.
Step 4: Configure confirmation and notification
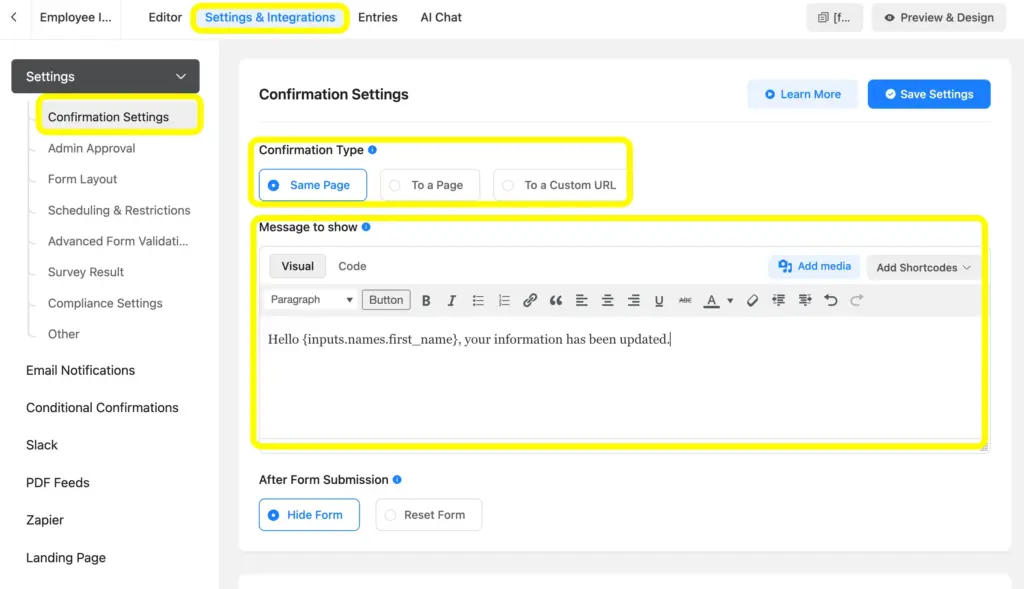
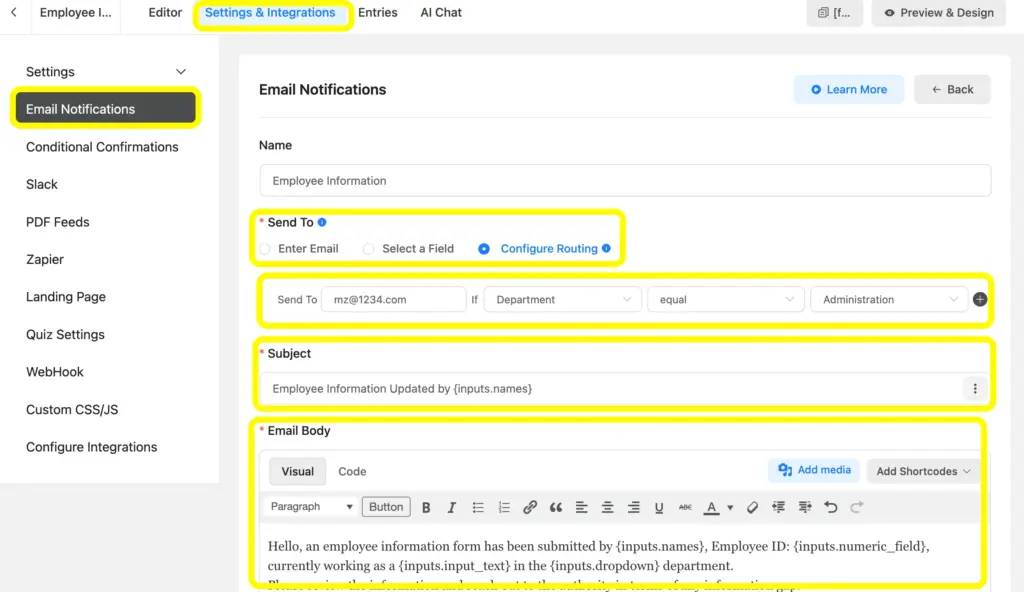
Once the fields are in place, head to the form’s Settings & Integration and then click on the Confirmation Settings. There you can write down the Message to Show, and use the Add Media and Shortcodes as well.
Once the confirmation is set, configure the form submission notification emails so HR or the relevant administrator gets an alert the moment a new submission comes in. You can configure routing to set the email’s destination based on the preset conditions.
Step 5: Preview and style the form
Before publishing the form on your WordPress site, make sure you’ve checked the preview to ensure that the fields, confirmation, and notifications all work accordingly. Submit a test entry and confirm the notification emails arrive correctly.
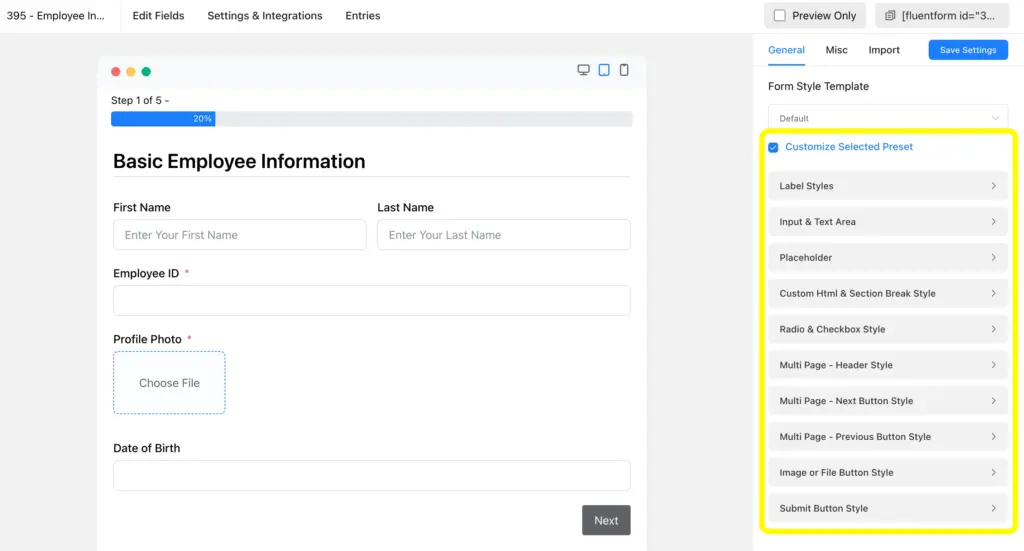
Then use the Advanced Form Styler to match the form to your site’s branding. You can adjust colors, fonts, spacing, and button styles through a visual editor, without writing any CSS.
Step 6: Embed the form on your WordPress site
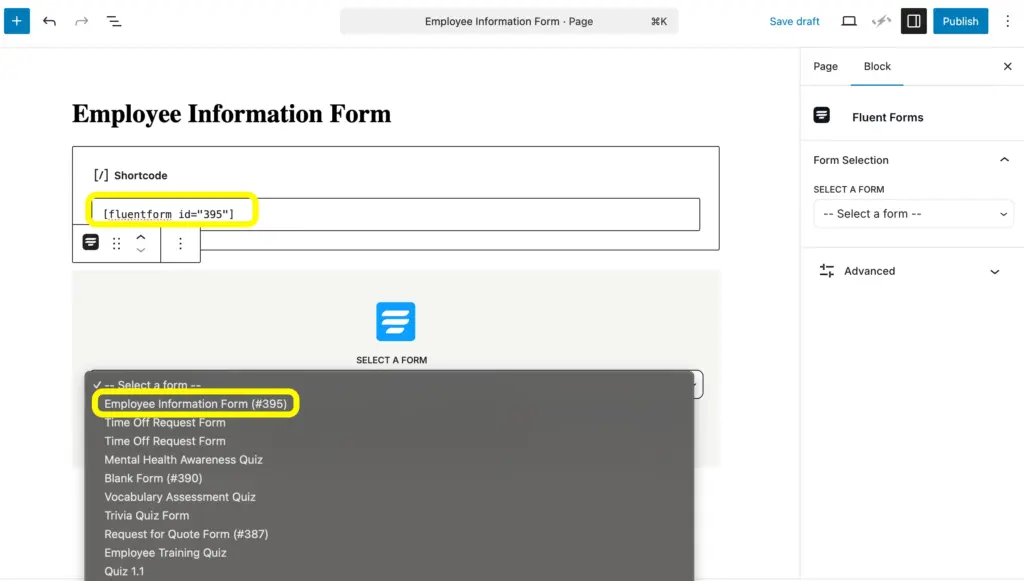
With the form built, configured, and styled, it’s time to embed it on your WordPress website. You can embed the form by copying the form’s shortcode from the top right side of your form, or adding it directly using the Fluent Forms block in the WordPress block editor.
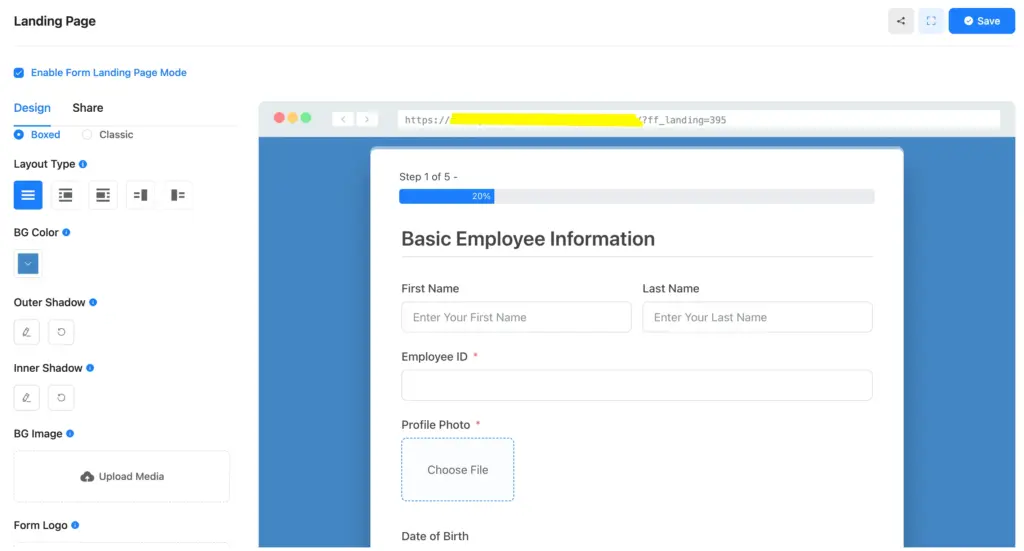
To create a dedicated, distraction-free page for your Employee Information Form, use the Fluent Forms landing page module and publish the form with a separate entity on a new page of your website.
To make it a landing page form, go to Settings & Integrations and enable the Landing Page Mode. You can easily customize the form according to your brand’s unique style there.
Multiply the Use of Employee Information
A form built for employee data collection easily extends to onboarding, record updates, or document requests, and entries can be exported or imported anytime. Stop chasing scattered files for information that should have been organized from the start. Get Fluent Forms Pro to access all the relevant fields and features in your next form.

Hi, this is Aparup. I am a Literature postgraduate, mixing my creative thoughts with my experience in the tech industry to surpass AI. Professionally, I am a content marketer seeking solutions to users’ problems regarding WordPress.



Leave a Reply