

How to Create a Project Inquiry Form on WordPress

Most businesses that lose good-fit clients don’t lose them to a competitor’s pitch. They lose them during the intake stage, when a vague “tell us about your project” contact form forces three or four email round-trips to figure out what the prospect actually needs. By the time enough details exist to write a real proposal, the prospect has already talked to someone else who asked better questions first.
A project inquiry form fixes this at the source. Instead of a name, email, and open “message” box, it asks the questions you’d normally save for a discovery call, such as project type, timeline, budget range, references, and files, and gets them answered before you ever pick up the phone. This guide walks through building one in WordPress with Fluent Forms, from picking the right fields to routing completed inquiries to the right person on your team.
TL;DR
- A project inquiry form replaces guesswork with structured detail, so you can evaluate a lead before the first call.
- The form should ask about project type, scope, timeline, budget, and supporting files, not just contact information.
- Fluent Forms lets you build this with drag-and-drop fields, conditional logic, file uploads, and routed email notifications.
- Conditional logic keeps the form short for simple inquiries and detailed for complex ones.
- Styling and embedding the form takes minutes with the Advanced Form Styler and Fluent Forms’ block, shortcode, or Gutenberg block.
What a Project Brief Form Should Include
Before opening the form builder, it helps to decide what “enough information” actually means for your business. A project inquiry form isn’t a contact form with extra steps. It’s a lightweight version of the discovery questionnaire you’d use on a call. Grouping the fields into a few clear categories makes the form easier to plan and easier for prospects to fill out.
Contact information
Start with the basics: name, email, phone number, and company name if the inquiry is coming from a business rather than an individual. A Website URL Field is worth adding here too, since a quick look at a prospect’s current site or portfolio often tells you as much as a paragraph of description would.
Project overview
This is where the prospect explains what they need to get done. A Dropdown or Radio Field for project type or service category keeps submissions easy to sort and filter later, while a Text Area Field lets the prospect describe the project itself: the problem they’re solving, the outcome they want, or the reason they’re reaching out now.
Scope & requirements
Ask what the project actually involves before you get to numbers. This might mean a Checkbox Field listing deliverables or services the prospect is interested in, a field for existing assets or systems they’re working with (like current branding, a tech stack, or a site that needs replacing), and a File Upload Field for briefs, mood boards, site maps, or reference documents. The more specific this section is to your service, the less back-and-forth you’ll need later.
Budget & timeline
A Dropdown or Radio Field for budget range works better here than an open numeric field; ranges are faster to scan and less likely to scare off a prospect who’s still exploring pricing. Pair it with a Date field for preferred start date or deadline, since urgency often changes how a project should be prioritized on your end.
Decision & next steps
Close with questions that tell you where the prospect is in their decision process: whether they’re comparing other providers, who else is involved in approving the project, and how they found you, which doubles as informal marketing attribution. A date and time field asking for their preferred meeting time also saves a round of email before the first call.
Steps to Create a Project Inquiry Form in WordPress
Step 1: Add a new form
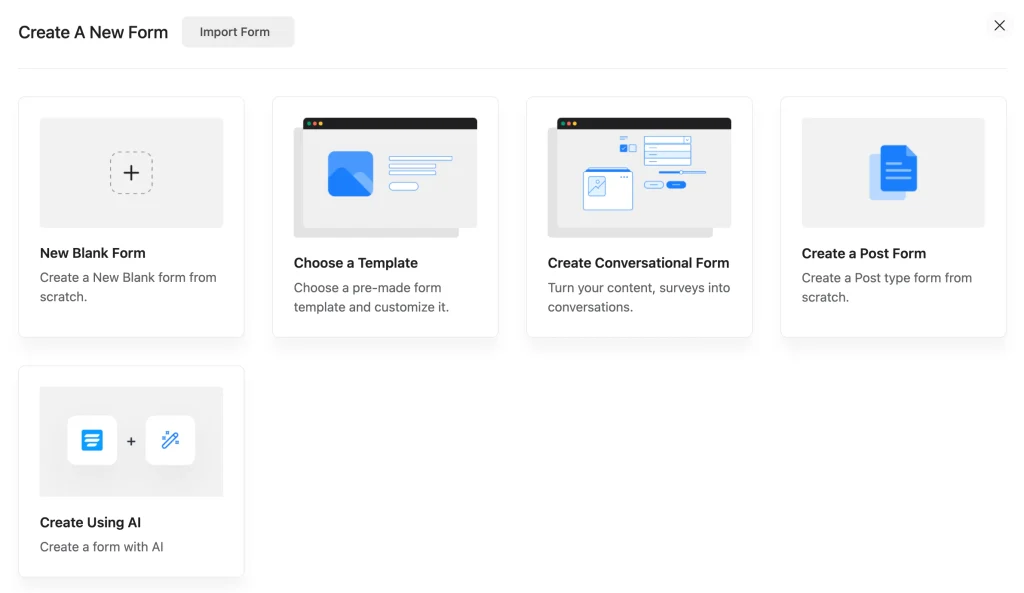
From your WordPress dashboard, go to Fluent Forms and click Add New Form. You can start from scratch or search the form templates for something close to a project intake form, then adjust it to match your service. To create a new form, click on Add New Form and then choose New Blank Form.
Step 2: Add and customize the relevant fields
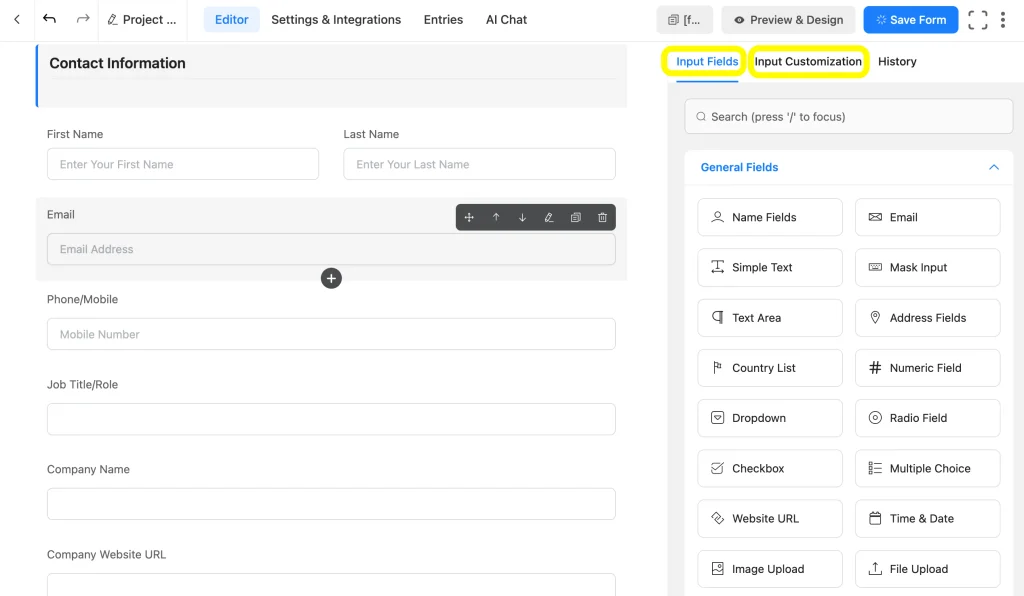
This is where the form earns its keep. Fluent Forms gives you 65+ input fields to build the exact structure your intake process needs. You can easily customize the fields along with the conditional logic, and also mark the fields as required. You’ll find multiple Input Customization options on the right side of the editor after clicking on the field you want to customize.
Step 3: Configure confirmation and email notification
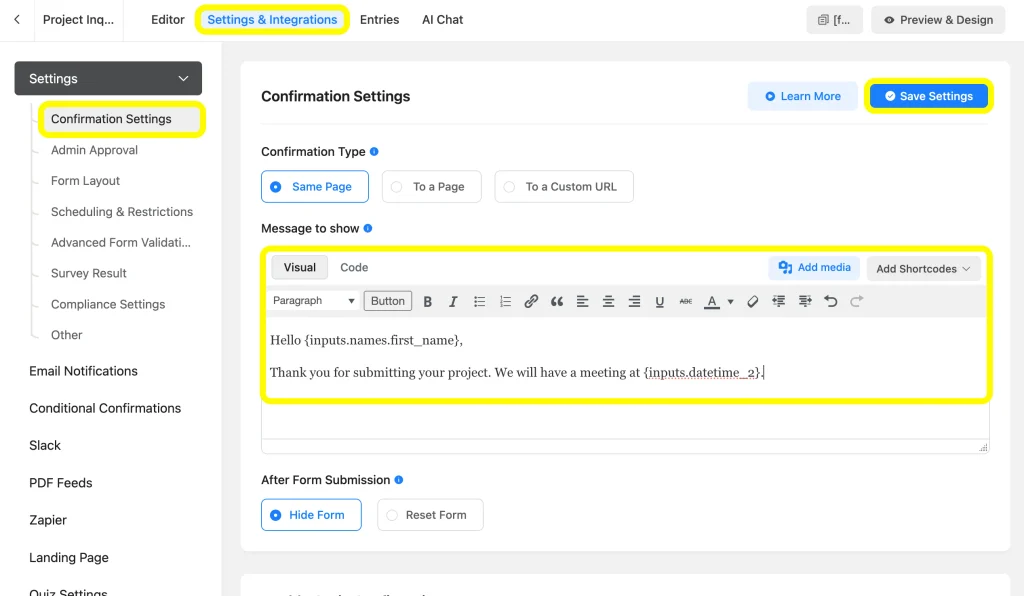
Once the fields are in place, set what happens after submission. Under the Confirmation settings, you can show a custom message on the same page or redirect the prospect to a thank-you page that sets expectations, for example, by confirming when you’ll respond to them.
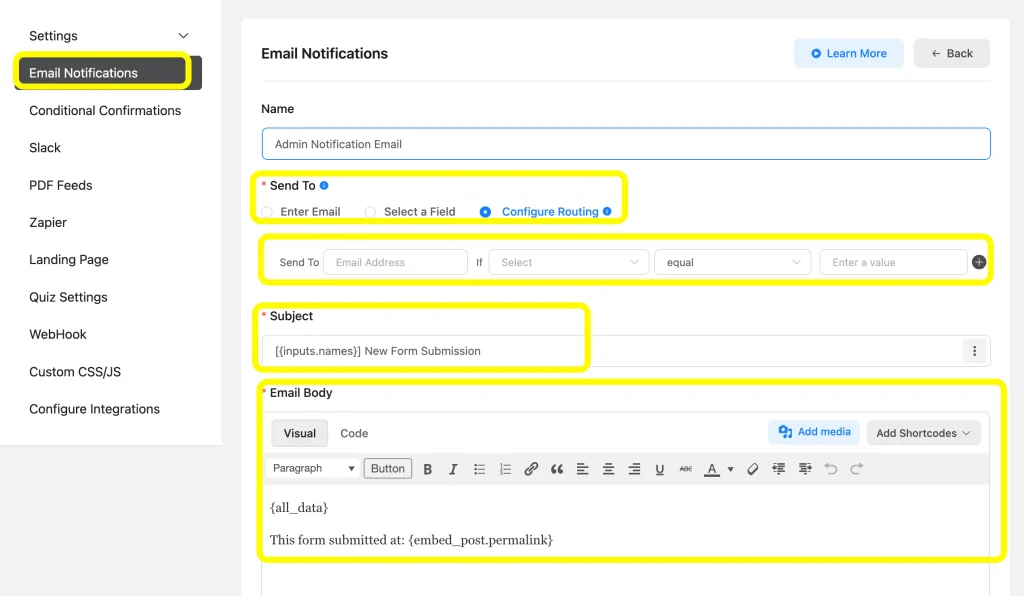
Set up email notifications for whoever handles new project inquiries on your team. You can configure routing to a specific team member, or multiple recipients based on the project type selected, keeping everyone informed without extra manual forwarding. You can Add Shortcodes and Add Media to make the email notification more tailored.
Step 4: Preview and style the form
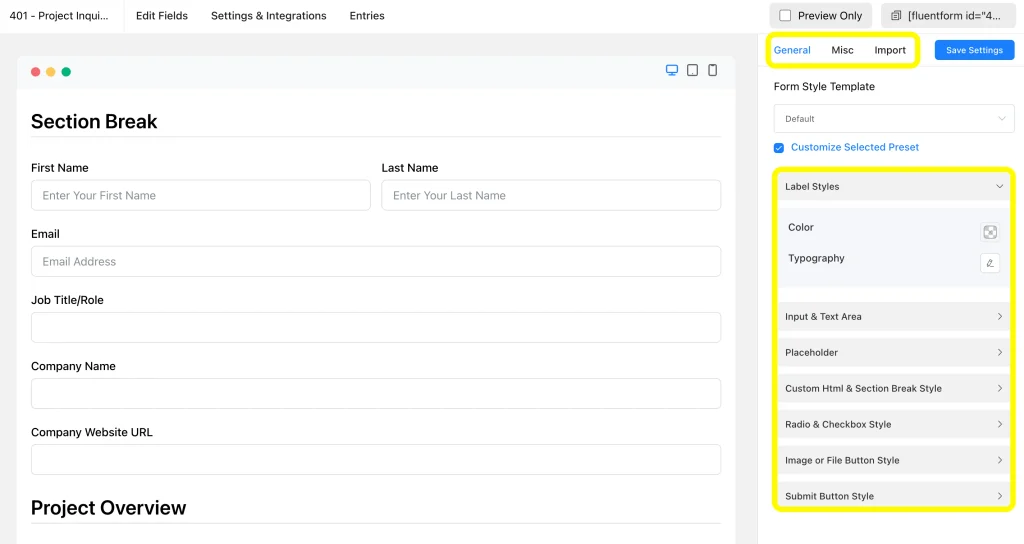
Use the Preview & Design option in the top-right of your form editor page to walk through the form and make sure everything is in order. If you want the form to match your site’s branding more closely, the Advanced Form Styler gives you control over colors, spacing, and typography without writing custom CSS. You can also import a preferred form style from the preview page.
Step 5: Embed the form on your WordPress website
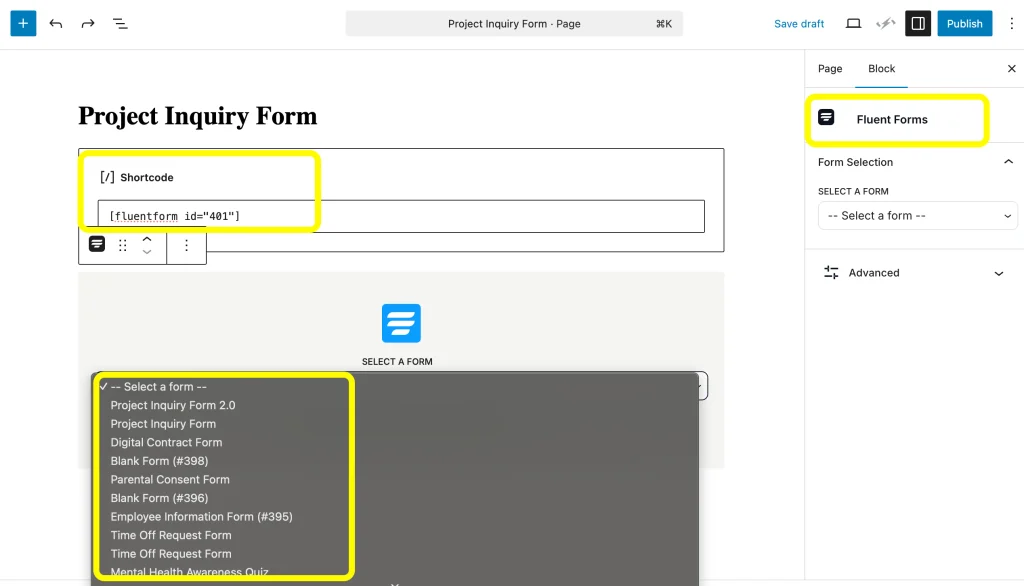
With the form ready, embed it on your preferred page using the Shortcode of the form or the Fluent Forms Block.
If you want to make the form a standalone one on a separate landing page, this guide to creating a lead-generating landing page covers how you can take it to a landing page.
Add a bonus step showing how to connect Fluent Forms with FluentCRM and manage the list; send them an automated email sequence here
Bonus step: connect Fluent Forms with FluentCRM
Once inquiries start coming in, you’ll want a way to organize them beyond a single inbox. FluentCRM is a self-hosted email marketing plugin that pairs natively with Fluent Forms, turning each submission into a tagged, segmented contact you can follow up with automatically. Check this documentation to connect FluentCRM integration with Fluent Forms.
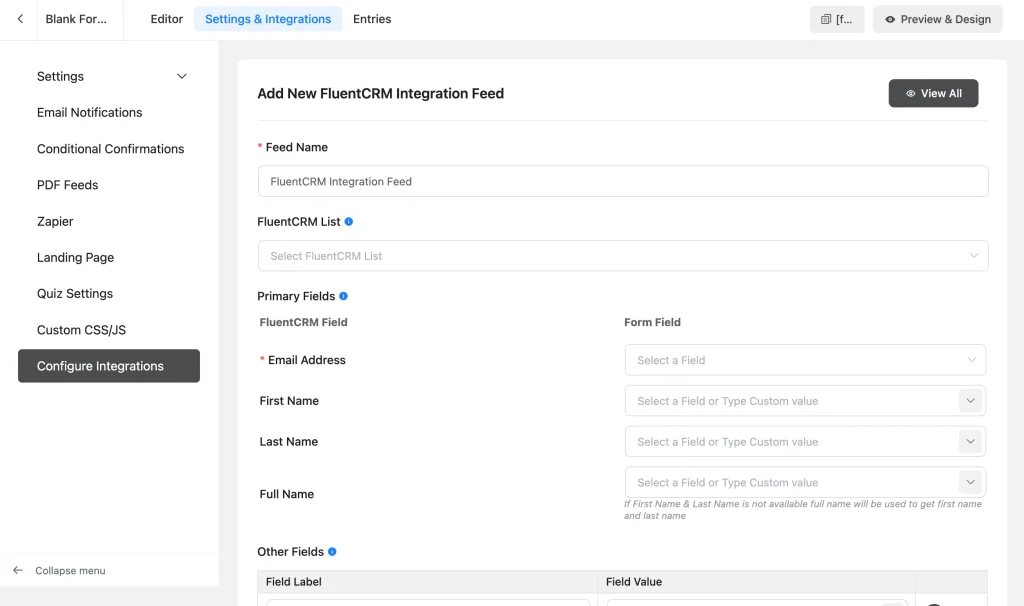
To turn it on, go to Integrations in the Fluent Forms navbar, search for FluentCRM, and toggle the module on. No extra setup is needed beyond having both plugins active. Open your project inquiry form’s Settings & Integrations tab and add a new FluentCRM feed. Map the Name and Email fields to the matching contact fields, then use the feed to assign a list and tags, such as tagging contacts by project type or budget range, so your list is already segmented the moment they submit.
From there, head to FluentCRM’s Automation section and create a new automation using the New Form Submission trigger, scoped to your project inquiry form. This is where the email sequence lives: a welcome email confirming you’ve received their inquiry, followed by a delay and a follow-up email if you haven’t responded yet. A prospect asking about a small project can land in a lighter-touch sequence, while a high-budget inquiry can trigger an internal alert so your team prioritizes it.
The result is one form submission doing three things at once: it lands in your inbox for review, creates a segmented contact in FluentCRM, and kicks off a follow-up sequence, without anyone on your team touching a spreadsheet.
Further Steps to Make the Best Use of Your Project Intake Form
Publishing the form is the starting point, not the finish line. A few additions turn a single submission into a repeatable process:
- Connect the form to your CRM or email marketing tool so new inquiries automatically create a contact record instead of relying on someone to copy details manually.
- Build a set of saved reply templates for common project types, so your team can respond quickly once they’ve reviewed a submission.
- Add a scoring or tagging step internally: even a simple “qualified / needs follow-up / not a fit” label, so your team can triage a backlog of inquiries at a glance.
- Review submissions periodically to spot patterns, such as a budget range you keep seeing mismatched against your pricing, or a project type you keep declining.
- Revisit the field list every few months, since the questions that mattered at launch may no longer capture what you need to know as your services change.
- Track where inquiries come from using the “how did you hear about us” field, and feed that back into your marketing decisions rather than letting it sit unused.
Turn Project Inquiries into a Better Client Acquisition Workflow
The single biggest shift a project inquiry form makes is in when the qualifying happens. You qualify prospects before you ever schedule a call, using details they’ve already handed you, not on the call itself.
If you take one thing from this guide: swap your generic contact form for a project inquiry form this week, even a simple version. Build the fields around what you actually need to scope a project, and let the form do the qualifying work before the conversation starts.
Ready to build yours? Get Fluent Forms Pro and start turning inquiries into qualified projects today.

Hi, this is Aparup. I am a Literature postgraduate, mixing my creative thoughts with my experience in the tech industry to surpass AI. Professionally, I am a content marketer seeking solutions to users’ problems regarding WordPress.



Leave a Reply