

Automate Client Intake Pipeline With Fluent Forms and FluentCRM
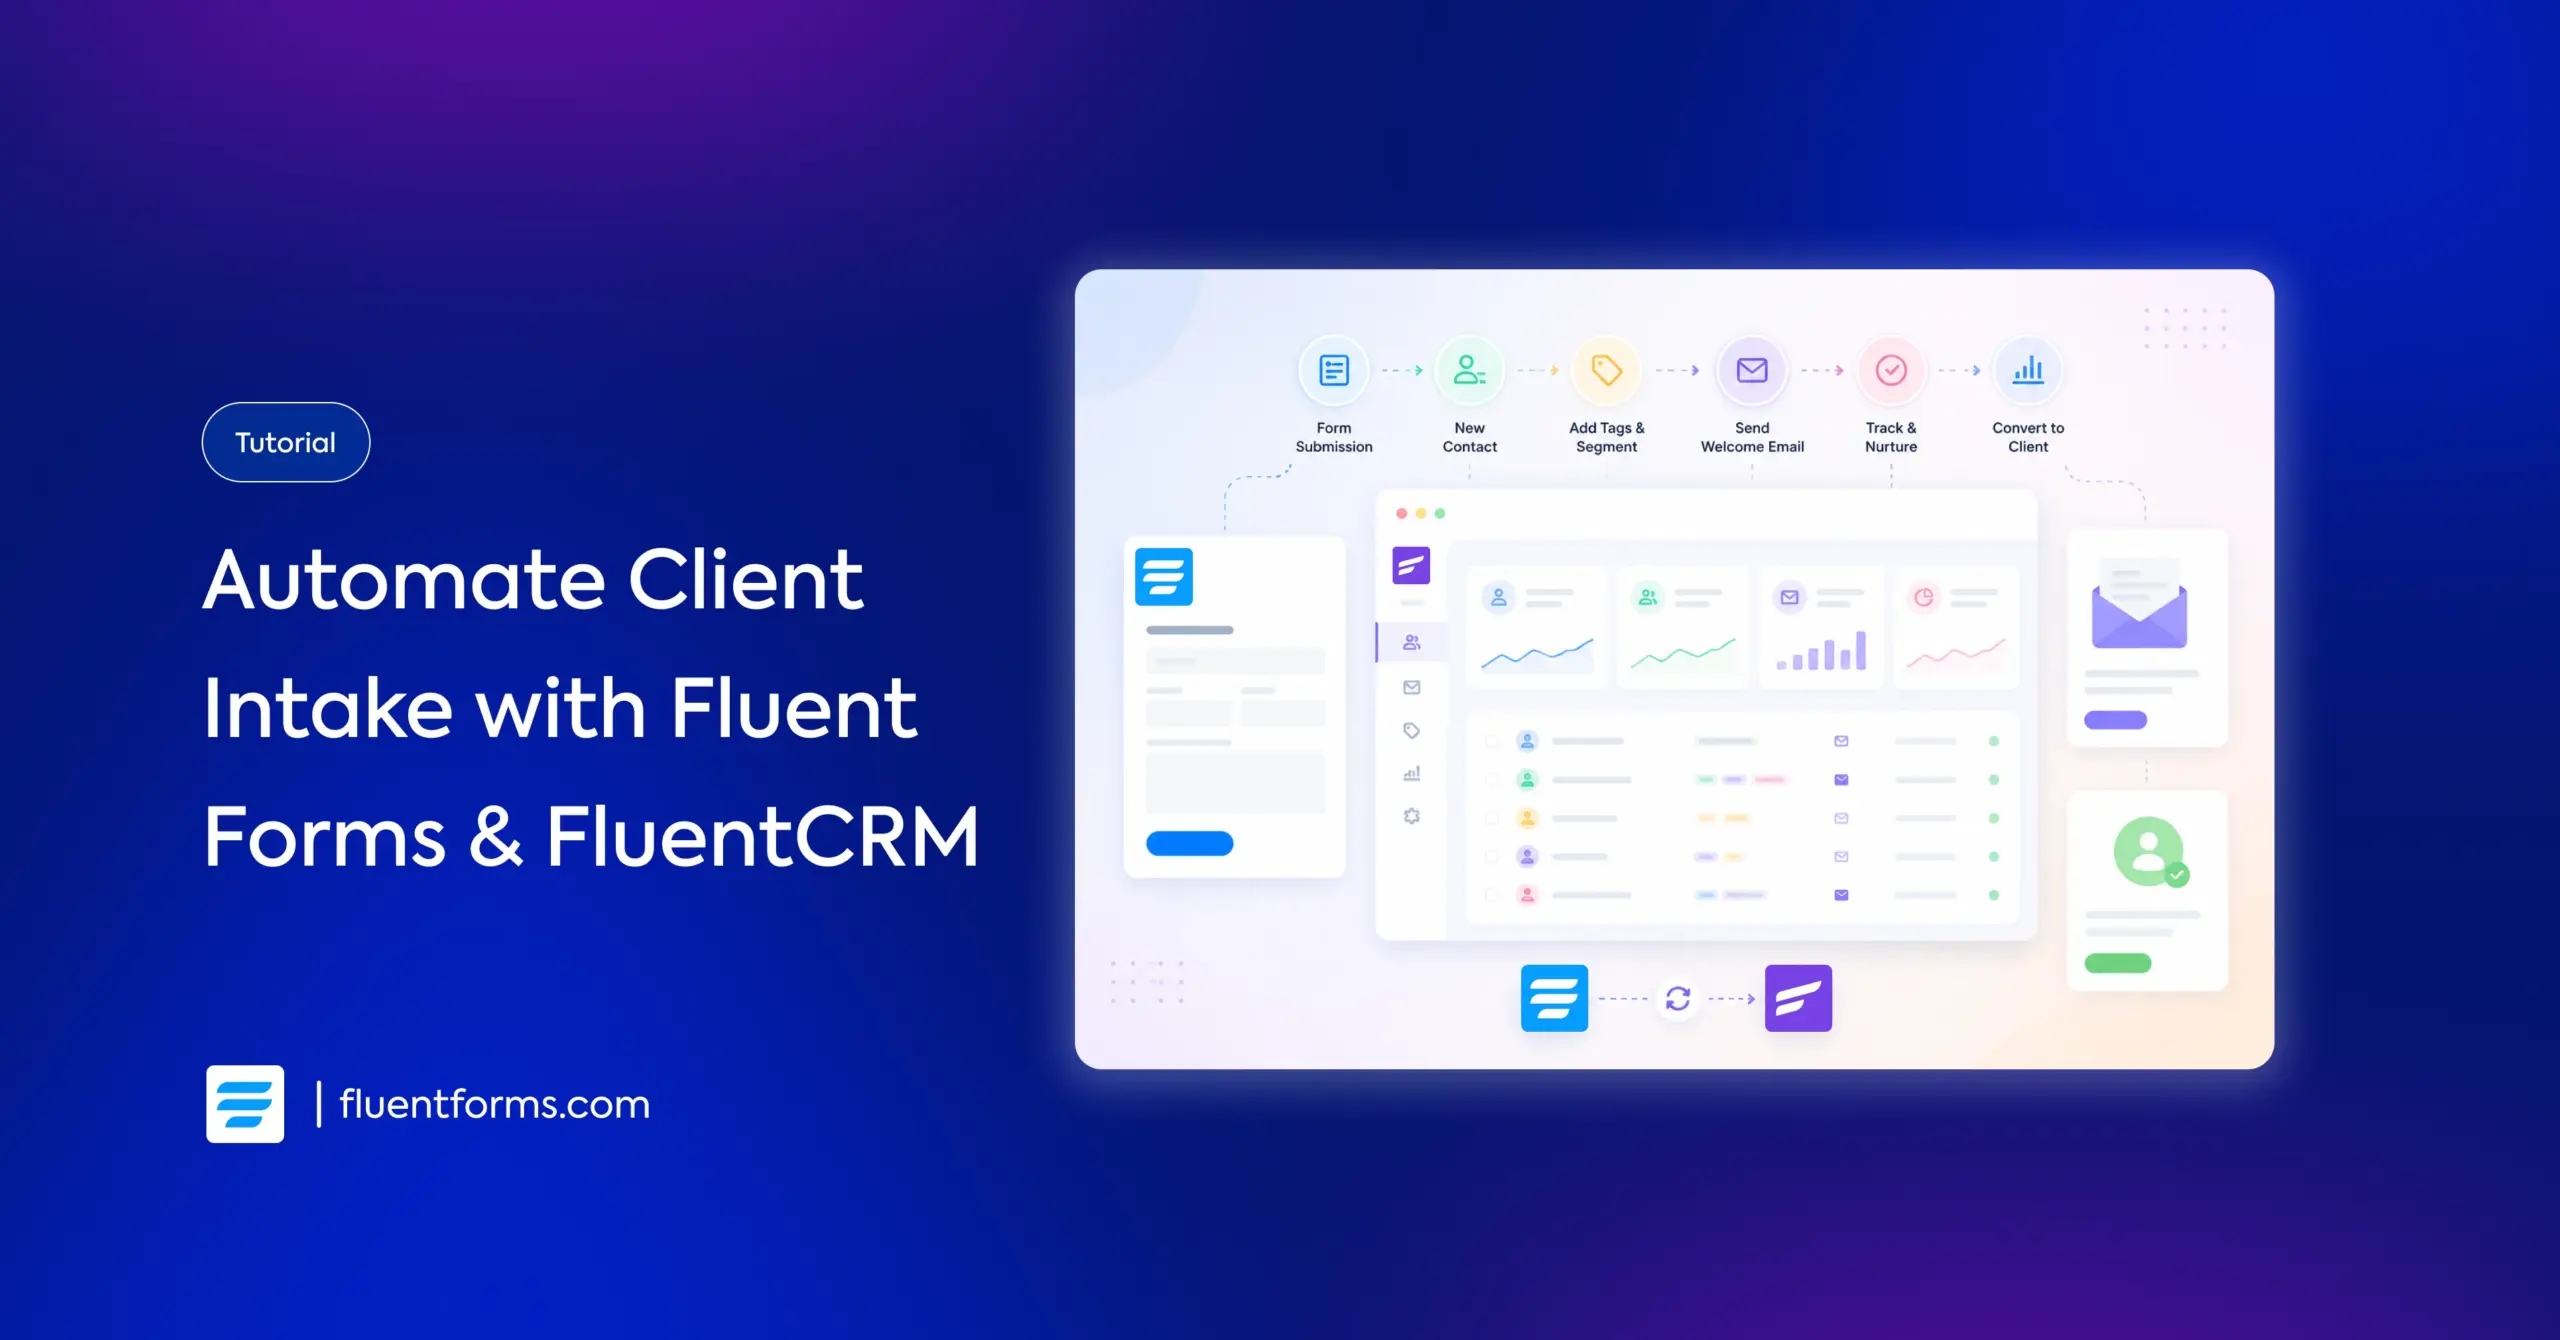
A user fills out your intake form. Within seconds, they’re a tagged contact in your CRM with a welcome email in their inbox.
You don’t have to do anything manually. Fluent Forms captures the data. FluentCRM tags it, segments it, and runs the follow-up automatically. I’ll show you how to set it up.
TL;DR
- Fluent Forms and FluentCRM integrate natively when installed on the same WordPress site.
- Build your intake form in Fluent Forms, then create a FluentCRM integration feed on the form to map fields, assign lists, and apply tags automatically.
- Use FluentCRM’s New Form Submission automation trigger to send a welcome email and apply additional actions when someone submits the form.
- The full pipeline (form > contact > tag > email) runs without manual intervention.
- Test every step: form entry, CRM contact, feed status, and email delivery.
What a Client Intake Pipeline Looks Like
A client intake pipeline has three stages.
Capture: A potential client fills out your intake form with their name, email, project details, and any other information you need to qualify them.
Store and segment: The submission creates a contact in your CRM, assigned and tagged to the right list.
Act: An automation fires. The client gets a welcome email confirming that you received their request. You get notified. The contact stays in your CRM, tagged and ready to work with.
Without automation, each of these stages requires manual effort. With Fluent Forms and FluentCRM, the whole workflow runs on autopilot after a single setup.
What You Need Before Starting
Before you build anything, make sure you have:
- Fluent Forms (free or Pro) installed and activated. The native FluentCRM integration works with the free version of Fluent Forms. Pro gives you access to more field types (like file upload, multi-step forms, and quiz score), but the integration itself works with both.
- FluentCRM (free or Pro) installed and activated. FluentCRM Pro is required for automation triggers, email sequences, and advanced features. The free version lets you manage contacts, lists, and tags, and run basic email campaigns.
- At least one list created in FluentCRM (e.g., “Prospective Clients”)
- At least one tag created in FluentCRM (e.g., “New Intake” or tags for project types)
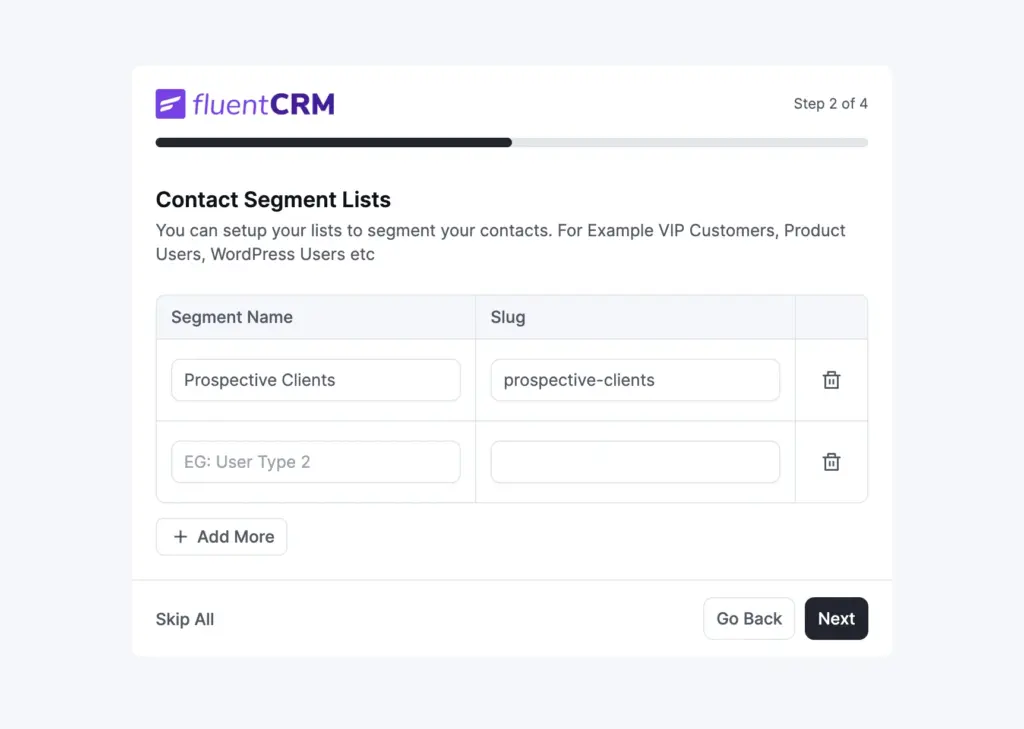
Lists and tags need to exist in FluentCRM before you set up the form integration. You’ll select them during configuration, and they won’t appear in the dropdown if they haven’t been created yet.
Step 1: Build the Intake Form in Fluent Forms
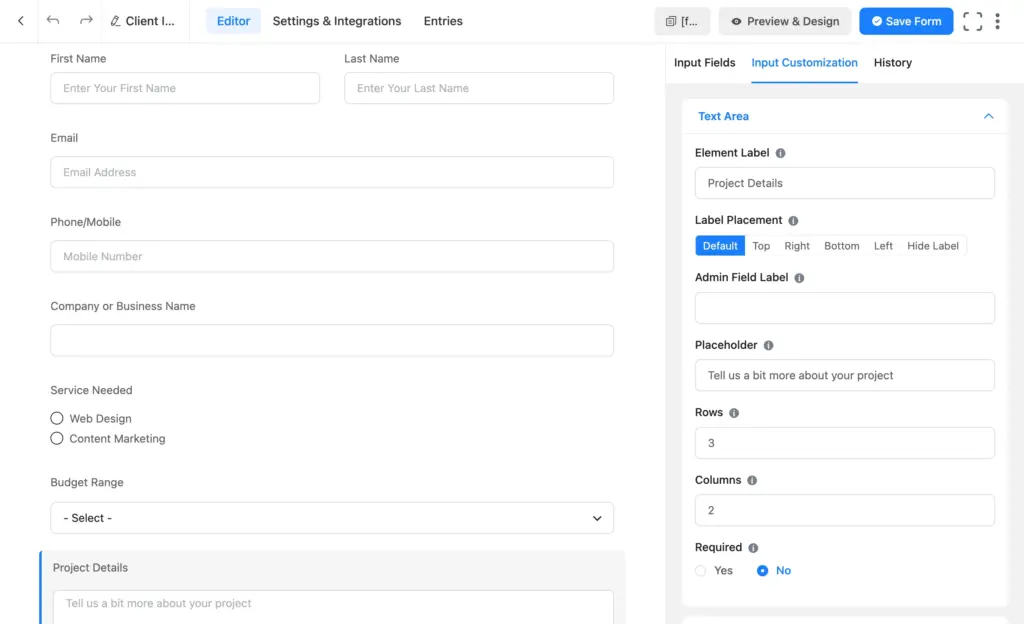
Go to Fluent Forms > Forms and click + Add Form. You can start from a blank form or pick a template and customize it.
Choose your fields
For client intake, you’ll typically want:
- Name (First and Last)
- Email (required)
- Phone
- Company or Business Name (simple text)
- Project Type or Service Needed (dropdown or radio buttons)
- Budget Range (dropdown/radio)
- Project Details or Message (textarea)
You can add or remove fields depending on your business. A web design agency might include a field for the client’s current website URL. A consulting firm might add a dropdown for preferred meeting times.
Organize with sections or multi-step layout
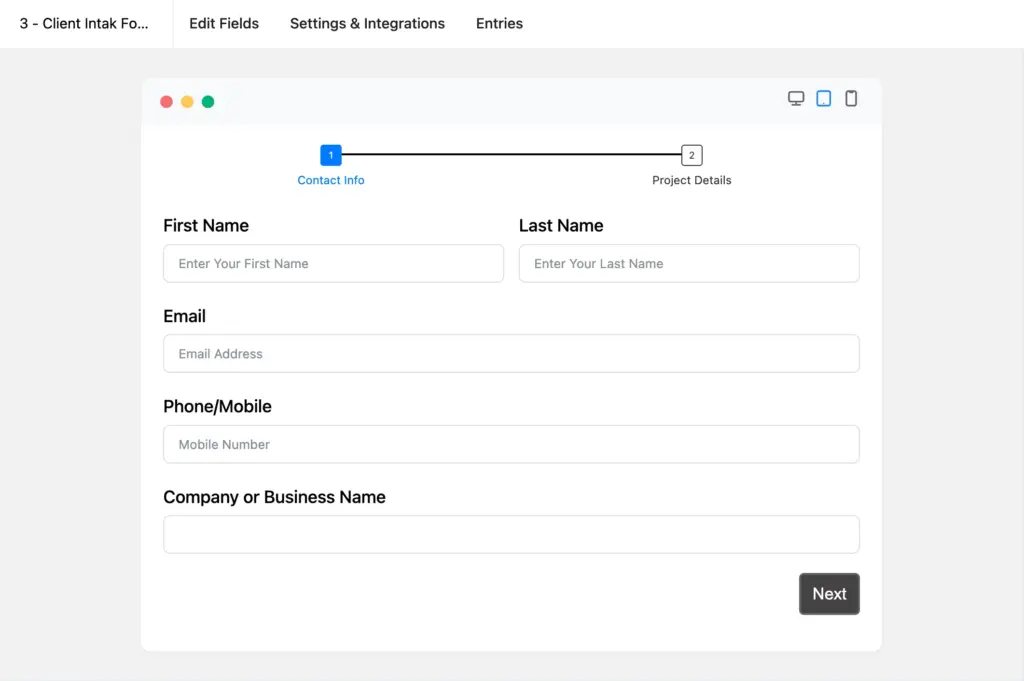
If your form has more than 5 or 6 fields, consider splitting it into steps using Fluent Forms’ multi-step feature. The first step collects contact info. The second step collects project details.
This keeps the form from feeling long, and Fluent Forms tracks partial entries on step forms so you can see who started but didn’t finish.
Save the form when you’re done.
Step 2: Connect the Form to FluentCRM
This is where you’ll create an integration feed that tells FluentCRM what to do with each submission.
Create the integration feed
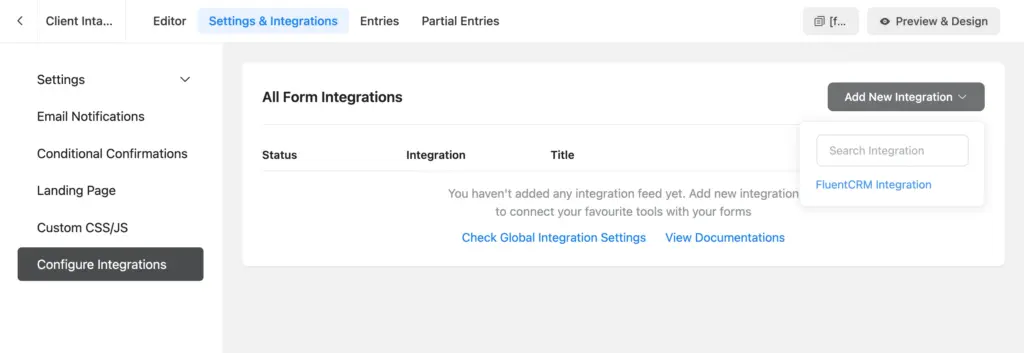
Open your intake form. Go to Settings & Integrations > Configure Integration. Click Add New Integration and select FluentCRM Integration from the dropdown.
Map your fields
The feed configuration has several sections. Here’s what to set:
A. Feed Name. Give it a clear name like “Intake Form to FluentCRM.”
B. FluentCRM List. Select the list you want new contacts added to (e.g., “Prospective Clients”).
C. Primary Fields. Map the core FluentCRM contact fields to your form fields:
| FluentCRM Field | Form Field |
| Email Address | |
| First Name | Name (First Name) |
| Last Name | Name (Last Name) |
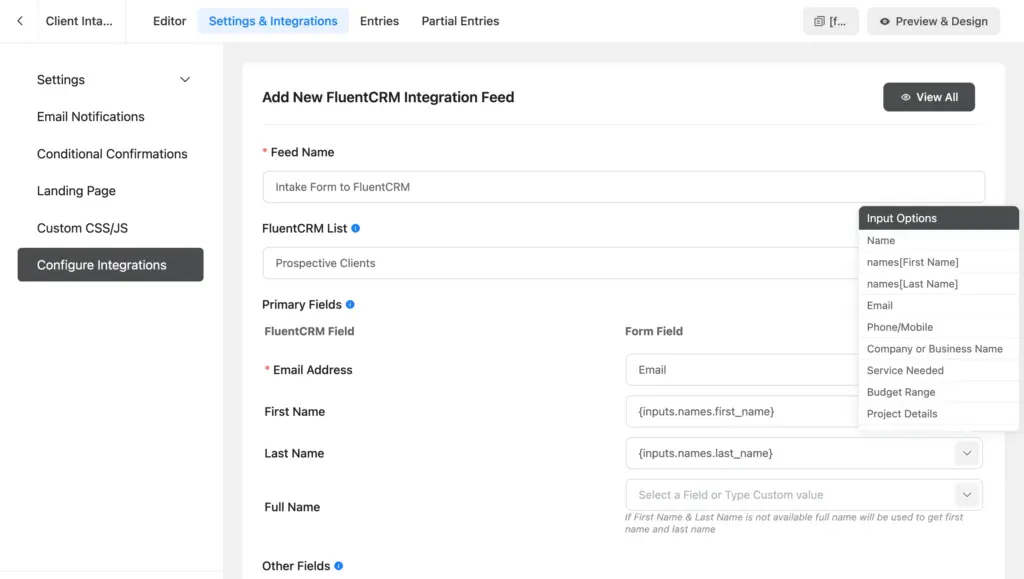
D. Other Fields. Click the + icon to add more field mappings. Map your remaining form fields to FluentCRM contact properties or custom fields. For example:
| FluentCRM Field | Form Field |
| Phone | Phone |
| Address Line 1 | (if collected) |
If your form collects data that doesn’t match any default FluentCRM contact field (like “Project Type” or “Budget Range”), you’ll need to create custom fields in FluentCRM first. Go to FluentCRM > Settings > Custom Fields, click + Add Field, and create fields with matching types (dropdown, text, etc.). Once created, they’ll appear in the Other Fields mapping dropdown.
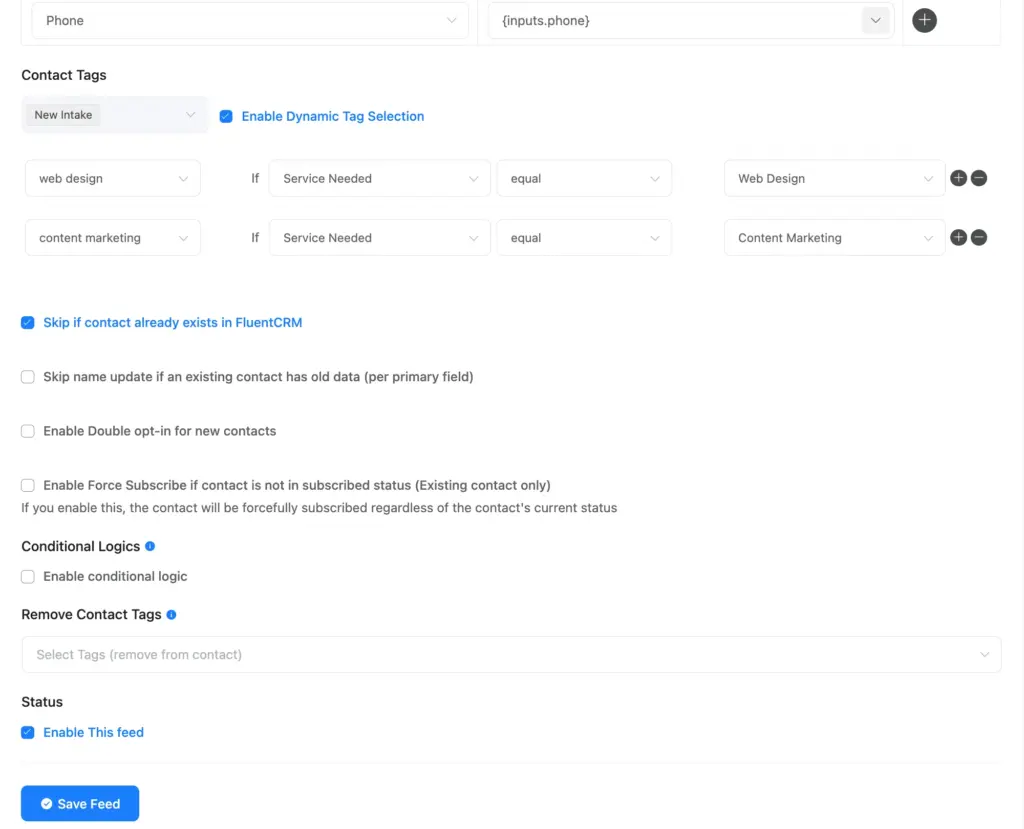
E. Contact Tags. Select the tags you want applied to every contact who submits this form (e.g., “New Intake”).
If you want tags applied based on what the client selected in the form (like tagging them with their chosen project type), check Enable Dynamic Tag Selection. This lets you map a form field to FluentCRM tags dynamically.
F. Additional configurations: Check Skip if contact already exists in FluentCRM. Enable double opt-in if you haven’t on the form settings, etc.
G. Conditional Logic. Not necessary unless you want the feed to run only for certain submissions.
Check Enable This Feed and click Save Feed.
Step 3: Create an Automation for New Submissions
The integration feed handles contact creation and tagging. But if you want to send a welcome email, add a delay, or apply additional actions, you need an automation funnel in FluentCRM.
Set the trigger
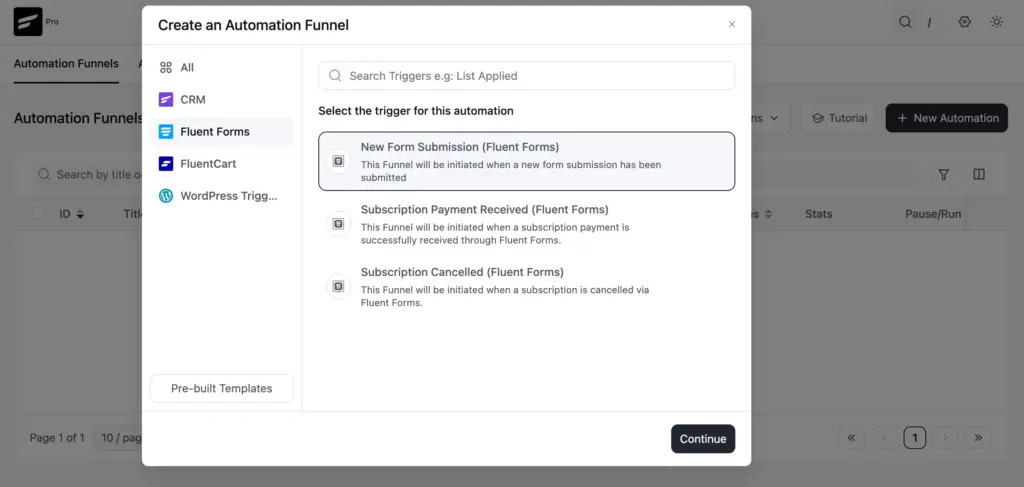
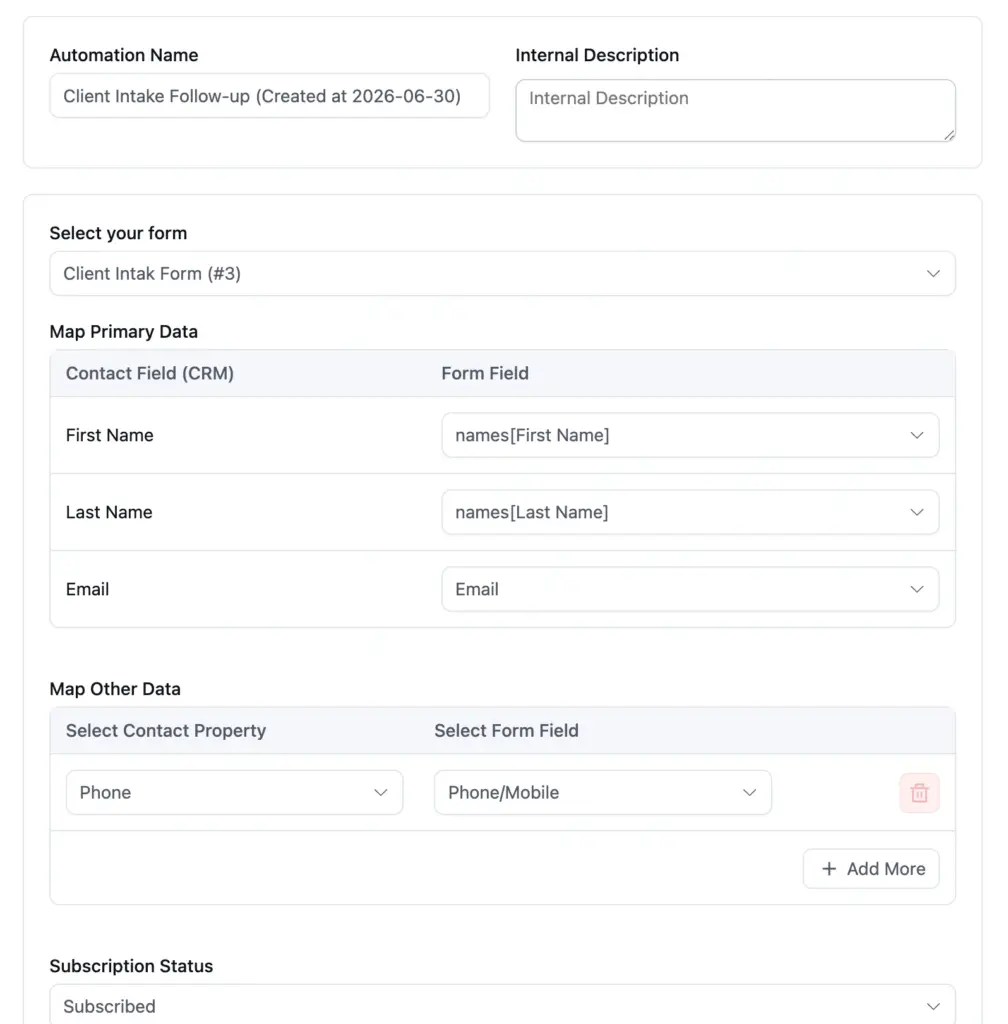
Go to FluentCRM > Automations and click + New Automation. Select the New Form Submission (Fluent Forms) trigger under CRM Triggers and click Continue.
Configure the trigger:
- Give the automation a name (e.g., “Client Intake Follow-up”).
- Select your intake form from the Select Your Form dropdown.
- Map your primary data (email, first name, last name) to the form fields.
- Set the Subscription Status to match what you chose in the integration feed.
- Click Save Settings.
Add actions to the funnel
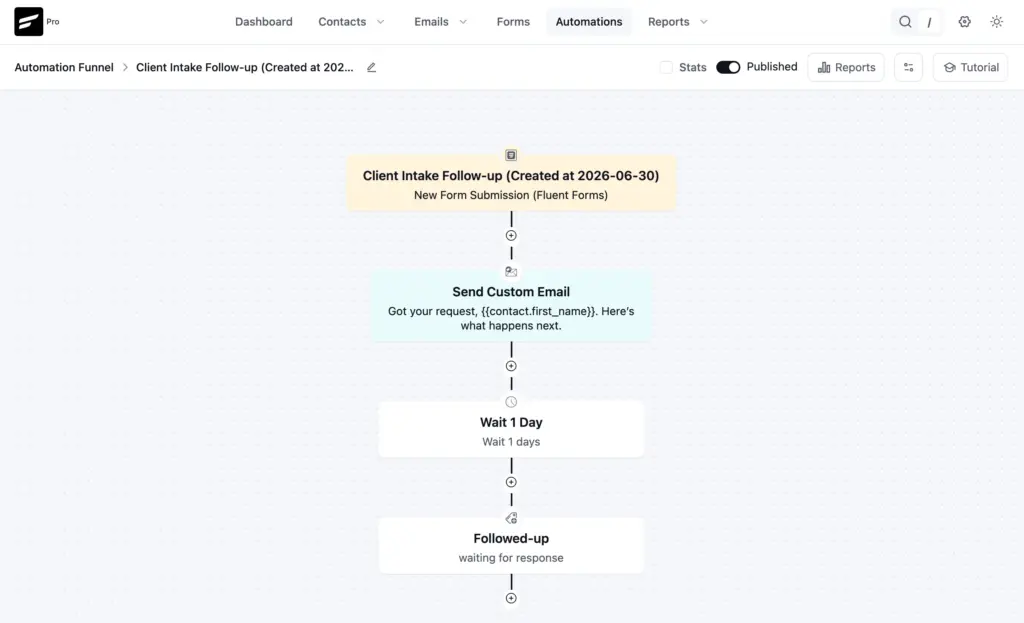
You’re now in the automation editor. Click the + button below the trigger to add actions. Here’s a simple intake follow-up sequence:
Send Custom Email. This is your welcome/confirmation email. Let the client know you received their request and what to expect next. You can use FluentCRM’s SmartCodes to personalize it with the contact’s name.
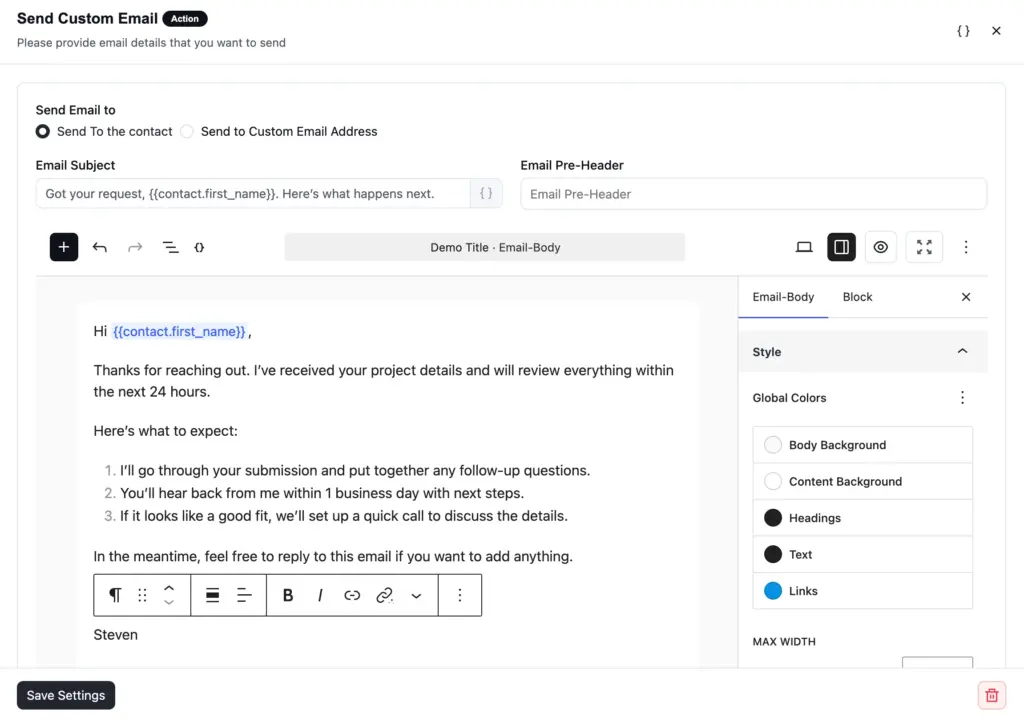
Wait. Add a wait period (e.g., 1 day). This gives you time to review the submission before the next action fires.
Apply Tag. Apply a tag like “Followed Up” or “Awaiting Response” to track where the contact is in your pipeline.
You can extend this as needed. Add more emails, add conditional checks (e.g., if the contact opened the first email), or apply different tags based on the project type.
Click Save and set the automation status to Published to activate it.
Test the Full Pipeline
Before you start clients’ journey through this pipeline, test it yourself.
- Open your intake form on the frontend and submit a test entry with a real email address.
- Go to Fluent Forms > Entries and confirm the submission appeared. Check the integration feed status under the entry’s details to make sure it shows a success message.
- Go to FluentCRM > Contacts and find your test contact. Confirm the right list, tags, and mapped fields are in place.
- Check your email inbox. The welcome email from the automation should arrive within a few minutes (depending on your cron setup).
- Go back to FluentCRM > Automations, open your funnel, and verify the contact moved through the automation steps.
If the contact appears in FluentCRM but the email didn’t send, check your email delivery setup. FluentCRM relies on WordPress email or an SMTP plugin. FluentSMTP is a free option that routes emails through a proper SMTP service.
Tips for a Better Intake Pipeline
Keep the form short
Every extra field reduces completion rates. Collect what you need to qualify and follow up. You can always ask for more details in the follow-up email.
Use conditional logic on the feed
If your intake form serves multiple purposes (e.g., web design inquiries and SEO inquiries), create separate feeds with conditional logic. Each feed can assign different tags and lists based on the project type the client selected.
Use dynamic tags
Instead of one generic “New Intake” tag, map your Project Type dropdown to FluentCRM tags. A client who selects “Branding” gets the “Branding” tag, and a client who selects “Development” gets the “Development” tag. This makes segmentation automatic.
Set up email delivery before going live
If you haven’t configured SMTP on your site, your welcome emails may end up in spam or not send at all. Set it up first to ensure email deliverability.
Review the automation reports
FluentCRM tracks how many contacts entered each automation, where they are in the sequence, and how emails performed. Check this periodically to catch issues early.
Build a Complete Client Intake Pipeline
New clients contact you via your intake form. Once it’s connected to FluentCRM, every submission creates a contact, applies the right tags, and triggers a follow-up sequence without you lifting a finger.
This automated workflow is designed to help your business grow. You set it up once, and every new inquiry gets the same professional follow-up, whether you get five submissions a week or fifty.
Build Smarter Forms for Free

Sarika writes for Fluent Forms and loves to offer insights into small businesses. She’s curious and enjoys discussing ideas, interests, and perspectives. In her free time, she’s either marvelling at architectural beauties or trying different cuisines.



Leave a Reply