Send Confirmation Email to Multiple Recipients from Contact Form
Now I remember how many times I was waiting for a confirmation after submitting a web form. Sometimes it takes hours because they didn’t set it as a default, as well as an automated one.
If you don’t want to make the users a victim of the confusion, you are looking for a solution to send a confirmation email to the users that their form has been submitted successfully.
Whether it’s a survey, booking, or order form, an email notification for form submission confirmation is required to reduce submission overlap. It’s also a better way to notify the admins or multiple recipients.
Isn’t that exciting? One simple notification setting, and the confirmation goes to the respondents, admins, and whoever you want to get notified, all at the same time!
So, in this blog, I’ll guide you through the steps for sending a confirmation notification on WordPress, simply using a form plugin like Fluent Forms.
TL;DR
- A form submission confirmation email reduces users’ confusion and repeated submissions
- Confirmation email notifications can be sent to the user, admins, and other recipients simultaneously
- Using a form plugin such as Fluent Forms, you can send confirmation emails on WordPress, which is hassle-free and requires form-based one-time settings
- The ‘Configure Routing’ option helps you to send the confirmation email to different recipients based on different responses
- Conditional logics help you send tailored notifications where you have the advanced options to add CC, BCC, etc to add, while using Fluent Forms
- FluentSMTP makes you send the email smoothly, whereas FluentCRM helps you to use the email for further email campaigns
Confirmation email: who sends it and who gets it
A confirmation email is sent by the website authority to confirm to users whether they’ve taken any action on the website, such as submitting a subscription form, placing an order, securing a booking, etc. It is to inform the users that their submission has been received and will be taken care of.
On the other hand, the users who have submitted a form will get an email as a token of confirmation. That helps the users not to try submitting the form again, and get a prompt response from the website they’ve contactedrecently.
Types of confirmation emails based on form submission
Depending on the industry of the respective website and the form getting submitted, the submission notification email varies. If someone has booked a room using a booking form, they will get a booking or booking request confirmation response depending on the business’s policy.
Any type of form that demands a response from the authority requires a confirmation that their query will be taken care of, or is under processing, or even it might be denied, but the user has the right to be notified. Here comes the ultimate variation of a confirmation email sending based on the submission of a form.
The admins of the website can also be notified when a form is triggered, simultaneously. Similarly, you can also set up who you want to send a notification to once an action is done, based on conditions, too.
Booking or reservation confirmation
When someone submits a reservation request on your website using a form, you can send an instant notification that the reservation request has been submitted. You can also decorate the email body with a few pieces of information based on their request, such as the room number, check-in and check-out times, a response to any special requests, the cancellation policy, terms/conditions, and payment details if required.
Registration or application confirmation
Users need an instant notification when they’re applying or registering for an event, job, or workshop. They may need to go through further procedures, which you can mention in the confirmation email.
Payment or subscription confirmation
If someone doesn’t receive any confirmation for payment or subscription, it not only causes anxiety but also serves as a reason to make the user pay again, which might lead to chaos. The payment processor may send a message that the payment is done, but it makes the process smoother if you’ve received the payment for a specific product, service, or subscription.
There might be a breakdown of areas of cost and the purpose of the payment.
Order confirmation
With an order confirmation email, the user gets the product ID, delivery cost, and expected delivery time, terms and conditions, return, refund, and cancellation policy, etc. It also expresses whether the payment is done, whether there is any due payment, a list of products, etc. So, an order confirmation email is not just the order, but also can be turned into a memo with complete details of the order.
Survey or quiz submission confirmation
After submitting a survey and quiz, the users usually get diverse responses as confirmation. In terms of the survey, users mostly receive a thank-you message for participating as a respondent.
After submitting a quiz, the users can get the whole overview about their participation in the quiz, including the results and the breakdown of the results, and their position, if applicable. They may also get the answer sheet attached as a document to check which questions they’ve answered properly or which they’ve answered incorrectly.
Order or booking cancellation confirmation
It’s not every time that a booking or order cancellation will be taken affirmatively. Sometimes those might get bounced depending on the terms and conditions applied. So, the users must get notified whether their cancellation request is accepted or denied,
In terms of an affirmative response to the cancellation request, the product/booking ID, name, and refund/return policy are enough, whereas the negative response should contain a reason reminding the policy.
Steps to send a confirmation email to multiple recipients in WordPress
You can easily send a confirmation email to multiple recipients when you use a WordPress form plugin like Fluent Forms. In short, you need to set up the email notification based on the users’ actions on your WordPress forms.
Here, I’ll show you how you can send confirmation emails to multiple recipients from your WordPress website, using Fluent Forms.
Step 1: go to the form’s settings and integration – email notification
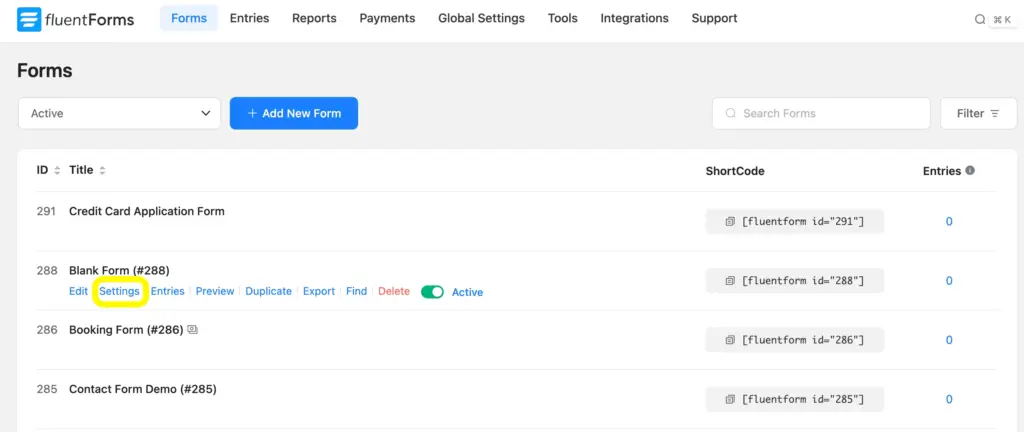
First of all, you need to go to the Forms page of Fluent Forms from your WordPress dashboard. You will see the list of the forms made using Fluent Forms. Simply hover over the form name for which you want to send a confirmation email.
Then click on the Settings option. This will take you to a new page.
Step 2: go to email notification and click on the settings icon
In the Settings & Integrations page, you will find the Email Notifications button, clicking on which you will get the Email Notifications option. Click on the settings icon on the right side to enter the next page of email notification settings.

Step 3: set up the email notifications
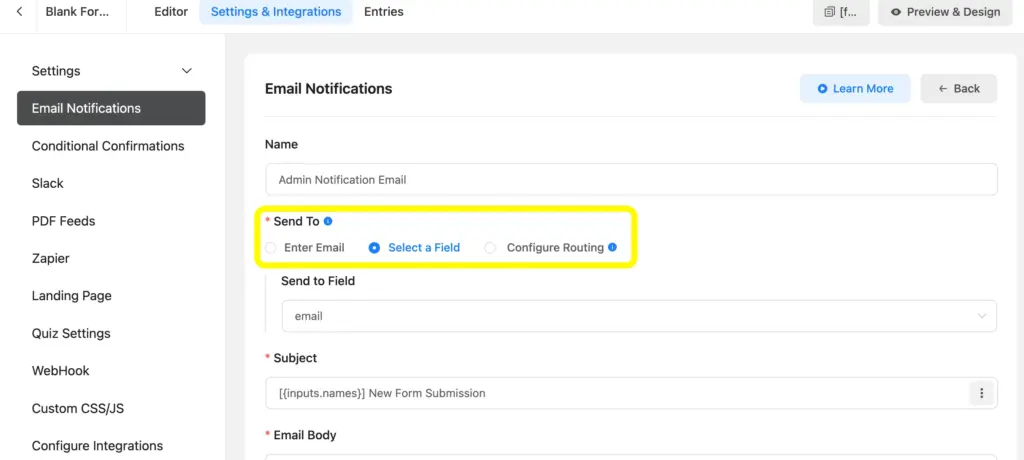
Inside the email notification setting page, at first, you need to select who you want to send the confirmation email.
In the Fluent Forms email notifications, you will be directed to 3 radio fields (marked in the image) as the Send To options. You can set it to
Enter Email: this is typically set for sending to the admin
Select a Field: it’s set to select the email field that the user fills out
Configure routing: based on the conditions of actions done by the users
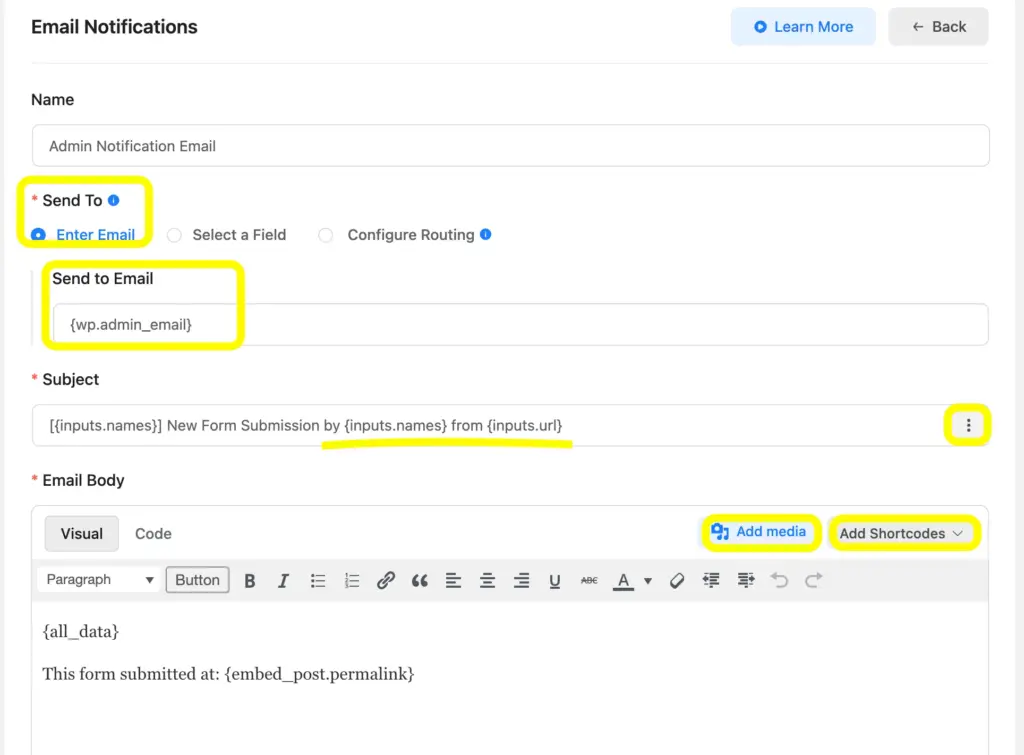
To send to the admin email, you can set up the email subject and body while customizing both. You can ‘Add Shortcodes’ in the subject and email body while using the ‘Add Media’ in the email body.
To send to the user, you can simply choose the ‘Select a Field’ option and select the Email field.
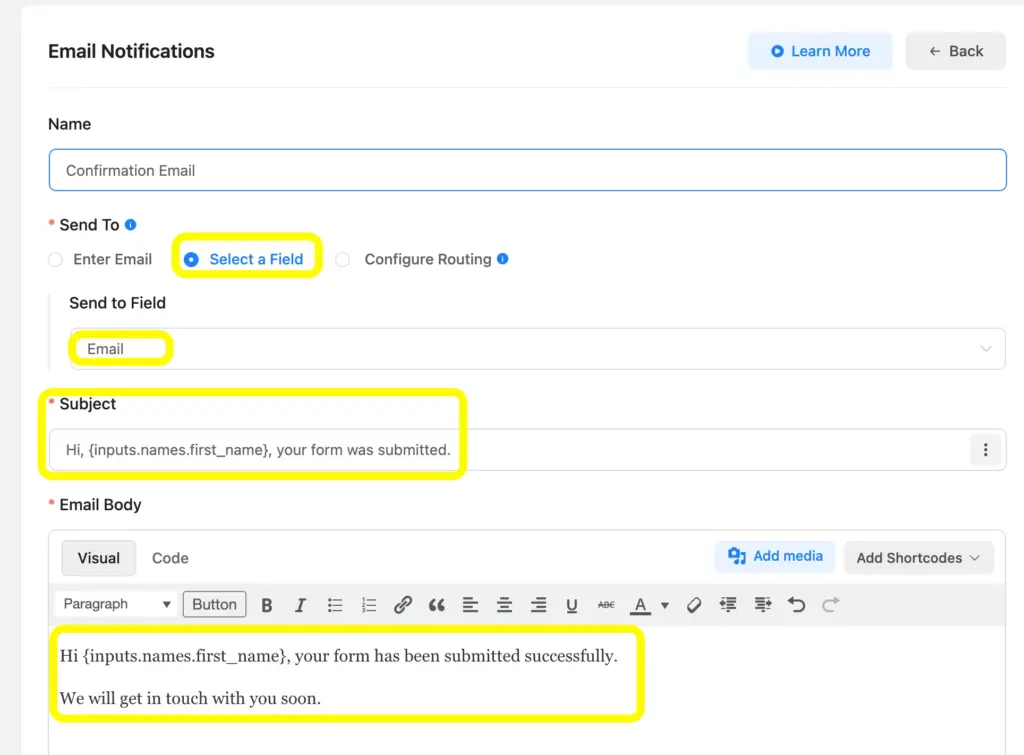
As you can see here, while editing the subject using the shortcodes, you can edit the Email Body as well.
And, you can ‘Enable Conditional Logic’, which is a great option to send tailored notifications, applying the shortcodes.
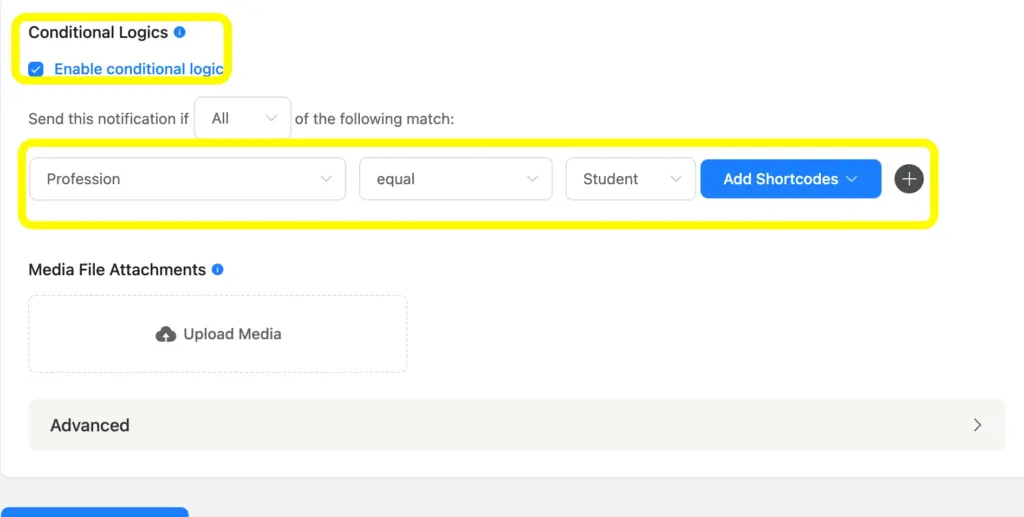
As you can also see here, you can upload media files as well.
Step 4: configure routing (if you need to)
You can easily set up the routing by choosing the Configure Routing option and setting it up based on the conditions. Have a look at the Fluent Forms Conditional Logic to have an overall idea of the conditional logic feature of this plugin, which might be applied to various spaces.
Here, you can make the email send to different email addresses based on different conditions.
Step 5: set up the advanced options
You can set up the Advanced Options from the lower part of the Email Notifications settings page, in which you can add the From Name, From Email, BCC, CC, etc.
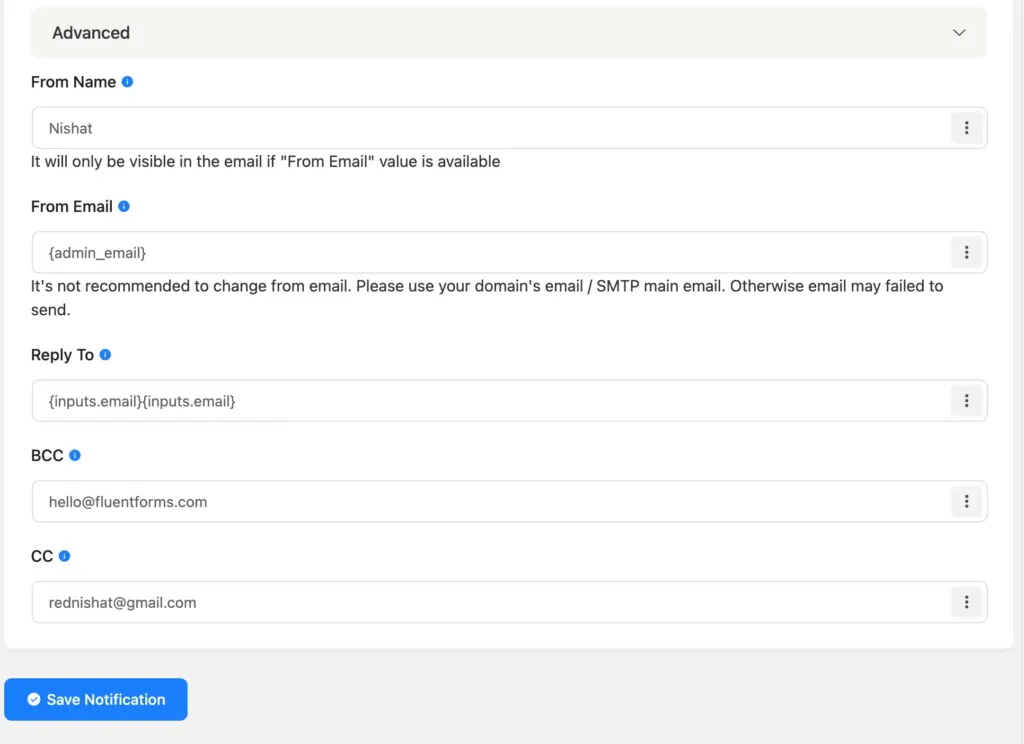
These are the simplest possible steps to send email notifications to the respondents as a token of confirmation. Use these settings in various types of forms.
Step 5: set up the SMTP plugin
To sort, filter, save, and view every email sent from your WordPress website, simply set up a free SMTP plugin such as FluentSMTP (Trusted by 500,000+ people). You can access this for free and easily integrate FluentSMTP with Fluent Forms in a few steps. FluentSMTP helps you deliver your confirmation email without any bouncing problem and your email does not get caught in the spam folder. In terms of any complications, follow our blog entitled ‘How to Fix Fluent Forms Email Delivery Issues’.
Pro tip: to make your contact form plugin work as the backbone of lead generation, use a CRM plugin such as FluentCRM and automate your email campaign’s effectiveness to the next level. You can integrate your Fluent Forms with FluentCRM and get your lead generation in full power.
Relevant features
Conditional Confirmation
The conditional confirmation of Fluent Forms helps you set up tailored confirmation based on the user’s action. Users will be notified with tailored confirmation messages when they submit a form applying any specific set of responses.
PDF Generator
Whether it’s an order confirmation or booking details, send a PDF document to the users along with submission and further details. Fluent Forms PDF Generator is an add-on that helps you get pdf version of a form’s details by applying templates, whereas the password protection is applied. This works superbly for the forms in which the numeric calculation is applicable.
Email Summaries
Get the summary of a form’s submissions every week, powered by the email summaries feature of Fluent Forms. You can also decide which submissions you want to check in detail, too.
Role Manager
Control access to forms using the role manager feature of Fluent Forms. You can give access to the people of your team in multiple roles, such as editor, contributor, etc.





Leave a Reply