How to Build Email List with Brevo in WordPress

A beginner-friendly email marketing tool can be a game-changer, and Brevo in WordPress is one of the best options out there. It’s perfect for small businesses eager to grow their audience without getting overwhelmed.
While collecting emails and running campaigns might seem like a hassle, integrating Brevo with Fluent Forms makes the entire process simple and efficient.
In this blog, you’ll get a step-by-step guide to connect Brevo with Fluent Forms and start creating your email list with ease. We’ll also cover the basics of building email lists so you don’t miss a thing.
Let’s get started with a brief introduction to Brevo and Fluent Forms.
TL;DR
- Brevo is a beginner-friendly email marketing tool, ideal for small businesses.
- Fluent Forms lets you create fast, flexible forms inside WordPress.
- Integrating Brevo with Fluent Forms helps you send WordPress form data straight to your Brevo email list without manual entry.
- Steps to connect:
- Create a list in Brevo
- Get your Brevo API key
- Enable Brevo module in Fluent Forms
- Map form fields using the Brevo feed
- Use signup forms, lead magnets, pop-ups, and social promotions to grow your list.
- Segment your list in Brevo for better targeting.
- Brevo’s free plan is solid. Other supported tools: Mailchimp, FluentCRM, Drip, and more.
Brevo
If you are looking for the most innovative platform that can help you grow your business, then look no further. Brevo will provide you with the perfect marketing & sales tools to thrive in your niche.

Some of the most impressive features that Brevo provides are:
- Chat
- Email marketing
- Transaction email
- Segmentation
- Facebook ads
- Landing pages
- Email heat map
- A/B testing
- Real-time statistics, etc.
Why use Brevo with Fluent Forms
Brevo (formerly Sendinblue) is a powerful email marketing platform with tools like:
- Email automation and newsletters
- SMS marketing
- Advanced segmentation and analytics
- Affordable pricing for startups and growing teams
But to get value from Brevo, you need an efficient way to collect leads – that’s where Fluent Forms comes in.
Fluent Forms is a fast, lightweight form builder for WordPress. With its built-in Brevo integration, you can:
- Instantly send form submissions to your Brevo contact lists
- Tag and segment users based on how they interact with your form
- Collect high-quality leads without manual data entry
It lets you create excellent forms for your WordPress website. It provides a ton of fantastic features to meet your data collection and lead generation requirements.
With this you can design a wide range of forms, from simple contact forms to more advanced payment forms.
The key features of Fluent Forms are –
- 60+ input fields to collect any type of information
- Numeric calculation to create forms with calculators
- Multi-step forms to break long forms into multiple steps
- Conversational forms to provide a better form-filling experience
- Advanced post creation to collect user-generated content
- Conditional logic to show/hide input fields based on user behavior
- Integration with popular payment gateways to collect payments and donations
- Spam protection using hCaptcha, reCAPTCHA, Turnstile, Honeypot, Akismet
- Quiz and survey with advanced scoring
- Advanced form styler to align form with your brand identity
- Custom CSS and JS to create more advanced forms
- Export entries in CSV, Excel, ODS and JSON format
- PDF add-on to turn form submissions into PDF files
- Form scheduling and restriction based on different rules
- Double opt-in confirmation to ensure efficient data collection
- Email notification after form submission
- Conditional confirmation to show confirmation messages based on predefined conditions
- Advanced form validation to accept eligible submissions
- Fully responsive and accessible to ensure inclusivity
- 60+ integrations to expand core functionalities
Currently, more than 600K websites use this form builder plugin, and the number is constantly growing. Although the free version of Fluent Forms can handle most of your basic needs, the Pro edition further pushes the limit.
Before jumping into the integration, it’s important to set up your list-building system the right way.
Integrate Brevo with Fluent Forms in 4 steps
To integrate Brevo with Fluent Forms, you have to follow these steps–
- Collect Brevo API key
- Enable the Brevo module
- Create a form and configure Brevo settings
- Map form fields in the Brevo feed
The steps are elaborated for you below.
Collect Brevo API key
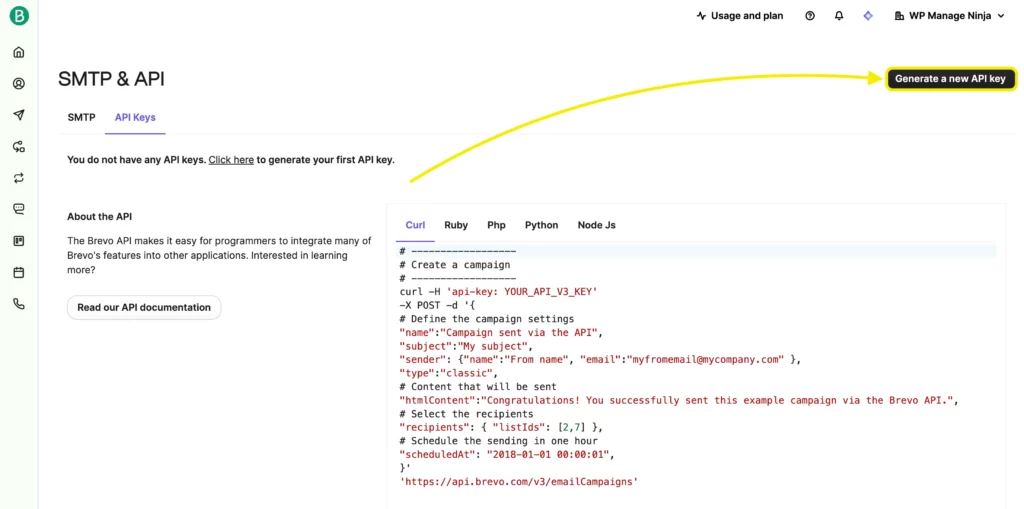
To connect Brevo with Fluent Forms, you’ll first need your Brevo API key.Log in to your Brevo dashboard, click on ‘My Profile’, then select ‘SMTP & API’.

On the SMTP & API page, click ‘Generate a new API key’.
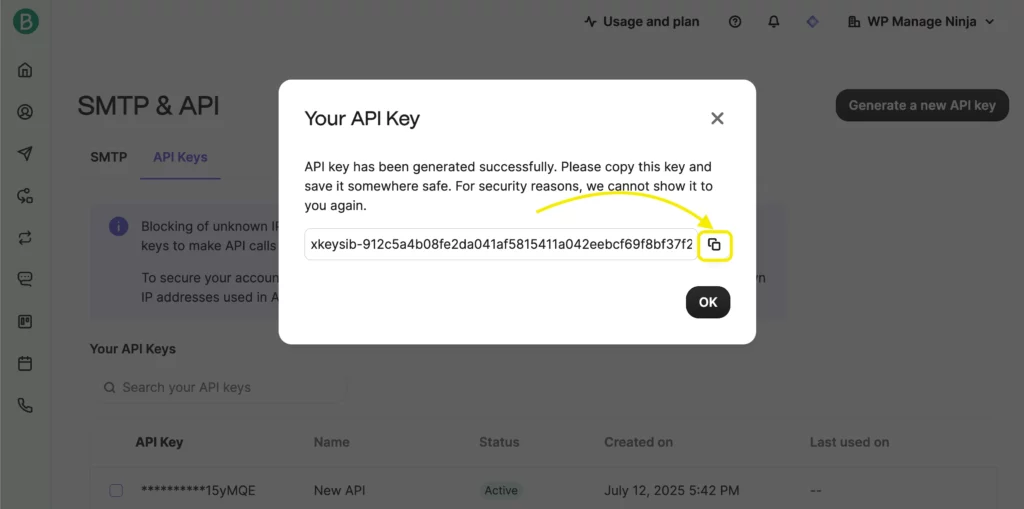
Give your API key a name and click ‘Generate’.

You’ll now see your API key. Copy it and store it securely – this is the only time it will be shown.
Enable the Brevo module
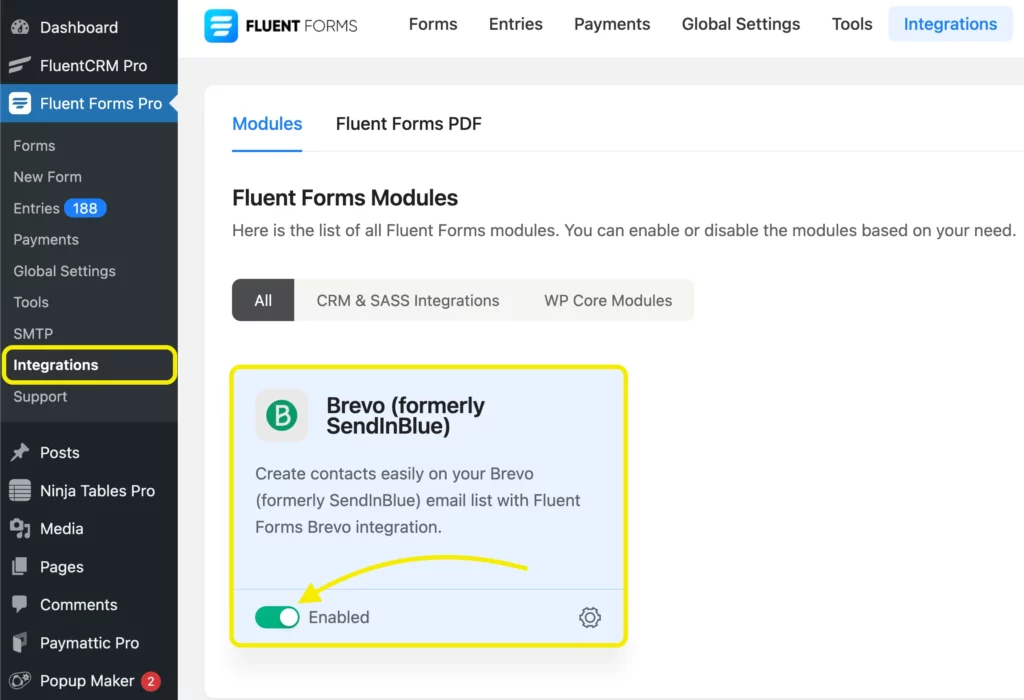
Next, enable the Brevo integration in Fluent Forms.
From your WordPress dashboard, navigate to Fluent Forms Pro → Integrations.
Search for Brevo in the list and toggle the module to enable it.
Now go to Global Settings → Configure Integrations and select Brevo from the dropdown.
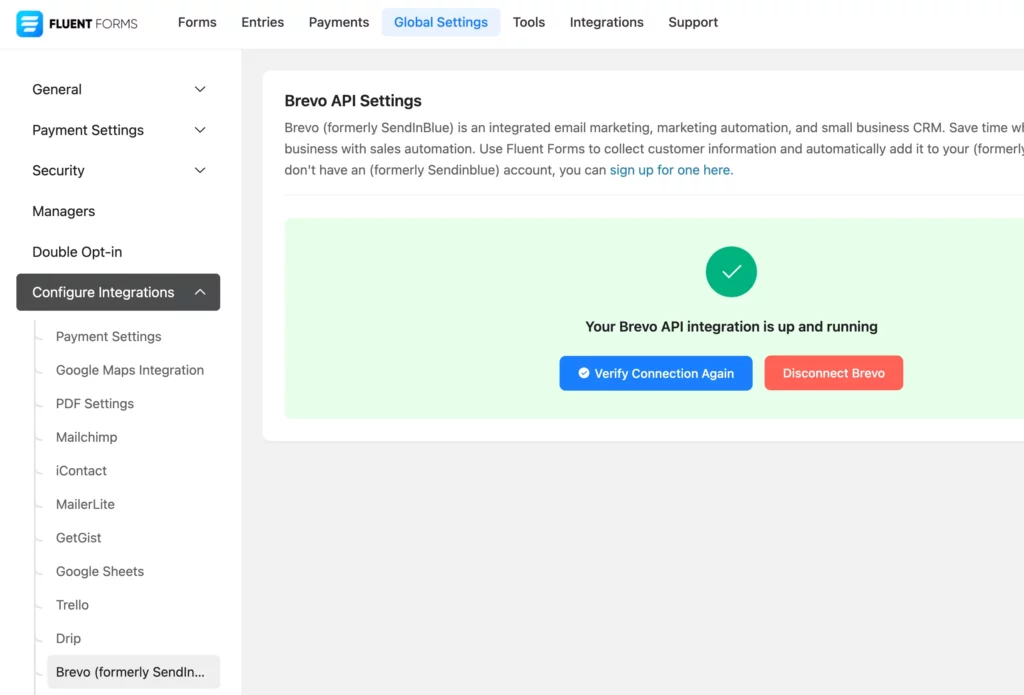
Paste your Brevo API key here and save the settings.
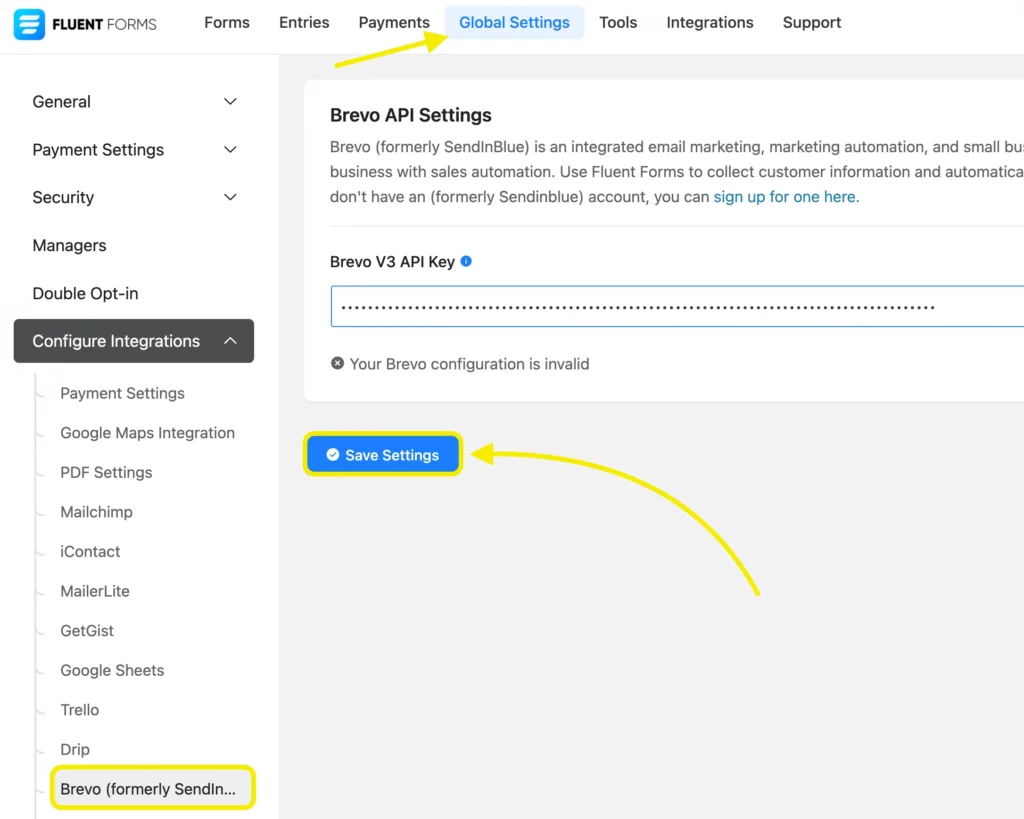
Once connected successfully, you’ll see a confirmation on the screen.
Create a form and configure Brevo settings
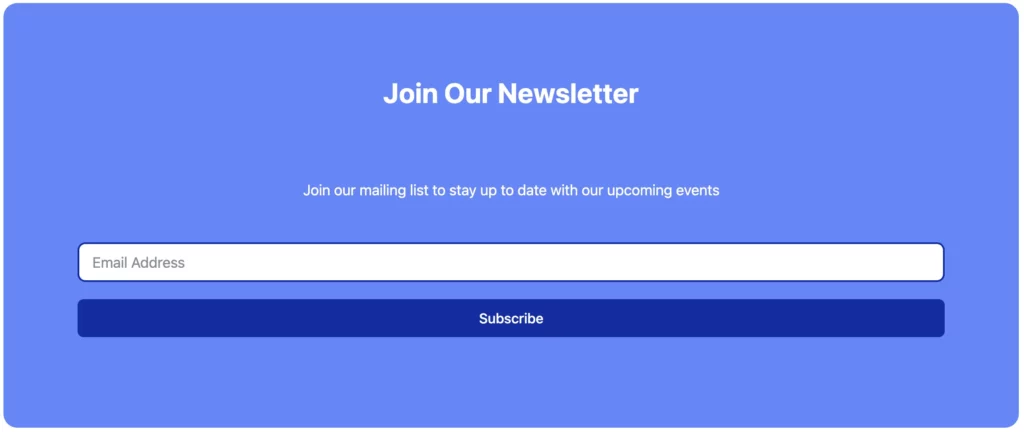
Now it’s time to create a form that will send data to Brevo.Create a new form in Fluent Forms – for example, a simple newsletter signup form.
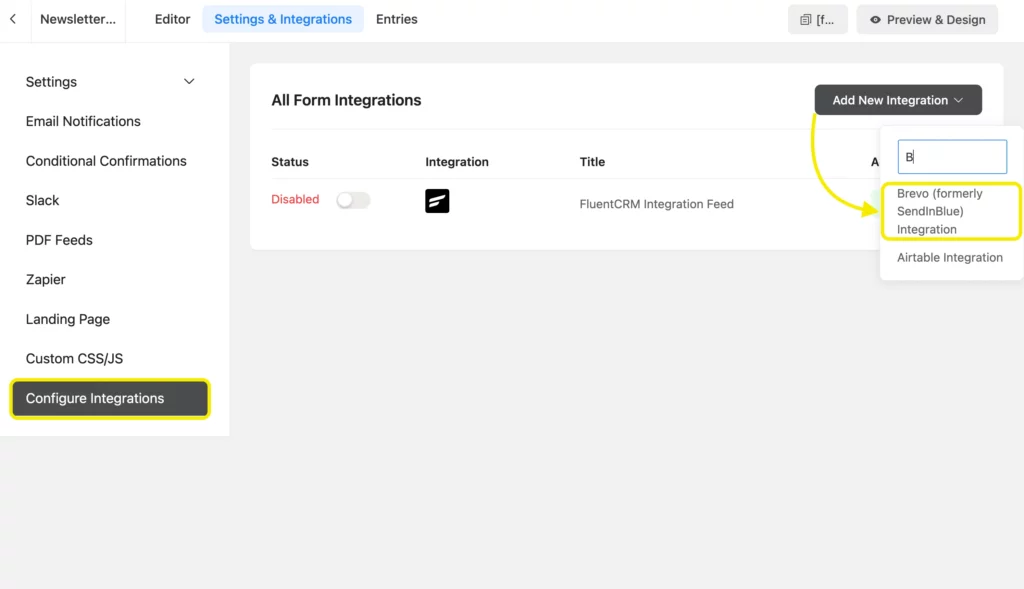
Go to the Settings & Integrations tab within the form editor. From the left-hand menu, click Configure Integrations.
Then click Add New Integration and choose Brevo.
Map form fields in the Brevo feed
Finally, map your form fields to Brevo.
Give your Brevo feed a name for easy identification.
Map the input fields (like Name, Email) from your form to the corresponding fields in Brevo.
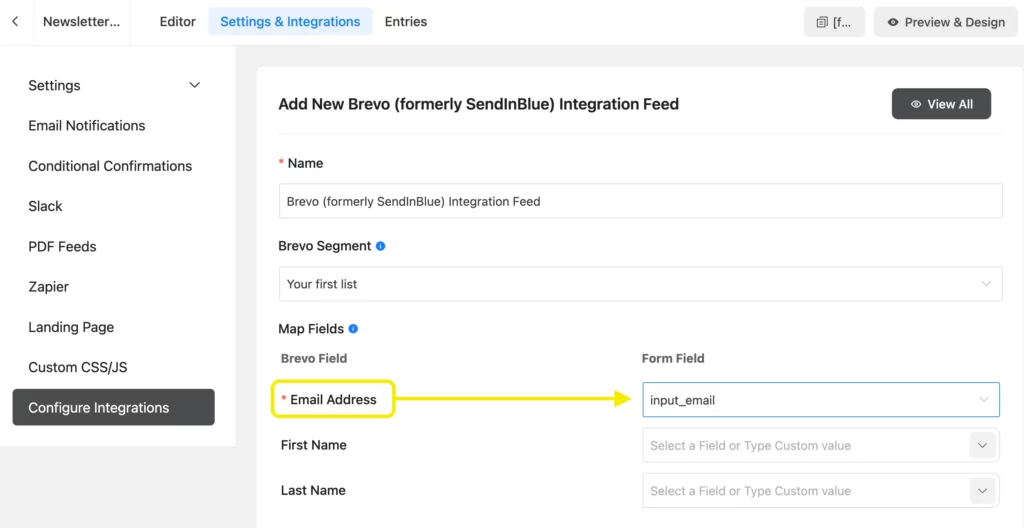
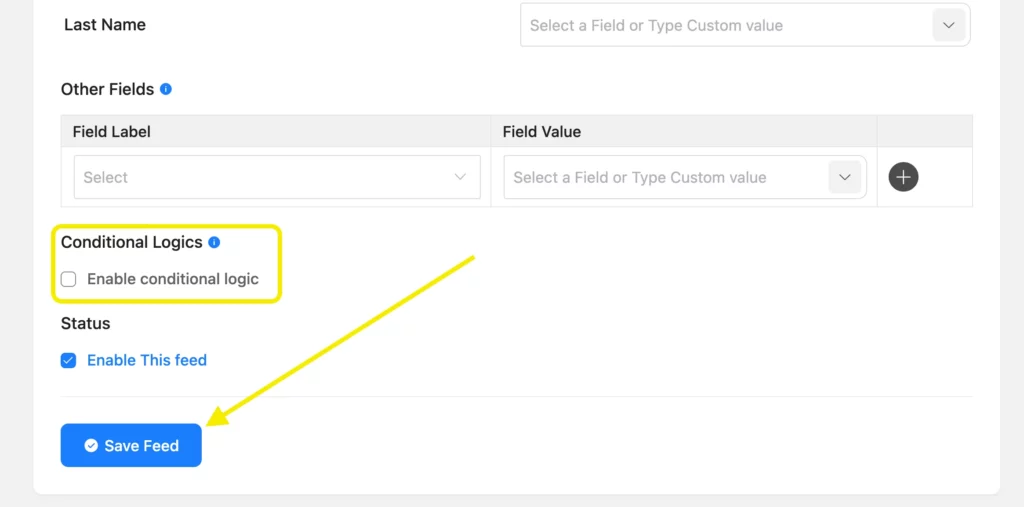
Optionally, enable Conditional Logics to segment contacts based on specific responses. Click on Save Feed when you’re done.
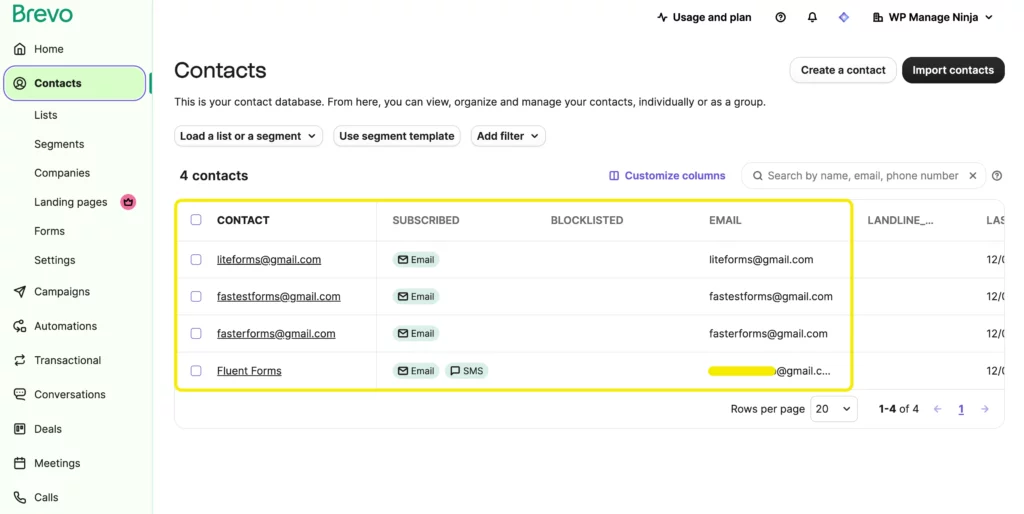
Submit some demo entries to test the connection. Once done, check the Contacts section in your Brevo dashboard – your form submissions should now appear there.
Fundamentals of building your email list with Brevo
Connecting Fluent Forms and Brevo is powerful — but to maximize results, you need to build your list with strategy.
Here are four essential steps:
1. Create & organize your lists
Start by organizing your contacts in Brevo.
- Go to Contacts → Lists.
- Click Create a list, give it a clear name (e.g., Newsletter, Lead Magnet – SEO Checklist), and save.
If you work with multiple audiences (e.g., leads, customers, partners), create separate lists for each.
2. Add contacts to your list
There are multiple ways to populate your Brevo lists:
- Manual entry: Go to Contacts → Create a contact, fill in the details, and assign them to a list.
- Import: Use the “Import contacts” option to upload from a CSV or copy-paste. Map your fields and choose the destination list.
- Forms: Create signup forms using Fluent Forms (or Brevo’s own tool). Whenever a visitor submits, they’ll be added automatically.
3. Grow your list
Here are proven methods to attract more subscribers:
- Website signup forms: Embed forms in your header, footer, or blog sidebar.
- Lead magnets: Offer free resources (guides, checklists, templates) in exchange for emails.
- Pop-ups: Use targeted pop-ups with exit intent or scroll triggers.
- Social media: Share your newsletter link or gated content with a signup form.
- Contests and giveaways: Run campaigns where people sign up with email to enter.
4. Segment your contacts (optional, but highly recommended)
Segmentation improves email performance. In Brevo, you can filter contacts by:
- Sign-up source
- User behavior (e.g., email opens, link clicks)
- Demographics or custom fields
Start with basic segments like engaged subscribers vs new leads, then build more targeted campaigns over time.
Now you know the fundamentals of building an email list and also how to create one with Brevo with Fluent Forms, what awaits next?
What to do once your integration is live
Your next step is to jump into the action. Here’s how you can fine-tune your setup for efficiency:
- Test your form: Submit a few test entries and check Brevo to ensure contacts are landing correctly.
- Use double opt-in (if needed): For legal compliance or better deliverability.
- Set up automation workflows in Brevo: Send welcome emails or lead-nurturing campaigns.
- Tag or segment based on form responses: For example, use dropdown or checkbox fields to label user interest.
- Monitor engagement: Clean up cold leads, and optimize subject lines based on open rates.
Is Brevo enough
Now that you have integrated Brevo with Fluent Forms, it’s your time to shine. Test out your campaigns and see if that fits your business.
It provides quite a good free plan for starters.
If you want more, there are other email marketing integrations such as FluentCRM, Mailchimp, Moosend, Drip, and many more with Fluent Forms.
Drop your comments below and let us know about your favorite email marketing integrations!

This is Sumit. He’s a physics major who’s trying to understand both the physical as well as the WordPress worlds. Whenever he’s not busy, plays fifa or spends time with his family.


Leave a Reply