

Troubleshooting Conditional Logic: The Complete Guide for Fluent Forms
You’ve set up conditional logic in Fluent Forms. But when you preview it, the field that should appear stays hidden. Or an email notification triggers when it shouldn’t. Or something isn’t working the way you expected. How do you figure out what’s causing the issue?
This guide walks you through the most common reasons conditional logic breaks in Fluent Forms and how to fix each one. Most of these are simple configuration fixes you can sort out in a few minutes. If you haven’t used conditional logic before or need a refresher, start with the introduction and use cases first.
TL;DR
- Most conditional logic problems in Fluent Forms come from configuration mistakes, not bugs. Wrong operator, mismatched values, or incorrect Any/All/Group selection are the usual causes.
- Always apply conditions on the dependent field (the one you want to show or hide), not the controlling field.
- To match multiple values, add separate conditions using Any, All, or Group logic.
- Text fields support the full range of operators (contains, starts with, ends with, regex match, etc.), but values must be an exact match, including capitalization.
- If your configuration is correct but conditions still fail, clear all caches and check for plugin or theme conflicts.
- Editing a controlling field’s label or options after setting up conditions will clear those conditions. You’ll need to set them up again.
- If nothing in this guide resolves your issue, contact Fluent Forms support with your form details.
Why Your Conditional Logic Might Not Be Working
Conditional logic issues fall into two categories.
Configuration issues are mistakes in how the rules are set up. These are the most common and the easiest to fix. For example, wrong operator for the field type, mismatched condition values, picking “All” when you meant “Any,” or setting the condition on the wrong field.
Environment issues are problems outside of Fluent Forms. For example, a plugin causing conflict, or a caching plugin serving old files, or a theme interfering with how the form loads on the page. These are less common but worth checking if your configuration is correct.
Fix Configuration Issues First
You won’t see any error message for misconfigured conditions. Because they’re technically correct, just don’t match your intentions. If you’re unsure of where to look for setup mistakes, go through these. Each one takes less than a minute to fix.
1. Your condition values don’t match the input
For selection fields (radio, checkbox, dropdown), Fluent Forms lets you pick the value from existing options when setting up the condition. You don’t need to type anything. So value mismatches are rare with these fields.
For text fields, you type the value manually in the condition expression. If the value you entered there doesn’t exactly match what the user types in the form, the condition won’t fire.
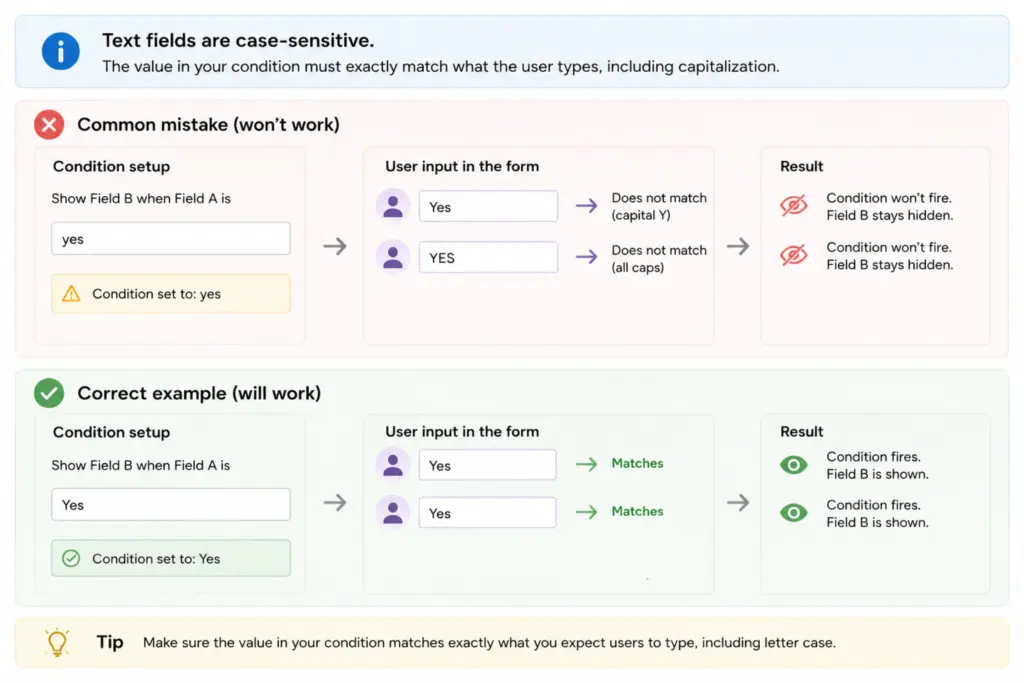
The most common mistake here is capitalization. If you set the condition to check for “yes” but the user types “Yes” or “YES,” it won’t match. Make sure the value in your condition matches exactly what you expect users to type, including the letter case.
2. You selected “All” when you needed “Any” (or vice versa)
When you add multiple conditions to a field, Fluent Forms needs to know how to evaluate them together. That’s where the conditional match setting comes in. There are three options: Any, All, and Group.
Any (OR logic): At least one condition must be true. Use this when different inputs should lead to the same result.
Example: Show a “Dietary Restrictions” field if the user selects “Vegan” OR “Gluten-Free” from a menu preference radio field. You’d add two conditions (Menu Preference equals Vegan, Menu Preference equals Gluten-Free) and set the match to Any.
When you need to match multiple values on a selection field:
Add separate conditions. For example, if you want to show Field B when Field A equals “Option 1” or “Option 2,” add two conditions on Field B:
- Field A equal Option 1
- Field A equal Option 2
Then set the conditional match to Any so the field shows when either condition is true.
All (AND logic): Every condition must be true. Use this when you need a specific combination of inputs.
Example: Show a “Team Size” field only when the user selects “Business” as account type AND enters a company email. Both conditions must match.
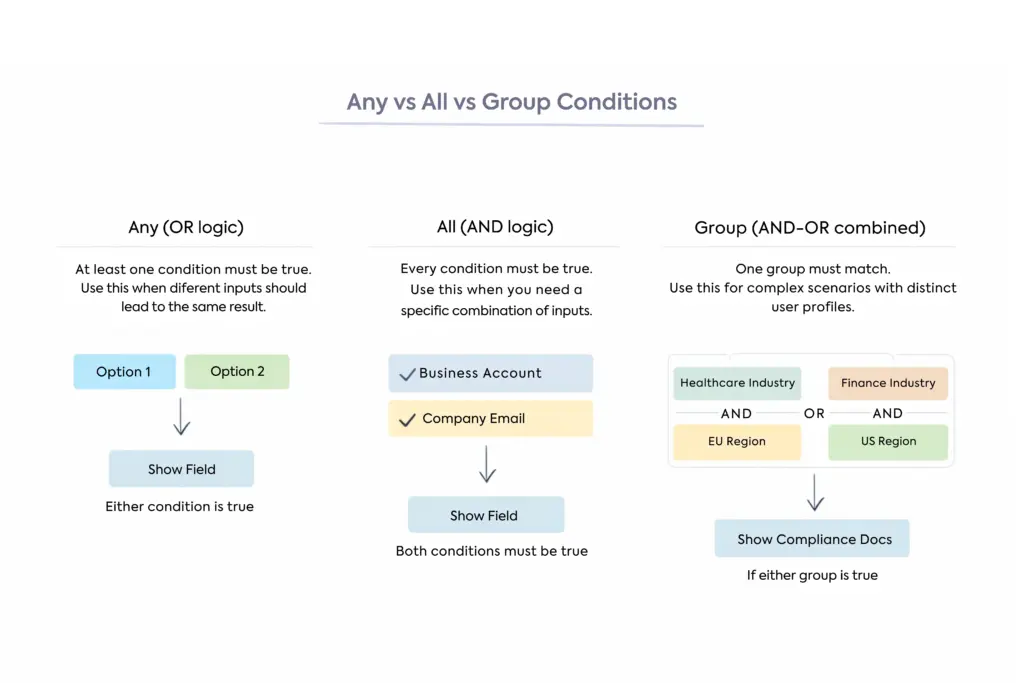
Group (AND-OR combined): All conditions inside a group must match (AND), but if any one group matches, the action triggers (OR). Use this for complex scenarios with distinct user profiles.
Example: Show a “Compliance Documents” section if (Industry equals Healthcare AND Region equals EU) OR (Industry equals Finance AND Region equals US). Two groups, each with its own set of requirements.
If you’ve set the match to “All” but only one of your conditions can be true at a time, your field will never show. Switch it to “Any.”
3. You set the condition on the wrong field
This one confuses a lot of first-time users. In Fluent Forms, you always apply conditional logic to the dependent field, the one you want to show or hide. Not the controlling field.
Let’s say you want Field B (an email field) to appear only when Field A (a radio button) equals “Yes.” The condition goes on Field B, not Field A.
To set it up: click on Field B, open Advanced Options, enable Conditional Logic, and create a rule that says, “Show this field when Field A equals Yes.”
If you attempt to apply the condition to Field A instead, you’ll hit a dead end. In the condition maker, you get to select fields by labels. However, a field’s own label isn’t an available option.
4. You edited the controlling field after setting up conditions
If you’re confident you’ve done everything right, this might be the reason for the condition not working.
You set up conditional logic on Field B based on Field A. Everything works. Later, you go back and edit Field A’s label or an option involved in the condition, maybe changing “Phone Call” to “Phone.”
When you do this, the condition on Field B that referenced “Phone Call” doesn’t automatically update. Instead, the condition box where that option was selected goes blank. The condition is now broken, and the field won’t show as expected.
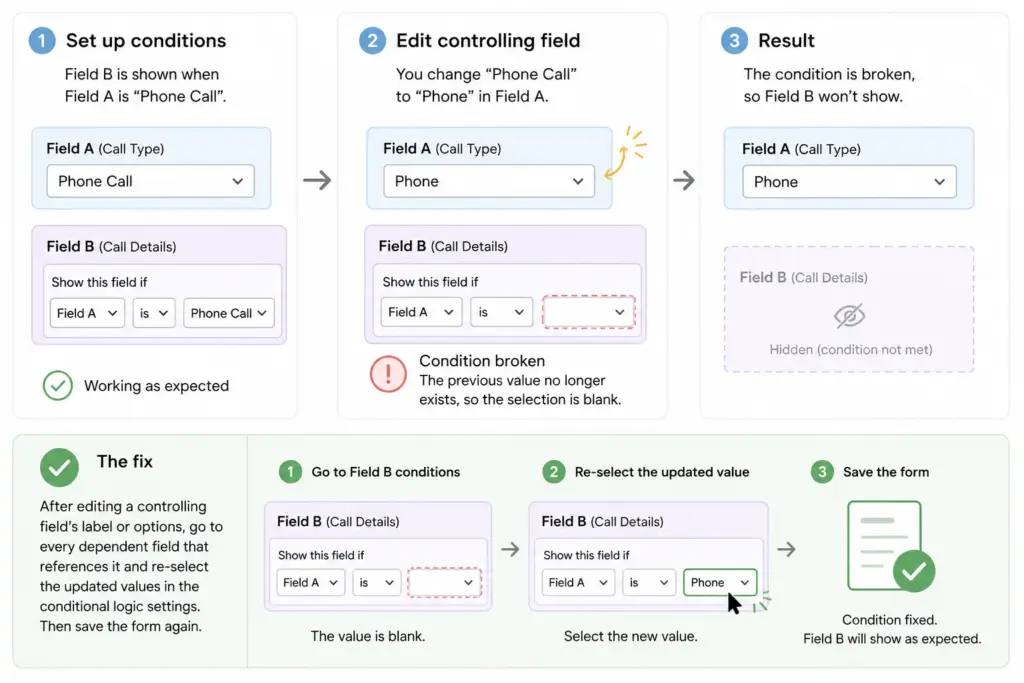
The fix: After editing a controlling field’s label or options, go to every dependent field that references it and re-select the updated values in the conditional logic settings. Then save the form again.
Whenever you edit a controlling field, double-check all dependent conditions.
5. You forgot to save
It sounds obvious, but it happens more often than you’d expect. You set up the conditions, preview the form, and wonder why nothing changed.
After setting up or editing conditional logic on any field, click Save Form. For conditional logic on email notifications or confirmation messages, click Save Settings or Save Notification inside that specific setting.
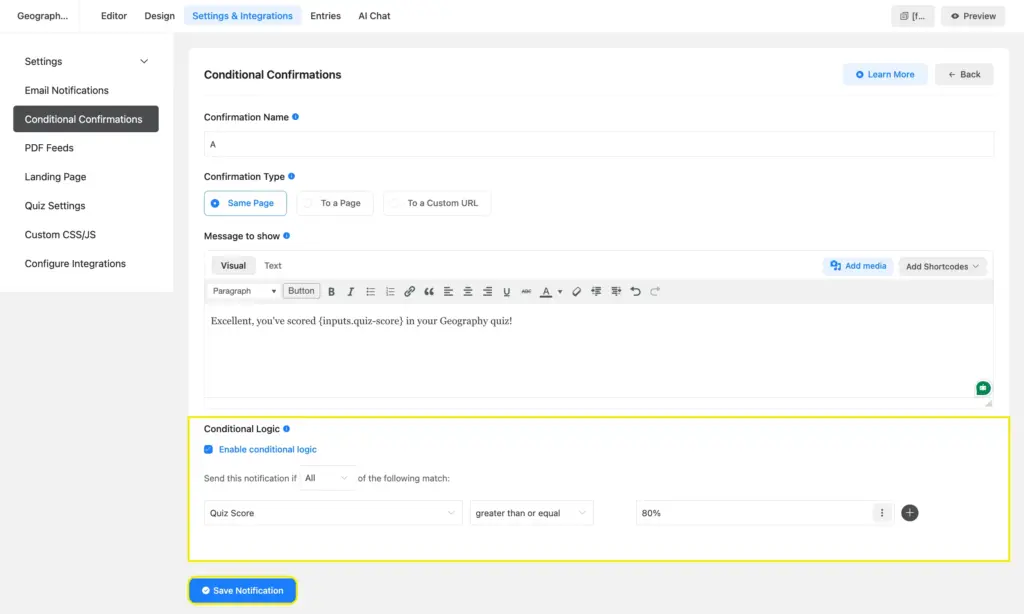
If you made changes and went straight to preview without saving, your edits aren’t active yet.
Fix Environment Issues
If your configuration looks correct but the conditions still aren’t working, the issue is likely outside of Fluent Forms. Your WordPress environment, specifically caching, other plugins, or your theme, can interfere with how the form’s conditional logic runs on the front end.
6. Clear cache
Caching plugins store old versions of your pages to speed up load times. If you updated your form’s conditional logic but a cached version of the page is still being served, visitors (and you) will see the old form without the updated rules.
Clear caches in this order:
- Browser cache: Press Ctrl+Shift+Delete (Windows) or Cmd+Shift+Delete (Mac) and clear cached files.
- WordPress caching plugin: If you use WP Rocket, LiteSpeed Cache, W3 Total Cache, or similar, clear all caches from the plugin’s settings.
- CDN cache: If you use Cloudflare or another CDN, clear the cache from your CDN dashboard.
- Server-level cache: Some hosting providers run server-side caching (like Varnish). Check your hosting dashboard or contact your host to clear it.
After clearing all caches, open your form in an incognito or private browser window. This ensures you’re loading a fresh version of the page.
7. Check for plugin conflicts
Another plugin on your site might be interfering with Fluent Forms’ scripts. This is especially common with optimization plugins that defer or minify JavaScript files, pop-up or slider plugins, and other form plugins running on the same site.
To isolate the conflict:
- Deactivate all plugins except Fluent Forms (and Fluent Forms Pro if you’re using it).
- Test your form. If conditional logic works now, a plugin conflict exists.
- Reactivate plugins one at a time, testing the form after each.
- When conditional logic breaks again, you’ve found the conflicting plugin.
Once you identify the conflict, check if the plugin has an option to exclude Fluent Forms’ scripts from its optimization. Many caching and minification plugins let you add script exclusions.
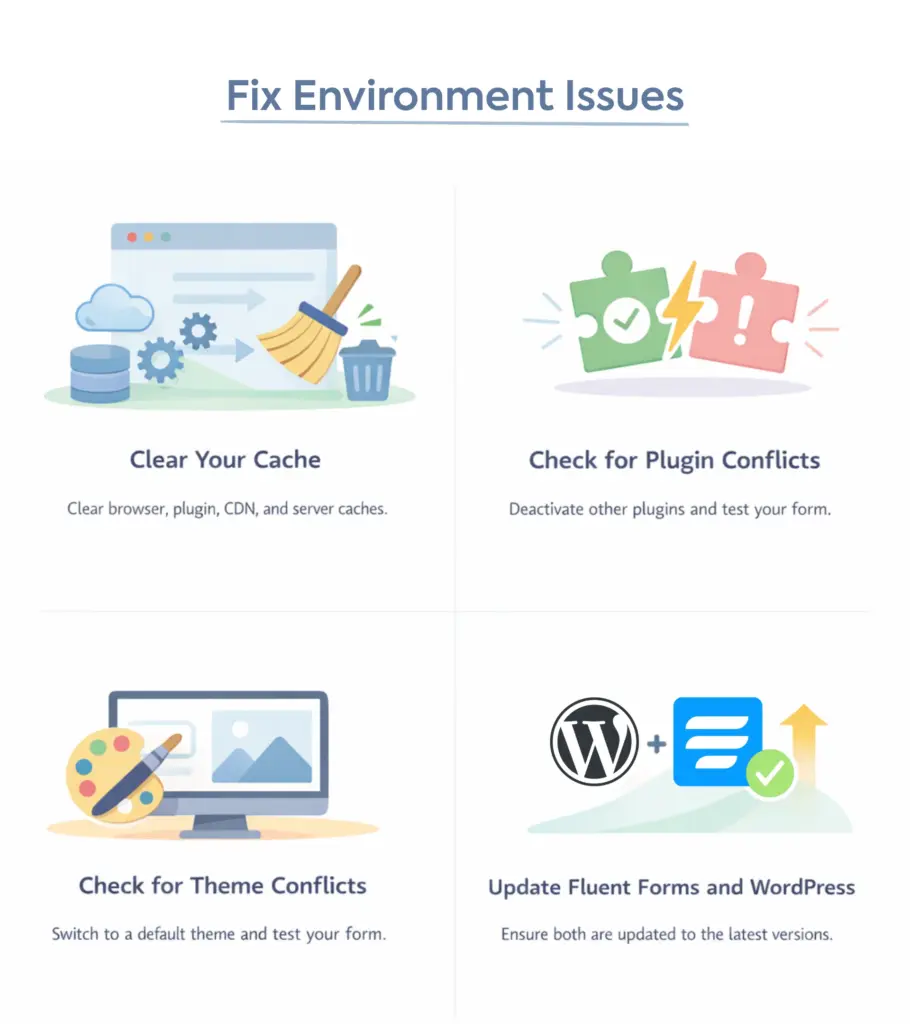
8. Check for theme conflicts
Your WordPress theme can sometimes interfere with how Fluent Forms’ conditional logic runs on the page.
To test this:
- Temporarily switch to a default WordPress theme like Twenty Twenty-Five.
- Test your form.
- If conditional logic works with the default theme, your theme is the source of the problem.
If the theme is causing the issue, reach out to the theme developer. You can also try excluding Fluent Forms’ JavaScript files from the theme’s script optimization settings.
9. Update Fluent Forms and WordPress
Outdated versions of Fluent Forms or WordPress can occasionally cause unexpected behavior. Before spending time troubleshooting, make sure you’re running the latest versions of both.
Go to Dashboard > Updates in your WordPress admin panel and check for available updates. You can also check the Fluent Forms changelog to see if any recent updates addressed conditional logic fixes.
Troubleshoot Specific Conditional Logic Cases
Conditional logic in Fluent Forms goes beyond showing and hiding fields. You can use it on email notifications, confirmation messages, shortcodes, containers, and more. The setup is almost similar. But in case a condition isn’t working, check the following.
10. Conditional email notifications aren’t sending
Find conditional email notifications within Settings & Integrations > Email Notifications. If your conditional notification isn’t working, check:
- Open the notification and scroll to Conditional Logics. See if the “Enable conditional logic” box is checked.
- Is the parameter field (the field the condition depends on) set correctly?
- Does the value match the actual field value? For selection fields, you can pick from the available options. For text fields, the value must match exactly.
- Is the “All” vs “Any” toggle correct? If you have two conditions and both need to match, use “All.” If either one should trigger the notification, use “Any.”
- Did you click Save Settings after making changes?
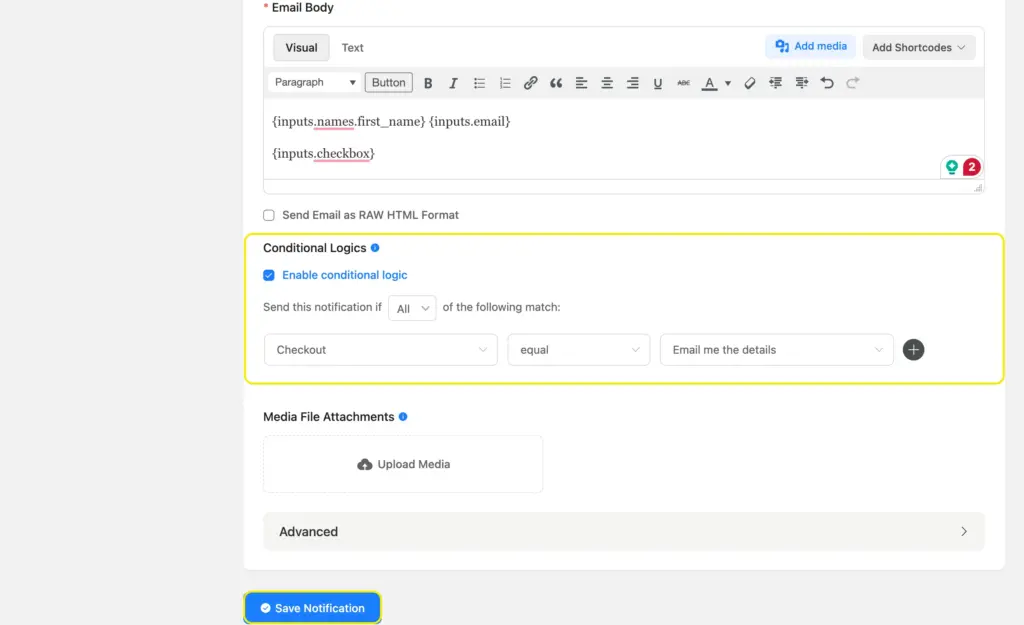
For more details on setting this up, check the conditional email notification documentation.
Conditional email routing isn’t sending to the right email address
Email routing is different from conditional email notifications. With routing, a single notification gets sent to different email addresses based on the user’s input. You set it up by selecting Configure Routing as the Send To option inside an email notification.
If the wrong person is receiving the email (or no one is), check these:
- Open the notification and confirm Configure Routing is selected under Send To, not a static email address.
- Check each routing row. The email address, the form field it depends on, and the condition value must all be correct.
- Pay attention to the operator in the middle box. It works the same way as field-level conditions: for selection fields, use “equal” or “not equal.” For text fields, the full range of operators (starts with, ends with, includes, etc.) is available.
- If you renamed options in the form field on which the routing depends, the routing conditions may need to be re-selected (same behavior as field-level conditions).
- Click Save Notification after making changes.
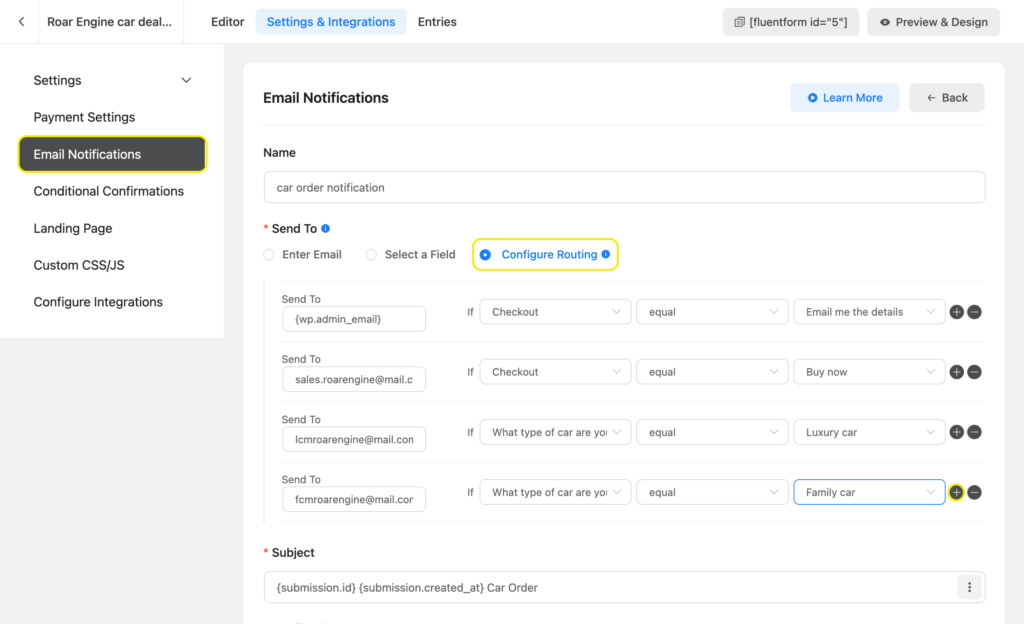
For a full setup walkthrough, see the conditional email routing guide.
11. Conditional confirmation messages show the wrong message
If you’ve set up multiple confirmation messages with different conditions and the wrong one is appearing, check the conditional logic inside each confirmation feed. Make sure the parameter, operator, and value are correct for each one.
Check the order of your confirmation feeds as well. If two confirmations have overlapping conditions, the first matching one may take priority. Try creating confirmations in the order of their priority and relevance.
After making any changes, click Save Notification inside the confirmation feed.
12. Conditional shortcodes aren’t displaying content
Conditional shortcodes let you show different content in confirmation messages, email notifications, and PDFs based on user input. If your shortcode content isn’t appearing, check these:
- Make sure you’re using the correct field name. The field parameter must match the actual Name Attribute (you’ll find this in the field’s advanced options) in your form (e.g., input_radio, not the field label).
- If you’re nesting conditions (checking two things at once), use for the inner condition, not another .
- Double-check the condition operator. Available options include equal, not_equal, greater_than, greater_or_equal, less_than, less_or_equal, contains, not_contains, starts_with, and ends_with.
Here’s the correct syntax for a simple conditional shortcode:
[ff_if field="input_radio" is="equal" to="yes"]
Your conditional content here.
[/ff_if]
For nested conditions:
[ff_if field="input_radio" is="equal" to="yes"]
Outer content.
[ff_sub_if field="ratings" is="greater_than" to="2"]
Inner content (shows only when both conditions are true).
[/ff_sub_if]
[/ff_if]
See the full conditional shortcodes documentation for more examples.
13. Conditional logic on containers isn’t working
Containers let you group multiple fields together and apply one conditional rule to the entire group. If your container’s conditional logic isn’t behaving as expected, here’s how the logic works:
- A container shows or hides based on its own conditions only.
- If a container is hidden, every field inside it is hidden too, regardless of any individual field conditions.
- If a container is visible, fields inside it still need to meet their own conditions (if any) to appear. So a field with its own conditional logic inside a visible container will only show when both the container’s conditions and the field’s conditions are met.
If a field inside a container isn’t showing up, check whether the container itself is visible first. Then check the field’s own conditions.
14. A form step is being skipped unexpectedly
In multi-step forms, you can’t apply conditional logic directly to a form step. But here’s something worth knowing: if every field inside a step has conditions that aren’t met (all fields are hidden), Fluent Forms automatically skips that step.
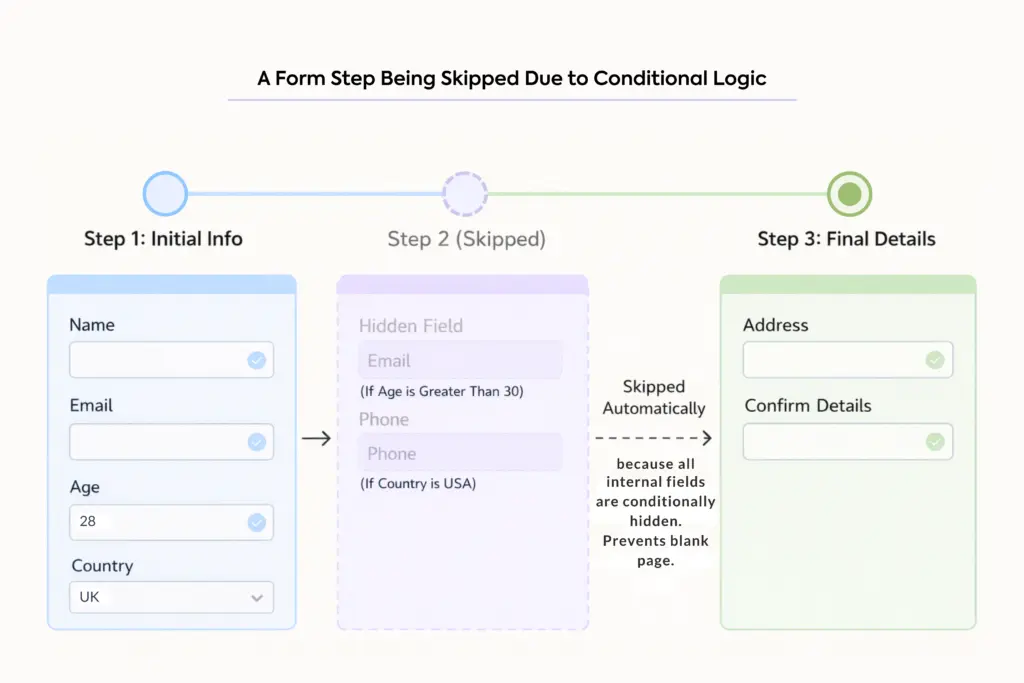
This is intentional. It prevents users from landing on a blank page with no fields to fill out. But if you didn’t expect the step to be skipped, it can look like a bug.
Check the conditions on each field inside the skipped step. If all of them are hidden because their conditions aren’t met, that’s why the step disappears. Adjust the conditions on individual fields, or add a field without conditions to ensure the step always shows.
15. Conditional logic with regex isn’t matching
The regex match operator works with text-based fields and lets you match patterns instead of exact values. It’s useful for validating zip codes, matching email domains, or checking for specific input formats.
If your regex condition isn’t working, common mistakes include:
- Missing anchors: ^cat matches strings that start with “cat.” cat$ matches strings that end with “cat.” ^cat$ matches exactly “cat” and nothing else.
- Forgetting to escape special characters: Characters like ., +, *, and ? have special meaning in regex. If you want to match a literal period, use \.
- Overly complex patterns: Start with a simple pattern and test it before adding complexity.
For a reference table of regex patterns and examples specific to Fluent Forms, see the regex with conditional logic documentation.
Troubleshooting Conditional Logic: A Quick Checklist
This quick checklist covers the most common causes at a glance. Take a note before approaching your conditional logic error.
- Do your condition values exactly match? (Especially for text fields where you type the value manually.)
- Is the conditional match mode (Any/All/Group) set correctly for what you’re trying to do?
- Is the condition applied to the dependent field, not the controlling field?
- Did you edit the controlling field’s options after setting up conditions? (If so, re-select the values.)
- Did you click Save Form or Save Settings after making changes?
- Have you cleared all caches (browser, plugin, CDN, server)?
- Have you tested with other plugins deactivated?
- Have you tested with a default WordPress theme?
- Are Fluent Forms and WordPress up to date?
Prevent Conditional Logic Issues Before They Happen
Once you’ve fixed your current issue, a few practices will keep you from repeating the same problems again.
Test after every change
Preview the form and test it on the live page after adding or modifying any conditional logic. Don’t batch multiple changes and test them all at once. If something breaks, you won’t know which change caused it.
Test every user path
If your form has multiple conditional branches, fill it out as different types of users. Select different options, leave fields blank, and make sure every path leads to the right outcome. This is especially important in multi-step forms.
Start simple, then add complexity
Get one condition working before adding more. If you start with five conditions and something fails, it’s harder to figure out which rule is the problem.
Use containers for groups of conditional fields
If you have four fields that should all appear or disappear together, put them in a container and apply one condition to the container. It’s easier to manage than applying the same condition to each field individually.
Place the dependent field below the controlling field
Conditional logic in Fluent Forms works regardless of field order. But from a user experience perspective, it’s better when a field appears below the question that triggered it. If a conditional field pops up above the field the user just interacted with, they’d have to scroll up to see it. Users can easily miss the field as scrolling up isn’t the logical order.
Check your forms after updates
After updating Fluent Forms, WordPress, or your theme, quickly test your conditional logic to make sure everything still works as expected.
Use a staging site for complex changes
If your form has many conditional rules and you’re making significant changes, test on a staging environment first. This prevents issues on your live site during configuration steps.
Keep notes on complex setups
If your form has 10+ conditions across multiple fields, confirmations, and email notifications, write down what each rule does and why. Future you (or a colleague who inherits the form) will appreciate it.
What to Do Next if You’re Still Stuck
If you’ve gone through every step in this guide and your conditional logic still isn’t working, it’s time to reach out to the Fluent Forms support team.
When you submit your ticket, include these details so the team can help you faster:
- Describe what you did step by step.
- Attach screenshots of the form editor.
- What conditional logic you’ve set up (which fields, which conditions)
- What’s happening vs. what you expected to happen
- Your browser and device (e.g., Chrome on Windows, Safari on iPhone)
- Whether the issue happens in the preview, on the live page, or both
- Any troubleshooting steps you’ve already tried from this guide
The more context you provide, the faster the team can diagnose and resolve your issue.

Sarika writes for Fluent Forms and loves to offer insights into small businesses. She’s curious and enjoys discussing ideas, interests, and perspectives. In her free time, she’s either marvelling at architectural beauties or trying different cuisines.



Leave a Reply