Automate Sales Workflows with Pipedrive Integration in WordPress

Can you instantly think of a business that does not need CRM tools? It’s hard to find any, right? CRM tools are made to effectively store customer information and manage relationships with customers. Pipedrive is a great choice when it comes to ease of use and affordability compared to its competitors. Pipedrive integration in WordPress can help you automate the workflows of your sales team.
To extract the best out of a CRM tool, you need to find a way to seamlessly collect data in the first place. And to help you out in this regard, we present Fluent Forms – the best form builder plugin on the market.
In this article, we will show you how to connect Fluent Forms with Pipedrive. Let’s get started.
Overview of Pipedrive
Pipedrive is a cloud-based customer relationship management (CRM) tool for teams focusing on sales. Its minimal yet effective design places the highest priority on usability. Pipedrive’s dependable and adaptable CRM solution allows your team to spend more time selling and less time filling.

With Pipedrive, you can:
- Save sales and marketing professionals’ time on email creation
- Turn email marketing into a breeze
- Create customizable emails with pro templates
- Nurture your target prospects into hot leads
- Know which campaigns win your audience
- Deep dive into email data to improve your flow
- Allow everyone on your team to collaborate better
- Automate sales tasks
- Support your customer communication
- Create customized sales reports
Pipedrive is easier to set up and use and also more affordable than its competitors like HubSpot and Salesforce. On top of all these, you can fully optimize your workflow thanks to an entire marketplace of integrations.
Fluent Forms as an alternative to Pipedrive’s built-in web forms
With Pipedrive’s built-in web forms feature, you can design personalized forms for your website that capture visitor information and move them through the funnel from leads to customers.
While the Pipedrive web forms functionality is easy to set up and use, it is not the most accessible. Thankfully, Fluent Forms can be a great choice in this regard. Fluent Forms offers the ultimate flexibility and freedom when it comes to form-building.
Fluent Forms has a bunch of amazing contact form features to suit your needs in the best possible way. This drag-and-drop form builder plugin is currently powering more than 500K+ WordPress sites.

The key features of Fluent Forms are –
- 60+ input fields to collect any type of information
- Numeric calculation to create forms with calculators
- Multi-step forms to break long forms into multiple steps
- Conversational forms to provide a better form-filling experience
- Advanced post creation to collect user-generated content
- Conditional logic to show/hide input fields based on user behavior
- Integration with popular payment gateways to collect payments and donations
- Spam protection using hCaptcha, reCAPTCHA, Turnstile, Honeypot, Akismet
- Quiz and survey with advanced scoring
- Advanced form styler to align form with your brand identity
- Custom CSS and JS to create more advanced forms
- Export entries in CSV, Excel, ODS and JSON format
- PDF add-on to turn form submissions into PDF files
- Form scheduling and restriction based on different rules
- Double opt-in confirmation to ensure efficient data collection
- Email notification after form submission
- Conditional confirmation to show confirmation messages based on predefined conditions
- Advanced form validation to accept eligible submissions
- Fully responsive and accessible to ensure inclusivity
- 55+ integrations to expand core functionalities
Pipedrive integration in WordPress allows you to sync new leads into your sales pipeline instantly.
How to set up Pipedrive integration in WordPress
To integrate Pipedrive with Fluent Forms in WordPress, follow the steps below:
Step 1: Enable the Pipedrive integration
You will need the pro version of Fluent Forms to set up Pipedrive integration.
Hover over Fluent Forms Pro from the WordPress dashboard sidebar and click on Integrations. Search for Pipedrive and enable Pipedrive integration.

Step 2: Get Pipedrive API Token
Again, click on Fluent Forms Pro > Global Settings > Configure Integrations > Pipedrive. Now you need the Pipedrive API Token to activate the integration.
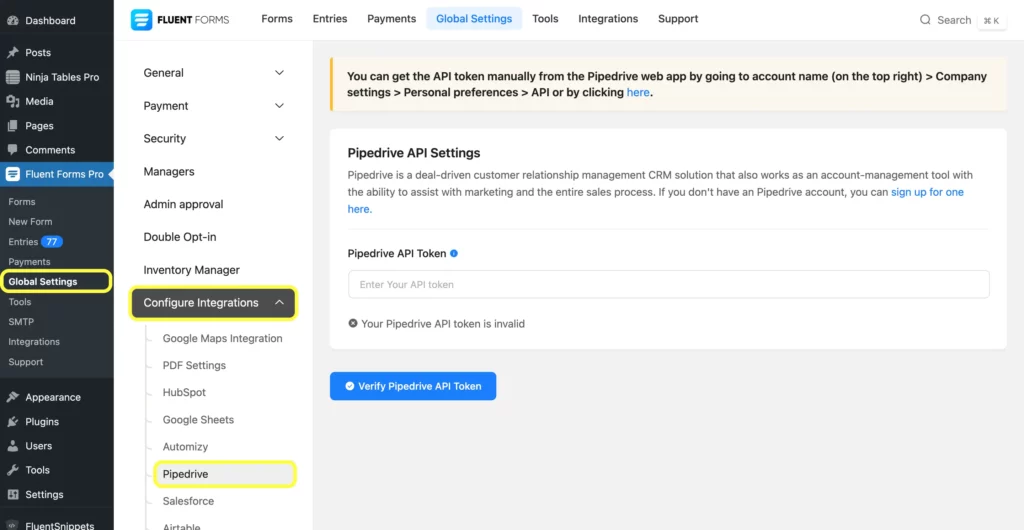
To get the API token, sign up here if you do not have a Pipedrive account. If you have one, log in to your Pipedrive account.
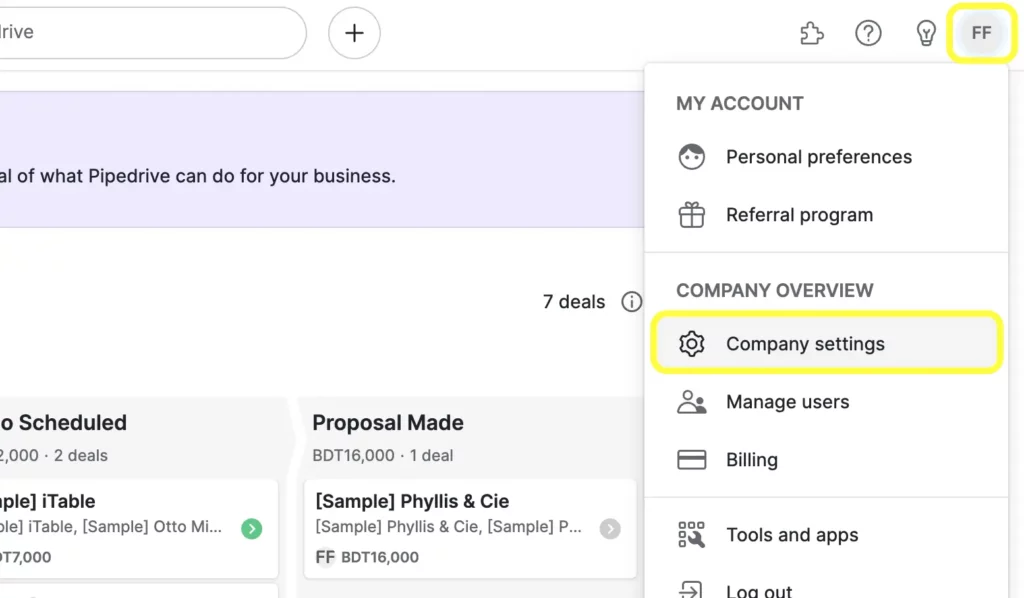
Once you log in to your account, click on the account name on the top right corner of the window, and go to Company settings.
Then click on Personal preferences > API.
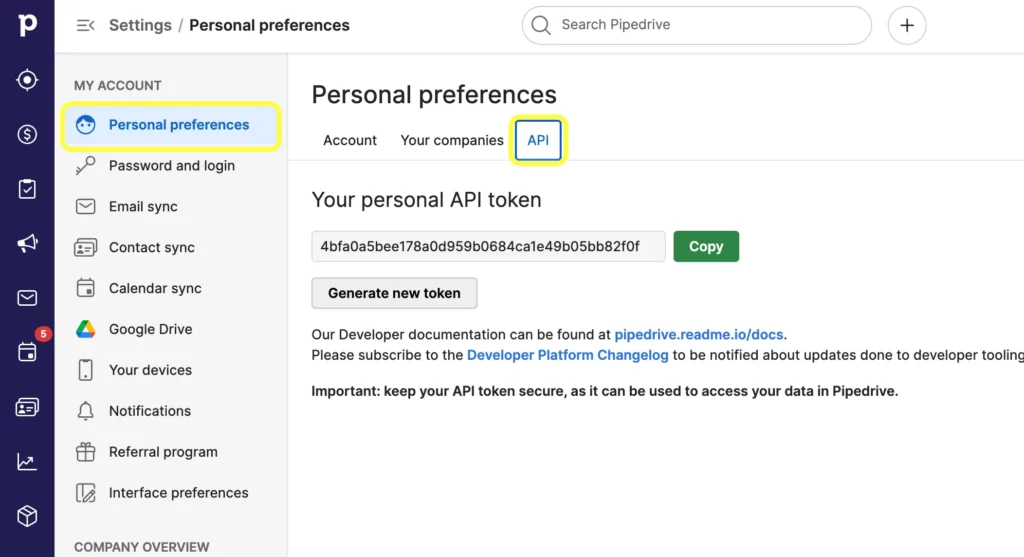
Copy the API token to use this in the next step.
Step 3: Paste the API Token in the Pipedrive integration settings
Paste the API token in the Pipedrive API Settings and click on the Verify Pipedrive API Token button.
Once your Pipedrive API Token is verified, you will see a message like the screenshot below.

Step 4: Setup the integration feed
Now go to the particular form’s Settings & Integrations tab for which you want the entries listed in Pipedrive.
Now click on Configure Integrations from the left panel. Then click on Add New Integration and select Pipedrive Integration from the dropdown menu.
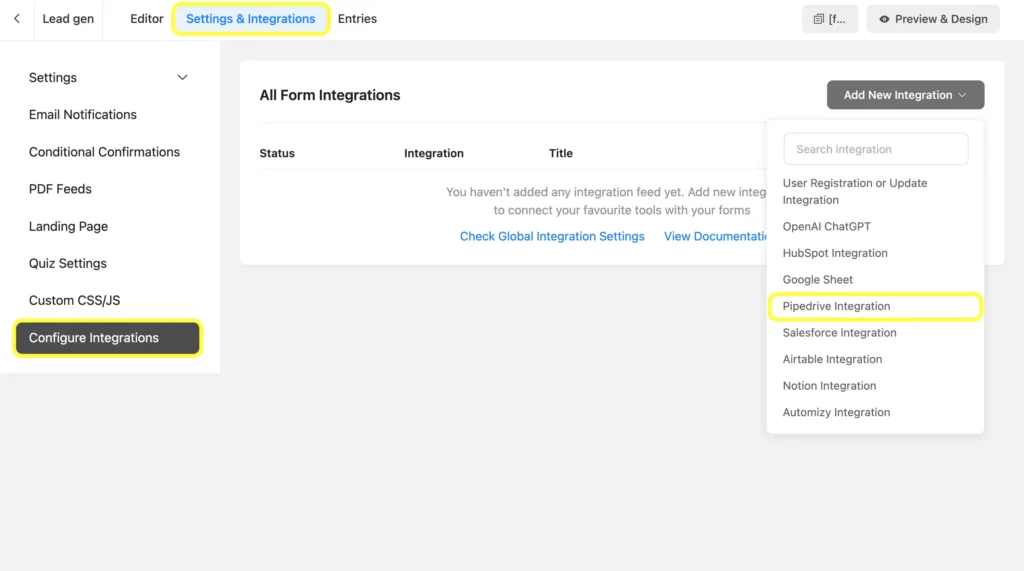
Name the feed and select the Pipedrive Service from the dropdown. Then configure the fields and map them to the Pipedrive list’s corresponding rows.

You can enable Conditional Logic if necessary. Lastly, click on checkbox beside Enable This Feed and click on the Save Feed button.
Related resource: Pipedrive integration with Fluent Forms documentation.
Conclusion
When the best form-builder plugin, Fluent Forms, is integrated with an amazing CRM tool Pipedrive, your business workflows become effortless and more efficient. Try this tutorial to connect Fluent Forms with Pipedrive and automate your sales workflows.
60+ Third-party Integrations
Expand your form functionality with seamless integrations.






Leave a Reply