
How to Display WooCommerce Reviews with Fluent Forms and WP Social Ninja

Running a WooCommerce store means you’re always finding new ways to build trust with buyers. And customer reviews are your secret weapon, only if they’re displayed the right way!
The default WooCommerce review system is just too basic. It only offers a star rating and a text box. There’s no customer photos, product images, or flexibility.
But today’s shoppers don’t just want to read reviews; they want to see them. They crave photos, real feedback, and proof that others love your products.
In this guide, you’ll learn how to collect WooCommerce reviews using Fluent Forms and display them beautifully with WP Social Ninja. Fluent Forms integration with WP Social Ninja will help you replace the plain default form with a customizable, image-ready review system without any coding.
Follow these steps, and you’ll have a professional, engaging review setup in under an hour!
Why your WooCommerce reviews need Fluent Forms and WP Social Ninja
You probably know that the default WooCommerce review system does the basics, where it collects star ratings and text comments. But that’s where it stops. There are no options for customer photos, additional fields, or control over how reviews look on your site.
That’s precisely where Fluent Forms and WP Social Ninja work together beautifully. This combination helps you collect richer, more detailed reviews and showcase them in stunning, customizable layouts that instantly improve your WooCommerce store.
Here’s what you can achieve with this powerful setup:
Improve WooCommerce product reviews collection: Replace the standard WooCommerce form with a Fluent Forms review template. Instead of boring text-only reviews, you’ll collect detailed feedback with product photos, reviewer images, and custom fields like Would you recommend this?
Custom reviews and testimonials: Not only on product pages, collect reviews from any page on your website, whether it’s service feedback, general testimonials, or reviews for a specific category. Ideal for businesses that want to highlight customer experiences, not just product reviews.
Why this matters for your eCommerce business:
- Visual social proof: Reviews with customer photos convert 3x better than text-only reviews
- Organized collection: Gather exactly the information you need through custom form fields
- Professional display: Create stunning review templates that match your brand
- Complete control: Choose where and how to display reviews across your entire site
- Deeper insights: Get valuable feedback on product quality, delivery, sizing, and more
- Authentic testimonials: Real customer images make reviews feel genuine and trustworthy
In short, your WooCommerce store will display reviews that look professional, feel credible, and influence buying decisions. It will help you earn trust and increase conversions naturally.
Prerequisites: What you must have before starting
Before diving into the setup, make sure you have these essentials ready. Don’t worry, if you’re missing something, we’ll walk you through getting it.
Requirement 1: Active WooCommerce store on WordPress
You need a working WooCommerce store with products already listed. If you’re brand new to WooCommerce, here’s the quick setup process:
- Install WordPress on your hosting
- Go to Plugins → Add New
- Search for “WooCommerce”
- Install and activate the plugin
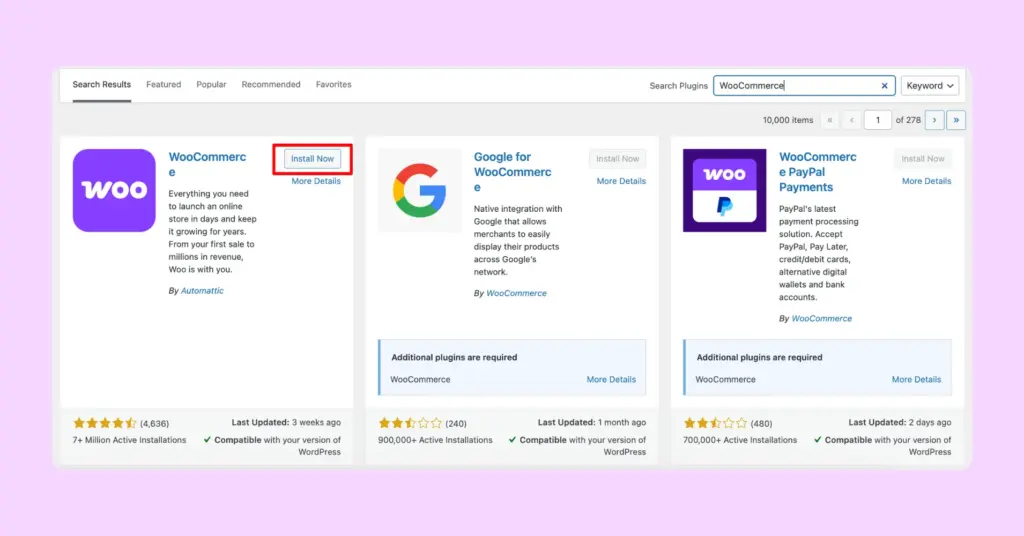
- Follow the WooCommerce setup wizard to configure your store
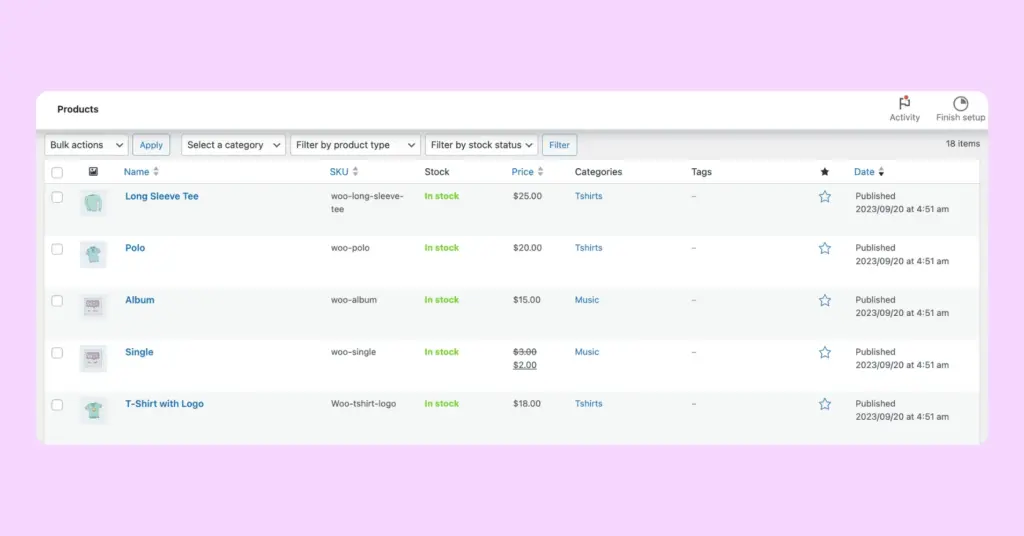
- Add at least a few products with images and descriptions
Already have WooCommerce running? Perfect! Move to the next requirement.
Requirement 2: Sync WooCommerce reviews with WP Social Ninja
While not mandatory, having some existing product reviews makes testing easier. If you already have WooCommerce product reviews, we’ll sync them with WP Social Ninja to display alongside your new Fluent Forms reviews.
To sync existing WooCommerce reviews:
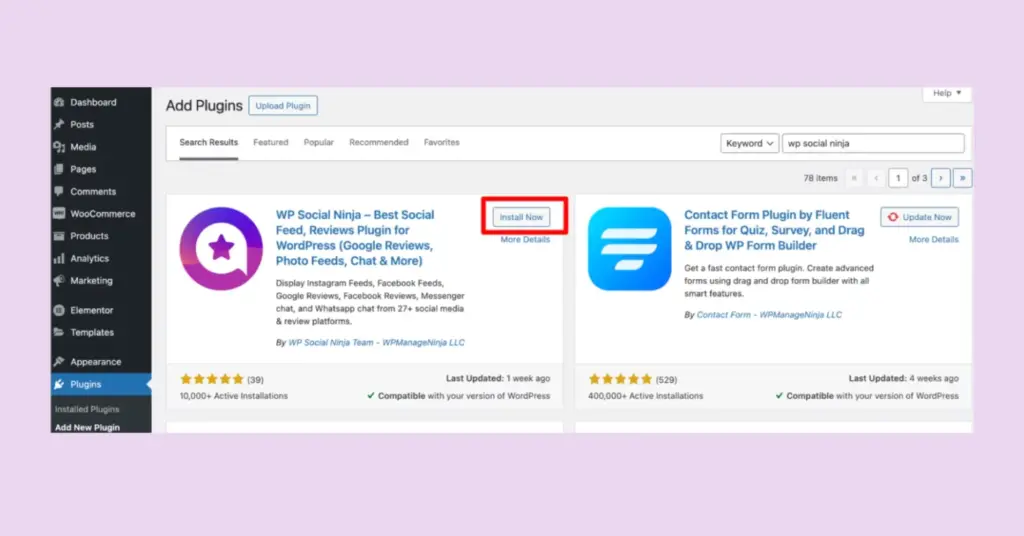
- Install WP Social Ninja (WooCommerce reviews plugin)
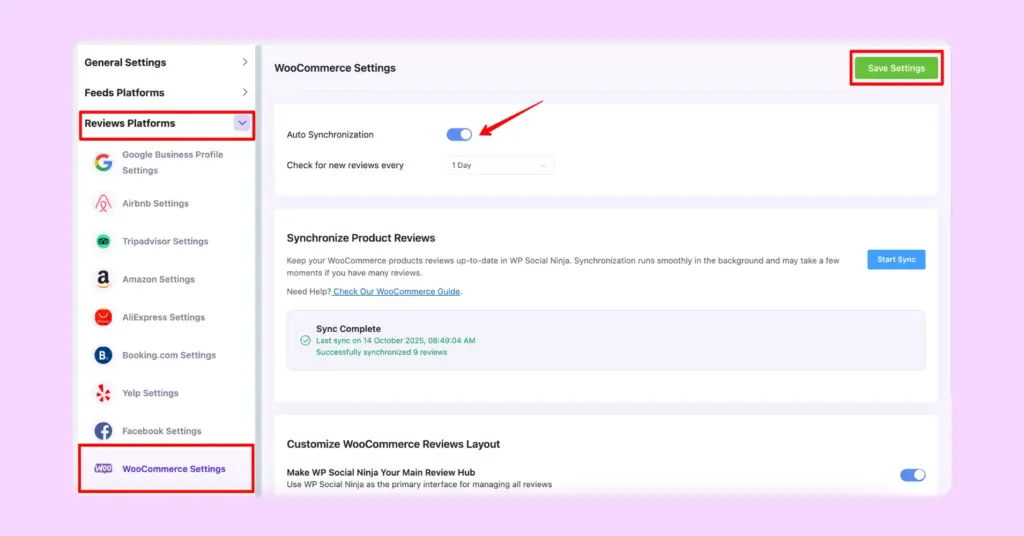
- Go to WP Social Ninja → Settings
- Click on Review Platforms tab
- Find WooCommerce Settings
- Enable the Sync WooCommerce Product Reviews toggle
Important Note: To sync WooCommerce reviews with WP Social Ninja, you must first connect your WooCommerce store to WP Social Ninja by enabling the WooCommerce module in the Platforms section. This tells WP Social Ninja to fetch and display your existing reviews. (You must need WP Social Ninja Pro for this feature)
Requirement 3: Fluent Forms Pro
Fluent Forms Pro gives you the Rating field and file upload capabilities needed for collecting reviews with images. Free version users won’t have access to these crucial review collection features.
Why you need Fluent Forms Pro:
- Rating field (1-5 stars) for customer ratings
- File upload fields for product and reviewer photos
- Advanced form customization options
- Integration with WP Social Ninja
Once you have all three requirements checked off, you’re ready to build your professional review system!
Step 1: Make your WooCommerce reviews template ready
Now that your prerequisites are in place, let’s create a stunning review template in WP Social Ninja that will display all your collected WooCommerce product reviews beautifully.
Access WooCommerce reviews in WP Social Ninja
- Log in to your WordPress dashboard
- Go to WP Social Ninja → Platforms
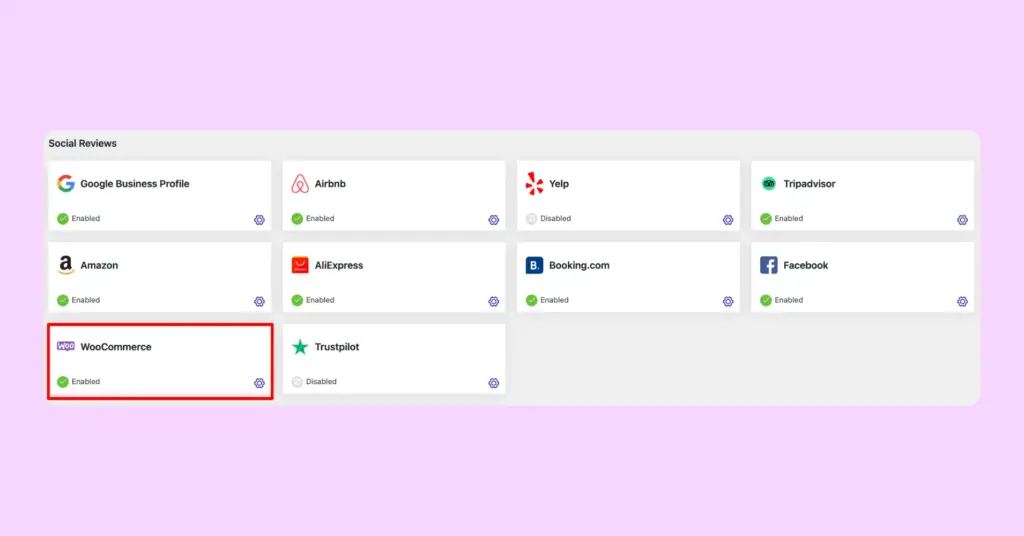
- Find the WooCommerce module and click on it
- You’ll see a list of your WooCommerce products
- Click on products you want to collect and display reviews for
- Click Add More Product button to add additional products
- Once products are selected, click Create a Template button
Important: Products need to be connected individually at this time. There’s no “select all” option, so choose your key products that need review displays.
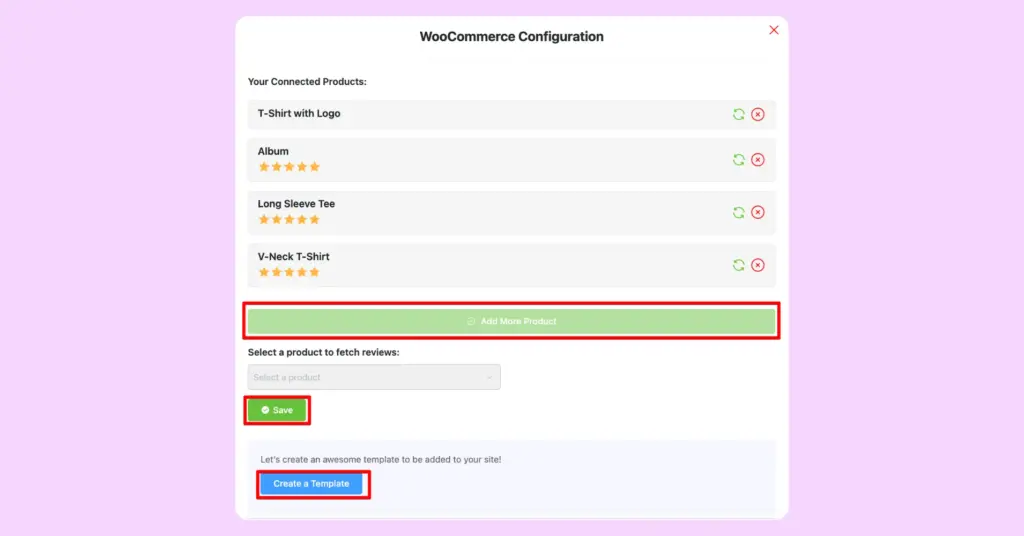
Create Your WooCommerce review template
After clicking “Create a Template,” you’ll enter the template editor. Here’s where you can create and customize your WooCommerce review template.
General Settings:
Template Name: Give it a descriptive name like “WooCommerce Product Reviews”
Template Design: Select your favorite template from different template options. (You can try “Polaris” template, which is a new addition to our templates)
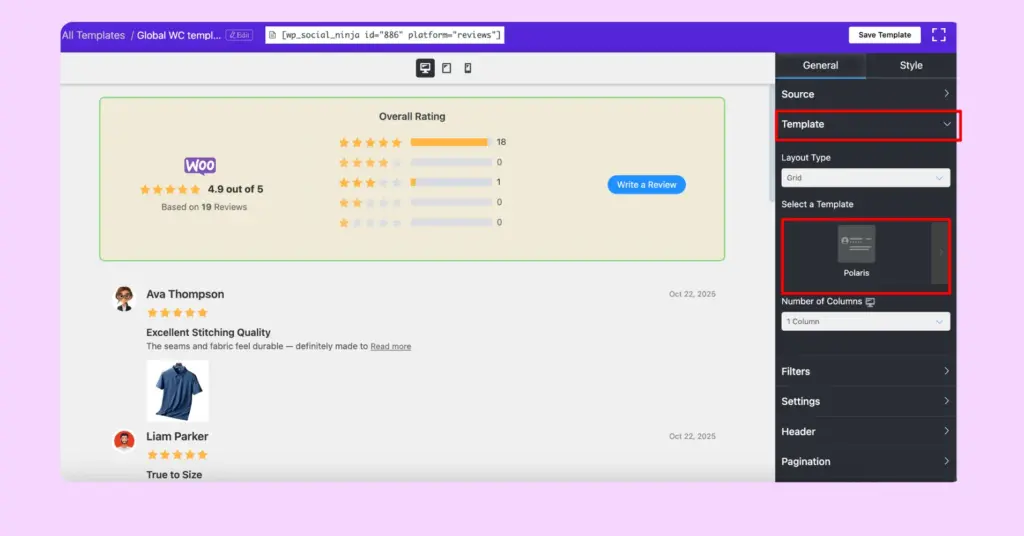
Layout Type: Choose from →
- Grid – Reviews displayed in card format, side by side
- Masonry – Pinterest-style layout with varying heights
- Slider – Reviews rotate in a carousel
- Badge – Compact display showing rating summary
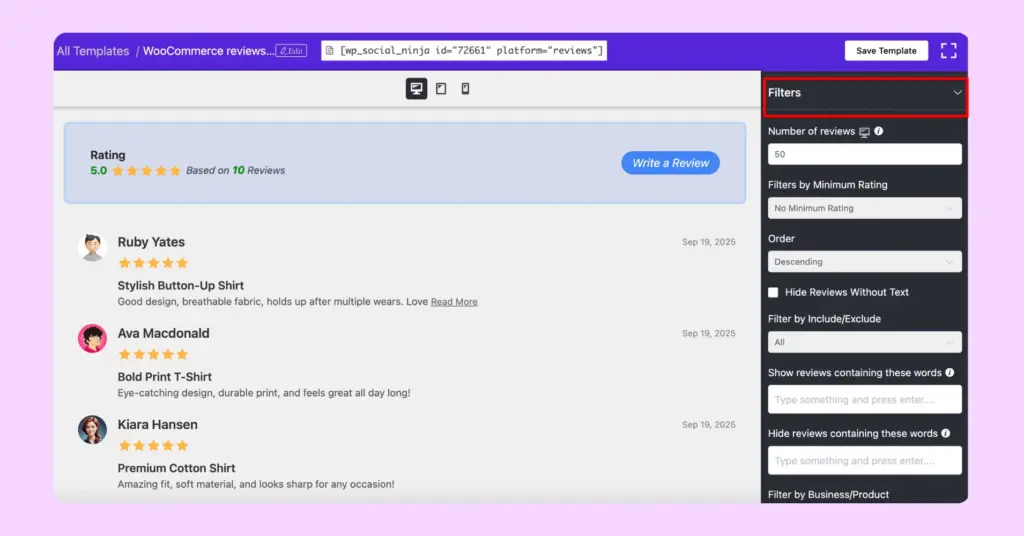
Filter Options:
- Show/hide reviews by specific words
- Display only certain star ratings
- Sort by newest, highest rated, or most helpful
Number of Columns: Select 1, 2, 3, or 4 columns depending on your page layout
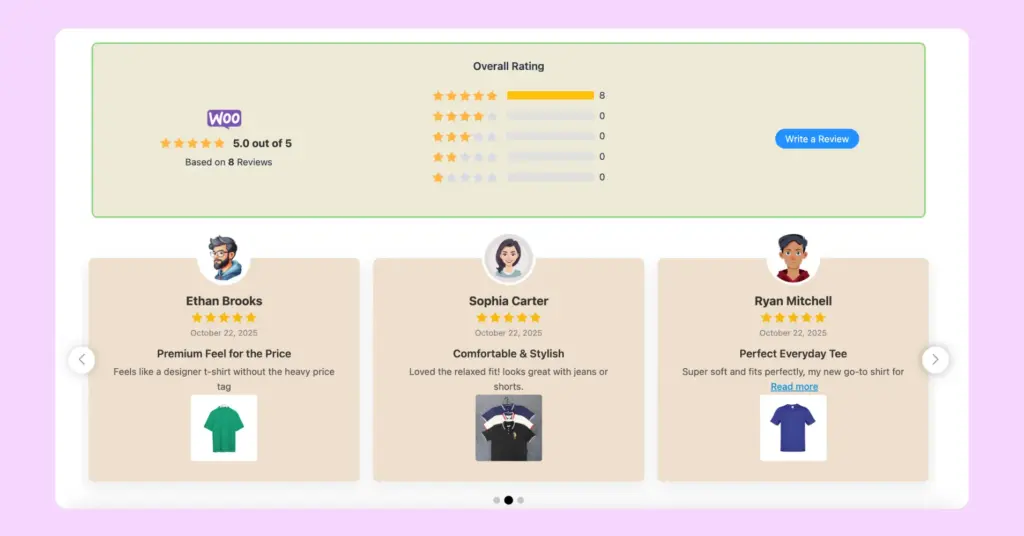
Header Settings: Enable the template header to show:
- Platform logo (WooCommerce icon)
- Overall average rating
- Total number of reviews
- “Write a Review” button (we’ll connect this to Fluent Forms later)
Style Customization:
- Customize colors to match your brand
- Adjust typography for reviewer names and review text
- Set spacing and padding for content and review box
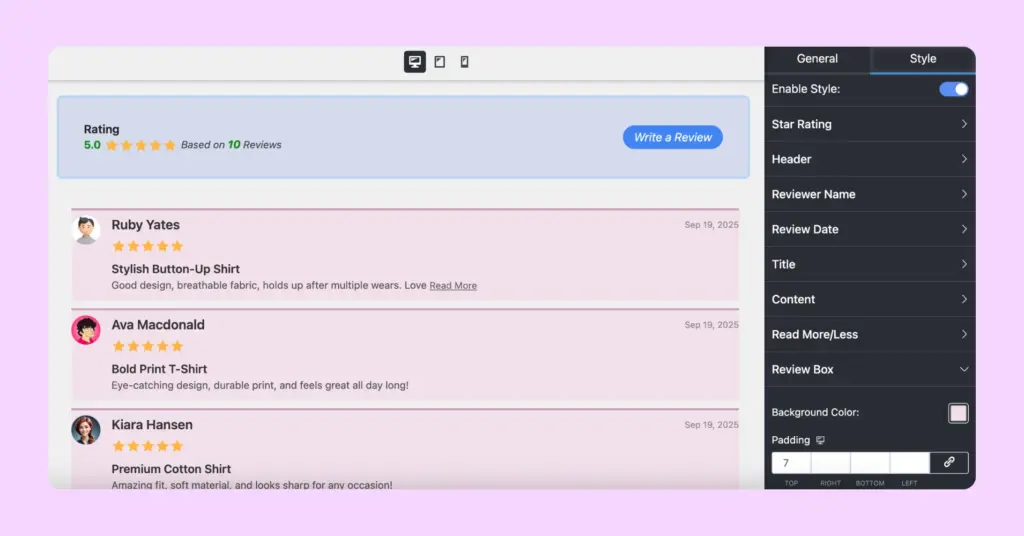
Save your template
- Click Save Template button
- Copy the shortcode that appears (looks like [wp_social_ninja id=”123″ platform=”reviews”])
- You can now embed this anywhere on your site
To know better about connecting your WooCommerce store, read the documentation.
WooCommerce Settings
In this section, you’ll synchronize your WooCommerce reviews (which you have seen previously). And from here, you need to select a few options to customize your WooCommerce reviews layout.
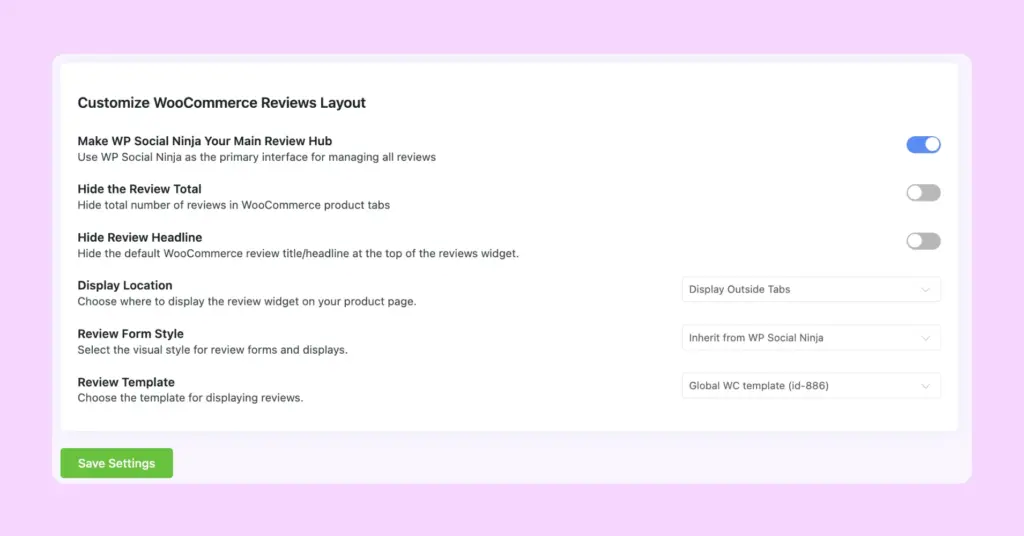
Make WP Social Ninja as Default Reviews: Turn this ON to replace the standard WooCommerce review display with your beautiful WP Social Ninja template
Hide Reviews Count: Toggle to show/hide text like “Based on 15 Reviews”
Template Placement: Choose where reviews appear:
- Display Inside Reviews Tab – Within WooCommerce’s default tab structure
- Display Outside Tabs – As a separate section outside of the product details tab
Review Form Style: Here you’ll choose either you want to use custom form that you’ve styled globally (which is ‘inherit’ from WP Social Ninja), or use the WooCommerce form.
Your WooCommerce review template is ready! Next, we’ll create the Fluent Forms template to collect new reviews.
Step 2: Ensure your Fluent Forms template is ready to collect reviews
Your next step is adding a review collecting system with Fluent Forms. Simply create a Fluent Forms review form, and the customer feedback it collects will automatically show up in your WP Social Ninja layout.
Enable WP Social Ninja integration in Fluent Forms
- Go to your Fluent Forms dashboard
- Click on the Integrations tab
- Scroll down or search for WP Social Ninja
- Toggle the switch to Enable the integration
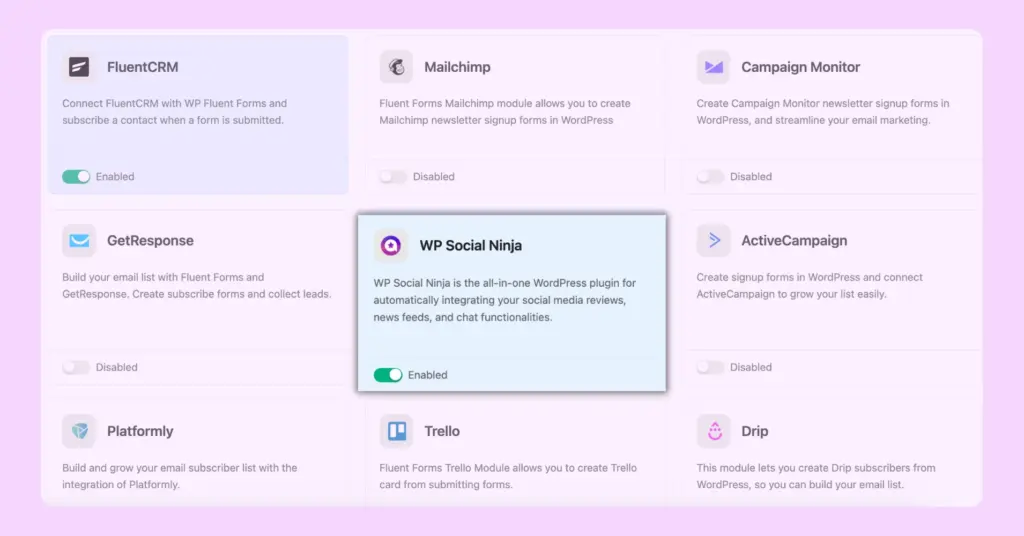
This connection allows reviews submitted through Fluent Forms to appear in your WP Social Ninja templates automatically.
Create your review collection form
- Navigate to Fluent Forms → All Forms
- Click Add a New Form button
- Choose Create a Blank Form
- Name your form “Product Review Form“
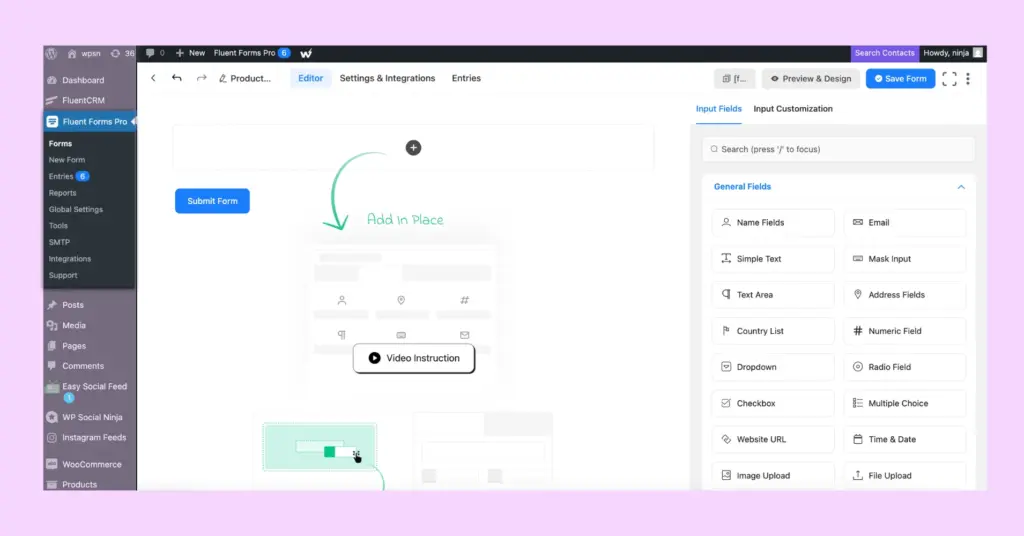
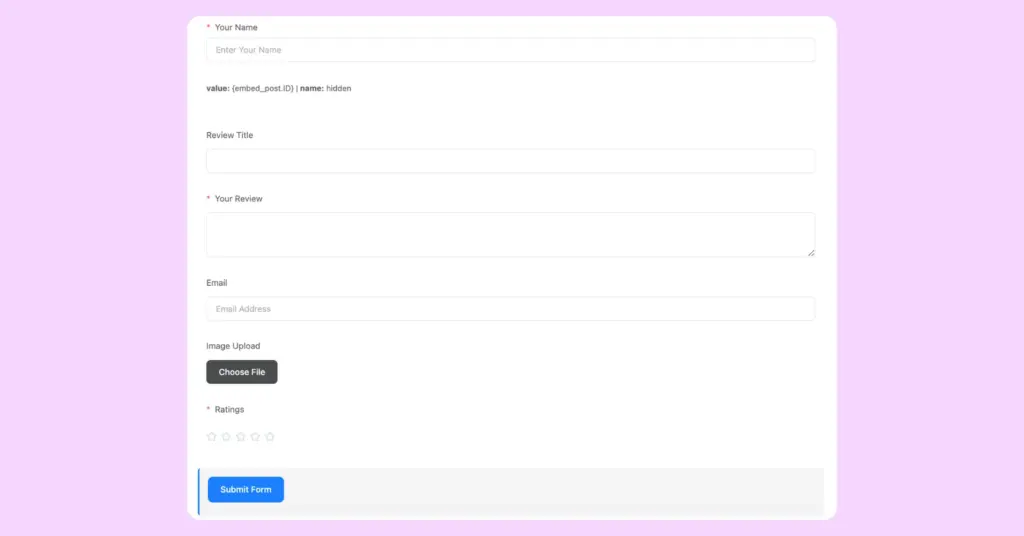
Add essential review fields
Drag and drop these fields from the left panel into your form:
Name Field
- Label: “Your Name”
- Make it required
- Shows who wrote the review
Email Address Field
- Label: “Email Address”
- Make it required
- Verifies legitimate reviewers
Product selection (Dropdown)
- Label: “Which product are you reviewing?”
- Add your product names as options
- Helps organize reviews by product
Rating Field
- Label: “Overall Rating”
- Set to 5 stars
- Make it required
- This is your star rating system
Review Title
- Use Text Input field
- Label: “Review Title”
- Optional but recommended
- Example: “Best purchase ever!”
Review Text
- Use Text Area field
- Label: “Your Review”
- Make it required
Product Image Upload
- Use File Upload field
- Label: “Upload Product Photo (Optional)”
- Let customers show your product in action
Reviewer Photo Upload
- Another File Upload field
- Label: “Add Your Photo (Optional)”
- Builds authenticity and trust
Save your form
Click Save Form and copy the form ID. You’ll use this to embed the review form on your product pages.
Your Fluent Forms review template is complete! Now let’s connect everything. For more details, you can read the blog: How to Add Reviews with Fluent Forms on Your Website.
Step 3: Collect WooCommerce reviews with Fluent Forms
This is the final step, connecting your Fluent Forms review collection with your WP Social Ninja display template. Once you set it up, every new review will automatically move from submission to a beautifully displayed section on your website.
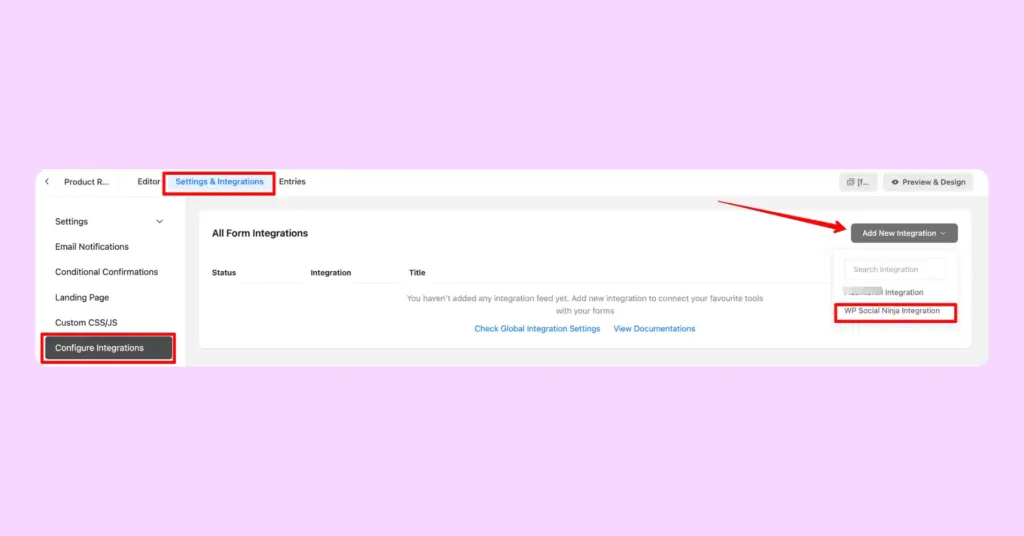
Create the WP Social Ninja Integration feed
- Open your Product Review Form in Fluent Forms
- Go to Settings & Integrations → Configure Integrations
- Click Add New Integration button
- Select WP Social Ninja Integration from the dropdown
Configure the Integration Feed
A configuration panel appears. Here’s what to set up:
Feed Name: Give it a name like “WooCommerce Review Feed”
Integration Source: You’ll see a dropdown showing you the source name. Choose “WooCommerce”
Map Your Form Fields:
This is crucial, you’re telling WP Social Ninja which form field contains which information:
- Ratings Field (Required): Select your 5-star Rating field
- Name Field: Map to your Name field
- Email Field: Map to your Email field
- Review Content: Map to your Review Text field
- Review Title: Map to your Review Title field
- Reviewer Image: Map to Reviewer Photo Upload field
- Review Image: Map to Product Photo Upload field

N.B: Set Conditional Logic if required
Save the Integration
- Click Create WP Social Ninja Feed
- Then click Save Form
- Your integration is now active!
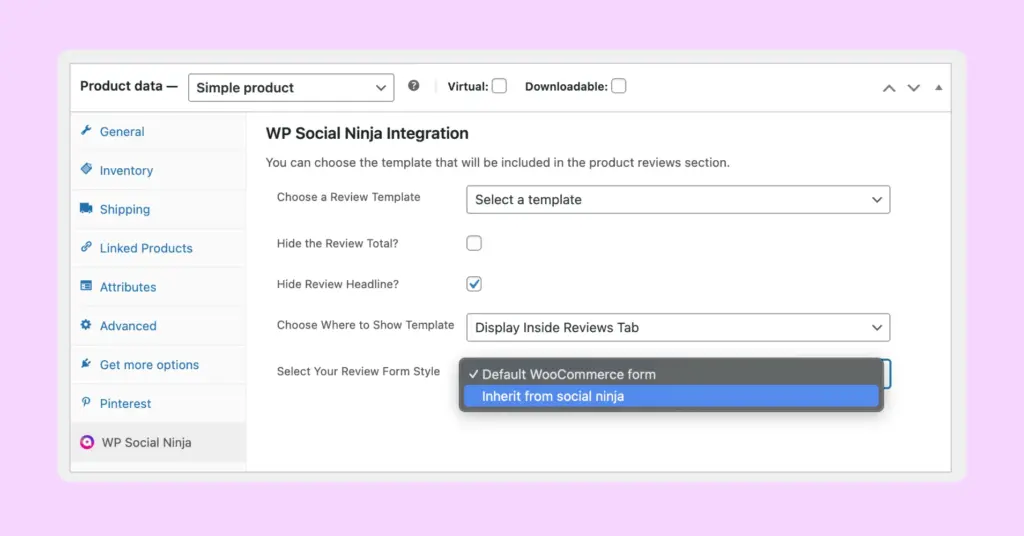
WooCommerce product specific settings
To fine-tune how reviews work for individual products, follow these simple steps:
- Go to Products → Edit Product in WooCommerce
- Scroll down to the WP Social Ninja Integration section
- Under Reviews Form, select Inherit from WP Social Ninja
- Click Save to apply the changes
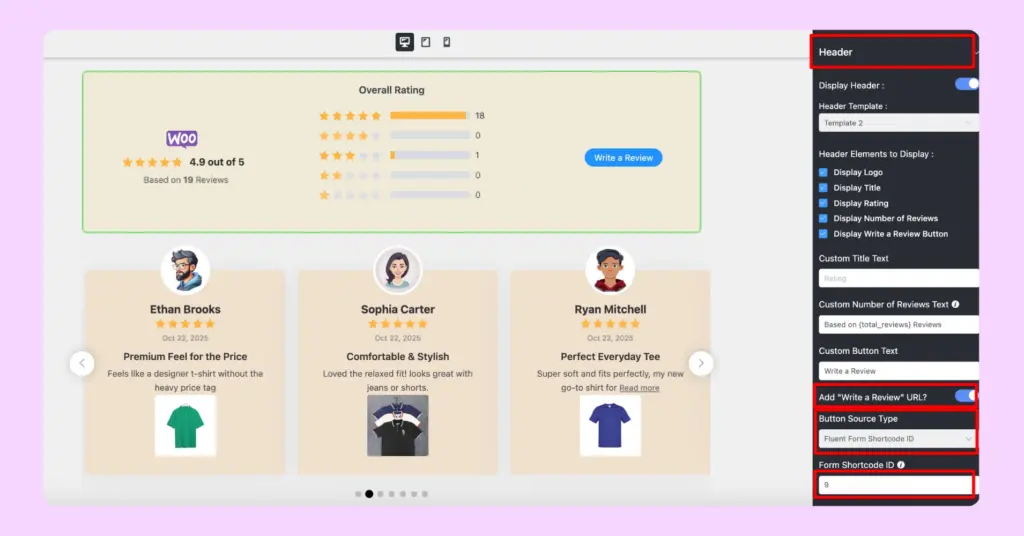
Connect the “Write a Review” Button to your form
Well, this is the last part. Remember the “Write a Review” button in your WooCommerce review header? Let’s make it open your Fluent Forms review form:
- Open your WooCommerce review template settings panel
- Go to the header, turn on the “Write a Review” URL
- Choose “Fluent Form Shortcode ID” in the Button Source Type box
- Input the Form Shortcode ID and click on “Save Template”
Now, as you’ve customized and styled your reviews template, also added the form successfully, what’s next? Basically, you have done everything and made your WooCommerce reviews template completely ready.
When your customers visit your product page, they will see this preview (if you already have some reviews):
From here, when the user clicks on the ‘write a review’ button, they will find this form:
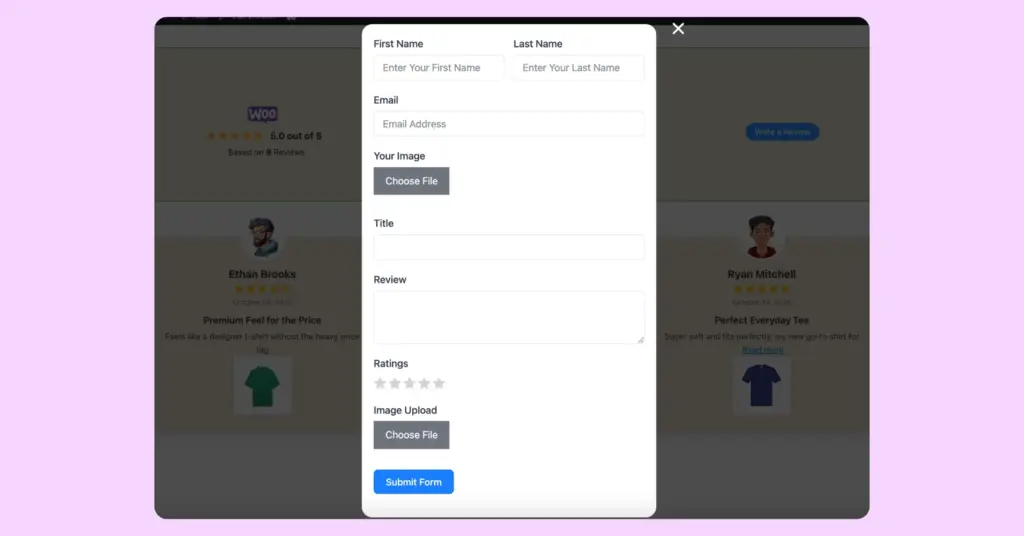
That’s all! Every time a customer leaves their review here, it will automatically be displayed on your product page.
Still, if you need more details on this, you can check WP Social Ninja’s documentation.
Get a professional review system
You have successfully set up a professional review collection system that collects, manages, and displays customer feedback in one smooth workflow. Customers can now submit detailed reviews with images using Fluent Forms, which will then be displayed by WP Social Ninja on your website.
Here’s what you’ve achieved:
- Effortlessly collect rich, photo-supported testimonials
- Default WooCommerce form replaced with a custom, branded form
- Control where and how reviews appear on your site
- Created strong social proof that turns visitors into buyers
Once you’ve tested your setup, every new review will flow perfectly from submission to display, without any extra steps or confusion. This entire system not only saves time but also strengthens the credibility of your brand.
Now, your WooCommerce store has a smart, reliable review system that keeps feedback organized and turns the voice of customers into lasting trust.

Fluent Forms Editorial Team is a group of experts who know about WordPress, business, growth, email marketing, and other technical stuff. Stay tuned!


Leave a Reply