
Integrate Razorpay in WordPress Forms for Effortless Transactions

WordPress forms have evolved far beyond contact fields. Add a payment method, and they become mini-checkout systems – ready for product sales, registrations, donations, booking payments, and more. Razorpay sits at the center of that experience, powering fast and secure online transactions across India.
Combine Razorpay with Fluent Forms and you get a streamlined, flexible, on-page checkout flow that helps businesses collect money without friction. This guide breaks down the benefits of using Razorpay with Fluent Forms, how to set things up step by step, and the use cases where this combination performs best.
TL;DR
- Razorpay brings a modern, multi-channel payment experience to WordPress, letting you accept orders, donations, subscriptions, and payouts with ease.
- Fluent Forms integrates with Razorpay cleanly, giving you fast, secure, on-page checkout flows designed to boost conversions.
- Setup takes four steps: create a Razorpay account, enable the payment module, configure your API keys, and build a form with a checkout style that suits your workflow.
- Once integrated, your forms can handle more than payments – automate emails, trigger CRM events, run bookings, and build full workflows inside WordPress.
What is Razorpay
Razorpay is a complete payment infrastructure designed to help businesses accept, process, and distribute money effortlessly. It focuses on simplicity, speed, and reliability – giving both merchants and customers a clean payment experience.

Some standout strengths of Razorpay:
- 100+ payment methods
Cards, UPI, net banking, wallets, pay-later systems, EMI – everything your customers may prefer. - Smart payment links and buttons
Create shareable links or one-click payment buttons for instant transactions. - Automated payouts
Pay contractors, vendors, or employees with scheduled or instant payouts. - Subscription engine
Bill customers on a recurring schedule with automated invoicing and reminders. - Split payments
Useful for marketplaces, events, or situations where revenue needs to be distributed. - Clean reporting & analytics
Transaction history, settlement info, and performance metrics directly inside your dashboard.
Razorpay’s ecosystem is built to scale – whether it’s an eCommerce shop, SaaS platform, NGO, event organizer, or a service-based business.
Why integrate Razorpay with Fluent Forms
When you connect a payment gateway to a form, it stops being a simple data collection tool and becomes a revenue pipeline.
Fluent Forms is built exactly for that – fast, lightweight, intuitive, and designed around how real businesses operate.
You get drag-and-drop simplicity, powerful conditional logic, flexible payment fields, and clean UI. Add Razorpay into the workflow, and you have a checkout experience embedded directly into your website.
What you can build with Razorpay + Fluent Forms:
- Product order forms
- Event or class registrations
- Donation and fundraising forms
- Subscription billing
- Booking and appointment payments
- Conditional pricing forms
- Custom one-page checkouts
- Internal payment workflows for services or digital products
Benefits of integrating Razorpay with Fluent Forms
Multiple ways to pay
UPI, net banking, cards, wallets – customers choose what feels easiest, making checkout smoother.
On-page modal checkout
Embedded Razorpay checkout keeps users on your site for faster conversions.
Automated receipts and smoother reconciliation
Fluent Forms triggers notifications, CRM tags, or custom workflows when payments succeed.
Flexible pricing models
One-time fees, recurring subscriptions, or dynamic pricing through conditional logic.
Developer-friendly and scalable
Businesses can extend, automate, and track payments as they grow.
Step-by-step guide to Razorpay integration with Fluent Forms
Step 1: Sign up for Razorpay
If you don’t already have a Razorpay account, create one from their signup page. This gives you access to your dashboard and the API keys required for integration.
Step 2: Enable payment module
In your WordPress dashboard:
Go to Fluent Forms → Global Settings. Then open Payment → Settings. Enable Payment Module from here.
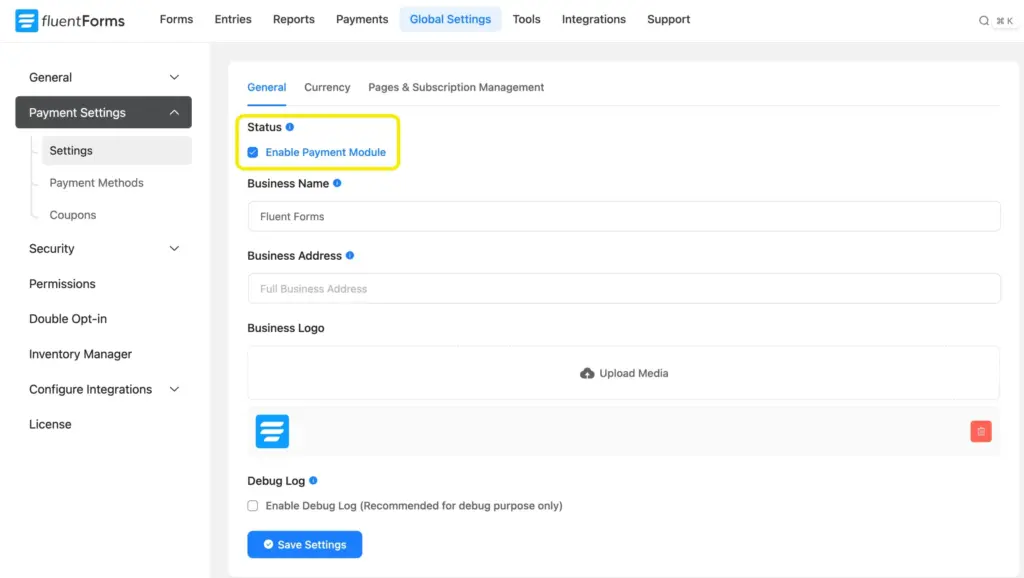
You’ll also find options for currency, business details, taxes, and subscription preferences here.
Step 3: Configure Razorpay in Fluent Forms
Next, go to the Payment Methods tab. Locate Razorpay and enable Razorpay Payment Method.

Choose your mode:
- Test Mode: for setup and testing
- Live Mode: for real transactions once you’re ready
I used the Test Mode for demonstration purposes.
Then select your preferred checkout type:
- Modal (embedded): complete the transaction inside the form
- Hosted: redirect users to a Razorpay-hosted checkout page
To finish setup:
Log in to your Razorpay dashboard.

Go to Accounts & Settings and find the Website & API keys tab. Generate your API Key and API Secret.
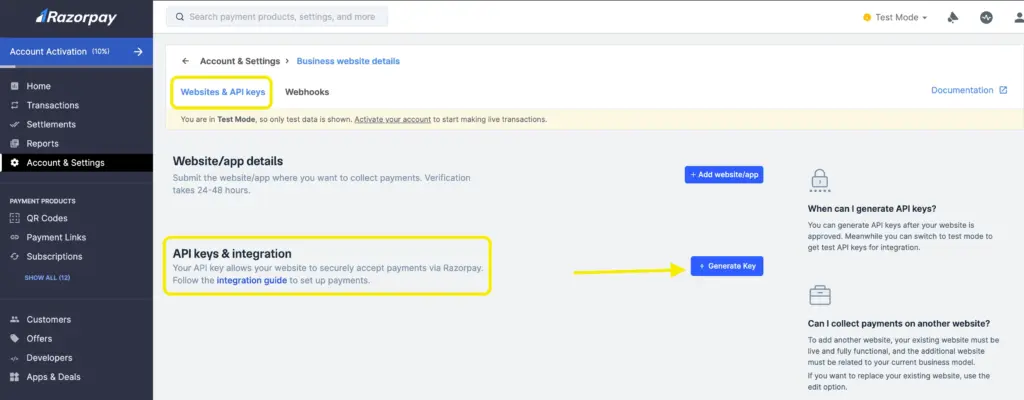
Follow this documentation, if you want to run test payments with Razorpay properly.
Paste both the Key and Secret into the Fluent Forms payment method setup fields; save your settings.

Step 4: Create a form and test payments
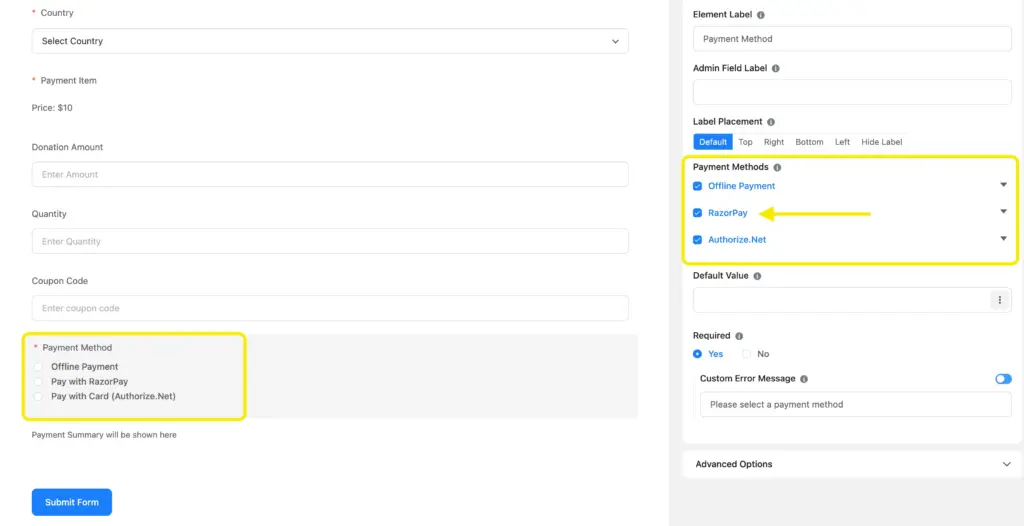
Now build your payment form: go to Fluent Forms → Add New Form. Add payment item, item quantity, and Razorpay as the payment method.
Submit a test payment to confirm everything works. Only switch to Live Mode when ready.
Here’s the payment form we used. You can find more ready to use forms like this on the form templates page.

If Razorpay is connected properly with Fluent Forms, a payment page will pop up like this.
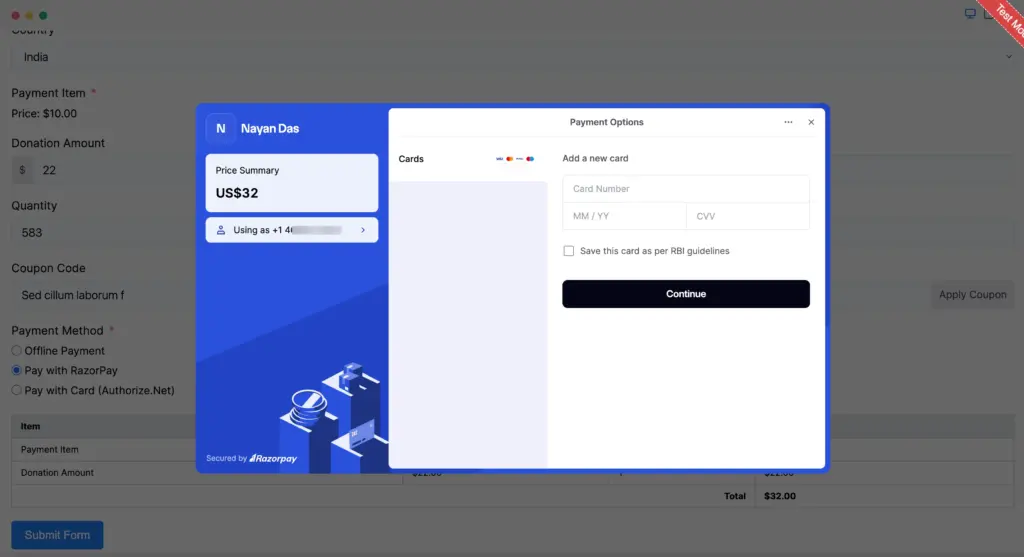
This way you’ll know that your website can now accept payments via Razorpay without any friction.
Note that: If you use these test cards for live mode payments, either of the following error messages will be displayed: card issuer is invalid or invalid card input.
What more you can do with your forms
Razorpay is a major win if your audience is primarily India-based or relies heavily on UPI and multi-channel payments. But Fluent Forms offers far more once payments are handled.
You can also connect:
- PayPal, Stripe, Razorpay, Mollie, Authorize.net, Paddle and Square
Offer alternatives depending on your region or customer preference. - Email marketing tools like Mailchimp, MailerLite, ActiveCampaign
Great for sending receipts, nurturing leads, or delivering digital items. - CRM and automation platforms like FluentCRM
Tag customers, start onboarding sequences, or deliver paid content automatically. - Messaging tools like Telegram, Slack
Keep your team on track whenever a form is submitted and manage leads properly.
With Fluent Forms, your payment form becomes part of a complete business system – collecting revenue, triggering automation, and managing user journeys in one place.
If you’ve used Razorpay with Fluent Forms before, share how it worked for you. If you’re exploring Razorpay for the first time, drop your questions below – happy to help you set up the perfect workflow.

This is Sumit. He’s a physics major who’s trying to understand both the physical as well as the WordPress worlds. Whenever he’s not busy, plays fifa or spends time with his family.


Leave a Reply