How to Accept Payments with WordPress Payment Integration

Collecting payments on your WordPress site shouldn’t feel like setting up an entire eCommerce system. Most businesses simply need a clean way to charge for a product, accept donations, collect service fees, or manage recurring payments – all without overwhelming plugins or complicated workflows.
That’s where WordPress payment integrations come in. And when you pair them with a smart form builder like Fluent Forms, your forms become complete checkout experiences: fast, flexible, and deeply connected to the rest of your workflow.
This guide walks you through how payment integrations work, how forms use them, and how to set up Stripe, PayPal, and Authorize.net inside Fluent Forms.
TL;DR
- WordPress payment collection does not require a full eCommerce setup. A form builder with gateway integration handles it.
- Fluent Forms supports eight gateways: Stripe, PayPal, Authorize.net, Razorpay, Paystack, Square, Paddle, and Mollie.
- One form handles item selection, dynamic pricing, coupons, subscriptions, and post-payment automations.
- Setup is three steps: enable the payment module, connect your gateway, add a payment field.
- Secure your site with SSL before going live.
WordPress payment processor vs payment integration
Nowadays, you have to select both a tool and an integration for collecting online payments. Well, there’s a bit of a difference between the payment processor and payment integration. Let’s find out the dissimilarities among them.
What is the WordPress payment processor
A payment processor works as an intermediary between your website and the payment procedure. The payment processors manage the following tasks.
- Managing the risk between your business and the credit card companies
- Handling relationship between you and your customer
- Collecting personal and financial information from customers
- Processing the transactions
- Transferring funds to your online business account
What is WordPress payment integration
A payment integration lets your form handle the entire payment process – securely, accurately, and without manual work.
When someone makes a payment:
- Your form collects the customer details.
- The gateway handles authorization through secure payment frames.
- The processor verifies the transaction.
- Your site receives a confirmation and triggers follow-up actions.
For your user, it’s one smooth experience.
For you, it’s a complete revenue workflow happening inside WordPress.
With embedded checkout (Stripe, Razorpay, Paystack), the entire payment happens inside your form, improving completion rates and user confidence.
Fluent Forms provide seamless payment integrations with WordPress forms. This is a fantastic form builder plugin in a proper bundle of solutions.
Its integration with Stripe, PayPal, Paystack, Authorize.net, Razorpay, Paddle, Square and Mollie – solved the problem of finding a different payment integration for the websites.
Now, let me tell you how online transactions are managed with WordPress payment integration. To know the process of collecting payments with WordPress payment integration, is also important.
How online transactions are handled
There are two phases in controlling the payment process. One is accepting the sale, and another one is settling the sale and receiving the money into the account. Let’s have a detailed discussion about these.
Accepting the sale
When a customer purchases an item using a credit card or debit card from your website, the details of the payment go through a payment gateway or integration. The client information is kept private in payment integration. Then it sends the data to the payment processor. Payment processors send a request to pay for the products purchased against the card to the issuing bank. At last, depending on the available funds of the customer, banks accept or deny the request for the payment. Surprisingly, the whole process takes only 1-2 seconds to complete.
Settling the sale and receiving the money into the account
Once the transaction process is complete, the bank deposits the money into the business account, from where products have been purchased based on the given information. Once the money hits the seller account, they can access the funds. The entire settlement process takes a few days to be done. Sometimes banks don’t allow access to all the funds at a time.
Why forms are the smartest way to collect payments
A form can do more than take card details. Fluent Forms can be a great example. You get drag-and-drop building, powerful logic, payment fields, and native integrations with major gateways.
It can also:
- show item selections
- calculate totals dynamically
- apply coupons
- update payment summaries in real time
- create conditional pricing flows
- run subscriptions
- trigger CRM actions, automations, onboarding sequences
- send receipts and confirmations instantly
Instead of stitching multiple tools together, a single form handles everything – payment, data collection, and workflow automation.

Some key features of Fluent Forms:
- 65+ input fields to collect any type of information
- Numeric calculation to create forms with calculators
- Multi-step forms to break long forms into multiple steps
- Conversational forms to provide a better form-filling experience
- Advanced post creation to collect user-generated content
- Conditional logic to show/hide input fields based on user behavior
- Integration with popular payment gateways to collect payments and donations
- Spam protection using hCaptcha, reCAPTCHA, Turnstile, Honeypot, Akismet
- Quiz and survey with advanced scoring
- Advanced form styler to align form with your brand identity
- Custom CSS and JS to create more advanced forms
- Export entries in CSV, Excel, ODS and JSON format
- PDF add-on to turn form submissions into PDF files
- Form scheduling and restriction based on different rules
- Double opt-in confirmation to ensure efficient data collection
- Email notification after form submission
- Conditional confirmation to show confirmation messages based on predefined conditions
- Advanced form validation to accept eligible submissions
- Reporting dashboard for an overview of the forms’ performance
- Fully responsive and accessible to ensure inclusivity
- 60+ integrations to expand core functionalities
Now, let’s move on to our main topic, which is about the procedure of accepting payments with WordPress payment integration. For a more precise understanding, I have divided the process into three different sections.
- Configure a method to accept payment with WordPress payment integration
- Select your WordPress payment integration
- Start collecting payments with your WordPress payment integration
Here are the details about the steps.
Configure payment settings in Fluent Forms
Go to the Global Settings of Fluent Forms from your dashboard. Select Payment from the left sidebar. Click on the Enable Payment Module button.
Now set the Business Name, Business Address and Business Logo. Click on the Save Settings.
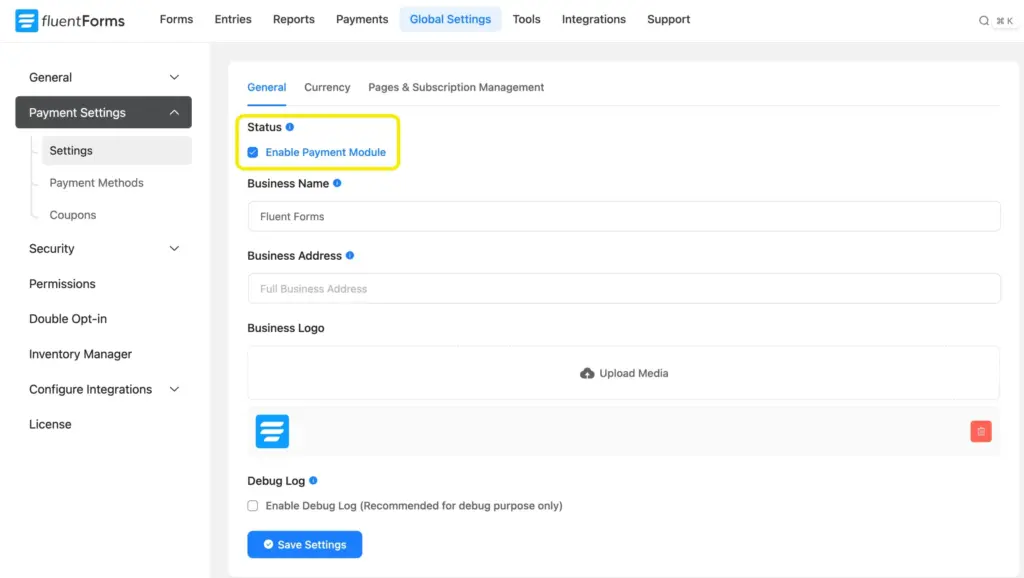
Next, go to the Currency Settings. Set the Default Currency using the dropdown menu. Also, you can customize the Currency Sign Position and Currency Separators.

There is a Pages & Subscription Management tab from where you can set a Payment Management and Payment Receipt Page.

You also have a Test Payment method, which allows you to verify if the entire payment process is functioning smoothly without processing actual transactions.
This feature is particularly useful for ensuring that everything is set up correctly, from form submission to payment confirmation, before going live.
Build Smarter Forms for Free

Select your WordPress payment integration
To choose the payment integration, head over to the Payment Methods. Fluent Forms offers eight payment methods, such as –
We have used three integrations for demonstration, Stripe, Paypal, and Authorize.net.
Stripe integration with Fluent Forms
Stripe is ideal if you want global coverage, wallets, subscriptions, and clean card payments.

Besides using the standard credit and debit cards, it lets you use other payment methods like:
- Google Pay
- Apple Pay
- AliPay
Stripe charges 2.9% + $ 0.30 per transaction to accept credit card payments. That is pretty much the industry standard. Stripe can also help you set up and proceed with recurring payments.
Fluent Forms offers Stripe integration in the free version. It only charges 1.9% additionally along with standard Stripe payment charge.
If you don’t have a Stripe account, you’ll need to create one to obtain the API key.
Now from the Fluent Forms Pro > Global Settings > Payment > Payment Methods window, check the box beside Enable Stripe Payment Method.

There are two modes: Test and Live Mode. Choose your preferred mode.
You will see a Connect with Stripe button. Click on it, and you’ll be redirected to the Stripe website, where you’ll need to log in to your account.

After logging in, you will be prompted to connect the account with Stripe.
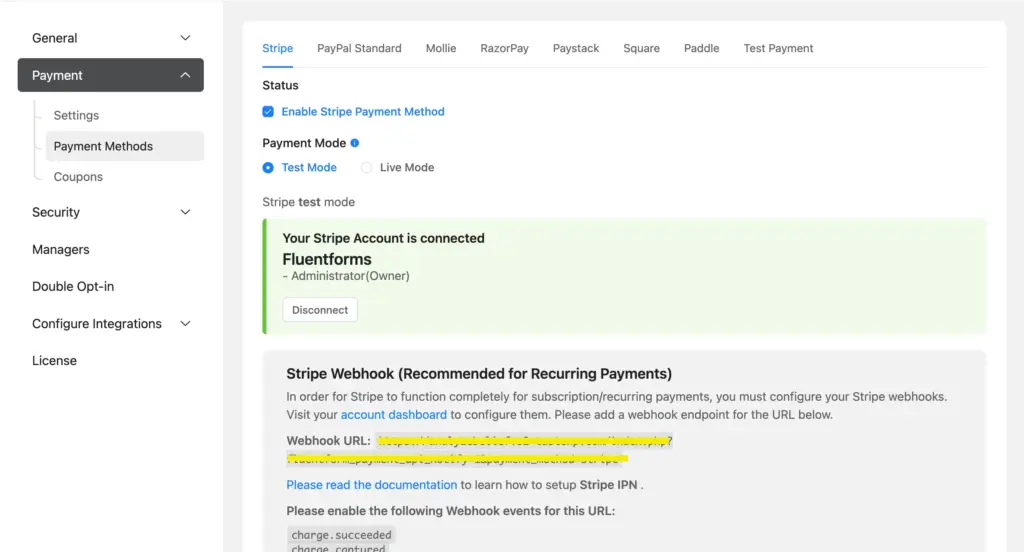
In a while, you will see that your Stripe account is connected with Fluent Forms.
PayPal integration with Fluent Forms
PayPal gives customers a trusted, familiar way to pay – especially useful for regions where PayPal adoption is high or for buyers who prefer not to share card details.

One of the significant benefits of PayPal is that it lets users accept payments with their PayPal account and cards. On the other hand, you can’t do the same with Stripe. So, it is excellent news for the privacy-conscious people who hesitate to give their card details for transactions.
In terms of fees, PayPal charges the same prices as Stripe. So, there is no difference there. And PayPal also lets you proceed with recurring payments. Moreover, it will give you rewards with points if you connect your credit card with your PayPal account.
To integrate PayPal with Fluent Forms, you need to create or log in to your PayPal account first.
Then go to the Fluent Forms dashboard. Click on Settings, and choose payment settings from the left sidebar.
Go to PayPal settings from the top bar. Keep the status on for Enable PayPal Payment Method. Choose the PayPal Payment Mode from Sandbox Mode and Live Mode. Then give your PayPal email.
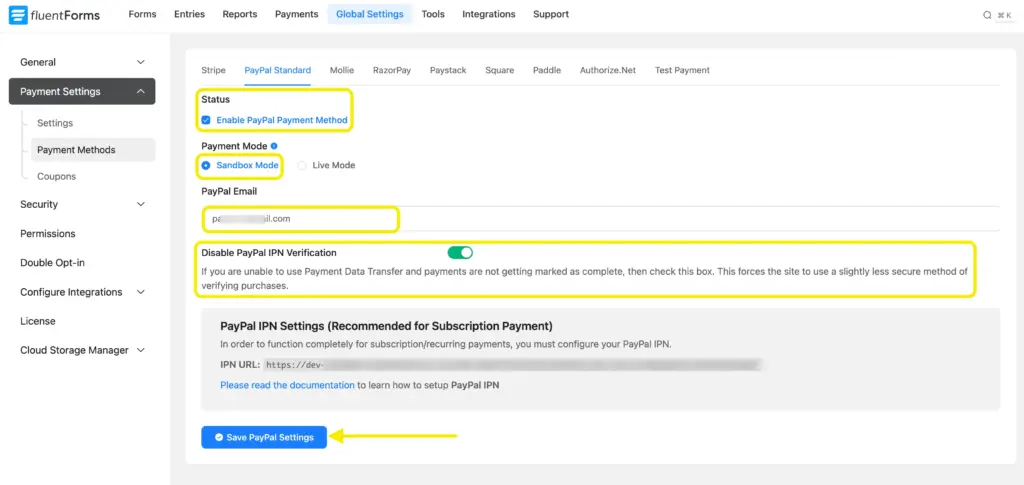
At last, you can turn on or off the Disable PayPal IPN verification mode. I am keeping it in a disabled mode because right now, I am not using it. Save the settings.
Authorize.net integration with Fluent Forms
Authorize.net is a long-trusted global payment gateway known for its stability, strong fraud controls, and reliable card processing. It’s a popular choice for nonprofits, service-based businesses, educational institutions, and organizations that need consistent, compliant, no-surprise payment handling.

Connect Authorize.net to Fluent Forms with these simple steps:
- Enable Authorize.net Payment Method
- Configure Authorize.Net with Fluent Forms
- Get the Credentials
- API Login ID, Transaction Key, and Webhook SignatureKey from the Authorize Account
- Get API Login ID
- Get Transaction Key
- WebHook Signature Key
- Required Authorize.Net Webhook Events Setup
- Integrate Authorize.Net in Forms
- Preview of Added Payment Method
For detailed process – Learn how to connect Authorize.net with Fluent Forms
Start collecting payments with your WordPress payment integration
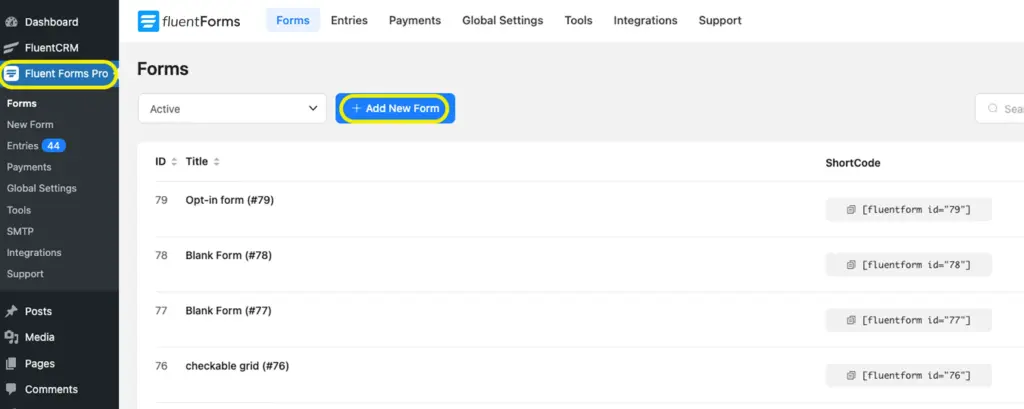
After setting up payment methods, you need to create a form to accept payments.
Go to Fluent Forms dashboard and click on Add New Form.
Add necessary input fields in your form. We have created a bakery order form.

Next, add the Payment Method field to your form and customize it according to your need.

You will see a Pay with Card (Stripe), and Pay with PayPal option as a payment method.
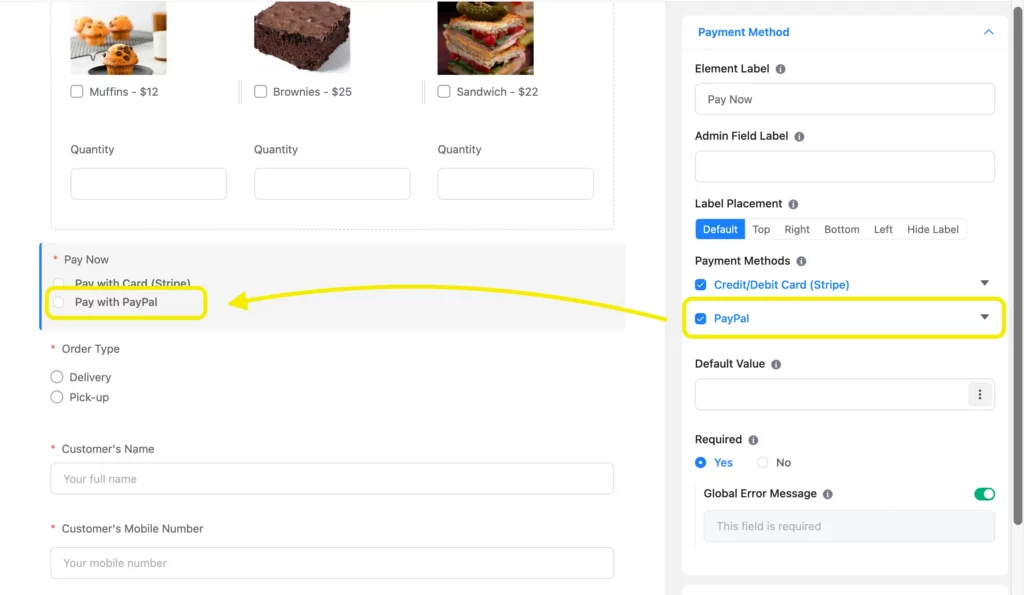
Don’t forget to save the form, and preview it before publishing on your website.
I hope you now understand the whole process of accepting payments with WordPress payment integration.
Now, let’s find out how you can secure your WooCommerce website with WordPress payment processors.
Securing your payment for your WooCommerce website
Along with selecting a payment processor that suits all of your criteria, you also need to secure your website to protect people’s financial and personal information. Here are some top practices to keep your WordPress websites safe.
Enable SSL encryption
You have to get an SSL certificate and install it to proceed with your website to HTTPS. Having SSL on your website can also contribute to SEO by securing your site. Moreover, sometimes Google warns visitors if they visit websites that don’t support SSL certificates.
Secure client accounts
Applying some tighter practices to your users’ accounts can also help you secure your client’s data. Encoding customer accounts, encouraging them to create stronger passwords, and even adding a simple CAPTCHA for logins can give additional security to your e-commerce business.
Final words
Accepting payments on WordPress doesn’t need to be complicated. With the right form plugin and a properly configured gateway, you can sell products, take donations, charge for services, run subscriptions, and automate entire workflows – all inside a single form.
If you want help refining your payment flow, choosing a gateway, or structuring a checkout form, just let me know.

This is Sumit. He’s a physics major who’s trying to understand both the physical as well as the WordPress worlds. Whenever he’s not busy, plays fifa or spends time with his family.


Leave a Reply