How to Show Percentage Quiz Scores on Custom Results Pages using Fluent Forms
When someone finishes a quiz on your site, showing them “14 out of 20” leaves them doing mental math. A percentage score removes that friction. “70%” is instantly understandable.
That’s exactly what we’re building in this guide. I’ll show you how to display percentage quiz scores using Fluent Forms and then how to deliver those results on a custom, branded page using either the Landing Page feature or Conversational Forms.
TL;DR
- Fluent Forms Pro’s quiz score field supports 6 score types: total points, correct questions, fraction, grade, percentage, and personality.
- Selecting Percentage as the score type automatically calculates and displays the percent score based on the total possible points.
- Select the {inputs.quiz-score} (quiz score) shortcode in confirmation messages and email notifications to display the percentage.
- For a custom results page, use the Landing Page feature (form + results on the same standalone page, no navigation) or a Conversational Form (one question at a time, full-screen results on completion).
- The form must live on the same page where you want the results to appear.
- Use conditional confirmations to show different messages for different score ranges (e.g., “Great job!” for 80%+ vs. “Keep practicing” for below 50%).
Understanding Fluent Forms Quiz Score Types
Before we set up percentage scoring, let’s quickly look at all the score types available in the Fluent Forms quiz module. The quiz score field is a hidden advanced field. Your users won’t see it on the form. It works behind the scenes to calculate and store the result, which you can then display in confirmation messages or emails.
Here are the 6 score types you can choose from:
- Total points: Adds up the point values of all correct answers. Best when different questions carry different weights.
- Total correct questions: Counts how many questions the user got right.
- Fraction point: Shows correct answers as a fraction (e.g., 7/10). Useful for quick, at-a-glance results.
- Grade system: Displays a custom label (A, B, C, Pass/Fail, or any text you define) based on score ranges.
- Percentage: Converts the score into a percentage of total possible points. The most universally understood format.
- Personality quiz: Maps answers to personality types instead of right/wrong scoring.
Why percentages work best in most cases
Everyone understands percentages instantly. A score of “16 out of 20” requires mental calculation. But “80%” communicates the same thing without any effort. It also makes it easy to set pass/fail thresholds and compare results across quizzes of different lengths.
How the percentage is calculated
Fluent Forms divides the total points scored by the maximum possible points, then multiplies by 100. If your quiz has 5 questions worth 2 points each (10 total) and a user gets 4 right (8 points), their percentage is 80%.
How to Display Quiz Scores as Percentages
The setup has five steps. Start with the quiz module. I’ll use a geography quiz as the example, but this works for any scored quiz where answers are right or wrong.
Prerequisites: You need Fluent Forms Pro installed and activated. The quiz module is a Pro feature.
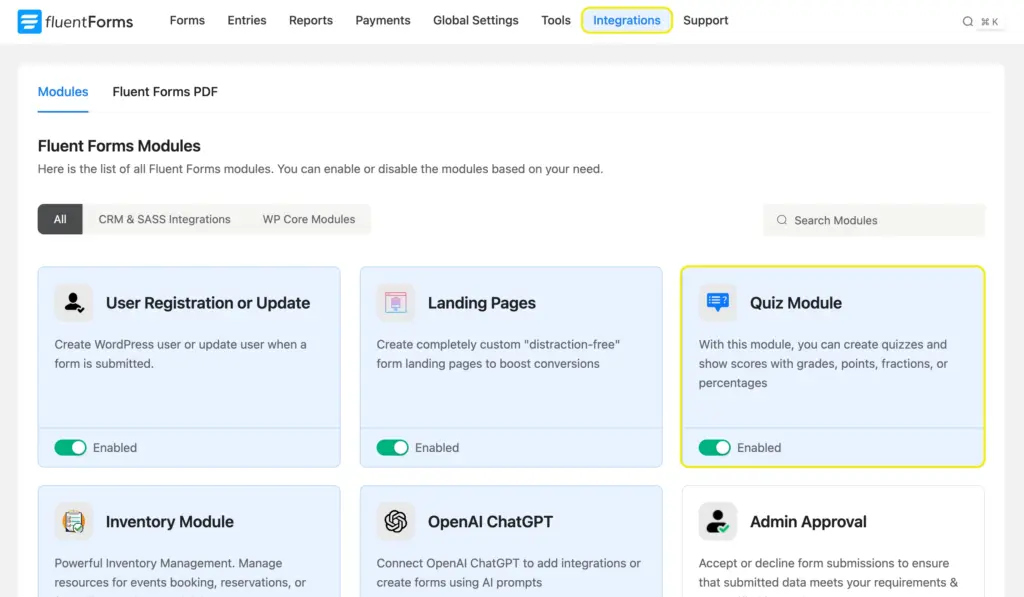
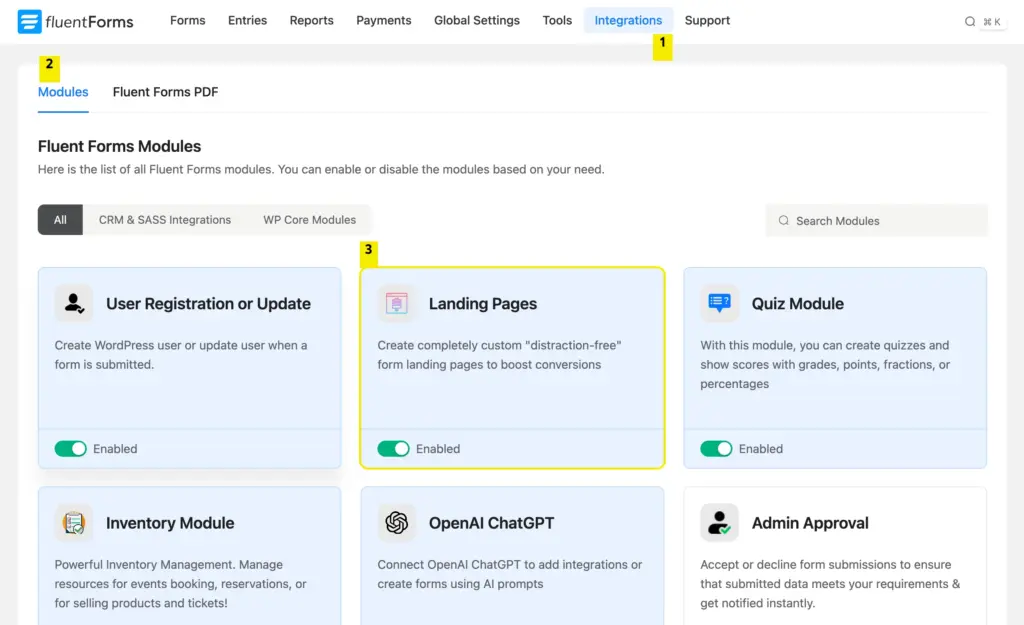
Step 1: Enable the quiz module
Go to Fluent Forms Pro > Integrations > Modules in your WordPress dashboard. Find the Quiz Module and toggle it on. This allows you to use quiz-specific settings across all your forms.
Step 2: Add questions and the quiz score field
Create a new form or edit an existing one. Add your quiz questions using supported fields:
- Radio field (single correct answer)
- Dropdown (single correct answer)
- Checkbox/Multiple Choice (multiple correct answers)
- Text input (exact match answers without options)
Write your questions in the element label. Add the answer options.

Once all questions are in place, go to Advanced Fields and add the Quiz Score field.
Step 3: Select “Percentage” as the score type
Click on the Quiz Score field to open its customization options. In the Select Score Type dropdown, choose Percentage.
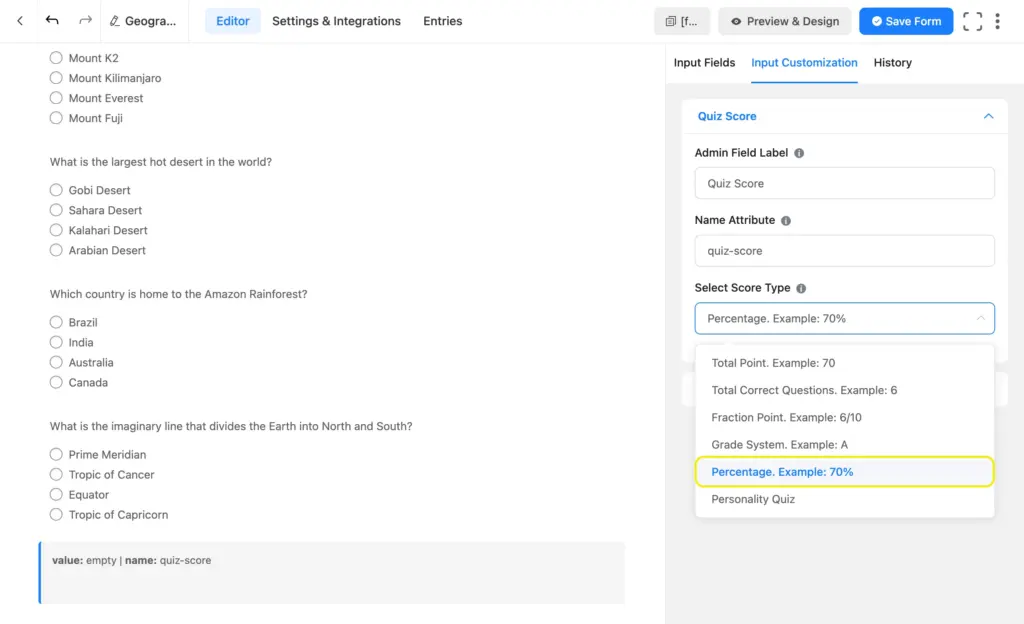
That’s it for this step. The field will now calculate the percentage automatically when a user takes the quiz.
You can add multiple quiz score fields if you want to show results in different formats. For example, one field for percentage and another for the grade system.
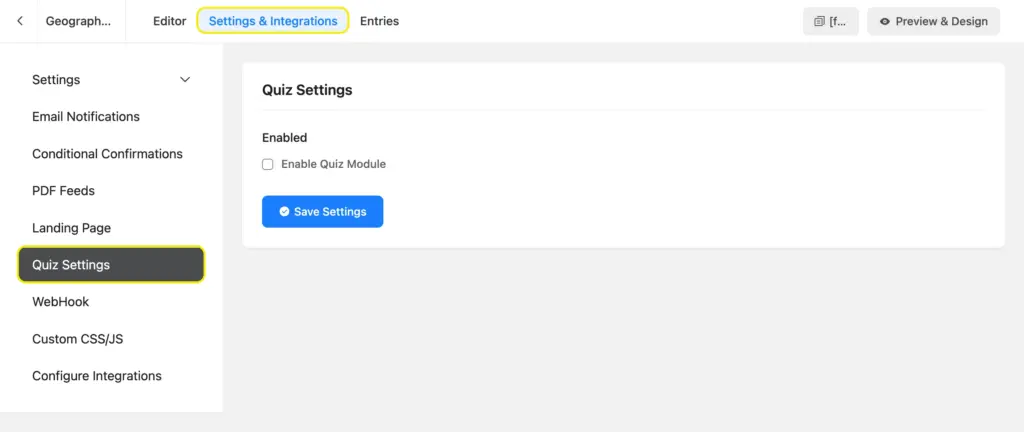
Step 4: Configure quiz settings (correct answers and points)
Navigate to Settings & Integrations > Quiz Settings. Enable the quiz module for this specific form.
Here’s what to configure:
- Append Result: Check this to show a detailed question-by-question breakdown on the confirmation page.
- Randomize Questions: Optional. Shuffles question order on each load.
- Randomize Options: Optional. Shuffles answer choices within each question.
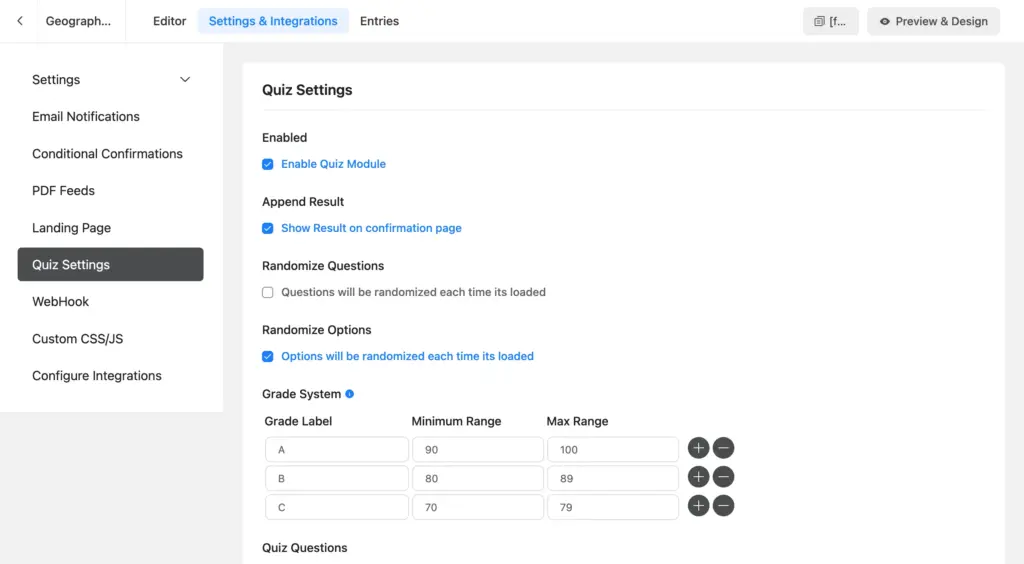
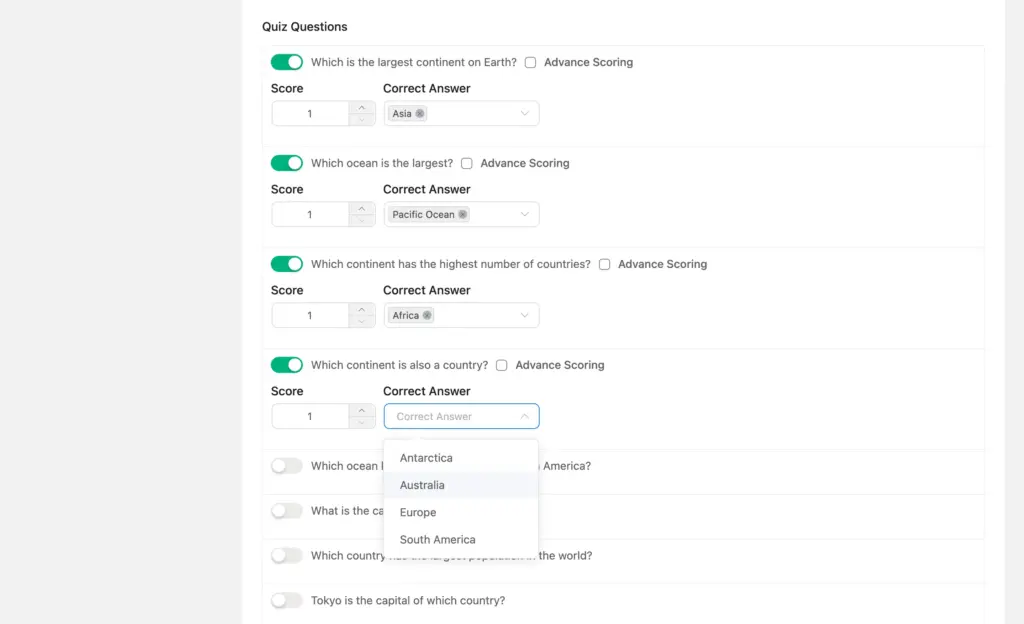
Scroll down to the Quiz Questions section. Toggle on each question, select (for selection fields) or type (for text fields) the correct answer, and assign points. You can give each question the same point value (e.g., 1 point each) or vary them.
Here’s how our quiz turned out. Download and customize it for your site.
Step 5: Display the percentage in confirmation messages
Go to Settings & Integrations > Settings > Confirmation Settings. This is what users see after they submit the quiz.
Write your confirmation message and insert the quiz score shortcode. Click Add Shortcodes > Input Options and select the quiz score field you added. It will insert something like {inputs.quiz-score}.
Here’s an example confirmation message:
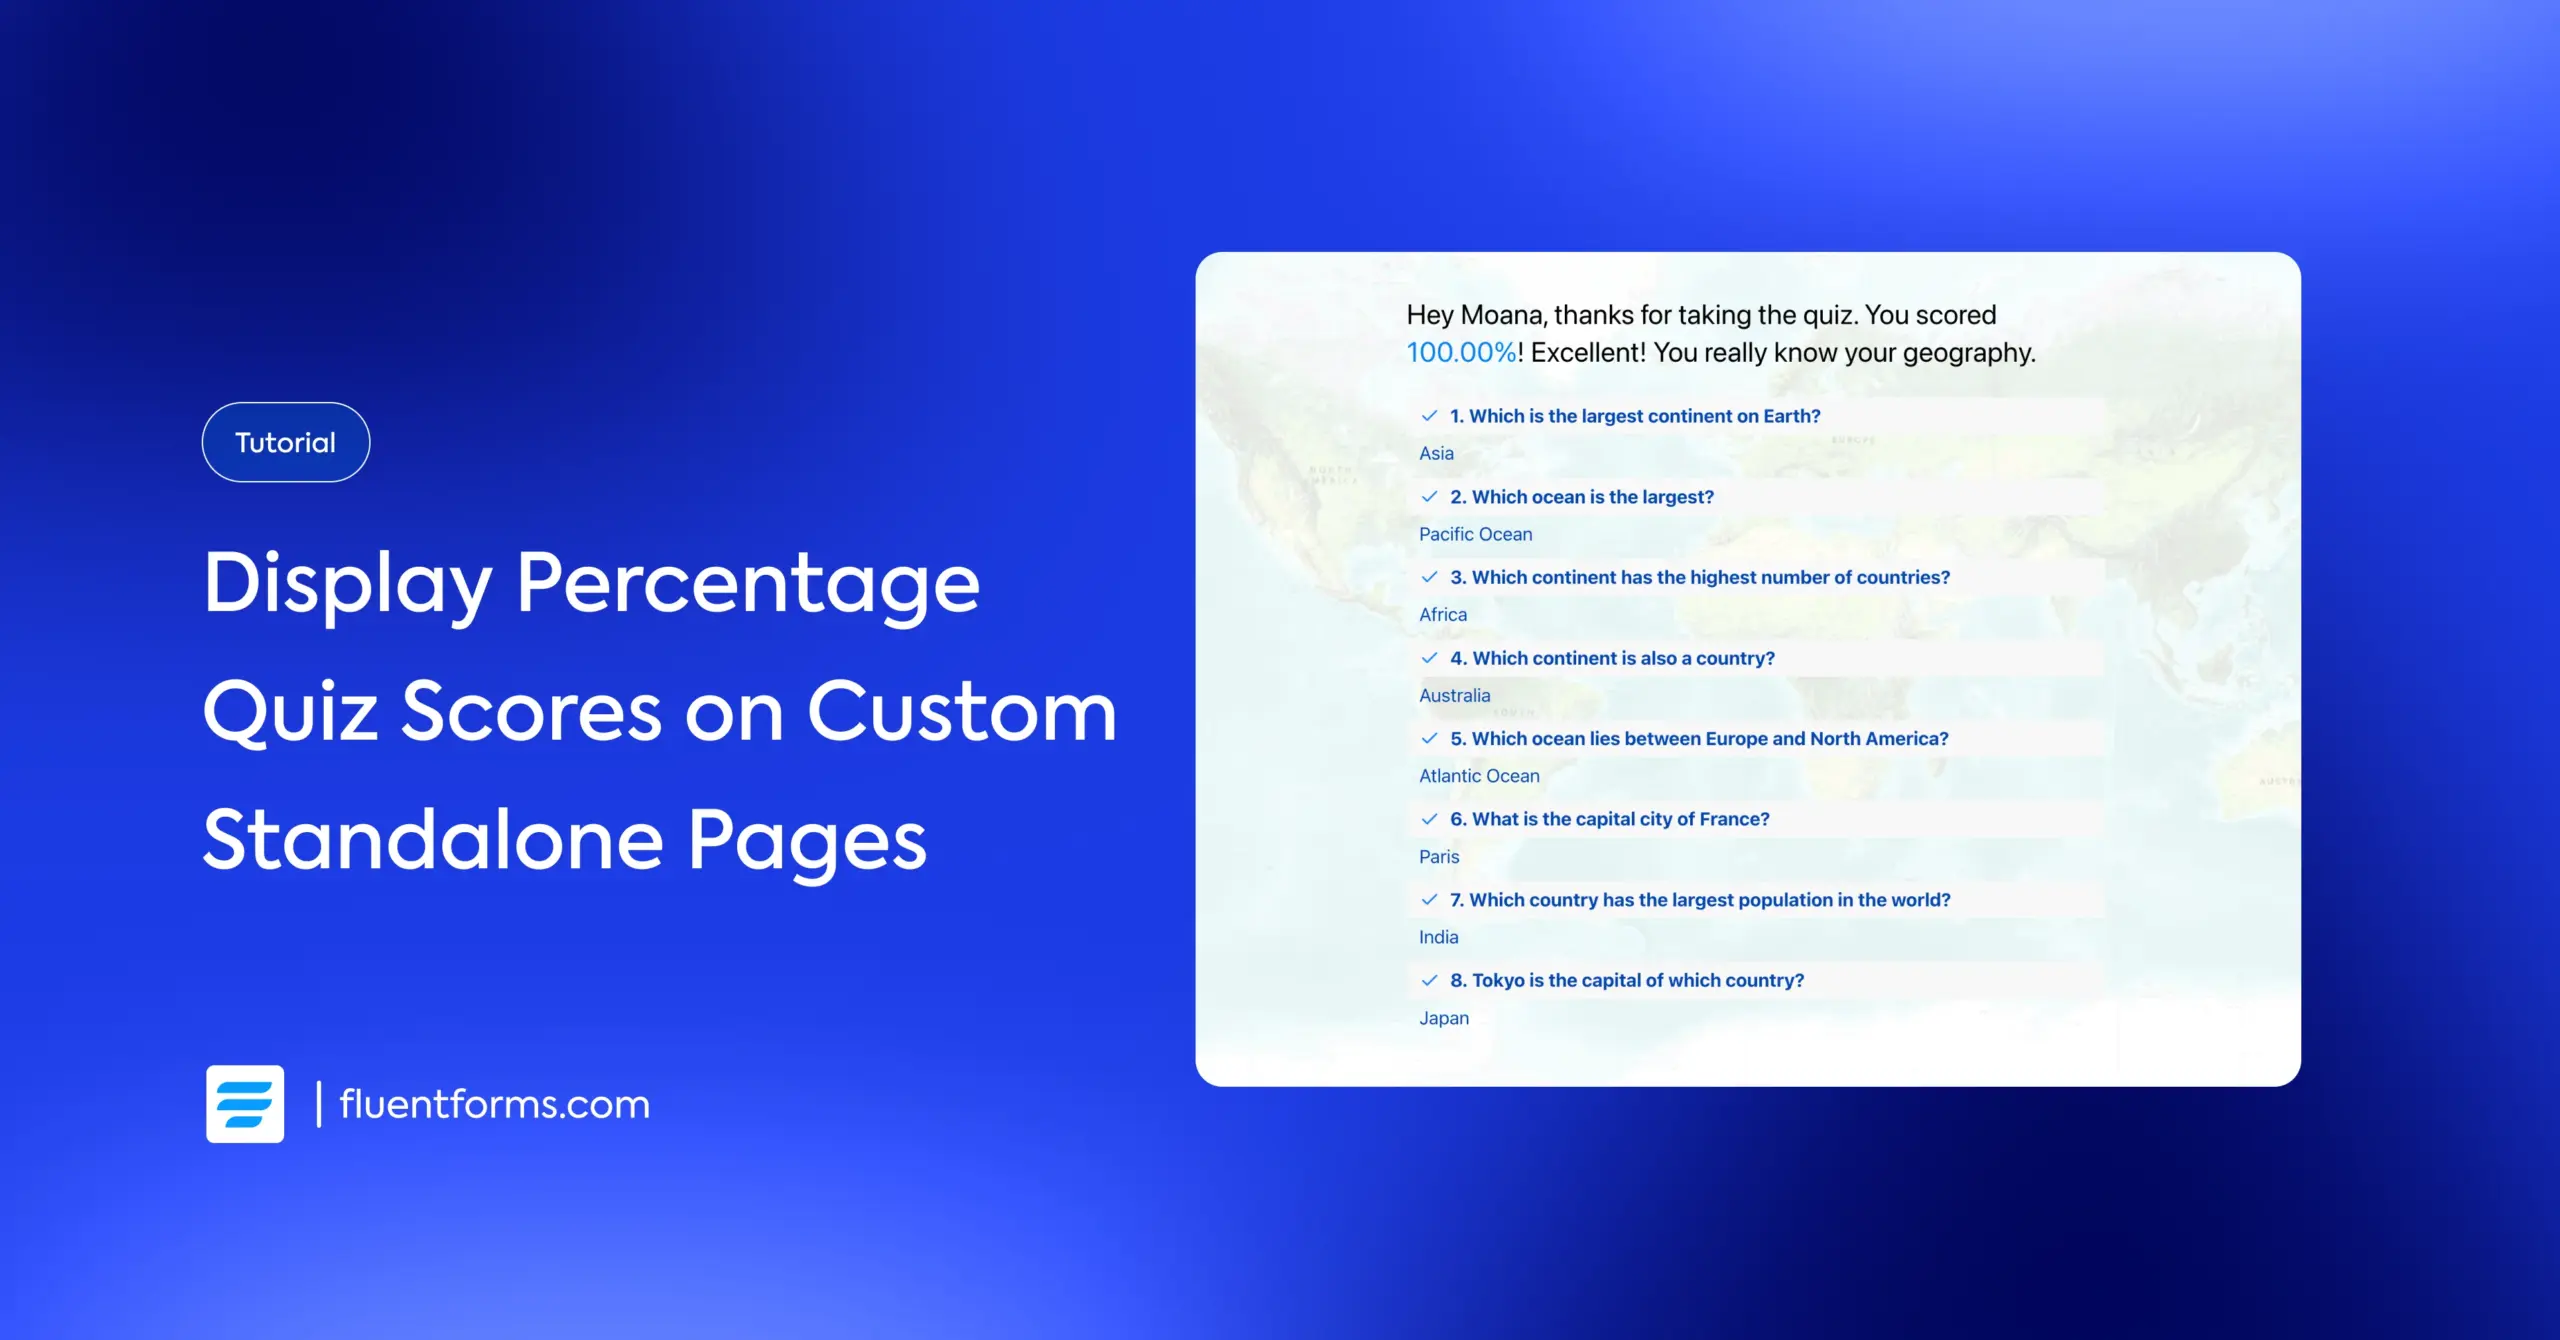
You scored {inputs.quiz-score}! Thanks for taking the quiz.
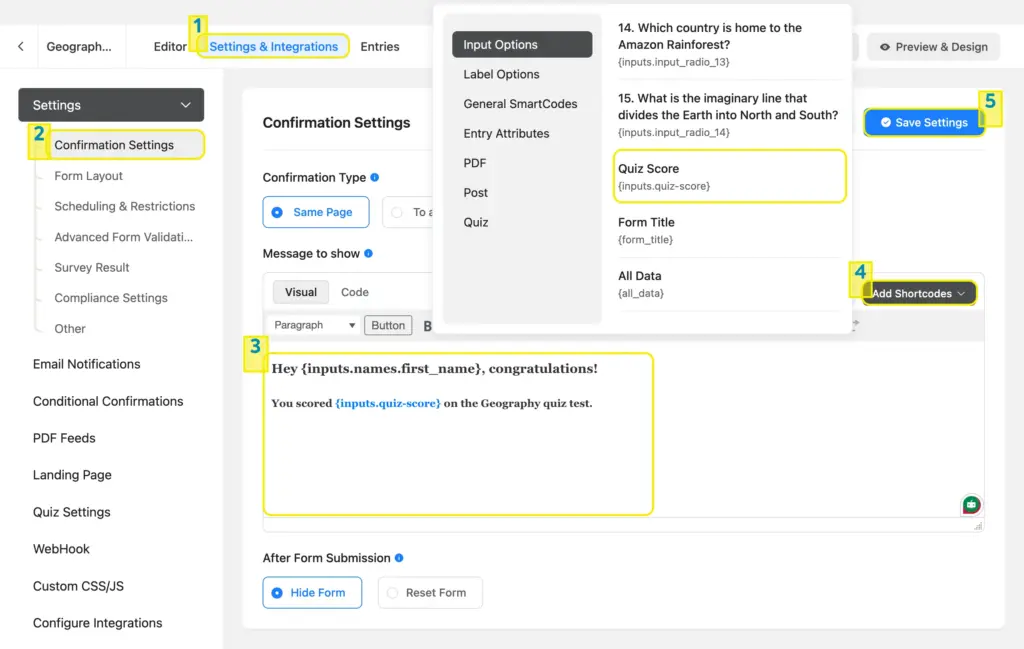
If you enabled “Append Result,” a table showing each question, the user’s answer, and the correct answer will automatically appear below your message.
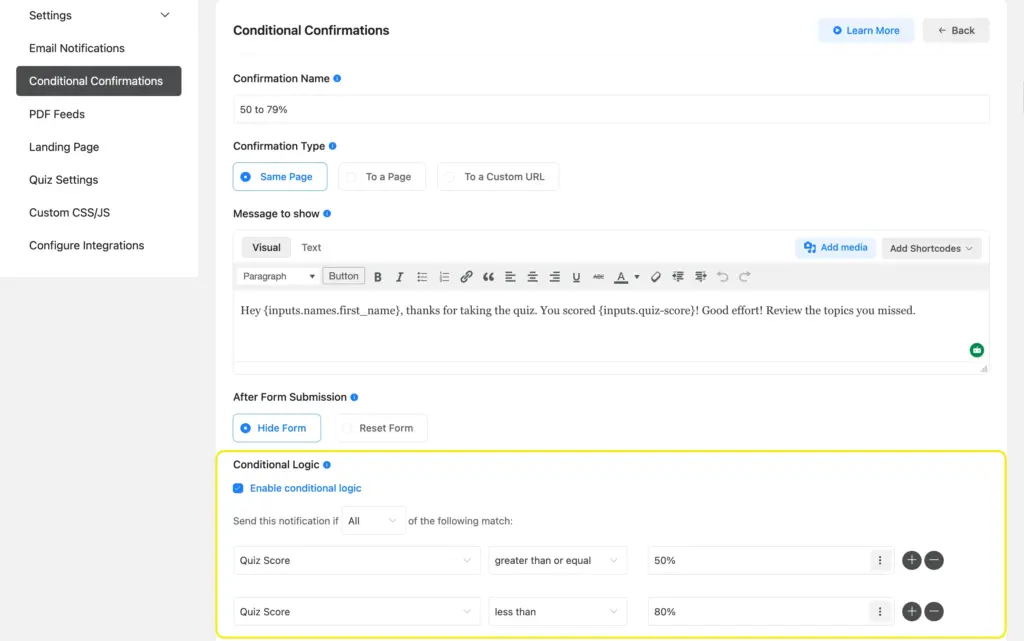
You can also use conditional confirmations to show different messages based on the score. For example:
- Score ≥ 80%: “Excellent! You really know your stuff.”
- Score 50-79%: “Good effort! Review the topics you missed.”
- Score < 50%: “Keep practicing. Here are some resources to help.”
To set this up, go to Conditional Confirmations, click Add Confirmation, write your message, and set the condition (e.g., Quiz Score is greater than or equal to 80).
Why Build a Custom Results Page for Your Quiz
The default confirmation message works fine. But on a regular page, navigation, sidebar, footer, and everything else are still visible. For a casual contact form, that’s perfectly fine. However, quiz results are more personal. Showing it on a custom page offers users a more curated experience.
A custom results page gives you:
- Full attention: No menus, sidebars, or distractions. The user’s focus stays on their result.
- Branded experience: Add your logo, background image, and custom colors for a professional look.
- Shareable URL: Give participants a direct link they can access anytime.
- Better engagement: More space for personalized messages, CTAs, and next steps.
Fluent Forms gives you two ways to build this without any extra plugins or page builders:
- Landing Page: A standalone, full-page form with customizable design. No site navigation.
- Conversational Form: A one-question-at-a-time experience that operates as its own page.
Both approaches create a page with no navigation. The form and its results are shown on the same page. Let me show you how each one works.
Method 1: Build a Custom Results Page Using a Landing Page
The Landing Page feature turns any Fluent Forms form into a standalone webpage. It has its own URL, its own design, and zero site navigation. When users submit the quiz on this page, the results appear right there on the same page (unless you want to direct users to a different page).
Important: The form must be on the landing page itself for the results to display there. You can’t have the form on one page and the results on another.
Step 1: Enable the Landing Page module
Go to Fluent Forms Pro > Integrations > Modules and enable the Landing Page module. This makes the landing page option available in every form’s settings.
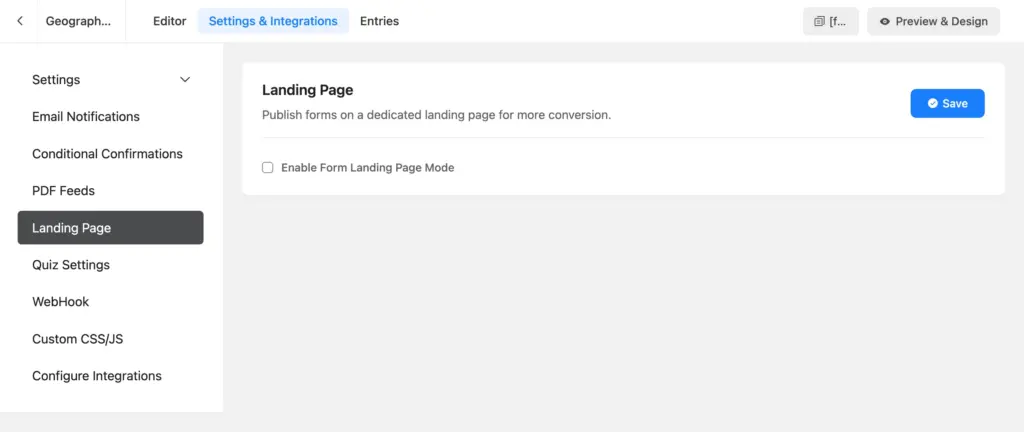
Step 2: Enable the landing page mode for your quiz
Open your quiz form (the one you already set up with percentage scoring). Navigate to Settings & Integrations > Landing Page. Check Enable Form Landing Page Mode.
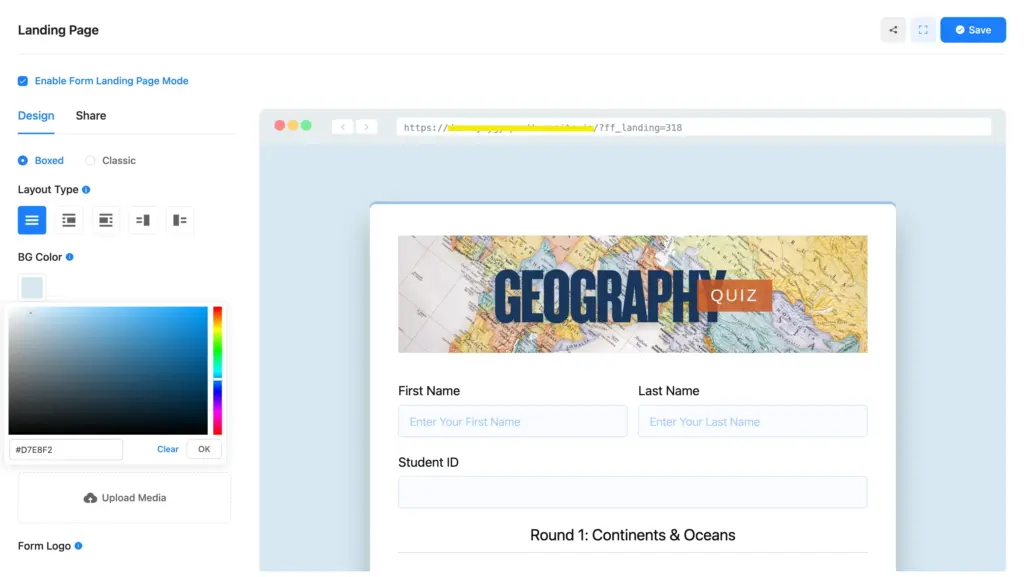
Your quiz form is now a standalone page. Every field, question, and quiz score configuration you set up earlier carries over.
Step 3: Customize the landing page design
Inside the Landing Page settings, you’ll find these options:
- Style: Choose Boxed (form has its own background color’s container) or Classic (transparent, blends with page background).
- Layout: Center the form or align it left/right with an image on the opposite side.
- Background Color: Set the page’s background color.
- Box shadow: Add inner & outer shadow to the form container.
- Background Image: Upload an image for a more visual design.
- Form Logo: Upload your brand logo for recognition.
- Page Heading: Add a title above the form (e.g., “Test Your Knowledge”).
- Description: Add a subtitle or instructions below the heading.
The landing page is automatically responsive on all devices. Fluent Forms handles that for you.
When a user submits the quiz on this landing page, the form disappears. The confirmation message (with their percentage score) that we set up earlier takes its place. Since there are no navigations or distractions on the page, the result gets full attention.
If you enabled “Append Result” in quiz settings, the full question breakdown also appears below the message.
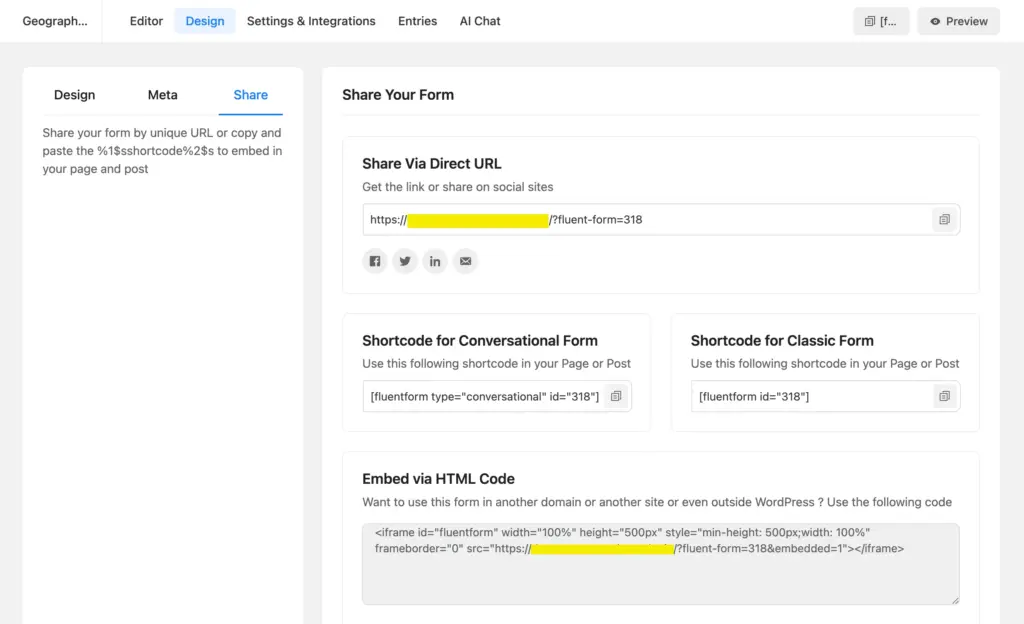
Step 4: Share via direct URL
Switch to the Share tab in your landing page settings. Copy the Direct URL. Anyone with this link can access your quiz page, take the quiz, and see their percentage score. Share it on social media, in emails, on your website, or anywhere you want to drive traffic.

Method 2: Build a Custom Results Page Using Conversational Forms
Conversational Forms take a different approach. Instead of showing all questions at once, they present one question per screen, like a chat. The entire experience runs in full-screen mode with no site navigation.
When the user finishes the quiz, the confirmation message (with their percentage score) appears on the same full-screen canvas. It becomes the results page.
This method is ideal for shorter quizzes (5-10 questions) where you want the experience to feel interactive and engaging.
Step 1: Create a conversational form with quiz questions
Go to Fluent Forms > New Form and select Create Conversational Form. Add your quiz questions using radio fields, dropdowns, or checkboxes. Repeat the same steps we used for quiz settings and confirmation messages.
You can also convert the existing quiz form into a conversational form. Open the form, and you’ll find the conversion option in the form editor.
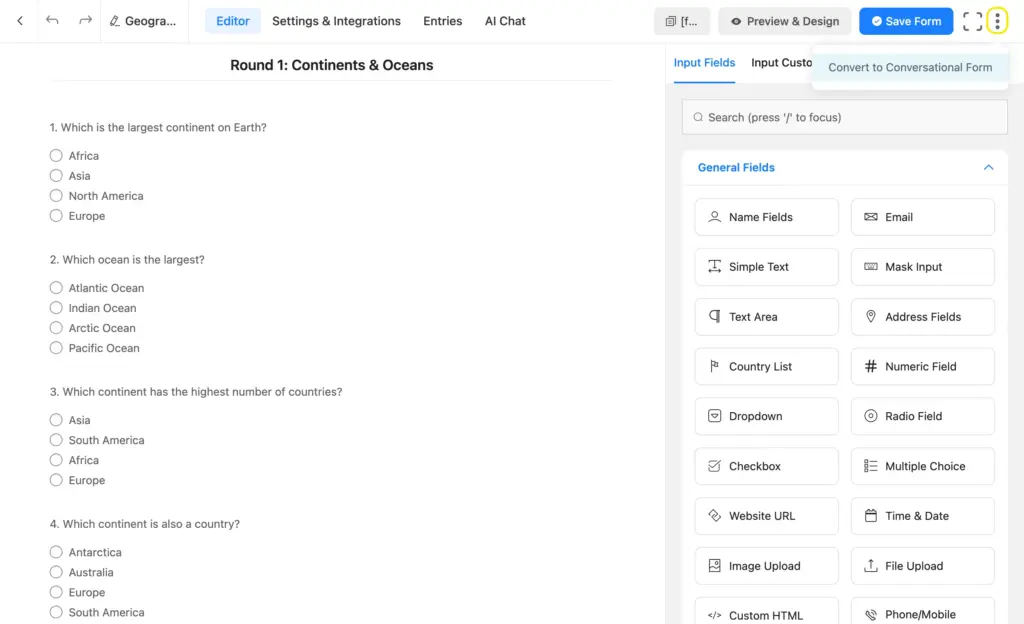
Note: You’ll get a warning about a few fields (mostly layout fields) that are not supported yet in conversational layouts. If your quiz uses any of those fields, you need to create them again using other fields. However, all quiz fields are supported in conversational forms.
Adjust the existing fields as you need. You can change the layout of each field, add a welcome screen, edit labels to create a more conversational tone, and more.

Once you’re done editing, click Save Form.
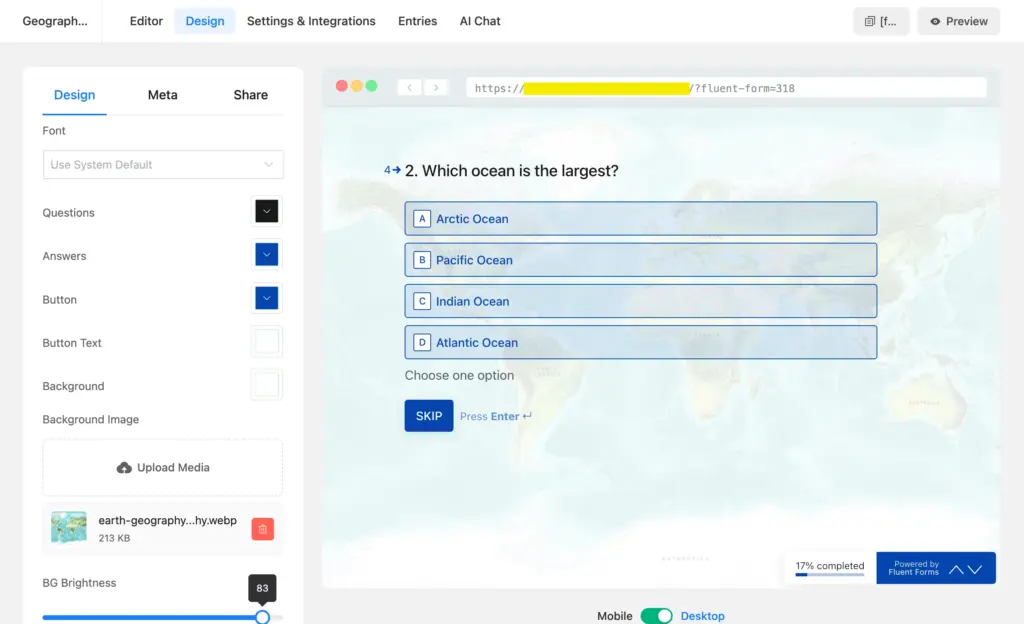
Step 2: Customize the conversational form design
In the conversational form editor, go to the Design tab. Here you can:
- Set text colors for questions, answers, and buttons
- Choose a background color for the button and the form
- Upload a background image and adjust image opacity
- Accessibility Settings
The confirmation message we set up earlier (with a percentage score) appears on this same screen after users submit their quiz.
Step 3: Share via direct URL or embed
Conversational forms come with a direct URL by default. Find it in the Share tab beside design and meta. Anyone with this link gets the full-screen quiz experience.
You can also embed the conversational form on a page using the HTML embed code. This creates a viewport for the form within your existing page. But for a true custom results page experience, the direct URL is best.
Landing Page vs. Conversational Form: Which One to Use
Both methods give you a navigation-free, full-screen results page. The difference is in how users experience the quiz itself.
| Landing Page | Conversational Form | |
|---|---|---|
| Quiz layout | All questions visible at once (or in multi-step) | One question at a time |
| Best for | Longer quizzes (10+ questions) | Shorter quizzes (5-10 questions) |
| Design control | Background (image & color), logo, heading, layout position | Colors, background image, welcome screen, layouts per question |
| User experience | Traditional form feel on a clean page | Chat-like, interactive, modern |
| Mobile experience | Responsive | Designed mobile-first |
| Sharing | Direct URL, shortcode, HTML embed | Direct URL, shortcode, HTML embed |
| Pro required | Yes (Landing Page module) | No (available in free version), but quiz scoring needs Pro |
Go with Landing Page if: Your quiz is long, you want a traditional layout, or you need more design customization (logo, heading, background image).
Go with Conversational Form if: Your quiz is short, you want to maximize engagement, or you’re targeting mobile users who appreciate the one-at-a-time format.
Tips to Make Your Quiz Results Page More Effective
A percentage score alone is useful. But you can make the results page more helpful for your users.
1. Use conditional confirmations for personalized messages
Don’t show the same generic “Thanks for taking the quiz!” to everyone. Set up conditional confirmations so users who score 90% see a different message than those who score 40%.
For example:
- High scorers: Celebrate them. Offer a certificate download or a discount code as a reward.
- Mid scorers: Encourage them. Point to specific resources for the topics they missed.
- Low scorers: Be supportive. Offer a retake link or a study guide.
2. Combine percentage with grade labels
Add two quiz score fields to your form: one set to ‘Percentage’ and another set to ‘Grade System’. Display both in your confirmation message. Something like “You scored 85% (Grade: A).” While the percentage gives precision, the grade creates an emotional connection. This can encourage students to study more for better grades.
3. Add a call to action after results
The results page is a high-attention moment. The user just completed something and is engaged. Use that attention. Add a CTA in your confirmation message:
- Link to a related course or product
- Encourage them to share their score on social media
- Invite them to take another quiz
- Offer to email them a detailed report
All of these are really easy to set up. Simply add a button to your confirmation message with the relevant URL.
4. Send results via email as a follow-up
Set up an email notification that sends the percentage score to the participant’s inbox. This gives them a permanent record and gives you an occasion to follow up later with related content or offers.
5. Keep the design clean and focused
Whether you use a landing page or a conversational form, don’t overload the results page. Keep the background simple. Make the score prominent. Use readable fonts. The goal is clarity, not complexity.
Deliver Quiz Results that Feel Professional
A percentage score is the simplest way to communicate quiz performance. And a dedicated results page is the simplest way to make that score feel like a focus rather than an afterthought.
With Fluent Forms, you don’t need separate tools for each piece. The quiz module handles the scoring. The landing page or conversational form handles the presentation. And the setup is really simple.
So go ahead. Set up your quiz score field. Turn on the landing page (or create a conversational form). Customize your confirmation message. And give your quiz participants a results experience that feels polished and reflects the thought behind it.
Build Smarter Forms for Free


Sarika writes for Fluent Forms and loves to offer insights into small businesses. She’s curious and enjoys discussing ideas, interests, and perspectives. In her free time, she’s either marvelling at architectural beauties or trying different cuisines.


Leave a Reply