Skip to content
Get Discount
Formidable Forms alternatives
  • Pricing
  • Features
  • Templates
  • Integrations
  • Blog
  • Docs
  • Account
Sign in

Get Discount
Formidable Forms alternatives
Popular Search submitsubmissionentryentriespayment

Getting Started

  • How to Install Fluent Forms
  • Upgrade to Fluent Forms Pro Add-on
  • Fluent Forms Glossary
  • Getting Started With Fluent Forms
  • Fluent Forms User Interface

Form Building

  • Manage Entries
    • Edit User Submitted Entries With Fluent Forms
    • Visual Representation of Form Entries in Fluent Forms
    • Managing Entries in Fluent Forms
  • Form Settings
    • Error Message Customization with Fluent Forms
    • User Login Requirement in Fluent Forms
    • Restrict Blank Form Submission with Fluent Forms
    • Help Message Customization in Fluent Forms
  • Publishing Form
    • How to embed your forms directly in Gutenberg layout
    • Dedicated Landing Page in Fluent Forms
    • How to Use Your Forms as Widget on your Sidebar or Footer
    • How to embed your forms using Elementor Widget
    • Fluent Forms with Oxygen Builder Widget
  • Form Style/Template
    • Modal/Popup/Lightbox in Fluent Forms
    • Fluent Forms Styling/Custom CSS
    • Official Form Styler of Fluent Forms
    • Form Layout Settings in Fluent Forms
  • Form Editor
    • How to Create a Form with Fluent Forms
    • Using and Customizing Pre-built Quick Forms in Fluent Forms
    • How to create a conversational form 
    • How to Design a Conversational Form 
    • How to Create a Form with OpenAI ChatGPT
    • How to Create a Form with Fluent Forms AI

Field Types

  • General Fields
    • Address Input Field in Fluent Forms
    • Name Input Field in Fluent Forms
    • CheckBox Field in Fluent Forms
    • Phone/Mobile Input Field in Fluent Forms
    • Dropdown Field in Fluent Forms
    • Email Address Input Field in Fluent Forms
    • Custom HTML Field in Fluent Forms
    • File Upload Input Field in Fluent Forms
    • Image Upload Input Field in Fluent Form
    • Multiple Choice Field in Fluent Forms
    • Numeric Input Field in Fluent Forms
    • Radio Field in Fluent Forms
    • Adding a Mask Input Field Guide
    • Adding a Simple Text Input Field
    • Adding a Text Area Input Field
    • Website URL Input Field Guide
    • Time & Date Input Field in Fluent Forms
    • Country List Field in Fluent Form
  • Advance Fields
    • Creating a Multi-Step Form in Fluent Forms  
    • hCaptcha in Fluent Forms
    • Hidden Input Field in Fluent Forms
    • Ratings Input Field in Fluent Forms
    • reCAPTCHA Field in Fluent Forms
    • Section Break in Fluent Forms
    • Terms & Conditions Field in Fluent Forms
    • Shortcode Input Field in Fluent Forms
    • Action Hook Field in Fluent Forms
    • Checkable Grid Input Field in Fluent Forms
    • GDPR Agreement Field in Fluent Forms
    • Password Input Field in Fluent Forms
    • Custom Submit Button in Fluent Forms
    • Range Slider Field in Fluent Forms
    • Net Promoter Score in Fluent Forms
    • Chained Select Field in Fluent Forms
    • Color Picker Field in Fluent Forms
    • Repeat Input Field in Fluent Forms
    • Rich Text Input Field in Fluent Forms
    • Save Progress Button in Fluent Forms
    • Quiz Score in Fluent Forms
    • Dynamic Field in Fluent Form  
    • FluentBooking Field in Fluent Form
  • Payment Fields
    • Add Subscription Field in Payment Forms 
    • Add Coupon Field in Payment Forms  
    • Add Payment Item Field in Payment Forms 
    • Add Payment Summary Field in Payment Forms 
    • Add Item Quantity Field in Payment Forms 
    • Add Custom Payment Amount Field in Payment Forms 
    • Add Payment Method Field in Payment Forms 
  • Container Fields
    • Add Container Fields in Fluent Forms
    • Add Repeat Container Field in Fluent Forms 
  • Post Fields
    • Add Post Title Field in Post Forms 
    • Add Post Content Field in Post Forms
    • Add Featured Image Field in Post Forms 
    • Add Post Excerpt Field in Post Forms 
    • How to Create a Post Form with Fluent Forms
    • Add Post Update Field in Post Forms
  • Taxonomy Fields
    • Add Categories Taxonomy Field in Post Forms
    • Add Tags Taxonomy Field in Post Forms

Form Notification

  • Conditional Email Notification in Fluent Forms
  • Conditional Email Routing 
  • How to Setup Admin/User Email Notifications  
  • Weekly Email Summary
  • Setup Form Submission Confirmation Message in Fluent Forms
  • Fluent Forms Not Sending Email Confirmations

Form Entries

  • How to Search and Filter Form Entries
  • How to Add a Date and Time Stamp to Form Entries
  • Partial Entries for Step Forms

Features and Functionalities

  • Conditional Confirmation Message in Fluent Forms
  • Unique Field Validation
  • Surveys and Polls in Fluent Forms
  • Set up Forms with Conditional Logic in Fluent Forms
  • Set up Double Opt-in emails in Fluent Forms
  • Inline Opt-in Form using Fluent Forms
  • Form Scheduling Feature in Fluent Forms
  • Form Restrictions Feature in Fluent Forms
  • Fluent Forms Quiz Module
  • Dynamic Default Value in Fluent Forms
  • How to use Meta Box Custom Fields with Fluent Forms
  • How to Create a WordPress User Registration Form With Fluent Forms
  • Post Selection Module in Fluent Forms
  • How to add Calc Values on the Repeat Field
  • Edit History Feature in Fluent Forms
  • Keyboard Navigation & Shortcuts in Fluent Forms
  • Use ACF to Add a Custom Field in the Post Form
  • Numeric Calculation in Fluent Forms
  • Admin Approval Feature in Fluent Forms
  • Global Inventory Manager in Fluent Forms
  • Fluent Forms Inventory Module
  • Creating a Personality Quiz Form in Fluent Forms
  • How to Create a WordPress User Update Form With Fluent Forms
  • Resizeable Container in Fluent Forms
  • Dynamic Input Values In Form Steps | Fluent Forms
  • Using JetEngine Custom Fields with Fluent Forms
  • Fluent Forms PDF Module
  • Mapping Meta Fields with Meta Keys in Fluent Forms
  • Set Default Form Value from URL Parameters

Integrations

  • Email Marketing
    • How to Integrate ActiveCampaign with Fluent Forms
    • How to Integrate CleverReach with Fluent Forms
    • How to Integrate iContact with Fluent Forms
    • How to Integrate Kit (Former ConvertKit) with Fluent Forms
    • How to Integrate GetResponse with Fluent Forms  
    • How to Integrate Mailchimp with Fluent Forms  
    • How to Integrate MailerLite with Fluent Forms
    • Mailpoet Integration with Fluent Forms
    • Mautic Integration with Fluent Forms
    • How to Integrate Gist with Fluent Forms
    • How to Integrate MooSend with Fluent Forms
    • How to Integrate Brevo (Formerly Sendinblue) with Fluent Forms  
    • How to Integrate Constant Contact with Fluent Forms 
    • ClickSend SMS Integration with Fluent Forms
    • Automizy Integration with Fluent Forms
    • How to Integrate Mailjet with Fluent Forms
    • How to Integrate Mailster with Fluent Forms 
    • How to Integrate SendFox with Fluent Forms
    • How to Integrate Campaign Monitor with Fluent Forms
  • CRM
    • AmoCRM Integration with Fluent Forms
    • Salesflare Integration with Fluent Forms
    • Pipedrive Integration with Fluent Forms
    • OnePageCRM Integration with Fluent Forms
    • Drip Integration with Fluent Forms
    • Zoho CRM Integration with Fluent Forms
    • FluentCRM integration with Fluent Forms
    • HubSpot Integration with Fluent Forms
    • Salesforce Integration with Fluent Forms
  • Automation
    • How to Integrate Webhook with Fluent Forms
    • How to Integrate Zapier with Fluent Forms
    • How to Integrate Platformly with Fluent Forms 
  • Notification
    • How to Integrate Telegram with Fluent Forms
    • How to Integrate Discord with Fluent Forms
    • How to Integrate Slack with Fluent Forms
  • Security
    • Spam Protection With Honeypot and Google reCAPTCHA in Fluent Forms
    • How to Integrate reCAPTCHA with Fluent Forms
    • How to Integrate hCaptcha with Fluent Forms
    • How to Integrate Cloudflare Turnstile with Fluent Forms
    • Integrate Akismet with Fluent Forms
  • Others
    • How to Integrate Google Sheets with Fluent Forms
    • How to Integrate Trello with Fluent Forms 
    • Twilio Integration with Fluent Forms
    • How to Integrate Airtable with Fluent Forms
    • How to Integrate BuddyBoss with Fluent Forms  
    • How to Integrate Notion with Fluent Forms    
    • How to Integrate Google Maps with Fluent Forms
    • How to Integrate OpenAI ChatGPT with Fluent Forms

Import/Export

  • Fluent Forms Migrator (WPForms, Contact Form 7, Gravity Forms, Ninja Forms & Caldera Forms)
  • How to Import and Export Fluent Forms
  • Importing Entries in Fluent Forms

Payment

  • Configure Payment Settings with Fluent Forms
  • How to Create a Payment Form with Fluent Form
  • Payment Integration
    • How to Integrate Square with Fluent Forms (Inline Payment Integration)
    • How to Integrate Stripe with Fluent Forms
    • How to Integrate PayPal with Fluent Forms
    • How to Integrate Razorpay with Fluent Forms
    • How to Integrate Mollie with Fluent Forms
    • How to Integrate Paystack with Fluent Forms
    • How to Integrate Paddle with Fluent Forms

Account Management

  • Setting up Managers in Fluent Forms (Access Control)

Shortcode

  • Form Editor Smart Codes
  • Conditional Shortcodes in Fluent Forms
  • Fluent Forms Shortcodes Overview
  • Shortcodes in Confirmation Settings
  • Pre-Fill Form Fields with FluentCRM Data
View Categories
  • Home
  • Docs
  • General Docs
  • Features and Functionalities
  • Conditional Confirmation Message in Fluent Forms

Conditional Confirmation Message in Fluent Forms

Sometimes, you can display confirmation messages based on user input. Fluent Forms allows you to set up Conditional Confirmation Messages so that users receive individualized feedback based on specific conditions.

In this documentation, we will walk you through setting up a conditional confirmation message with fluent Forms.

So, let’s get started.

Access the Form Settings #

To learn how to set conditional confirmation message, follow the steps below – 

First, go to Forms from the top navbar, and open the Editor page of your desired form by clicking the Edit button where you want to set the conditional confirmation message.

If you do not have any existing forms, read  Create a Form from Scratch or Create a Form using Templates documentation to create a new one.

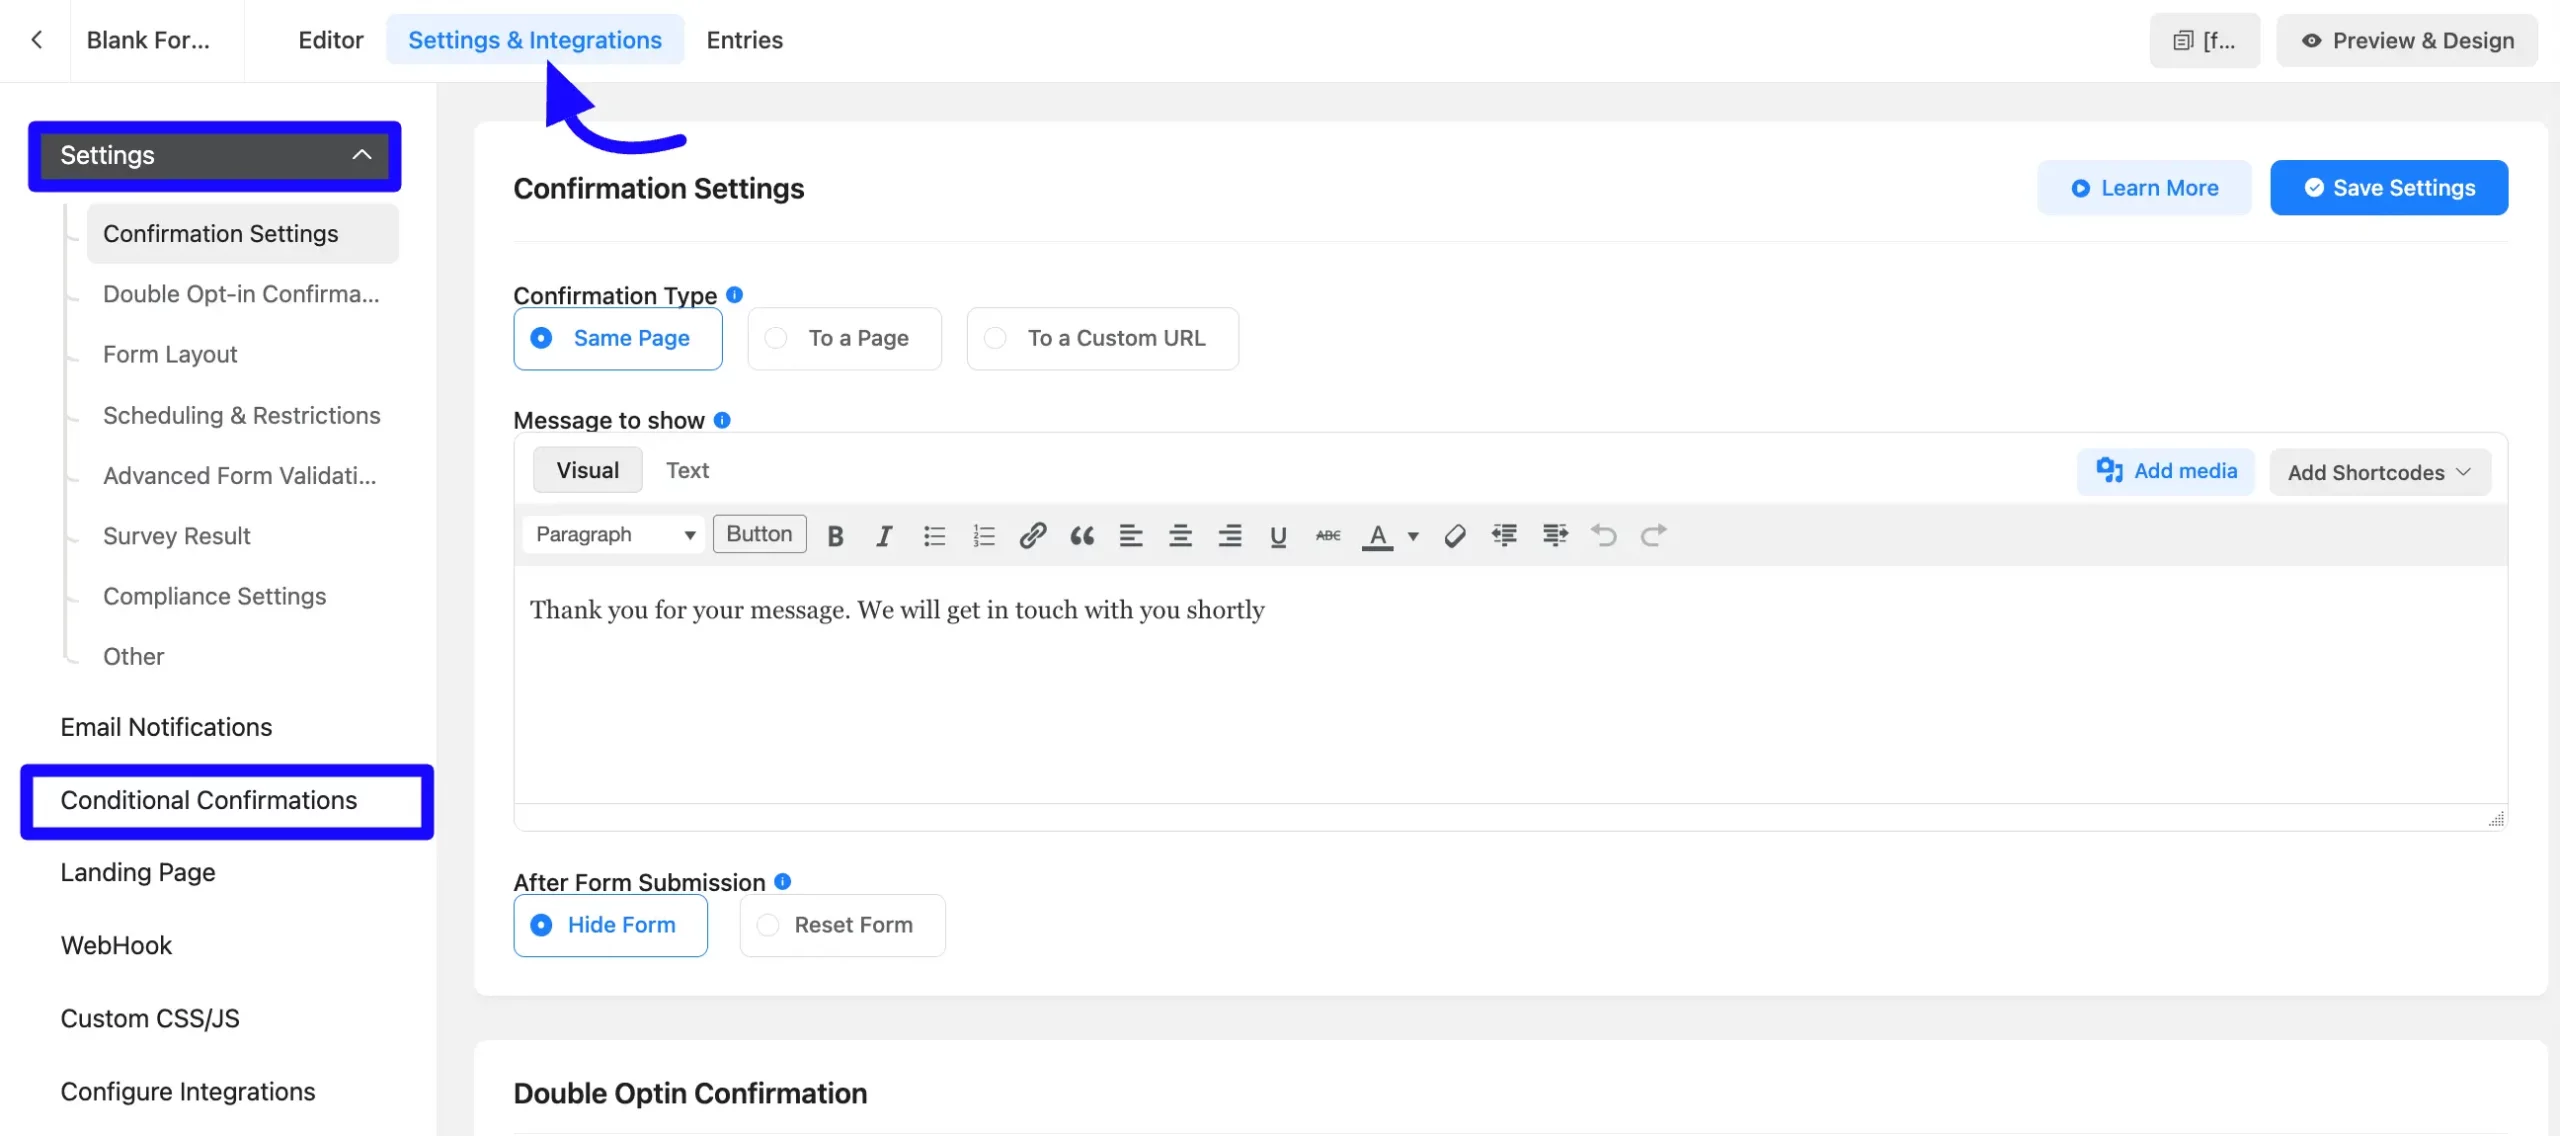
Once inside the form editor, click on Settings & Integrations tab for the selected form. Now from the left sidebar, select Conditional Confirmation under the Settings section.

Confirmation Settings 01 scaled 46275

Add a New Confirmation Message #

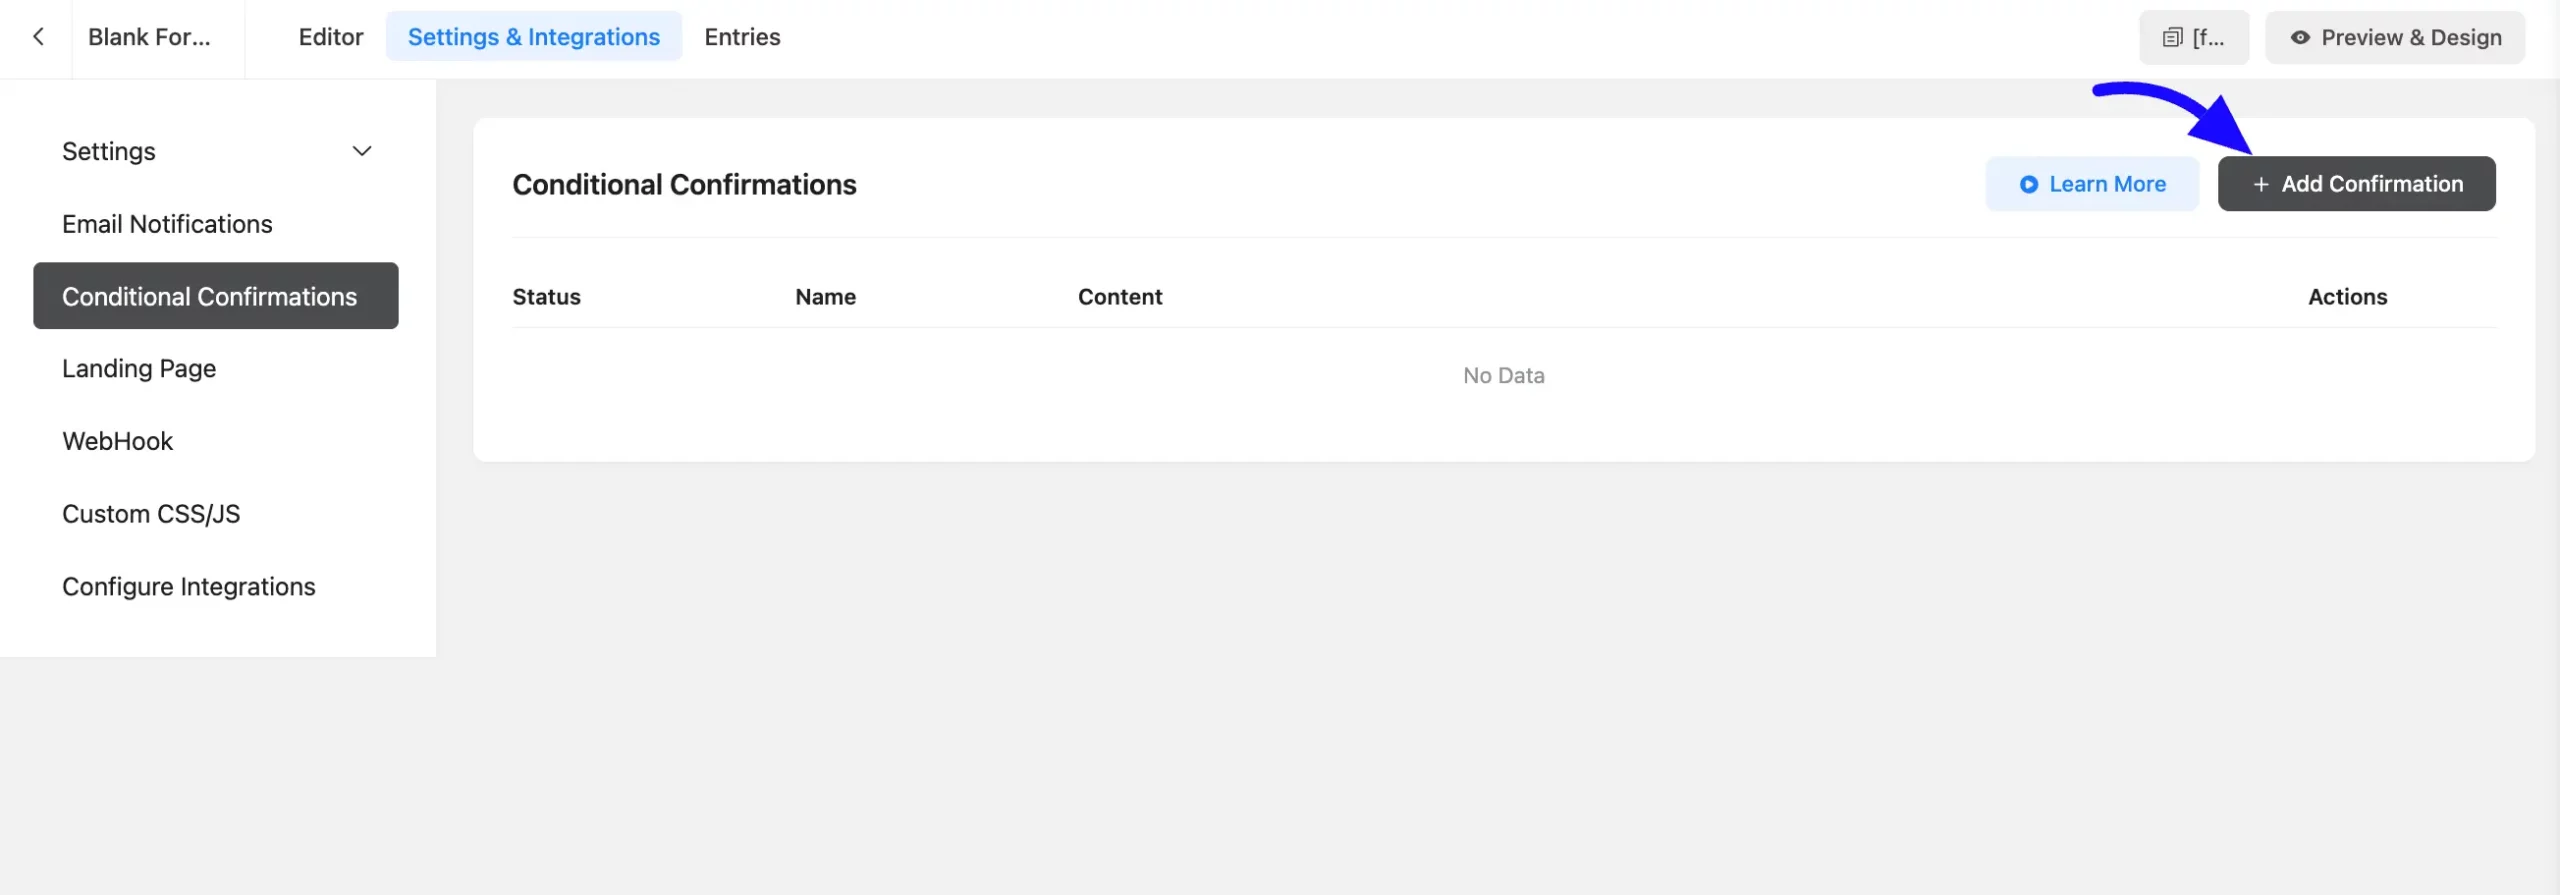
Here appears a new window. Now click the Add Confirmation button in the top right corner.

Add confirmation 02 scaled 46275

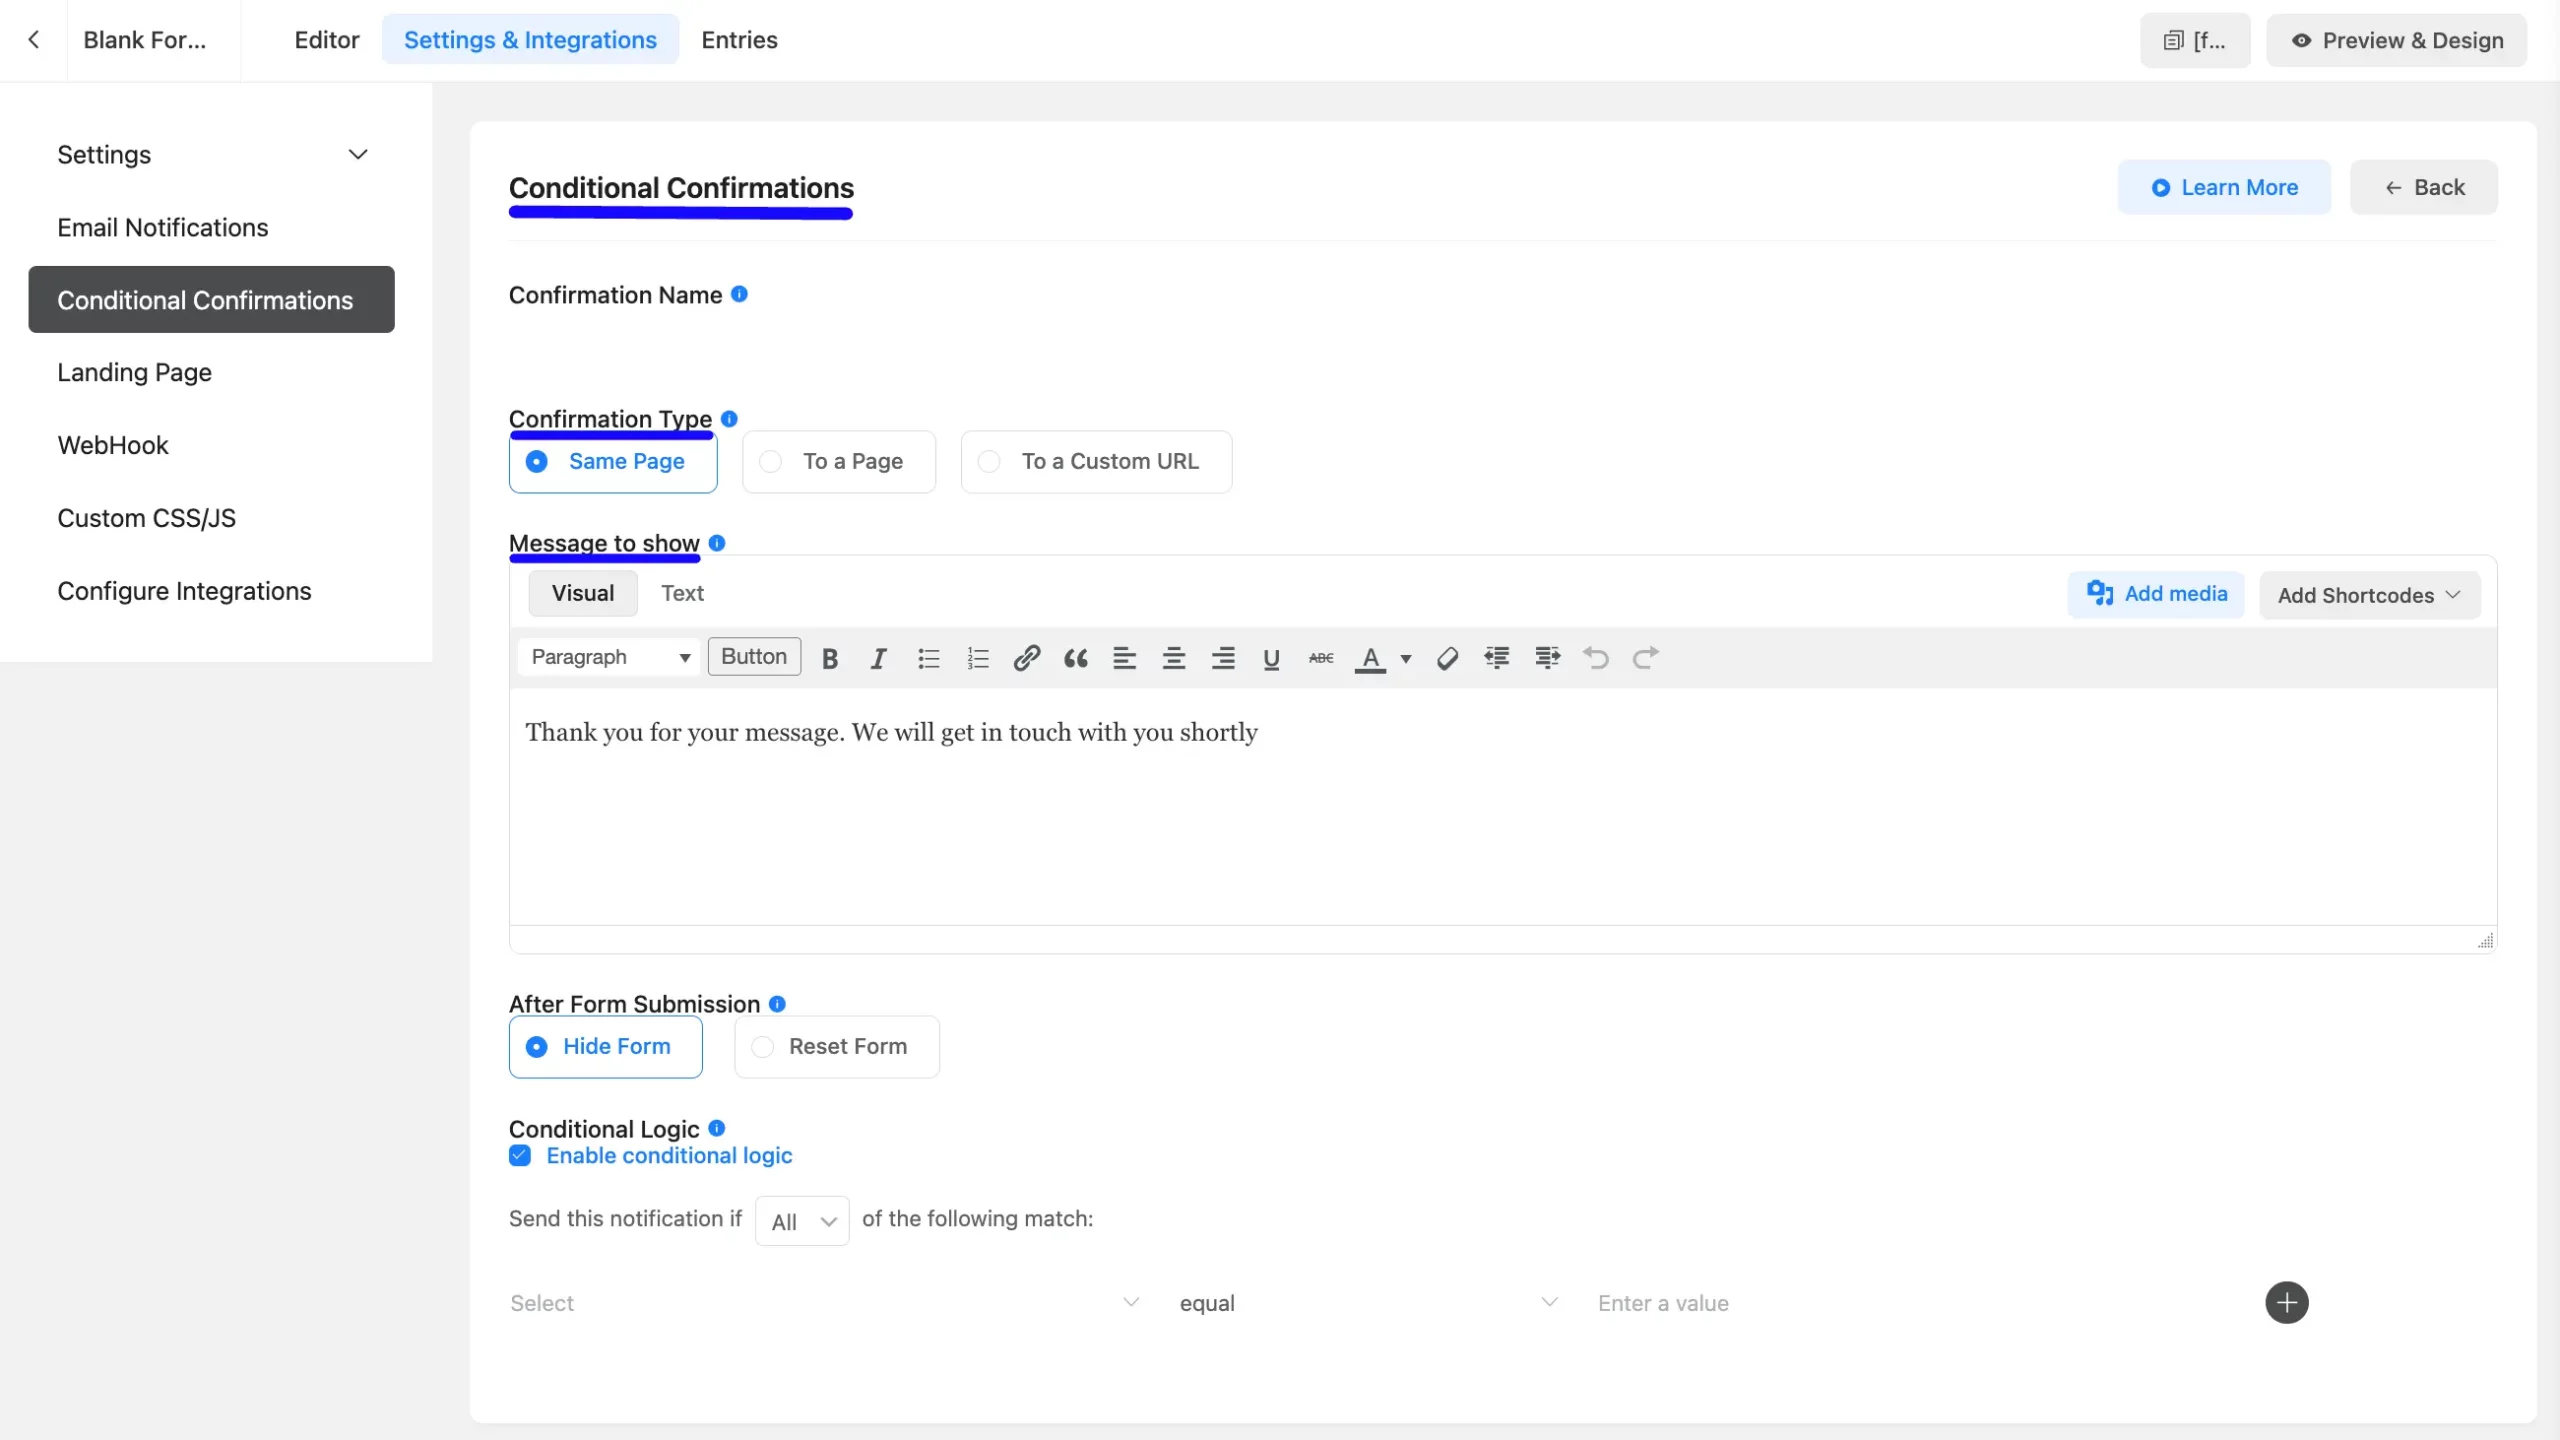
Here also appears a new window. Now enter the details below-

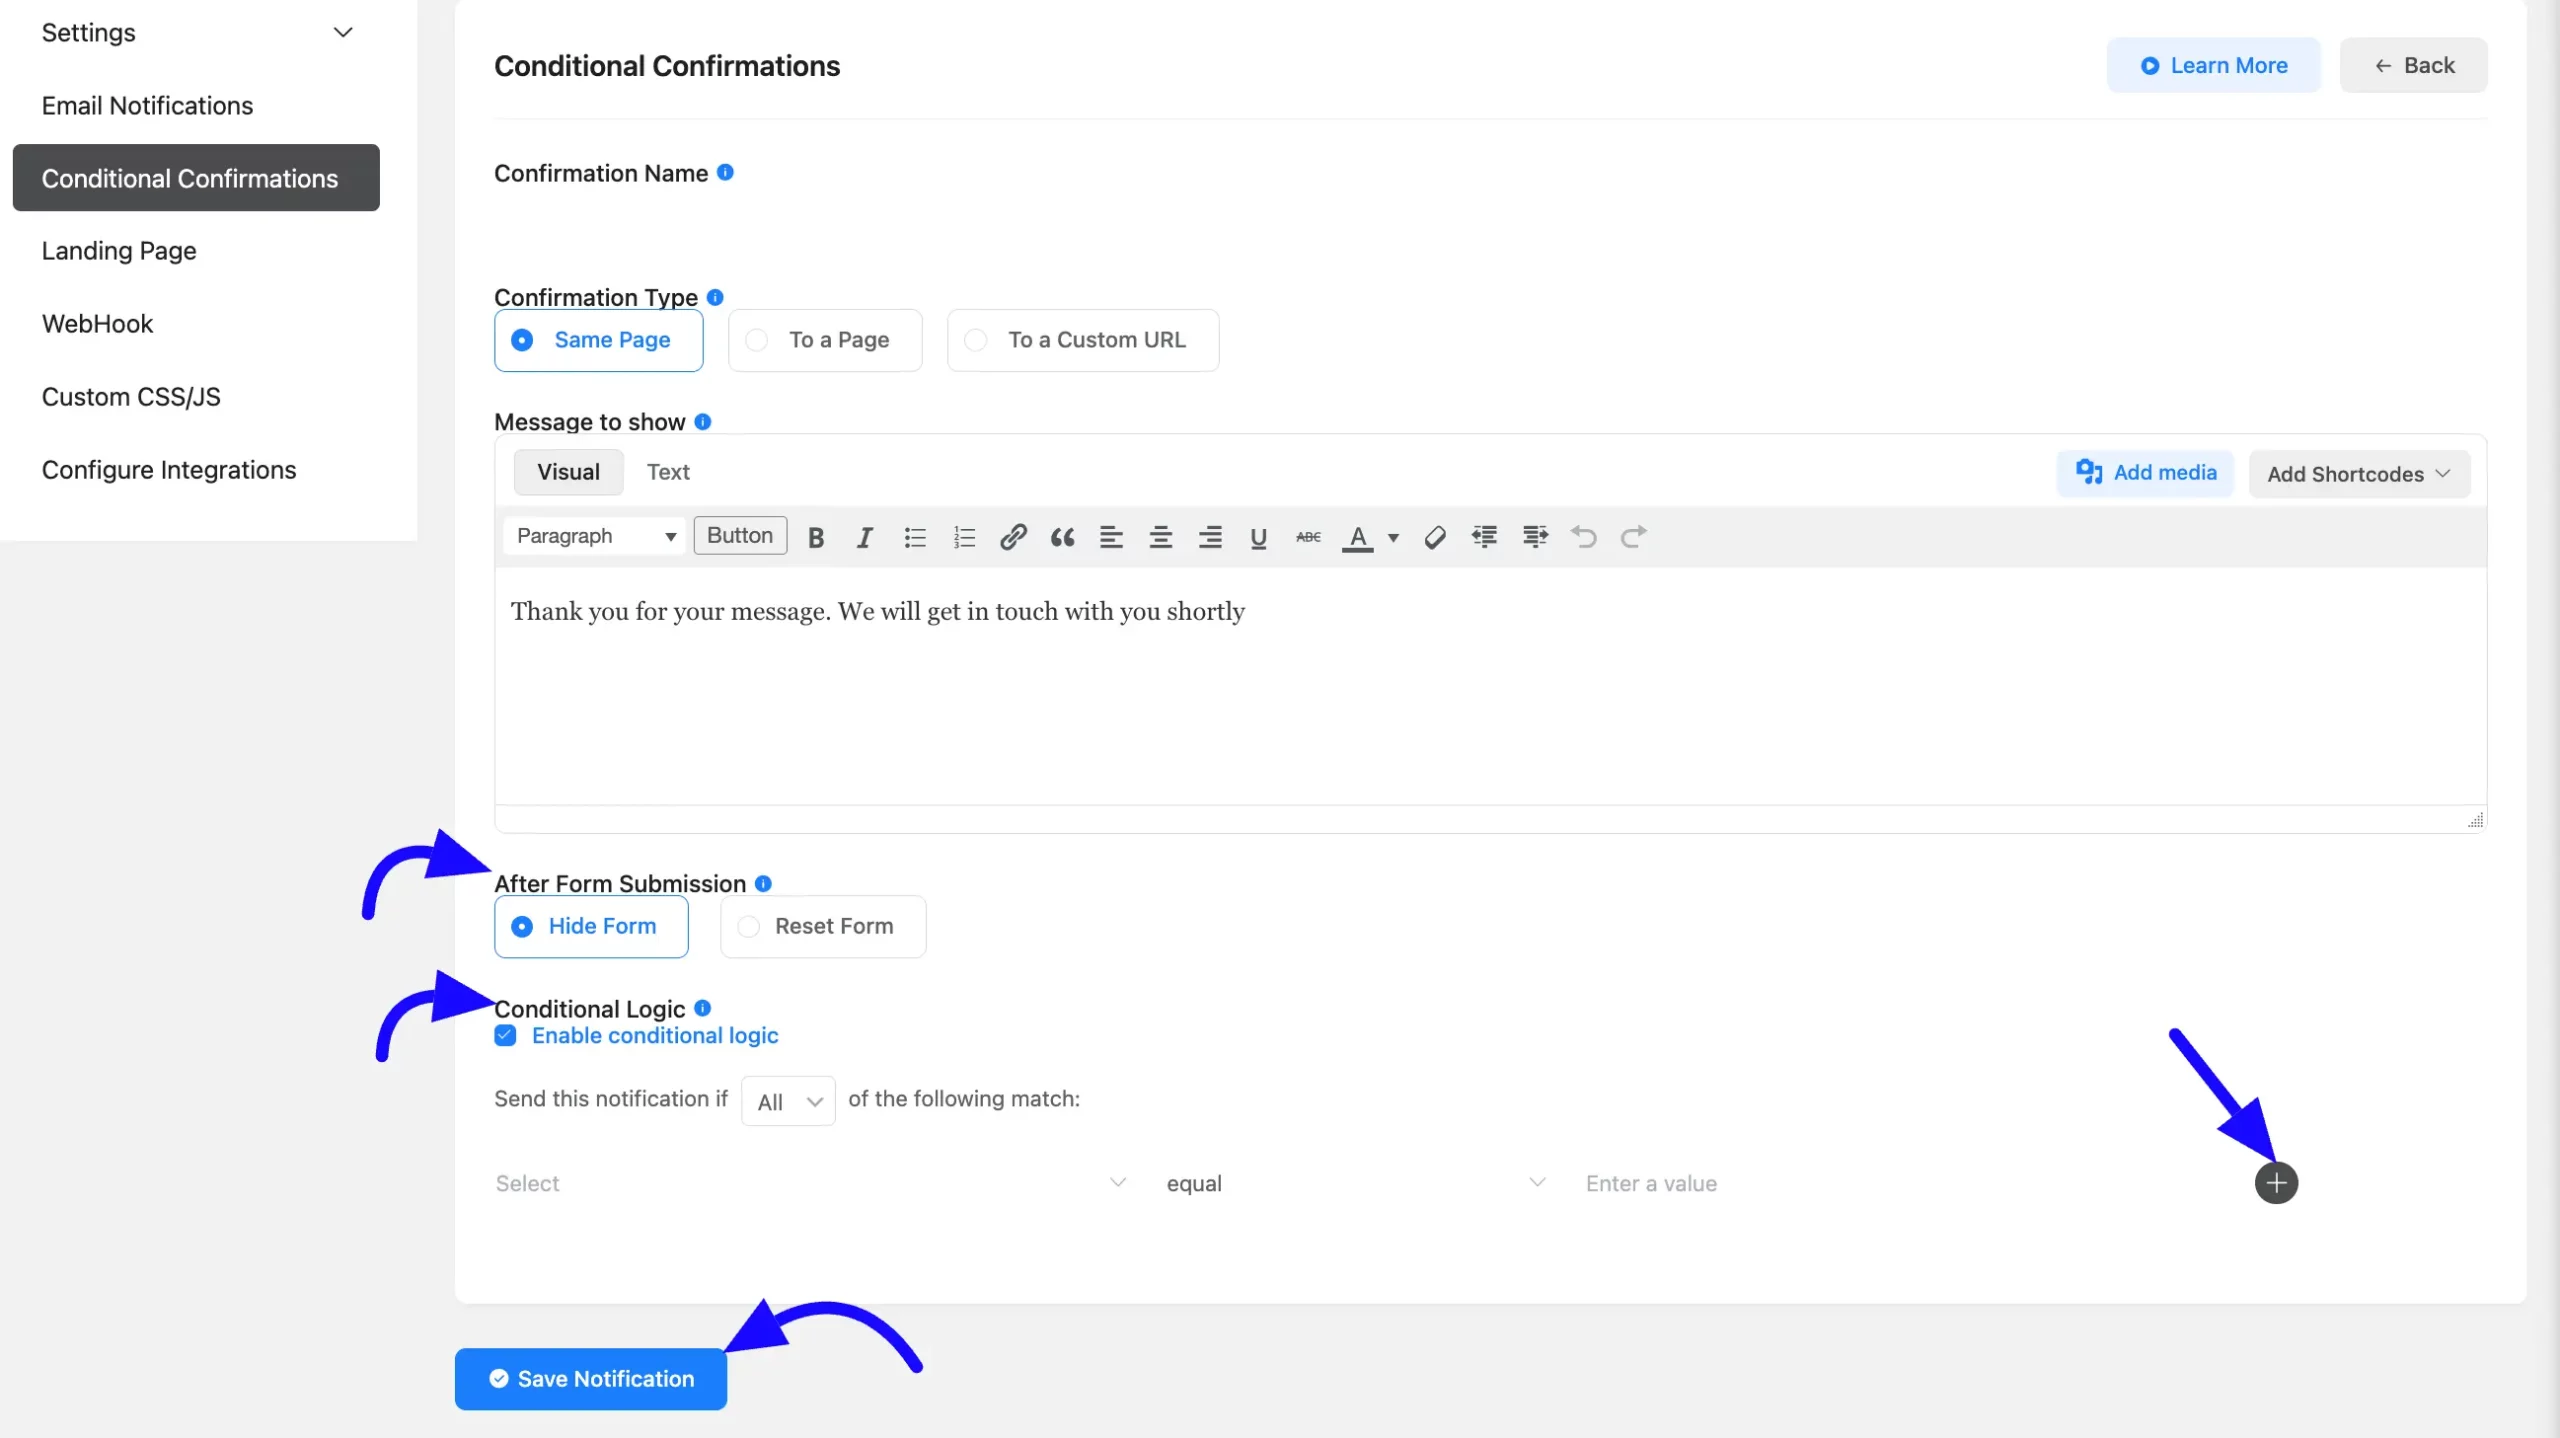
Confirmation Name: Give a confirmation name that describes its purpose. 

Confirmation Type:  Choose where you want the confirmation message to appear. There are three Confirmation types. 

  • Same Page: Displays the confirmation message on the same page as the form.
  • To a page:  Redirects the user to a specific page after form submission. 
  • To custom URL: Redirects the user to a custom URL after form submission.

Message to Show: Here enter the custom message you want to display when the condition met. You can also add shortcode or image to your message.

confirmation message 03 scaled 46275

Redirect Query String: The field where you can enter the custom URL with query parameters.

  • Pass Field Data Via Query String: This allows you to pass form field data as query parameters in the redirect URL. 

For this option to be enabled you must check the Pass Field Data Via Query String box below.

pass string query 04 46275

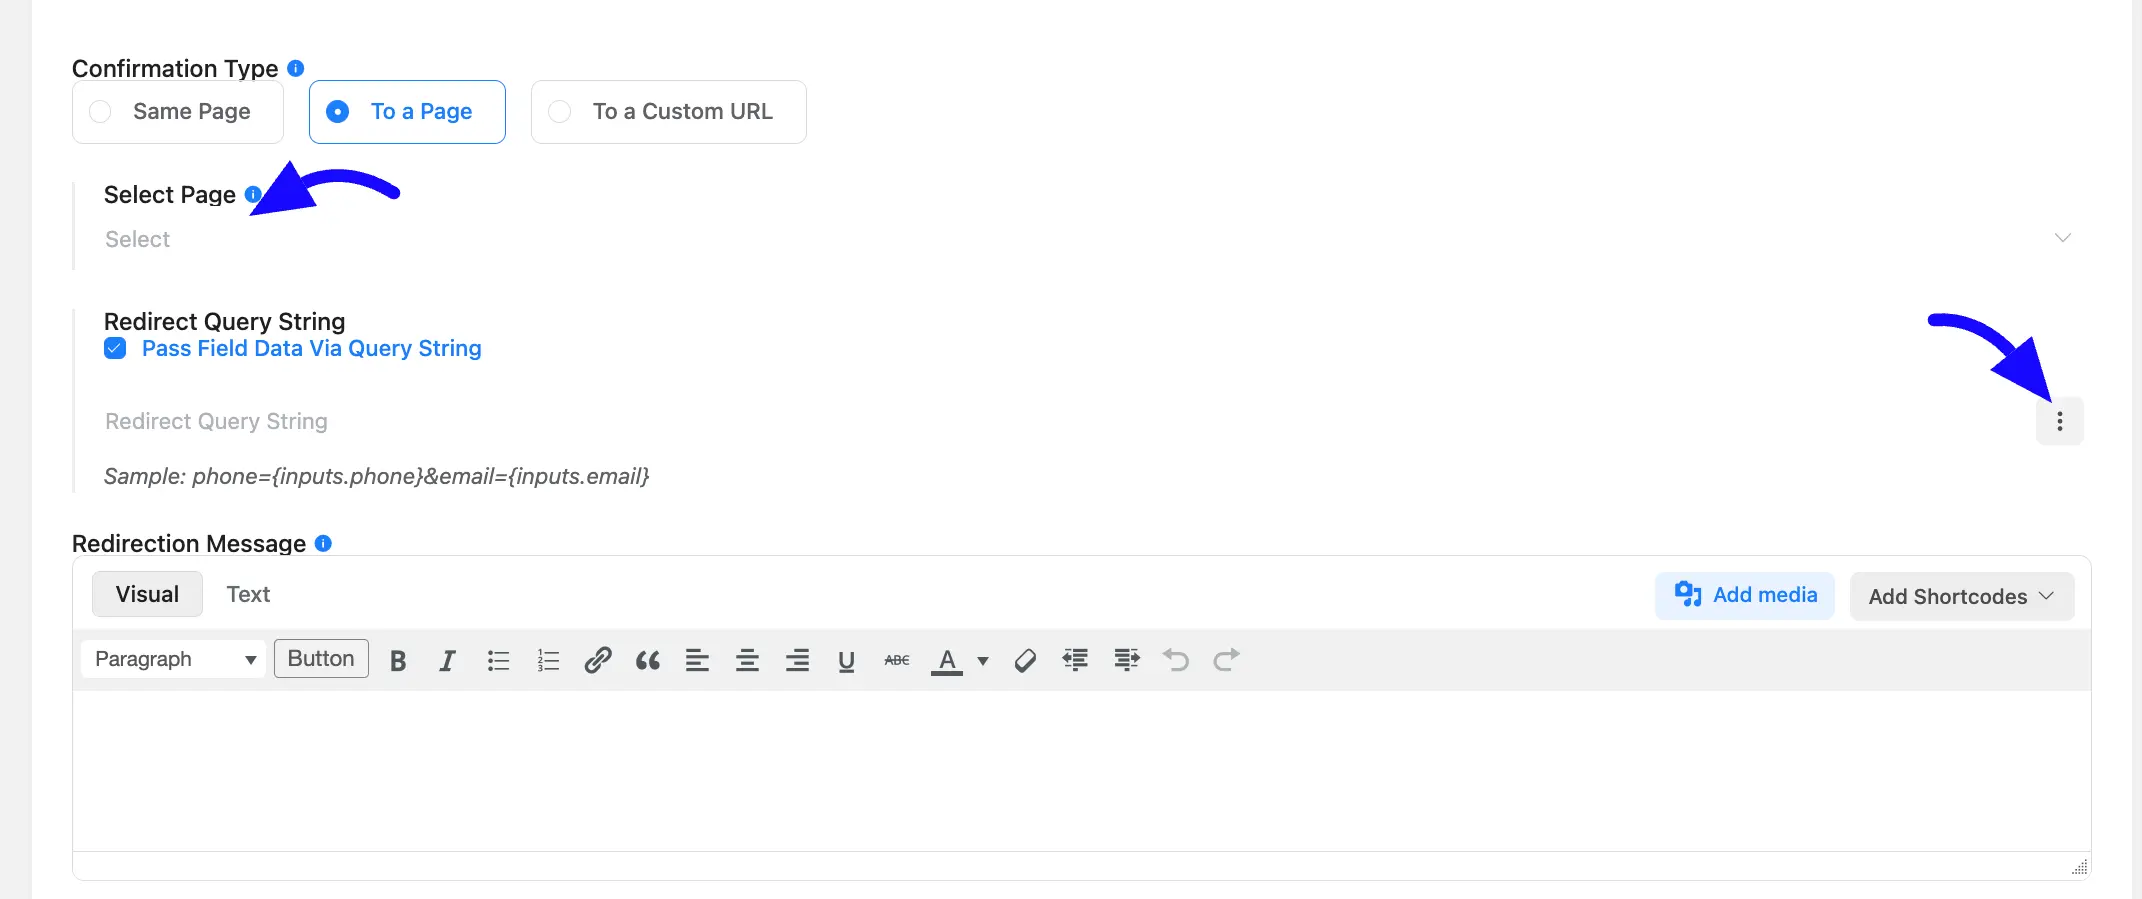
Suppose If you select To a Custom URL and enable Pass Field Data Via Query String, you can enter a URL like this: https://example.com/thank-you?email={email}&phone={phone}

Then it will redirect the user to the https://example.com/thank-you page and pass the values of the phone and email fields as base of query parameters. 

You can use these query parameters on the thank-you page to display personalized information or perform other actions.

After Form Submission: Now choose what should happen after the form is submitted. Options are Hide Form and Reset Form. 

This option only shows the message when you select the Same Page option in Confirmation Type.

Enable Conditional Logic #

First enable the Conditional logic by clicking the check box. Now decide whether all conditions must be met select All or if any single condition is sufficient select Any.

Then Select the specific form fields on which the condition will depend. For example, you might choose a rating or numeric input field.

Now define the logic that needs to be satisfied for the confirmation message to appear. You can set conditions like:

  • Equal to / Not equal to: Exact match or mismatch.
  • Greater than / Less than: Numerical comparison.
  • Contains: The text field contains a specific word or phrase.
  • Starts with / Ends with: The text field starts or ends with certain characters.
  • Advanced Operator: Equal,Less,Greater, and Regex match data length.

Next, provide the specific value or condition that triggers the message. For instance, if you want to display a message when the user’s score is less than 3, you would set the logic to “less than 3.”

If you want to add multiple conditional logic then click the plus icon on the left side.

Once your message and logic are set, click Save Notification button to apply the changes.

confirmation logic 05 scaled 46275

Users will see a message that matches their input by setting up these conditional confirmations, creating a more personalized and responsive experience.

And that’s it! You’ve successfully set up Conditional Confirmation Messages in Fluent Forms, ensuring users receive appropriate feedback based on their form submissions.

If you have any queries then feel free to contact our support team.

What are your Feelings
Share This Article :
  • Facebook
  • X
  • LinkedIn
  • Pinterest
Still stuck? How can we help?

How can we help?

Updated on June 3, 2025
Unique Field Validation

Powered by BetterDocs

Table of Contents
  • Access the Form Settings
  • Add a New Confirmation Message
    • Enable Conditional Logic

Fluent Forms is a lightweight, fastest WordPress contact form plugin empowering 500K+ businesses worldwide.

Email Newsletter

fluentform Newsletter Inline
Free tutorials, exclusive contents & more.
Facebook Facebook Group Twitter Instagram Linkedin YouTube WordPress

Resources

  • Account
  • Contact Us
  • Get Support
  • Brand Guideline
  • Changelog
  • Documentation
  • Developers Docs
  • API Docs
  • Report a Security Issue

Addons

  • Signature
  • PDF Generator (Free)
  • Mautic (Free)
  • Mailpoet (Free)

Calculators

  • BMI Calculator
  • GKI Calculator
  • Pay Raise Calculator
  • VAT Calculator
  • Fuel Cost Calculator
  • All Calculator Forms

Comparison

  • Free vs. Pro
  • Fluent Forms vs. WPForms
  • Fluent Forms vs. Gravity Forms
  • Fluent Forms vs. Ninja Forms
  • Fluent Forms vs. Forminator

Miscellaneous

  • Features Available in Free Version
  • Free Form Templates
  • Form Templates
  • Quick Start Guide
  • Fluent Forms Integrations

Features

  • Conversational Forms
  • Multi-Step Forms
  • Conditional Logic
  • Numeric Calculation
  • Payment
  • Quiz and Survey
  • Form Security
  • Advanced Form Styler
  • Advanced Post Creation
  • Address Autocomplete
  • Form to PDF
  • AI Form Builder

OUR PRODUCTS

  • FluentCommunity
  • FluentCRM
  • FluentBooking
  • FluentBoards
  • Fluent Support
  • FluentSMTP
  • Ninja Tables
  • WP Social Ninja
  • Paymattic
  • AzonPress
  • FluentSnippets

Copyright © 2025 Fluent Forms, a brand of WPManageNinja™.
This site is protected by reCAPTCHA and the Google Privacy Policy and Terms of Service apply.

The Free Version of Fluent Forms is Ready! We’ll send it to your email.
Direct Download – CTA- Homepage

By downloading you agree to our terms of use and privacy policy.

  • Pricing
  • Features
  • Templates
  • Integrations
  • Blog
  • Docs
  • Account